BT1214 - Beard trimmer PHILIPS - Free user manual and instructions
Find the device manual for free BT1214 PHILIPS in PDF.
User questions about BT1214 PHILIPS
0 question about this device. Answer the ones you know or ask your own.
Ask a new question about this device
Download the instructions for your Beard trimmer in PDF format for free! Find your manual BT1214 - PHILIPS and take your electronic device back in hand. On this page are published all the documents necessary for the use of your device. BT1214 by PHILIPS.
USER MANUAL BT1214 PHILIPS
natural_image
Black hairbrush with textured grip and white mark (no text or symbols visible)
75% recycled paper 75% paper recycle
text_image
Medical procedure diagram showing step-by-step instructions for using a no-smoker device, with numbered steps and corresponding illustrations.
text_image
BTI26 BTI25 BTI24 BTI23 BTI22 BTI29English
Introduction
Congratulations on your purchase and welcome to
Philips! To fully benefit from the support that
Philips offers, register your product at
www.philips.com/welcome.
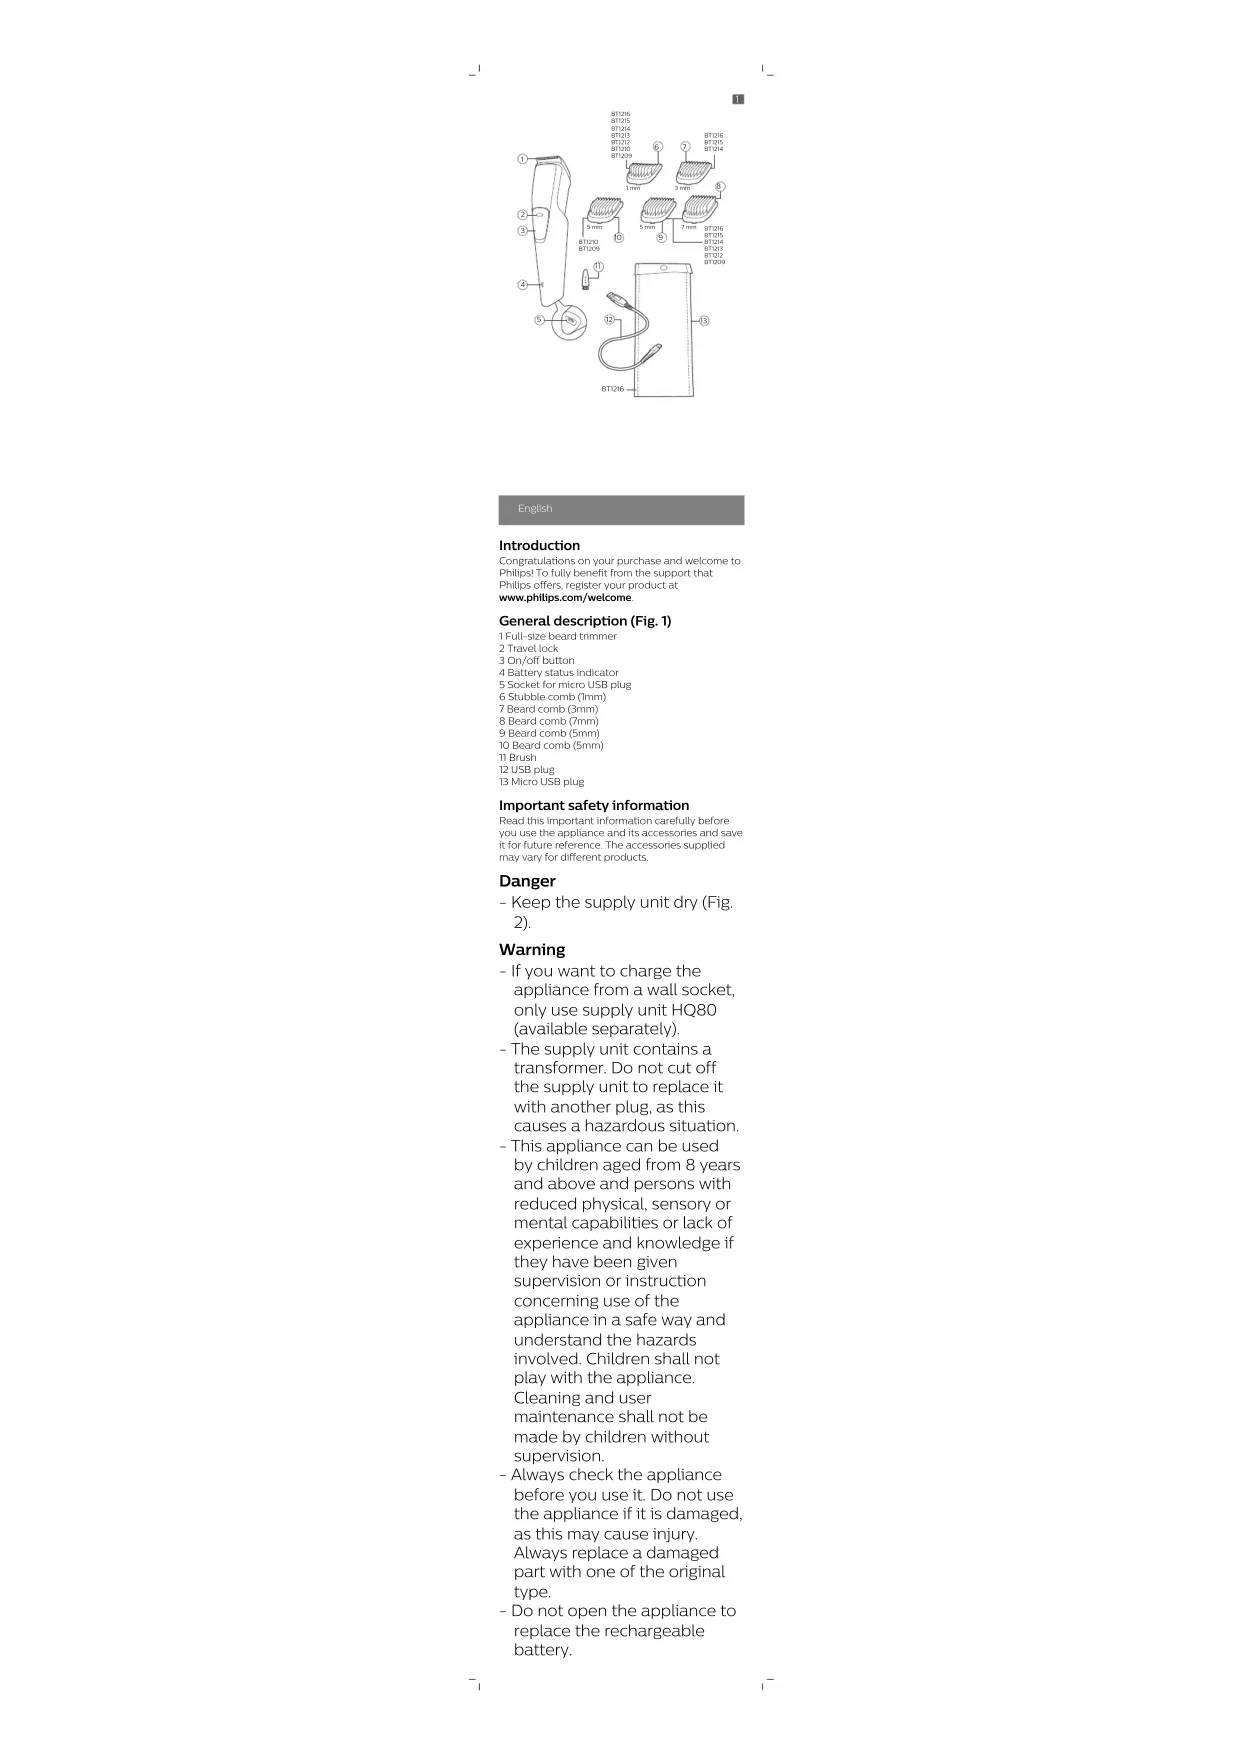
General description (Fig. 1)
1 Full-size beard trimmer
2 Travel lock
3 On/off button
4 Battery status indicator
5 Socket for micro USB plug
6 Stubble comb (1mm)
7 Beard comb (3mm)
8 Beard comb (7mm)
9 Beard comb (5mm)
10 Beard comb (5mm)
11 Brush
12 USB plug
13 Micro USB plug
Important safety information
Read this important information carefully before you use the appliance and its accessories and save it for future reference. The accessories supplied may vary for different products.
Danger
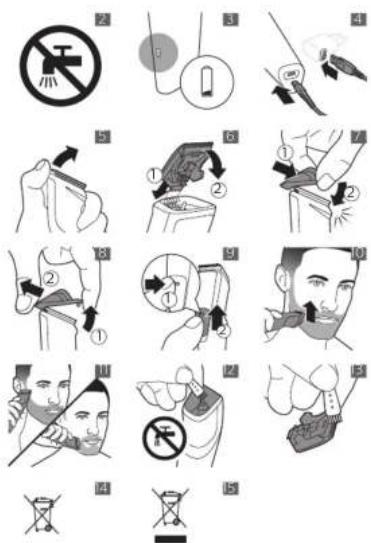
- Keep the supply unit dry (Fig. 2).
Warning
- If you want to charge the appliance from a wall socket, only use supply unit HQ80 (available separately).
- The supply unit contains a transformer. Do not cut off the supply unit to replace it with another plug, as this causes a hazardous situation.
- This appliance can be used by children aged from 8 years and above and persons with reduced physical, sensory or mental capabilities or lack of experience and knowledge if they have been given supervision or instruction concerning use of the appliance in a safe way and understand the hazards involved. Children shall not play with the appliance. Cleaning and user maintenance shall not be made by children without supervision.
- Always check the appliance before you use it. Do not use the appliance if it is damaged, as this may cause injury. Always replace a damaged part with one of the original type.
- Do not open the appliance to replace the rechargeable battery.
Caution
- This appliance is not washable. Never immerse the appliance in water and do not rinse it under the tap (Fig. 2).
- Only use this appliance for its intended purpose as shown in the user manual.
- For hygienic reasons, the appliance should only be used by one person.
- Never use compressed air, scouring pads, abrasive cleaning agents or aggressive liquids such as petrol or acetone to clean the appliance.
- Do not use the supply unit in or near wall sockets that contain an electric air freshener to prevent irreparable damage to the supply unit.
Electromagnetic fields (EMF)
This Philips appliance complies with all applicable standards and regulations regarding exposure to electromagnetic fields.
General
- The supply unit is suitable for mains voltages ranging from 100 to 240 volts.
- The supply unit transforms 100-240 volts to a safe low voltage of less than 24 volts.
Charging
Charging with the supply unit
- When the battery is almost empty, the battery status indicator lights up orange (Fig. 3).
- When the appliance is charging, the battery status indicator lights up green.
Charge the appliance before first use and when the display indicates that the battery is almost empty. When the appliance has charged for 8 hours, it has a cordless operating time of up to 60 minutes.
I Make sure the appliance is switched off.
2 Insert the micro USB plug into the appliance and insert the USB plug in the supply unit (Fig. 4).
3 Put the supply unit in the wall socket.
4 After charging, remove the supply unit from the wall socket and pull the micro USB plug out of the appliance.
Using the appliance
Note: This appliance can be used without cord or when it is connected to the wall socket.
Note: Switch off and clean the appliance after each use.
Detaching and attaching cutting elements
1 To detach a cutting element, push upwards against the teeth of the cutting element and take it off the handle (Fig. 5).
2 To attach a cutting element, insert the lug of the cutting element into the guiding slot at the front and push the back of the cutting element onto the appliance ('click') (Fig. 6).
Attaching and detaching combs
1 To attach any type of comb onto a cutting element, slide the front part of the comb onto the teeth and push the projection at the back of the comb into the appliance ('click') (Fig. 7).
2 To detach any type of comb from the cutting element, carefully pull its back part off the appliance and then slide it off the cutting element (Fig. 8).
Note: When trimming for the first time, start by using the comb with the maximum trimming length setting to familiarize yourself with the appliance.
Switching the appliance on and off
1 Press the travel lock button, then slide the on/off button upwards to switch on the appliance (Fig. 9).
2 Slide the on/off button downwards to switch off the appliance.
Trimming without comb
Use the full-size beard trimmer without a comb to trim hair close to the skin (to a length of 1/32in (0.5mm) or to create clean lines around your beard, neck and sideburns.
1 To trim hair close to the skin, place the flat side of the cutting element against your skin and make strokes against the direction of hair growth (Fig. 10).
2 For edging, hold the cutting element perpendicular to the skin and move it upwards or downwards with gentle pressure (Fig. 11).
Trimming with comb
Note: When you trim for the first time, start at the highest length setting to familiarize yourself with the appliance.
- You can use the beard and stubble comb attached to the cutting element to groom your beard and moustache in your preferred style.
1 Attach the comb (Fig. 7) to the full-size beard trimmer.
2 Switch on the appliance.
3 To trim the most effective way, move the guard against the direction of hair growth. Make sure the surface of the guard always stays in contact with the skin.
Stubble and beard combs
Attach a comb to the full-size beard trimmer to trim your beard and moustache evenly. The appliance comes with 1 stubble comb and 3 beard combs. The hair length settings are indicated on the combs. The settings correspond to the remaining hair length after trimming.
Comb mm
Stubble comb 1mm
Beard comb 3mm
Beard comb 5mm
Beard comb 7mm
Cleaning
Cleaning after every use
Note: Never use scouring pads, abrasive cleaning agents or aggressive liquids such as gasoline or acetone to clean the product.
Clean the appliance after every use.
1 Turn off the appliance and disconnect from the power outlet.
2 Remove any comb (Fig. 8) or cutting element (Fig. 5) from the appliance.
3 Remove any hairs that have accumulated in the hair chamber with the cleaning brush supplied (Fig. 12).
4 Clean the cutting element with the cleaning brush supplied (Fig. 13).
Ordering accessories
To buy accessories or spare parts, visit www.shop.philips.com/service or go to your Philips dealer. You can also contact the Philips Consumer Care Center in your country (see the international warranty leaflet for contact details).
Recycling
- This symbol means that this product shall not be disposed of with normal household waste (2012/19/EU) (Fig. 15).
- This symbol means that this product contains a built-in rechargeable battery which shall not be disposed of with normal household waste (Fig. 14) (2006/66/EC). Please take your product to an official collection point or a Philips service center to have a professional remove the rechargeable battery.
- Follow your country's rules for the separate collection of electrical and electronic products and rechargeable batteries. Correct disposal helps prevent negative consequences for the environment and human health.
Removing the rechargeable battery
Only remove the rechargeable battery when you discard the product. Before you remove the battery, make sure that the product is disconnected from the wall socket and that the battery is completely empty.
Take any necessary safety precautions when you handle tools to open the product and when you dispose of the rechargeable battery.
1 Check if there are screws in the back or front of the appliance. If so, remove them.
2 Remove the back and/or front panel of the appliance with a screwdriver. If necessary, also remove additional screws and/or parts until you see the printed circuit board with the rechargeable battery.
3 Remove the rechargeable battery.
Warranty and support
If you need information or support, please visit www.philips.com/support or read the international warranty leaflet.
Warranty restrictions
Cutting units are not covered by the terms of the international warranty because they are subject to wear.
Dansk
Introduktion
3 Retirez la pile rechargeable.