DVR1HD Mini - Dashcam SNOOPER - Free user manual and instructions
Find the device manual for free DVR1HD Mini SNOOPER in PDF.

User questions about DVR1HD Mini SNOOPER
0 question about this device. Answer the ones you know or ask your own.
Ask a new question about this device
Download the instructions for your Dashcam in PDF format for free! Find your manual DVR1HD Mini - SNOOPER and take your electronic device back in hand. On this page are published all the documents necessary for the use of your device. DVR1HD Mini by SNOOPER.
USER MANUAL DVR1HD Mini SNOOPER
Vehicle Drive Recorder
natural_image
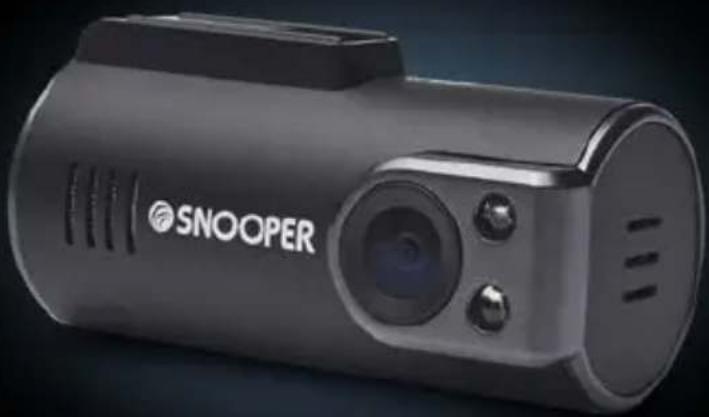
Exterior view of a SNOOPER camera module (no visible text or symbols beyond branding)
User manual

Benutzerhandbuch

Vehicle Drive Recorder

natural_image
Exterior view of a SNOOPER camera module (no visible text or symbols beyond branding)
User manual
Warranty Registration
Please visit www.snooperneo.co.uk and click on the 'Registration' button to register your unit for warranty.
Contents Page
Key product features 3
About your Snooper DVR-1HD Mini Vehicle Drive Recorder 4
What's included? 5
Installing your Snooper DVR-1HD Mini 6
Powering your DVR-1HD Mini 8
Charging the internal battery back-up 10
Preparing a new micro SD card for use 11
Using your Snooper DVR-1HD 12
Reviewing video and audio recordings using the Snooper Player 14
Snooper Player explained 16
Changing your Snooper DVR-1HD's hardware settings 19
Troubleshooting 22
Technical Specifications 23
Service under Warranty 24
Copyright
Copyright @2014 SNOOPER. All rights reserved. Product specifications and features are for reference only and are subject to change without prior notice.
Key product features
- Super compact 'Mini' design. Can be discreetly mounted in any vehicle.
- 720P High Definition video with super-wide 120 degree viewing angle.
- Auto record. Never miss a thing as your DVR-1HD starts recording automatically.
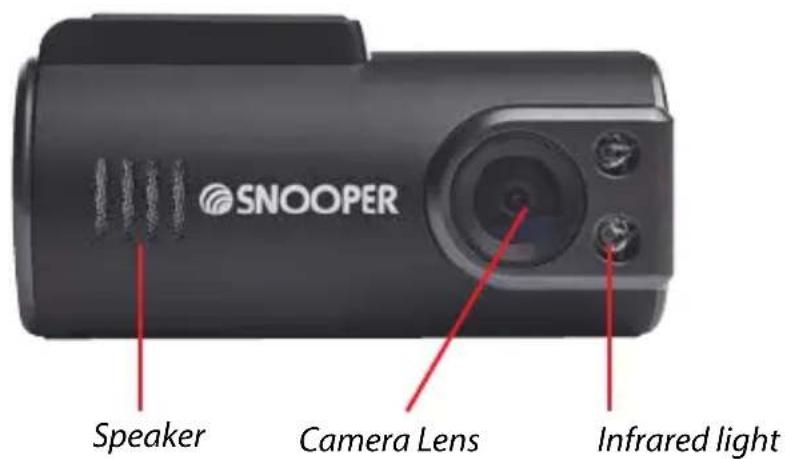
- Built-in microphone.
- Includes 8GB micro SD card and can support up to 32GB micro SD card (DVR-1HD Mini requires speed class 6 and above)
- GPS tracking provides accurate evidence of your route, recording vehicle speed whilst confirming date and exact time of any incidents.
- Built-in adjustable G-sensor constantly monitors for impacts and sudden changes in speed or direction that could indicate you have been involved in an incident.
- Event and Incident lock down. Any sections of video footage that are adjudged by the G-sensor to include an 'Event' or 'Incident' will be locked and saved so they cannot be automatically over written with other footage.
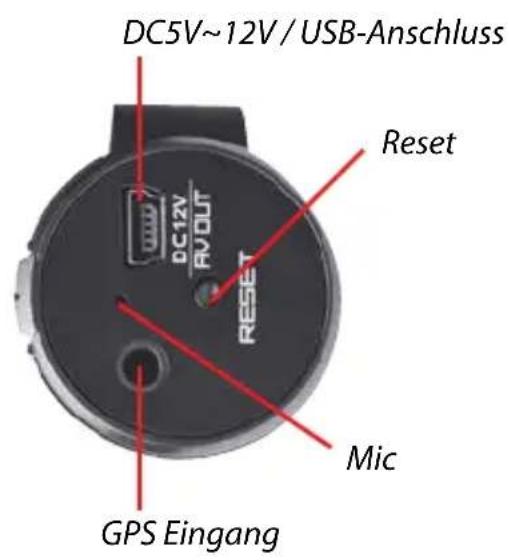
About your Snooper DVR-1HD Mini Vehicle Drive Recorder
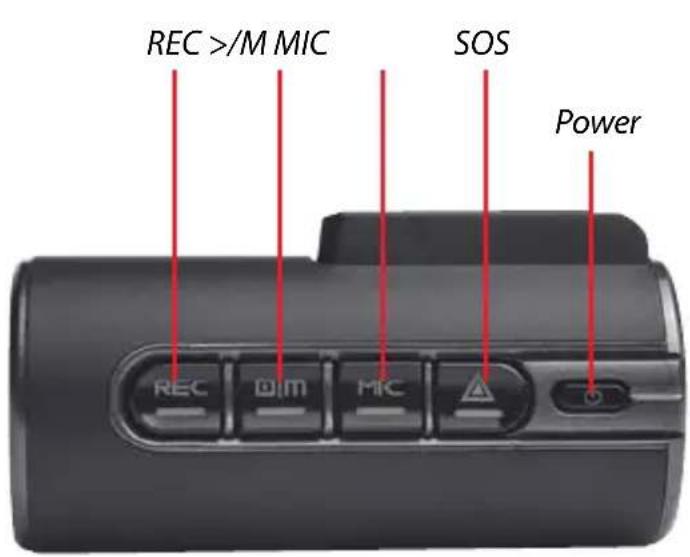
Power.
Illuminates red to indicate the unit is powered on.
SOS.
Press to instantly save and lock a video file.
MIC.
Press to turn the built-in microphone on and off. The MIC button will illuminate Orange when set to record audio.
>/M.
Use to enter menu when device connected to an appropriate monitor.
REC.
Will flash blue to indicate that the unit is recording video footage and to confirm that the unit is connected to GPS.

What's included?
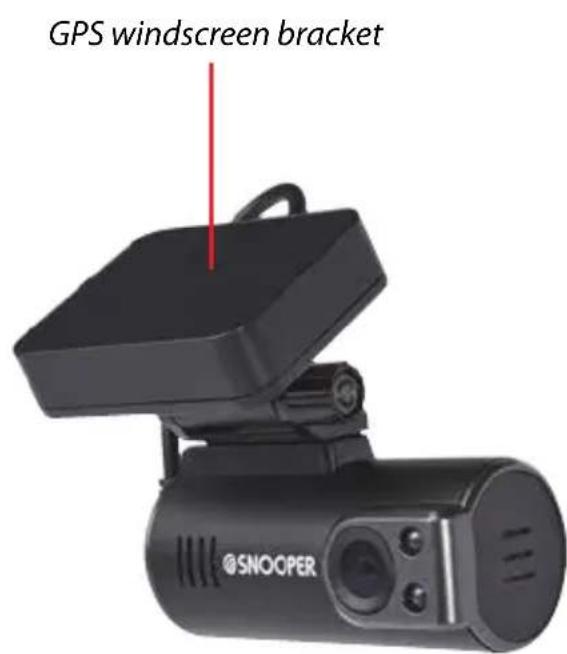
DVR-1HD Mini
GPS windscreen mount
5V USB car charger
12V Hard wire cable
USB data cable
USB to Video out cable
Installing your Snooper DVR-1HD Mini
DVR1HD Mini has been designed to be mounted in the front windscreen of your vehicle using the GPS windscreen bracket provided. For best results your DVR should be mounted centrally, behind or as near to the rear view mirror as possible, giving it the best view of the road ahead.
natural_image
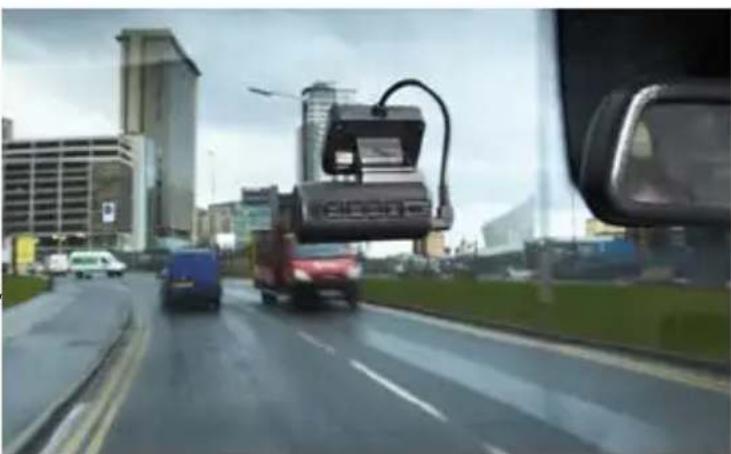
Street view from inside a car showing vehicles and urban buildings in the background (no visible text or symbols)Follow these instructions to install your DVR1HD Mini.
- Find a convenient location on your vehicle's windscreen where you can mount the GPS windscreen antenna without obscuring the driver's view or interfering with any of the vehicle's controls. You need to find a position where your DVR has a clear view of the road ahead (normally behind or as close as possible to the rear view mirror).
User tip: Don't forget that you need to get power to your DVR so keep this in mind when choosing your location.
Please note that the GPS windscreen bracket needs to have a clear view of the sky to obtain a good GPS connection. Do not position the bracket where the built-in GPS antenna is obscured by metal. The
GPS antenna should operate through tinted glass and the blacked out areas often seen around and behind the rear view mirror. The GPS antenna should also operate through most heat reflective windscreens, but please test before completing the final installation.
- Clean the area of glass where you intend to mount the GPS windscreen bracket with a good quality glass cleaner.
- Remove the backing from the double sided tape on the GPS windscreen bracket and carefully position it in the desired location on the windscreen.
User Tip: It will take approximately 24hrs for the adhesive to 'go off' and for the GPS windscreen bracket to become securely mounted.
- Slide your DVR1HD Mini on to the windscreen bracket and adjust the bracket as necessary so that the camera lens is pointing down the road ahead.
User Tip: For best results your DVR1HD should be angled slightly downwards away from the sky and towards the road ahead.
Powering your DVR-1HD Mini using the car charger
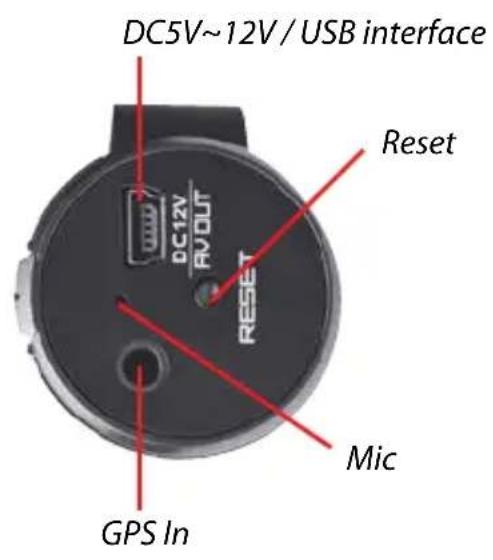
- Connect the USB plug on the end of the car charger to the USB DC5V\~12V socket on the end of the DVR. Plug the car charger in to a 12V cigarette lighter socket in your vehicle, ensuring that the cable is not obscuring the driver's view or interfering with any of the driver's controls.
Caution: use only the car charger supplied with your Snooper DVR-1HD Mini. Using a different car charger could cause the unit to operate incorrectly and could damage the unit invalidating the warranty.
Powering your DVR-1HD Mini using the 'hard wire' lead
You can power your DVR-1HD by wiring it directly to your vehicles 12V electrical system using the 'Hard Wire' cable supplied as standard with your unit.
- Connect the positive side of the cable (marked with a red plus symbol) to a 12V permanent live. This is a permanent live which has power if the if ignition if On or Off.
- Connect the negative side of the lead to a negative ground - any metal portion of the vehicles frame.
Important: If you are unfamiliar with this procedure, please consult a professional auto electrician.
User Tip: We recommend that you power the device to a permanent 12V supply so that the ‘Parking Mode’ operates correctly. If you power your DVR-1HD from a ‘switched’ 12V supply that powers off when you turn the vehicle’s engine off, your DVR will power off shortly after when the internal battery back-up has run out of power. With a permanent 12V supply your DVR1 will remain powered on and can continue to monitor the area around your vehicle whilst you are away from it.
However please note that if you do connect the device to a permanent feed, and you are planning to leave your vehicle for an extended period of time we recommend that your DVR-1HD is either switched off or disconnected from the power source to avoid draining your vehicle's battery.
Caution: use only the hard wire cable supplied with your Snooper DVR-1HD Mini. Using a different hard wire cable could cause the unit to operate incorrectly and could damage the unit invalidating the warranty.
Charging the internal battery back-up
Your DVR1HD includes a small built-in rechargeable battery back-up. This is required if you want to change the factory default settings and need to connect the device to a separate monitor or Snooper portable navigation device.
There are two ways to charge the internal battery.
- Connect your DVR-1HD to your PC using the USB cable provided.
- Charge using the USB car charger provided.
When charging, a red LED indicator light will illuminate. Once the internal battery is fully charged the red LED indicator light will automatically switch off.
Please note that the internal battery has not been designed to run your DVR-1HD. Your DVR-1HD must be powered by a permanent 5V or 12V feed to operate correctly.
Preparing a new micro SD card for use
Please note minimum SD card requirement. Minimum 4GB. Maximum GB. Speed Class 6 and over.
Your DVR-1HD comes with a Micro SD card pre-installed and already prepared. However if you choose to upgrade or change the SD card you will need to prepare it for use first.
- Power off the device and insert the new SD card.
- Power on the device. The SOS and power button LEDs will illuminate red and flash.
- Press the REC button. The SOS and power button LEDs will stay illuminated but will stop flashing to indicate the preparation procedure is underway.
- After approximately 60 seconds the SOS button LED will turn off and the blue REC button LED will flash to indicate that the SD card has been successfully prepared and the unit is ready for use.
User tip: We recommend you connect your DVR to a permanent power source so that the unit does not power off during the preparation procedure.
Using your Snooper DVR-1HD
Once installed and correctly powered your DVR-1HD has been designed to operate automatically. As you drive, the device will automatically record the view in front of your vehicle and will record all audio within range of the built-in microphone. The GPS antenna will automatically record your journey and all video, audio and trip information can be reviewed later using the Snooper Player software included on the SD card included.
The power button LED will illuminate RED to indicate that the unit is powered on. The REC button will flash BLUE to indicate your DVR is recording video footage and has a GPS connection. The MIC button will be illuminated Orange if the built-in microphone is switched on.
User Tip: If you want to power the unit off at any time, simply press the power button. When you power it back on again, it will operate automatically as before.
There are several user selectable settings, but for ease of use we have carefully set-up your DVR-1HD for optimum performance as follows:-
Image size - 1280 x 720.
For maximum image clarity we have set the image resolution to 1280 x 720.
Time Setup - GMT.
Audio record - On.
When powered on the MIC button will be illuminated orange and your DVR-1HD will automatically record all audio within range of it's built-in microphone.
User Tip: Press the MIC button at any time to temporarily mute the built-in microphone.
G-Sensor sensitivity – Normal.
The unit's built-in G-Sensor monitors for any unusual movement such as heavy breaking, hard impact or sharp turning which may indicate that your vehicle has been involved in an incident. If the G-sensor is activated the portion of video that includes this event will be locked and saved so that it cannot be automatically overwritten.
IR Led - On.
The infrared LEDs help improve visibility at night, especially useful for Parking Mode.
Frequency - 50 Hz
GPS Time Zone - GMT: +0 (zero)
User Tip: We think these are the optimum settings for your DVR-1HD, but if you wish to change them, please refer to the 'settings' section later in this manual.
Reviewing video and audio recordings using the Snooper Player.
-
Carefully remove the micro SD card from the device and insert it in to a USB socket on your PC using an appropriate micro SD card reader.
-
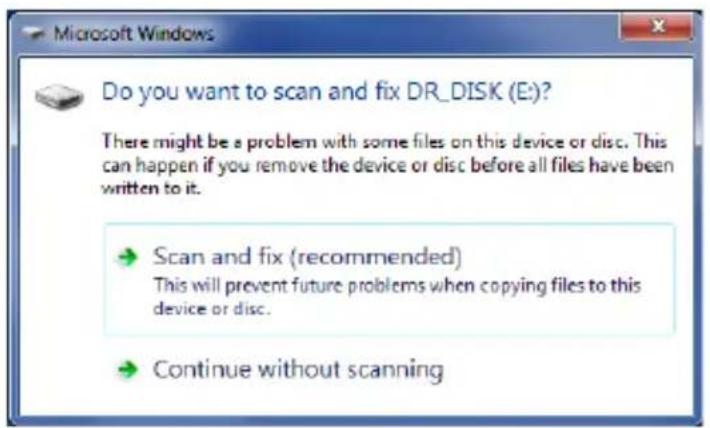
A pop-up box should appear on your PC as follows:-
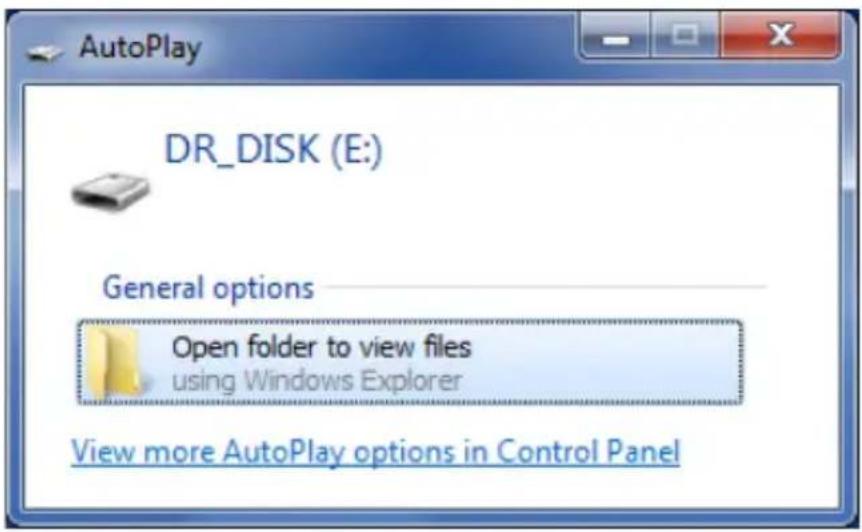
- Click on 'Open folder to view files.
- Double click on the 'Snooper Player' icon as seen below.

Snooper_Player
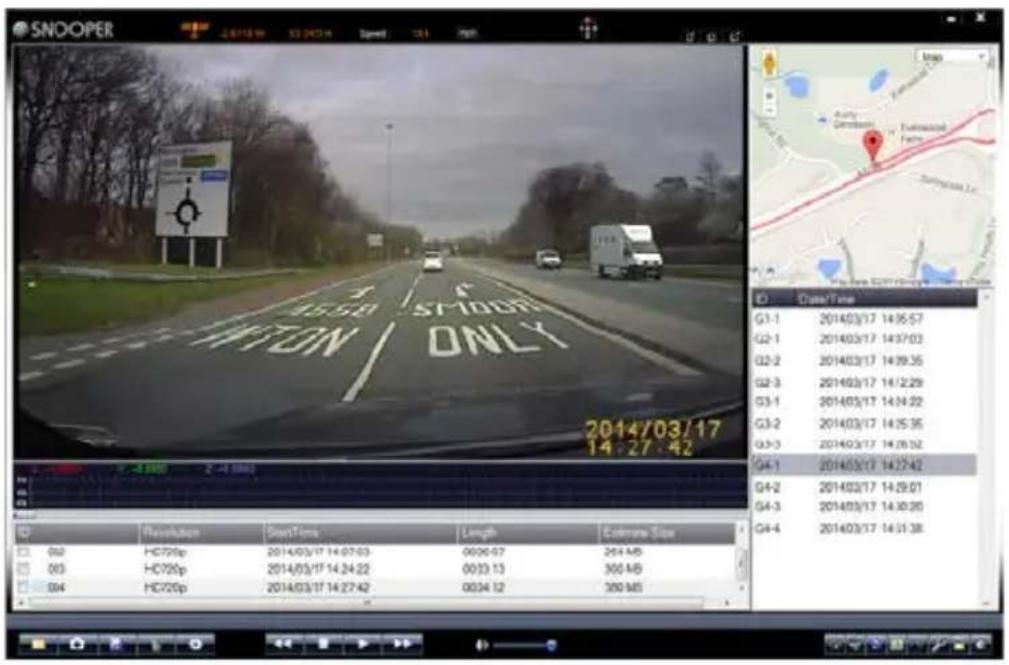
- The Snooper Player software will be displayed on your computer screen as follows:-
User Tip: if the following pop-up box appears, click 'Continue without scanning'. Any 'broken' files on the SD card can be repaired using the Snooper Player software. Clicking 'Scan and fix (recommended) may result in files being deleted and data permanently lost.
Snooper Player explained
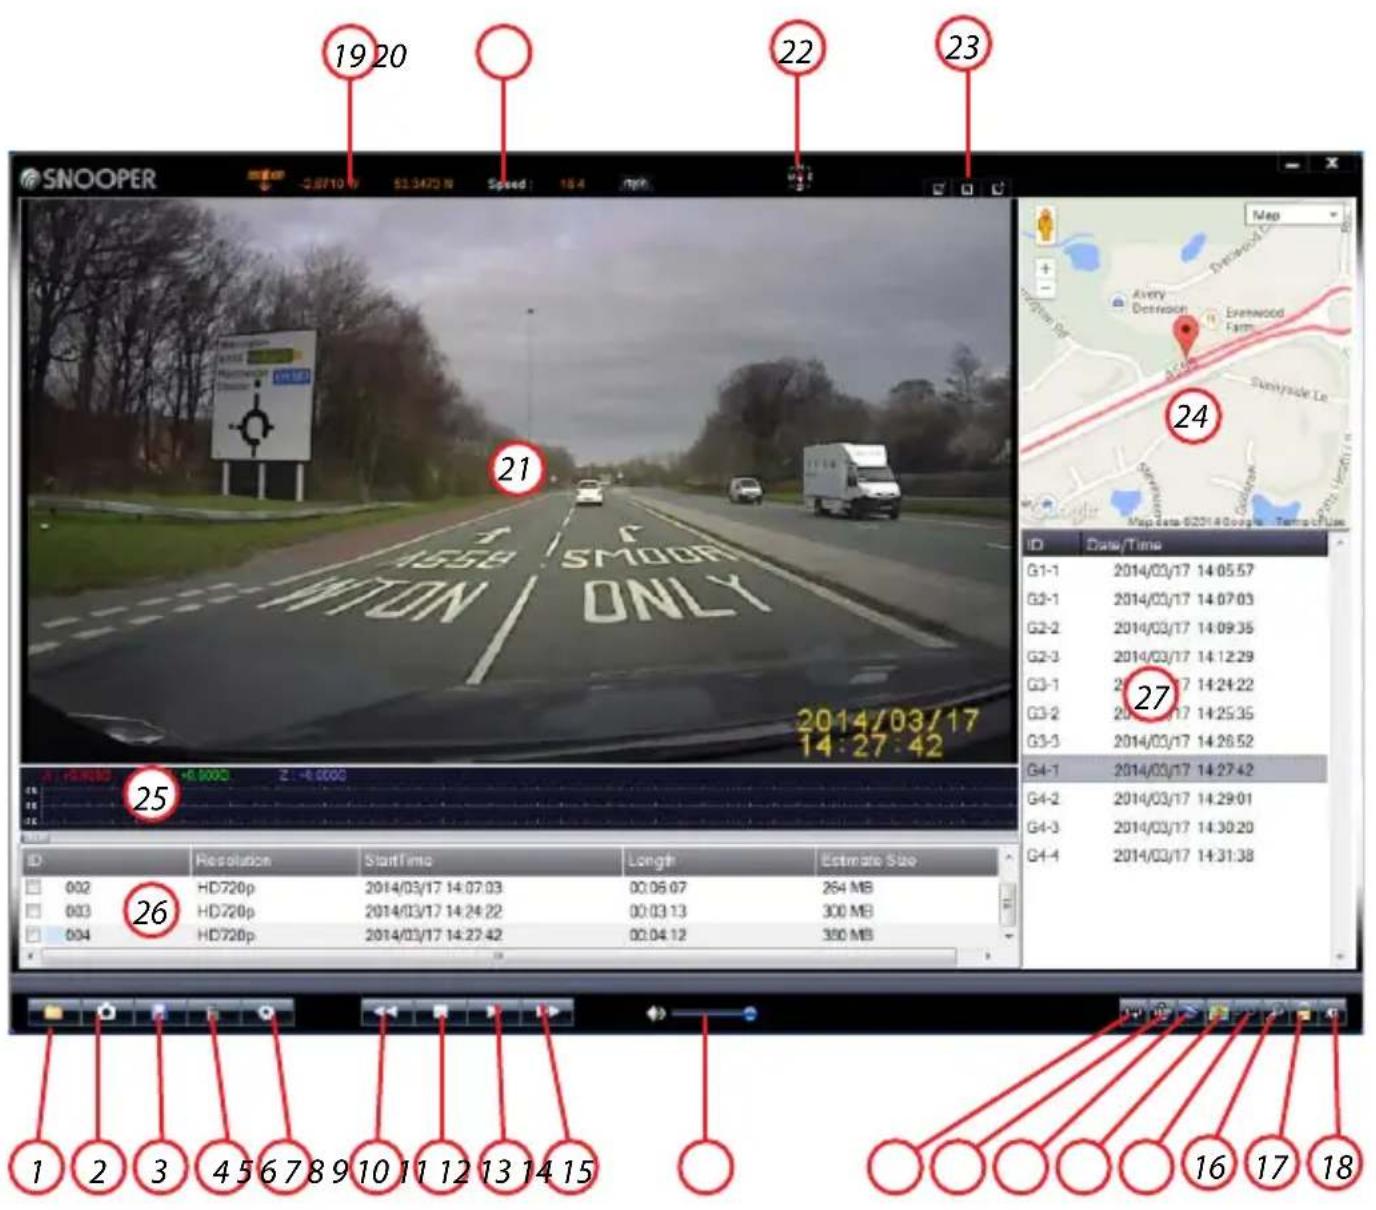
- Open folder from your PC containing existing video/audio footage.
- Click to take a snap shot from any section of video recorded.
- Save route data. Select a folder to export it from the Snooper Player and save it to your PC.
- Delete routes recorded and no longer required, from the Snooper Player.
- Change settings such as Language and set up a password to protect your data.
- View video footage in 'slow motion'
- Stop video footage playing.
- Play/pause video footage.
- Increase speed of video footage.
- Adjust volume of audio.
- Run video footage on repeat.
- Flip video footage 180 degrees
- Export GPS coordinates to your PC in KML format.
- Open and close Google Map view window.
-
Open and close G-sensor information window.
-
Repair broken video files.
- Unlock 'Incident/Event' video footage.
- Adjust Brightness, Contrast and Saturation of any video file selected.
- GPS coordinates.
- Your speed reading. Click to switch between mph and km/h.
- Video footage.
- Compass heading.
- Adjust size of Snooper Player window.
- Google Map view. Shows route track using coordinates collected and saved by DVR-1HD GPS antenna.
- G-sensor information window. Displays any event information such as hard breaking, impacts or sharp turns that might indicate that an incident has occurred on a recorded route.
- Main route folders.
- Sub route files.
Changing your Snooper DVR-1HD's hardware settings
The settings in your DVR-1HD have been set for optimum use but are user selectable and can be changed by connecting the device to an appropriate monitor using the video cable provided. You can also connect the unit to any Snooper PND but may need to purchase an adaptor cable separately from www.snooper.co.uk
- Ensure that the DVR-1HD internal battery is fully charged and the SD card is inserted.
- Connect the USB to Video cable provided, between your DVR1HD and a suitable monitor.
- Power on the DVR1HD. You should see what the DVR1HD camera is looking at on the monitor.
- Press the >|M button to enter the Menu.
- Scroll up and down through the menu using the MIC and SOS button and use to the REC button to Enter or Confirm a setting.
- To exit the menu or 'go back' press the >|M button.
Within the menu you can change the following settings:-
Image size.
Change the resolution between 1280x720P and 640x480P. Selecting the lower resolution will enable you to record more footage at a time on the SD card, but the video footage will be lower quality.
Time setup.
The default factory setting is at GMT. Set as appropriate for your time zone or to adjust DST.
Format.
The SD card supplied with your DVR-1HD is already prepared for use. If you choose to change the SD card for any reason though it will need to be 'prepared' before use. This can be done following the instructions earlier in this guide entitled Preparing a new micro SD card for use or by using the Format function within this menu.
Audio Record.
The built-in microphone is switched on as standard and can be controlled using the MIC button on the unit. It can also be switched on and off within this menu.
Language.
The language within this menu can be switched between English, French, German, Dutch, Spanish and Italian.
G-sensor sensitivity.
As standard the G-sensor has been set to 'Normal'. Use this setting to change the sensitivity between Low, Normal, High or Disable.
IR LED.
The IR LEDs are set to operate automatically when they are required. Use this setting to switch between Auto and Off.
Frequency.
Your DVR-1HD is set as standard at 50HZ, but can be switched to 60HZ if required.
GPS time zone.
The factory default is GMT. As well as manually selecting the time and date, you can also use GP,S + or -, to set the correct hour for your time zone.
Troubleshooting
Replacing the fuse in the car charger.
If the unit stops operating first check the fuse in the cigarette lighter plug. If the fuse has blown, follow these steps and replace it with a 2 amp, 6 x 30mm fast blow fuse. Caution: Using a fuse that does not meet these ratings or removing fuse protection can damage your unit, the power cable, or the vehicles electrical system
- Grasp the ring near the tip of the cigarette lighter plug, and then carefully unscrew the ring by turning it counter clockwise.
Caution: If you must use pliers to loosen the ring, be careful not to crush the tip. Never use pliers or other tools to retighten the ring on the cigarette lighter plug.
- Pull the ring straight out, then remove the metal tip, spring and old fuse.
- Check the fuse to see if it has blown. If it has, replace it.
- Replace the metal tip and spring inside the ring, then place the fuse inside the cigarette lighter plug and screw the ring back onto the plug. Make sure the metal tip is visible when you reassemble the cigarette lighter plug
Technical specification
Viewing angle 120 degree
Resolution/Frame rate HD 1280×720 30Fps
Video format AVI
Photo format JPEG
Camera 1M pixel.
Memory card 4GB\~32GB micro SD Card (speed class 6 and above)
G-sensor Built-in
Battery back-up 200mAh
Speaker Built in
GPS Windscreen mount & antenna
AV out Support
Operating temperature -10 to 60°C
Unlimited cycle recording
Input voltage DC5V\~12V
Current MAX 300MA
Dimensions 70mm x 35mm x 35mm.
Service under Warranty
Your device comes with a standard one year manufacturer's warranty.
If, for some reason, your unit requires service under warranty return your device, via special delivery (insured) and in suitable packaging to:
The Returns Department, Performance Products Limited, Cleaver House, Sarus Court, Manor Park, Cheshire WA7 1UL
Enclose the following information:
(a) Your name, address and a full description of the problem.
(b) A telephone number where you can be reached during business hours.
(c) Your units' serial number.
Disposal of Old Electrical & Electronic Equipment
(applicable in the European Union).
natural_image
Simple line drawing of a trash bin with two crossed lines and a blank rectangular base (no text or symbols)This symbol on a product or its packaging indicates that this product shall not be treated as household waste. It should be handed over to an applicable collection point for the recycling of electrical equipment. By ensuring that this product is disposed of correctly you will help/prevent potential negative impact on the environment. The recycling of materials will help to conserve natural resources. For further details about recycling please contact your local civic office or the shop where it was originally purchased.

SNOOPER
Performance Products Ltd, Cleaver House, Sarus Court, Manor Park, Runcorn WA7 1UL. Tel 0333 240 1000 Fax 0333 240 1100
www.snooper.co.uk

SNOOPER
DVR-1 HD MINI
Fahrzeugrecorder

natural_image
Exterior view of a SNOOPER camera module (no visible text or symbols beyond branding)
Benutzerhandbuch
Power.
natural_image
Street view from inside a car showing a truck driving on a wet road with city buildings in the background (no visible text or symbols)The Returns Department,
Performance Products Limited, Cleaver House,
Sarus Court, Manor Park, Cheshire WA7 1UL, Großbritannien
natural_image
Simple line drawing of a trash bin with two crossed lines indicating no waste or prohibition (no text or symbols)
Performance Products Ltd, Cleaver House, Sarus Court, Manor Park, Runcorn WA7 1UL. Tel 0333 240 1000 Fax 0333 240 1100
www.snooper.co.uk

SNOOPER
DVR-1 HD MINI
Voertuigrecorder

natural_image
Exterior view of a SNOOPER camera module (no visible text or symbols beyond branding)
natural_image
Close-up of a black SNOOPER camera with red indicator lights and control buttons (no visible text or symbols beyond brand logo)Luidspreker
Cameralens
Infraroodlampje
natural_image
Street view from inside a car showing a red truck driving on a multi-lane road with city buildings in the background (no visible text or symbols)The Returns Department, Performance Products Limited, Cleaver House, Sarus Court, Manor Park, Cheshire WA7 1UL, Engeland
natural_image
Simple line drawing of a trash bin with two crossed lines indicating no waste or prohibition (no text or symbols)
Performance Products Ltd, Cleaver House, Sarus Court, Manor Park, Runcorn WA7 1UL. Tel 0333 240 1000 Fax 0333 240 1100
www.snooper.co.uk

SNOOPER
DVR-1 HD MINI
Caméra de bord

natural_image
Exterior view of a SNOOPER camera module (no visible text or symbols beyond branding)
natural_image
Street view from inside a vehicle showing a car driving on a wet road with city buildings in the background (no visible text or symbols)Reviewing video and audio recordings using the Snooper Player.
FR·15
The Returns Department, Performance Products Limited, Cleaver House, Sarus Court, Manor Park, Cheshire WA7 1UL, Royaume-Uni
natural_image
Simple line drawing of a trash bin with two crossed lines indicating no waste or prohibition (no text or symbols)
Performance Products Ltd, Cleaver House, Sarus Court, Manor Park, Runcorn WA7 1UL. Tel 0333 240 1000 Fax 0333 240 1100
www.snooper.co.uk

SNOOPER
DVR-1 HD MINI
natural_image
Street view from inside a car showing vehicles on a wet road with modern buildings in the background (no visible text or symbols)The Returns Department, Performance Products Limited, Cleaver House, Sarus Court, Manor Park, Cheshire WA7 1UL
natural_image
Symbol of a trash bin crossed with two crossed lines, no text or labels presentPerformance Products Ltd, Cleaver House, Sarus Court, Manor Park, Runcorn WA7 1UL. Tel 0333 240 1000 Fax 0333 240 1100
www.snooper.co.uk

SNOOPER
DVR-1 HD MINI
natural_image
Street view from inside a car showing a truck driving on a wet road with city buildings in the background (no visible text or symbols)The Returns Department,
Performance Products Limited
Cleaver House, Sarus Court,
Manor Park, Cheshire WA7 1UL, Regno Unito
natural_image
Simple line drawing of a trash bin with two crossed lines indicating no waste or prohibition (no text or symbols)
Performance Products Ltd, Cleaver House, Sarus Court, Manor Park, Runcorn WA7 1UL. Tel 0333 240 1000 Fax 0333 240 1100
www.snooper.co.uk