HG 1984 SB - Cooker ASKO - Free user manual and instructions
Find the device manual for free HG 1984 SB ASKO in PDF.

User questions about HG 1984 SB ASKO
0 question about this device. Answer the ones you know or ask your own.
Ask a new question about this device
Download the instructions for your Cooker in PDF format for free! Find your manual HG 1984 SB - ASKO and take your electronic device back in hand. On this page are published all the documents necessary for the use of your device. HG 1984 SB by ASKO.
USER MANUAL HG 1984 SB ASKO
Thank you for choosing this quality product from ASKO. We hope it will meet your expectations and fulfil your needs for many years to come. Scandinavian design combines clean lines, everyday functionality and high quality. These are key characteristics of all our products and the reason they are greatly appreciated throughout the world.
Chère Cliente, Cher client,
natural_image
Black-and-white collage showing kitchen utensils including cutlery, fork, and plates (no text or symbols)Igniting and adjusting 8
Flame failure device 8
COMFORTABLE COOKING 9
Optimal use of the hob 9
Wokburner (type Hg1664s, 1774s/a and Hg1984s/a) 9
Use of the auxiliary support 9
MAINTENANCE 10
General 10
Stubborn stains on enamel 11
Stubborn stains on stainless steel 11
Cleaning the pan support 11
Brass wok burner parts 11
Cleaning removable burner components 11
Cleaning removable knobs 12
Keradur® burner bases 12
TROUBLESHOOTING 13
Faults table 13
INSTALLATION 14
General 14
Gas connection 14
Electrical connection 14
Building in 15
Building in dimensions 15
Building in dimensions 16
Building in dimensions 16
Building in dimensions 17
Building in dimensions 17
Space to be left free around the appliance 18
Install appliance and make connections 18
Gas information 19
Setting up the appliance for other gas 19
APPENDIX 20
Disposal of packaging and appliance 20
Technical data 20
YOUR GAS HOB
Introduction
You have chosen to cook with gas. You have therefore also chosen a hob which offers optimum ease of use.
The gas hob is easy to operate, heats up quickly and is reliable. Furthermore, the gas flame can be adjusted very accurately. Professional chefs don't cook with gas for nothing!
Thanks to the spacious positioning of the wok burner, a wok can be used and leave minimal two burners free for the preparation of other dishes.
By reading through these instructions you can find out quickly and simply about the possibilities off ered by your appliance. Advice on safety and the maintenance of your appliance is included, as well as environmental tips and ways of saving energy.
Do not throw away the instructions for use and the installation instructions. Another user who takes on the appliance will find this information useful.
Enjoy your cooking.
YOUR GAS HOB
Description
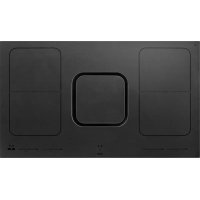
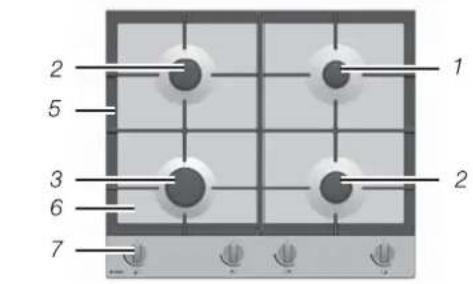
Hob Hg1984s/Hg1984a
text_image
1 2 4 5 2 3 6 7Description
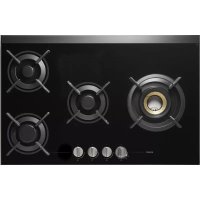
Hob Hg1774s / HG1774a

text_image
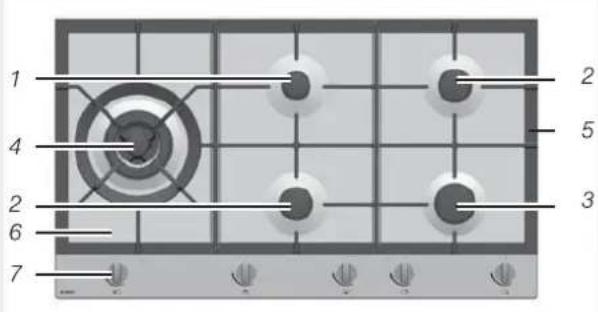
1 2 3 4 5 6 7Hob Hg1664s
text_image
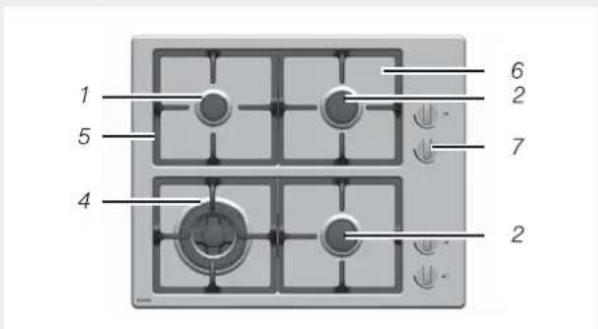
1 5 4 6 2 7 2Hob Hg1654s
text_image
2 5 3 6 7 1 2- Simmer burner
- Normal burner
- Rapid burner
- Wok burner
- Pan support
- Drip tray
-
Knob
-
Simmer burner
- Normal burner
- Rapid burner
- Wok burner
- Pan support
- Drip tray
- Knob
General
- WARNING: this appliance and the accessible parts will become hot during use. Do not touch hot parts. Keep children younger than 8 away from the appliance unless they are under continuous supervision.
- This appliance can be used by children aged 8 years and over, as well as by people with reduced physical, sensory or mental capabilities or lack of experience and knowledge, provided they are supervised and instructed in the safe use of the appliance and understand the hazards involved.
- The manufacturer cannot be held liable for any damage resulting from failure to follow the safety instructions and warnings.
- The hob is only to be used for the preparation of food. The unit is not designed for heating rooms.
- Never open the casing of the appliance.
- Do not warm closed tins on the hob. There will be a build-up of pressure that will cause tins to explode. You might get injured or scalded.
- WARNING: danger of fire: never leave anything on the hob.
- WARNING: cooking with fat or oil on a hob without supervision can be dangerous and can lead to fire. NEVER try to extinguish a fire with water. Instead, switch the appliance off and then cover the flames with for example a lid or a fire blanket.
- The appliance should not be placed or used outdoors.
- Do not use the appliance as a worktop. The appliance may accidentally be switched on or still be hot, which means objects could melt, become hot or catch fire.
- Never cover the appliance with a cloth or something similar. If the appliance is still hot or is switched on, there is a risk of fire. Never use a pressure cleaner or steam cleaner to clean the hob.
- Do not use the appliance in temperatures below 5 °C.
- When you use the hob for the first time you will notice a “new smell”. Don’t worry, this is normal. If the kitchen is well ventilated, the smell will soon disappear.
Safe use
- Ensure that there is adequate ventilation during use.
- Keep all natural ventilation openings open.
- When using the hob for long periods, extra ventilation is necessary. For example, open a window or install an electric fan.
- Never flambé under a cooker hood. The high flames can cause a fire, even if the cooker hood is switched off.
- The burner components are hot during and immediately after use.
- Do not touch them, and avoid contact with non-heat resistant materials.
- Never immerse hot burner caps and pan supports in cold water. The rapid cooling can damage the enamel.
- The distance between the pan and a knob or non-heat resistant wall should always be greater than two centimetres. In case of smaller distances the high temperature may cause the knobs or wall to discolour and/or deform.
• Always use the pan supports and suitable cookware.
• Always place the pan on the pan support. - Placing the pan directly on the burner cap can result in dangerous situations.
-
Aluminium trays or foil are not suitable as cooking utensils. They can burn into the burner caps and pan supports.
-
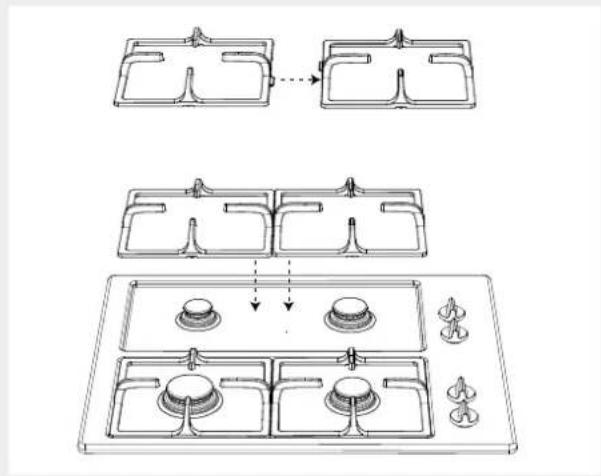
The hob can only function effectively if the burner components have been assembled using the guide ridges. Ensure that the pan supports lie properly against each other and flat at on the drip tray. Only then can the pans be positioned stably.
- Keep oven gloves or oven cloths away from the flame.
Children
- Do not allow children to play with the appliance. Do not allow children to clean or maintain the appliance unless supervised.
- Do not keep objects that children might find interesting in cupboards above or behind the appliance.
- The cooking zones/burners heat up during use and stay hot for a while afterwards. Keep young children away from the hob during and immediately after cooking.
CONTROLS
Igniting and adjusting
Each burner can be adjusted continuously between the high and lowpositions.
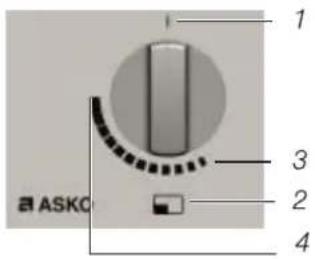
text_image
1 2 3 4 ASKO- 0-setting
- Burner indication
- Low setting
- High setting
Flame failure device
Your gas hob has a flame failure device. This ensures that the gas supply is shut off if the flame goes out during cooking.
Operating the thermal flame failure device
Press the control knob and turn it anti-clockwise. Hold the control knob pressed (in the high setting) for approximately 3 seconds after the burner has ignited. The flame failure device switches on.
COMFORTABLE COOKING
Optimal use of the hob
Always ensure that the flames remain below the pan. If flames play around the pan, a lot of energy is lost. In addition, the handles can get too hot. Do not use pans with a base diameter less than 12 cm. Smaller pans will not be stable.
- When frying, stir-frying, heating through large quantities and deepfrying it is best to use the rapid or wok burner.
• Preparing sauces, simmering and boiling can be done best on the simmer burner. On its high setting this burner is large enough for cooking food right through. - Cook with the lid on the pan. This way you save up to 50% energy.
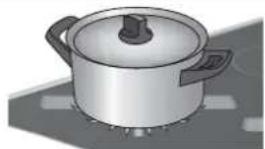
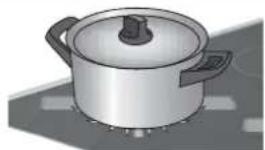
- Use pans with a flat, clean, dry base. Pans with a flat base stand stably and pans with a clean base transfer the heat more effectively to the food.
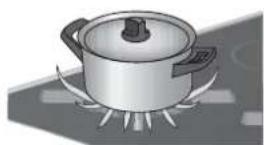
Wrong
natural_image
Illustration of a cooking pot with a lid and side handles, placed on a stove (no text or symbols visible)Right
Wokburner (type Hg1664s, 1774s/a and Hg1984s/a)
With the wok burner you can prepare dishes at a very high temperature. For this purpose it is important:

• to cut the ingredients into strips, slices or pieces before cooking;
• to use good-quality oil, such as olive, maize, sunflower or peanut oil when stir-frying. A small quantity is enough. Butter and margarine on the other hand will burn because of the high heat;
- to place the dishes with the longest cooking time in the pan fi rst, so that at the end of the cooking time all ingredients are cooked al dente at the same time.
Use of the auxiliary support
Hg1774s/HG1774a/Hg1984s/Hg1984a
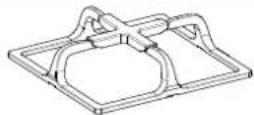
- The auxiliary support supplied for the wok burner or available as an accessory provides additional stability in case of a wok with a round base.
- The auxiliary support for the wok has special recesses so it can be positioned neatly on top of the standard wok pan support.
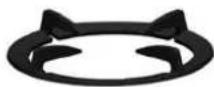
Hg1664s
- The auxiliary support supplied for the wok burner or available as an
- accessory provides additional stability in case of a wok with a fl at base.
MAINTENANCE
General
Your appliance has been manufactured from high-grade materials, which are easy for you to clean.
- Regular cleaning immediately after use prevents over-cooked food being able to become ingrained and cause stubborn stains that are difficult to remove. Use a mild cleaning agent.
- Clean the control knobs, burners and pan supports fi rst and then the stainless steel drip tray. This avoids the stainless steel drip tray getting dirty again during cleaning.
- Clean the spark plugs preferably with a cloth. Do this carefully, the spark plug can become defective. The sparkplug will only operate correctly in a dry environment. If the plug is very dirty, you may clean the point with a tiny brush.
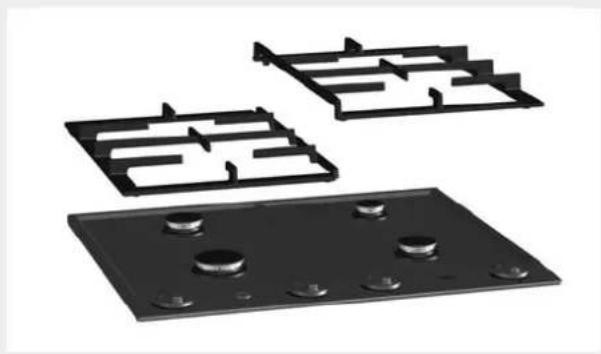
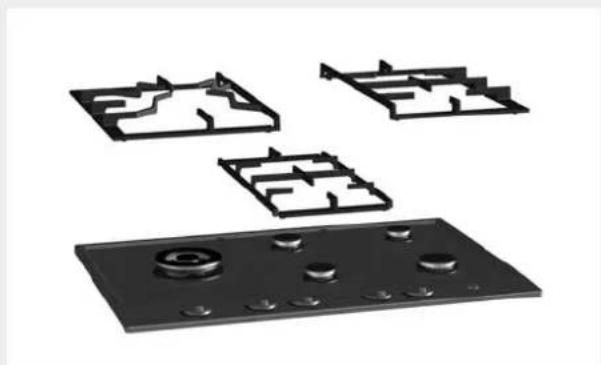
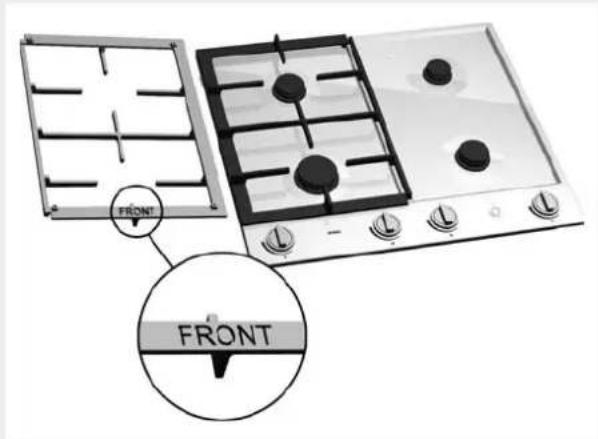
- Set the pan supports down vertically, without sliding them over the stainless steel drip tray.
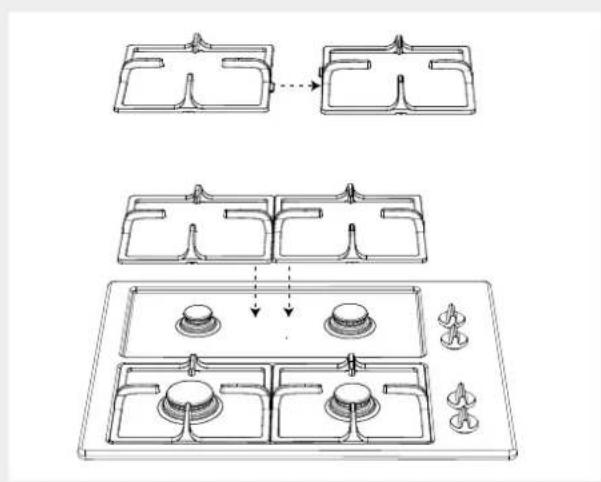
- Place the pan supports back in the right order. The text 'FRONT' at the bottom of all pan supports helps positioning these parts (see Hg1654/1774/1984).
Hg1654
natural_image
Three black plastic electrical circuit boards with mounting holes and internal compartments (no text or symbols visible)Hg1774/1984
natural_image
Exploded view diagram of a mechanical component with multiple floor plan views (no text or labels)Hg1654
flowchart
graph TD
    A["Top Panel"] --> B["Top Panel 1"]
    B --> C["Top Panel 2"]
    C --> D["Top Panel 3"]
    D --> E["Bottom Panel Unit"]
    style A fill:#f9f,stroke:#333
    style B fill:#f9f,stroke:#333
    style C fill:#f9f,stroke:#333
    style D fill:#f9f,stroke:#333
    style E fill:#ccf,stroke:#333

text_image
FRONT FRONTAssemble the burner parts using the guide ridges.
text_image
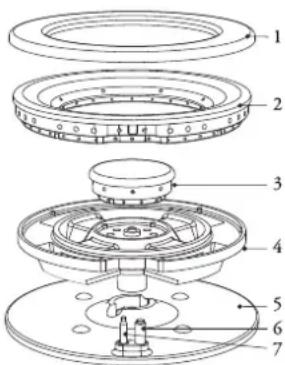
Technical diagram of a mechanical assembly with numbered components for identificationWok burner
- Burner cap outer ring
- External torch head
- Internal lid and torch head
- Gas base
- Burner base
- Sparkplug
- Thermocouple
text_image
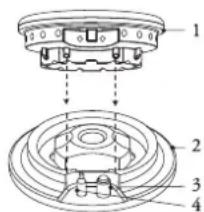
Technical diagram of a mechanical assembly with numbered components labeled 1 to 4Simmer-, semi-rapid and rapid burner
- Burner head
- Burner base
- Sparkplug
- Thermocouple
Stubborn stains on enamel
- Remove with a non-abrasive cream. Never use scouring powder, scouring pads, sharp objects or aggressive cleansing agents.
Stubborn stains on stainless steel
- If spilled, acid fluids and sugary foodstuffs like red cabbage, beetroot, soy sauce, applesauce and rhubarb may cause the surface to discolour. Stubborn stains on stainless steel are best removed with a cleaning agent for stainless steel. Always polish in the direction of the steel structure to avoid shine spots. (This kind of damage is not covered by the warranty!)
- If the above methods do not remove the stains, clean the plate with a special cleaning agent for stainless steel. Remember to treat the entire drip tray in order to avoid discolouring. Also, as a follow-up treat the drip tray with a polish or maintenance agent for stainless steel. Please note that over the years the surface will slightly discolour.
Cleaning the pan support
- The enamel on the pan supports is suitable for cleaning by dishwasher. However, the connection with the rubber feet is not. Therefore do not clean the pan supports in the dishwasher. Moreover, the pan supports might show some discoloration if they were washed in the dishwasher. If the rubber feet are lost, the pan support is likely to damage the drip tray.
Brass wok burner parts
- A few parts of the work burner are made from brass. It is normal for the colour of the brass to change as a result of the high temperatures that occur when cooking with a wok.
Cleaning removable burner components
- The removable burner components (including wok) are best cleaned with a mild cleaning product and a soft cloth. In the case of obstinate stains you can soak the parts in hot suds.
- Burner parts should not be cleaned in the dishwasher. The parts may be damaged by the dishwasher detergent!
- Never use scouring powder, scouring pads, sharp objects or aggressive cleansing agents.
Cleaning removable knobs
- If the knobs are very dirty, you can remove them temporarily to clean them. The knobs are best cleaned with a mild cleaning product and a soft cloth. Wearing rubber gloves makes it easier to remove the knob!

ATTENTION!
Avoid an excess of moisture around the knob holes when cleaning.
Keradur® burner bases
- The burner bases have a unique Keradur® surface coating. The special dirt-repelling lacquer has a ceramic fi lling which makes cleaning easier and substantially improves the durability of the burners. The burner bases are best cleaned with a mild cleaning product and a soft cloth.
TROUBLESHOOTING
Faults table
If the appliance does not work properly, this does not always mean that it is defective. Try to deal with the problem yourself fi rst by checking the points mentioned below in the table or contact the Asko service department (see guarantee card).
| FAULT CAUSE SOLUTION | ||
| There is a smell of gas in the vicinity of the appliance. | The gas connection of the gas hob is leaking. | Turn off the gas mains. Contact your gas fitter. |
| A burner does not ignite. Plug not in socket. | Push the plug into the socket. | |
| Fit a new fuse or switch the automatic fuse back on. | ||
| Clean and dry the sparkplug. | ||
| Assemble the burner parts using the centring ridges. | ||
| Clean and dry the burner parts, making sure that the outflow holes are open. | ||
| Open the main gas tap. | ||
| Check with your gas supplier. | ||
| Connect a new gas bottle or have the tank filled. | ||
| Check that the gas used is suitable for the appliance. If not, contact your gas fitter. | ||
| A burner does not ignite. Control knob not kept pressed in far enough. | Keep the control knob pressed in far enough between full and low. At first use this can take some more time because of the gas supply. | |
| The burner does not burn evenly. | Burner parts incorrectly installed. | Assemble the burner parts using the centring ridges. |
| Burner parts dirty or damp. | Clean and dry the burner parts, making sure that the outflow holes are open. | |
| Wrong type of gas used. | Check that the gas used is suitable for the appliance. If not, contact your gas fitter. | |
| The burner goes out after igniting. | Control knob not kept pressed in long enough. | Keep the control knob pressed in for at least 5 seconds. |
INSTALLATION
General
This appliance should only be connected by authorised personnel. This appliance should be installed according to the requirements of the local authority.
Caution!
The type of gas and the country for which the appliance has been designed are indicated on the application identification card.
Please contact the ASKO service department if installation or operational faults occur during installation.
This is a category 3 appliance.
Gas connection
The gas connection must comply with national and local regulations.
- The gas connection must comply with national and local regulations.
- We recommend that the hob be connected by means of a fixed pipe.
- Connection using a specially designed safety hose is also permitted.
- Behind an oven always install a full metal pipe.
Warning!
- Ensure that the hose assembly is restrained from accidental contact with the flue or flue outlet of an underbench oven. The hose should not be subjected to abrasion, kinking or permanent deformation and should be able to be inspected along its entire length. Unions compatible with the hose fittings must be used and connections tested for gas leaks. The supply connection point shall be accessible with the appliance installed.
- In all cases the connection tap for the appliance must be positioned such that it is easily accessible.
- Before using the appliance for the first time check the connections using water and washing-up liquid to ensure that there are no gas leaks.
Electrical connection
230 - 240V - 50Hz - 1.1 W
The electrical connection must comply with national and local regulations.
• Wall socket and plug must be accessible at all times.
- If you want to make a fixed connection, ensure that a multi-pole switch with a distance between contacts of 3 mm is installed in the supply cable.
- Do not use an adapter or an extension lead to connect the device to the electrical mains. Safe use of the device cannot be guaranteed with these accessories.
⚠ WARNING!
This appliance must be earthed.
Installation, maintenance or repairs should only be carried out by professionals who are authorized by the manufacturer, as failure to do so will void the warranty.
The device should be disconnected from the mains prior to installation, maintenance or repairs. The device is only disconnected from the electric power if:
- the main switch of the electrical wiring/installation in the house is switched off, or
- the fuse for the electrical wiring/installation in the house has been completely removed, or
• the plug has been pulled out of the socket.
Faulty parts may only be replaced by original Asko parts. Only those parts are guaranteed by Asko to meet the safety requirements.
If the connecting cable is damaged, it may only be replaced by the manufacturer, the manufacturer's service organisation or equivalently qualified persons, in order to avoid dangerous situations.
Building in
Preparing the hob
Fit the elbow supplied on the appliance's gas connection.
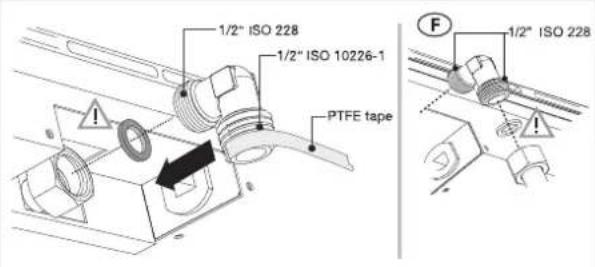
text_image
1/2" ISO 228 1/2" ISO 10226-1 PTFE tape F 1/2" ISO 228Cut opening in worktop
Cut the opening in the worktop. This should be done very accurately (see building in dimensions). If the woodtop is made of treated wood, then coat the sawn surfaces of the top with sealing varnish, to prevent moisture causing the top to swell.
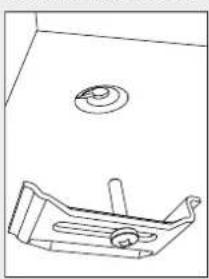
Attachment points for mounting brackets
See 1* in the illustrations of dimensions for Building in for the attachment points for mounting brackets.
natural_image
Technical line drawing of a mechanical component with a circular top and base (no text or symbols)Screw hole for mounting bracket

natural_image
Simple line drawing of a mechanical clamp or bracket with a screwdriver, no text or symbols presentThin worktops Thick worktops
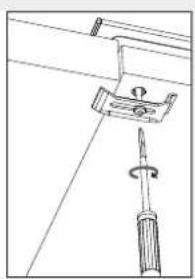
natural_image
Technical line drawing of a mechanical clamp or bracket assembly with a screwdriver (no text or symbols)Building in dimensions
Hg1654s
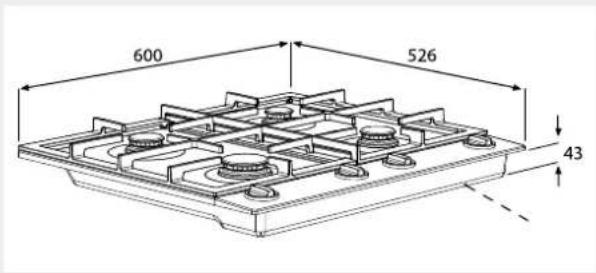
text_image
600 526 43minimum distance between rear of appliance and rear wall: 10 mm
text_image
600 490 60 560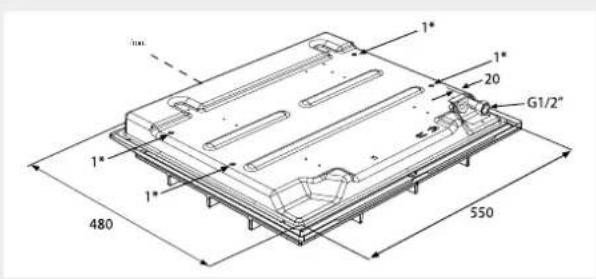
text_image
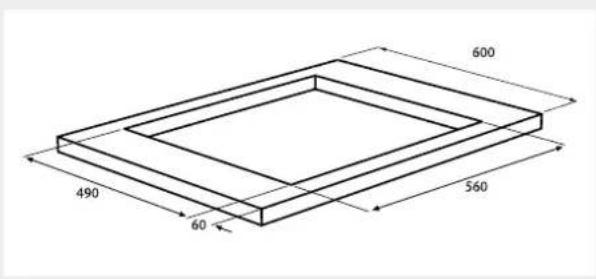
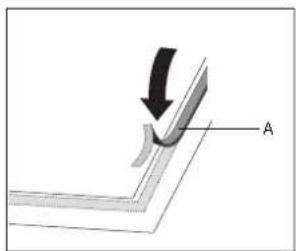
1mm 1* 1* 20 G1/2" 480 550Placing the sealing tape
Remove the protective foil from the sealing tape (A) and apply the tape around the cut-out in the worktop.
natural_image
Diagram showing a curved object with an arrow indicating direction, labeled 'A' (no text or symbols beyond label)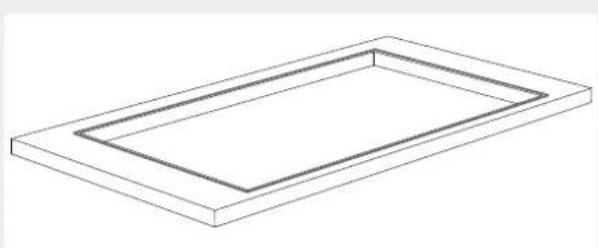
natural_image
Isometric line drawing of a rectangular frame with two inner rectangular outlines (no text or symbols)Building in dimensions
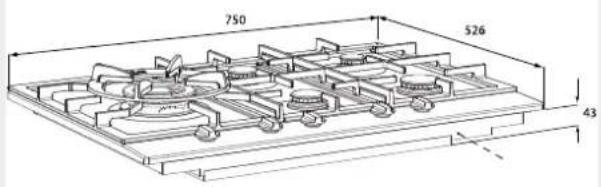
Hg1774s
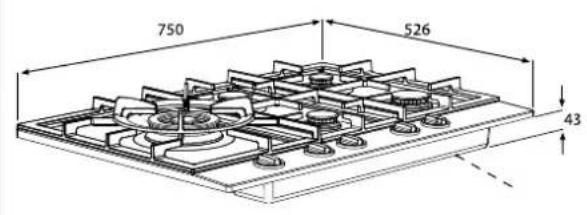
text_image
750 526 43minimum distance between rear of appliance and rear wall: 10 mm
Building in dimensions
Hg1774a
text_image
750 526 43minimum distance between rear of appliance and rear wall: 10 mm
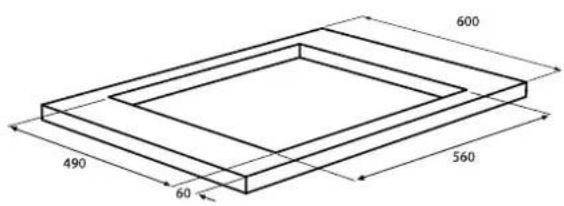
text_image
600 490 60 560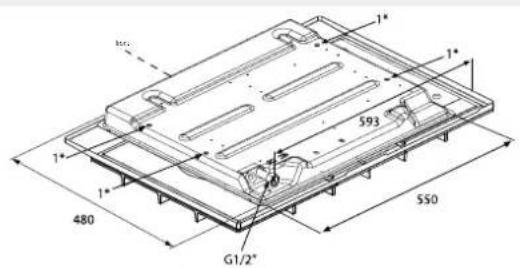
text_image
1" 1" 593 1" 1" 480 G1/2" 550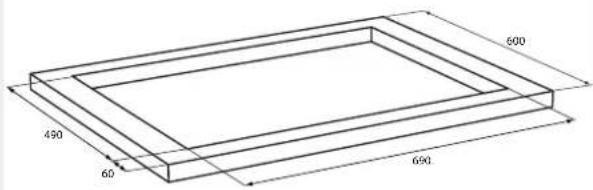
text_image
490 60 650 600
text_image
480 G1/2° 20 680 3° 3° n₁ n₂ n₃ n₄ n₅Building in dimensions Hg1664s
text_image
425 110 45 min 32 490 560minimum distance between rear of appliance and rear wall: 10 mm
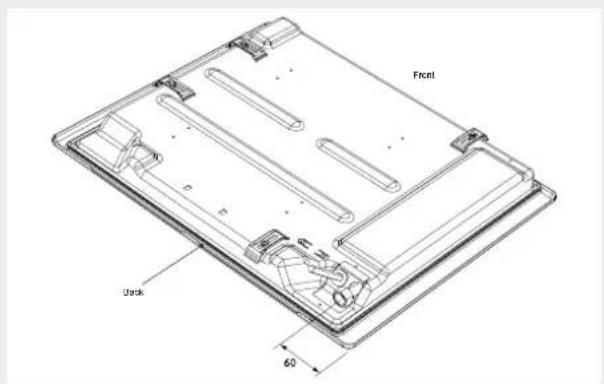
text_image
Front Back 60Building in dimensions
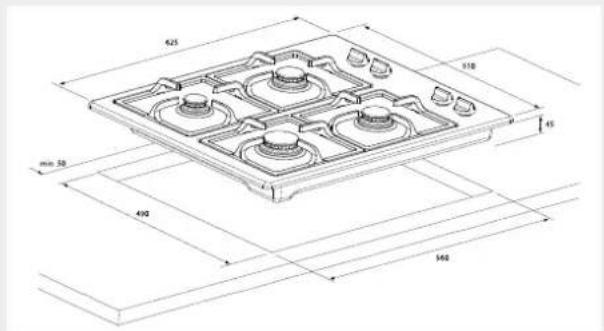
Hg1984s/a
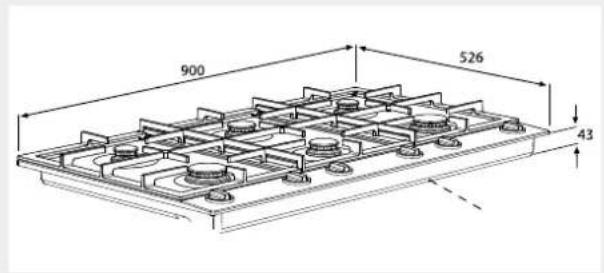
text_image
900 526 43minimum distance between rear of appliance and rear wall: 10 mm
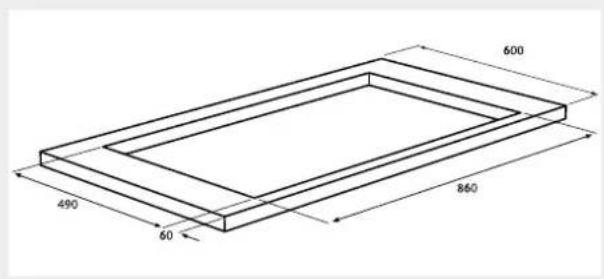
text_image
600 490 860 60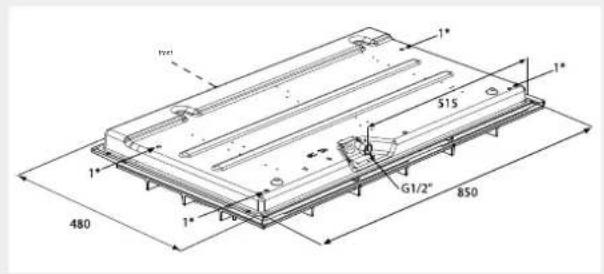
text_image
10mm 1" 315 1" G1/2" 850 1" 480Space to be left free around the appliance A hob generates heat. Leave a sufficient distance between the appliance and non heat-resistant materials. Take care also with materials that may discolour (such as stainless steel).
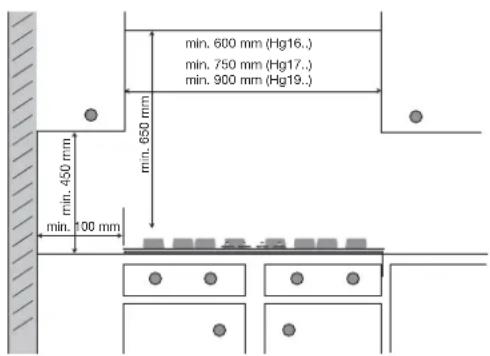
text_image
min. 600 mm (Hg16.) min. 750 mm (Hg17.) min. 900 mm (Hg19.) min. 650 mm min. 450 mm min. 100 mm
CAUTION!
The bottom of the hob becomes hot. Do not place combustible items in a drawer if the drawer is fitted directly below the hob.
Install appliance and make connections
- Place the appliance in the worktop and secure it using the mounting brackets and screws supplied.
- Connect to the gas supply.
- Check with soap suds that the connection is gastight.
- Connect the appliance to mains electricity.
Please attach the duplicate data plates packed with this user manual to a readily accessible location near the appliance, such as a cupboard door.
Gas information
| G25/25 mbar | G20/20 mbar | G25/20 mbar | G30/29 mbar | G31/29 mbar | G31/36 mbar | G30/50 mbar | G31/50 mbar | G31/67 mbar | |
| Burner-type | (kW) (kW) | (kW) (kW / g/h) | (kW /g/h) | (kW /g/h) | (kW /g/h) | (kW /g/h) | (kW /g/h) | ||
| Simmer 1.00 | 1.00 0.90 0.90 | 0 / 65 0.79 / 57 | 0.90 / 65 1.00 | 0 / 72 0.88 | 63 1.00 / 72 | ||||
| Semi-rapid | 2.00 2.00 | 1.80 1.60 / 115 | 1.41 / 101 | 1.60 / 115 2.00 | 144 1.76 / 127 | 2.00 / 144 | |||
| Rapid 3.00 3.00 | 2.70 2.30 / 166 | 2.02 / 146 | 2.30 / 166 | 2.70 / 194 2.88 | 171 2.70 | 194 | |||
| Wok 4.50 4.50 | 4.50 3.50 / 252 | 3.08 / 222 | 3.50 / 252 4.00 | 288 3.52 | 253 4.00 / 288 |
Setting up the appliance for other gas
This appliance has been set up for natural gas (G25/25 or G20/20). The appliance can be set up for other gas types and pressures by means of a conversion kit. You can order the kit from the sales and service organisation. The conversion instructions are supplied with the kit.
APPENDIX
Disposal of packaging and appliance
In the manufacturing of this appliance durable materials were used. Make sure to dispose of this equipment responsibly at the end of its lifecycle. Ask the authorities for more information regarding this.
The appliance packaging is recyclable. The following may have been used:
- cardboard;
• polythene fi Im (PE);
• CFC-free polystyrene (PS hard foam).
Dispose of these materials in a responsible manner and in accordance with government regulations.

As a reminder of the need to dispose of household appliances separately, the product is marked with the symbol of a crossed-out wheeled dustbin. This means that at the end of its working life, the product must not be disposed of as urban waste. It must be taken to a special local authority differentiated
waste collection centre or to a dealer providing this service.
Disposing of a household appliance separately avoids possible negative consequences for the environment and health deriving from inappropriate disposal and enables the constituent materials to be recovered to obtain significant savings in energy and resources.
NOTE!
The packaging material may be hazardous for children.

Declaration of conformity
We hereby declare that our products satisfy the applicable European directives, orders and regulations, as well as the requirements
stated in the referenced standards.
Technical data
On the label on the bottom of this equipment, you will find the total wattage, the required voltage and the frequency.
SOMMAIRE
VOTRE TABLE DE CUISSON À GAZ 22
Présentation 22
VOTRE TABLE DE CUISSON À GAZ 23
Description 23
Description 23
SÉCURITÉ 24
Généralités 24
Utilisation sûre 24
Enfants 25
COMMANDES 26
natural_image
Illustration of a cooking pot on a stovetop (no text or symbols)Mauvais
natural_image
Illustration of a cooking pot with lid and side handles, placed on a stove (no text or symbols)Bon
natural_image
Three black plastic electrical enclosures with mounting holes and internal compartments (no text or symbols visible)Hg1774/1984

natural_image
Exploded view diagram of a mechanical component with multiple floor plan views (no text or labels)Hg1654
flowchart
graph TD
    A["Top Pan"] --> B["Top Panel"]
    B --> C["Bottom Panel"]
    C --> D["Control Panel"]
text_image
FRONT FRONTtext_image
Technical diagram of a mechanical assembly with numbered components for identificationBrûleur wok
text_image
Technical diagram of a mechanical assembly with numbered components labeled 1 to 4natural_image
Technical line drawing of a mechanical component with a circular top and base (no text or symbols)natural_image
Technical line drawing of a mechanical clamp or bracket assembly (no text or symbols)natural_image
Simple line drawing of a screwdriver inserted into a bracket with a handle (no text or symbols)natural_image
Diagram showing a curved object with an arrow indicating direction, labeled 'A' (no text or symbols beyond label)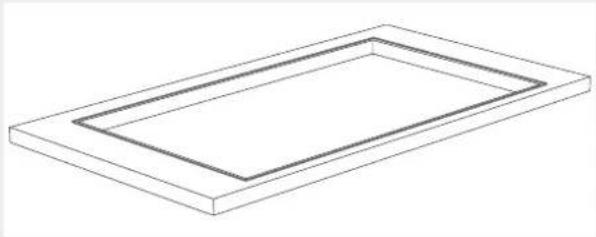
natural_image
Isometric line drawing of a rectangular frame with two inner rectangular outlines (no text or symbols)Dispose of these materials in a responsible manner and in accordance with government regulations.