
DR 57 - Hi-fi system ALBRECHT - Free user manual and instructions
Find the device manual for free DR 57 ALBRECHT in PDF.
| Product type | DAB+ hi-fi system for vehicles |
| Brand | Albrecht |
| Model | DR 57 |
| Category | Hi-fi system |
| Dimensions | 123 x 66 x 32 mm |
| Net weight | 87 g |
| Power supply | 10-30 V via cigarette lighter socket (adapter included) |
| Radio modes | DAB/DAB+, FM transmitter, Bluetooth |
| DAB+ frequencies | Band III (174-240 MHz) |
| FM frequencies | 87.5-108.0 MHz (transmitter 50 nW) |
| Bluetooth | Version 4.0, 2402-2480 MHz, 10 mW |
| Built-in speaker power | 1 W, 8 Ω |
| Connectors | 3.5 mm stereo audio input/output, micro-USB port |
| Main functions | Auto search, 5 presets + favorites, DAB service following, traffic information, hands-free calling, Bluetooth streaming, screen color/brightness adjustment |
| Screen | Color TFT |
| Included accessories | Active magnetic DAB/DAB+ antenna, 3.5 mm audio cable, dual USB charger 12/24V, suction cup, micro-USB cable |
| Maintenance and cleaning | Wipe with a dry cloth; do not use abrasive products |
| Safety | Do not expose to water, moisture or excessive heat; do not block ventilation slots |
| Repairability and warranty | 2-year warranty; repair by dealer or Alan Electronics after-sales service; no spare parts available separately |
| General information | CE declaration available online; recycling via WEEE |
Frequently Asked Questions - DR 57 ALBRECHT
User questions about DR 57 ALBRECHT
0 question about this device. Answer the ones you know or ask your own.
Ask a new question about this device
Download the instructions for your Hi-fi system in PDF format for free! Find your manual DR 57 - ALBRECHT and take your electronic device back in hand. On this page are published all the documents necessary for the use of your device. DR 57 by ALBRECHT.
USER MANUAL DR 57 ALBRECHT
- Main Unit and Accessories: 25
- Control Unit and Connectors 26
- First Use: 28
3.1. Installing the DAB+ Antenna 29
- Connecting the DR 57 to your Car Stereo 30
4.1. Connecting via FM-Transmitter 30
4.1.1. Connecting via FM-Transmitter (Auto Mode): 30
4.1.2. Select FM Transmitting Frequency (Manual Mode): 31
4.2. Connection via Audio Cable 31
- Main Functions 32
5.1. Search and Select DAB/DAB+ Channels: 32
5.2. Service Information: DAB+ Mode 32
5.3.DAB Service Following 33
5.3.1. De-/Activate Service Following 33
5.4.Traffic Announcements 33
5.4.1. De-/Activate Traffic Announcements 33
5.5. Selection of Screen Background and Font Colour: 34
5.6.LCD display Dimmer Control 34
5.7.Favourite Buttons Light 34
5.8. Select Language: 34
5.9. Restore Factory Setting 35
5.10. Software Version 35
6.Preset Stations 35
6.1.Storing Preset Stations 35
6.2. Recalling Preset Stations 36
6.3. Remove Preset Stations 36
- Bluetooth Mode 36
7.1.De-/Activate Bluetooth 36
7.2.Pairing a Phone 37
7.3. Phone Call 37
7.3.1.Output Mode 38
7.4. Bluetooth MusicPlayback 38
- Charging USB Devices 38
9.Aux in 39
10.Product Specification 39
11. Troubleshooting 40
12. Safety Instructions 41
13. Warranty and Recycling Information 41
14. CE Declaration of Conformity 42
15. Service Address 42
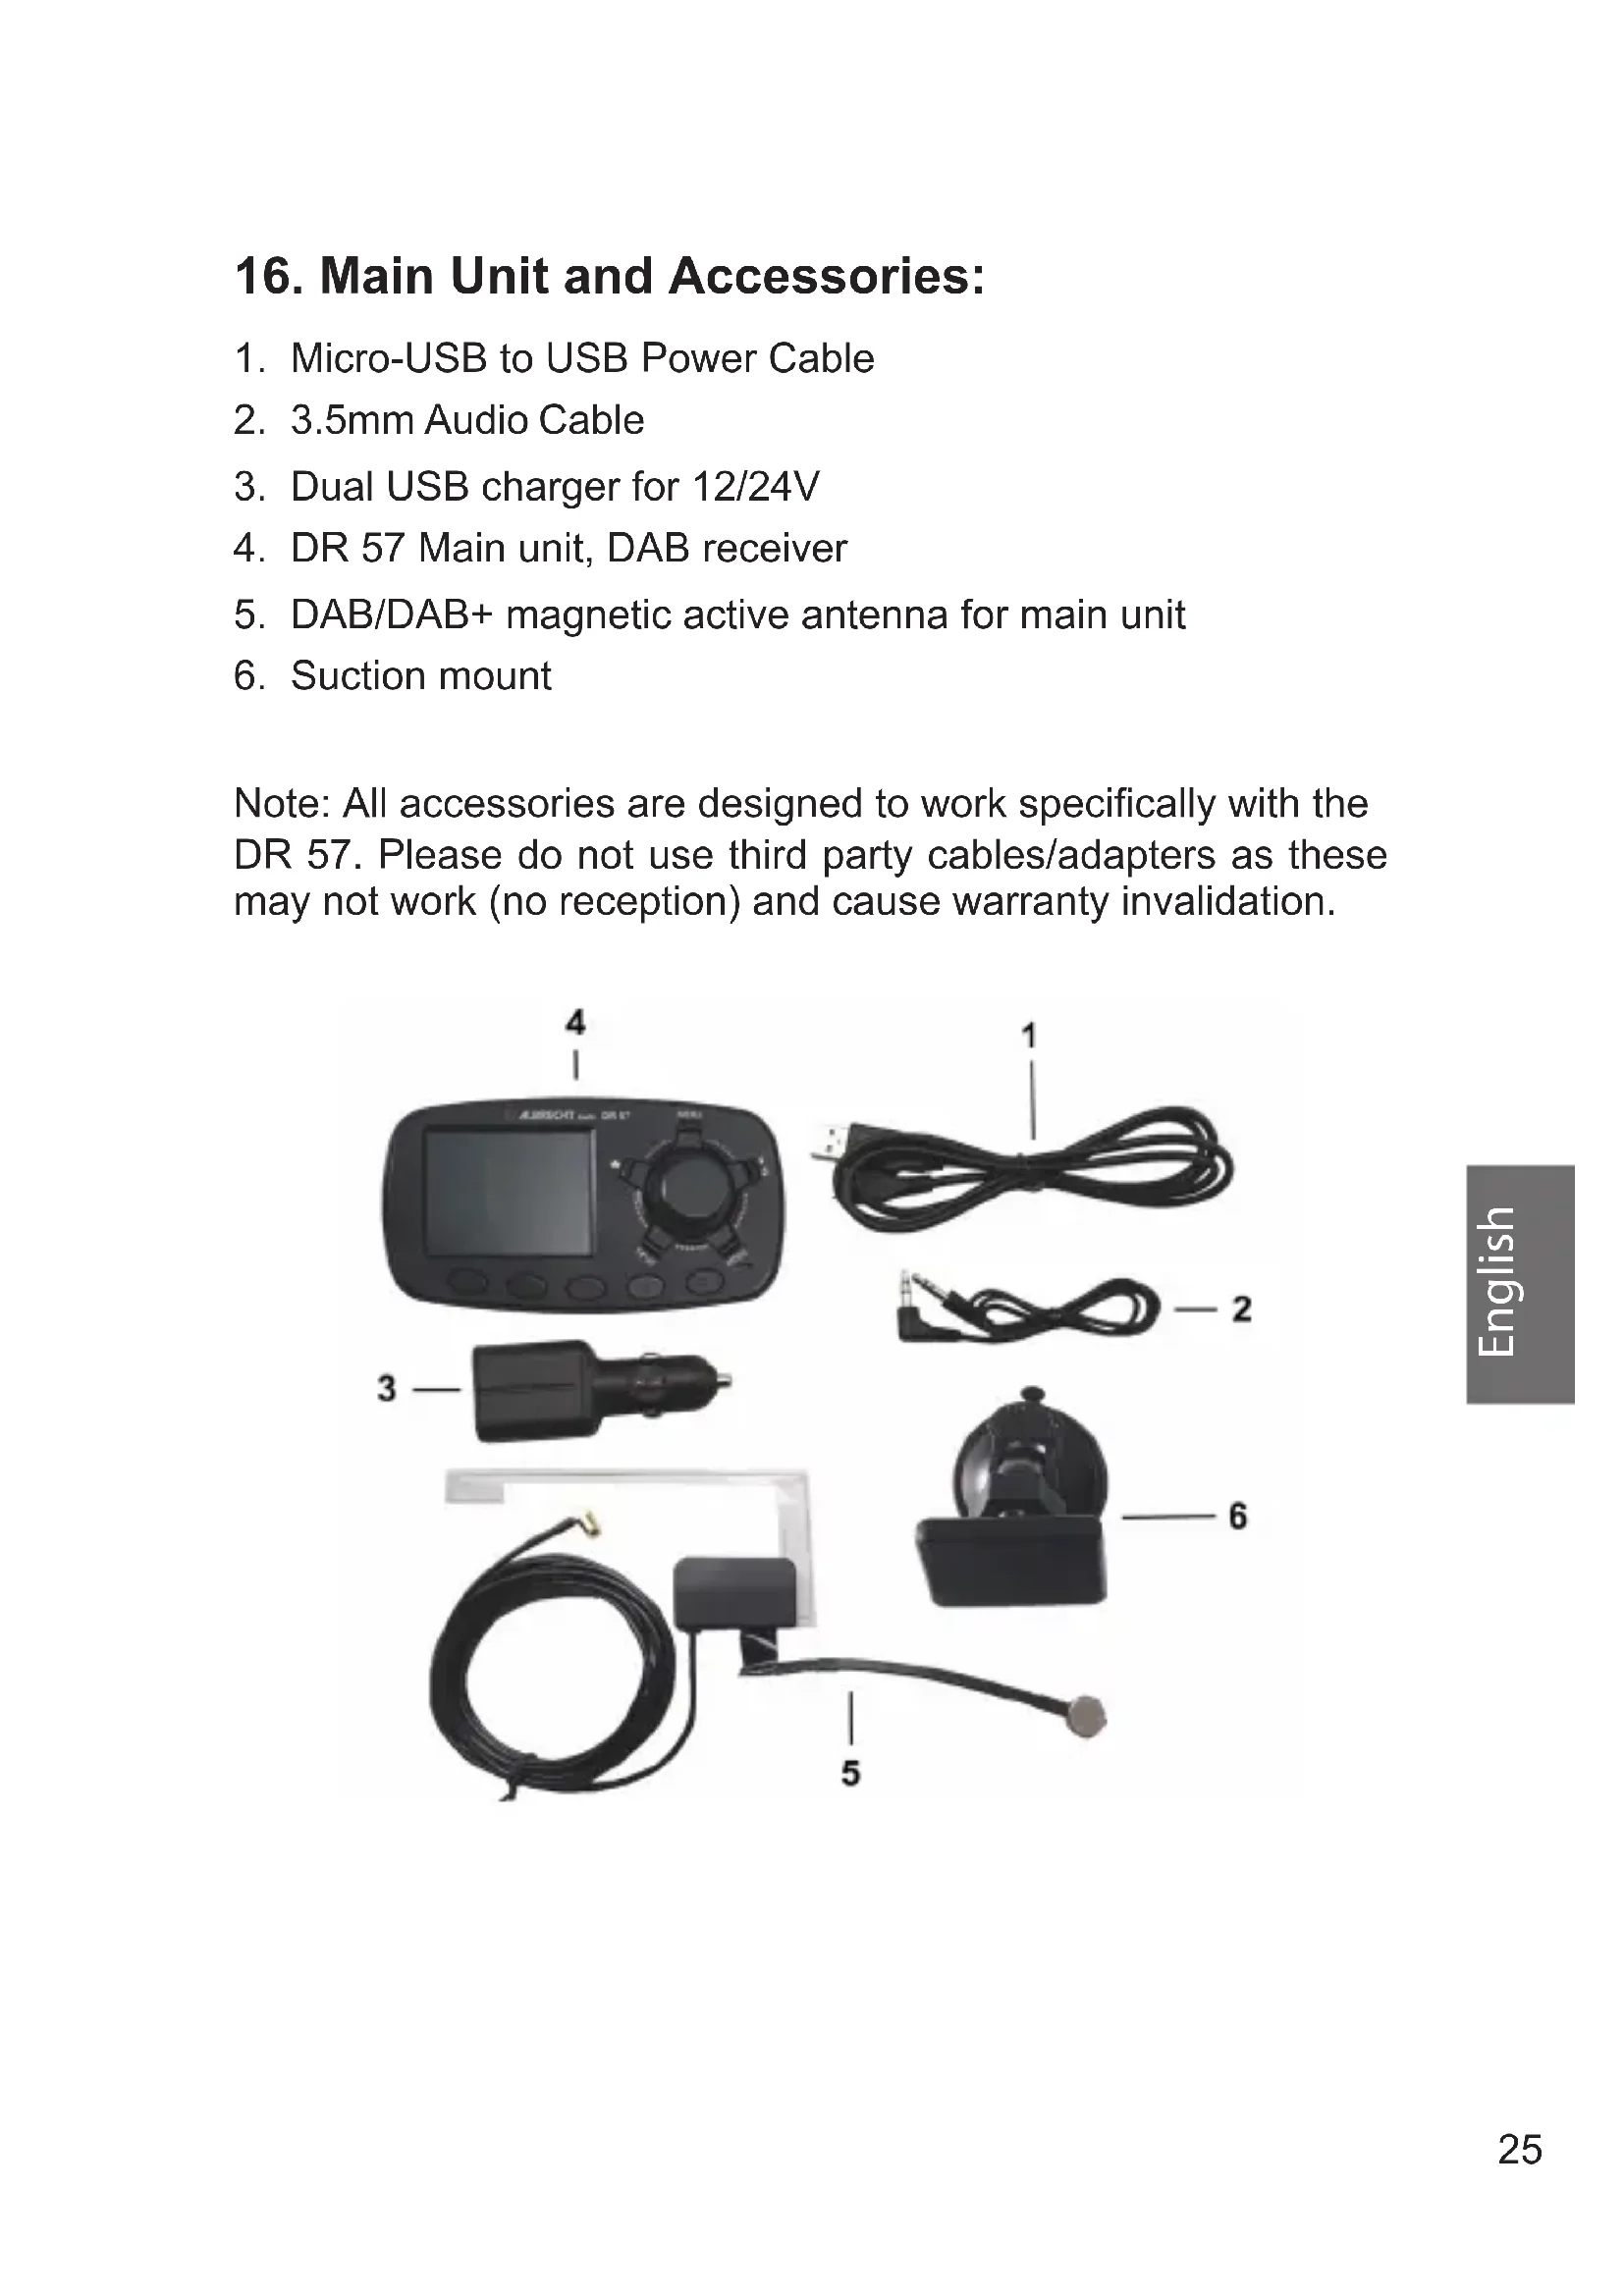
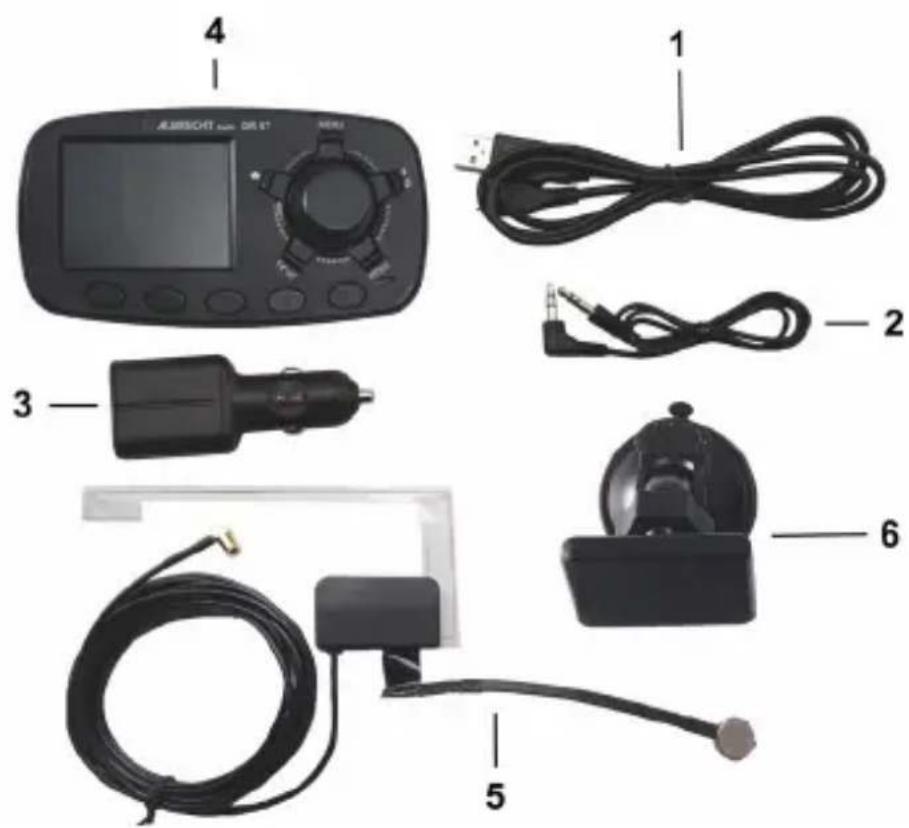
16. Main Unit and Accessories:
- Micro-USB to USB Power Cable
- 3.5mm Audio Cable
- Dual USB charger for 12/24V
- DR 57 Main unit, DAB receiver
- DAB/DAB+ magnetic active antenna for main unit
- Suction mount
Note: All accessories are designed to work specifically with the DR 57. Please do not use third party cables/adapters as these may not work (no reception) and cause warranty invalidation.
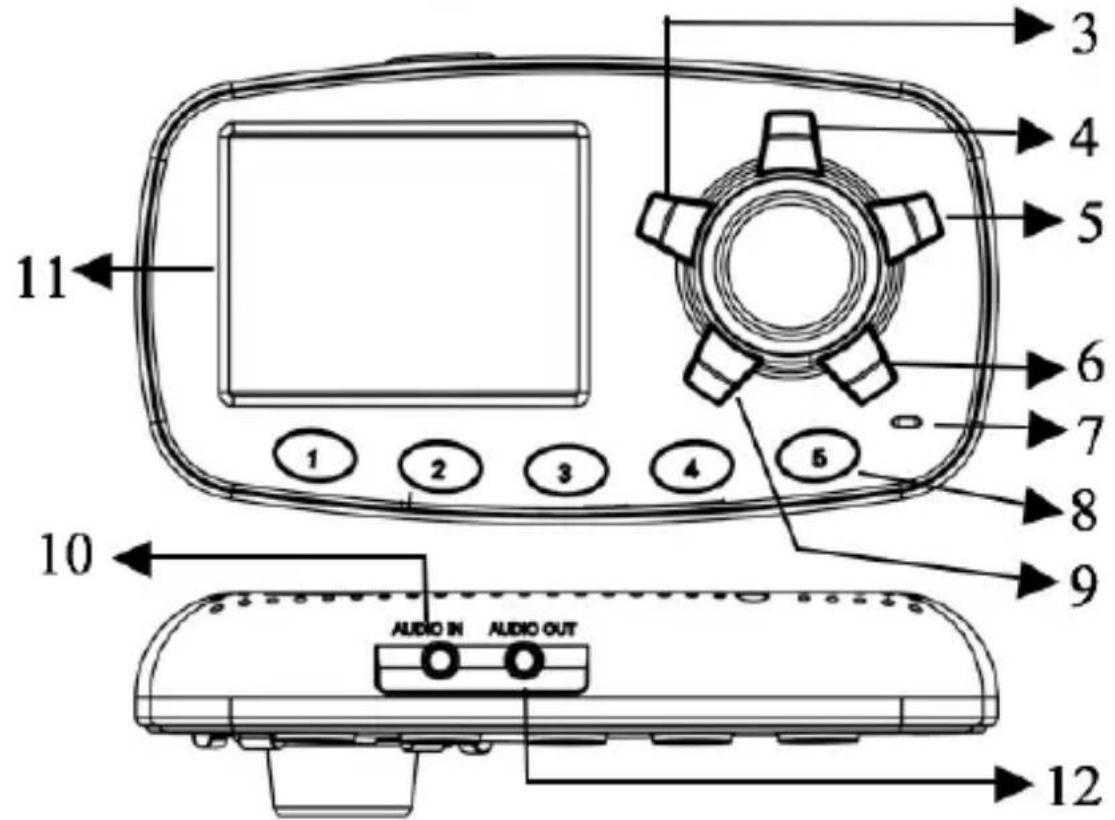
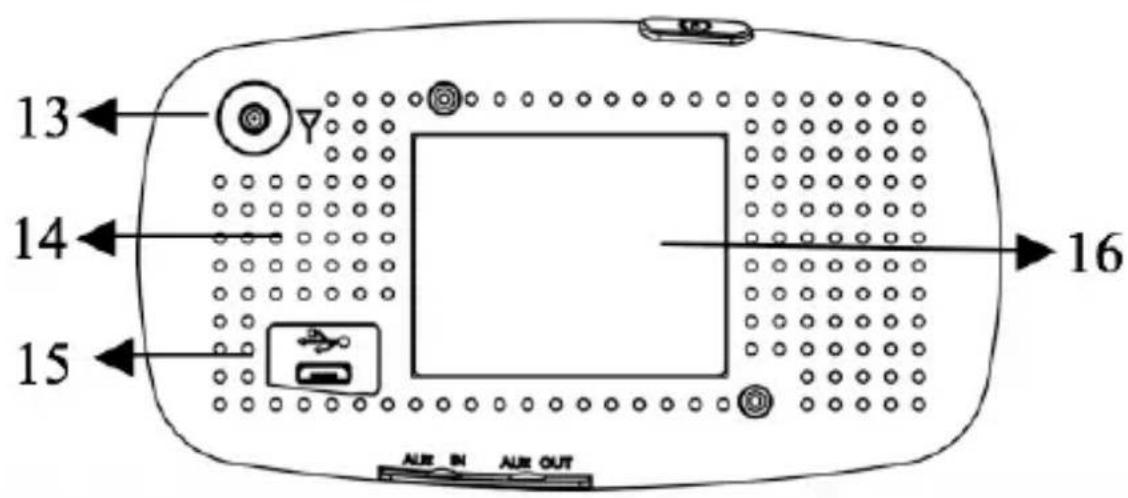
17. Control Unit and Connectors
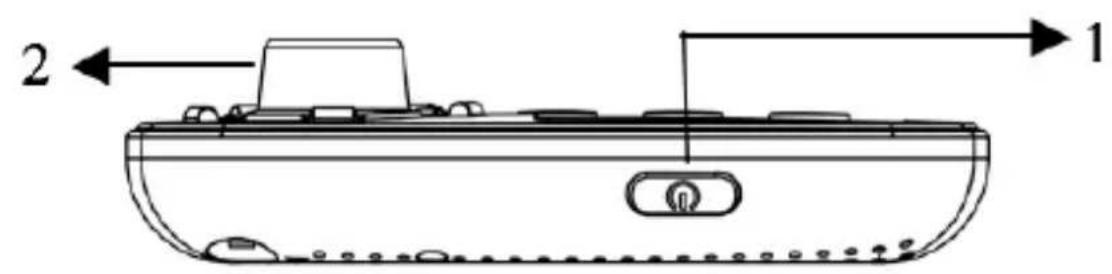
| 1 | On/standby button | |
| 2 | OK | Rotate for navigating the menu Rotate for the last/next station Press to confirm |
| 3 | ★ | Press to open the favourite list Press long to store a favourite |
| 4 | MENU | Press to open the station list Press long to open the menu |
| 5 | Play/Pause button, press long BT ON/OFF Phone button | |
| 6 | MODE | Press to change the mode Press long to dim the screen |
| 7 | Hands free built-in microphone | |
| 8 | 1-5 Preset buttons | |
| 9 | TX SF | Press to adjust the FM transmitter Press long for service following On/Off |
| 10 | AUDIO IN | AUX-In socket |
| 11 | TFT color display | |
| 12 | AUDIO OUT | AUX-Out socket |
| 13 | DAB/DAB+ antenna socket | |
| 14 | Hands free built-in speaker | |
| 15 | Power supply Micro USB socket | |
| 16 | Magnetic mount plate | |
18. First Use:
- Mount the DR 57 In-Car DAB+ Radio adapter to the windscreen with the provided suction mount.
- Connect one end of the USB power supply cable to the Micro USB power socket at the back of DR 57 and the other end to the dual USB car charger. Plug the dual USB car charger into the car cigarette-lighter socket.
- Connect the supplied antenna to the antenna socket. To mount the antenna correctly please refer to chapter "Installation Guide" starting at page 86.
- Turn on the power with the "On Button" on top of the unit and the display will show the Albrecht logo, then the device will automatically scan all the local DAB/DAB+ channels and store them in the memory of the device until another "Auto Scan" is performed. During scanning a status bar will show the progress of the scan.
- Once the scan is completed, you can select any DAB/DAB+ radio channel by rotating the Navigation Knob.
18.1. Installing the DAB+ Antenna
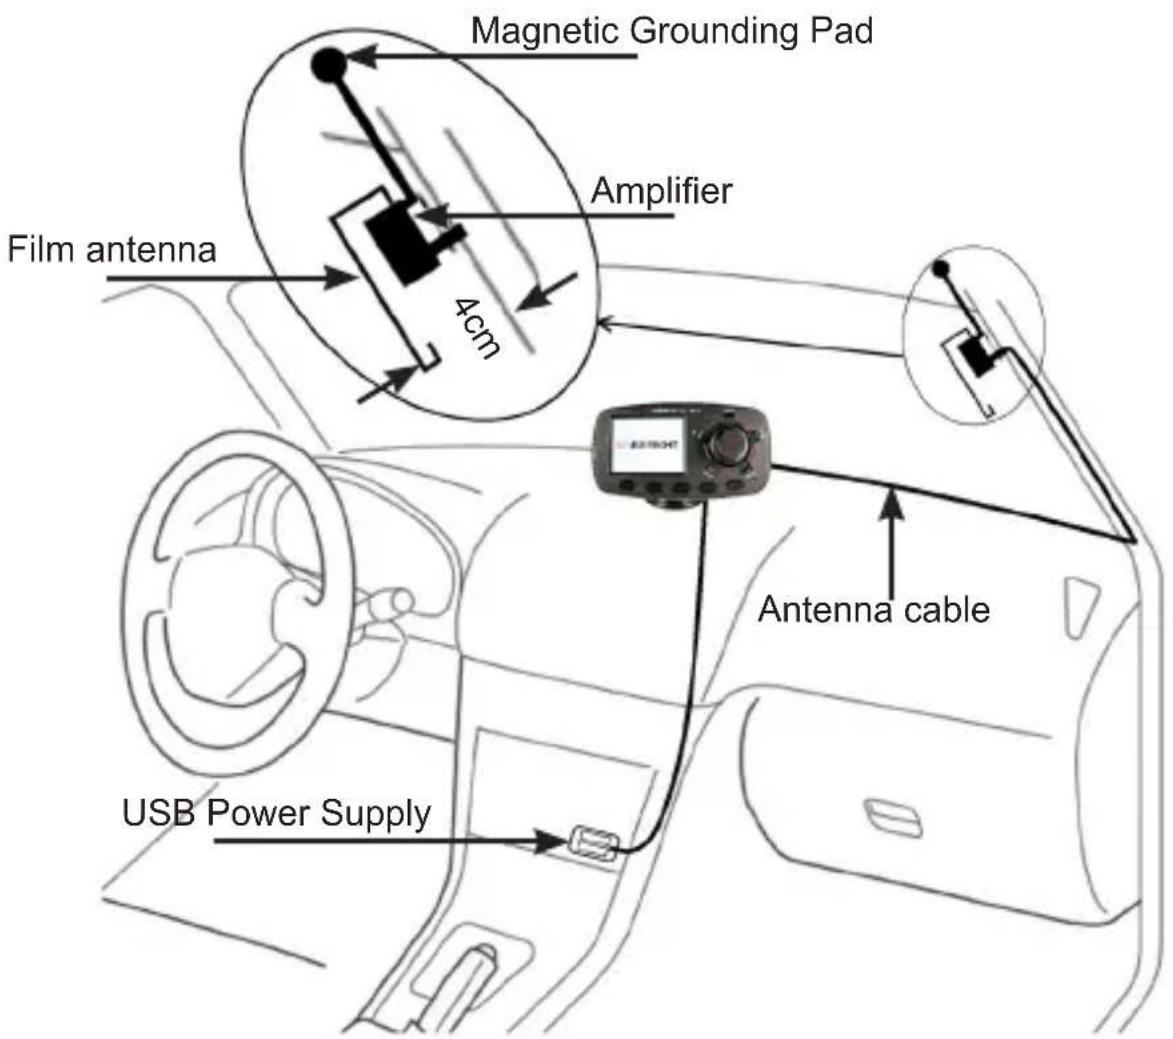
- Use a wipe to clean the windscreen and gently pull down the car roof liner
- Insert the magnetic pad grounding tail and ensure the magnetic pad contacts to the metal roof of the car
- Remove the adhesive backing from the antenna power amplifier box and stick to the window glass
-
Stick the transparent antenna film to the glass as indicated in the diagram, gently applying pressure to remove any air bubbles.
-
Tuck the cable behind the A-Frame and run it to the main unit DR 57
- The antenna should be mounted vertically, not horizontally
- Do not attach the DAB antenna over heating wires, in a place that obstructs the driver's view, or in a place that can experiences interference from metal.
- Check for metallic heat coating (sun filter) on your car's front window if you are having issues with DAB connectivity. The heat coating or sun filter may have negative impact to the reception performance.
- The antenna can also be mounted to the rear side windows.
19. Connecting the DR 57 to your Car Stereo
19.1. Connecting via FM-Transmitter
You can choose to set the FM transmitting frequency automatically or manually.
19.1.1. Connecting via FM-Transmitter (Auto Mode):
- Press and hold the MENU button to enter the menu mode, rotate the navigation knob to search for Audio Out choose FM Transmitter and confirm by pressing the navigation knob. Note: This is the default configuration, so this step can be skipped upon first use.
- Press TX button to show the TX Frequency: xxx.xMHz at the footer and then press and hold TX for 3 seconds to activate the automatic scanning of a "vacant" FM transmission frequency without interference from other channels. The scanning process will take 20-30 seconds. The display is showing "-.-.-MHZ" and stops at a vacant frequency.
- After a "vacant" frequency is found, press the navigation knob again to confirm the setting or it will automatically confirm after 3 seconds. The selected "vacant" frequency will
be shown at the header, e.g. TX 108.0MHz
- Then tune your car FM radio system to match the selected FM transmitting frequency for transmission of the audio signal from DR 57 to your car stereo audio system.
19.1.2. Select FM Transmitting Frequency (Manual Mode):
- Press the TX button to enter FM transmitting frequency selection mode.
- Then rotate the navigation knob to select your favourite vacant frequency (based on your past experience with known vacant frequencies in your area) which you would like to receive by your car radio.
- The screen will go back to DAB+ mode automatically after 3 seconds and the selected frequency will be shown at the header, e.g. TX 108.0MHz.
Remarks: "Vacant frequency" means there is no FM radio broadcasting content or noise when the frequency is selected.
19.2. Connection via Audio Cable
- Connect the 3.5mm AUDIO OUT socket of the DR 57 through the supplied audio cable with the line-in socket of your car radio.
- Press and hold Menu to enter the menu, rotate the navigation knob to search for Audio Out and confirm by pressing the navigation knob. A headphone icon will be displayed at the header.
Remark: In Audio Out socket mode, there will be no FM transmission to the car stereo.
20. Main Functions
20.1. Search and Select DAB/DAB+ Channels:
If you are not in DAB+ mode, press the MODE button until the "DAB+ Radio" mode is selected. Rotate the navigation knob to select the desired DAB/DAB+ channel. Or you can press the MENU button to enter the Station list, rotate the navigation knob to scroll up or down and select the desired DAB+ channel by pressing the navigation knob.
You may also press and hold the MENU button to enter the menu and select DAB Autoscan by rotating the navigation knob to reactivate the "Auto Scan" process if you need to update the DAB+ radio channels.
Remark: For normal use, you don't have to perform the "DAB Autoscan" every time you use the car DAB+.
20.2. Service Information: DAB+ Mode
The service information data will be displayed with scrolling text which is being broadcasted from the station.
While listening to DAB+, the display will show the following information if applicable
- Channel Name
Frequency - Multiplex Name (DLS)
DAB+icon - Signal Strength
FM Transmitting Frequency - Bluetooth Connection Status
Audio Out Status
Service Following status - Traffic Announcements status
20.3. DAB Service Following
If you leave the broadcast area of the station you are listening to, Service Following searches if the same station is broadcasted in the new area as well and switches the frequency automatically.
20.3.1. De-/Activate Service Following
In "DAB" mode, press and hold SF button to turn ON the service following function. "Service Following ON" will be displayed on the LCD screen and a white "S/F" icon will appear at the header of the display. Repeat the same procedure to turn OFF the service following function. The "S/F" icon will disappear from the LCD screen.
If the "S/F" icon turns from white to red, it means that the DAB station supports S/F feature and the device has detected it, however, it is not switched over yet. Once it does switch to another region, the S/F icon will turn white again.
Remark: For applications where SF feature is not used, it is recommended to turn off the SF function.
20.4. Traffic Announcements
Traffic Announcement lets you receive traffic announcements automatically, no matter what source you are listening to.
20.4.1. De-/Activate Traffic Announcements
Press and hold the MENU button to enter the menu
Use the Navigation Knob to scroll up or down to select Traffic Announcement and confirm by pressing the Navigation Knob.
Rotate the Navigation Knob to select ON or OFF and confirm by pressing the Navigation Knob.
To cancel an active traffic announcement, simply press the button. The DR 57 will return to the last played radio station.
20.5. Selection of Screen Background and Font Colour:
The color of the screen background and font can be set to four different combinations:
- White black background / white font
- Orange black background / orange font
- Blue black background / blue font
- Colour black background / colour font
To set the colour, follow the procedure below: Press and hold the MENU button and rotate the Navigation Knob to scroll to the Colour Settings. Select your favourite colour and confirm by pressing the Navigation Knob.
20.6. LCD display Dimmer Control
When driving at night, you may want to change the brightness level of the colour LCD display. Press and hold the MODE button to dim the display. Press and hold the MODE button again to return to normal brightness level.
20.7. Favourite Buttons Light
Press and hold the MENU button to enter the Menu, rotate the Navigation Knob to scroll to the Button Light and confirm by pressing the Navigation Knob. Now select ON or OFF by rotating the Navigation Knob again and confirm with the Navigation Knob.
20.8. Select Language:
Press and hold the MENU button to enter the Menu. Use the Navigation Knob to scroll to Language and confirm by pressing the Navigation Knob. Rotate the Navigation Knob again to select your desired language and confirmed by pressing the Navigation Knob.
20.9. Restore Factory Setting
Please note all station presets, settings and configurations will be lost after you have performed the "Factory Reset".
Press and hold the MENU button to enter the Menu. Turn the Navigation Knob to scroll to Factory Reset and confirm by pressing the Navigation Knob. Select YES or NO by rotating the Navigation Knob and confirm by pressing the Navigation Knob.
Press and hold the MENU button to enter the Menu. Rotate the Navigation Knob to scroll up or down to select Software Version and confirm by pressing the Navigation Knob to see the current software version of the device. Press the Navigation Knob again to exit the menu.
21. Preset Stations
21.1. Storing Preset Stations
To program and store your favourite DAB+ stations use the Preset Buttons (1-5) on the front of the device:
In DAB mode, use the Navigation Knob to select a favourite DAB+ station, press and hold any of the selected Preset Buttons (1-5) to store the selected station to this button. A message Stored Successfully will be displayed.
You may program and store more than 5 favorite DAB+ preset stations by using the following procedure:
Select a DAB+ station, press and hold the button to enter the Store Preset Stations mode. Rotate the Navigation Knob to select a number in memory to store your favourite station, press the Navigation Knob to confirm. A message Stored Successfully will be displayed.
21.2. Recalling Preset Stations
In DAB mode, press any Preset Buttons (1-5) on the front of the device to recall your favorite DAB+ preset station. Or press the button to enter the Select Preset Stations list to show all the preset DAB+ stations. Choose a Preset Station and select it by pressing the Navigation Knob.
21.3. Remove Preset Stations
To delete all of your favourite DAB+ preset stations, press and hold the MENU button to enter the menu mode, use the Navigation Knob to search for Delete All Presets and select YES or NO by pressing the Navigation Knob to confirm. If YES is selected, then the complete memory will be cleared.
22. Bluetooth Mode
In order to connect a Bluetooth phone to the DR 57 both units need to be paired. This only needs to be done during the first connection. Once both units are paired they will automatically connect in the future as soon as they are within Bluetooth range.
Up to eight devices can be paired to the DR 57. If more than one device is in Bluetooth range the DR 57 will connect to the last connected one. If a different phone shall be connected, the Bluetooth on the current phone needs to be disabled manually.
22.1. De-/Activate Bluetooth
In Bluetooth mode press and hold to toggle between Bluetooth on and off.
The Bluetooth icon in the header bar will indicate the status.
- Icon not visible: Bluetooth off
- Icon flashing: Bluetooth on; not connected
- Icon constantly visible: Bluetooth on; connected
22.2. Pairing a Phone

- Activate Bluetooth by pressing
- Press and hold TX in order to activate pairing mode. The display shows Pairing in Progress.
- Activate Bluetooth on your phone and search for available Bluetooth peripherals.
- Select "CAR DAB" from the list
- Once connection is established the DR 57 screen will show Connected and the Bluetooth icon will be shown in the header.
Remark: the pairing time may take several seconds to one minute depending on various brands or models of phone.
When asked for a PIN code
If you want to abort Paring in progress, you can always press the button.
22.3. Phone Call
When there is an incoming call, the DR 57 rings with a ringtone, press the button to answer a call.
- Answer a call: press dving ringing
- Decline a call: press and hold during ringing
End a call: press during the call
During the call the display will show the speaker phone volume and talk time, turn the Navigation Knob to adjust the volume level.
22.3.1. Output Mode
You can output phone calls either via the built-in speaker or the car speakers. When Car Speaker mode is selected, the volume can only be adjusted by the car stereo volume control button.
Press and hold the MENU button to enter the menu,
Rotate the Navigation Knob to select Hands Free Speaker and press the Navigation Knob to confirm
In Hands Free Speaker menu, rotate the Navigation Knob to select Built-in Speaker or Car Speaker and confirm by pressing the Navigation Knob.
22.4. Bluetooth MusicPlayback
Connected Bluetooth phones can now playback music files on the DR 57 (Refer to your phone user guide for more information).
The music will be forwarded to your car stereo either via the FM transmitter or the audio out socket depending on the selected option in the Audio Out menu. For more information see chapter 19. Connecting the DR 57 to your Car Stereo"
Press the button to play or pause the music playback. Rotate the Navigation Knob to select the next or previous songs.
23. Charging USB Devices
Using your mobile phone USB cable and plug the USB connector into the dual USB car charger with 12/24V socket.
Connect the other end of the cable to your device and start charging. (Charging Power Output: 5V, 1A, the current is big enough for iPad charging).
24. Aux in
To connect an external audio device, such as smartphones/tablelets/iPods/MP3 players and the like, proceed as follows:
Press MODE until AUX IN is displayed.
Connect the external audio source to the "AUX IN" socket on the down side of the DR 57 via the supplied 3.5mm audio cable.
25. Product Specification
| 1 P | Product Model: DR 57 |
| 2 | Radio format support: DAB/DAB+, FM Transmitter and DAB to DAB Service following |
| 3 D | AB+ frequency: Band III (174.00 –240.00MHz) |
| 4 F | M transmission frequency: 87.6—107.9MHz, 50 nW |
| 5 B | Bluetooth: Version 4.0, 2402 - 2480 MHz, 10 mW |
| 6 S | Speaker phone output: 1.0W, 8Ω |
| 7 A | Audio IN: 3.5mm stereo jack |
| 8 A | Audio Out: 3.5mm stereo jack |
| 9 | Power Output: 5V, 1A (charging for iPad2/iPhone/iPod/Android Phone etc.) |
| 10 | Power Source: Car Cigarette-lighter Socket (10V-30V) |
| 11 | Dimension: 123 x 66 x 32 mm |
| 12 | Net weight: 87g (approx.) |
*Information of this user manual is subject to change without prior notice.
26. Troubleshooting
Problem: DAB transmission via FM to the car radio is poor, with interference or not working at all.
Please use the supplied USB cable and cigarette adapter. Other cables often do not suppress interferences sufficiently.
Problem: No DAB reception when the DR 57 is connected via the line-in input to the car radio, although the DAB signal strength is good.
Please switch the DR 57 to the "AUX" mode in the menu.
Poor DAB reception on some motorways or roads, part 1.
Because the DAB network is not yet fully expanded, this can result in poor reception while driving in some rural areas that are not yet fully developed. Therefore, please test the DR 57 receiver in a better developed area before you send in the device for repair because of faulty reception.
Problem: Poor DAB reception, part 2.
Commercially available USB adapters without interference suppression are certainly suitable for many applications, but not adequate for powerful DAB receivers. Therefore, for optimum reception, use the USB adapter and the cigarette adapter supplied by us which are specifically designed for the DR 57 receiver.
Problem: Poor DAB reception, part 3.
Check whether the supplied DAB antenna was installed exactly as described in the installation instructions and if it is also properly connected to the vehicle ground. Other electronic devices that are not interference suppressed (such as low-cost dash caps), especially in the interior of the vehicle, may interfere with the DAB reception.
27. Safety Instructions
- Do not use this radio in/near water.
- Clean with dry cloth.
- Do not block any ventilation openings.
- Use only accessories provided by manufacturer.
- Do not leave your radio where excessive heat could cause damage.
28. Warranty and Recycling Information
We are legally obliged to include disposal and warranty information as well as EU declaration of conformity with the use instructions in different countries for every unit. Please find this information on the following pages.
2-Year Warranty From Date Of Purchase
The manufacturer/retailer guarantees this product for two years from date of purchase. This warranty includes all malfunctions caused by defective components or incorrect functions within the warranty period excluding wear and tear, such as exhausted batteries, scratches on the display, defective casing, broken antenna cable and defects due to external effects such as corrosion, over voltage through improper external power supply or the
use of unsuitable accessories. Defects due to unintended use are also excluded from the warranty.
Please contact your local dealer for warranty claims. The dealer will repair or exchange the product or forward it to an authorized service center.
You can also contact our service partner directly. Please include your proof of purchase with the product and describe the malfunction as clearly as possible.
29. CE Declaration of Conformity
Standards and Regulations
Hereby, Alan Electronics GmbH declares that the radio equipment type DR 57 is in compliance with Directive 2014/53/EU. The full text of the EU declaration of conformity is available at the following in
ternet address: www.alan-electronics.de/CE-Papiere/
WEEE and Recycling
The European laws do not allow any more the disposal of old or defective electric or electronic devices with the household waste. Return your product to a municipal collection point for recycling to dispose of it. This system is financed by the industry and ensures environmentally responsible disposal and the recycling of valuable raw materials.
30. Service Address
Technical Hotline (for units sold in Germany)
Contact our service hotline by phone +49 (0) 6103 / 9481 - 66 (regular costs for German fixed network) or e-mail at
service@albrecht-midland.de
Before returning the product, check the chapter 11 "Troubleshooting" for some easy steps and tests or contact our hotline.
© 2020 Alan Electronics GmbH
35.4.1. Désactiver/Activer Traffic Announcements
37.1. Désactiver/Activer Bluetooth
49.3. Service Following DAB
Please mount the DR 57 to the windscreen with the supplied suction cup mount. Ideally in an easy-to-reach place where it is not blocking your sight.

Now connect the antenna to the DR 57 and hide the cable between dashboard and windscreen.
The antenna should be fitted on the passenger side of the front windscreen. Ensure that there is a 4cm gap from the side of the windscreen to the vertical strip of the antenna film as shown.
Wipe the inside of the windscreen where the antenna is to be fitted.
If the glass is cold, you may need to warm the glass to ensure good adhesion and gently pull down the car roof liner. Insert the magnetic tap grounding tail and ensure the magnetic tap contacts to the metal roof of the car.
Remove the adhesive backing of the antenna power amplifier box and stick it to the window glass. Now stick the antenna to the glass, gently apply pressure to remove any air bubbles.
Tuck the antenna cable and route it down the A-Pillar to where the DR 57 is to be mounted.
Do not attach the DAB antenna over heating wires, in a place that obstructs the driver's view, or in a place that can experience interference from metal.
Please connect the power supply cable now. The cigarette lighter adapter is able to supply a second USB device.
Please switch on the DR 57 now.
Now tune the FM Transmitter to a vacant frequency. To do this press TX/SF and turn the control knob.
Tune your car radio system to the same frequency. The station name DAB Mode will be displayed and you can hear the selected DAB station.
To connect your mobile phone to the DR 57 you need to press the Mode button until you enter the Bluetooth mode. Press until Bluetooth is switched on. Now press and hold TX/SF until the message "Pairing" appears. Now you can search on your mobile for Bluetooth devices and connect it to "Car DAB". While being in Bluetooth mode you can stream music from your phone to your radio. When you are listening to DAB radio incoming calls will interrupt the radio.