AGB 669/DP-SP/3 - INSTRUCTION FOR USE - Home Appliance WHIRLPOOL - Free user manual and instructions
Find the device manual for free AGB 669/DP-SP/3 - INSTRUCTION FOR USE WHIRLPOOL in PDF.

| Product type | Professional hood-type dishwasher |
| Brand | Whirlpool |
| Model | AGB 669/DP-SP/3 |
| Use | Collective (catering, gastronomy) |
| Power supply | 400V/3+N 230V/1, 50 Hz |
| Max power consumption | 6.75 kW |
| Boiler heating element power | 6 kW |
| Tank heating element power | 3 kW |
| Wash pump power | 0.75 kW |
| Water supply pressure | 200 - 400 kPa (2-4 bars) |
| Water supply temperature | 50 - 60 °C (hot water) |
| Recommended water hardness | 7 - 12 °dF |
| Water consumption per rinse cycle | 3.5 L |
| Boiler capacity | 9 L |
| Tank capacity | 28 L |
| Cycle durations (water 50°C) | 1'15" (short), 2' (medium), 3' (long), up to 10' (continuous) |
| Noise level | 67 dB(A) |
| Protection degree | IPX4 |
| Net weight | 115 kg |
| Cable type | H05VV-F |
| Wash programs | Short, medium, long, continuous |
| Integrated dosing systems | Detergent (red hose) and rinse aid (transparent hose) |
| Safety features | Mandatory grounding, differential circuit breaker, emergency stop via main switch |
| Maintenance | Daily filter cleaning, periodic disassembly and cleaning of spray arms, semi-annual check by a technician |
| Spare parts | Use only genuine Whirlpool parts |
| Compliance | IEC-EN-IEC 60335-2-58/61770, WEEE directive 2002/96/EC |
Frequently Asked Questions - AGB 669/DP-SP/3 - INSTRUCTION FOR USE WHIRLPOOL
User questions about AGB 669/DP-SP/3 - INSTRUCTION FOR USE WHIRLPOOL
0 question about this device. Answer the ones you know or ask your own.
Ask a new question about this device
Download the instructions for your Home Appliance in PDF format for free! Find your manual AGB 669/DP-SP/3 - INSTRUCTION FOR USE - WHIRLPOOL and take your electronic device back in hand. On this page are published all the documents necessary for the use of your device. AGB 669/DP-SP/3 - INSTRUCTION FOR USE by WHIRLPOOL.
USER MANUAL AGB 669/DP-SP/3 - INSTRUCTION FOR USE WHIRLPOOL
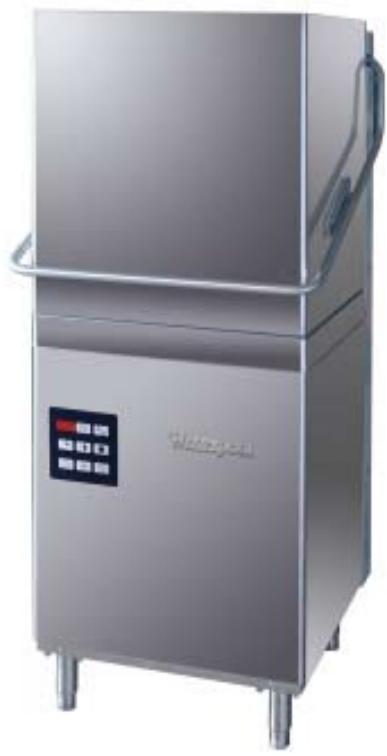
natural_image
Exterior view of a stainless steel industrial oven with control panel (no visible text or symbols)LAVASTOVIGLIE PROFESSIONALI PROFESSIONAL DISHWASHERS LAVE-VAISSELLE A USAGE COLLECTIF PROFESSIONELLER GESCHIRRSPÜLER LAVAVAJILLAS PROFESIONAL MÁQUINA DE LAVAR LOUÇA PROFISSIONAL
MANUALE D' USO ED INSTALLAZIONE MANUAL FOR USE AND INSTALLATION MANUEL D' EMPLOI ET MISE EN PLACE GEBRAUCHSANWEISUNG UND INSTALLATION MANUAL DE INSTALACIÓN DE USO MANUAL DE INSTALAÇO USO
MODELS - MODELES - MODELLE - MODELLI - MODELOS
| AGB 669/WP | AGB666/WP |
| AGB669/DP | AGB666/DP |
| AGB672/WP | AGB670/WP |
| AGB664/WP | AGB670/DP |
natural_image
Diagram of two electrical components with directional arrows indicating current flow, no text or symbols present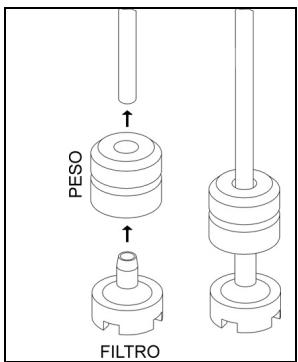
natural_image
Two technical illustrations of cylindrical storage units in different material layouts (no text or symbols)Bicchieri
natural_image
Isometric technical line drawing of a mechanical assembly with no visible text or symbols1 Safety and usage instructions
2 Technical characteristics
3 Installation and positioning
4 INSTALLER - TECHNICAL ASSISTANT INSTRUCTIONS
5 First startup
6 Settings
7 Screen-displayed anomalies (technical)
8 USER INSTRUCTIONS
9 Program selection
10 Maintenance and cleaning
11 Problems and anomalies (user)
12 Screen-displayed anomalies (user)
Thank you for having chosen this product.
We recommend that you read all of the instructions contained in the manual attentively in order to become familiar with the most suitable conditions for the correct use of the dishwasher.
TECHNICAL INSTRUCTIONS:
Are intended for qualified personnel who will perform the installation, the setup, the testing and eventual assistance operations.
USER INSTRUCTIONS:
Indicate the recommended usage, the command descriptions and the proper cleaning and maintenance operations for the dishwasher.
1 Safety and usage instructions

THIS MANUAL CONSTITUTES AN INTEGRAL PART OF THE DISHWASHER; IT MUST NECESSARILY BE STORED INTEGRAL AND TOGETHER WITH THE APPARATUS.

THE POSITIONING, CONNECTIONS, SETUP AND TROUBLESHOOTING, AND THE SUBSTITUTION OF THE POWER CABLE MUST BE PERFORMED BY QUALIFIED PERSONNEL.
THE DISHWASHER IS INTENDED EXCLUSIVELY FOR PROFESSIONAL USE AND MUST BE USED BY COMPETENT PERSONNEL. IT IS DESIGNED TO WASH DISHES (PLATES, CUPS, BOWLS, BAKING PANS, SILVERWARE) AND SIMILAR ITEMS FROM THE GASTRONOMY AND THE COLLECTIVE RESTAURANT INDUSTRIES. IT CONFORMS TO THE INTERNATIONAL ELECTRIC AND MECHANICAL SAFETY NORMS (CEI-EN-IEC 60335-2-58/61770) AND ELECTROMAGNETIC COMPATIBILITY NORMS (CEI-IEC-EN 55014-1/-2, 61000-3;4, 50366).
THE MANUFACTURER DECLINES ANY RESPONSABILITY FOR DAMAGE TO PERSONS OR THINGS CAUSED BY NON-OBSERVANCE OF THE INSTRUCTIONS PRESENT IN THE MANUAL, BY INCORRECT USE, BY TAMPERING EVEN WITH A SINGLE PART OF THE APPARATUS AND BY USE OF NON-ORIGINAL REPLACEMENT PARTS.

THE ELECTRICAL GROUNDING OF THE APPARATUS ACCORDING TO THE METHODS PRESCRIBED BY THE ELECTRICAL SYSTEM'S SAFETY NORMS IS OBBLIGATORY.
THIS APPARATUS IS MARKED IN CONFORMITY TO THE EUROPEAN DIRECTIVE 2002/96/EC, WASTE ELECTRICAL AND ELECTRONIC EQUIPMENT (WEE).
BY ENSURING THAT THIS PRODUCT BE DISPOSED OF IN A CORRECT MANNER, THE USER CONTRIBUTES TO THE PREVENTION OF POTENTIALLY NEGATIVE ENVIRONMENTAL AND HEALTH CONSEQUENCES.
THE SYMBOL ON THE PRODUCT, OR UPON ITS ACCOMPANYING DOCUMENTATION, INDICATES THAT THIS PRODUCT MUST NOT BE TREATED AS DOMESTIC WASTE, BUT MUST BE TAKEN TO A SUITABLE COLLECTION DEPOT FOR THE RECYCLING OF ELECTRIC AND ELECTRONIC APPARATUS. DISPOSE OF THE APPARATUS ACCORDING TO THE LOCAL WASTE DISPOSAL NORMS.
FOR MORE INFORMATION ON THE TREATMENT, RECOVERY AND RECYCLING OF THIS PRODUCT, CONTACT YOUR COMPETENT LOCAL AUTHORITY, YOUR DOMESTIC WASTE DISPOSAL SERVICE OR THE STORE IN WHICH THE PRODUCT WAS PURCHASED.

DO NOT INSERT SOLVENTS SUCH AS ALCOHOL OR TURPENTINE WHICH COULD PROVOKE EXPLOSIONS. DO NOT INSERT DISHES WITH RESIDUES OF ASH, WAX OR VARNISH.

NEVER USE THE DISHWASHER OR ITS PARTS AS A STEP-LADDER, SUPPORT OR BRACE FOR PERSONS, THINGS OR ANIMALS.
LEANING OR SITTING UPON THE DISHWASHER'S OPEN DOOR COULD CAUSE IT TO TIP, WITH CONSEQUENT PERSONAL DANGER.
DO NOT LEAVE THE DISHWASHER'S DOOR OPEN IN ORDER TO AVOID TRIPPING UPON IT.

DO NOT DRINK THE RESIDUAL WATER EVENTUALLY PRESENT IN THE DISHES OR IN THE DISHWASHER AFTER A WASH CYCLE.

THE APPARATUS IS NOT ADAPTED FOR USE BY MINORS AND PEOPLE WITH REDUCED PHYSICAL, SENSORIAL OR MENTAL CAPABILITIES WITHOUT EXPERIENCE OR FAMILIARITY WITH THE DEVICE. THE USE OF THE APPARATUS IS PERMITTED TO THESE PEOPLE ONLY UNDER THE SUPERVISION OF A PERSON IN CHARGE OF THEIR SAFETY.
2 Technical characteristics
| AGB672 AGB669 | AGB666 AGB670 | AGB664 | ||
| Voltage | V | 400V/3+N230V/1 | 400V/3+N230V/1 | 400V/3+N230V/1 |
| Frequenza | Hz | 50 | 50 | 50 |
| Total power | kW | 6,75 | 7,1 | 10,75 |
| Boiler element power | kW | 6 | 6 | 10 |
| Tank element power | kW | 3 | 3 | 3 |
| Wash pump power | kW | 0,75 | 1,1 | 0,75 |
| Water supply pressure | kPa | 200-400 | 200-400 | 200-400 |
| Water supply temperature | °C | 50 – 60 | 50 – 60 | 15 – 30 |
| Water supply hardness | °dF | 7 – 12 | 7 – 12 | 7 – 12 |
| Rinse cycle water consumption | l | 3,5 | 3,5 | 3,5 |
| Boiler capacity | l | 9 | 9 | 12 |
| Tank capacity | l | 28 | 35 | 28 |
| Standard cycle duration with water supply at 50°C | s | 60/120/180/C | 60/120/180/C | 60/120/180/C |
| Noise level | dB(A) | 67 | 67 | 67 |
| Protection rating | IPX | 4 | 4 | 4 |
| Net weight | kg | 115 | 123 | 118 |
| Power cable type | ◀HAR▶ | H05VV-F | H05VV-F | H05VV-F |
Electrical Scheme – voltage regulation
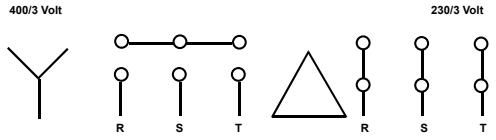 | 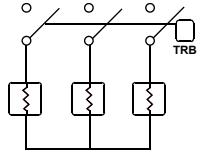 | 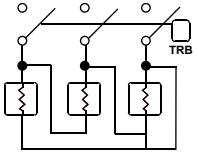 |
| 400/3 Volt | 230/3 Volt | |
| Wash Pump | Boiler Resistance | |
3 Installation and positioning
INSTALLATION and POSITIONING
Bring the dishwasher to its installation location, remove its packaging and verify the integrity of the apparatus and of the components. If damaged, written notification must be sent to the transporter.
The packaging elements (plastic bags, polystyrene foam, nails, etc) must not be left within reach of children and domestic animals as they are a potential source of danger.
All of the materials used for packaging are compatible with the environment. They may be safely preserved, or may be disposed of at an appropriate waste disposal facility.
The components in plastic material subject to eventual disposal through recycling are marked in the following manner:
PE polyethylene: external wrapping, instructions bag, protection bags.
PP polypropylene: bands.
PS polystyrene foam: protective corners, packaging cover.
The wood and cardboard components can be disposed of by respecting the norms in vigor.
When disposing of the product, avoid leaving it in the environment; its disposal must respect the norms in vigor.
All of the metallic parts are in stainless steel and are detachable.
The plastic parts are marked with the symbol of the relative material.
POSITIONING:

Warning: the internal system and the locations in which communal apparatus are to be installed, must answer to the norms in vigor.
The manufacturer declines any responsibility for direct damages to persons of things deriving from lack of respect for the said norms.
Prior to installation verify that objects and materials which could be damaged by aqueous vapor or by spray from washing solutions are not in the vicinity, or are adequately protected.
Position the dishwasher in the desired position and remove the protective wrapping.
Level the dishwasher (with the help of a level) on its four feet, regulating them in such a way so as to guarantee stability; any alternate solution must be approved by the manufacturer.
4 INSTALLER – TECHNICAL ASSISTANT INSTRUCTIONS
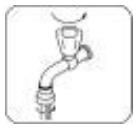
Water and drain connection:
The water tubes and the electrical power cable stick out from the back of the machine. Connect the water supply tube to a 34 " threaded gas outlet.
Use only new tubes for the connection to the water supply; old or used tubes must not be utilized.
The dynamic supply pressure must be between 2 and 4 bar; if the pressure is higher, a pressure reducer must be installed.
It is indispensable to install a general faucet on the supply water input tubing; the faucet must be accessible after installation has been completed. Do not install the faucet behind the dishwasher.
The declared cycle durations refer to a 50^ hot water supply.
Where a cold water supply is used, the duration of the cycle could increase in relation to the input water temperature since the dishwasher is equipped with a constant temperature and pressure rinse system.
Drain:
Every dishwasher comes equipped with a drain connection tube; this is prescribed to be at floor level, with a trap drain.

Caution: make sure that the supply and drain tubes are not bent, restricted or crushed after installation.

4.1 Electrical connection
The dishwasher's electrical connection and that of eventual supplementary apparatus is to be entrusted to authorized and qualified personnel, with respect to the norms in vigor; observe also the technical regulations for the connections.
The total power installed is given upon the apparatus' technical data label.
Other apparatus must not be protected along with the dishwasher.
The user must provide for the installation, according to the norms in vigor, of a main electrical power switch and of a differential switch compatible with the machine's characteristics.
These switches must be installed near the dishwasher, be easily accessible after installation and guarantee complete disconnection from the electrical supply in category III overvoltage conditions.

Caution!!!
The dishwasher is free of electrical current only when the main switch is off.
- Connect the apparatus to the usage equalizer. The ▼ clamp for the connection is located at the lower back of the machine.
- The protection conductor (PE) is yellow-green in color, the neutral conductor (N) is blue and the phase conductors (L1, L2, L3) are black, gray and brown.
5 FIRST STARTUP
FIRST STARTUP
The electrical protection system must be subjected to a functional test before use. The installation must be performed and/or verified by the authorized reseller who will be responsible for the first startup and the instructions relative to the dishwasher's operation.
PREPARATION FOR USE
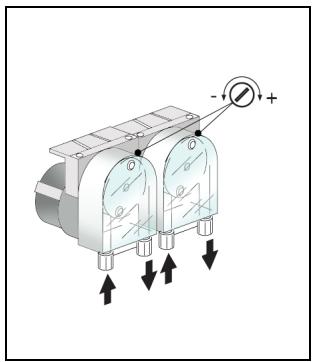
Important:
The rinse-aid metering unit comes equipped in all models while the detergent metering unit comes equipped in only some models.
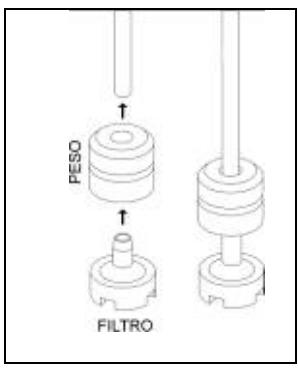
If both metering units are present position the external detergent and rinse-aid containers and insert their respective suction tubes located at the back of the machine.
Red tube: detergent
Transparent tube: rinse-aid
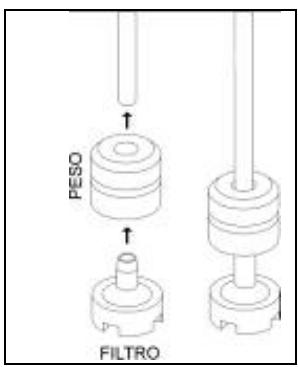
Before inserting the tubes in the containers apply the weight (necessary to keep the tube at the bottom of the container) and the filter as indicated in the diagram.
natural_image
Diagram of a dual-chamber electrical meter with directional arrows indicating current flow (no text or symbols)
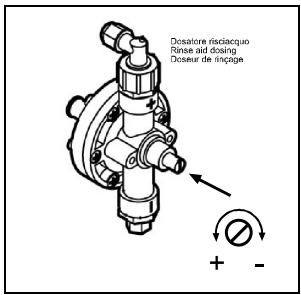
For adjustments, use the adjustment screws indicated in the diagram. It is recommended that adjustments be performed by personnel from the companies who have supplied the detergent products.
If the detergent metering unit did not come pre-installed it can be installed at a later time by ordering the relative KIT.
Alternatively, an external metering unit can be connected by means of an electrical connection with a 2x0.5 mm type H05 RN-F cable. This cable must be inserted through the passage indicated in the TECHNICAL CHARACTERISTICS scheme and connected in accordance with the electrical scheme furnished with the dishwasher.
The metering unit must be of 230V/50Hz with a maximum absorbed power of 15W.
Connect the detergent metering unit to the dishwasher through the red tube cited above.
6 TRONIC MODEL SETTINGS ( Installer )

SETTINGS
During the first startup, arrange for the setup or the adjustment of the functions/parameters indicated hereafter:
POWER SUPPLY : 200 – 250 VAC.
POWER CONSUMED : 4 VA
OPERATIONAL TEMPERATURE: 0 / 60 °C
OPERATIONAL HUMIDITY: max 90 % without condensation
NORMS: The control unit is designed and manufactured in observance of the
European norms in vigor regarding electrical safety and electromagnetic compatibility.
Particularly the following:
EN 61000-6-3 : Emissions for residential and commercial environments
EN 61000-6-2 : Immunity for industrial environments
EN 61000-4-11 : Immunity to supply micro-interruptions
EN 60335-1 : Low voltage safety directive
ZERO CROSSING : The relay which powers the tank's electrical resistance is equipped with the “ zero crossing ” function which synchronizes the switching of this relay, both in closing and in opening, with the voltage supply’s passing to zero, both for 50 Hz and 60 Hz frequencies. In this manner, use of the relay’s contacts is significantly reduced.
| Clamp | Connection for top-loading models |
| 1 – 2 | Control Unit Power Supply, 230 VAC |
| 3 – 4 | Boiler temperature sensor |
| 5 – 6 | Tank temperature sensor |
| 10 | Break-tank pressostat |
| 11 | Reserve input |
| 12 | Micro hood |
| 13 | Tank pressostat, closed over level |
| 14 | Common inputs |
| 15 | Boiler resistance remote control switch coil |
| 16 | Tank resistance, max. 10 Amp. |
| 17 | - |
| 18 | - |
| 18 B.TANK | Rinse pump (machine type 4) |
| 19 | Wash pump (max. 1 HP) |
| 20 | Rinse electrovalve + pressure increase pump |
| 21 | Drain pump (max. 0.75 HP) Optional |
| 22 | Output power supplies, 230 VAC phase |
| Parameter | Description | Range | Preset |
| P0 | Drain cycle time | 1-5' | 1 |
| P1 | Boiler temperature | 60-95°C | 82°C |
| P2 | Tank temperature | 40-65°C | 55°C |
| P3 | Rinse duration | 10-40" | 13" |
| P4 | Boiler stop option | YES/NO | 0 NO |
| P5 | Machine type1 = brief, continuous wash (maximum 10')2 = brief, medium, long, continuous wash (maximum 10')3 = brief and medium wash set to 14 = break tank, medium, long and continuous wash with this configuration the cold rinse option must be set to “0”5 = with three wash cycles without break tank for top-loading6 = with three wash cycles with break tank for top-loading | ||
| P6 | Drain with overflow option | YES/NO | 0 NO |
| P7 | Cold rinse option | YES/NO | 0 NO |
| P8 | Regeneration option | YES/NO | 0 NO |
| P9 | Maximum water load duration | 1-10' | 10 |
To access the factory menu the following procedure must be followed:
1) Shut the machine off with the button
2) Within 6 seconds of machine shutdown press the button 7 times At the end of the 6 seconds, the message "P0" will appear on the screen.
3) Select the parameter to modify with the ∞ ○ button
4) Press the button to view the selected parameter on the display
5) Modify the parameter with the ∞ ○ button
6) Confirm the modification with the button
7) Select, in the same way, other parameters to be modified and modify them as described above 8) After having set all of the machine's parameters, press the button to exit.
7 SCREEN DISPLAYED ANOMALIES
The machine is capable of signaling a series of malfunctions on the display.
If the problem persists after having turned the machine off and then on again, act as indicated below:
| E1 | Boiler sensor malfunction | Substitute |
| E2 | Tank sensor malfunction | Substitute |
| E3 | Water loading timeout ( the water loading duration has exceeded the time set in P9 ) | Electrovalve inspection – Verify that the water faucet is open |
| E6 | Draining anomaly. At the end of the draining phase the CPU still detects water in the Tank. This may be due to: | Drain pump malfunctionDrain tube blockageTank Pressostat malfunctionDrain cycle time ( P0 ) set too low |
| E7 | 30 minute Tank timeout | Inspect the Tank and boiler thermostatsCheck for inverted sensors |
| E8 | 15 minute boiler timeout | Inspect the Tank and boiler thermostatsCheck for inverted sensors |
8 USER INSTRUCTIONS
8.1 Control panel
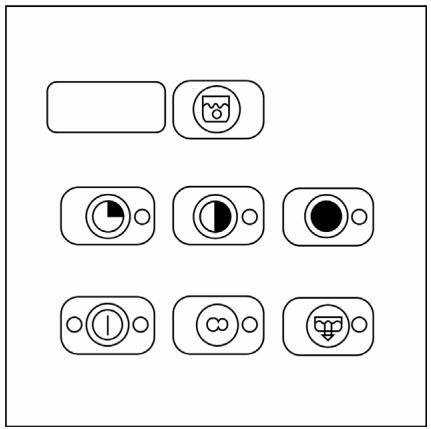
 | On Off button |
 | Tank filling symbol |
 | Boiler draining button |
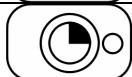 | Brief wash cycle |
 | Medium wash cycle |
 | Long wash cycle |
 | Continuous wash cycle |
| ○ | Led indicator functions: ○ off; ⚙ flashing/on |
8.2 Before washing
Use only detergents and rinse-aids for industrial dishwashers.
Do not use detergents intended for hand washing.
It is recommended to use products which were designed especially for this dishwasher.

During the loading of the tanks be careful not to switch products as this could provoke dishwasher malfunction and damage.
Do not mix different detergents together as this could damage the metering unit.
Detergents for industrial dishwashers can cause serious irritations. Take care to respect the instructions provided by the detergent manufacturer on the packaging.
| Open the water supply faucet (usage). | Verify: | Turn off the main switch (usage), “OFF” appears on the display. | |
| The levels of detergent and rinse-aid in the containers. | The correct positioning of the filters, the rotation of the sprinklers, the absence of foreign objects within the dishwasher. | ||
 |  | 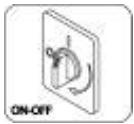 | |
8.3 FIRST DAILY USE (Tank and boiler empty)
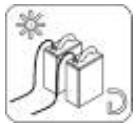
Activate the wall switch. Two small illuminated points on the display will turn on; the led indicator on the left of the switch will be lit red in order to indicate that the machine is receiving electrical current; Position the overflow and close the hood.
- Press the general power button. The led indicator to the right of the button turns green and the machine begins to fill itself. The led indicator will begin to flash. Once filling has been completed it will stop flashing and will remain a steady green
- Select the desired washing time by means of the selectors, keeping in mind that upon first use the machine is positioned automatically on a medium cycle. The green led indicator relative to the selected cycle turns on. The led indicator flashes until the end of the wash cycle, after which it turns a steady green again. To start the cycle, open the hood, insert the basket and close the hood; the selected led indicator will begin to flash and will stop flashing at the end of the completed cycle.
- The display will indicate the wash or rinse temperatures based upon the active function of the machine.
Note: if the machine came equipped with rinse delay, the wash will continue until the programmed rinse
temperature is reached, after which the cycle will terminate. After having selected the continuous cycle
the led indicator ∞ will start to flash. To interrupt the cycle press ∞ again. The rinse will begin and
the cycle will terminate once the led indicator becomes a steady green. When finished, for models with a drain pump, remove the overflow and press for 4 seconds. Drainage will begin once the led indicator turns on, and will terminate with the automatic shutdown of the machine.
9 PROGRAM SELECTION
| PROGRAM | WASH TYPEOLOGY | DURATION (*) | |
 | Glasses | Brief about 1’ 15” | |
 | Glasses, cups, very dirty plates | Medium about 2’ | |
 | Silverware and very dirty plates | Long about 3’ | |
 | Particularly dirty dishes | Continuous from 0 to 10’ | |
(*)The cycle durations indicated above are based upon a tri-phase connection with a 50°C hot water supply.
Where a cold water supply is used, the duration of the cycle could increase in relation to the input water temperature.
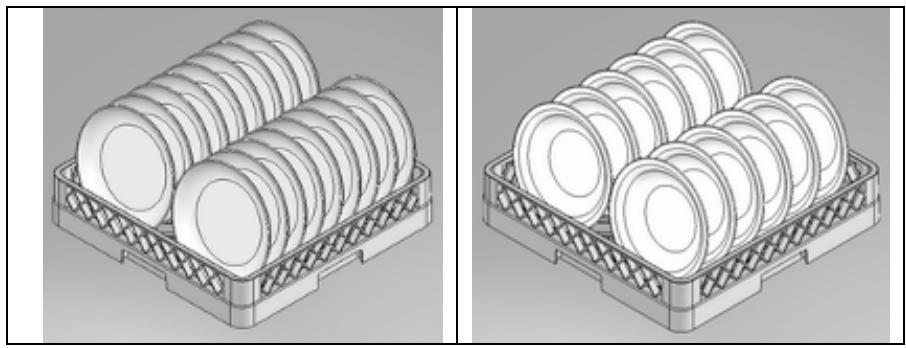
DISH LOADING
Plates
The basket can contain
12 bowls or 18 flat plates.
Remove solid residues from the dishes (bones, peels, cores, etc.); before washing, let dishes with residues of dried-on cheese, egg..... etc. soak in cold water.
natural_image
Two technical illustrations of cylindrical storage compartments in different material layouts (no text or symbols)Glasses
Cups should be positioned upside down.
Silverware
Use the appropriate basket(s). It is preferable to arrange large amounts of silverware with the handles facing down, taking care to avoid injury from fork prongs and knife blades.
Total drainage at the end of the day
When all washing operations have been completed, do the following:
- turn the main switch to the "OFF" position;
- turn off the main wall switch;
- close the water supply faucet;
- remove the overflow (the machine begins to drain) ;
- remove the filter once the machine is empty;
- wash the inside of the Tank and the filters with suitable products;
- reposition the filters and the overflow in their respective lodgings.
At the end of the working day, for models with a drain pump (optional), remove the overflow and press the drain
button 📄 for 4 seconds. Drainage will begin once the led indicator 📃 turns on and will terminate with the automatic shutdown of the machine.
The cleaning of the filters is recommended after a complete draining, as described in the previous paragraph.

Do not turn off the washing machine while the Tank is full. Always drain it first.
10 MAINTENANCE AND CLEANING
Notwithstanding that special, programmed maintenance is not required, we recommend having the dishwasher checked by a specialized technician twice a year.
Note: intentional damage or that derived from carelessness, negligence, lack of respect for the regulations, instructions and norms or erred connections are not to be considered the responsibility of the manufacturer.
10.1 Daily cleaning
The dishwasher has an IPX4 protection rating, but the use of direct streams of water for its cleaning is forbidden.
Cleaning of the filter during the day
In case of particularly heavy usage it is recommended to perform a cleaning of the filter every 30-40 wash cycles in order to maintain the machine in operative conditions; Use “partial Tank draining” in order to perform these cleanings.
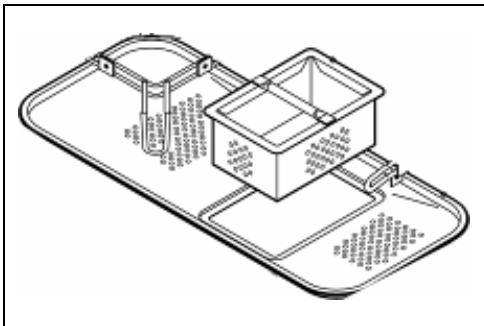
Remove the filters (it is sufficient to lift them out of their lodgings as shown in the figure), making sure that greasy residues do not fall into the opening underneath the filters. Clean away the residues and rinse the filters abundantly before correctly replacing them; Do not utilize pointy or sharp objects for cleaning.
Be sure to remove eventual hardened calcium deposits in order to avoid their accumulation;
- Clean the surfaces well and frequently with a damp rag; use neutral, non-abrasive detergents which do not contain chlorine-based substances. Corrosive products can damage stainless steel.
In order to avoid drops or vapors damaging the steel surfaces, do not even use the above-indicated products for the cleaning of the flooring beneath or around the dishwasher.
10.2 Periodic checks
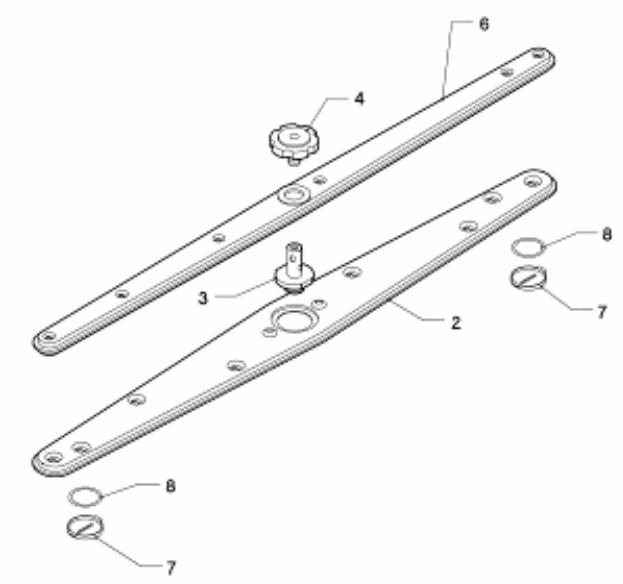
Disassemble the sprinklers (lower and upper 2-4) by removing the central screw (4); unscrew the caps at the two far ends of the rinsing sprinklers (7).
Clean the holes and the nozzles under a stream of clean water. Do not use utensils which could cause damage. Carefully reassemble the sprinklers.
Clean the outside of the machine with neutral soap and a damp cloth. Rinse and dry with care.
10.3 Prolonged disuse
If the use of the dishwasher is not foreseen for a relatively long period of time it is necessary to drain the detergent and rinse-aid dispenser in order to avoid crystallization and pump damage: Remove the suction tubes from the detergent and rinse-aid containers and emerge them in a container filled with clean water. Perform a few wash cycles and drain the machine completely.
Finally, turn off the main switch and close the water supply faucet. The detergent and rinse-aid suction tubes will be placed back in the containers when the machine is ready to be put back in use, taking care so as not to invert the tubes (red tube = detergent; transparent tube = rinse-aid).
Do not leave the device on, inactive and in disuse for long periods of time.
| PROBLEM | POSSIBLE CAUSE | POSSIBLE REMEDY |
| THE LED POWER INDICATORDOES NOT TURN ON | There is no electrical current | Verify the electrical current connection. |
| THE WASH PROGRAM DOES NOT START | The dishwasher has not finished loading | Wait for theled indicator to turn on |
| POOR WASHING RESULTS | Sprinkler wash holes are clogged or encrusted | Disassemble and clean the sprinklers (10.2 Periodic checks) |
| Detergent or rinse-aid insufficient or not adequate | Verify detergent type and quantity. | |
| Plates / glasses poorly positioned | Arrange plates / glasses accordingly. | |
| Low wash temperature | Verify the temperature shown on the display, if below 50°C call Assistance. | |
| Inadequate cycle setting | Increase the duration of the wash cycle, particularly if dishes are very dirty or contain partially dried residues. | |
| RINSE INSUFFICIENT | Sprinkler nozzles clogged Calcium encrustations in the boiler | Verify the cleanliness of the nozzles and the correct function of any installed water softeners. |
| GLASSES AND SILVERWARE ARE STAINED | Rinse-aid inadequate or not dispensed correctly.Water is of a hardness level above 12°dF or contains many dissolved salts | Verify the rinse-aid container and ensure its adequacy for use with the water supply. If the problem persists contact assistance. |
| WATER IS PRESENT IN THE TANK AFTER DRAINING | Drainage tube is positioned poorly or is partially blocked | Verify that the dishwasher's tube and drain are not blocked and that the drain is not in too high of a position; see the connection diagram. |
12 SCREEN DISPLAYED ANOMALIES (USER)
After having turned the machine off and on again, if the problem persists communicate the type of error displayed on the screen to technical assistance:
| E1 | Boiler sensor malfunction |
| E2 | Tank sensor malfunction |
| E3 | Water loading timeout ( the water loading duration has exceeded the time set in P9 ) |
| E6 | Draining anomaly. At the end of the draining phase the CPU still detects water in the Tank. This may be due to: Drain pump malfunction, Drain tube blockage, Tank Pressostat malfunction, Drain cycle time set too low |
| E7 | 30 minute Tank timeout |
| E8 | 15 minute boiler timeout |
natural_image
Two technical illustrations of cylindrical storage compartments in different material layouts (no text or symbols)Verres
natural_image
Diagram of two electronic components with directional arrows indicating movement or force, no text or symbols present.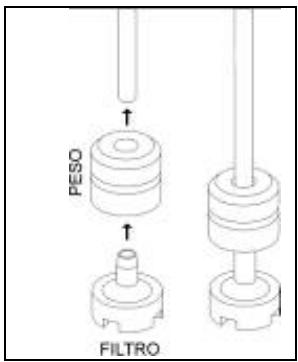
natural_image
Two technical illustrations of cylindrical storage compartments in a meshed plastic tray (no text or symbols)Gläser
natural_image
Diagram of two electronic components with directional arrows indicating flow or movement (no text or symbols)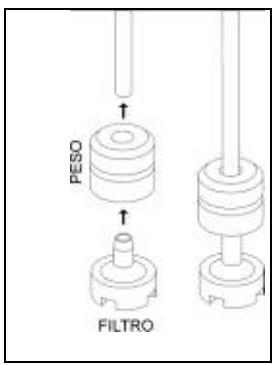
natural_image
Two technical illustrations of cylindrical storage units in different material compartments (no text or symbols visible)Vasos