
F60CONXT - Oven BERTAZZONI - Free user manual and instructions
Find the device manual for free F60CONXT BERTAZZONI in PDF.
| Brand | Bertazzoni |
| Model | F60CONXT |
| Category | Built-in oven |
| Range | Design (F60 CON XT) |
| Control type | Touch and rotary selectors |
| Display | LCD screen |
| Cooking modes | Convection, Baking, Turbo, Grill, Convection grill, Defrost, Dehydrate, Dough rising, Reheat, Assistant, Slow cooking, Sabbath mode |
| Cooking assistant | Yes (XT models) |
| Temperature probe | Yes (XT models) |
| Timer | Yes, up to 10 hours |
| Programming | Delayed start and automatic end of cooking |
| Lighting | Touch control |
| Power supply | Electric |
| Cleaning | Manual, regular cleaning recommended |
| Safety | Automatic stop at end of cooking, auto standby |
| Sabbath mode | Yes |
| Installation type | Built-in |
| Cabinet fixing | Yes |
| Rack and tray | Included |
Frequently Asked Questions - F60CONXT BERTAZZONI
User questions about F60CONXT BERTAZZONI
0 question about this device. Answer the ones you know or ask your own.
Ask a new question about this device
Download the instructions for your Oven in PDF format for free! Find your manual F60CONXT - BERTAZZONI and take your electronic device back in hand. On this page are published all the documents necessary for the use of your device. F60CONXT by BERTAZZONI.
USER MANUAL F60CONXT BERTAZZONI
Dear new owner of a Bertazzoni product,
Our company brings to homeowners around the world beautiful, high-performance kitchen appliances, which make their dreams come true.
We marry the finest Italian craftsmanship with technical precision using state-of-the-art manufacturing, which give our customers peace of mind.
Our brand elevates food - preparing it, sharing it, enjoying it - to a new dimension where taste, fun, and lifestyle - the values of our land - come together.
We have built this company with the unique passion and dedication of family entrepreneurship. Our fathers handed it to us. Our children will inherit it. It's in our minds, our hearts, our soul.
Since 1882 our name is on the products we build. We are proud – and at the same time humbled – by our heritage. This company is Bertazzoni. We are Bertazzoni. And we vow to continue building this great enterprise into the future.
DALLA SCRIVANIA DEL PRESIDENTE
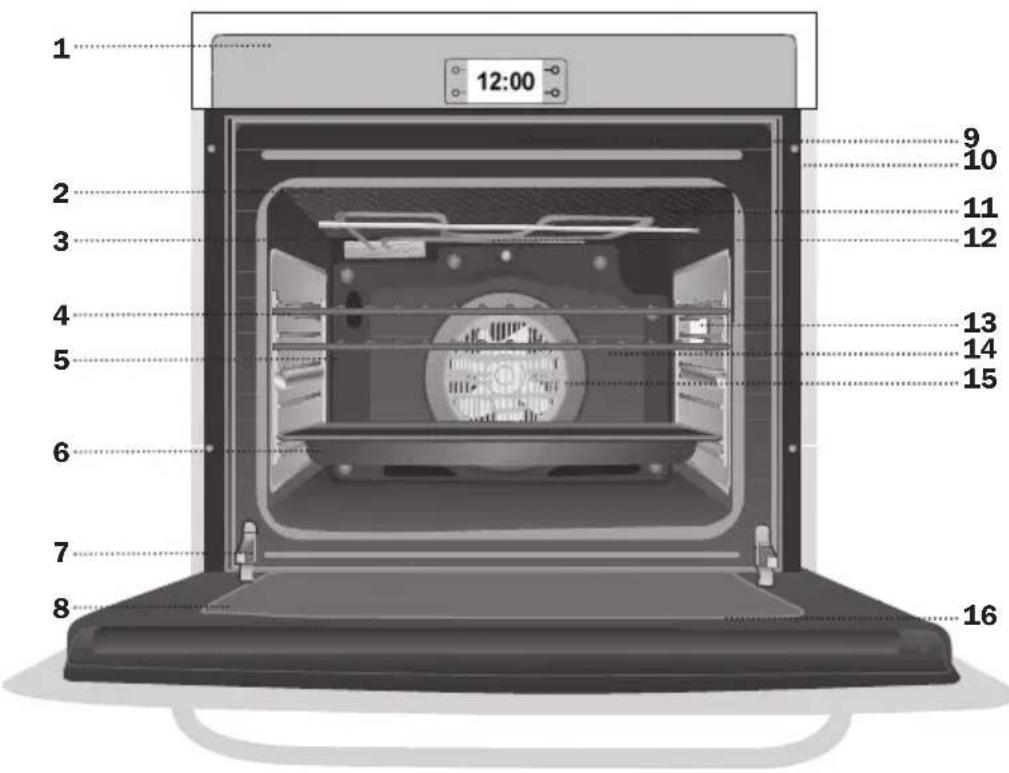
A Aree touch control
B Display LCD
A Touch control areas
B LCD Display
C Temperature knob
D Cooking modes knob

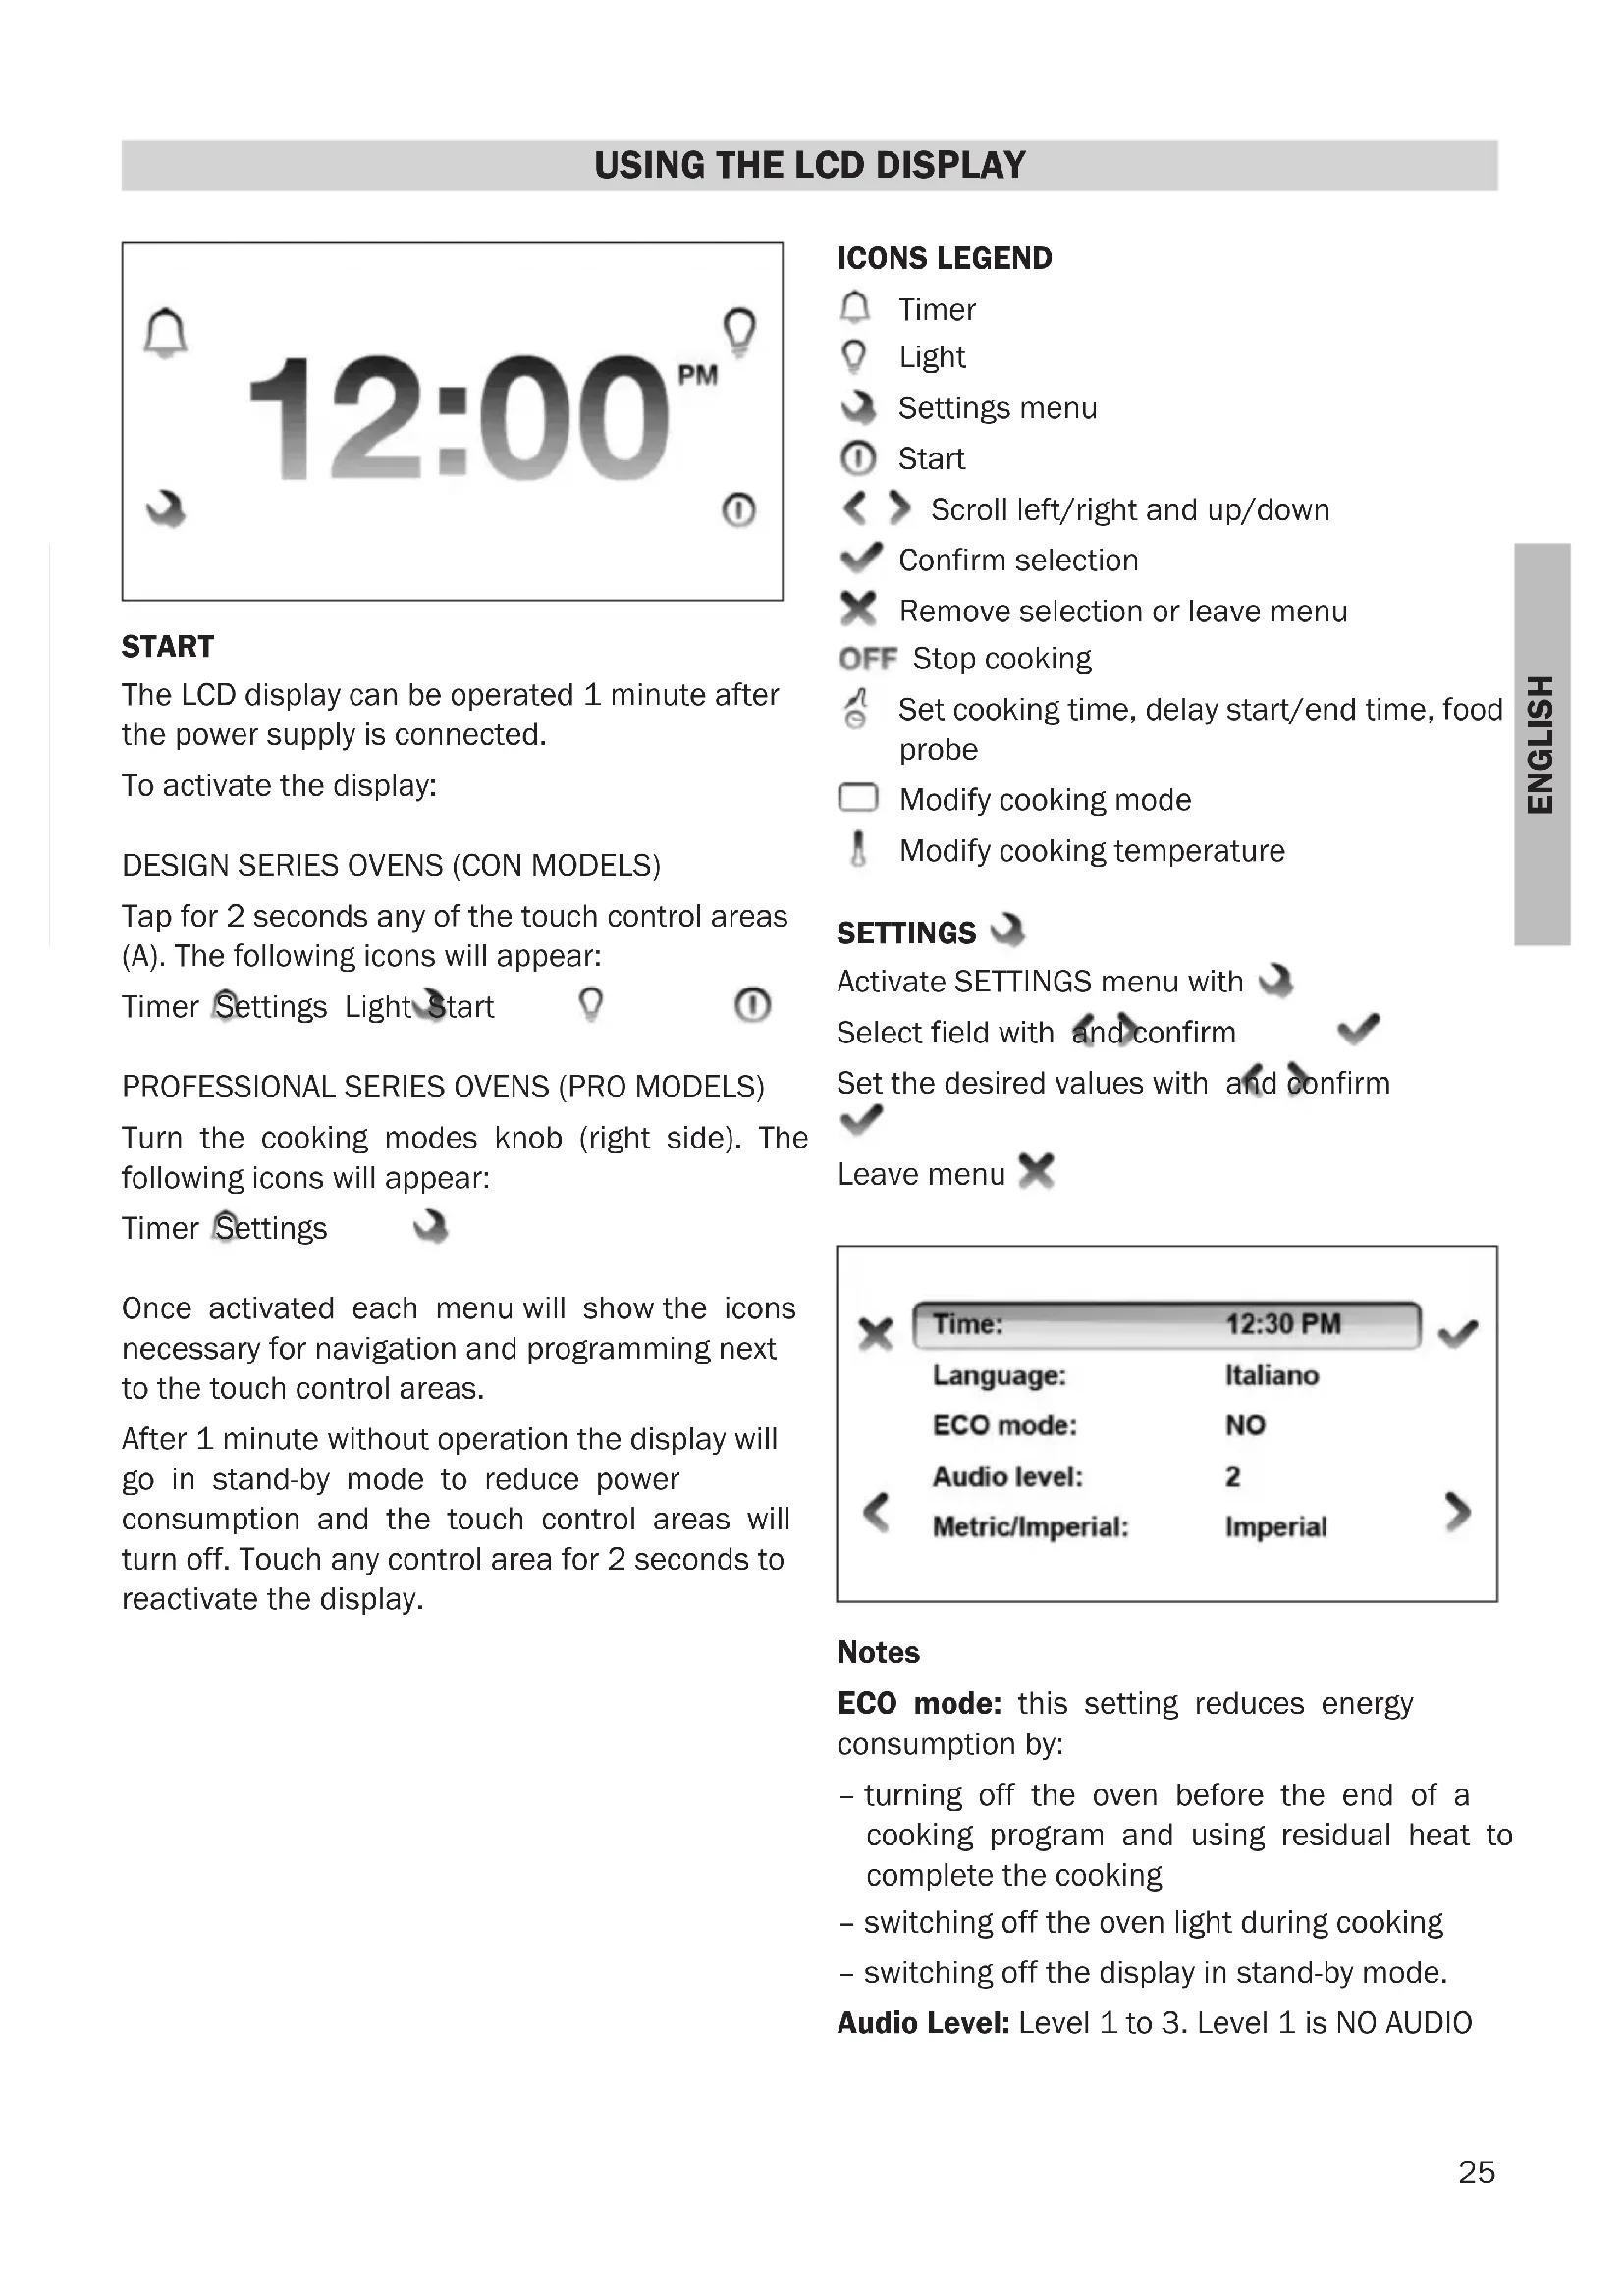
START
The LCD display can be operated 1 minute after the power supply is connected.
To activate the display:
DESIGN SERIES OVENS (CON MODELS)
Tap for 2 seconds any of the touch control areas (A). The following icons will appear:
Timer Settings Light Start

PROFESSIONAL SERIES OVENS (PRO MODELS)
Turn the cooking modes knob (right side). The following icons will appear:
Timer Settings

Once activated each menu will show the icons necessary for navigation and programming next to the touch control areas.
After 1 minute without operation the display will go in stand-by mode to reduce power consumption and the touch control areas will turn off. Touch any control area for 2 seconds to reactivate the display.
ICONS LEGEND
Timer
Light
Settings menu
0 Start
< > Scroll left/right and up/down
Confirm selection
× Remove selection or leave menu
OFF Stop cooking
Set cooking time, delay start/end time, food probe
Modify cooking mode
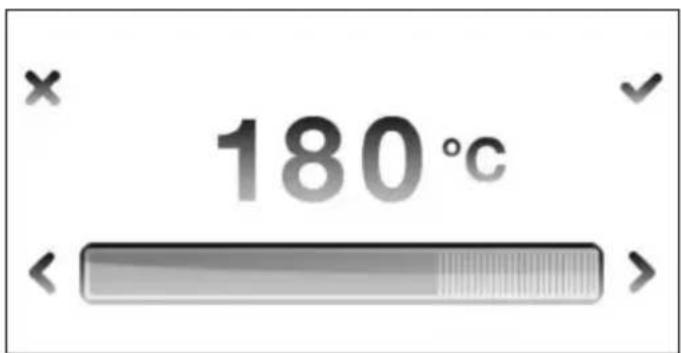
Modify cooking temperature
SETTINGS
Activate SETTINGS menu with
Select field with and confirm
Set the desired values with and confirm
Leave menu
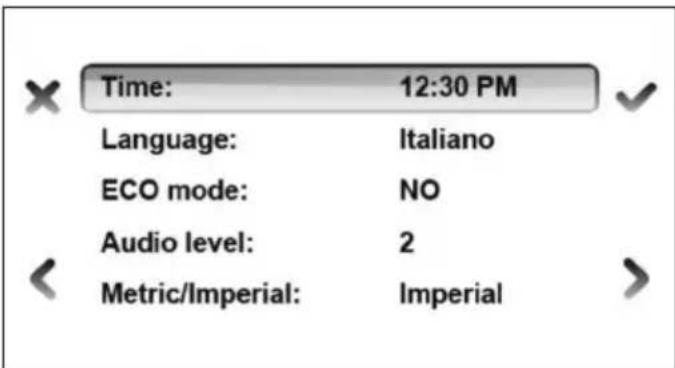
Notes
ECO mode: this setting reduces energy consumption by:
turning off the oven before the end of a cooking program and using residual heat to complete the cooking
- switching off the oven light during cooking
- switching off the display in stand-by mode.
Audio Level: Level 1 to 3. Level 1 is NO AUDIO
Metric /Imperial
Metric: Celsius/Kg/24 hour clock
Imperial:Farenheit/Lbs/12 hour clock
SHOW ROOM mode: this option is for showroom demonstration. In showroom mode the heating elements are not activated. Never use this at home.
TIMER
Activate TIMER with
Set desired time (max 10 hours) with and confirm
Leave menu
Note
The timer can be used independently from cooking.
The display will show the countdown. A tone sound will be heard at the end of the countdown. To stop sound at the end of the countdown tap any touch control areas. To modify the timer enter this menu again.
LIGHT
Turn the oven light on and off by tapping this icon.
Note: this function is not available in the PRO series ovens.
BASIC OPERATION - DESIGN SERIES MODELS (F60 CON XT)
START
Activate the oven by touching any control area for 2 seconds.
Start programming with ①
Select COOKING MODES and confirm

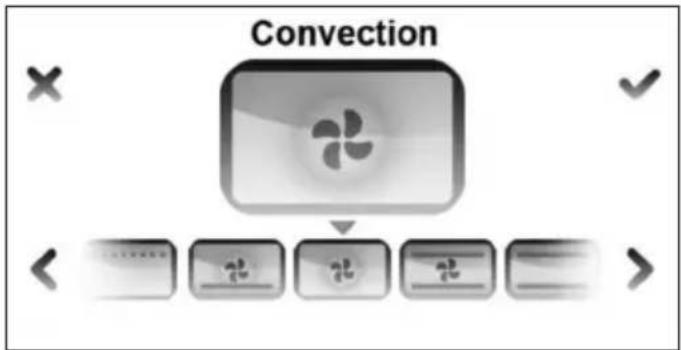
Set desired COOKING TEMPERATURE and confirm
The oven will start PRE-HEATING in a few seconds showing the progress in the display. The end of pre-heating will be confirmed with a tone. Place the food in the oven when the desired temperature has been reached.
Note
The preheating bar is not shown in broil, convection broil, dehydrate, defrost, warming and proofing modes.

MODIFY/STOP
Modify COOKING MODE during cooking with Modify COOKING TEMPERATURE during cooking with
STOP cooking with and confirm

START
Activate the oven by turning the COOKING MODE knob (right)
Select COOKING MODE by turning the right knob Select COOKING TEMPERATURE by turning the temperature left knob
The oven will start PRE-HEATING in a few second showing the progress in the display. The end of pre-heating will be confirmed with a tone. Place the food in the oven when the desired temperature has been reached.
Note
The preheating bar is not shown-in broil, convection broil, dehydrate, defrost, warming and proofing modes.
In order to shorten the heat-up time the preheating is always done with turbo mode
Each cooking mode has a default optimum temperature that appears as soon the cooking mode is selected
MODIFY/STOP
Modify COOKING MODE during cooking by turning the cooking mode knob
Modify COOKING TEMPERATURE during cooking by turning the temperature knob
Stop cooking by turning the function knob in the OFF position
TIME MANAGEMENT MENU - TIMER, DELAY/END COOKING, FOOD PROBE
START
After programming the oven for cooking, touch or to enter the time management menu.

SET TIMER
This function is simply a minute minder: the timer can be used independently from cooking and it will not turn off the oven at the end of the set time. For the oven to shut off automatically, select END OF COOKING (see below).
Activate the TIMER
Set the desired duration (max 10 hours) and confirm
Leave menu
The display will show the countdown. The end of the countdown will be confirmed with a repeating tone. Tap any touch control area to stop tone.
Important!
COOKING WILL NOT STOP AT THE END OF THE COUNTDOWN. TURN THE OVEN OFF MANUALLY AND REMOVE FOOD FROM OVEN TO AVOID OVERCOOKING.
END OF COOKING
The oven will automatically turn off after the set cooking time has elapsed.
Activate END OF COOKING
Set the desired duration (max 10 hours) and confirm
Leave menu
The display will show the countdown. The oven will turn off at the end of the countdown and the display will show END OF COOKING - BUON APPETITO! The end of the countdown will be confirmed with a repeating tone. Touch any touch control area to stop tone.
MODIFY/CANCEL
Activate end of cooking menu and modify the time value.
Set time to 0:00 to cancel
Note
Cooking time is calculated from the end of preheating. During preheating the end of cooking time is not shown in the display.
It is not possible to set end of cooking when using the food probe. If a food probe temperature is set, the end of cooking will be deleted.
DELAY START
The oven will start at a desired time.
Activate DELAY START Delay
Set desired time before oven will turn on < > and confirm
Leave menu
The display will show the countdown. The oven will turn on at the end of a count down. The end of the countdown will be confirmed with a repeating tone.
Note
DELAY START can be combined with the END OF COOKING.
FOOD PROBE
The food probe is only available on XT models.
The food probe monitors the core temperature of the food during cooking and turns off the oven when the desired temperature is reached. It can be used ONLY with the following cooking modes:
Convection
Bake
Convection bake
Turbo
Broil
Convection Broil
Insert the food probe in the item to be cooked.
For best results, insert the probe as close as possible to the center of the item and make sure it is not in contact with bones or fat. Improper placement of the probe could shut the oven off too early and result in uncooked food. With poultry, make sure the probe does not rest in a cavity.
Activate
Select the desired food temperature with < > and confirm
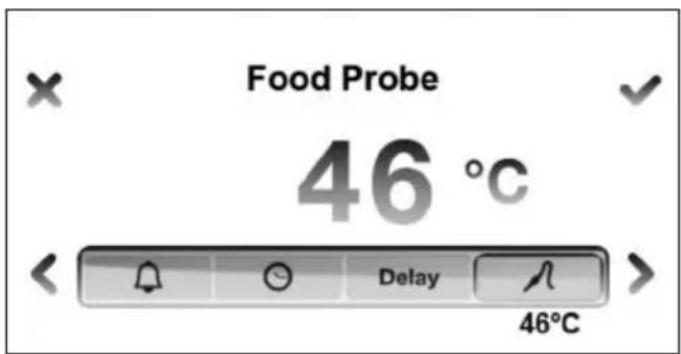
After the preheating sequence is completed, the display will show the message INSERT FOOD PROBE. CONTINUE?

Connect the probe jack to the port located in the upper left side of the oven cavity. Place the food in the oven and confirm
The display will show the set temperature and the actual temperature measured by the probe. The oven will turn off when the desired food temperature is reached. The display will show END OF COOKING - BUON APPETITO! End of cooking will be confirmed with a tone. To stop tone tap any touch control area.
Note
Food probe temperature can be selected at any time while cooking.
If the probe jack is not inserted in its port, a message will appear on the display requiring confirmation of the probe insertion. Cooking will stop if the probe is not inserted. Select NO on the confirmation screen to continue cooking without probe.
Important
DO NOT LEAVE THE PROBE IN THE OVEN CAVITY WHEN NOT IN USE.
| MODE DETAILS USE FOR/TIPS | ||
| BAKE Bake and b | oil elements ON Convection OFF Temperature 37°C - 260°C Use lower 2 shelf levels. | Soufflés Meringues Angel food cakes Cream puffs Cookies Cakes Cheesecakes, Pies Quiches Baked potatoes |
| CONVECTION BAKE | Bake element ON at full power Broil element ON at moderate power Convection fan ON Temperature 37°C - 260°C Use several levels at the same time. NOTE: As a general rule, the temperature of a recipe not designed for baking in a convection oven should be lowered by 20F (15C) | Cookies Cakes Breads Rising dough Cheesecake Pies Quiches Baked potatoes Casseroles |
| CONVECTION Con | vection fan and convection element ON Use several levels at the same time. Temperature 37°C - 260°C NOTE: As a general rule, the temperature of a recipe not designed for baking in a convection oven should be lowered by (15 °C.) | Gentle cooking of pastries, soufflés and cakes. At higher temperature use also for roasting meats and poultry. |
| TURBO Bake elem | ent ON at full power Convection element and fan ON at full power Temperature 37°C - 260°C Use shelf levels 2 and 3 | Uniform cooking with strong heat from the bottom of pizza, focaccia and bread. |
| BROIL Broil element | 4 power settings - LOW (1) to HIGH (4)The element is heated for the first 3 minutes at maximum power and then the power is reduced according to the selected power setting. | Brown food on the top side only. Turn food over if browning is required on both sides. |
| CONVECTION BROIL | Broil element ONConvection fan ON4 power settings - LOW (1) to HIGH (4)The element is heated for the first 3 minutes at maximum power and then the power is reduced according to the selected power setting. | Brown food on top and bottom side.This mode is preferred for browning food that is too delicate for turning such as fish.NOTE: The degree of browning on each side might be different. |
| DEFROST/DEHYDRATE | In DEFROST mode only the fan is active to circulate air in the cavity. All heating elements are turned off.In DEHYDRATE mode the fan is on and the cavity is maintained at 37°C. | Defrost foodDehydrate food, flowers, vegetables. |
| PROOFING Bake el | element ON at low constant heat powerFan on every 5 minutes to eliminate stagnant air.Use any shelf level. | For best results, place dough in bowl and cover with a clean towel. |
| WARMING Bake el | element at low to moderate power.Temperature 60/76/93°C preset. | Use the warming program in Sabbath mode (S.M.) during religious observance. |
The broil element operates on 4 different power levels.
The element is heated for the first 3 minutes at maximum power and then the power is reduced according to different desired effects.
Level 1 produce a mild browning of the food surface
Level 4 produce an intense irradiated heat that cause a fast browning of food.
Select the power level according to the desired effect on food.
Select BROIL to brown food on the top side only. This mode requires turning food if browning is required on both sides
Select CONVECTION BROILER to brown food slightly also on the bottom side. This mode is preferred for browning food on both sides that is too delicate for turning such as fish. The degree of browning on each side might be different
TIPS FOR BEST RESULTS - BROILING AND ROASTING ADJUST TO DESIRE LEVEL OF 'DONENESS'
| FOOD | SHELF POSITION | COOKING MODE | TEMPE-RATURE | APPROXIMATE COOKING TIME | SUGGESTIONS |
| Ground beef patties, 1/2" thick | 6 Broiler | Convection Broiler | LEV 4 15 | to 20 minutes | Broil until not pink in center |
| T-Bone steak 6 Broiler | Convection Broiler | LEV 4 12 | to 20 minutes | Broil until done to desired level | |
| Flank steak 6 Broiler | Convection Broiler | LEV 4 12 | to 20 minutes | Broil until done to desired level | |
| Eye of round roast 5 Bake | 5 Bake | Convection bake | 165°C 20 | to 25 min per pound | Small roasts require longer time per pound; reduce time using Convection Bake |
| Loin roast 5 Bake | Convection bake | 165°C 20 | to 25 min per pound | Cook until juices are clear | |
| Boneless skinless chicken breasts | 6 Broiler | Convection Broiler | LEV 3 20 | to 25 minutes | Cook until juices are clear |
| Chicken thighs 5 Broiler | Convection Broiler | LEV 3 25 | to 30 minutes | Remove skin and ook until juices are clear | |
| Half chicken 5 Broiler | Convection Broiler | LEV 4 30 | to 45 minutes | Turn with tongs and cook until juices are clear | |
| Roast chicken 4 Bake | 4 Bake | Convection bake | 175°C 75 | to 90 minutes | Reduce time using Convection Bake. Time may vary if stuffed. |
| Turkey 4 Bake or | Convection bake | 165°C 20 | to 25 min per pound | Reduce time using Convection Bake. Time may vary if stuffed. |
TIPS FOR BEST RESULTS - BAKING
CHECK PACKAGE DIRECTIONS
| FOOD PAN | TEMPE-RATURE | COOKING TIME (minutes) | LEVEL | |
| Cookies 30x38 Cookie Sheet 185° 8 to 12 2..5 | ||||
| Layer Cakes 20 or 22"Round 175° 25 to 35 | 2..5 | |||
| Sheet Cakes 22x33 Pan 175° 30 to 40 2..5 | ||||
| Bunt Cakes 30 Cup | 160° 60 to 75 2.5 | |||
| Brownies, Bar Cookies | 22x22 Pan 160° 20 to | 25 2..5 | ||
| Biscuits | 30x38 Cookie Sheet 21 5° | 10 to 15 2..5 | ||
| Quick Bread | 20x10 Loaf Pan | 175° 55 | to 70 2..5 | |
| Muffins | 12 cup Muffin Pan | 215° 14 | to 19 2..5 | |
| Fruit Pies | 22 Diameter | 215° 35 | to 45 2..5 | |
| Fruit Cobblers | 22x22 Pan | 200° | 25 to 30 | 2..5 |
| Yeast Bread | 20x10 Loaf Pan | 185° | 25 to 30 | 2..5 |
| Dinner Rolls | 22x32" Pan | 200° | 12 to 18 | 2..5 |
| Cinnamon Rolls | 22x32" Pan | 185° | 25 to 30 | 2..5 |
| Yeast Cake | 30x38 Cookie Sheet 20 0° | 20 to 30 2..5 | ||
| FOOD PREPARATION | APPROXIMATE TIME (hrs) | DONE WHEN... | |
| Apples Cut in 5mm | slices and dip in 1/4 cup lemon juice + 2 cups water solution | 11-15 Slightly pliable | |
| Bananas Cut in 5m | m slices and dip in 1/4 cup lemon juice + 2 cups water solution | 10-15 Soft, pliable | |
| Cherries Wash and | towel dry. Remove pits 10-15 Pliable | leathery, | chewy |
| Orange peels and slices | Peel and cut in 1/4" slices Peels:2-4 | Slices: 12-16 | Orange peel: dry and brittle. Orange slices: skins are dry and brittle, fruit is slightly |
| Pineapple rings Towel | dry Canned: 9-13 | Fresh: 8-12 | Soft and pliable |
| Strawberries Wash | and towel dry. Cut in 1cm slices. Place skin (outside) down on rack | 12-17 Dry, brittle | |
| Red peppers Wash | and towel dry. Remove stems, chop coarsely about 2,5cm pieces | 16-20 Leathery with no moisture inside | |
| Mushrooms Wash and | and towel dry. Cut off stem end. Cut into 2mm slices | 7-12 | Tough and leathery, dry |
| Tomatoes | Wash, drain well.and towel dry. Cut in 2mm slices. | 16-23 Dry, bick red colour | |
| Oregano, sage, parsley, thyme, fennel | Rinse and dry with paper towel | 3-5 | Crisp and brittle |
| Basil | Use basil leaves 3 to 4 inches from top. Spray with water, shake off moisture and pat dry | 3-5 | Crisp and brittle |
Available on XT models only
Developed with the help of Italian professional chef consultant Roberto Carcangiu, Bertazzoni's exclusive ASSISTANT function is a revolutionary system for upgrading oven cooking in the home. The ASSISTANT is pre-programmed with finely calibrated sets of cooking modes, temperatures and times sequences for each type of food. The system does not provide recipes - those are yours to choose from. The ASSISTANT will simply 'pilot' the oven to help you make the best of your oven recipes.
Enjoy selecting the sequences already stored in the ASSISTANT that best suit your own style of cooking and culinary taste. After you have familiarized with them, you will be able to build new sequences of your own creation and store them for future use.
The ASSISTANT is available on XT models only together with a food probe for temperature control.


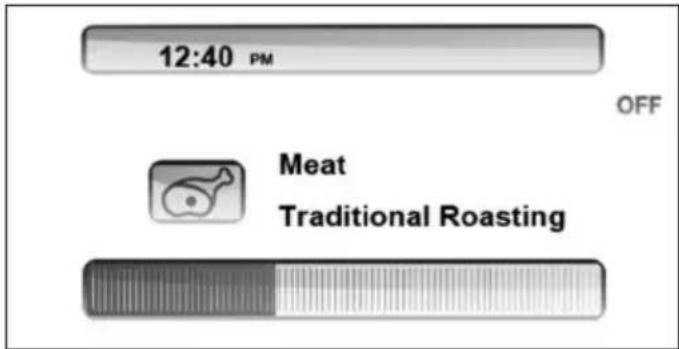
MANAGE - Selected the food type, weigh/size, type of cooking and desired finish and let the Assistant oversee the cooking until your dish is perfect.
SAVE - After you cook a perfect dish, name the cooking sequence and let the Assistant store it for future use.
RETRIEVE - Retrieve a previously stored set and let the ASSISTANT manage the oven according to the instructions you selected for that dish.

BREAD

CAKES AND PASTRY

FISH

MEAT

PASTA

PIZZA

POULTRY

VEGETABLES
START
Activate the oven by touching any control area for 2 seconds.
Start programming with ①
Select ASSISTANT with or with right
knob and confirm
Select MANAGE with and confirm
Select TYPE OF FOOD with and confirm
Selected food categories will guide you through the selection of additional parameters (e.g. for meat: weight, type of cut, food probe temperature). Follow the directions on the display, select the appropriate parameters and confirm.
The oven will begin pre-heating and signal the end of the pre-heating cycle with a tone. Insert the food in the oven only after the pre-heating is complete.
The display will show the time remaining until the end of the cooking sequence.
The oven will turn off at the end of the cooking cycle. The display will show END OF COOKING - BUON APPETITO! End of cooking will be confirmed with a tone.
Important:
COOKING WILL CONTINUE WITH RESIDUAL HEAT. REMOVE THE DISH FROM THE OVEN IMMEDIATELY TO AVOID OVERCOOKING.
FOOD PROBE
If the cooking sequence requires the use of the food probe, the display will ask you to input the desired food temperature (lower = rare, higher = well done). Once the pre-heating cycle is completed, the display will remind you to insert the food probe. Connect the food probe jack to the appropriate port in the oven cavity at the end of preheating. The cooking sequence will start only after confirmation that the food probe has been inserted.

When using the food probe, the display will show the food probe temperature (actual and target) instead of the remaining time until the end of cooking.
The oven will turn off when the food temperature measured by the probe reaches the desired level. The display will show END OF COOKING - BUON APPETITO! End of cooking will be confirmed with a tone.
Important:
COOKING WILL CONTINUE WITH RESIDUAL HEAT. REMOVE THE DISH FROM THE OVEN IMMEDIATELY TO AVOID OVERCOOKING.
STOP/MODIFY
To STOP cooking tap and confirm

It is not possible to change cooking mode, temperature or duration while cooking with the ASSISTANT function. If additional cooking is needed, operate the oven in manual mode until the desired result is obtained.
Important
Pre-programmed sequences have been calibrated for cooking food starting from room temperature. If using frozen food for a dish, defrost it before starting a sequence.
Note :
In low temp roasting mode, food is baked at a very low temperature then requiring long cooking time. Baking time can last up to 5/6 hours, according to food dimensions.
In assistant cooking mode, the time is calculated from the end of preheating. Make sure to introduce food in the oven as soon as the preheating time is finished, otherwise the cooking time can result too short.
All cooking methods refer to fresh food, except where indicated. For frozen food, refer to your standard procedure
ASSISTANT FUNCTION - OPTIONS CHART
| Food Preparation Food probe | Pre-programmed cooking time* | ||
| Meat Traditional Roasting yes | |||
| Low Temp. Roasting yes | |||
| Braising 90 min. | |||
| Slow cooking yes | |||
| Oven Fried 6 min. | |||
| Poultry Traditional Roasting yes | |||
| Slow cooking yes | |||
| Fish Traditional Roasting yes | |||
| Oven Fried 12 min. | |||
| Grilled - food temp. probe yes | |||
| Grilled - manual 7 min. | |||
| Cakes Rising pastry | dough | 35 min. | |
| Shortbread dough | 25 min. | ||
| Bread | Manual | 22 min. | |
| Food temp. probe | yes | ||
| Pizza Homemade pizza | 14 min. | ||
| Pasta | Frozen au gratin | yes | |
| Fresh au gratin | 35 min. | ||
| Vegetables | Stew / Sauté | 20 min. | |
| Grilled | 7 min. | ||
| Roasted potatoes | 50 min. |
- Time indicated excludes pre-heating
SLOW COOKING
Slow cooking allows cooking of very large pieces of meat and poultry (over 4Kg.) for several hours at a very low temperature. This cooking mode does not end when the temperature set on the food probe is reached, but the food is then continuously kept at this temperature. The temperature shown on the food probe will them continuously be adjusted once the set valve has been reached.
A manual switch off of the oven is then required. A cooking time of 12 hours is suggested. The program is automatically switched off after 24h.
CUT TYPE
| Cut type | Type of meat |
| Less tender | Beef chuck |
| Beef brisket | |
| Corned beef | |
| Short ribs | |
| Pork shoulder | |
| Lamb shank | |
| Pork blade roast | |
| Tender | Beef tenderloin |
| Prime rib | |
| Pork tenderloin | |
| Leg of lamb | |
| Chicken legs/thighs |
SAVE
The ASSISTANT stores your latest cooking sequence for future use.
Select ASSISTANT with or with right knob and confirm Select SAVE with and confirm
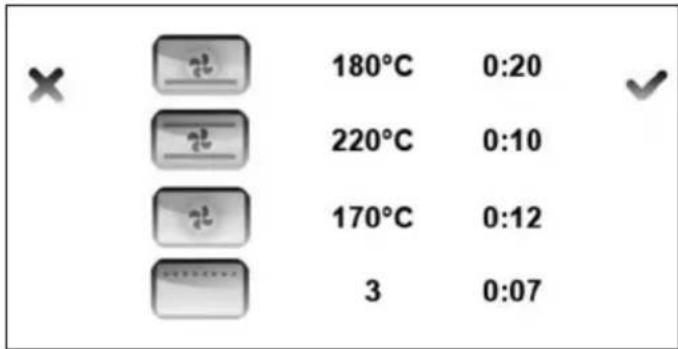
The display will show the last cooking sequence performed, indicating the set of cooking modes, temperatures and times used for the cycle.
Confirm
Select FOOD CATEGORY and confirm
Enter a name for this cooking sequence - scroll through the keyboard with and confirm each letter with
NOTE: scrolling accelerates by keeping the finger on the touch area.

Confirm with OK
Touch to leave this menu without saving the sequence.
After saving a sequence, the display will return to the main ASSISTANT menu.
Important
The memory can store up to a maximum of 32 personalized cooking sequences in addition to those pre-programmed. When the memory is full and you attempt to store another cooking sequence, a message will prompt you to delete one of the previously stored sequences.
The interface will eliminate steps that are not significant for cooking results, such as functions used for less than 1 minute.
A maximum of 4 different cooking steps (combination of function/temperature/time) can be recorded in a sequence.
RETRIEVE
To retrieve a previously stored personal sequence follow these simple steps.
Select ASSISTANT with or with right knob and confirm
Select RETRIEVE with and confirm
Select FOOD CATEGORY and confirm
Select a stored sequence and confirm
You will have the following options:
- START: will immediately start the cooking sequence.
- MODIFY: allows to modify food category and name associated to a personal cooking sequence
- DELETE: delete the selected cooking sequence. Confirmation is required.
Note:
if no cooking sequence is saved an empty menu will be displayed.
SABBATH MODE
This special program is designed for religious observances.
START
Activate the oven by touching any control area for 2 seconds.
Start programming with ①
Select WARMING with or with right knob and confirm
Select S.M. with and confirm
The oven will turn on and pre-heat until the temperature of 100^ is reached. Then, the temperature will be held constant until the oven is switched off. Opening of the door will not cause an immediate re-heating of the oven: the heating will continue according to a set procedure independent from use.
The oven lights will not turn on in Sabbath Mode even if the door is open.
MODIFY/STOP
To modify cooking mode:
-DESIGN SERIES OVEN: Scroll COOKING MODES < >
- PROFESSIONAL SERIES OVENS: use the cooking mode knob (right)
Turn off the oven with
TROUBLESHOOTING GUIDE
| OVEN PROBLEM POSSIBLE | CAUSES AND/OR REMEDY |
| Oven does not function Range | is not connected to electrical power. Ask a professional to check power circuit breaker, wiring and fuses. |
| Oven light does not work Light | bulb is burned out. Oven is not connected to power. |
| Oven is not heating Check the | circuit breaker or fuse box to your house. Make sure there is proper electrical power to the oven. Make sure the oven temperature has been selected. |
| Oven light is not working properly | Replace or reinsert the light bulb if loose or defective. |
| Oven light stays on Check for | obstruction in oven door. Check to see if hinge is bent. |
| Cannot remove light cover The | ere may be debris/spillage around the lens cover. Wipe lens cover area with a clean dry towel prior to attempting to remove the lens cover. |
Specific error messages may appear in case of malfunction. Call after sale service and provide the information that appear in the display for a quick and accurate diagnosis.
FOURS DE LA GAMME DESIGN (MODELES CON)
- DALLA SCRIVANIA DEL PRESIDENTE
- START
- ICONS LEGEND
- SETTINGS
- Notes
- Metric /Imperial
- TIMER
- Note
- LIGHT
- BASIC OPERATION - DESIGN SERIES MODELS (F60 CON XT)
- MODIFY/STOP
- TIME MANAGEMENT MENU - TIMER, DELAY/END COOKING, FOOD PROBE
- SET TIMER
- Important!
- END OF COOKING
- MODIFY/CANCEL
- DELAY START
- FOOD PROBE
- Important
- TIPS FOR BEST RESULTS - BROILING AND ROASTING ADJUST TO DESIRE LEVEL OF 'DONENESS'
- TIPS FOR BEST RESULTS - BAKING
- CHECK PACKAGE DIRECTIONS
- Available on XT models only
- Important:
- STOP/MODIFY
- Note :
- ASSISTANT FUNCTION - OPTIONS CHART
- SLOW COOKING
- CUT TYPE
- SAVE
- RETRIEVE
- Note:
- SABBATH MODE
- TROUBLESHOOTING GUIDE
Brand : BERTAZZONI
Model : F60CONXT
Category : Oven