PA4600 - Radio SCANSONIC - Free user manual and instructions
Find the device manual for free PA4600 SCANSONIC in PDF.

| Features | Details |
|---|---|
| Product type | Radio |
| Supported frequencies | FM, AM |
| Power supply | Mains and battery |
| Dimensions | Compact, ideal for home use |
| Weight | Lightweight, easy to carry |
| Additional features | Alarm clock, timer, digital display |
| Usage | Easy to use with intuitive buttons |
| Maintenance | Regular cleaning recommended, no removable parts |
| Safety | Complies with electrical safety standards |
| General information | Ideal for radio enthusiasts, good value for money |
Frequently Asked Questions - PA4600 SCANSONIC
User questions about PA4600 SCANSONIC
0 question about this device. Answer the ones you know or ask your own.
Ask a new question about this device
Download the instructions for your Radio in PDF format for free! Find your manual PA4600 - SCANSONIC and take your electronic device back in hand. On this page are published all the documents necessary for the use of your device. PA4600 by SCANSONIC.
USER MANUAL PA4600 SCANSONIC
Portable DAB+/DAB/FM Radio With Bluetooth Function
text_image
08:59™ E5 PLUS PlayingUK User Manual
DK Brugervejledning
IMPORTANT SAFETY INSTRUCTIONS
When used in the correct manner, this unit has been designed and manufactured to ensure your personal safety.
However, improper use can result in potential electrical shock or fire hazards. Please read all safety and operating instructions carefully before installation and use, and keep these instructions handy for future reference. Take special note of all warnings listed in these instructions and on the unit.
Water and Moisture
The unit should not be used near water. For example: near a bathtub, washbowl, kitchen sink, laundry tub, swimming pool or in a set basement.
Ventilation
The unit should be situated so that its location or position does not interfere with its proper ventilation. For example, it should not be situated on a bed, sofa, rug or similar surface that may block the ventilation openings. Also, it should not be placed in a built-in installation, such as a bookcase or cabinet, which may impede the flow of air through the ventilation openings.
Heat
The unit should be situated away from heat sources such as radiators, heat registers, stoves or other appliances (including amplifiers) that produce heat.
Power Source
The unit should be connected to a power supply only of the type described in the operating instructions or as marked on the appliance.
Cleaning
The unit should be cleaned only as recommended.
Care should be taken so that objects do not fall and liquids are not spilled into any openings or vents located on the product.
Lightning and Power Surge Protection
Unplug the unit from the wall outlet. This will prevent damage to the product due to lightning and power-line surges.
Overloading
Do not overload wall outlets, extension cords, or integral convenience receptacles as this can result in a risk of fire of electric shock.
Damage Requiring Service
This unit should be serviced by qualified service personnel when:
Objects have fallen into or liquid has been spilled into the enclosure.
The unit has been exposed to rain.
The unit has been dropped or the enclosure damaged.
The unit exhibits a marked change in performance or does not operate normally.
Periods of Non-use
If the unit is to be left unused for an intended period of time, such as a week or longer, the power adaptor should be unplugged from the unit to prevent damage or corrosion.
Servicing
The user should not attempt to service the unit beyond those methods described in the user's operating instructions.
Service methods not covered in the operating instructions should be referred to qualified service personnel.
WARNING:
1) The mains plug of adapter is used as disconnect device, the adapter shall remain readily operable.
2) Batteries shall not be exposed to excessive heat such as sunshine, fire or the like.
3) To reduce the risk of fire or electric shock, do not expose this apparatus to rain or moisture. The apparatus shall not be exposed to dripping or splashing and that objects filled with liquids, such as vases, shall not be placed on apparatus.
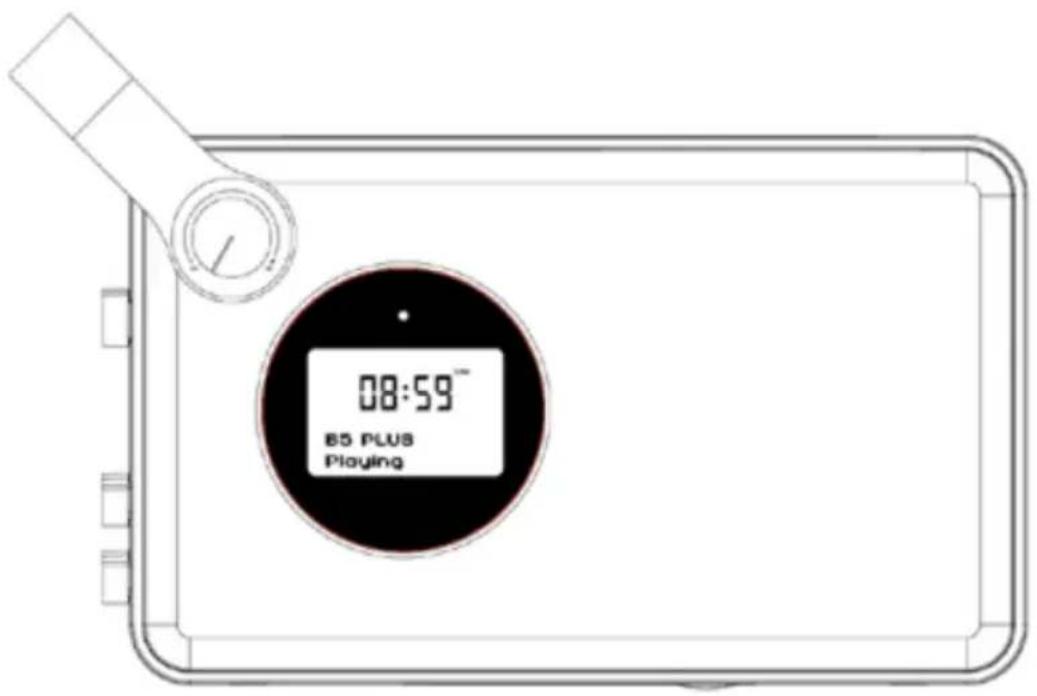
LOCATION OF CONTROLS
FRONT VIEW

text_image
08:59" 83 PLUS PlakjingTOP VIEW

text_image
7 8 9 10 11 12 13 14- POWER ON/OFF Switch
- BACK-LIGHT ON/OFF Switch
- FUNCTION Selector
- VOLUME Knob
- Battery charging indicator
- LCD Display
-
▶||/OK/STANDBY Button
-
During power on, press and hold this button for 3 seconds to switch the unit to Standby mode.
- In Standby mode, press and hold this button for 3 seconds to switch the unit on.
- To select current option or enter current menu/submenu.
• In Bluetooth mode:
- To play/pause current playback.
- When receiving an incoming call on your cell phone, tap this button once to answer the phone, tap this button again to end the call.
- < Button
- To scroll through a Menu or DAB station list.
- In FM mode:
- Short press this button to manually search through the station from current frequency toward the lower frequency.
- Press and hold this button to search through the lower station frequency with strong signal and stop on the first station signal it finds automatically.
- In Bluetooth mode: to return to the beginning of current track or skip to the previous track
-
Button
- To scroll through a Menu or DAB station list.
- In FM mode:
- Short press this button to manually search through the station from current frequency toward the higher frequency.
- Press and hold this button to search through the higher station frequency with strong signal and stop on the first station signal it finds automatically.
• In Bluetooth mode: to skip to the next track
- MENU Button
- Press this button to show menu for the current mode, press it again to show Now Playing screen.
- INFO Button
- In DAB/FM mode: Cycle through further information screens.
- PRESET/PAIR Button
• In DAB/FM mode:
- Short press this button to enter the radio station presets recalling mode.
- Press and hold this button to enter the radio station storing mode.
• In Bluetooth mode:
- Press and hold this button for 3 seconds to break the current connection and initiate pairing.
- ALARM/SNOOZE/DIM Button
- Press & hold this button during any operating mode to set the alarms.
- To activate the snooze function when the alarm is activated.
- When the back-light is on, short press this button to adjust the brightness level (Bright or Dim).
14. Built-in Microphone
BACK VIEW
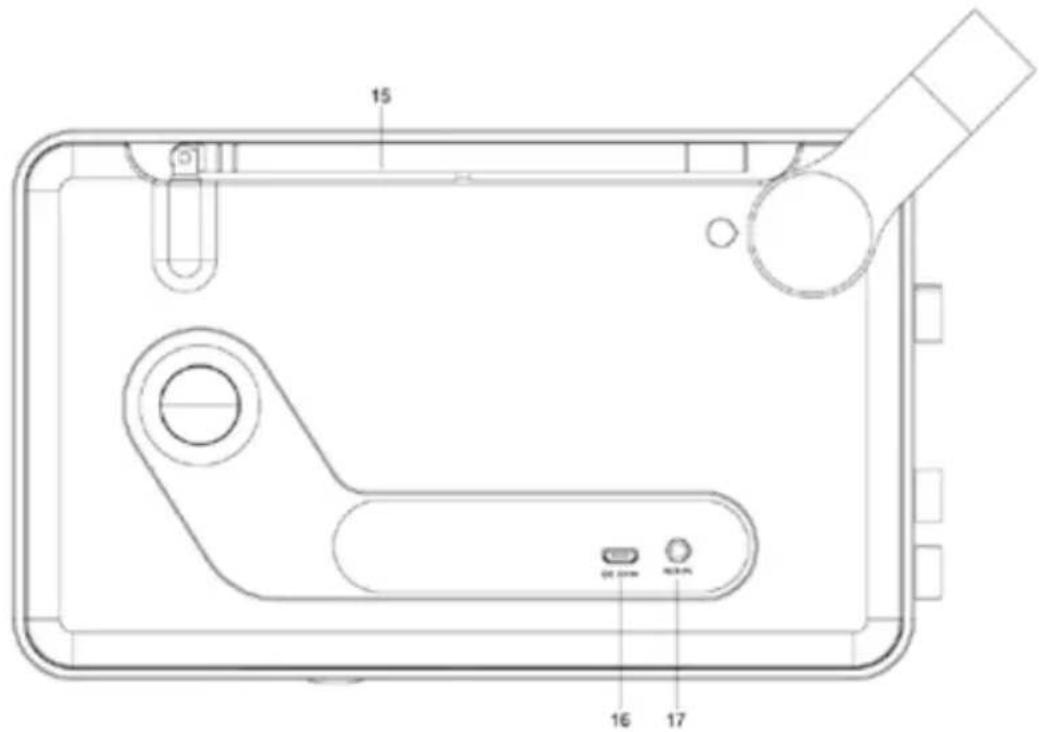
text_image
15 16 20 24 17- Telescopic Antenna
- DC 5V Jack
- 3.5mm AUX-IN Jack
BOTTOM VIEW
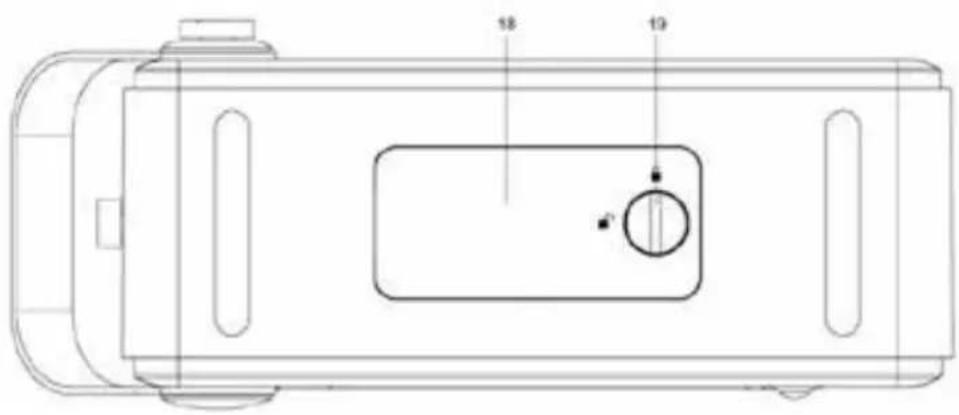
text_image
18 19-
Battery Cover
-
Battery locking screw

=Unlocked

=Locked
BATTERY INSTALLATION
- Use a coin to rotate the battery locking screw 90 degrees to unlock the battery cover.
- Remove the battery cover with your fingers.
- Follow the polarity to install the accompanied 3.7V lithium ion battery
- Replace the battery compartment door and rotate the locking screw to lock the battery cover.
WARNING:
- Be sure that the battery is installed correctly.
- Only batteries of the same or equivalent type as recommend are to be used.
- If the unit is not to be used for an extended period of time, remove the battery to prevent damage or injury from possible battery leakage.
- Do not dispose of the battery in fire, the battery may explode or leak.
POWER SUPPLY
- Connect the supplied AC-DC adapter to the DC 5V Jack on the back of the device through the attached USB cable, and insert the grid plug into a properly installed AC socket.
- Make sure the grid voltage corresponds to the figures on the rating plate.
Caution
- Only use the supplied power adaptor for this device. Do not use for other devices.
- Only use the original AC adapter. This adapter has been specially designed for the accompanied battery in order to gradually charge the battery. Any other adapter may shorten the battery life or can damage it or the device.
Note:
Disconnect from mains power supply during longer periods of non-use.
Charging the battery installed
The installed battery can also be charged by using the accompanied AC-DC adapter that you plug into the wall socket and the other end into the DC 5V jack, the battery charging indicator will light up in Yellow, once it is fully charged, the light turns to Green.
Note:
- The duration of the charging process depends on the state of charge of the battery.
- Remember to take out the battery during longer periods of non-use.
GENERAL OPERATION
- Rotate the Power ON/OFF Switch to "ON" position to turn on the unit, the display on the unit will light up and display the time digits "00:00" and the current operating mode.
-
Rotate the Function Selector to select different operating mode: DAB, FM, AUX-IN, Bluetooth.
-
Press and hold ▶ ||/OK/STANDBY button for 3 seconds to enter into standby mode, it will display "00:00:00" and "Time is not set" to prompt you to set the clock time.
- In Standby mode, press and hold ▶ ||/OK/STANDBY button for 3 seconds to switch the unit on.
- To completely switch off the unit, rotate the Power ON/OFF switch to OFF position.
Notes:
- The time and date can be updated automatically. With auto-update, the time and date are automatically synchronized with national time signals broadcast over DAB and FM (when available). It also can be set manually by pressing the MENU button during any operating mode, and then enter the submenu of "Set Time/Date" from "System > Time", press ">” or "<" button to select & press ▶||/OK button to confirm the setting.
- ECO design: The unit turns to Standby mode automatically if it is not providing the main functions or inappropriate for the intended use for 60 minutes during any operating mode (except for FM mode).
OPERATING THE UNIT IN DAB MODE
DAB radio mode receives DAB/DAB+ digital radio and displays information about the station.
Auto Scan
- Fully extend the telescopic antenna.
- Switch the unit on by rotating the Power ON/OFF switch to ON position to turn on the unit.
- Rotate the Function Selector to DAB position to enter DAB mode.
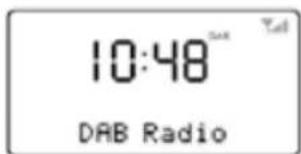
text_image
10:48 Tall DAB Radio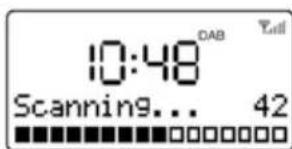
text_image
10:48 DAB Scanning... 42For the first time use or if the station list is empty, the radio automatically performs a full scan to see what stations are available, the display shows the scan progress and the total channel number during the scanning.
-
When the scan progress is completed, it will then set the time and start playing the first station on the station list it finds.
-
To change the station, press “<” or “>” button to scroll through the list of stations and press ▶|//OK button to tune to the displayed station. The Playing screen is displayed with the new station details.
-
If no stations are detected during the scan the display will show "Service not available".
Notes:
-
Just like Digital TV there are some areas where it may still be difficult to get a good DAB signal. The broadcasters are constantly improving DAB coverage, so in some cases it may be necessary to wait before some or all DAB services become available. You can check coverage for your area.
-
You may also need to start a scan manually to update the list of stations for one of the following reasons:
- New stations may become available from time to time.
- Stations close or can no longer be received (In the station list, invalid stations are indicated with a question mark “?” in front of their name).
- If reception was not good for the original scan (for example the antenna was not up), this may result in an empty or incomplete list of available stations.
- If you have poor reception of some stations causing the audio to break up, you may wish to list only stations with good signal strength.
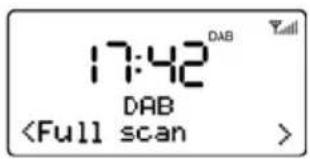
How to re-do a full scan
To re-do a full scan, you may short press the MENU button to show the menu and then press ▶ ||/OK button to select Full Scan
text_image
17:42 DAB DABManual Tune
As well as the normal method of scanning, you can also manually tune to a particular channel/frequency. This can be useful for adjusting your antenna to achieve the best possible reception and scanning a particular channel to update the station list.
-
Press MENU button and then press “>” to show the submenu: Manual tune, press the OK button to enter.
-
Press “<” or “>” to display a particular channel/frequency, press OK button to tune to that channel/frequency. The display shows a live indication of the received signal strength on the selected frequency. Adjustments to your antenna will be manifested in the received signal strength displayed.

text_image
13:26 8C 187.507MHzNote:
The slightly larger rectangle indicates the audio quality threshold – if the signal strength, as indicated by the solid rectangles, falls below this threshold the audio quality will deteriorate.
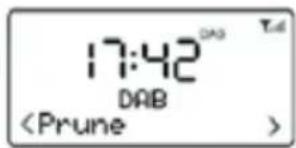
To remove stations that are listed but unavailable
-
Press MENU button and then press “>” or “<” to show the submenu: Prune, press the OK button to enter the Prune option.
-
Press “>” to select “Yes” and then press OK button to confirm to prune.
text_image
17:42 DAB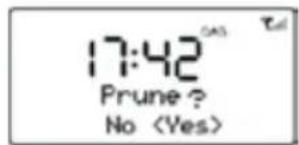
text_image
17:42 Prune ? NoNote:
This removes all invalid stations indicated in the station list with a ‘?’ in front of the station name.
Station Presets
The unit allows you to store up to 20 DAB stations for easy recall at any time.
To save a station
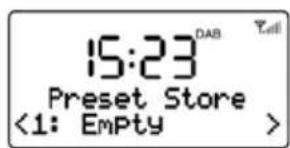
- If you have found the desired station, press and hold the PRESET button until the display shows Preset Store.
text_image
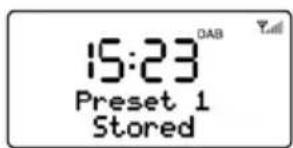
15:23 Preset Store <1: Empty >- Press "<" or "> " button to choose the preset memory position, press the ▶||/OK button to confirm the settings.
text_image
15:23 Preset 1 StoredTo recall a station
-
Short press the PRESET button during DAB mode to enter the preset memory selecting mode.
-
Press “>” or “<” button to select the preset station
-
Press ▶ ||/OK button to choose and play the displayed station.

text_image
15:23 DAB Preset Recall <6: BBC Radio 6>Now playing information
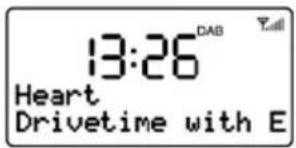
While a station is playing, the screen shows its name and DLS (Dynamic Label Segment) information broadcast by the station such as programme name, track title and contact details. Long DLS info, over 16 characters scrolls across the display.
text_image
13:26 DAB Heart Drivetime with ETo view further information
Each time you press INFO button, the next set of information is displayed, cycling through: DLS text, DL Plus information (this is only displayed if broadcast by the station), signal strength, programme type, ensemble name, channel number/frequency, signal error rate, bit rate, codec/DAB variant, time and date.
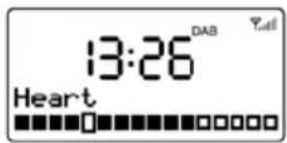
text_image
13:26 DAB HeartNote:
DL Plus presents additional information that can be broadcast by stations and stored temporarily on your radio.
Dynamic range compression (DRC)
This function reduces the difference between the loudest and quietest audio being broadcast. Effectively, this makes quiet sounds comparatively louder, and loud sounds comparatively quieter.
Note:
DRC only works if it is enabled by the broadcaster for a specific station.
To change the DRC setting
Select Menu > DRC, then press ▶ ||/OK button to enter the DRC submenu.
Press “>” or “<” to select the available options: DRC off, high, low.

text_image
Digital display showing time and control signals including '3:17 DAB' and 'OPERATING THE UNIT IN FM MODE
FM radio mode receives analogue radio from the FM band (87.5-108MHz) and display RDS (Radio Data System) information about the station. 1. Fully extend the telescopic antenna. 2. Rotate the FUNCTION Selector to FM position to enter FM mode. 3. Press and hold the “<”/“>” button to search the station, it will then stop automatically at the first station it finds. 4. Short press "<" or "> " button to tune the radio down or up in 50KHz steps for fine tuning. Note:
If the reception is too weak and there is noise on the received station, try to improve the reception by changing the position of the telescopic antenna.Station presets
The unit allows you to store up to 20 FM stations which work in the same way as described in DAB mode.Now playing information
While FM radio is playing, the screen shows its frequency, or if RDS information is available, station name and any further 'RadioText' information. If no information is available, just the frequency and a No Radio Text message is shown. To view further information about the broadcast
Each time you press INFO button, the next set of information is displayed, cycling through: RDS RadioText, programme type, frequency, time and date. OPERATING THE UNIT IN AUX-IN MODE
Aux In mode plays audio from an external source such as an MP3 player. 1. Plug one end of the 3.5mm audio cable (included) into the headphone or line out jack on your player, plug the other end of cable into the unit AUX-IN jack on the back of the unit. 2. Rotate the FUNCTION Selector to AUX position to enter AUX mode. 3. Turn on the external audio source and play your device. 4. The volume level can now be controlled through the main unit. Operate all other functions on the external device as usual.Notes:
1) If you're connected to the Line out Jack of your external device, then you only need to adjust the volume control of this unit. If you're connected to the Headphone Jack of your external device, then you may need to adjust both the volume control of your external device and the volume control of this unit to find the most desirable volume setting. 2) Press and hold the ▶||/OK button to switch the unit to Standby mode or switch the unit off by rotating the Power ON/OFF switch to OFF position when you finish listening. Don't forget to switch off the power of your external device as well.OPERATING THE UNIT IN BLUETOOTH MODE
This device offers you the possibility to use a Bluetooth enabled device. The functional radius is limited to approx. 10 metres depending on the surroundings and the unit used. Due to the different device manufacturers, models, and software versions, a full functionality cannot be guaranteed.Logging on devices (Pairing)
Before using your speaker with a compatible device, such as a mobile phone, for the first time, you must pair and connect it to the device. 1. Switch the unit on by rotating the Power ON/OFF switch to "ON" position. 2. Ensure that the Bluetooth function is activated in your player (e.g. mobile phone). For this, refer to the operation manual of your player. 3. Rotate the FUNCTION selector to BT position to enter Bluetooth mode, "Bluetooth Disconnected" is shown & flashed on the display. It shows that this unit is available to pair with other devices.Pair the Speaker
1. If you haven't paired this unit with a device or the paired devices list is empty, pairing mode is activated. 2. Activate Bluetooth on the compatible device, and set it to search for compatible devices. 3. Select the speaker name "PA4600" from the list of found devices. Tips: Only one playback unit can be connected to the speaker. If the speaker is already connected to another playback unit, the speaker will not appear in the BT selection list. If your device asks for a passkey (depending on the device manufacturers, model, and software version), then enter digits "0000" (four zeros) and press OK. If pairing has been carried out successfully, “Connected” will be shown on the display, meanwhile, a voice prompt “Connecting” will be heard. After connected completely, you can listen to music wirelessly through Bluetooth and select music in Bluetooth device. 4. Short press ▶ ||/OK button to pause or resume playback. 5. Press “>” button to skip to next track, or press “<” button to the beginning of current track or previous track. 6. To stop the unit, press and hold the ▶||/OK button to turn into standby mode or switch the unit on by rotating the Power ON/OFF switch on the left of the unit to OFF position.NOTES:
- The Bluetooth compatibility cannot be ensured for devices (e.g. mobile phones) getting released in the future. - To be able to transfer audio data, Bluetooth needs to stay activated in your player, observe the operation manual of your player. - If a mobile phone on which you are playing music receives a call, the music will be interrupted. The sound however is not played back via the speaker. After you have ended the call, the devices are connected to each other again and playback continues. - If there is an existing connection, press and hold the PRESET/PAIR button for 3 seconds to break the current connection and initiate pairing mode. - The player will be disconnected when your device is moved beyond the operational range. If you want to reconnect your device to this player, place it within the operational range. - If the device is moved beyond the operational range, when it is brought back, please check if the device is still connected to the player. - If the connection is lost, follow the instructions above to pair your device to the player again.Using the Unit as a Hands-free Bluetooth Speakerphone
1. Link your cell phone to the radio via Bluetooth as described above. 2. When receiving an incoming call on your cell phone, short tap the ▶||/OK button on the unit to switch the incoming call from cell phone to the speaker. Complete your call using the built-in microphone and speaker. 3. Adjust the volume control of your cell phone to obtain the desired sound level. 4. To end the call, just tap the ▶||/OK button again, the call will end. If you were playing music from your cell phone to the speaker before answering the call, the music will automatically resume playing when you hang up.SYSTEM LIBRARY
You may set sleep timer, clock time, alarms and other system settings in the System library.HOW TO ENTER & SELECT THE SUBMENU OF SYSTEM LIBRARY
1. Press MENU button during any operating mode. 2. Press “>” or “<” button to select “System”. text_image
10:43 DAB < System >SLEEP TIMER SETUP
- Press “>” or “<” button to select “Sleep” option in the submenu of system library. - Press ▶ ||/OK button to enter into Sleep timer setting, "Set sleep time" shown on the display and the sleep icon "💡" flashes on the display. - Press “>” or “<” button to adjust the sleep delay time in minutes from: Sleep off/15/30/45/60/90. - The setting confirms automatically after 10 seconds, the sleep icon “” stops flashing on the display. - Select "Sleep off" to cancel the sleep mode, the sleep icon " 🔒" disappears simultaneously. text_image
10:48 Systemtext_image
10:48 Set sleep time Sleep offSETTING THE CLOCK TIME MANUALLY
The clock time can also be set manually in the submenu of system library. \- Press “>” or “<” button to select “Time” option in the submenu of system library. \- Press ▶ ||/OK button to enter the subdirectory of Time setting, "Set Time/Date" shown on the display, press ▶ ||/OK button again to confirm and enter into clock time setting. text_image
10:48 Systemtext_image
10:48 Set time 10:48text_image
10:48 Time SavedSETTING AND USING THE ALARMS
As well as a clock/calendar, there are two versatile wake-up alarms with snooze facility. Each alarm can use a buzzer or a selection from any of the audio sources for the alarm sound, an active alarm is indicated by a bell icon “ 🔊” in the left of the LCD display.Note:
The alarm parameters can only be set during any operating mode after time set.Set the Alarm 1
1. During any operating mode, press and hold the ALARM/SNOOZE button, "Alarm1 Setup" is shown on the display.  2. Short press ▶ ||/OK button to set the Alarm1 parameters. The hour digits flashes on the display.  3. Short press “>” or “<” button to adjust the hour, then press OK button confirm the hour, the hour digit will stop flashing and the minute digit will start flashing. 4. The Alarm1 Time Set prompts you for the following parameters. Select a value for each parameter in turn by using “>” or “<” button and then press ▶||/OK button to confirm and move on to the next parameter.Alarm Parameters:
- On time – hours and minutes - Duration – 15 | 30 | 45 | 60 | 90 minutes, if the alarm is not cancelled the unit will return to standby after this time period. - Alarm Type (Source) – Buzzer | DAB | FM. If DAB or FM is chosen as the audio source you will also be prompted to select the last listened station or one of the preset stations (if set). - Alarm Mode – Daily | Once | Weekends | Weekdays, choose the days on which the alarm is active. - Alarm – Off | On After Alarm on is selected, the alarm1 will be armed automatically, the alarm1 alert icon stops flashing. Set the Alarm 2
1. During any operating mode, press and hold the ALARM/SNOOZE button until the "Alarm 1 Setup" is shown on the display. 2. Press “>” or “<” button to select “Alarm 2 Setup” & press ▶ ||/OK button to set the Alarm 2 parameters  3. The other setting of Alarm 2 refers to Alarm 1 setting described above.Notes:
- To ensure the alarm function works properly, make sure that the volume level is set at a proper position before turning off the unit. - Please do not switch off the power by the left side of power ON/OFF selector after alarm setting, otherwise, the alarm sound cannot work. - At the set time, the alarm will sound, quietly at first, then gradually building up to the set volume. When an alarm sounds, the bell icon in the display flashes. - Press and hold ALARM/SNOOZE button for 3 seconds to cancel the Alarm when it is activated.Snooze
\- When the alarm is activated (waking you), short press the ALARM/SNOOZE button will stop the alarm one time. The Snooze icon “” will show on the display.  \- The alarm will sound again after 10 minutes (default nap time).OTHER SYSTEM SETTINGS
Language Set
\- Press “>” or “<” button to select “Language” option in the submenu of system library.  \- Press ▶ ||/OK button to enter the subdirectory of Language setting. The language used for display messages can be selected from: English / Francais / Deutsch / Italiano / Español \- Press “>” or “<” button to select & press ▶ ||/OK button to confirm the setting.Factory Reset
A factory reset clears all user defined settings, replacing them with the original default values, so time/date, DAB/FM station list and preset stations are all lost. \- Press “>” or “<” button to select “Factory Reset” option in the submenu of system library. \- Press ▶ ||/OK button to enter the subdirectory of Factory Reset. If you select "Yes", you are asked to confirm by pressing ▶ ||/OK button.  SW Version
Press “>” or “<” button to select “SW version” option in the submenu of system library, then press/OK button to display the current software version.  TROULBSHOOTING AND ERROR MESSAGES
1. Error Messages| Message Description | |
| DAB mode | |
| No DAB Station No DAB | receptionNo DAB stations are available - check aerial. |
| Not available The listed station cannot be found. | |
| Signal error The DAB signal has been interrupted. | |
| (No name) The current station does not broadcast an identity name. | |
| ? List Invalid | |
| Signal error The DAB signal has been interrupted. | |
| FM mode | |
| No Radio Text No RDS text information is available on this station. | |
| No PTY No RDS programme type information is available. | |
| No Name No RDS station name is being broadcast. | |
| Problem Cause | Solutions | |
| No sound Volume is too low Increase the volume | ||
| Poor sound quality in Radio mode | Radio signal too weak Try to adjust the antenna position. | |
| FM: Hiss DAB: intermittent cut-out DAB: "No stations available" message | Low signal strength Check/move antenna Move radio Rescan local | |
| No audio signal via the Bluetooth connection | No audio signal via the Bluetooth connection | Check whether a connection exists. If necessary, pair the speaker again to the audio source. |
| Volume too low Increase the volume on the speaker | ||
| Bluetooth can not be connected | Pairing does not work Check | whether the audio source supports the A2DP protocol. |
| Audio source is switched off | Switch on the audio source | |
| Bluetooth is switched off at the audio source. | Switch on the Bluetooth function in the audio source. | |
| Bluetooth version is not supported. | Use a different playback unit. | |
| Poor sound quality from a Bluetooth® device | Bluetooth device is almost out of range of the PA4600 | Move your Bluetooth device closer to the PA4600 |
| SPECIFICATIONS | |
| Power adaptor (included) | Input AC 100-240V ~ 50/60Hz |
| Output DC 5V = 1.5A | |
| Battery capacity (included) 1,050 | mAh |
| Max Play Time (with battery) 3.5 | Hours |
| Power Consumption 8 W | |
| Standby Power Consumption <1W | |
| DAB Frequency 174.928-239.2 MHz | |
| FM Frequency 87.5-108 MHz | |
| Bluetooth support V2.1+ EDR | |
| Bluetooth operation range upto 10 metres | |
| Transmission frequency 2.4 GHz | |
| Protocols A2DP 1.2 | |
| Working Temperature -5°C~+40°C | |
| Working Humidity 20%~80% | |
PA4600
Bærbar DAB+/DAB/FM-radio med Bluetooth
text_image
08:59" 85 PLUS PlayingVIGTIGE SIKKERHEDSANVISNINGER
Dette apparat er designet og fremstillet således, at såfremt det anvendes korrekt, er din personlige sikkerhed sikret. Uautoriseret brug kan derimod udgøre en potentiel fare for elektrisk stød og brand. Læs omhyggeligt alle sikkerheds- og betjeningsinstrukser, inden du sætter radioen op og tager den i brug, og gem denne vejledning, så du kan slå op i den senere. Vær især opmærksom på alle advarsler i denne vejledning og på selve radioen.Vand og fugt
Undlad at anvende radioen nær vand. For eksempel: nær et badekar, håndvask, køkkenvask, vaskebalje, swimming pool eller i en fugtig kælder.Ventilation
Apparatet bør placeres således, at den nødvendige luftcirkulation omkring det ikke hindres. Radioen bør f.eks. ikke placeres på en seng, sofa, gulvtæppe eller lignende blød overflade, der kan blokere ventilationsåbningerne. Ligeledes bør apparatet ikke indbygges i et skab eller en bogkasse, da den frie luftcirkulation gennem apparatets ventilationsåbninger derved nedsættes eller hindres.Varme
Radioen bør placeres på passende afstand af varmekilder så som radiatorer, ovne eller andre apparater (inkl. forstærkere), der afgiver varme.Strømkilde
Radioen bør udelukkende tilsluttes en strømkilde af den type og spænding, der er angivet i denne vejledning og på apparatets mærkeplade.Rengøring
Radioen bør altid rengøres i overensstemmelse med vejledningen. Sørg omhyggeligt for, at genstande og væske ikke får adgang til radioens indre gennem dens åbninger og ventilationssprækker.Lynnedslag og fejlstrømsbeskyttelse
Tag stikket ud af stikkontakten. Derved undgår du skade på produktet i tilfælde af lynnedslag og fejlstrøm.Overbelastning
Undlad at overbelaste stikkontakter, forlængerledninger eller multistikdåser, da dette kan medføre fare for brand eller elektrisk stød.Skade, der kræver serviceeftersyn
Denne radio bør kontrolleres af en faguddannet reparatør under følgende omstændigheder: Du har tabt en genstand på eller spildt væske ned i radioen. Radioen har været udsat for regn. Radioen har været tabt, eller kabinettet er blevet beskadiget. Radioen opfører sig mærkbart anderledes end den plejer eller kan ikke betjenes på normal vis.Perioder uden brug
Undgå risiko for skader eller korrosion ved at tage stikket til netledningen ud af stikkontakten, hvis apparatet ikke skal bruges i længere tid, dvs. en uge eller længere.Service
Forsøg aldrig selv at servicere radioen ud over, hvad der er beskrevet i betjeningsvejledningen. Al service, der ikke udtrykkeligt er beskrevet i denne vejledning, bør overlades til kvalificeret servicepersonale.ADVARSEL:
1) Stikproppen fungerer som hovedafbryder. Sørg for, at der altid er fri adgang til den stikkontakt, apparatet er tilsluttet. 2) Batteriet må ikke udsættes for ekstrem varme fra f.eks. sollys, ild eller lignende. 3) Nedsæt risikoen for brand eller elektrisk stød ved aldrig at udsætte dette apparat for regn eller fugt. Apparatet må ikke udsættes for dryp eller stænk. Undlad at placere væskefyldte beholdere, som f.eks. vaser, ovenpå apparatet.KNAPPER OG KONTROLLER
FRONTPANEL text_image
08:59" 83 PLUS Plakjingtext_image
7 8 9 10 11 12 13 1413. Knappen ALARM/SNOOZE/DIM (lysdæmpning)
- Tryk og hold denne knap i enhver afspilningstilstand, hvis du vil indstille alarmerne. - Aktiverer snooze-funktionen, när alarmen lyder. - Når baggrundslyset er tændt, kan du trykke kort på denne knap for at justere lysstyrkeniveauet (Kraftigt eller Dæmpet).14. Indbygget mikrofon
BAGPANEL text_image
15 16 17text_image
18 1918. Batteridæksel
19. Låseskrue til batterirum
 ILÆGNING AF BATTERI
1. Brug en mønt til at dreje batteridækslets låseskrue 90 grader for at åbne batteridækslet. 2. Tag fat i batteridækslet og tag det af. 3. Læg et 3,7 V lithium ion-batteri i batterirummet i overensstemmelse med markeringerne for polaritet. 4. Sæt dækslet på batterirummet igen og drej låseskruen for at låse dækslet på plads.ADVARSEL:
- Sørg for, at batteriet vender korrekt. - Det anbefales, altid at bruge batterier af den anbefalede eller tilsvarende type. - Hvis enheden ikke skal bruges i længere tid, skal du fjerne batteriet så du forhindrer skader, og eventuelle personskader som følge af batterilækage. - Kast aldrig batterier på ilden, de kan eksplodere eller lække.STR∅MFORSYNING
1. Forbind den medfølgende AC-DC-strømforsyning til terminalen mærket DC 5V på radioens bagpanel via USB-stikket og sæt stikproppen i en standard stikkontakt. 2. Kontrollér, at spændingen på brugsstedet modsvarer den angivne spænding på radioens mærkeplade.Forsigtig
1. Brug kun den medfølgende adapter til denne radio. Må ikke anvendes til andre enheder. 2. Brug kun den originale AC-adapter. Denne adapter er specielt designet til brug med og gradvis opladning af det indbyggede batteri. Brug af en anden adapter kan nedsætte batteriets levetid eller beskadige batteriet eller radioen.Bemærk:
Tag stikket ud af stikkontakten, hvis du ikke skal bruge radioen i længere tid.Opladning af det indbyggede batteri
Radioens batteri kan også oplades ved hjælp af den medfølgende AC-DC-strømforsyning ved at sætte ledningens ene stik i DC 5V-terminalen og forbinde strømforsyningen til lysnettet. Ladeindikatoren lyser gult under opladningen og skifter til grønt, når opladningen er gennemført.Bemærk:
1. Ladetiden kan variere afhængigt af, hvor meget strøm batteriet mangler til en fuld opladning. 2. Husk at tage batteriet ud af radioen, hvis du ikke skal bruge den i længere tid.GENEREL BETJENING
- Drej Power ON/OFF-knappen over på "ON" for at tænde radioen, hvorefter displayet lyser op og viser tidscifrene "00:00" samt den aktuelle afspilningstilstand. - Drej Funktionsvælgeren og vælg den ønskede funktion: DAB, FM, AUX-IN, Bluetooth. - Tryk og hold ▶ ||/OK/STANDBY-knappen i 3 sekunder for at stille radioen på standby, hvorefter displayet viser "00:00:00" samt "Time is not set" som en opfordring til at indstille uret. - Når radioen står på Standby, skal du trykke og holde ▶ ||/OK/STANDBY-knappen i 3 sekunder for at tænde radioen. - Når du vil slukke radioen, skal du dreje knappen Power ON/OFF over på OFF.Bemærk:
1. Ur og dato kan opdateres automatisk. Med auto-opdatering synkroniseres tid og dato automatisk med de nationale tidssignaler, der sendes over DAB og FM (hvis tilgængelige). Uret kan også indstilles manuelt ved at du, uanset afspilningstilstand, trykker på MENU-knappen og åbner undermenuen "Set Time/Date" (indsæt tid/dato) i menuen "System > Time" (system > tid) og dernæst trykker på knapperne ">” eller "<" for at vælge og på ►|/OK-knappen for at bekræfte din indstilling. 2. ECO design: Radioen går automatisk på Standby, hvis ingen afspilning eller betjening har fundet sted i 60 minutter (gælder ikke FM-tilstand).BETJENING AF RADIOEN I DAB-TILSTAND
DAB-radio modtager DAB/DAB+ digital radio og viser oplysninger om stationen.Automatisk kanalsøgning
1. Stræk teleskopantennen helt ud. 2. Tænd radioen ved at dreje Power ON/OFF-knappen over på ON. 3. Drej Funktionsvælgeren over på DAB for at aktivere DAB-tilstand. text_image
10:48 DAB Radio 10:48 Scanning... 42Bemærk:
1. Ligesom med Digital TV kan der være områder, hvor det stadig er svært at få et godt DAB-signal. Udbyderne forbedrer konstant DAB-dækningen, så i visse tilfælde kan det være nødvendigt at vente på, at nogle eller alle DAB-services bliver tilgængelige. Du kan tjekke dækningen i dit område. 2. Det kan også blive nødvendigt at søge manuelt for at opdatere stationslisten af en af følgende årsager: \- Nye stationer bliver fra tid til anden tilgængelige. \- Stationer lukker og kan ikke længere modtages (På stationslisten markeres ugyldige stationer med et spørgsmålstegn “?” foran navnet). \- Hvis modtagelsen ikke var god, da den indledende kanalsøgning blev gennemført (f.eks. hvis antennen ikke var strakt ud), kan det medføre en tom eller ukomplet liste over tilgængelige stationer. \- Hvis du har et dårligt signal på visse stationer, således at lyden falder ud, foretrækker du måske en stationsliste bestående udelukkende af stationer med god signalstyrke.Sådan gentager du en fuld kanalsøgning
Hvis du vil gentage en fuld kanalsøgning, skal du trykke kort på MENU-knappen for at kalde menuen frem og dernæst trykke på ▶ ||/OK-knappen og vælge Full Scan (fuld kanalsøgning) text_image
17:42 DAB DABManuel kanalsøgning
Ud over den almindelige søgemetode kan du også vælge at søge manuelt efter bestemte kanaler eller frekvenser. Dette kan være nyttigt, hvis du har justeret antennen for at modtage signalet bedst muligt og vil søge efter en bestemt kanal for at opdatere stationslisten. 1. Tryk på MENU-knappen og tryk dernæst på “>” for at se undermenuen: Manual tune, tryk på OK for at åbne. 2. Tryk på knappen “<” eller “>” for at få vist en bestemt kanal/frekvens og tryk på OK-knappen for at stille ind på kanalen/frekvensen. Displayet viser en live indikation af signalstyrken fra den valgte frekvens. Justeringer af antennen vil have indflydelse på signalstyrken i signalet, der modtages. text_image
13:26 8C 187.507MHzBemærk:
Den lidt større firkant angiver en lydkvalitetstærskel – hvis signalstyrken, som angivet med de massive firkanter, ligger under dette niveau, vil lydkvaliteten være af dårlig kvalitet.Fjerner stationer fra listen, som ikke er tilgængelige
1. Tryk på MENU -knappen og tryk dernæst på knappen “>” eller “<” for at se undermenuen: Prune, tryk på OK-knappen for at åbne undermenuen. 2. Tryk på “>”, vælg “Yes” og tryk dernæst på OK-knappen for at bekræfte udlugningen. text_image
17:42 DABtext_image
17:42 Prune ? NoBemærk:
Dette fjerner alle ugyldige stationer markeret med et ‘?’ foran stationens navn fra stationslisten.Faste stationer
Du kan gemme op til 20 DAB-stationer i radioen, så du har nem adgang til dem när som helst.Sådan gemmer du en station
1. Hvis du har fundet en station, du vil gemme, skal du trykke og holde PRESET-knappen, indtil displayet viser Preset Store. text_image
15:23 Preset Store <1: Empty >text_image
15:23 Preset 1 StoredSådan genkalder du en station
1. Tryk kort på PRESET-knappen i DAB-tilstand for at få adgang til de faste stationer i radioen. 2. Tryk på knappen “>” eller “<” for at vælge en fast station. 3. Tryk på ▶||/OK-knappen for at vælge afspilning af den viste station. text_image
15:23 DAB Preset Recall <6: BBC Radio 6>Oplysningerne i Spiller nu
Mens en station afspilles, viser displayet stationens navn og DLS (Rulletekst) oplysninger udsendt af stationen som f.eks. programmets navn, titlen på musikstykket og kontaktoplysninger. Lange DLS-oplysninger på over 16 tegn ruller over displayet. text_image
13:26 Heart Drivetime with EHvis du vil se flere oplysninger
Hver gang, du trykker på INFO-knappen, vises næste sæt oplysninger på cirkulær vis som følger: DLS-tekst, DL Plus oplysninger (dette vises kun, hvis stationen udsender det), signalstyrke, programtype, multiplex navn, kanalnummer/frekvens, signal fejlrate, bitrate, codec/DAB-variant, tid og dato. text_image
13:26 Heart DAB YallBemærk:
DL Plus angiver yderligere oplysninger, der kan sendes af stationen og lagres midlertidigt i din radio.Komprimering af dynamisk område (DRC)
Denne funktion indskrænker forskellen mellem de mest højlydte og mest lydsvage passager i udsendelsen. Effektivt set gør funktionen de stille passager højere og de høje lyde gøres mere lavmælte.Bemærk:
DRC kan kun anvendes, hvis den aktuelle station tilbyder det.Sådan ændres indstillingen for DRC
Vælg Menu > DRC og tryk dernæst på ▶ ||/OK-knappen for at åbne undermenuen DRC. Tryk på knappen “>” eller “<” for at vælge den ønskede indstilling blandt: DRC fra, høj, lav. text_image
3:17 DABBETJENING AF RADIOEN I FM-TILSTAND
FM radio-tilstand modtager analog radio fra FM-båndet (87,5-108 MHz) og viser RDS (Radio Data System) oplysninger om stationen. 1. Stræk teleskopantennen helt ud. 2. Drej FUNKTIONSVÆLGEREN over på FM for at aktivere FM-tilstand. 3. Tryk og hold knappen “<”/“>” for at søge efter en station. Radioen standser automatisk ved den første station, den finder. 4. Tryk kort på knappen "<" eller ">" for at finjustere frekvensen op eller ned i trin à 50 KHz. Bemærk:
Hvis modtagelsen er for dårlig, og hvis der er støj på stationen, kan du prøve at forbedre modtagelsen ved at justere teleskopantennens position.Faste stationer
Du kan gemme op til 20 faste FM-stationer i radioen på samme måde som beskrevet i afsnittet DAB-tilstand.Oplysningerne i Spiller nu
Mens en FM-station afspilles, viser displayet stationens frekvens eller, hvis der er RDS-oplysninger tilgængelige, stationens navn og evt. yderligere 'RadioTekst'. Hvis der ingen oplysninger er tilgængelige, vises blot frekvensen, og ingen Radio Tekst vises (No Radio Text). Hvis du vil se flere oplysninger om udsendelsen
Hver gang, du trykker på INFO-knappen, vises næste sæt oplysninger på cirkulær vis som følger: RDS Radiotekst, programtype, frekvens, tid og dato. BETJENING AF RADIOEN I AUX-IN-TILSTAND
Med Aux In kan du afspille audio fra en ekstern signalkilde som f.eks. en MP3-afspiller. 1. Forbind den ene ende af det medfølgende 3,5 mm audiokabel til stikket mærket headphone eller line out på den eksterne afspiller og forbind kablets andet stik til terminalen mærket AUX-IN på bagsiden af denne radio. 2. Drej FUNKTIONSVÆLGEREN over på AUX for at aktivere AUX-tilstand. 3. Tænd den eksterne signalkilde og start afspilningen. 4. Lydstyrken kan nu justeres på radioen. Betjen den eksterne enhed på sædvanlig vis.Bemærk:
1) Hvis radioen er forbundet til Line out på din eksterne enhed, kan du nøjes med at justere lydstyrken på denne enhed. Hvis radioen er forbundet til hovedtelefonstikket på din eksterne enhed, kan det være nødvendigt at justere lydstyrken både på den eksterne enhed og på denne radio for at finde den ønskede indstilling for lydstyrke. 2) Tryk og hold ▶||/OK-knappen for at stille radioen på Standby, eller sluk radioen ved at dreje Power ON/OFF-knappen over på OFF, når du er færdig med at lytte. Glem ikke at slukke din eksterne enhed også.BETJENING AF RADIOEN I BLUETOOTH-TILSTAND
Med denne radio kan du anvende en Bluetooth-enhed. Rækkevidden er begrænset til ca. 10 meter afhængigt af omgivelserne og den anvendte enhed. Pga. forskelle blandt de forskellige producenter, modeller og software-versioner kan fuld funktionalitet under alle forhold ikke garanteres.Logge ind på en enhed (Parring)
Inden du første gang anvender radioen sammen med en kompatibel enhed, som f.eks. en mobiltelefon, skal du parre radioen med den eksterne enhed. 1. Tænd radioen ved at dreje Power ON/OFF-knappen over på "ON". 2. Sørg for, at Bluetooth-funktionen er aktiveret i din afspiller (f.eks. mobiltelefon). For nærmere oplysninger herom, se manualen til din afspiller. 3. Drej FUNKTIONSVÆLGEREN over på BT for at aktivere Bluetooth-tilstand, hvorefter "Bluetooth Disconnected" vises og blinker på displayet. Det betyder, at radioen er klar til parring med en anden enhed.Parring af radioen
1. Hvis du ikke har parret denne radio med en anden enhed, eller hvis listen over tilgængelige enheder er tom, aktiveres parringstilstand. 2. Aktivér Bluetooth i den enhed, du vil tilslutte, og sæt den til at søge efter kompatible enheder. 3. Vælg enhedsnavnet "PA4600" på listen over fundne enheder. Tip: Der kan kun være én ekstern enhed forbundet med radioen ad gangen. Hvis radioen allerede er forbundet til en anden enhed, vil den ikke blive vist på listen over tilgængelige enheder i den eksterne enhed. Hvis din enhed beder om en kode (det afhænger af producent, model og software-version), skal du indtaste koden "0000" (fire nuller) og trykke på OK. Når parringen er blevet gennemført korrekt, vises "Connected" (tilsluttet) på displayet samtidig med, at en stemmeprompt siger "Connecting" (tilslutter). Når tilslutningen er gennemført, kan du lytte til musik trådløst gennem Bluetooth og vælge musik på din Bluetooth-enhed. 4. Tryk kort på ▶ ||/OK-knappen for at pause eller genoptage afspilningen. 5. Tryk på knappen “>” for at springe til næste musikfil eller tryk på “<” for at springe tilbage til begyndelsen af den aktuelle musikfil eller til foregående fil. 6. Når du vil afbryde afspilningen, skal du trykke og holde knappen ▶||/OK for at stille radioen på standby eller dreje knappen Power ON/OFF på radioens venstre side til OFF.BEMAERK:
- Der gives ikke garanti for Bluetooth-kompatibilitet for alle enheder (f.eks. mobiltelefoner), der fremstilles i fremtiden. - For at kunne overføre audiodata skal Bluetooth forblive aktiveret på din afspiller. Kig i vejledningen til din afspiller. - Hvis der indgår et opkald til din mobiltelefon, mens du lytter til musik, afbrydes musikken automatisk. Opkaldet kan dog ikke høres gennem radioens højttaler. Når du har afsluttet opkaldet, genoprettes forbindelsen mellem enhederne, og afspilningen fortsætter. - Hvis radioen allerede er parret med en anden enhed, skal du trykke og holde knappen PRESET/PARRING i 3 sekunder for at ophæve den eksisterende forbindelse og aktivere parringstilstand. - Forbindelsen til afspilleren afbrydes også, hvis du flytter din enhed udenfor rækkevidde af radioen. Hvis du vil genoprette forbindelsen, skal du bringe din afspiller indenfor rækkevidde igen. - Hvis du har haft din enhed udenfor rækkevidde og bringer den tilbage indenfor rækkevidde, skal du tiekke, at de to stadiq er forbundet med hinanden. - Hvis forbindelsen er gået tabt, skal du følge vejledningen herover for at parre de to enheder igen.Anvendelse af radioen som håndfri Bluetooth Speakerphone
1. Forbind din mobiltelefon til radioen via Bluetooth, som beskrevet herover. 2. Når der indgår et opkald til din mobiltelefon, skal du trykke kort på ▶||/OK-knappen på radioen for at trække opkaldet fra mobiltelefonen og over til radioen. Gennemfør samtalen gennem den indbyggede mikrofon og højttaler. 3. Indstil lydstyrken på din mobiltelefon til det ønskede lydniveau. 4. Når du vil afslutte opkaldet, skal du blot trykke på ▶ ||/OK-knappen igen for at afbryde. Hvis du var i gang med at afspille musik fra din mobiltelefon til radioen, da telefonen ringede, genoptages afspilningen automatisk, når du ringer af.SYSTEMBIBLIOTEK
I Systembiblioteket kan du indstille sleep autosluk, ur, alarmer og foretage andre systemindstillinger.SÅDAN ÅBNER OG VÆLGER DU SYSTEMBIBLIOTEKETS UNDERMENU
1. Tryk på MENU-knappen i en hvilken som helst afspilningstilstand. 2. Tryk på knappen “>” eller “<” og vælg “System”. text_image
10:43 DAB < System >OPSÄETNING AF SLEEP AUTOSLUK
\- Tryk på knappen “>” eller “<” og vælg punktet “Sleep” (autosluk) i systembibliotekets undermenu. text_image
10:48 Systemtext_image
10:48 Set sleep time Sleep offMANUEL INDSTILLING AF URET
Uret kan også indstilles manuelt gennem systembibliotekets undermenu. \- Tryk på knappen “>” eller “<” og vælg punktet “Time” (tid) i systembibliotekets undermenu. text_image
10:48 Systemtext_image
10:48 Set time 10:48text_image
10:48 Time SavedOPSÆTNING OG ANVENDELSE AF ALARMERNE
Ud over ur/kalender har radioen to nyttige alarmer, begge med snooze-funktion. Hver af alarmerne kan indstilles til vækning med buzzer eller med et udvalg fra en hvilken som helst audiokilde. En aktiveret alarm vises på displayet med et klokkeikon “①” i venstre side af LCD-displayet.Bemærk:
Parametrene for alarmerne kan indsættes under enhver afspilningstilstand, men først, når uret er blevet indstillet.Indstilling af Alarmen 1
1. Tryk og hold ALARM/SNOOZE-knappen under enhver afspilningstilstand, hvorefter "Alarm1 Setup" vises på displayet. 2. Tryk kort på ▶ ||/OK-knappen for at indsætte parametre for Alarm1. Timetallet blinker på displayet.   3. Tryk kort på knappen “>” eller “<” for at indsætte timetallet og tryk dernæst på OK-knappen for at bekræfte. Timetallet holder op med at blinke, og minuttallet blinker i stedet. 4. Under opsætning af Alarm 1 vil du blive bedt om at indsætte nedenstående parametre. Vælg en værdi for hver parameter efter hinanden ved at trykke på knappen “>” eller “<” og tryk dernæst på ▶ ||/OK-knappen for at bekræfte og gå videre til næste parameter.Parametre for alarmen:
- On time – timer og minutter - Duration – 15 | 30 | 45 | 60 | 90 minutter. Hvis alarmen ikke slås fra, vender radioen tilbage til standby efter den valgte periode. - Alarm Type (Kilde) – Buzzer | DAB | FM. Hvis DAB eller FM vælges som signalkilde, vil du også blive bedt om at vælge, om du vil vækkes af den station, du sidst lyttede til, eller en af de faste stationer (hvis radioen er sat op med faste stationer). \- Alarm Mode –Daily | Once | Weekends | Weekdays, (dagligt, én gang, weekend, hverdage); vælg hvilke dage, alarmen skal lyde. \- Alarm -Off | On Hvis du vælger Alarm on, er alarm 1 automatisk slået til, og ikonet for alarm 1 holder op med at blinke. Indstilling af Alarmen 2
1. Du kan i enhver afspilningstilstand trykke og holde ALARM/SNOOZE-knappen, indtil "Alarm 1 Setup" vises på displayet. 2. Tryk på knappen “>” eller “<”, vælg “Alarm 2 Setup” og tryk på ▶ ||/OK-knappen, hvis du vil indsætte parametre for Alarm 2. 3. De øvrige indstillinger for Alarm 2 foretages på samme måde som beskrevet herover for Alarm 1. Bemærk:
- For at sikre, at alarmen fungerer korrekt, skal du tjekke, at lydstyrken er indstillet til et hørbart niveau, inden du slukker radioen. - Undlad at slukke radioen med Power ON/OFF-knappen i venstre side, när alarmen er indstillet, da alarmen i så fald ikke vil fungere. - På det valgte tidspunkt lyder alarmen, først stilfærdigt, siden skrues der gradvist op for lydstyrken. Når alarmen lyder, blinker klokke-ikonet på displayet. - Tryk og hold ALARM/SNOOZE-knappen i 3 sekunder for at slå alarmen fra, när den lyder.Snooze
\- Når alarmen lyder (vækker dig), kan du trykke kort på ALARM/SNOOZE -knappen, hvis du vil afbryde alarmen midlertidigt. Snooze-ikonet “ ^27 ” vises på displayet.  \- Alarmen lyder igen efter 10 minutter (standardperioden for snooze).ANDRE SYSTEMINDSTILLINGER
Opsætning af sprog
\- Tryk på knappen “>” eller “<” og vælg punktet “Language” i systembibliotekets undermenu.  \- Tryk på ▶ ||/OK-knappen for at åbne undermenuen Language. Du kan vælge sprog til visning af oplysningerne på displayet blandt følgende: English / Francais / Deutsch / Italiano / Español \- Tryk på knappen “>” eller “<” for at vælge og tryk på ▶ ||/OK-knappen for at bekræfte din indstilling.Nulstilling til fabriksindstillinger
En nulstilling sletter alle brugerdefinerede indstillinger og gendanner de originale standardværdier, således at tid/dato, DAB/FM stationslister og faste stationer alle går tabt. - Tryk på knappen “>” eller “<” og vælg punktet “Factory Reset” i systembibliotekets undermenu. - Tryk på ▶ ||/OK-knappen for at åbne undermenuen Factory Reset. Hvis du vælger "Yes", vil du blive bedt om at bekræfte med et tryk på ▶ ||/OK-knappen.  SW-version
Tryk på knappen “>” eller “<”, vælg punktet “SW version” (software-version) i systembibliotekets undermenu og tryk dernæst på ▶ ||/OK-knappen for at få vist den aktuelle software-version.  FEJLFINDING OG FEJLMEDDELELSER
1. Fejlmeddelelser| Meddelelse Beskrivelse | |
| DAB-tilstand | |
| No DAB Station Ingen | modtagelse af DABIngen tilgængelige DAB-stationer - tjek antennen. |
| Not available Den valgte station kan ikke findes. | |
| Signal error DAB-signalet er blevet afbrudt. | |
| (No name) Den aktuelle station udsender ikke et navn, hvorved den kan identificeres. | |
| ? Liste ugyldig | |
| Signal error DAB-signalet er blevet afbrudt. | |
| FM-tilstand | |
| No Radio Text Ingen | RDS tekstoplysninger tilgængelige fra denne station. |
| No PTY Ingen RDS | programtypeoplysninger tilgængelige. |
| No Name Intet RDS | stationsnavn udsendes. |
| Problem Årsag | Løsning | |
| Ingen lyd Der er skruet | for langt ned for lyden | Skru op for lyden |
| Dårlig lydkvalitet i radio-tilstand | Radiosignalet er for svagt Prov at justere antennen. | |
| FM: Susen DAB: jævnlige lydudfald ved lytning til DAB: Meddelelsen "No stations available" vises | Lav signalstyrke Tjek/justér antennen Flyt radioen Foretag en ny kanalsøgning | |
| Intet audiosignal via Bluetooth-forbindelsen. | Intet audiosignal via Bluetooth-forbindelsen. | Tjek, at der er oprettet forbindelse. Hvis nødvendigt må du parre radioen med audiokilden igen. |
| Der er skruet for langt ned for lyden. | Skru op for lyden på radioen. | |
| Skru op for lyden på audiokilden. | ||
| Bluetooth-tilslutning ikke mulig. | Parring kan ikke gennemføres. | Tjek, at audio-kilden understøtter A2DP-protokollen. |
| Audiokilden er slukket. Tænd | audiokilden. | |
| Bluetooth er slået fra i audiokilden. | Slå Bluetooth-funktionen til i audiokilden. | |
| Bluetooth-versionen understøttes ikke. | Brug en anden afspiller. | |
| Dårlig lydkvalitet fra en Bluetooth®-enhed. | Bluetooth-enheden er næsten udenfor PA4600 rækkevidde | Flyt din Bluetooth-enhed tættere på PA4600 |
| SPECIFICATIONER | |
| Strømforsyning (medfølger) | Indgangsspænding AC 100-240 V, 50/60 Hz |
| Udgangsspænding DC 5V --- 1,5A | |
| Batterikapacitet (medfølger) 1050 mAH | |
| Afspilningstid (med batteri) 3,5 Timer | |
| Strømforbrug 8 W | |
| Standby Strømforbrug <1 W | |
| DAB Frekvensområde 174,928-2 | 39,2 MHz |
| FM Frekvensområde 87,5-108MHz | |
| Bluetoothunderstøttelse V2.1+ EDR | |
| Bluetooth rækkevidde op til 10 meter | |
| Sendefrekvens 2,4 GHz | |
| Protokoller A2DP 1.2 | |
| Driftstemperatur -5 °C ~ +40 °C | |
| Luftfugtighed på brugssted 20% ~ 80% | |
PA4600
Tragbares DAB+/DAB/UKW-Radio mit Bluetooth-Funktion
text_image
08:59™ E5 PLUS PlayingWICHTIGE SICHERHEITSHINWEISE
Gestaltung und Herstellungsweise des Gerätes gewährleisten Ihre persönliche Sicherheit, vorausgesetzt, es wird den Anweisungen gemäß verwendet. Unsachgemäße Verwendung kann hingegen Stromschlag oder Feuer verursachen. Bitte diese Sicherheits- und Betriebsanleitung vor dem Installieren und der Benutzung des Gerätes vollständig lesen und für zukünftigen Zugriff an einem zugänglichen Ort aufbewahren. Besonders alle in dieser Anleitung und auf dem Gerät angeführten Warnhinweise beachten.Wasser und Feuchtigkeit
Das Gerät nicht in nassem Umfeld benutzen. Zum Beispiel: in der Nähe von Badewannen, Waschbecken, Küchenspülen, Waschkessel, Schwimmbecken oder in feuchten Kellern.Lüftung
Das Gerät an einem Ort und in einer Position platzieren, die ausreichende Lüftung gewährleisten. Z. B., nicht auf einem Bett, Sofa, Teppich oder ähnlichen Oberflächen platzieren, wo die Lüftungsöffnungen blockiert werden könnten. Es sollte auch nicht in geschlossenen Möbeln wie Bücherschränken oder Regalschränken platziert werden, die den Luftstrom in den Lüftungsöffnungen behindern könnten.Hitze
Das Gerät fern von Wärmequellen wie Heizungen, Wärmeregler, Öfen oder anderen Hitze erzeugenden Geräten platzieren (einschließlich Verstärker).Stromquellen
Das Gerät nur an Stromquellen anschließen, die in der Betriebsanleitung genannt werden oder auf dem Gerät bezeichnet sind.Reinigen
Das Gerät sollte nur gemäß der Empfehlung gereinigt werden. Achten Sie darauf, dass keine Fremdkörper oder Flüssigkeiten in die Öffnungen des Geräts eindringen.Schutz vor Blitzschlag und Spannungsspitzen
Bei Gewitter das Stromkabel von der Steckdose abziehen, um einer Beschädigung des Gerätes durch Blitzschlag oder Spannungsspitzen vorzubeugen.Überlastung
Steckdosen, Verlängerungskabel, oder integrierte Gerätesteckdosen nicht überlasten, um einem Risiko von Feuer oder Stromschlag vorzubeugen.Falls Reparaturen anfallen
Das Gerät ausschließlich von qualifiziertem Servicepersonal warten lassen, wenn: Gegenstände oder Flüssigkeiten in das Gehäuse geraten sind. Das Gerät Regen ausgesetzt war. Das Gerät heruntergefallen ist oder das Gehäuse beschädigt wurde. Sich die Leistung des Gerätes verändert hat oder es nicht normal funktioniert.Nichtgebrauch
Wird das Gerät über einen längeren Zeitraum – eine Woche oder länger - nicht benutzt, das Stromkabel vom Gerät abziehen, um Beschädigung oder der Entstehung von Rost vorzubeugen.Wartung
Der Benutzer sollte nicht versuchen, das Gerät über die in der Bedienungsanleitung aufgeführte Beschreibung hinaus selbst zu warten. Wartungsarbeiten, die in der Betriebsanleitung nicht angeführt sind, dürfen nur von qualifiziertem Servicepersonal ausgeführt werden.WARNUNG:
1) Der Stecker des Netzadapters wird als Trennvorrichtung verwendet; die Trennvorrichtung muss immer betriebsbereit sein. 2) Batterien und Akkus dürfen keiner übermäßigen Hitze, wie durch direkte Sonneneinstrahlung oder durch Feuer, ausgesetzt werden. 3) Um eine Gefährdung durch Feuer oder Stromschlag auszuschließen, das Gerät weder Regen noch Feuchtigkeit aussetzen. Schützen Sie das Gerät vor tropfenden oder spritzenden Flüssigkeiten, und stellen Sie keine mit Flüssigkeiten gefüllten Gefäße (z. B. Vasen) auf das Gerät.BEDIENELEMENTE
VORDERANSICHT text_image
08:59" 83 PLUS Plakjingtext_image
7 8 9 10 11 12 13 14- Im Bluetooth-Modus:
\- Aktuelle Wiedergabe fortsetzen/vorübergehend anhalten. \- Tippen Sie beim Eingang eines Anrufs auf Ihrem Mobiltelefon einmal auf diese Taste um den Anruf anzunehmen. Tippen Sie zum Beenden des Anrufs erneut auf die Taste.8. Taste <
\- Scrollt durch ein Menü oder die DAB-Senderliste.- Im UKW-Modus:
- Drücken Sie kurz diese Taste, um einen Sender ab der aktuellen Frequenz in Richtung niedrigerer Frequenzen manuell zu suchen. - Halten Sie diese Taste gedrückt, um Sender in Richtung niedrigerer Frequenzen mit einem starken Signal suchen. Beim ersten gefundenen Sendersignal hält der Suchlauf an. \- Im Bluetooth-Modus: Kehrt zum Anfang des aktuellen Titels zurück oder springt zum vorigen Titel.9. Taste >
\- Scrollt durch ein Menü oder die DAB-Senderliste.- Im UKW-Modus:
- Drücken Sie kurz diese Taste, um einen Sender ab der aktuellen Frequenz in Richtung höhere Frequenzen manuell zu suchen. - Halten Sie diese Taste gedrückt, um Sender in Richtung höherer Frequenzen mit einem starken Signal suchen. Beim ersten gefundenen Sendersignal hält der Suchlauf an. \- Im Bluetooth-Modus: Springt zum nächsten Titel.10. Taste MENU
\- Drücken Sie die Taste, um das Menü für den aktuellen Modus anzuzeigen; mit erneutem Tastendruck zeigen Sie das aktuelle Wiedergabemenü an.11. Taste INFO
\- Im DAB/UKW-Modus: Geht zyklisch durch weitere Informationsbildschirme.12. Taste PRESET/KOPPLUNG
• Im DAB/UKW-Modus:
- Rufen Sie mit einem kurzen Tastendruck auf diese Taste den Senderspeicher-Abrufmodus auf. - Halten Sie die Taste gedrückt, um den Speichermodus für Sender aufzurufen.• Im Bluetooth-Modus:
\- Halten Sie die Taste für 3 Sekunden gedrückt, um die aktuelle Verbindung zu trennen und die Kopplung zu starten.13. Taste ALARM/SNOOZE/DIM
- Halten Sie die Taste in einem beliebigen Betriebsmodus gedrückt, um die Alarme einzustellen. - Aktiviert die Schlummerfunktion bei eingeschaltetem Wecker. - Drücken Sie die Taste bei eingeschalteter Hintergrundbeleuchtung, um die Helligkeit einzustellen (hell oder dunkel).14. Eingebautes Mikrofon
RÜCKANSICHT text_image
Technical diagram of a device casing with labeled components and numbered partstext_image
18 19 c18. Batteriefachdeckel
19. Sicherungsschraube des Batteriefachdeckels
 =Entriegelt  =VerriegeltBATTERIEN EINSETZEN
1. Drehen Sie die Sicherungsschraube des Batteriefachdeckels mit einer Münze um 90 Grad, um den Batteriefachdeckel zu entriegeln. 2. Entfernen Sie den Batteriefachdeckel mit den Fingern. 3. Legen Sie die mitgelieferte 3,7 V Lithium-Ionen-Batterie entsprechend der Polarität ein. 4. Schließen Sie den Batteriefachdeckel und drehen Sie die Sicherungsschraube zum Verriegeln des Deckels.WARNUNG:
- Achten Sie darauf, dass die Batterie ordnungsgemäß eingesetzt wurde. - Die Batterie nur mit dem gleichen oder ähnlichen Batterietyp austauschen, der empfohlen wurde. - Entfernen Sie bei längerer Nichtbenutzung des Geräts die Batterien, um Schäden oder Verletzungen durch mögliches Auslaufen der Batterie zu vermeiden. - Entsorgen Sie Batterien niemals im Feuer, diese könnten explodieren oder auslaufen.STROMVERSORGUNG
1. Schließen Sie den mitgelieferten Netzadapter mit dem beigefügten USB-Kabel an die 5 V Buchse auf der Rückseite des Geräts und den Netzstecker an eine vorschriftsmäßig installierte Steckdose an. 2. Vergewissern Sie sich, dass die Netzspannung der auf dem Typenschild entspricht.Vorsicht
1. Verwenden mit diesem Gerät nur den im Lieferumfang enthaltenen Netzadapter. Nicht für andere Geräte verwenden. 2. Verwenden Sie nur den Original-Netzadapter. Dieser Adapter wurde speziell zum schrittweisen Aufladen der integrierten Batterie entworfen. Alle anderen Adapter können die Lebensdauer der Batterie verkürzen oder die Batterie und das Gerät beschädigen.Hinweis:
Bei längerer Nichtbenutzung den Netzstecker ziehen.Installierte Batterie laden
Die installierte Batterie kann auch mit dem beigefügten Netzadapter geladen werden. Schließen Sie den Netzadapter an eine Steckdose und das anderen Ende an die DC 5 V Buchse an. Die Batterieladeanzeige leuchtet gelb auf. Sobald die Batterie vollständig aufgeladen ist, leuchtet die Anzeige grün.Hinweis:
1. Die Dauer des Ladevorgangs hängt vom Ladezustand der Batterie ab. 2. Vergessen Sie nicht, bei längerer Nichtbenutzung die Batterie zu entnehmen.ALLGEMEINE BEDIENUNGSHINWEISE
- Drehen Sie ON/OFF auf „ON“, um das Gerät einzuschalten; das Display leuchtet auf und zeigt die Uhrzeit als „00:00“ sowie den aktuellen Betriebsmodus an. - Drehen Sie die Funktionsauswahl, um die verschiedenen Betriebsmodi auszuwählen: DAB, UKW, AUX-IN, Bluetooth. - Halten Sie ▶ ||/OK/STANDBY für 3 Sekunden zum Aufrufen des Standby-Modus gedrückt; im Display werden „00:00:00“ und „Time is not set“ als Hinweis angezeigt, die Uhrzeit einzustellen. - Im Stand-by-Modus halten Sie ▶ ||/OK/STANDBY für 3 Sekunden zum Einschalten des Geräts gedrückt. - Drehen Sie zum Ausschalten des Geräts den Schalter Power ON/OFF in die Stellung „OFF“.Hinweise:
1. Uhrzeit und Datum können automatisch aktualisiert werden. Bei Auto-Aktualisierung werden Zeit und Datum automatisch mit den von DAB und UKW (wenn verfügbar) übertragenen Ortszeitsignalen synchronisiert. Eine manuelle Einstellung ist ebenfalls in einem beliebigen Betriebsmodus mit MENU und Aufrufen des Untermenüs „Set Time/Date“ unter „System > Time“ möglich, dann drücken Sie „>“ oder „<“ zur Auswahl und ▶|/OK zur Bestätigung der Einstellung. 2. ECO-Design: Das Gerät wechselt nach 60 Minuten automatisch in den Standby-Modus, falls es sich nicht in den Hauptfunktionen befindet oder falls die Funktion während eines Betriebsmodus sich als ungeeignet erweist (außer UKW-Modus).BEDIENUNG DES GERÄTES IM DAB-MODUS
Der DAB-Radiomodus empfängt DAB/DAB+ Digitalradio und zeigt Informationen über den Sender an.Suchlauf
1. Ziehen Sie die Teleskopantenne voll aus. 2. Drehen Sie ON/OFF auf ON, um das Gerät einzuschalten. 3. Drehen Sie die Funktionsauswahl in die Stellung DAB, um den DAB-Modus aufzurufen. text_image
10:48 DAB Radiotext_image
10:48 DAB Tall Scanning... 42Hinweise:
1. Wie beim Digital-TV gibt es einige Gebiete, in denen es möglicherweise schwierig ist, ein gutes DAB-Signal zu empfangen. Die Rundfunkanbieter verbessern ständig die DAB-Abdeckung, so dass Sie in einigen Fällen warten müssen, bevor einige oder alle DAB-Dienste verfügbar sind. Sie können die Abdeckung für Ihr Gebiet überprüfen. 2. Möglicherweise müssen Sie einen Suchlauf auch manuell starten, um die Senderliste aus einem der folgenden Gründe zu aktualisieren: \- Von Zeit zu Zeit sind neue Sender verfügbar. - Sender wurden geschlossen oder können nicht mehr empfangen werden (In der Senderliste werden ungültige Sender mit einem Fragezeichen „?“ vor dem Namen gekennzeichnet). - Wenn beim ersten Suchlauf der Empfang nicht gut war (z. B. die Antenne war nicht ganz ausgezogen), kann dies zu einer leeren oder unvollständigen Liste der verfügbaren Sender führen. - Bei schlechtem Empfang kommt es bei einigen Sendern zu Tonaussetzern und Sie möchten nur Sender mit hoher Signalstärke anzeigen.Erneutes Ausführen eines vollständigen Suchlaufs
Für einen erneuten vollständigen Suchlauf drücken Sie MENU zur Anzeige des Menüs, dann drücken Sie ▶|//OK zur Auswahl von Full Scan. text_image
17:42 DAB DABManuelle Sendersuche
Wie bei der normalen Suchmethode können Sie auch einen bestimmten Kanal/ eine bestimmte Frequenz manuell einstellen. Dies kann zum Anpassen der Antenne für den bestmöglichen Empfang und zum Suchen eines bestimmten Kanals zum Aktualisieren der Senderliste nützlich sein. 1. Drücken Sie die Taste MENU und drücken Sie dann „>“, um das Untermenü aufzurufen: Manual tune. Drücken Sie anschließend zum Aufrufen die Taste OK. 2. Drücken Sie zum Anzeigen eines bestimmten Kanals/Frequenz die Taste „<“ oder „>“ und drücken Sie die Taste OK, um diesen Kanal oder diese Frequenz einzustellen. Das Display zeigt die Echtzeit-Anzeige der empfangenen Signalstärke der gewählten Frequenz an. Anpassungen der Antenne wirken sich auf die angezeigte Empfangs-Signalstärke aus. text_image
13:26 80 C 187.507MHzHinweis:
Das etwas größere Rechteck zeigt den Schwellenwert der Audioqualität an -Wenn die Signalstärke, die durch dieses Rechteck dargestellt wird, unter diesen Schwellenwert fällt, verschlechtert sich die Audioqualität.Löschen von Sendern, die zwar aufgelistet werden, jedoch nicht verfügbar sind
1. Drücken Sie die Taste MENU und zeigen Sie dann mit „<“ oder „>“ das Untermenü an: Prune, Rufen Sie mit der OK-Taste die Prune auf. 2. Wählen Sie mit „>“ die Option „Yes“ und bestätigen Sie dann das Bereinigen mit OK. text_image
17:42 DABtext_image
17:42 Prune ? NoHinweis:
Dies entfernt alle ungültigen Sender aus der Senderliste, die mit einem „?“ vor dem Sendernamen gekennzeichnet sind.Senderspeicher
Das Gerät kann jederzeit bis zu 20 DAB-Sender für schnelles Abrufen speichern.Speichern eines Senders
1. Wenn Sie den gewünschten Sender gefunden haben, halten Sie die Taste PRESET gedrückt, bis das Display „Preset Store“ anzeigt. text_image
15:23 Preset Store <1: Empty >text_image
15:23 DAB Yall Preset 1 StoredAbrufen eines Senders
1. Drücken Sie im DAB-Modus kurz die Taste PRESET, um den Senderspeicher-Auswahlmodus aufzurufen. 2. Wählen Sie mit der Taste „>“ oder „<“ den vorbelegten Sender. 3. Wählen Sie ihn mit der ▶ ||/OK-Taste aus und starten Sie die Wiedergabe des angezeigten Senders. text_image
15:23 DAB Preset Recall <6: BBC Radio 6>Informationen zur „Aktuellen Wiedergabe“
Während der Wiedergabe eines Senders zeigt der Bildschirm seinen Namen und DLS (Dynamisches Label-Segment)-Informationen an, die vom Sender übertragen werden, wie Programmname, Titel und Kontaktdaten. Eine lange DLS-Information mit mehr als 16 Zeichen scrollt über das Display. text_image
13:26 DAB Heart Drivetime with EWeitere Informationen anzeigen
Jedes Mal, wenn Sie die Taste INFO drücken, wird die nächste Informationsgruppe zyklisch angezeigt: DLS-Text, DL Plus-Informationen (diese wenden nur angezeigt, wenn sie vom Sender übertragen werden), Signalstärke, Programmtyp, Ensemblename, Kanalnummer/Frequenz, Signal-Fehlerrate, Bitrate, Codec/DAB-Variante, Zeit und Datum. text_image
13:26 DAB HeartHinweis:
DL Plus enthält zusätzliche Informationen, die von den Sendern übermittelt und vorübergehend in Ihrem Radio gespeichert werden können.Dynamik-Komprimierung (DRC)
Diese Funktion verringert den Unterschied zwischen den lautesten und leisesten übertragenen Passagen. Tatsächlich erhöht dies die relative Lautstärke der leisen Töne und verringert die Lautstärke der lauten Töne.Hinweis:
DRC funktioniert nur, wenn die Funktion vom Rundfunkanbieter eines bestimmten Senders aktiviert wurde.Ändern der DRC-Einstellung
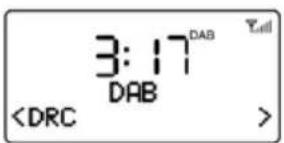
Wählen Sie Menu > DRC und rufen Sie dann mit der ▶ ||/OK-Taste das DRC-Untermenü auf. text_image
3:17 DABtext_image
3:17 DAB DRCBEDIENUNG DES GERÄTES IM UKW-MODUS
Der UKW-Radiomodus empfängt analoges Radio im UKW-Frequenzbereich (87,5 bis 108 MHz) und zeigt RDS (Radio Data System)-Informationen über den Sender an. 1. Ziehen Sie die Teleskopantenne voll aus. 2. Drehen Sie die FUNKTIONSAUSWAHL in die Stellung UKW, um den UKW-Modus aufzurufen. 3. Halten Sie die Taste,,<“/„>“ zum Suchen der Sender gedrückt. Beim ersten gefundenen Sender hält der Suchlauf automatisch an. 4. Drücken Sie kurz die Taste „<“ oder „>“, um das Radio für eine Feineinstellung in 50 KHz-Schritten aufwärts oder abwärts abzustimmen. Hinweis:
Wenn der Empfang zu schwach und der empfangene Sender verrauscht ist, versuchen Sie durch Ändern der Position der Teleskopantenne den Empfang zu verbessern.Senderspeicher
Das Gerät kann bis zu 20 UKW-Sender speichern. Das erfolgt auf die gleiche Weise wie beim oben beschriebenen DAB-Modus.Informationen zur „Aktuellen Wiedergabe“
Bei der UKW-Wiedergabe eines Senders zeigt der Bildschirm dessen Frequenz, oder wenn RDS-Informationen vorhanden sind, den Sendernamen und weitere Radiotext-Informationen an. Wenn keine Informationen verfügbar sind, wird nur die Frequenz und die Meldung „No Radio Text“ angezeigt. Weitere Informationen zur Übertragung anzeigen
Jedes Mal, wenn Sie die Taste INFO drücken, wird die nächste Informationsgruppe zyklisch angezeigt: RDS-Radiotext, Programmtyp, Frequenz, Datum und Uhrzeit. BEDIENUNG DES GERÄTES IM AUX-IN-MODUS
Im Aux In-Modus kann Audio von einer externen Quelle wiedergegeben werden, wie z. B. einem MP3-Player. 1. Schließen Sie das eine Ende des 3,5mm Audiokabels (im Lieferumfang enthalten) an die Kopfhörer- oder Line-Out-Buchse Ihres Players und das andere Ende des Kabels an der AUX-IN-Buchse auf der Rückseite des Geräts an. 2. Drehen Sie die FUNKTIONSAUSWAHL in die Stellung AUX, um den AUX-Modus aufzurufen. 3. Schalten Sie die externe Audioquelle ein und starten Sie die Wiedergabe am externen Gerät. 4. Die Lautstärke kann nun über das Hauptgerät geregelt werden. Bedienen Sie alle anderen Funktionen wie gewohnt am externen Gerät.Hinweise:
1) Wenn Sie mit der Line out-Buchse des externen Geräts verbunden sind, dann können Sie die Lautstärke nur an diesem Gerät anpassen. Wenn Sie mit der Kopfhörerbuchse des externen Geräts verbunden sind, dann müssen Sie unter Umständen den Lautstärkeregler des externen Geräts und den des Hauptgeräts anpassen, um die optimale Lautstärkeeinstellung zu suchen. 2) Halten Sie ▶|/OK nach der Verwendung zum Umschalten in den Stand-by-Modus gedrückt oder schalten Sie das Gerät aus, indem Sie ON/OFF auf OFF drehen. Vergessen Sie nicht, auch die Stromversorgung des externen Geräts auszuschalten.BLUETOOTH-MODUS
Dieses Gerät bietet Ihnen die Möglichkeit, ein Bluetooth-fähiges Gerät zu verwenden. Die Betriebsreichweite ist auf ungefähr 10 Meter begrenzt, abhängig von der Umgebung und dem verwendeten Gerät. Auf Grund der verschiedenen Gerätehersteller, Modelle und Softwareversionen kann eine vollständige Funktionalität nicht garantiert werden.Anmelden der Geräte (Koppeln)
Bevor Ihren Lautsprecher mit einem kompatiblen Gerät benutzen können, wie zum Beispiel einem Mobiltelefon, müssen Sie ihn beim ersten Mal mit dem Gerät koppeln und verbinden. 1. Drehen Sie ON/OFF auf ON, um das Gerät einzuschalten. 2. Achten Sie darauf, dass die Bluetooth-Funktion an Ihrem Wiedergabegerät (z. B. Mobiltelefon) aktiviert wurde. Für Einzelheiten schlagen Sie in der Bedienungsanleitung Ihres Wiedergabegeräts nach. 3. Drehen Sie FUNKTIONSWAHL auf BT, um den Bluetooth-Modus aufzurufen, „Bluetooth Disconnected“ blinkt im Display. Das zeigt an, dass dieses Gerät zur Kopplung mit anderen Geräten bereit ist.Koppeln des Lautsprechers
1. Wenn Sie diesen Lautsprecher nicht mit einem Gerät gekoppelt haben oder die Liste der gekoppelten Geräte leer ist, wird der Kopplungsmodus aktiviert. 2. Aktivieren Sie am kompatiblen Gerät die Bluetooth-Funktion und lassen Sie es nach kompatiblen Geräten suchen. 3. Wählen Sie in der Liste der aufgefundenen Geräte den Lautsprecher „PA4600“. Tipps: Mit dem Lautsprecher kann nur ein Wiedergabegerät gekoppelt werden. Wenn der Lautsprecher schon mit einem anderen Wiedergabegerät verbunden ist, wird der Lautsprecher in der BT-Auswahlliste nicht angezeigt. Wenn Ihr Gerät die Eingabe eines Passkeys verlangt (hängt vom Gerätehersteller, Modell und der Softwareversion ab), dann geben Sie die Ziffern „0000“ (vier Nullen) ein und drücken Sie die Taste OK. Nach erfolgreicher Kopplung wird „Connected“ im Display angezeigt und der Sprachhinweis „Connecting“ ertönt. Nach dem vollständigen Verbinden können Sie über Bluetooth Musik drahtlos anhören oder Musik auf Ihrem Bluetooth-Gerät auswählen. 4. Drücken Sie ▶ ||/OK, um die Wiedergabe zu unterbrechen (Pause) oder fortzusetzen. 5. Springen Sie mit der Taste „>“ zum nächsten Titel oder mit der Taste „<“ zum Anfang des aktuellen Titels oder zum vorigen Titel. 6. Halten Sie die Taste ▶ ||/OK gedrückt, um das Gerät anzuhalten und in den in den Standby-Modus zu schalten. Schalten Sie das Gerät aus, indem Sie den Ein-/Ausschalter auf der linken Seite des Geräts in die Stellung OFF drehen.ANMERKUNG:
- Für zukünftige Geräte (z. B. Mobiltelefone) kann die Bluetooth-Kompatibilität nicht gewährleistet werden. - Um Audiodaten übertragen zu können, muss Bluetooth auf Ihrem Wiedergabegerät aktiviert bleiben. Schlagen Sie in der Bedienungsanleitung Ihres Wiedergabegeräts nach. - Wenn Sie auf einem Mobiltelefon, auf dem Sie Musik wiedergeben, einen Anruf annehmen, wird die Musik unterbrochen. Der Ton wird jedoch nicht über den Lautsprecher wiedergegeben. Wenn Sie den Anruf beendet haben, verbinden sich die Geräte wieder und die Wiedergabe wird fortgesetzt. - Gibt es eine bestehende Verbindung, so halten Sie PRESET/KOPPLUNG für 3 Sekunden gedrückt, um die Verbindung zu trennen und den Kopplungsmodus aufzurufen. - Der Player wird getrennt, wenn sich Ihr Gerät aus dem Betriebsbereich begibt. Zum erneuten Verbinden mit diesem Player bringen Sie ihn wieder in den Betriebsbereich. - Wird das Gerät außerhalb des Betriebsbereichs gebracht, so überprüfen Sie bei der Rückkehr, ob es weiterhin mit dem Player verbunden ist. - Wurde die Verbindung verloren, so folgen Sie den obigen Anleitungen zur erneuten Kopplung Ihres Geräts mit dem Player.Gebrauch des Geräts als Bluetooth-Freisprecheinrichtung
1. Verbinden Sie Ihr Mobiltelefon über Bluetooth mit dem Radio, wie oben beschrieben. 2. Beim Eingang eines Anrufs auf Ihrem Mobiltelefon tippen Sie kurz auf die Taste ▶|/OK am Gerät, um den eingehenden Anruf vom Mobiltelefon zum Lautsprecher umzuschalten. Führen Sie Ihren Anruf mit dem eingebauten Mikrofon und Lautsprecher durch. 3. Stellen Sie die gewünschte Lautstärke mit dem Lautstärkeregler Ihres Mobiltelefons ein. 4. Zum Beenden des Anrufs tippen Sie erneut auf ▶ ||/OK. Wenn Sie vor dem Anruf Musik von Ihrem Mobiltelefon über den Lautsprecher wiedergeben haben, wird die Musikwiedergabe automatisch fortgesetzt, sobald Sie aufgelegt haben.SYSTEMBIBLIOTHEK
In der Systembibliothek stellen Sie den Sleeptimer, die Uhrzeit, Alarme und sonstige Systemeinstellungen ein.UNTERMENÜ DER SYSTEMBIBLIOTHEK AUFRUFEN UND WÄHLEN
1. Drücken Sie in einem beliebigen Betriebsmodus die Taste MENU. 2. Drücken Sie „>“ oder „<“ zur Auswahl von „System“. 3. Drücken Sie ▶ ||/OK zum Aufrufen des Untermenüs der Systembibliothek. 4. Drücken Sie „>“ oder „<“ zur Auswahl und drücken Sie ▶|/OK zur Bestätigung der Einstellung.SLEEPTIMER EINSTELLEN
\- Drücken Sie „>“ oder „<“ zur Auswahl von „Sleep“ im Untermenü der Systembibliothek. text_image
10:43 DAB < System >text_image
10:48 Systemtext_image
10:48 Set sleep time Sleep offUHRZEIT MANUELL EINSTELLEN
Die Uhrzeit kann im Untermenü der Systembibliothek ebenfalls manuell eingestellt werden. \- Drücken Sie „>“ oder „<“ zur Auswahl von „Time“ im Untermenü der Systembibliothek. text_image
10:48 Systemtext_image
10:48 Set time 10:48text_image
10:48 Time SavedALARME EINSTELLEN UND NUTZEN
So wie bei einer Uhr oder einem Kalender sind zwei vielseitige Wecker mit Schlummerfunktion vorhanden. Jeder Wecker kann einen Summer oder eine der Audioquellen als Alarmsignal auswählen. Ein aktiver Alarm wird durch ein Glockensymbol „auf der linken Seite des LCD-Displays angezeigt.Hinweis:
Die Alarmparameter müssen nach der Uhrzeit in einem beliebigen Betriebsmodus eingestellt werden.Wecker 1 einstellen
1. Halten Sie in einem beliebigen Betriebsmodus ALARM/SNOOZE gedrückt, „Alarm1 Setup“ wird im Display angezeigt. 2. Drücken Sie ▶ ||/OK, um die Parameter für Alarm1 einzustellen. Die Stundenziffern blinken im Display.   3. Drücken Sie kurz die Taste „>“ oder „<“, um die Stunden einzustellen. Anschließend bestätigen Sie den Stundenwert mit der Taste OK. Die Stundenziffern hören auf zu blinken. Die Minutenziffern jetzt fangen zu blinken an. 4. Die Wecker1-Zeiteinstellung fordert Sie zur Eingabe folgender Parameter auf. Wählen Sie der Reihe nach mit der Taste „>“ oder „<“ einen Wert für jeden Parameter, bestätigen Sie dann mit der Taste ▶|//OK und gehen Sie zum nächsten Parameter.Wecker-Parameter:
- On time – Stunden und Minuten - Duration – 15 | 30 | 45 | 60 | 90 Minuten. Wenn der Weckalarm nicht abgebrochen wird, kehrt das Radio nach diesem Zeitraum in den Standby-Modus zurück. - Alarm Type (Quelle) – Buzzer | DAB | FM. Bei Auswahl von DAB oder FM als Audioquelle werden Sie ebenfalls aufgefordert, den zuletzt gehörten Sender oder einen der Senderspeicher zu wählen (sofern belegt). - Alarm Mode – Daily | Once | Weekends | Weekdays (Täglich | Einmal | Wochenende | Wochentage). Wählen Sie die Tage aus, an denen der Weckalarm aktiv ist. - Alarm - Off | On Nachdem „Alarm on“ gewählt wurde, wird der Weckalarm1 automatisch scharfgeschaltet. Das Weckalarm1-Symbol blinkt nicht mehr. Wecker 2 einstellen
1. Halten Sie in einem beliebigen Betriebsmodus ALARM/SNOOZE gedrückt, bis „Alarm 1 Setup“ im Display angezeigt wird. 2. Drücken Sie „>“ oder „<“ zur Auswahl von „Alarm 2 Setup“ und dann ▶ ||/OK, um die Parameter für Alarm 2 einzustellen. 3. Die weiteren Einstellungen von Alarm 2 entsprechen Alarm 1, wie oben beschrieben. Hinweise:
- Vergewissern Sie sich zur Gewährleistung, dass die Alarmfunktion ordnungsgemäß arbeitet, dass der Lautstärkepegel korrekt eingestellt ist, bevor Sie das Gerät ausschalten. - Schalten Sie das Gerät nicht mit ON/OFF aus, nachdem Sie den Alarm eingestellt haben, anderenfalls wird der Alarm nicht ausgelöst. - Zur eingestellten Zeit ertönt der Weckalarm zuerst leise und wird dann schrittweise bis zur eingestellten Lautstärke erhöht. Wenn ein Weckalarm ertönt, blinkt das Glockensymbol im Display. - Halten Sie die Taste ALARM/SNOOZE 3 Sekunden lang gedrückt, um den Weckalarm abzubrechen, falls er aktiviert wurde.Schlummerfunktion
\- Wenn der Weckalarm aktiviert wurde (Wecken), drücken Sie kurz die Taste ALARM/SNOOZE, um den Weckalarm zu beenden. Das Schlummersymbol „“ wird auf dem Display angezeigt. \- Der Weckalarm ertönt nach 10 Minuten nochmals (Standardschlummerzeit). SONSTIGE SYSTEMEINSTELLUNGEN Einstellung der Sprache
\- Drücken Sie „>“ oder „<“ zur Auswahl von „Language“ im Untermenü der Systembibliothek. \- Drücken Sie ▶ ||/OK der Untermenüs der Spracheneinstellung. Die Sprache der Displaymeldungen kann gewählt werden: English / Francais / Deutsch / Italiano / Español \- Drücken Sie „>“ oder „<“ zur Auswahl und drücken Sie ▶|//OK zur Bestätigung der Einstellung. Rücksetzen auf die Werkseinstellungen
Das Rücksetzen auf die Werkseinstellungen löscht alle vom Benutzer definierten Einstellungen, so dass Zeit/Datum, DAB/UKW-Senderliste und die voreingestellten Sender verloren sind. - Drücken Sie „>“ oder „<“ zur Auswahl von „Factory Reset“ im Untermenü der Systembibliothek. - Drücken Sie ▶ ||/OK zum Aufrufen des Untermenüs zum Zurücksetzen zu den Werkseinstellungen.  Bei Auswahl von „Yes“ werden Sie aufgefordert, mit Tastendruck auf ▶ ||/OK zu bestätigen. Softwareversion
Drücken Sie „>“ oder „<“ zur Auswahl von „SW version“ im Untermenü der Systembibliothek, dann drücken Sie ▶||/OK zur Anzeige der aktuellen Softwareversion.  text_image
10:48 SW version dab-wni-FS2445-0FEHLERBEHEBUNG UND FEHLERMELDUNGEN
1. Fehlermeldungen| Meldung Beschreibung | |
| DAB-Modus | |
| No DAB Station Kein DAB | B-EmpfangKeine DAB-Sender verfügbar – Überprüfen Sie die Antenne. |
| Not available Der aufgeführte Sender kann nicht gefunden werden. | |
| Signal error Das DAB-Signal wurde unterbrochen. | |
| (No name) Der aktuelle Sender überträgt keinen Identitätsnamen. | |
| ? Liste ungültig | |
| Signal error Das DAB-Signal wurde unterbrochen. | |
| UKW-MODUS | |
| No Radio Text Keine RDS | Textinformationen für diesen Sender verfügbar. |
| No PTY Keine RDS-Programmtyp-Informationen verfügbar. | |
| No Name Es wurde kein RDS-Sendername übertragen. | |
| Problem Ursache Lösungen | ||
| Kein Ton Lautstärke ist | zu niedrig Lautstärke erhöhen. | |
| Schlechte Tonqualität im Radiomodus | Radiosignal ist zu schwach Richten Sie die Antenne neu aus. | |
| UKW: Rauschen DAB: Unterbrochene DAB-Aussetzer: Meldung „No stations available“ | Geringe Signalstärke Antenne überprüfen/ ausrichten Das Radio umsetzen Ortssender erneut suchen. | |
| Kein Audiosignal über die Bluetooth-Verbindung | Kein Audiosignal über die Bluetooth-Verbindung | Überprüfen Sie, ob eine Verbindung besteht. Falls notwendig, koppeln Sie den Lautsprecher erneut mit der Audioquelle. |
| Lautstärke ist zu niedrig Erhöhen Sie die Lautstärke am Lautsprecher. | ||
| Erhöhen Sie die Lautstärke an der Audioquelle. | ||
| Es ist keine Bluetooth-Verbindung möglich | Das Koppeln funktioniert nicht | Kontrollieren Sie, ob die Audioquelle das A2DP- Protokoll unterstützt. |
| Die Audioquelle ist ausgeschaltet | Schalten Sie die Audioquelle ein. | |
| Bluetooth ist an der Audioquelle ausgeschaltet. | Schalten Sie die Bluetooth-Funktion an der Audioquelle ein. | |
| Die Bluetooth-Version wird nicht unterstützt. | Verwenden ein anderes Wiedergabegerät. | |
| Von einem Bluetooth® Gerät wird schlechte Tonqualität übertragen | Bluetooth-fähiges Gerät nahezu außerhalb der Reichweite des PA4600 | Gehen Sie mit Ihrem Bluetooth-fähigen Gerät dichter an das PA4600 heran |
| TECHNISCHE DATEN | |
| Netzadapter (im Lieferumfang enthalten) | Eingang AC 100-240 V ~ 50/60 Hz |
| Ausgang DC 5 V = 1,5 A | |
| Batteriekapazität (Batterie im Lieferumfang enthalten) | 1.050 mAh |
| Max. Wiedergabezeit (mit Batterie) | 3,5 Stunden |
| Leistungsaufnahme 8 W | |
| Leistungsaufnahme in Standby < 1W | |
| DAB-Frequenz 174,928 bis 239,2 MHz | |
| UKW-Frequenz 87,5 bis 108 MHz | |
| Bluetooth-Unterstützung V2.1 + EDR | |
| Bluetooth-Arbeitsbereich bis zu 10 Meter | |
| Übertragungsfrequenz 2,4 GHz | |
| Protokolle A2DP 1.2 | |
| Betriebstemperatur -5 °C bis +40 °C | |
| Betriebsluftfeuchtigkeit 20 % bis 80 % | |
PA4600
Radio portable numérique DAB+/DAB/FM, avec fonction Bluetooth
text_image
08:59™ E5 PLUS PlayingCONSIGNES DE SÉCURITÉ IMPORTANTES
Cet appareil a été conçu et fabriqué pour ne causer aucun risque, à condition qu'il soit utilisé comme il devrait l'être. Cependant, toute erreur de manipulation peut présenter un danger de choc électrique ou de début d'incendie. Lisez toutes les instructions de sécurité et de fonctionnement avant d'installer et d'utiliser votre appareil, et conservez-les instructions pour référence ultérieure. Respectez tous les avertissements rapportés dans ce guide et sur l'appareil.Eau et humidité
N'utilisez pas cet appareil près d'une source d'eau. Par exemple : près d'une baignoire, d'un lavabo, d'un évier de cuisine, d'un bac à laver le linge, d'une piscine ou d'une cave humide.Ventilation
Posez l'appareil dans un endroit et dans une position lui assurant une ventilation suffisante. Par exemple, ne le posez pas sur un lit, un canapé, un tapis ou toute autre surface risquant d'obstruer les ouvertures de ventilation. Également, ne le placez pas à l'intérieur d'un meuble encastré, telle une bibliothèque ou un autre meuble risquant d'entraver la bonne circulation de l'air par les ouvertures de ventilation.Chaleur
Éloignez l'appareil de toute source de chaleur telle qu'un radiateur, une ouverture d'air chaud, un four et tout autre appareil dégageant de la chaleur (y compris un amplificateur).Alimentation électrique
Branchez l'appareil uniquement sur une alimentation électrique du type décrit dans les instructions d'utilisation ou marqué sur le produit même.Nettoyage
Nettoyez l'appareil uniquement de la manière indiquée dans ce guide. Aucun objet ni liquide ne doit être introduit par les fentes et ouvertures de l'appareil.Protection contre la foudre et les pointes de courant
Débranchez l'appareil de la prise secteur. Vous évitez ainsi que la foudre et les pointes de courant n'endommagent l'appareil.Surcharge
Ne surchargez pas vos prises secteur, rallonges électriques et boîtiers de raccordement pour éviter de vous exposer alors à des risques de début d'incendie et de choc électrique.Dommage nécessitant une réparation
Vous devez apporter votre appareil à un technicien qualifié lorsque : Un liquide ou un objet est tombé à l'intérieur de l'appareil . L'appareil a été exposé à la pluie. L'appareil est tombé ou présente des signes extérieurs de dommage . L'appareil affiche une baisse de performances ou ne fonctionne pas normalement.Périodes de non utilisation
Débranchez votre appareil de la prise secteur si vous n'envisagez pas de l'utiliser avant longtemps (une semaine ou plus). Vous éviterez qu'il ne se détériore sous l'effet de phénomènes électriques ou de la corrosion.Réparation
Seules les opérations de maintenance indiquées dans ce guide sont permises à l'utilisateur. Toutes les autres sont du seul ressort d'un technicien professionnel qualifié.AVERTISSEMENT :
1) Votre seule option pour éliminer toute tension à l'intérieur de l'appareil est de débrancher celui-ci du secteur. Aussi, prévoyez que la prise soit facilement accessible à tout moment. 2) La pile ne doit pas être exposée à une chaleur excessive telle que les rayons du soleil, un feu, etc. 3) Pour éviter des risques d'incendie et de choc électrique, n'exposez pas votre appareil à la pluie ou à l'humidité. Ne placez pas votre appareil dans un endroit l'exposant à un contact avec un liquide (par égouttement, éclaboussure, etc.) et ne posez dessus aucun objet rempli d'un liquide, tel un vase.EMPLACEMENT DES ÉLÉMENTS DE COMMANDE
VUE AVANT text_image
08:59™ RS PLUS Playingqtext_image
7 0 9 10 11 12 13 14- En mode Bluetooth :
- Lire/marquer une pause dans la lecture en cours. - À la réception d'un appel sur votre téléphone portable, tapez une fois sur cette touche pour accepter l'appel ; tapez une seconde fois pour terminer l'appel.8. Touche <
\- Permet de parcourir les options d'un menu ou les entrées d'une liste de stations numériques.- En mode FM :
- Appuyez brièvement sur cette touche pour démarrer une recherche de stations dans le sens décroissant des fréquences, depuis la fréquence actuelle. - Appuyez sur cette touche et maintenez-la enfoncée pour démarrer une recherche de stations dans le sens décroissant des fréquences et l'arrêter sur la première station dont le signal est suffisamment fort. \- En mode Bluetooth : positionne la lecture au début du titre actuel ou du titre précédent.9. Touche >
\- Permet de parcourir les options d'un menu ou les entrées d'une liste de stations numériques.- En mode FM :
\- Appuyez brièvement sur cette touche pour démarrer une recherche de stations dans le sens croissant des fréquences, depuis la fréquence actuelle. \- Appuyez sur cette touche et maintenez-la enfoncée pour démarrer une recherche de stations dans le sens croissant des fréquences et l'arrêter sur la première station dont le signal est suffisamment fort. \- En mode Bluetooth : passe au titre suivant.10. Touche MENU
\- Appuyez cette touche pour afficher le menu du mode actuel, appuyez à nouveau pour afficher l'écran Lecture en cours.11. Touche INFO
\- En mode radio numérique/FM : Affiche diverses informations.12. Touche PRESET/COUPLAGE
- En mode radio numérique/FM :
- Appuyez brièvement sur cette touche pour passer en mode rappel des stations de radio présélectionnées. - Appuyez sur cette touche et maintenez-la enfoncée pour passer en mode présélection de station.- En mode Bluetooth :
\- Maintenez appuyée cette touche pendant 3 secondes pour annuler la connexion en cours et lancer le couplage.13. Touche ALARME/SNOOZE/DIM
- Maintenez appuyée cette touche dans un mode quelconque pour régler les alarmes. - Active le mode rappel de réveil lorsque la source sonore de réveil retentit. - Lorsque le rétroéclairage est activé, appuyez sur cette touche pour régler le niveau de luminosité (forte ou faible).14. Microphone intégré
VUE ARRIÈRE
text_image
Technical diagram of a device casing with numbered components and labeled partsVUE DE DESSOUS
text_image
18 19INSTALLATION DE LA PILE
1. À l'aide d'une pièce de monnaie, tournez la vis de verrouillage du cache de la pile de 90 degrés, jusqu'à déverrouiller le cache. 2. Dégagez le cache de son logement avec vos doigts. 3. Installez la pile au lithium ionique de 3,7 V qui vous a été fournie, en respectant le sens des polarités. 4. Remettez en place le cache du compartiment de la pile et tournez la vis jusqu'à le verrouiller complètement.AVERTISSEMENT :
- Vérifiez que la pile est correctement installée. - Utilisez uniquement une pile de même type ou d'un type équivalent. - Si vous n'allez pas utiliser l'appareil pendant une longue durée, retirez la pile pour éviter qu'elle ne coule et cause des dégâts ou des blessures. - Ne jetez jamais des piles dans le feu, elles risquent d'exploser ou de laisser leur électrolyte s'échapper.ALIMENTATION ÉLECTRIQUE
1. Branchez l'extrémité appropriée de l'adaptateur d'alimentation électrique sur le port DC 5V USB situé à l'arrière de votre radio. Branchez l'autre extrémité sur une prise secteur qui a été correctement installée. 2. Vérifiez que la tension fournie par le secteur correspond à celle marquée sur la plaquette de spécifications électriques de l'appareil.Attention
1. Utilisez uniquement l'adaptateur électrique qui a été fourni avec l'appareil. Ne le branchez sur aucun autre appareil. 2. Utilisez uniquement l'adaptateur original du fabricant. Il a été spécialement conçu pour charger progressivement la pile de votre appareil. Tout autre adaptateur risque de raccourcir la durée de vie de la pile et d'endommager la pile ou l'appareil.Remarque :
Débranchez l'appareil du secteur lorsque vous n'envisagez pas de l'utiliser avant longtemps.Recharge de la batterie installée
Vous pouvez également charger la pile de votre radio à l'aide de l'adaptateur secteur qui vous a été fourni. Pour cela, branchez le connecteur USB du chargeur sur le port DC 5V de votre radio et branchez le bloc adaptateur sur une prise secteur. Le témoin de charge reste allumé en jaune pendant toute la durée du chargement ; il devient vert dès que la pile est complètement chargée.Remarque :
1. La durée de chargement dépend du niveau actuel de tension de la pile. 2. N'oubliez pas de retirer la pile de votre appareil lorsque vous n'envisagez pas d'utiliser celui-ci avant longtemps.INSTRUCTIONS GÉNÉRALES
- Positionnez le bouton ON/OFF sur « ON » pour allumer l'appareil, l'écran s'allume et affiche l'heure « 00:00 » et le mode de fonctionnement. - Tournez le sélecteur de fonction sur le mode que vous voulez utiliser : DAB, FM, AUX-IN, Bluetooth. - Maintenez appuyée la touche ▶ ||/OK/VEILLE pendant 3 secondes pour accéder au mode veille, « 00:00:00 » et « Time is not set » seront affichés pour vous inviter à régler l'heure. - En mode veille, maintenez appuyée la touche ▶ ||/OK/VEILLE pendant 3 secondes pour allumer l'appareil. - Pour éteindre l'appareil, tournez le commutateur Power ON/OFF sur la position OFF.Remarques :
1. L'heure et la date peuvent être ajustées automatiquement. En mode synchro, l'heure et la date sont automatiquement synchronisées avec les signaux transmis sur la bande numérique ou FM (lorsque ces signaux sont disponibles). Elle peut également être réglée manuellement en appuyant sur la touche MENU en tout mode, puis d'accéder au sous-menu « Set Time/Date » du menu « System > Time », appuyez sur « > » ou « < » pour sélectionner et appuyez sur ▶ ||/OK pour confirmer le réglage. 2. Conception ECO : votre radio bascule automatiquement en mode veille en l'absence de toute commande ou en l'absence d'une commande appropriée pour le mode concerné, ceci pendant 60 minutes depuis l'un quelconque des modes de fonctionnement, sauf le mode FM.UTILISATION DE L'APPAREIL EN MODE RADIO NUMÉRIQUE
Le mode radio numérique permet de diffuser le contenu de stations numériques DAB/DAB+ et d'afficher des informations sur les stations.Recherche automatique de stations
1. Déployez complètement l'antenne télescopique. 2. Positionnez le bouton ON/OFF sur « ON » pour allumer l'appareil. 3. Tournez le sélecteur de fonction sur la position DAB pour activer le mode radio numérique. text_image
10:48 DAB Radio 10:48 Scanning... 42Remarques :
1. Comme pour la télévision numérique, la réception des signaux peut se révéler insuffisante dans certaines régions. Les diffuseurs s'emploient constamment à améliorer la couverture numérique, mais vous pouvez encore, dans certains endroits, avoir à attendre la disponibilité de certains ou tous les services numériques. Vérifiez la couverture numérique de votre région. 2. Vous pouvez être amené à démarrer manuellement une recherche de stations pour l'une des raisons suivantes : \- De nouvelles stations deviennent accessibles. - Des stations ferment ou ne sont plus accessibles (elles sont alors repérées par un point d'interrogation « ? » dans la liste des stations). - La réception était trop faible lors de la première recherche (par exemple si vous aviez oublié de déployer l'antenne) et la liste des stations qui a été générée était vide ou incomplète. - La réception de certaines stations, trop faible, provoque le décrochement de la radio et vous voulez ne conserver que les stations de signal suffisamment fort.Démarrage d'une nouvelle recherche complète des stations
Pour refaire une recherche complète, vous pouvez appuyer sur la touche MENU pour afficher le menu, puis appuyez sur la touche ▶ ||/OK pour sélectionner Full Scan text_image
17:42 DAB DABRecherche manuelle de stations
En plus du balayage de la bande de fréquences, vous pouvez rechercher manuellement un canal ou une fréquence spécifique. Cette fonction est utile pour ajuster la position de l'antenne afin d'optimiser la réception et pour rechercher un canal spécifique afin de mettre à jour la liste des stations. 1. Appuyez sur la touche MENU puis sur la touche « > » pour sélectionner l'option : Manual tune. Appuyez sur la touche OK pour confirmer votre choix. 2. Sélectionnez un canal/une fréquence à l'aide des touches « < » et « > ». Appuyez sur la touche OK pour aligner la radio sur ce canal ou cette fréquence. L'écran affiche la force des signaux reçus sur la fréquence correspondante. Tout ajustement de la position de l'antenne est immédiatement répercuté sur la force des signaux reçus qui est affichée à l'écran. text_image
13:26 DAB 8C 187.507MHzRemarque :
Le rectangle légèrement plus grand repère le seuil de la qualité audio. Lorsque la force du signal, indiquée par les rectangles pleins, chute en dessous de ce seuil, la qualité audio devient insuf sante.Pour supprimer les stations qui figurent dans la liste mais ne sont pas accessibles
1. Appuyez sur la touche MENU puis sur la touche « > » ou « < » jusqu'à sélectionner le sous-menu : Prune, appuyez sur la touche OK pour accéder à l'option Prune. 2. Appuyez sur la touche « > » pour sélectionner « Yes » puis sur la touche OK pour confirmer votre choix. text_image
17:42 DABtext_image
17:42 Prune ? NoRemarque :
Cette opération supprime toutes les stations de la liste qui sont repérées par un ?'.Présélection de station
Vous pouvez présélectionner jusqu'à 20 stations numériques afin d'y accéder ensuite plus rapidement.Pour présélectionner une station de radio
1. Recherchez la station si ce n'est pas déjà fait, appuyez sur la touche PRESET et maintenez-la enfoncée jusqu'à afficher le message Preset Store. 2. Utilisez les touches « < »/« >» pour choisir une position mémoire, appuyez sur la touche ▶ ||/OK pour confirmer le réglage.Pour entendre le contenu d'une station de radio présélectionnée
1. Appuyez brièvement sur la touche PRESET depuis le mode radio numérique. La radio se place en mode rappel de présélection. 2. Choisissez une station présélectionnée à l'aide des touches « > » et « < ». 3. Appuyez sur la touche ▶ ||/OK pour valider votre choix et diffuser le contenu de la station.Informations sur la lecture en cours
Pendant la diffusion d'une station, la radio affiche son nom et le radiotexte (DLS pour Dynamic Label Segment) éventuellement fourni par la station (nom de l'émission, titre de la chanson, coordonnées de contact, etc.). Lorsque les informations DLS occupent plus de 16 caractères, elles défilent à l'écran. text_image
15:23 DAB Preset Store <1: Empty >text_image
15:23 Preset 1 Storedtext_image
15:23 DAB Preset Recall <6: BBC Radio 6>text_image
13:26 DAB Heart Drivetime with EPour afficher d'autres informations
Chaque pression sur la touche INFO affiche une information différente, selon la séquence suivante : Texte DLS, informations DL Plus (si de telles informations sont transmises par la station), force du signal, type de programme, nom de l'ensemble, canal/fréquence, taux d'erreur dans le signal, débit binaire, codec/variant DAB, heure et date. text_image
13:26 HeartRemarque :
DL Plus affiche les informations supplémentaires envoyées par certaines stations et stockées temporairement sur la radio.Compression dynamique (DRC pour Dynamic Range Compression)
Cette fonction réduit l'écart entre le niveau sonore le plus faible et le niveau sonore le plus fort. Pour cela, elle augmente le volume des plages de faible niveau sonore et diminue celui des plages de fort niveau sonore.Remarque :
La compression dynamique ne fonctionne que si le diffuseur l'autorise expressément pour une station spécifique.Pour configurer la compression dynamique
Sélectionnez Menu > DRC et appuyez sur la touche ▶ ||/OK pour accéder au sous-menu correspondant. text_image
3:17 DABtext_image
3:17 DAB DRCUTILISATION DE L'APPAREIL EN MODE FM
Le mode FM vous permet de recevoir les stations analogiques de la bande FM (87,5-108 MHz) et d'afficher les informations RDS (Radio Data System). 1. Déployez complètement l'antenne télescopique. 2. Tournez le sélecteur de FONCTION sur la position FM pour activer ce mode. 3. Appuyez sur la touche « < »/« > » et maintenez-la enfoncée pour démarrer la recherche automatique de stations. La radio s'arrête sur la première station qu'elle détecte. 4. Appuyez brièvement sur la touche « < » ou « > » pour affiner le réglage de fréquence par augmentation ou décrémentation de 50 KHz. Remarque :
Si la réception est faible et perturbée par du bruit, essayez de modifier la position de l'antenne télescopique.Présélection de station
Vous pouvez présélectionner jusqu'à 20 stations FM sur votre appareil. La procédure est identique à celle qui a été décrite pour le mode radio numérique.Informations sur la lecture en cours
Pendant que vous écoutez le contenu d'une station FM, sa fréquence et, si ses données RDS sont disponibles, son nom et le radiotexte transmis par le poste émetteur, sont affichés sur l'écran de votre appareil.  Si aucune information n'est disponible, la fréquence et le message No Radio Text sont affichés sur l'écran.Pour afficher d'autres informations sur la diffusion
Chaque pression sur la touche INFO affiche une information différente, selon la séquence suivante : Radiotexte RDS, type d'émission, fréquence, heure et date. UTILISATION DE L'APPAREIL EN MODE AUX
Le mode Aux vous permet d'écouter sur votre radio le contenu audio d'un appareil externe, par exemple un lecteur MP3. 1. Branchez une extrémité du câble audio 3,5mm (fourni) sur la sortie écouteurs ou ligne de la source externe et branchez l'autre extrémité sur l'entrée AUX-IN de votre radio. 2. Tournez le sélecteur de FONCTION sur la position AUX pour activer ce mode. 3. Allumez la source externe et démarrez la lecture d'un contenu sur cet appareil. 4. Vous contrôlez le volume depuis l'unité principale. Pour toutes les autres fonctions, procédez depuis la source audio externe.Remarques :
1) Si vous avez connecté le câble audio sur la sortie ligne de la source externe, il vous suffit d'ajuster le volume sur la source. Si vous avez connecté le câble audio sur la sortie écouteurs de la source externe, vous devez ajuster le volume à la fois sur la source et sur la radio jusqu'à trouver le niveau sonore qui vous convient. 2) Maintenez appuyée la touche ▶ ||/OK pour mettre l'appareil en veille ou l'éteindre en positionnant le bouton ON/OFF sur OFF. N'oubliez pas d'éteindre également la source audio externe.UTILISATION DE L'APPAREIL EN MODE BLUETOOTH
Vous pouvez coupler votre radio à un appareil compatible Bluetooth. La portée de transmission est limitée à 10 mètres, selon l'environnement et l'appareil couplé. La multitude de fabricants, modèles et versions du microprogramme ne nous permet pas de vous assurer la totale fonctionnalité de votre radio avec tous les appareils existants.Connexion à un appareil externe (couplage)
Avant de pouvoir utiliser pour la première fois votre radio avec un appareil externe compatible Bluetooth (par exemple un téléphone portable), vous devez coupler les deux appareils et établir une connexion entre eux. 1. Positionnez le bouton ON/OFF sur « ON » pour allumer l'appareil. 2. Vérifiez que la fonction Bluetooth est active sur l'appareil externe (par exemple votre téléphone portable). Pour cela, reportez-vous au guide d'utilisateur de l'appareil externe. 3. Positionnez le sélecteur de FONCTION sur BT pour passer en mode Bluetooth, « Bluetooth Disconnected » se met à clignoter. Votre radio est prête à être couplée à un autre appareil.Couplage de la radio
1. Si vous n'avez jamais couplé votre radio à un appareil externe ou si la liste de couplage est vide, le mode couplage est activé. 2. Sur l'autre appareil, activez la fonction Bluetooth et démarrez la recherche des unités compatibles Bluetooth qui se trouvent à sa portée. 3. Sélectionnez l'enceinte « PA4600 » dans la liste des appareils trouvés. Remarque : Vous ne pouvez connecter qu'un lecteur de contenu à la fois à votre radio. Si la radio est déjà couplée à un premier lecteur externe, elle n'apparaît pas dans la liste de sélection BT d'un second appareil. Si l'appareil externe vous demande un mot de passe (cette exigence varie d'un fabricant, d'un modèle et d'une version du microprogramme à une autre), tapez la séquence « 0000 » (quatre zéros) et appuyez sur la touche OK. Si le couplage a été réalisé avec succès, « Connected » sera affiché et le message vocal « Connecting » sera émis. Votre radio est maintenant prête pour diffuser la musique lue sur l'autre appareil. Sélectionnez alors un premier titre sur l'appareil externe Bluetooth. 4. Appuyez sur la touche ▶ ||/OK pour suspendre/reprendre la lecture. 5. Pour passer au titre suivant, appuyez sur la touche « > » ; pour revenir au début du titre actuel ou au titre précédent, appuyez sur la touche « < ». 6. Pour arrêter toute lecture et placer la radio en mode veille, appuyez sur la touche ▶ ||/OK et maintenez-la enfoncée ; pour éteindre complètement la radio, tournez le commutateur de marche/arrêt sur la position OFF.REMARQUES :
- Nous ne garantissons pas la compatibilité Bluetooth de notre radio avec les appareils (téléphones portables, etc.) qui seront commercialisés ultérieurement. - Pour transmettre des données audio, le mode Bluetooth doit être actif sur l'autre appareil externe. La procédure est indiquée dans le guide d'utilisateur de cet autre appareil. - Si vous écoutez sur votre radio la musique stockée sur un téléphone portable et que le téléphone détecte un appel, celui-ci cesse immédiatement la transmission de la musique. et se déconnecte de la radio. Dès que l'appel est terminé, le téléphone rétablit une connexion avec la radio et reprend la diffusion de la musique. - Si une connexion existe déjà, maintenez appuyée la touche PRESET/COUPLAGE pendant 3 secondes pour l'annuler et relancer le couplage. - Le lecteur sera également déconnecté lorsque votre appareil est déplacé au-delà de la portée de transmission. Ramenez votre appareil dans la portée de transmission pour le reconnecter au lecteur. - Si l'appareil est déplacé en dehors de la portée de transmission puis ramené, vérifiez s'il est toujours connecté au lecteur. - Si la connexion est perdue, suivez les instructions ci-dessus pour coupler de nouveau votre appareil au lecteur.Utilisation de la radio comme haut-parleur Bluetooth à mains libres
1. Établissez une connexion Bluetooth entre votre téléphone portable et la radio selon la procédure que nous vous avons décrite précédemment. 2. Dès que le téléphone détecte un appel, tapez brièvement sur la touche ▶ ||/OK de la radio pour basculer l'appel sur la radio. Vous entendez maintenant votre correspondant sur le haut-parleur de la radio et pouvez lui parler via le microphone intégré de cette même radio. 3. Réglez le volume sonore sur le téléphone. 4. Pour terminer un appel, appuyez de nouveau sur la touche ▶ ||/OK. Si le téléphone diffusait de la musique sur la radio au moment de la prise de l'appel, la lecture reprend automatiquement.Bibliothèque système
Vous pouvez régler la veille automatique, l'heure, les alarmes et d'autres paramètres système dans la bibliothèque système.COMMENT ACCÉDER ET SÉLECTIONNER UN SOUS-MENU DE LA BIBLIOTHÈQUE SYSTÈME
1. Appuyez sur la touche MENU depuis l'un des modes de fonctionnement. 2. Appuyez sur la touche « > » ou « < » pour sélectionner « System ». text_image
10:43 DAB < System >RÉGLAGE DE LA VEILLE AUTOMATIQUE
- Appuyez sur la touche « > » ou « < » pour sélectionner l'option « Sleep » dans le sous-menu de la bibliothèque système. - Appuyez sur la touche ▶ ||/OK pour accéder au sous-menu réglage de veille automatique, « Set sleep time » apparaît et l'icône de veille automatique « 😊 » se met à clignoter. - Appuyez sur la touche « > » ou « < » pour choisir la valeur du délai de veille automatique en minutes parmi : Sleep off (Désactivée)/15/30/45/60/90. - Après 10 secondes, la valeur sélectionnée est automatiquement validée et l'icône de la fonction arrêt automatique « 😊 » s'arrête de clignoter sur l'écran. - Sélectionnez « Sleep off » pour désactiver la fonction arrêt automatique. L'icône « 😊 » disparaît de l'écran. text_image
10:48 Systemtext_image
10:48 Set sleep time Sleep offRÉGLAGE MANUEL DE L'HEURE
L'heure peut également être réglée manuellement dans le sous-menu de la bibliothèque système. - Appuyez sur la touche « > » ou « < » pour sélectionner l'option « Time » dans le sous-menu de la bibliothèque système. - Appuyez sur la touche ▶ ||/OK pour accéder au sous-menu de réglage de l'heure, « Set Time/Date » apparaît, appuyez de nouveau sur la touche ▶ ||/OK pour confirmer et accéder au réglage de l'heure. - À chaque fois, sélectionnez une valeur à l'aide des touches « > » et « < », puis appuyez sur la touche ▶ ||/OK pour confirmer la modification et passer au paramètre suivant. - « Time Saved » apparaît une fois la date est réglée. text_image
10:48 Systemtext_image
10:48 Set time 10:48text_image
10:48 Time SavedRÉGLAGE ET UTILISATION DES ALARMES
Comme avec une horloge/calendrier, vous pouvez définir deux heures de réveil et utiliser la fonction de rappel pour chacune. Vous sélectionnez, à votre gré, la source sonore de vos réveils. L'icône d'une cloche « » s'allume sur la gauche de l'écran LCD lorsque la fonction réveil est active.Remarque :
Le réglage des alarmes ne peut être effectué qu'une fois l'heure réglée.Réglage du réveil 1
1. Dans un mode quelconque, maintenez appuyée la touche ALARME/SNOOZE, « Alarm1 Setup » apparaît. 2. Appuyez sur la touche ▶ ||/OK pour régler l'alarme 1. Les chiffres de l'heure clignotent sur l'écran.   3. Ajustez les chiffres de l'heure à l'aide des touches « > » et « < », et appuyez sur la touche OK pour confirmer la modification. Les chiffres de l'heure sont maintenant fixes sur l'écran et les chiffres des minutes clignotent. 4. La séquence continue automatiquement pour les autres paramètres du réveil 1. À chaque fois, sélectionnez une valeur à l'aide des touches « > » et « < », puis appuyez sur la touche ▶ ||/OK pour confirmer la modification et passer au paramètre suivant.Paramètres de réveil :
- On time – heures et minutes - Duration – 15 | 30 | 45 | 60 | 90 minutes. Si vous n'arrêtez pas le réveil, la radio retourne automatiquement en mode veille une fois que le délai que vous avez choisi est écoulé. - Alarm Type (Source) – Buzzer | DAB | FM. Si DAB ou FM est choisie comme source audio il vous sera également demandé de sélectionner la dernière station syntonisée ou l'une des stations mémorisées (si possible). - Alarm Mode –Daily | Once | Weekends | Weekdays (Chaque jour | Une fois | Sam et dim | Lun à ven), choisissez les jours pendants lesquels le réveil se déclenchera. - Alarm – Off | On Si vous activez la fonction réveil (Alarm on), la radio active automatiquement les réglages du réveil1 et l'icône de ce réveil cesse de clignoter. Réglage du réveil 2
1. Dans un mode quelconque, maintenez appuyée la touche ALARME/SNOOZE jusqu'à ce que « Alarm 1 Setup » apparaisse. 2. Appuyez sur la touche « > » ou « < » pour sélectionner « Alarm 2 Setup » et appuyez sur la touche ▶ ||/OK pour régler l'alarme 2  3. Le réglage de l'alarme 2 est identique à celui de l'alarme 1 (comme décrit ci-dessus).Remarques :
- Pour vérifier que l'alarme fonctionne correctement, assurez-vous que le niveau de volume est réglé à un bon niveau avant d'éteindre l'unité. - N'éteignez pas l'unité à l'aide du sélecteur ON/OFF situé sur le côté gauche après le réglage de l'alarme, autrement l'alarme ne se déclenche pas. - À l'heure que vous avez fixée, la source sonore de réveil retentit, d'abord faiblement puis de plus en plus fort, jusqu'au niveau que vous avez choisi. Simultanément, l'icône de la cloche clignote sur l'écran. - Maintenez appuyée la touche ALARM/SNOOZE pendant 3 secondes pour arrêter l'alarme une fois déclenchée.Fonction rappel de réveil
- Lorsque l'alarme se déclenche (pour vous réveiller), appuyez sur la touche ALARM/SNOOZE pour l'arrêter. L'icône de rappel de réveil « 📊 » apparaît sur l'écran.  \- La source sonore de réveil retentira de nouveau 10 minutes plus tard (délai par défaut).AUTRES PARAMÈTRES SYSTÈME
Réglage de la langue
\- Appuyez sur la touche « > » ou « < » pour sélectionner l'option « Language » dans le sous-menu de la bibliothèque système.  \- Appuyez sur la touche ▶ ||/OK pour accéder au sous-menu de réglage de la langue. Cette option vous permet de sélectionner la langue d'affichage des messages à l'écran. Vous avez le choix entre : English / Francais / Deutsch / Italiano / Español \- Appuyez sur la touche « > » ou « < » pour sélectionner et appuyez sur la touche ▶ ||/OK pour confirmer le réglage.Réinitialisation
La réinitialisation de votre appareil efface tous vos réglages de configuration pour les remplacer par les réglages initiaux du fabricant. Vos réglages de l'heure et de la date, la liste des stations numériques et FM, et vos présélections de station sont alors perdus. \- Appuyez sur la touche « > » ou « < » pour sélectionner l'option « Factory Reset » dans le sous-menu de la bibliothèque système. \- Appuyez sur la touche ▶ ||/OK pour accéder au sous-menu restauration des valeurs par défaut.  Si vous sélectionnez « Yes », il faut confirmer en appuyant sur la touche ▶ ||/OK. Version logicielle
Appuyez sur « > » ou « < » pour sélectionner l'option « SW version » dans le sous-menu de la bibliothèque système, puis appuyez sur la touche OK pour afficher la version actuelle du logiciel.  text_image
10:48 SW version dab wni FS2445-0GUIDE DE DÉPANNAGE ET MESSAGES D'ERREUR
1. Messages d'erreur| Message Description | |
| Mode DAB | |
| No DAB Station Aucune réception de signaux numériquesPas de stations DAB disponibles : vérifiez l'antenne. | |
| Not available Impossible de localiser la station indiquée. | |
| Signal error La réception numérique a été interrompue. | |
| (No name) La station actuelle ne diffuse pas son identité. | |
| ? Liste non valide | |
| Signal error La réception numérique a été interrompue. | |
| Mode FM | |
| No Radio Text Aucune information RDS n'est disponible pour cette station. | |
| No PTY Aucune information RDS sur le type de programme n'est disponible. | |
| No Name Aucun nom de station RDS n'est diffusé. | |
| Problème Cause | Solutions | |
| Aucun son Le volume est trop bas. Augmentez le volume. | ||
| Le son reproduit en mode radio est de mauvaise qualité. | Le signal radio est trop faible. | Essayez d'ajuster la position de l'antenne. |
| FM : Sifflement Numérique : coupures intermittentes. Numérique : Message « No stations available » | Signaux trop faibles Vérifiez/réorientez l'antenne Déplacez la radio Démarrez une recherche locale de stations. | |
| Pas de signal audio en transmission Bluetooth | Pas de signal audio en transmission Bluetooth | Vérifiez que la connexion a été établie. Le cas échéant, recouplez la radio à la source audio. |
| Le volume est trop bas. Augmentez le volume sur la radio. | ||
| Augmentez le volume sur la source audio. | ||
| Impossible d'établir une connexion Bluetooth | Le couplage ne fonctionne pas correctement. | Vérifiez si la source audio prend en charge le protocole A2DP. |
| La source audio est éteinte. | Allumez la source audio. | |
| La fonction Bluetooth est désactivée sur la source audio. | Activez la fonction Bluetooth sur la source audio. | |
| La version Bluetooth n'est pas prise en charge. | Choisissez une autre source audio. | |
| Le son reproduit en mode Bluetooth® est de mauvaise qualité. | L'appareil Bluetooth est hors de portée de PA4600 | Rapprochez votre appareil Bluetooth de PA4600 |
| SPÉCIFICATIONS | |
| Adaptateur électrique (fourni) | Entrée : courant alternatif 100-240 V, 50/60 Hz |
| Sortie 5V CC = 1,5A | |
| Capacité de la pile (fournie) 1 050 mAH | |
| Autonomie maximale en lecture (avec la pile) | 3,5 heures |
| Consommation 8 W | |
| Consommation électrique en mode veille | <1 W |
| Fréquences numériques 174,928-239,2 MHz | |
| Fréquences FM 87,5-108 MHz | |
| Compatibilité Bluetooth V2.1+ EDR | |
| Portée de transmission en mode Bluetooth | jusqu'à 10 mètres |
| Fréquence de transmission 2,4 GHz | |
| Protocole A2DP 1.2 | |
| Températures de fonctionnement | -5°C à +40°C |
| Taux d'humidité en fonctionnement | 20% à 80% |