
Quilters Choice Professional BLQP - Sewing machine BABY LOCK - Free user manual and instructions
Find the device manual for free Quilters Choice Professional BLQP BABY LOCK in PDF.


User questions about Quilters Choice Professional BLQP BABY LOCK
0 question about this device. Answer the ones you know or ask your own.
Ask a new question about this device
Download the instructions for your Sewing machine in PDF format for free! Find your manual Quilters Choice Professional BLQP - BABY LOCK and take your electronic device back in hand. On this page are published all the documents necessary for the use of your device. Quilters Choice Professional BLQP by BABY LOCK.
USER MANUAL Quilters Choice Professional BLQP BABY LOCK
Quilter's Choice Professional
Model BLQP
Instruction and Reference Guide
"IMPORTANT SAFETY INSTRUCTIONS"
"Read all instructions before using."
When using a sewing machine, basic safety precautions should always be taken, including the following:
DANGER - To reduce the risk of electric shock:
- The sewing machine should never be left unattended while plugged in. Always unplug the sewing machine from the electrical outlet immediately after using and before cleaning.
Always unplug before changing the light bulb. Replace bulb with same type rated 120V 15 watts for 120V model or rated 240V 15 watts for 220-240V model.
WARNING - To reduce the risk of burns, fire, electric shock, or injury:
Do not allow this sewing machine to be used as a toy. Close attention is necessary when the sewing machine is used by or near children.
Use this sewing machine only for its intended use as described in this manual. Use only accessories recommended by the manufacturer as contained in this manual.
- Never operate this sewing machine if it has a damaged cord or plug, if it is not working properly, if it has been dropped or damaged, or dropped into water. Return the sewing machine to the nearest authorized dealer or service center for examination, repair, electrical or mechanical adjustment.
- Never operate the sewing machine with any air openings blocked. Keep ventilation openings of the sewing machine and foot control free from the accumulation of lint, dust, and loose cloth.
- Never drop or insert any object into any opening.
Do not use outdoors. - Do not operate where aerosol (spray) products are being used or where oxygen is being administered.
- To disconnect, turn the main switch to the symbol "O" position which represents off, then remove plug from outlet.
-Do not unplug by pulling on cord. To unplug, grasp the plug, not the cord. - Keep fingers away from all moving parts. Special care is required around the sewing machine needle.
Always use the proper needle plate. The wrong plate can cause the needle to break.
Do not use bent needles. - Do not pull or push fabric while stitching. It may deflect the needle causing it to break.
- Turn off power to the machine by flipping the ON/OFF switch to the symbol "O" before making any adjustments in the needle area, such as threading the needle, changing the needle, threading the bobbin or changing the pressor foot etc.
Always unplug the sewing machine from the electrical outlet when removing covers, lubricating, or when making any other user servicing adjustments mentioned in the instruction manual.
This sewing machine is not intended for use by young children or infirm persons without supervision. - Young children should be supervised to ensure that they do not play with this sewing machine.
CAUTION For U.S.A. only- This appliance has a polarized plug (one blade wider than the other) to reduce the risk of electric shock, this plug
is intended to fit in a polarized outlet only one way.
If the plug does not fit fully in the outlet, reverse the plug.
If it still does not fit, contact a qualified electrician to install the proper outlet.
Do not modify the plug in any way.
"SAVE THESE INSTRUCTIONS"
"This sewing machine is intended for household use."
"Read all instructions before using."
FOR USERS IN THE UK, EIRE, MALTA AND CYPRUS ONLY
If your sewing machine is fitted with a three-pin non-rewireable BS plug then please read the following.
IMPORTANT
If the available socket outlet is not suitable for the plug supplied with this equipment, it should be cut off and an appropriate three-pin plug fitted. With alternative plugs and approved fuse must be fitted in the plug.
NOTE
The plug served from the main lead must be destroyed as a plug with bared flexible cords is hazardous if engaged in a live socket outlet. In the event of replacing the plug fuse, use a fuse approved by ASTA to BS 1362, i.e. carrying the mark, rating as marked on plug.
Always replace the fuse cover, never use plugs with the fuse cover omitted.
WARNING
DO NOT CONNECT EITHER WIRE TO THE EARTH TERMINAL WHICH IS MARKED WITH THE LETTER 'E', BY THE EARTH SYMBOL 12 OR COLOURED GREEN OR GREEN AND YELLOW.
The wires in this main lead are coloured in accordance with the following code:
Blue Neutral
Brown Live
As the colours of the wiring in the main lead of this appliance may not correspond with the coloured markings identifying the terminals in your plug, proceed as follows.
The wire which is coloured blue must be connected to the terminal which is marked with the letter 'N' or coloured black or blue.
The wire which is coloured brown must be connected to the terminal which is marked with the letter 'L' or coloured red or brown.
CONGRATULATIONS ON CHOOSING
A BABY LOCK SEWING MACHINE
Your machine is one of the finest sewing machines available for home use.
To fully enjoy all the features incorporated into it, we suggest that you study this booklet.
PLEASE READ BEFORE USING YOUR SEWING MACHINE
For safe operation
- Be sure to watch the placement of your hands in relation to the needle while sewing. Do not touch moving parts such as the balance wheel, thread take-up or needle while the machine is operating.
Remember to turn off the power switch and unplug the cord when:
Operation is completed
- Replacing or removing the needle or any other parts
A power failure occurs during use
- Maintaining the machine
Leaving the machine unattended
Do not place anything on the foot controller.
- Plug the machine directly into the wall outlet. Do not use extension cords.
For a longer service life
- When storing your sewing machine, avoid direct sunlight and high humidity locations. Do not store the sewing machine beside a space heater, iron, or other hot objects.
Use only neutral soaps or detergents to clean the case. Benzene, thinner, and scouring powders can damage the case and machine, and should never be used.
Do not drop or hit the machine.
Always consult the operation manual when replacing any accessories, including: the presser feet, needle or other parts to assure correct installation.
For repair or adjustment
In the event that a malfunction occurs or adjustment is required, first follow the troubleshooting table in the back of the operation manual to inspect and adjust the machine yourself. If the problem persists, please consult your nearest authorized Baby Lock service center.
For additional product information and update, or to find your nearest Baby Lock dealer, visit our website at www.babylock.com
CONTENTS
Accessories 1
Machine Features. 2
Before You Begin 3
Power Cord and Foot Controller 3
Power Switch 3
Thread Tension Dial. 3
Hand Wheel 3
Stitch Length Regulator 3
Reverse Stitch Lever. 3
Presser Foot Lift Lever. 4
Knee Lift. 4
Presser Foot Pressure Adjustment Dial. 4
Fabric Extension Table 4
Thread Cutter Button 5
Needle Stop Position Button 5
Light Switch. 5
Feed Dog Adjustment Knob. 5
Changing Needles and Light Bulb. 6
Changing the Needle 6
Changing the Feed Pin 6
Changing Light Bulbs. 6
7
Bobbin Winding. 7
Bobbin Insertion 9
Upper Threading 10
Using the Needle Threader 10
Using the Spool Net 11
Stitch Samples and Needle Chart. 12
Stitch Samples 12
Thread Tension. 12
Changing Presser Feet 13
Changing Presser Feet (Zipper Foot) 13
Presser Feet 13
Basic Sewing 14
Basic Sewing 14
Pin Feeding (for hard-to-handle fabrics) 14
Rolled Hem Foot 15
Zipper Foot. 16
Invisible Zipper Foot. 17
1/4" Foot 17
Quilting Foot. 18
Walking Foot 18
Seam Guide 19
Caring for Your Machine 20
Cleaning the Machine 20
Lubrication Points 20
Trouble Shooting 21
Accessories
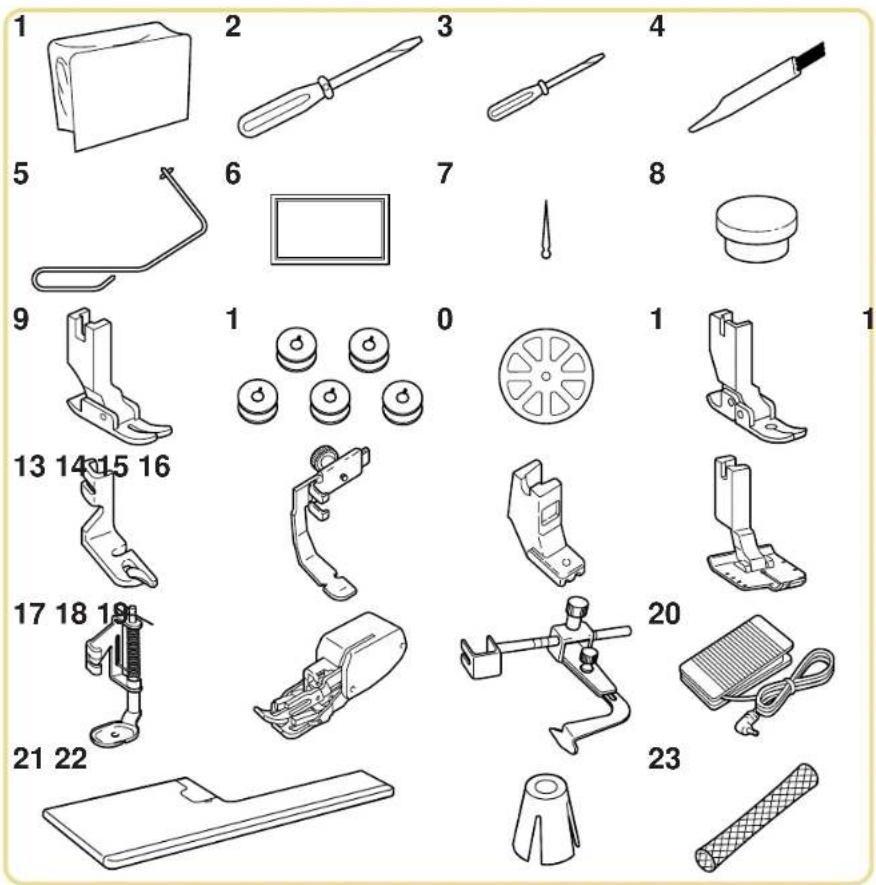
| No. | Part Name Part Code | |
| 1 | Cover XA0917-052 | |
| 2 | Medium Screwdriver 125877-001 | |
| 3 | Small Screwdriver 125878-001 | |
| 4 | Cleaning Brush XA4527-001 | |
| 5 | Knee Lift XA0830-051 | |
| 6 | Needles and Case 1 Size 9 (ORGAN HLX5) 2 Size 11 1 Size 14 1 Size 16 1 Ballpoint Needle | X80805-001 |
| 7 | Feed Pin | 138483-001 |
| 8 | Feed Pin Changer | XC1407-051 |
| 9 | General Purpose Foot | XA1425-001 |
| 10 | Bobbin (5) | SA159 |
| 11 | Spool Cap | XA2111-000 |
| 12 | Flex Reaction Foot (on machine) | 136021-001 |
| 13 | Rolled Hem Foot | X57138-001 |
| 14 | Zipper Foot 112797-001 | |
| 15 | Invisible Zipper Foot | 148475-001 |
| 16 | 1/4" Foot | XA7258-001 |
| 17 | Quilting Foot | XA7255-201 |
| 18 | Walking Foot | XA7253-001 |
| 19 | Seam Guide | XA7256-001 |
| 20 | Foot Controller | XC1220-051 |
| 21 | Fabric Extension Table | XC1387-051 |
| 22 | Spool Cone Holder (on machine) | XA0679-050 |
| 23 | Spool Net | XA5523-050 |
Note
Foot controller: Model P
This foot controller is used for sewing machine model BLQP.
Machine Features
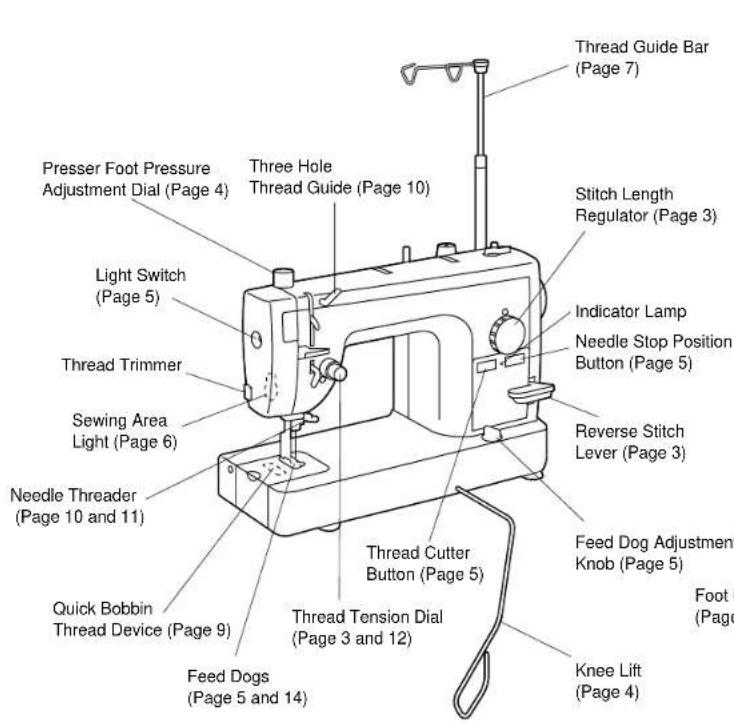
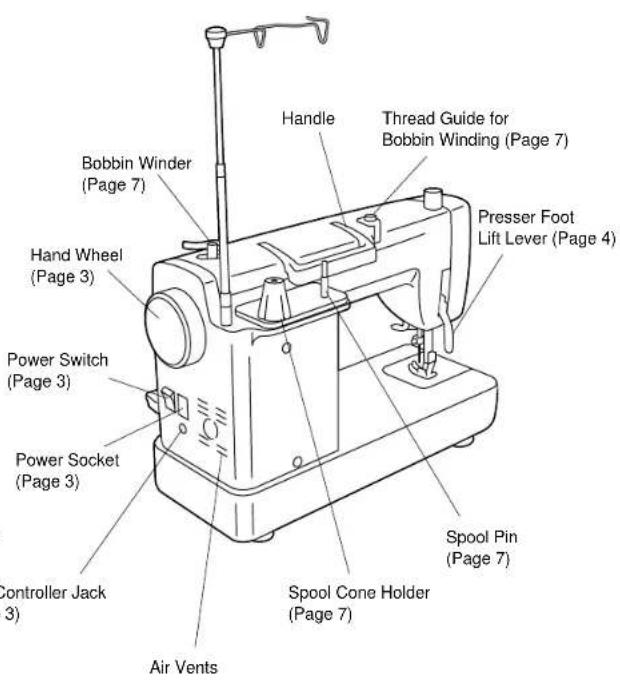
Before You Begin (1)
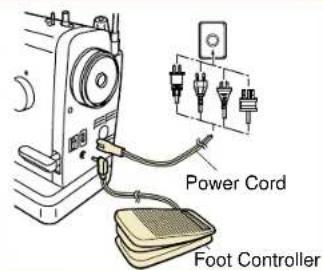
Power Cord and Foot Controller
Note
Please use common household current.
Plug in cord.
Plug foot controller into machine. Note
Foot controller: Model P This foot controller is used for sewing machine model BLQP.
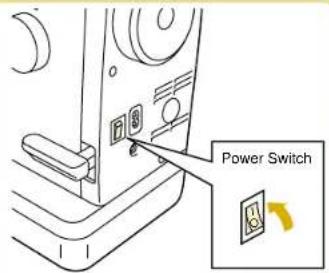
Power Switch
- Flip power switch to "l" position to turn on.
To switch power off, flip switch to "O" position.
Thread Tension Dial
- When tighter thread tension is desired, turn the tension dial to the right. Upper and bobbin threads will meet on right side of the fabric.
- When looser thread tension is desired, turn tension dial to the left. Upper and lower threads will then meet on wrong side of fabric.
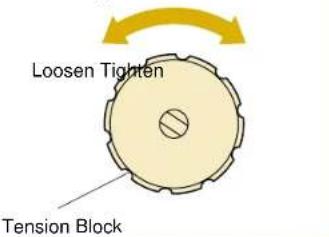
Upper Thread Tension
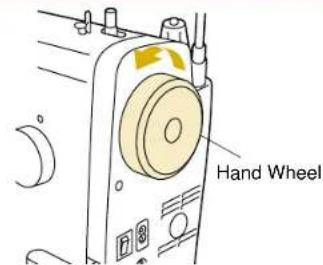
Hand Wheel
- Position needle using hand wheel.
Always turn hand wheel towards you.
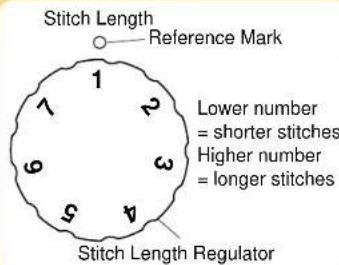
Stitch Length Regulator
Adjust desired stitch length using stitch length regulator dial.
Reverse Stitch Lever
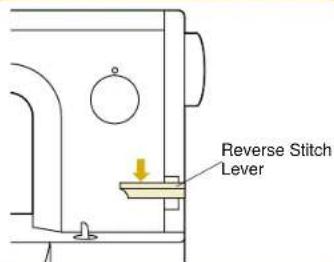
Sewing in reverse is possible when the reverse stitch lever is in the lowered position.
Make sure to push the lever all the way down when reverse sewing is desired.
*When the feed adjustment dial is set between 5-7mm, the reverse stitch length is always 5 mm.
Presser Foot Lift Lever
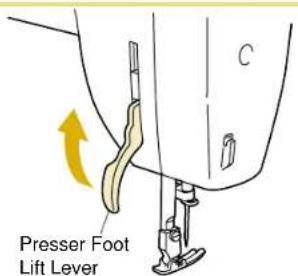
Lowering the presser foot lift lever lowers the sewing foot down onto the fabric and engages the thread tension function.
*When working with heavy fabrics or other fabrics that don't slide easily under the foot, raise the presser foot lever to position the fabric.
Knee Lift
Using the convenient knee lift to lift and lower the presser foot easily, leaving both your hands free.
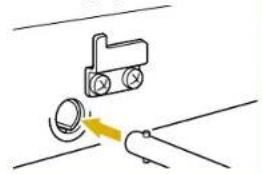
Setting up the knee lift.
*Push the knee lift bar all the way into the socket.
*When knee lift is not in use, it can rest at the bottom of the fabric extension table.
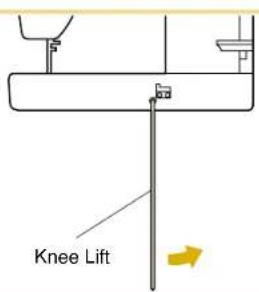
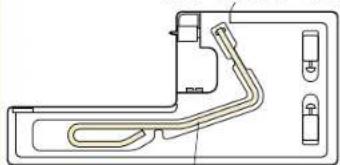
Fabric Extension Table
Knee Lift
Presser Foot Pressure Adjustment Dial
-Turning the pressure adjustment dial raises and lowers the pressure indicator needle as the amount of pressure on the presser foot changes.
See also: "Feed Dog Adjustment Knob" on page 5.
See "Thread Tension" on page 12.
*Coordinate the color coding for proper foot pressure and feed dog settings.
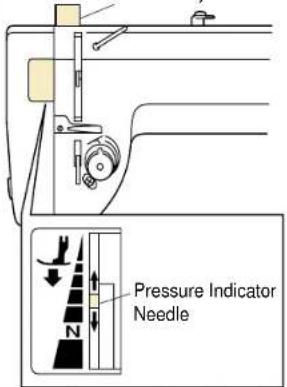
Presser Foot Pressure Adjustment Dial
Fabric Extension Table
Lower table feet and attach fabric extension table as shown in the below diagram.
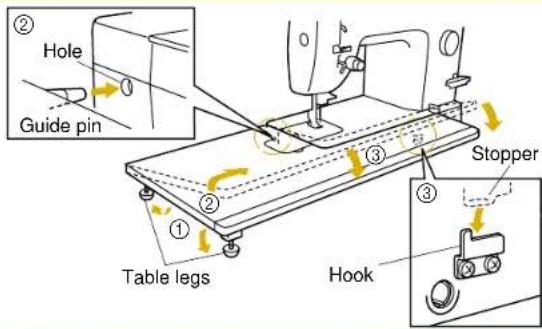
Before You Begin (2)
Thread Cutter Button
Note
When the machine stops due to jammed threads and so forth, do not step on the foot controller, turn the power off and move the needle with the hand wheel, check the situation. Otherwise broken needles could result.
The thread cutter trims upper and bobbin threads at the end of seams.
*Press with the presser lever down.
Needle Stop Position Button
- When indicator lamp is lit up, the machine will stop sewing with the needle lowered through the fabric.
- When indicator lamp is off, the needle position when sewing stops, will be random.
If the safety mechanism is activated, for example if the thread becomes tangled, the red lamp flashes.
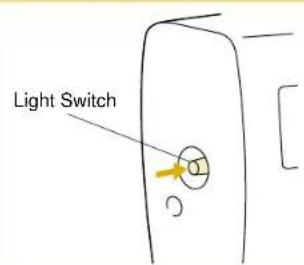
Light Switch
- Push light switch to turn the light over the sewing area on and off.
Feed Dog Adjustment Knob
Height of feed dogs can be adjusted to coincide with fabric weights.
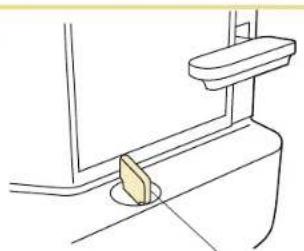
Feed Dog Adjustment Knob
Foot Pressure and Feed Dog Position
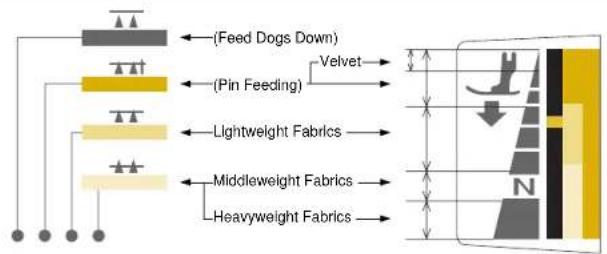
Select one of four feed dog positions according to your needs.
Note
*If a setting other than 工 is selected, the pin feed mechanism will not operate. *Coordinate the color coding for proper foot pressure and feed dog settings.
Changing Needles and Light Bulb
Note
Please make sure power is off before carrying out the following operations. There is a chance of injury if the machine accidentally starts running during this operation.
Changing the Needle
①Turn the sewing machine off. Raise needle to highest position using hand wheel, and lower presser foot.
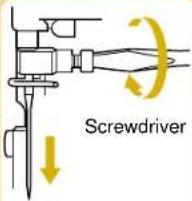
② Loosen screw with screwdriver, and remove needle.
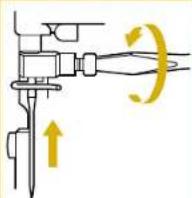
Hold the needle with the flat side to the right, and insert the needle as far as it will go. Make sure needle is screwed in tightly.
If the needle is not adequately inserted or the screw is loose, this may break the needle or cause a breakdown and the needle threads will not work.
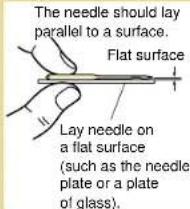
*Check needles on a flat surface to make sure they are not bent.
Note
HLX5 needles should be used; however, Schmetz 130/705H may also be used under normal circumstances.
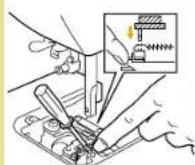
Changing the Feed Pin
① Set the feed dogs to "velvet" position. (See page 5.)
② Remove needle, presser foot and needle plate.
③ Lower presser foot and turn hand wheel until feed pin is in its highest position.
④ Insert small screwdriver (included) as shown in diagram.
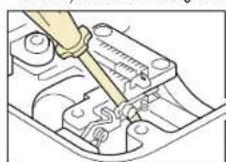
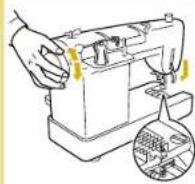
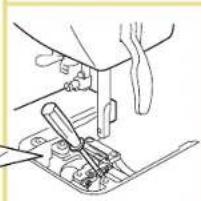
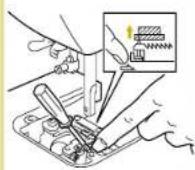
While holding spring with fingertip, lower the feed pin changer onto the needle to pick it up.
⑥ Attach new feed pin to feed pin changer, lower and attach while holding spring with fingertip.
⑦Remove screwdriver.
⑧Re-attach needle plate, needle and presser foot.
Note
Please make sure power is off before carrying out the following operation. The glass plate over the light bulb will be hot immediately after using the machine, therefore it is advisable to wait until the light bulb has had a chance to cool down before changing bulbs.
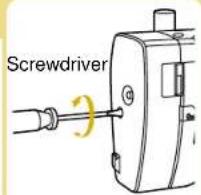
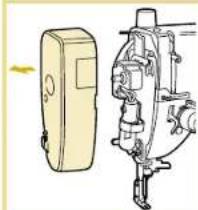
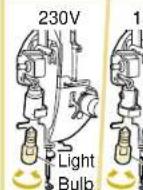
Changing Light Bulbs
①Turn off power.
Remove screw from head.
③ Remove bulb housing.
④ Unscrew bulb and remove.
Screw in new bulb.
Sewing Light:
See page 20.
⑥ Re-attach bulb housing and tighten screw.
Threading (1)
Bobbin Winding
Note
Do not move bobbin winding clutch while machine is running.
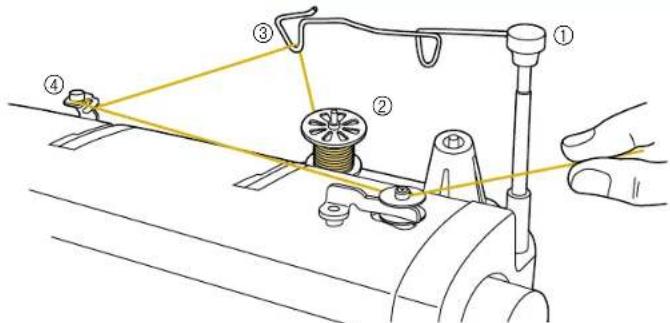
⑤ - ⑩: See the following illustrations.
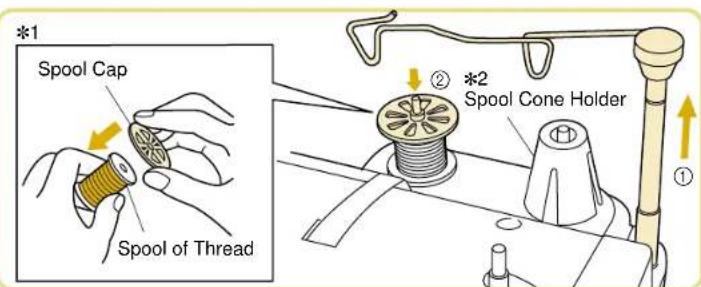
① Raise the thread guide bar all the way.
②Mount a spool thread on the spool pin.
1 Use spool cap when using parallel-wound thread.
2 Use spool cone holder to stabilize cone shaped spools of thread.
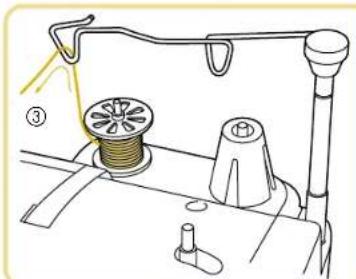
Pass the thread through the triangular hole.
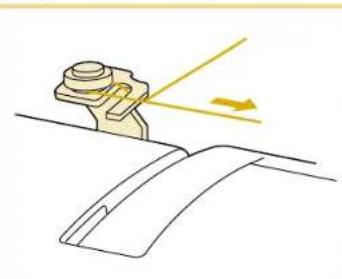
④ Pass thread through bobbin winding thread guide as shown in drawing.
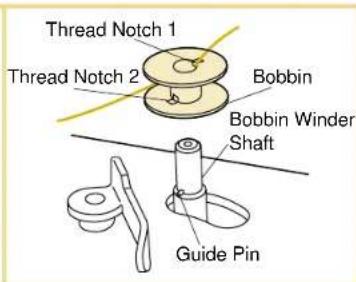
⑤ Run thread through top thread notch 1, and align bottom thread notch 2 of the bobbin with guide pin on bobbin winder shaft.
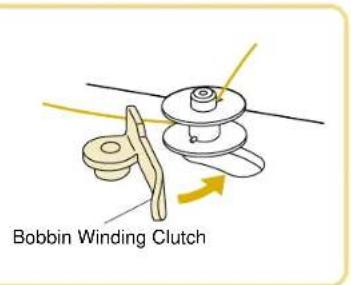
⑥ Press bobbin winding clutch up against empty bobbin. If the bobbin stop does not slide easily between the top and bottom of the bobbin, check that the bobbin is seated properly with the guide pin (5) inserted into the lower notch.
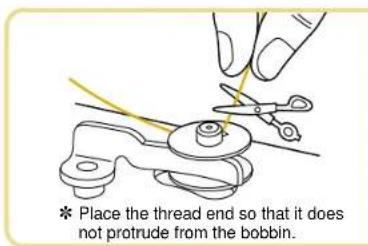
While holding the end of the thread, step on the foot controller for a few seconds. Once enough thread has wound itself around the bobbin to hold itself in place, release the foot controller and trim the excess thread. Continue to wind the bobbin while pressing down on the foot controller.
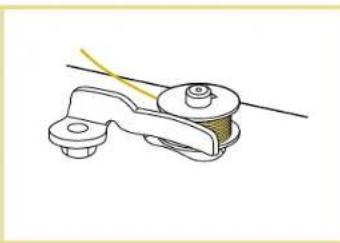
Release the foot controller to stop winding process when bobbin is full.
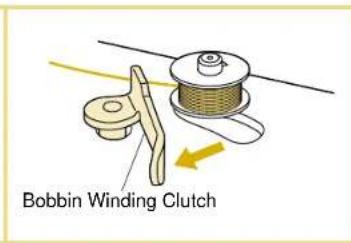
Manually move bobbin winding clutch back to original position.
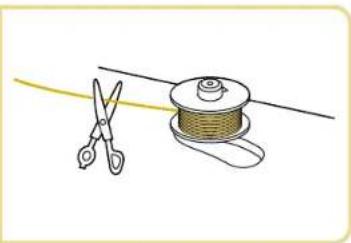
Cut thread and remove bobbin.
Bobbin Insertion
CAUTION-Moving parts
To reduce risk of injury, switch power off before servicing. Open covers.
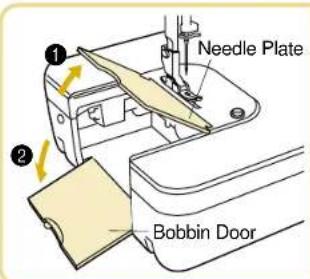
① Lift needle plate and open bobbin door.
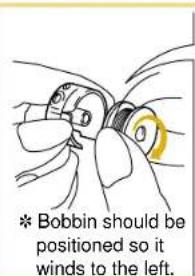
Put bobbin into the bobbin case.
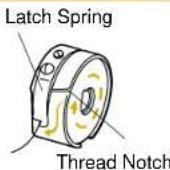
- Run thread through thread notch and under latch spring, so that a length of thread is exposed.
- Always use the bobbin case that was supplied with this machine. A secondary bobbin case can be ordered from your dealer.
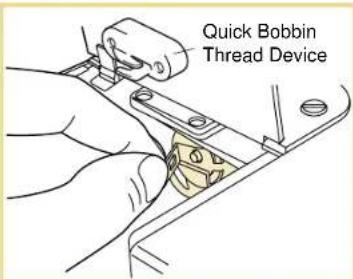
③ Pull the latch lever of the bobbin case out and push the bobbin case into the shuttle race and release the latch lever.
* If the latch lever is not set securely on the hook, it may fly off during sewing and cause lower thread breakage. Rotate the hand wheel one full rotation towards you to check that the bobbin case is set securely.
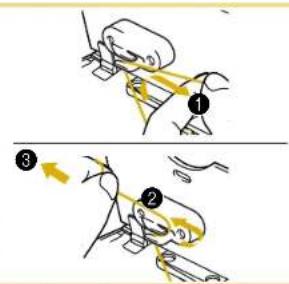
④ Pass the thread through the quick bobbin thread device in the order 1, pull in the direction of the arrow 3, then cut the thread.
Quick Bobbin Thread Device This device cuts the bobbin thread end to an appropriate length after the bobbin has been replaced and holds it at that length, so the operation of pulling out the thread can not be skipped.
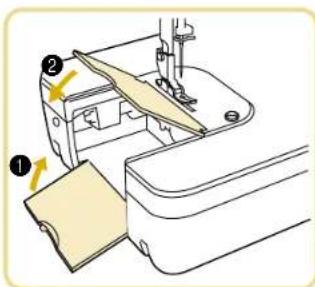
⑤ Lower slide plate and close bobbin door, following numbers 1 above in order.
- When the fabric extension table is set in place
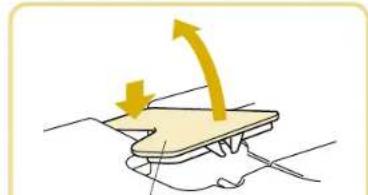
Bobbin Thread Setting Cover
Open the bobbin thread setting cover beforehand, then set the bobbin thread in place. (You can set the bobbin thread in place without removing the fabric extension table.)
Threading (2)

Please turn off the power before using needle threader. Accidally stepping on the foot controller during this operation could cause bodily injury or damage to the machine.
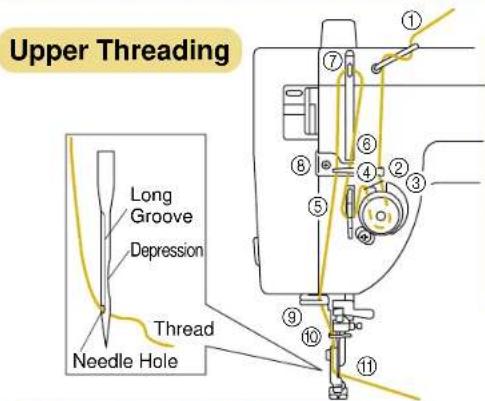
Using the Needle Threader
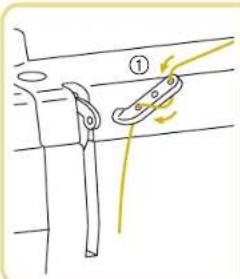
Make sure thread take-up lever is in highest position and presser foot is up.
When using polyester thread or thread that tangles or breaks, run the thread through all Three Hole of the thread guide.

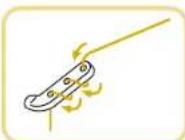
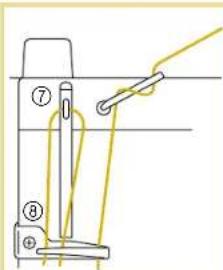
If the thread is still tangles or breaks, run the thread through the holes backwards as shown in diagram.
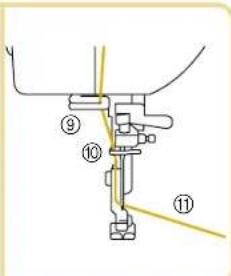
①Rotate hand wheel towards you until needle is in the highest position, and lower presser foot.
10 Take thread in your left hand, and gently pull it forward.
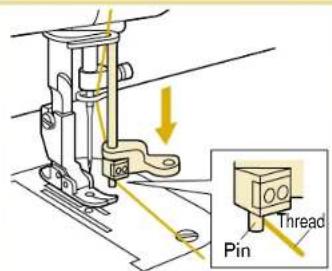
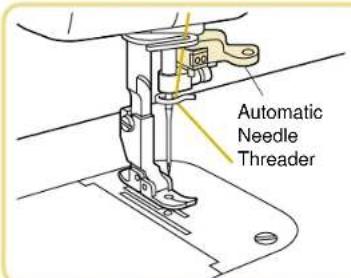
③ Lower needle threader.
- Pull thread along the right side of the pin.
- Do not force the needle threads lower than the eye of the needle. Be sure that the needle is in the highest position.
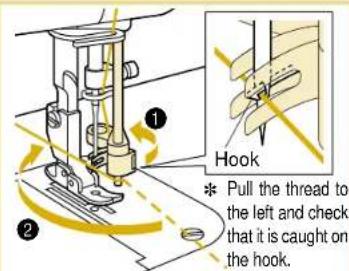
④Turn the needle threader lever all the way in the direction of 1 and when the hook extends from the needle hole, pull the thread in the direction of 2 to catch it on the hook.
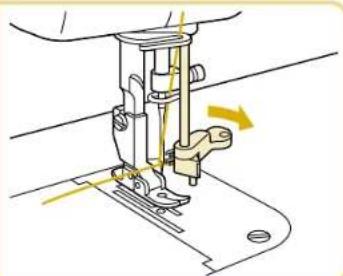
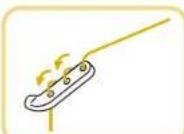
⑤ While holding the thread gently, return the needle threadsler lever to the right. As you do this the hook that has caught the thread will move as well, pulling a loop of thread through the eye of the needle.
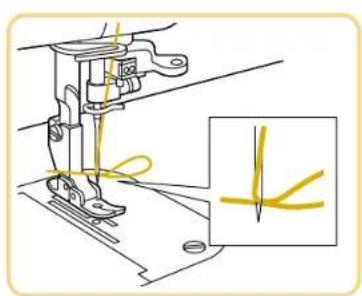
⑥Pull thread loop to the right.
| Needle (HLX5) | Thread |
| #9 | #30 #50 #60#20 |
| #11 | #20 #30 |
| #14 | #20 #30 |
| #16 | #20 |
The needle threader cannot be used with the thread-needle combinations illustrated in the chart to the left. Transparent nylon thread can be used regardless of the chart, providing the needle used is a #14 or #16.
Using the Spool Net
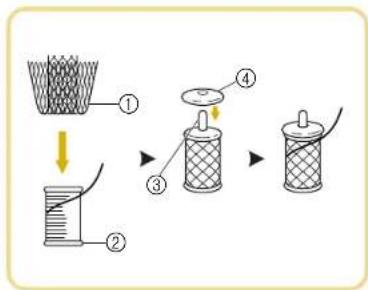
If using transparent nylon thread, metallic thread, or other strong thread, place the included spool net over the spool before using.
If the spool net is too long, fold it once to match it to the spool size before placing it over the spool.
①Spool net
②Thread spool
③Spool pin
④Spool cap
Stitch Samples and Needle Chart
Stitch Samples
① Set stitch length regulator to desired stitch length.
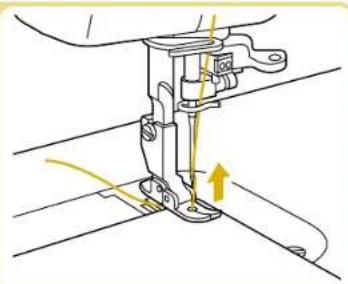
Make sure approximately 15cm of upper and bobbin threads are pulled out and laying behind presser foot. While needle is in raised position, insert a test strip from the garment fabric under the foot.
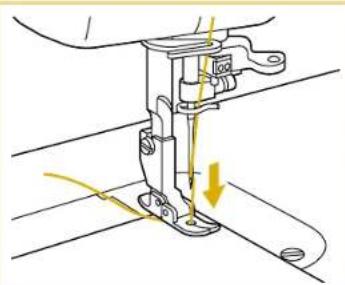
③Lower pressor foot.
④Turn the hand wheel forward to lower the needle through the fabric, then step gently on the foot controller to begin.
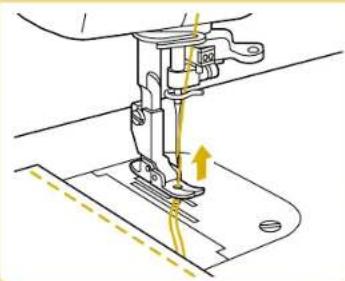
⑤ Turn the hand wheel towards you to raise the needle and thread take-up lever to their highest positions.
⑥ Lift presser foot, remove fabric and then cut thread.
*When using thread cutter:
⑤ Press the thread cutter button while the presser foot lever in the down position.
⑥ Lift foot and remove fabric.
Thread Tension
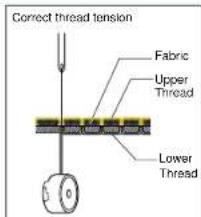
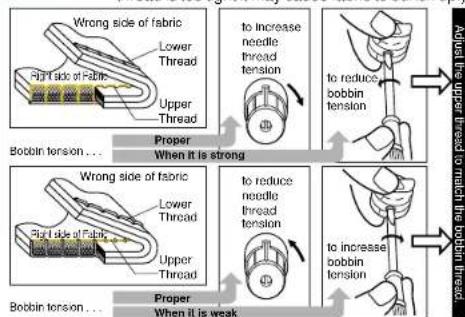
Incorrect thread tension can lead to such undesirable results as messy stitches, pickered seams and thread breakage.
Bobbin thread should feed smoothly. Adjust bobbin thread to match that of upper thread. (If bobbin thread is too tight it may cause fabric to bunch up.)
- Selecting the proper needle for use with the fabric and thread you are working with
- The following chart applies to many different fabric, thread and needle combinations.
| Fabric - Thread - Needles | HLX5 | Schmetz130/705H | |||
| Cloth | Thread | Needle (HLX5) | |||
| Special fabric | Velvet | Silk, Polyester #30 - #50 | #11 - #14 | #9 | #65 |
| Quilt | Polyester #20 - #50 | #11 - #16 | #11 | #75 | |
| Synthetic Suede | Polyester #20 - #50 | #14 | #90 | ||
| Knit | Polyester #20 - #50 | #16 | #100 | ||
| Coating | Polyester #50 | #11 - #14 | #18 | #110 | |
| Light weight fabrics | Lawn | Cotton #30 | #9 | ||
| Tricot | Polyester #60 | ||||
| Silk Georgette | Silk #50 | ||||
| Wool Georgette | Silk, Polyester #50 | #11 | |||
| Middle weight fabrics | Gingham | Cotton #60 - #80 | #11 - #14 | ||
| Lightweight Jersey | Polyester #60 | #11 | |||
| Gabardine, Flannel | Silk #50 | ||||
| Heavy weight fabrics | Denim | Cotton #20 - #50 | #14 - #18 | ||
| Jersey | Polyester #20 - #50 | #11 - #16 | |||
| Tweed | Silk #20 - #50 | ||||
HLX5 needles are recommended; however, Schmetz 130/705H needles may also be used under normal sewing conditions.
Adjust the pressure adjustment dial and the feed dog adjustment knob according to the chart on the sewing machine.
When sewing on knit fabrics such as jersey or tricot, use a ballpoint needle or a needle designed for use with knit fabrics.
For best results when using metallic threads, sew with a good quality thread, set upper tension on 2, and use metallic needle.
Changing Presser Feet
Note Make sure the power is off before changing presser feet.
Changing Presser Feet (Zipper Foot)
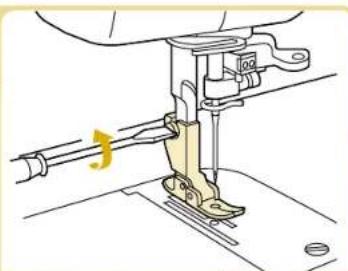
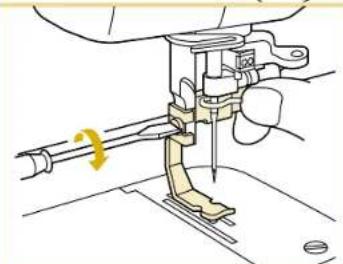
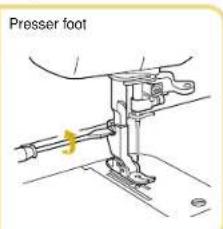
① Raise presser foot, and raise needle to highest position.
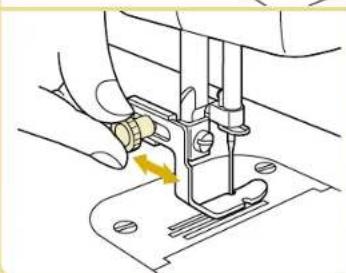
② Loosen and remove screw using screwdriver.
③Attach zipper foot and tighten screw.
Use the same method to attach the other feet that come with your BLQP.
See page 18 for directions on attaching the "Walking Foot".
*Use the position knob on back of the zipper foot to adjust position of foot in relation to needle.
Only the zipper foot has a position knob. You can begin sewing with all other presser feet immediately after attaching.
Presser Feet
- Flex Reaction Foot For perfect stitching on otherwise difficult fabrics like velvet, leather and suede.
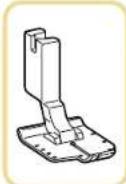
-Rolled Hem Foot Use on the edge of fabric, such as on hems of dress shirts, to fold the edge of the fabric in three while sewing.
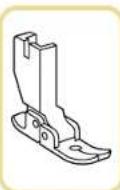
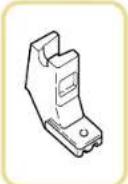
Invisible Zipper Foot
Use to attach concealed fasteners.
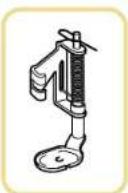
Quilting Foot
Spring action foot for darning, quilting or free-motion embroidery.

-
Use only feet supplied with your BLOP. Each foot is specially designed for this machine and has clearance for the pin at the rear of each foot. Use of other presser feet may damage or break the pin feed mechanism.
-
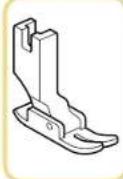
General purpose Foot
- This foot is used for most sewing. (Can also be used for sewing thick fabrics or seams.)
- When sewing thick seams, lightly guide the fabric with your hand on the downward side of the seam.
*Can also be used with pin feeding.
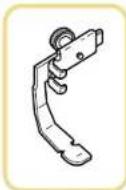
Zipper Foot Use to attach fasteners other than concealed fasteners.
1/4" Foot For quilt and patchwork piecing with 1/4" or 1/8" seam allowance.
Basic Sewing (1)
Basic Sewing
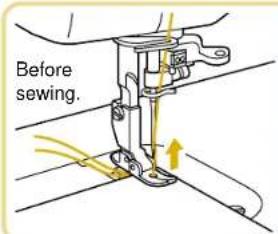
Lift foot, pull about 15 cm of upper and bobbin thread under and behind foot, and position fabric under foot.
Lower pressor foot lever to lower fool.
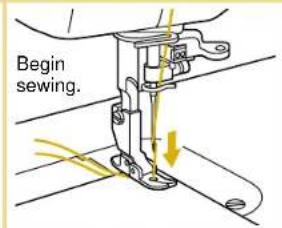
③Turn the hand wheel forward you to lower the needle through the fabric, then step gently on the foot controler to begin.
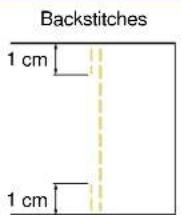
*At the beginning and end of a seam, press down the reverse stitch lever and backstitch about 1 cm.
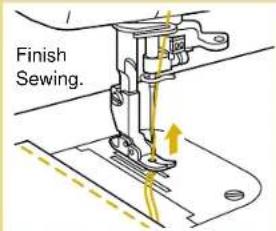
④ Raise needle to highest position.
Lift loot, remove fabric and cut thread. When using thread trimmer:
④ Push thread trimmer button (this will cause the upper and bobbin threads to be cut automatically and the needle to stop in a raised position). Lift pressor fool and remove fabric.
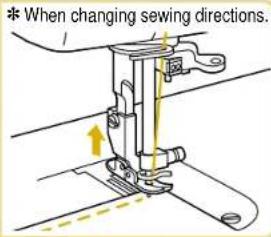
Make sure needle is pierced all the way through fabric.
Lift presser foot, and turn fabric using needle as an axis.
③Lower foot and continue sewing.
Pin Feeding (for hard-to-handle fabrics)
Velvet, quilt fabric, synthetic suee, knits and other fabrics can be joined evenly by activating the pin feed mechanism.
Machine Set-up for Pin Feeding Pin Feeding Mechanism
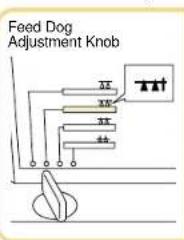
①Move feed adjustmen knob to pin feeding position.
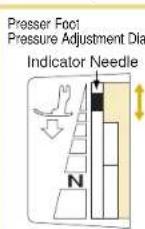
② Adjust pressure adjustment dial until indicator needle is in the right position in the matching color coded area.
③Attach flex reaction presser foot for perfect stitching on difficult fabrics like velvet, leather and suede.

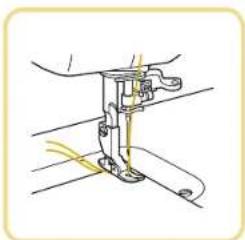
The feed pin passes up through all layers of fabric moving with the feed dog's motion to feed all layers of the fabric evenly.
*For safety, the feed pin is automatically lowered when presser foot is raised.
Start to Sew
Gently pull thread until feed pin catches fabric and sew.
Basic Sewing (2)
Note Make sure power is off before changing feet.
Rolled Hem Foot
① Attach rolled hem foot.
*Refer to page 13 for instructions on changing sewing feet.
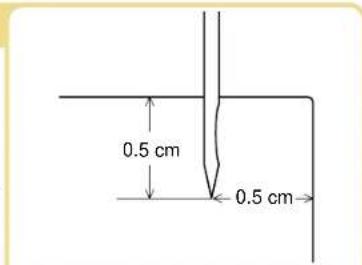
② Insert needle approximately 0.5 cm from the edge of the fabric and sew 2 stitches.
③Turn the hand wheel towards you to raise the needle, raise the presser foot, then pull the fabric forward.
Hold the 4 threads in your left hand.
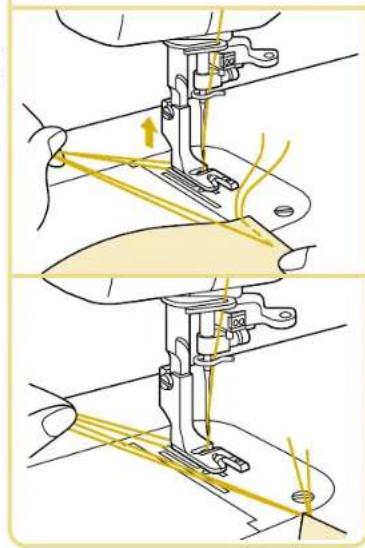
With your right hand, put the edge of the rolled hem under the presser foot, from the spot where the threads come out. Insert the edge so that it lies directly under the needle. Lower the presser foot.
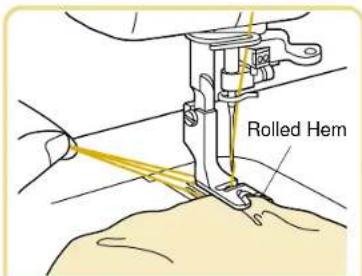
Pull gently on threads in left hand while sewing the first 3-4 stitches to hold them in place.
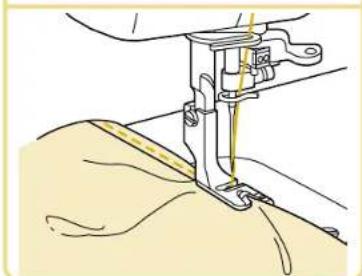
⑦ Fold hem over about 0.5cm and continue feeding folded hem under foot while sewing towards the curved guide on the foot.
Basic Sewing (3)
Note
Make sure power is off before changing feet.
- When attaching zippers to stretch fabrics, use the pin feed method and adjust foot pressure accordingly.
The zipper foot can also be used as a guide when attaching piping to fabric.
Zipper Foot
①Attach zipper foot.
See "Changing Presser Feet (Zipper Foot)" on page 13.
② Turn the hand wheel towards you to lower the needle and adjust the position of the foot relative to the needle using the adjustment screw to slide the foot from left to right.
③ Line up zipper to the section of fabric it will be attached to, and mark the base of the opening on the fabric. It should be set approximately 0.5cm below zipper stop. Sew from below the base of the opening.
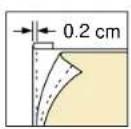
④ Divide the seam margin. Fold the seam margin with the overlap of the zipper position facing down 0.2 cm on the outside of the mark.
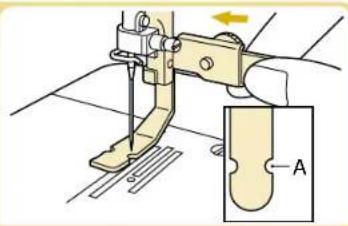
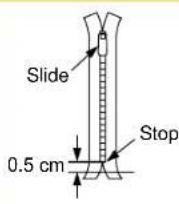
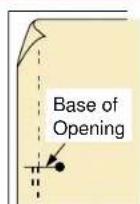
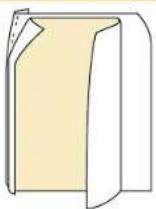
⑤ Secure the zipper with basting and sew along the mark.
Make sure the needle does not strike the metal part of the zipper when sewing. The needle may break and cause injury.
Line up the folded hem on the opposite side with the stitches.
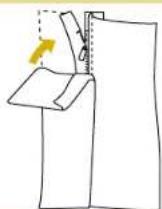
7Change position of zipper foot.
Turn the hand wheel to lower the needle and position the presser foot.
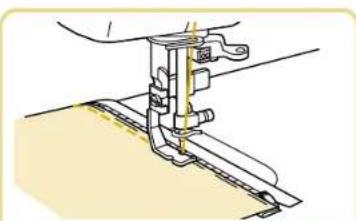
With the fabric right side up, baste the zipper onto the fabric, then sew the edge of theasting.
*Reinforce base of opening by.
sewing over it twice.
If the zipper slide gets in the way,
lower the needle all the way
through the fabric, lift the foot, and
move the slider out of the way.
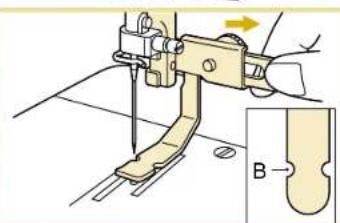
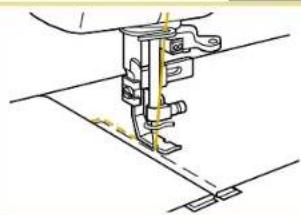
Invisible Zipper Foot
①Attach invisible zipper foot.
② Align zipper with fabric. Mark the base of the opening approximately 2cm above the end of the zipper.
③ Baste the zipper position.
④ Separate the seam allowance.
With the zipper mounted, baste just the seam margin on one side of the zipper.
⑥Close the zipper and baste the other side of the zipper.
⑦Remove the basting at the zipper position.
Fit the zipper teeth into the presser foot groove, guide them to prevent them from falling over, and sew to the base of the opening.
*When sewing with the teeth to the right, the left side of the foot should line up with the left teeth of the zipper.
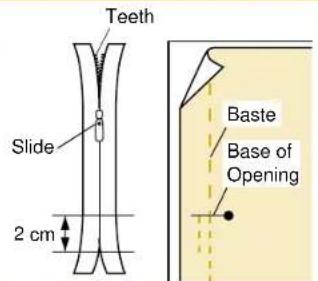
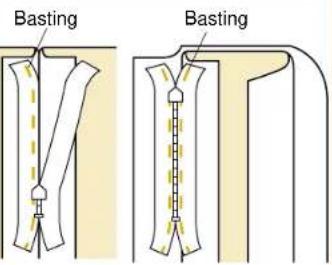
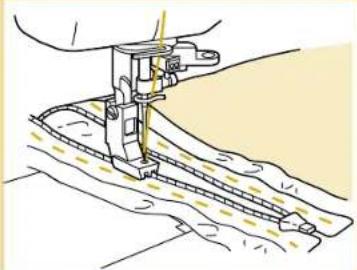
1/4" Foot
Sewing machine settings:
Stitch length = 2 - 2.5
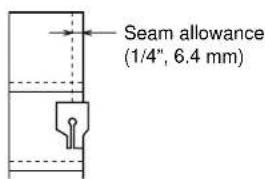
- Sew a consistent seam allowance (1/4", 6.4 mm) when piecing together a quilt.
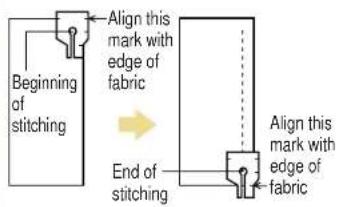
- Use guides (mark) to begin, end, or pivot 1/4" from edge of fabric.
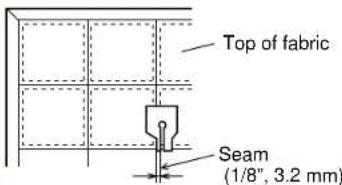
- Accurately top stitch 1/8 from seam.
Quilting Foot
Reduce the foot pressure and turn the dial on the machine lowering the feed dogs for free motion quilting.
Note
If the foot is frequently used, be sure to apply a small amount of oil about once a month to the area indicated by the arrow. (If too much oil is applied, wipe off the excess with a cloth.)
- For best results when using metallic or monofilament threads for free-motion quilting, sew with a good quality thread, set upper tension 1-2, and use a metallic needle.
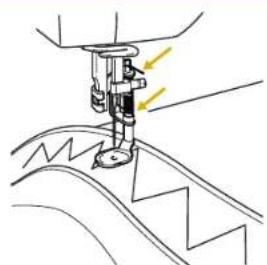
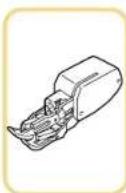
Walking Foot
Note
- Do not press the foot controller all the way down. Try to keep the sewing speed low (500 r.p.m. or less).
The fabric may not feed if you sew at high speeds.
The feed dog for feeding the cloth may not move if the foot pressure on the fabric is too strong. Use the pressor foot pressure adjustment dial to achieve the desired results.
It is not advisable or necessary to use the Pin Feed mode with the walking foot.
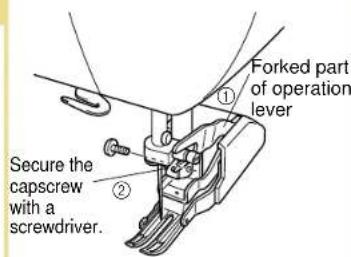
① Insert the forked part of the operation lever while raised in an upright position onto the screw on the right side of the needle bar, as shown and then insert the capscrew.
② Tighten the screw securely with a screwdriver. Tightening adequately is important as the screw might loosen due to the foot and forked operation lever vibration.
Seam Guide
① Tighten the screw securely with a screwdriver since it might otherwise loosen due to vibration.
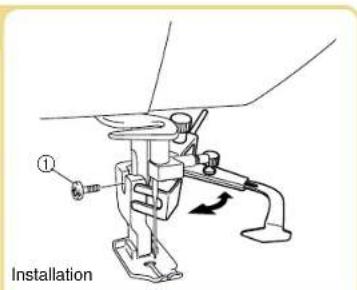
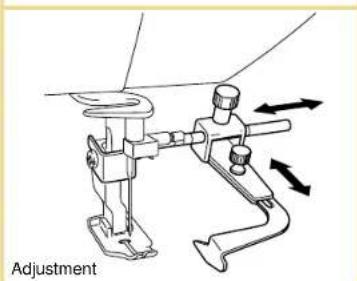
To be able to adjust the position of the foot towards the arrow.
Caring for Your Machine
Cleaning the Machine
Note
Make sure power is off before cleaning sewing machine.
①Turn machine off.
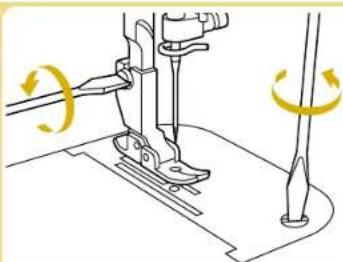
②Remove foot.
③ Remove needle plate.
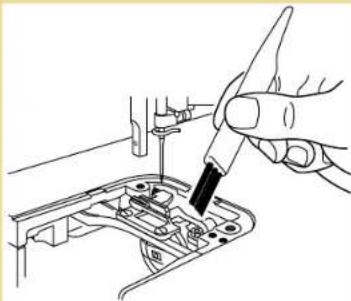
④ Clean out dust and thread scraps.
Thread scraps can be swept out through the bobbin door.
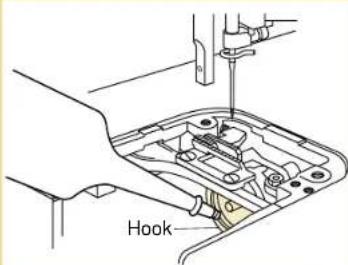
When the area under the needle plate is cleaned out, oil hook of bobbin case with sewing machine oil.
*Use a cloth to clean the machine of any excess oil.
Use only fine sewing machine oil.
⑥ Attach needle plate and foot.
Lubrication Points
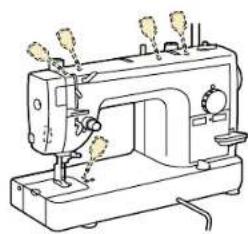
- When using the sewing machine every day, apply a few drops of oil to each location indicated twice a month.
Use a cloth to wipe the machine clean of any oil spilled near the lubrication points.
Use only fine sewing machine oil.
■Keep Your Sewing Machine Clean
Please use a soft, dry cloth to wipe off light dirt and dust. If sewing machine is very dirty, wipe with a cloth soaked in warm water, or in warm water containing a neutral detergent. Then wipe off any detergent residue, and wipe off water with a dry cloth.
Precautions
Please keep sewing machine away from heat sources such as irons and space heaters. Do not use chemicals like benzine or thinner to clean your machine. When machine is not in use, please keep machine out of direct sunlight.
| Item | Specification | Item | Specification |
| Sewing Speed (maximum) | 1,500 stitches per minute | Height of feed dog | 0.7 mm 1.1 mm |
| Height of lower needle | 3 mm - 3.5 mm | ||
| Stitch Length (pitch) | 0 - 7 mm | Needles that may be used | HLX5#9 - #18 SCHMETZ 130:705H #65 - #110 |
| Stroke of Needle | 34.1 mm | Bed dimensions | 439 mm × 178 mm |
| Stroke of Thread Take-Up Lever | 64.7 mm | Total weight | 11 kg |
| Sewing Light | 120V model: 120V/15W Parts code: X53061-350 | ||
| Foot Height | Foot Lift One 6 mm Two 9 mm Knee control Over 10 mm | 220-240V model: 240V/15W Parts code: 205336-050 | |
| Sewing area | 595 mm × 285 mm |
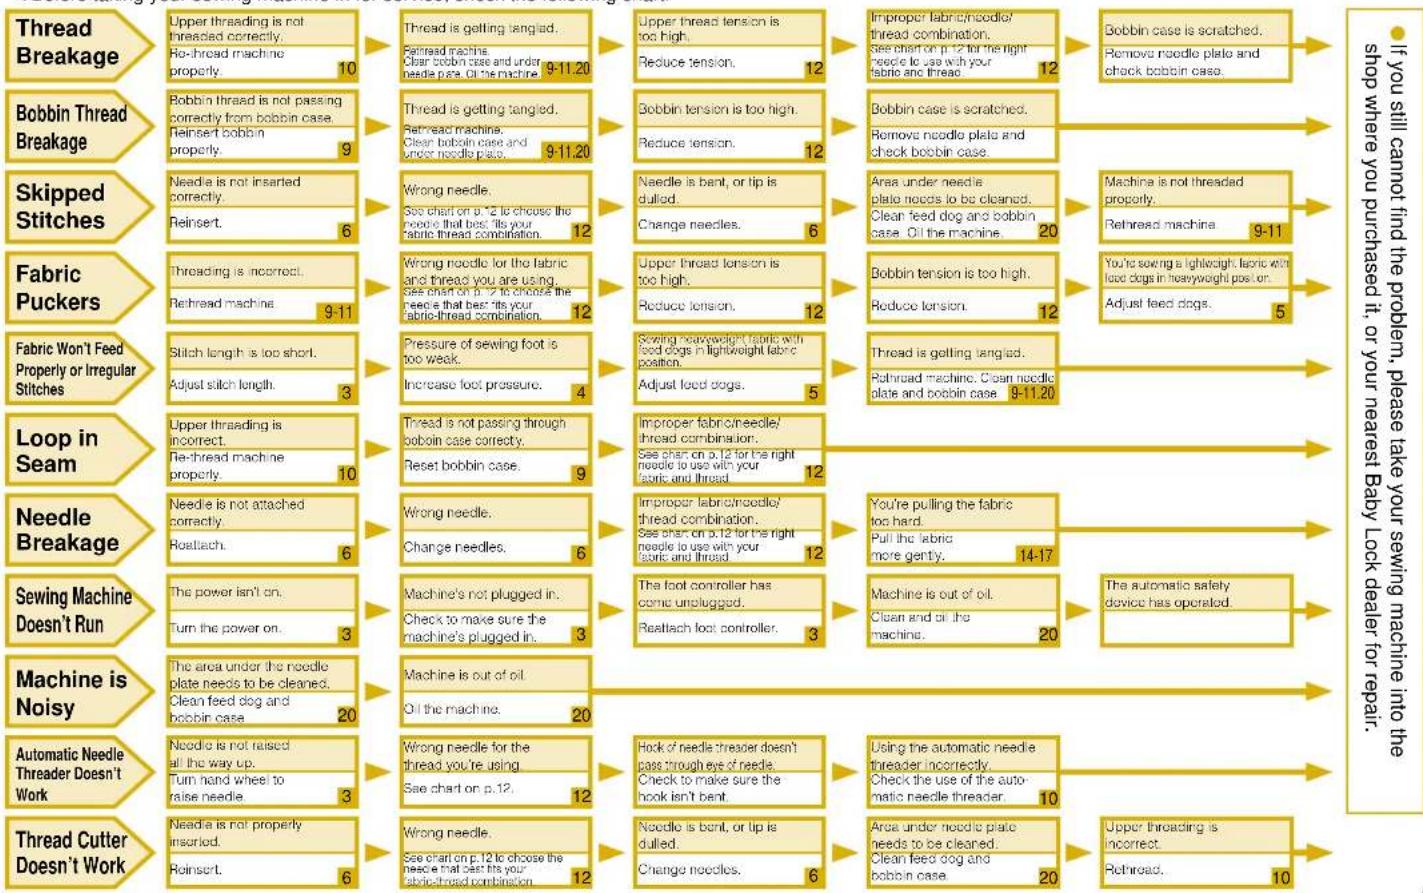
Trouble Shooting
*Before taking your sewing machine in for service, check the following chart.
NOUS VOUS REMERCIONS D'AVOIR CHOISI LA MACHINE A COUDRE ELECTRONIQUE BABY LOCK
Les differents pied-de-biche 36
Couture de base 37
Couture de base 37
Entainent par ergot
Pied double-entrainment. 41
Guide de couture 42
Entretien de la machine a coudre 43
Nettoyage de la machine 43
Pied double-entrainment
Pied double-entrainment
