Symphony BLSY - Sewing machine BABY LOCK - Free user manual and instructions
Find the device manual for free Symphony BLSY BABY LOCK in PDF.

User questions about Symphony BLSY BABY LOCK
0 question about this device. Answer the ones you know or ask your own.
Ask a new question about this device
Download the instructions for your Sewing machine in PDF format for free! Find your manual Symphony BLSY - BABY LOCK and take your electronic device back in hand. On this page are published all the documents necessary for the use of your device. Symphony BLSY by BABY LOCK.
USER MANUAL Symphony BLSY BABY LOCK
Instruction and Reference Guide Addendum
Model BLSY

text_image
baby lock®FOR THE LOVE OF SEWING
To register your machine warranty and receive Baby Lock product updates and offers, go to www.babylock.com/profile. If you have questions with registration, visit your Authorized Baby Lock Retailer.
Baby Lock Consumer Helpline: 800-313-4110
www.babylock.com
CONTENTS
INTRODUCTION....2
USING THE CIRCULAR ATTACHMENT TO SEW PATTERNS IN A CIRCLE....2
About the Circular Attachment.... 2
Included Accessories.... 2
Attaching the Circular Attachment.... 3
Sewing a Circle 3
Using the Quarter Circle Template 5
Using the Included Presser Feet.... 5
CREATING BOBBIN WORK....7
About Bobbin Work 7
Required Materials 8
Upper Threading....9
Preparing the Bobbin Thread.... 9
Positioning the Fabric and Sewing.... 12
Adjusting the Thread Tension 15
Troubleshooting 16
LIST OF STITCHES THAT CANNOT BE USED WITH THE CIRCULAR ATTACHMENT......17
INTRODUCTION
This Addendum provides additional information not described in the Instruction and Reference Guide. Refer to these instructions after first reading the Instruction and Reference Guide provided with your sewing machine.
USING THE CIRCULAR ATTACHMENT TO SEW PATTERNS IN A CIRCLE
About the Circular Attachment
This device can sew circular patterns that graduate out at 5mm intervals, ranging from 30mm to 130mm in radius* when the center needle position is selected. The device is set to the left of the needle on your sewing machine. Utility and decorative stitches can both be sewn using this device.
* Radius= Distance from center of circle to any point on the circle.

Note
- You cannot use any decorative stitch with side feeding or stitches with a width over 7.0 mm. Before sewing on your project, be sure to sew trial stitches and check the sewing results. If stitches that cannot be used are sewn, the pattern may become misaligned. For a list of stitches that cannot be used, refer to the table “LIST OF STITCHES THAT CANNOT BE USED WITH THE CIRCULAR ATTACHMENT” located on page 17.

CAUTION
- Special care is required for the pivot pin; neglectful treatment may cause injury. Young children should be supervised to ensure that they do not play with the attachment. When attachment is not in use, always keep the pivot pin in the indicator to avoid its loss.
Included Accessories
1 4 Conversion Chart 5
text_image
a d b c e2 3 90 3 1/2 6


text_image
f 150 120 100 90 80 70 60 50 40 30 h g| mm (1) | i n |
| 130 5 3 | /16 |
| 120 4 3 | /4 |
| 110 4 3 | /8 |
| 100 4 | |
| 80 3 3 | /16 |
| 70 2 3 | /4 |
| 60 2 3 | /8 |
| 50 | 2 |
| 40 | 3/2 |
| 30 | 13/16 |
C
| No. | Part Name | Part Code |
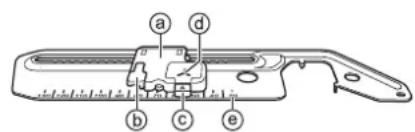
| 1 | Circular Attachmenta Indicatorb Handle/Flips Upc Release buttond Setting position for pivot pine Scale | - |
| 2 | Pivot Pin | XE6016-001 |
| 3 | Attachment Screw(2pcs. one is extra) | XE6022-001 |
| No. | Part Name | Part Code |
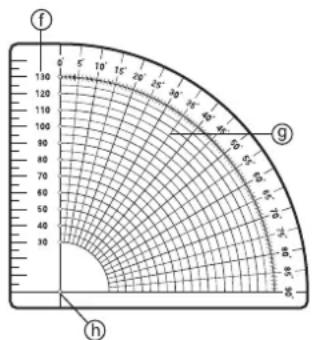
| 4 | Template1 Radius of circle in mm9 Angular lines listed in degrees starting at 0 with 5 degree intervals6 Center | XE6024-001 |
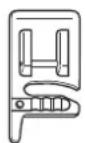
| 5 | Braiding Foot | XE5680-001 |
| 6 | Cording Foot | XA6871-001 |

Note
• We recommend that you use the extension table on your sewing machine for smooth fabric control.
- Do not raise the extension table when the circular devise is attached.
- The pivot pin may be released if you hold up the fabric while attached to the circular attachment. When holding up the fabric gently press down on the top of the pivot pin.
- When sewing smaller circles or using fabric with a grain or uneven textures, a perfect circle may not be achieved.
- Some of presser feet such as the side cutter cannot be used with this attachment, always test your accessory feet with the attachment.
- When using this attachment test the sewing speed of your machine for the best results.
- When sewing larger pieces of fabric or garments, make sure that your fabric or garment does not get caught on the machine creating drag or distortion of your design.
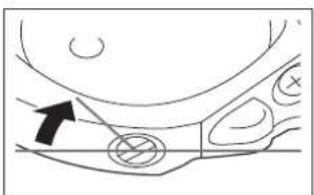
Attaching the Circular Attachment
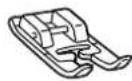
1 Place the circular attachment at left as shown in the figure.
→ The two tabs on the underside of the attachment will drop down into corresponding holes in the needle plate, so that the attachment lays flat on the bed of your machine.

natural_image
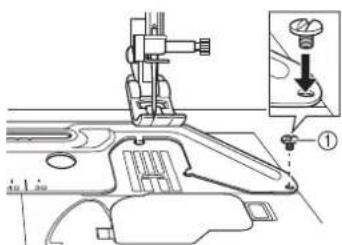
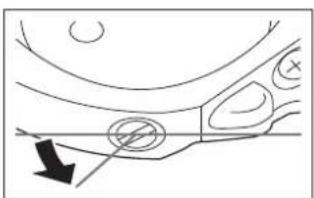
Technical line drawing of a mechanical component with no visible text or symbols2 Insert the screw on the circular attachment in the screw hole at the right of the needle plate (①).
text_image
Technical diagram showing mechanical assembly with labeled parts and an inset detail view of a component.①Attachment Screw
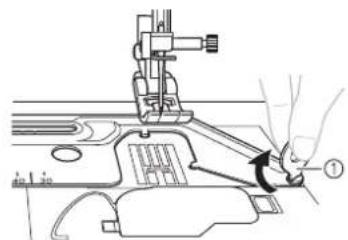
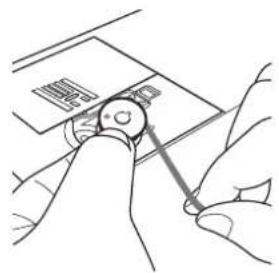
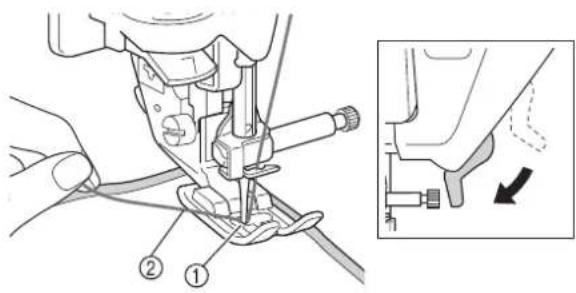
3 Securely tighten the screw with the disc-shaped screwdriver included in your machine.
text_image
Technical diagram showing a sewing machine needle insertion operation with labeled parts and directional arrow①Disc-shaped screwdriver
Sewing a Circle

Note
- Thread the machine needle before setting the pivot pin into the circular attachment. Threading lever may hit the pivot pin and damage the pin or the machines threading mechanism.
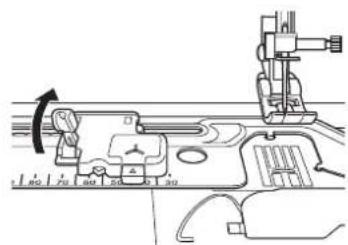
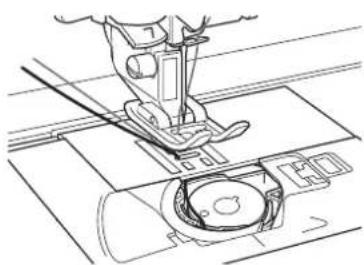
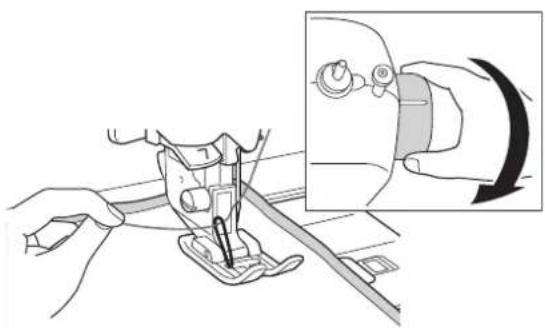
1 Raise the handle.
text_image
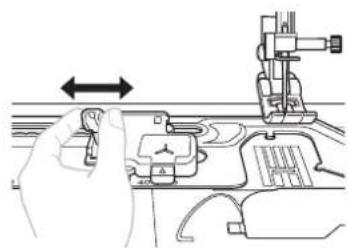
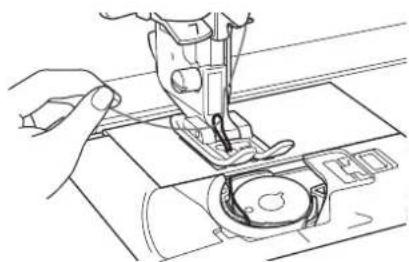
Technical diagram showing mechanical assembly with labeled parts and directional arrow indicating rotation or movement2 Slide the indicator to match the desired size of your circle.
natural_image
Line drawing of a hand operating a sewing machine with a left-hand rule arrow (no text or symbols)
Note
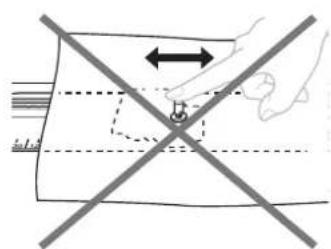
- Do not slide the indicator by holding onto the pivot pin, doing so may cause the pivot pin to bend or break.
text_image
Diagram illustrating hand positioning on a rectangular object with bidirectional arrow and crosshairs, likely for motion or pressure analysis.
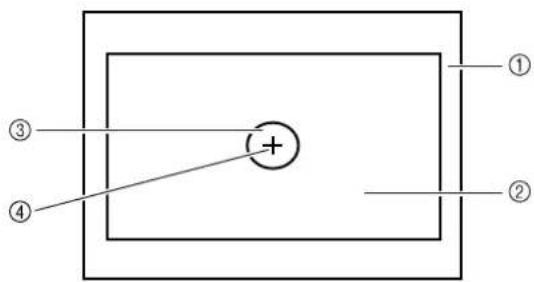
Use a piece of stabilizer that is larger than your design area, reinforcing with a smaller piece of the stabilizer at the center of the circle when using fine fabric or the same pivot pin area repeatedly.
text_image
① ② ③ ④ +①Wrong side of Fabric
②Stabilizer
③Reinforcement Stabilizer
④Pivot Pin area

Note
- A stabilizer is always required when sewing on any fabric or garment to prevent stretching or puckering. Depending on the type of fabric being sewn, will determine whether you use permanent, iron on, temporary or a sticky stabilizer.

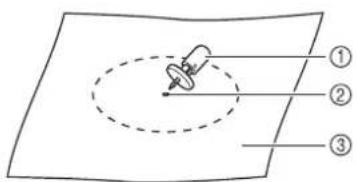
Insert the pivot pin at the center of circle from the right side of fabric.
text_image
Diagram showing a pin inserted into a circular target, with three labeled parts (①, ②, ③) indicating different positions or regions.①Pivot Pin
②Center of circle
③Right side of Fabric

Note
- When sewing a small diameter circle, we recommend that you first pin the fabric to the attachment and then set the indicator to your desired size.

Pressing the top of the pivot pin, insert the point of the pivot pin into the "Y" mark on the attachment.

text_image
Technical diagram showing mechanical assembly with numbered components and measurement scale①Right side of Fabric
②Wrong side of Fabric
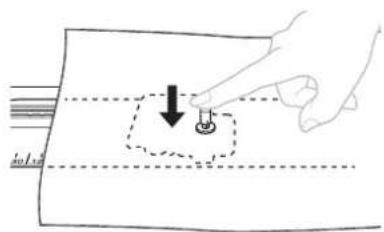
natural_image
Hand holding a small object with a downward arrow, placed on a rectangular surface (no text or symbols)
Select the desired stitch and sew allowing the fabric to feed smoothly, making sure that you do not push or pull your fabric causing an uneven circle.
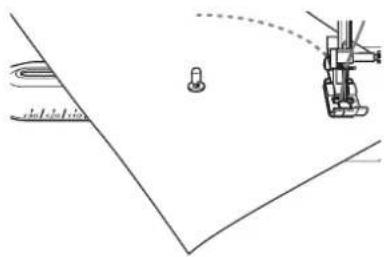
natural_image
Diagram showing a robotic arm interacting with a small mechanical component, no text or symbols present
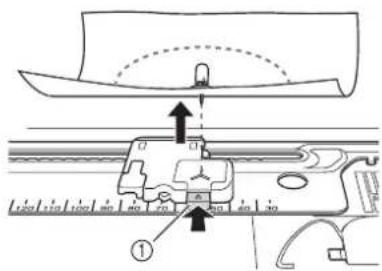
After sewing, always press the release button to remove the pin and fabric from the circular attachment.
text_image
Technical diagram showing mechanical assembly with labeled components and directional arrows①Release button

CAUTION
- Do not leave the pivot pin inserted in your fabric and not attached to the circular attachment. To do so may result in accidental injury or machine damage.
Using the Quarter Circle Template
When combining utility or decorative stitches, or repeating an individual stitch, use the included template as a guide.
1 Mark the pivot point (center of your circle) prior to sewing on the fabric (①).
2 Select your desired stitch and the size of a circle using the markings on the attachment, then place the fabric on the attachment.
3 Sew a single stitch or one pattern combination (②).
4 Remove fabric or garment from attachment.
5 With temporary pencil draw two lines from the pivot point, one at the start of your stitch pattern (③) and one at the end of the stitch pattern (④).

text_image
① ② ③ ④①Pivot Point
②Single stitch/Pattern combination
③Start of the stitch
④End of the stitch
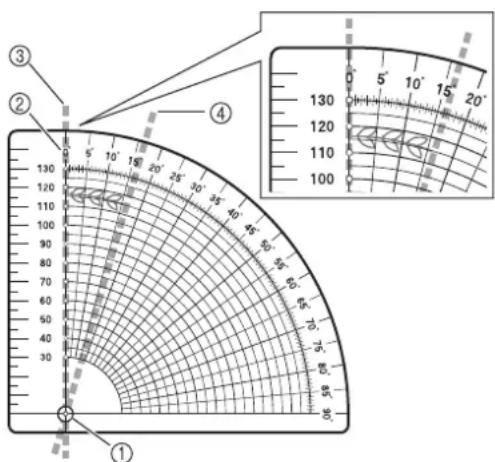
6 Place the template on top of your design, lining up the center pivot point and the center marking on the template (①). Then place the 0 degree line on the right side of template (②) at the start of the stitch (③).
text_image
Diagram of a semicircular coordinate system with numbered components and an inset showing a magnified view of the arc.①Center on template
②0 degree line
③Start of the stitch
④End of the stitch
7 Check the line at the end of the stitch (④) and note the approximate degrees. With a circle measuring 360 degrees divide the stitch length (your degree/stitch measurement) into 360 and that will give you an approximate count on the stitch repetitions. SAMPLE: Your stitch is 16 degrees long so: 360 divided by 16 equals 22.5 repetitions.

Note
- This is not an exact count due to the number of variables i.e. stitch length, fabric used, thread and the stabilizer. You may be able to adjust the length of the stitch, depending on the stitch used, increasing or decreasing to get a closer match so that your circle closes without overlapping or shortage (①).
- Always stitch a trial version of the design checking the stitch length, width and the direction of sewing, making sure that it is suitable for your project.
• Additional calculations may be necessary if your pattern overlaps.
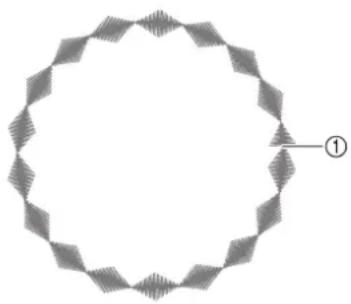
Example: Shortage of the Pattern
natural_image
Geometric pattern of a circular frame with diamond-shaped segments and a labeled point (①), no text or symbols present.①End of the stitch
Using the Included Presser Feet
Using the included presser feet, you can embellish your sewing projects, giving them a professional look with your personal flair.
BRAIDING FOOT
You can use a wide variety of braiding up to 5mm in width, using straight, zigzag and select decorative stitches.

CAUTION
- Do not use this foot when sewing with densely woven braiding that is difficult for the needle to penetrate easily. Doing so could result in needle breakage, damage and/or injury.
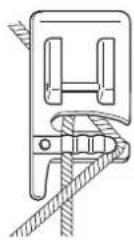
1 Loosen the screw on the guide plate sliding the plate to fit the width of the braid.
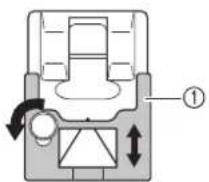
①Plate
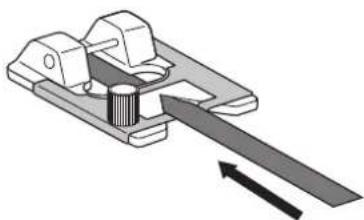
2 Insert the braid through the guide before attaching the foot onto the machine.
natural_image
Mechanical assembly diagram showing a lever mechanism with a rotating shaft and housing (no text or symbols)3 Tighten the screw and pull the braid to the back of the braiding foot.

4 Attach the foot onto the machine.
natural_image
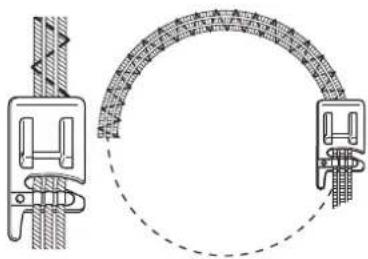
Mechanical assembly diagram showing a lever mechanism with no visible text or symbols5 Select the desired stitch and sew in a circular manner gently guiding the braid.

natural_image
Technical diagram showing mechanical assembly with a circular component and a vertical rod (no text or symbols)■CORDING FOOT
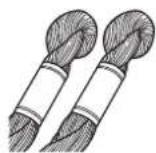
You can embellish using 1 to 3 cords of decorative threads or yarn.
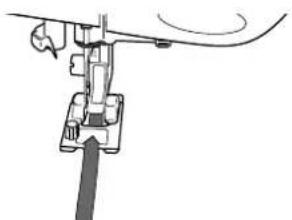
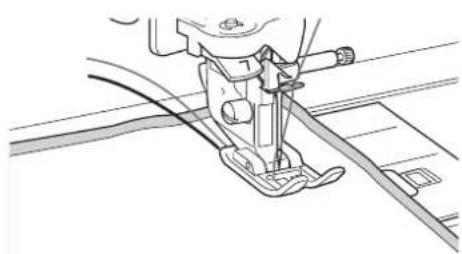
1 Slip a cord from the right of the presser foot, into each guide (to use single cord, use the center guide).
2 Place the cords under and to the back of the cording foot.

3 Select a zigzag or decorative stitch and sew in a circular manner gently guiding the cords.
natural_image
Technical diagram showing mechanical components and a circular assembly with textured surfaces (no text or symbols)
Note
- When sewing with zigzag or decorative stitches, adjust the stitch width, so that it is slightly wider than the width of the braid or cording.
CREATING BOBBIN WORK
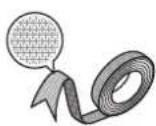
About Bobbin Work
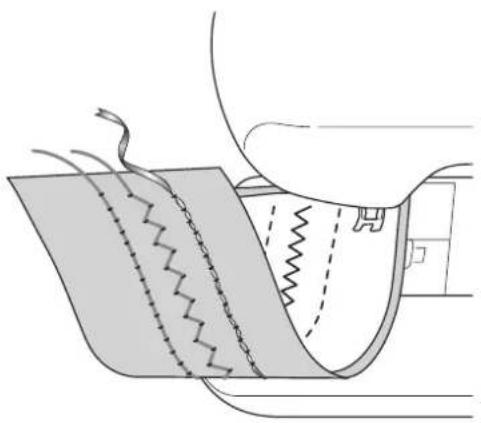
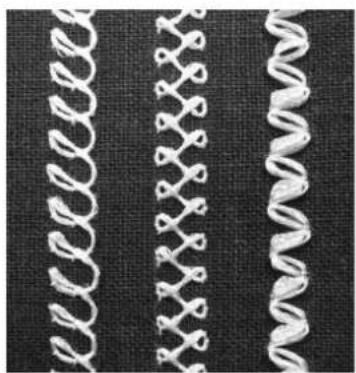
Beautiful embroidery work, with a three-dimensional appearance, can be created by winding the bobbin with heavy weight thread or ribbon, which is too thick to be threaded through the machine's needle. The decorative thread or ribbon will stitch out on the underneath side of fabric while sewing with the fabric wrong side facing up.
natural_image
Diagram of a sewing machine needle stitching fabric, showing stitching and stitching details (no text or symbols)- Utility stitches 2. Decorative stitches 3. Free motion sewing
natural_image
Close-up of three white knitted coiled springs on a dark fabric background (no text or symbols)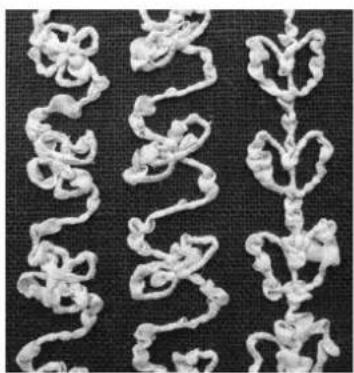
natural_image
Close-up of white knitted fabric swatches arranged in a zigzag pattern on a dark textured background (no text or symbols)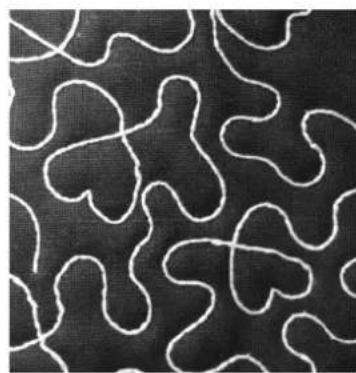
natural_image
Abstract pattern of white wavy lines on a black textured background (no text or symbols)Required Materials
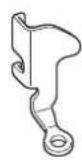
■Bobbin case and cord guide bobbin cover
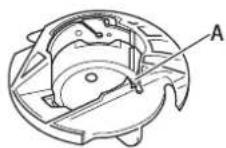
①Bobbin case (gray)
There is a notch at the location indicated by the letter "A".
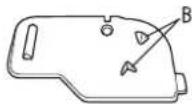
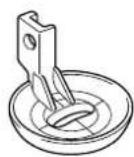
②Cord guide bobbin cover (for bobbin work or attaching cording using single hole).
There are two small v-shaped tabs on the back of the bobbin cover as indicated by the letter "B".
The tabs help hold the bobbin in place so it does not lift up while thick thread is being pulled through.
■Lower thread
We recommend the following types of threads for bobbin work.
No.5 or finer hand embroidery thread or decorative thread
Flexible woven ribbon
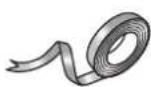
Fine embroidery ribbon (silk or silk-like material) (3.5 mm (approx. 1/8 inch) or less, recommended)
* When wide ribbon or heavy weight threads are being used, we recommend test sewing with and without bobbin case tension being applied to see which gives the best stitching results. If wide ribbon such as 3.5mm (approx. 1/8 inch) is to be used, we recommend that bobbin case tension not be applied. Refer to page 11 for more detailed instructions.

Note
- Do not use thread heavier than No.5 hand embroidery thread.
- Some threads may not be appropriate for bobbin work. Be sure to sew trial stitches before sewing on your project.
■Upper thread
Upper thread choices can vary depending on the finished look you would like to achieve. By using sewing machine embroidery thread (polyester), multipurpose polyester thread, or monofilament (transparent nylon) thread the appearance of a single design can be changed many times just by choosing a different upper thread weight and/or color. If you do not wish for the upper thread to be visible, we recommend using monofilament thread or polyester light weight thread (50wt. or above) that is the same color as the lower thread.
Needle
Use a needle appropriate for the upper thread and fabric being used. Refer to "Fabric/Thread/Needle Combinations" (in the chapter "CHANGING THE NEEDLE") in the Instruction and Reference Guide.
■Presser foot
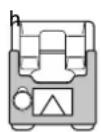
Utility stitches or decorative stitches: Monogramming foot "N"
Free motion sewing: Free motion quilting foot "C", Free motion open toe quilting foot "O" or Free motion echo quilting foot "E"
Fabric
Be sure to sew trial stitches on a piece of scrap fabric, which includes the same threads and fabric as what is being used in your project.

Note
- The sewing results may be affected by the type of fabric used. Before sewing your project, be sure to sew trial stitches on a piece of scrap fabric that is the same as the fabric used in the project.
Upper Threading
1 Install a needle appropriate for the upper thread and fabric to be used.
For details on installing the needle, refer to "CHANGING THE NEEDLE" in the Instruction and Reference Guide.
2 Attach the presser foot.
For details on attaching the presser foot, refer to "CHANGING THE PRESSER FOOT" in the Instruction and Reference Guide.
3 Thread the machine with the upper thread.
For details on threading the machine, refer to "Upper Threading" in the Instruction and Reference Guide.
natural_image
Technical line drawing of a sewing machine (no text or symbols)Preparing the Bobbin Thread
In order to create bobbin work, the bobbin case must be replaced with the one for bobbin work. Before creating bobbin work, clean the bobbin case and the race.
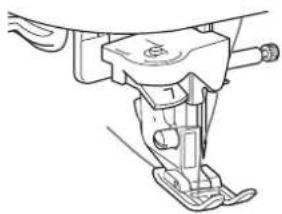
1 Raise the needle and presser foot, and then turn off the machine.
2 Remove the flat bed attachment.
3 Grasp both sides of the needle plate cover, and then slide it toward you to remove it.
text_image
Diagram showing a hand holding a device with internal components and a labeled arrow indicating direction, marked as figure ①.①Needle plate cover
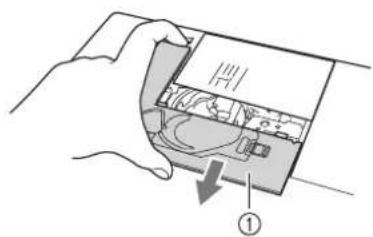
4 Remove the bobbin case.
text_image
Diagram showing a hand holding a small object with a label pointing to it, possibly indicating a step or procedure in a machine tool.① Bobbin case
5 Use the cleaning brush included with the machine or a vacuum cleaner to remove any lint and dust from the race and its surrounding area.
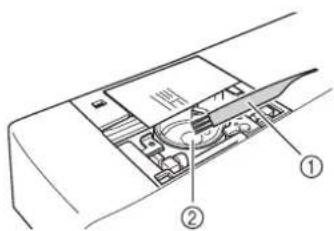
text_image
1# ① ②①Cleaning brush
②Race
6 Wipe the bobbin case (gray) with a soft lint free cloth to clean it.
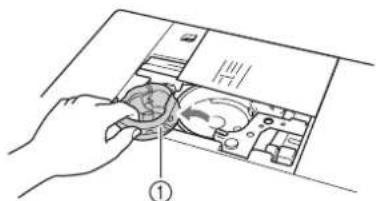
7 Insert the bobbin case (gray) so that the ▲ mark on bobbin case aligns with the ● mark on machine as shown below.
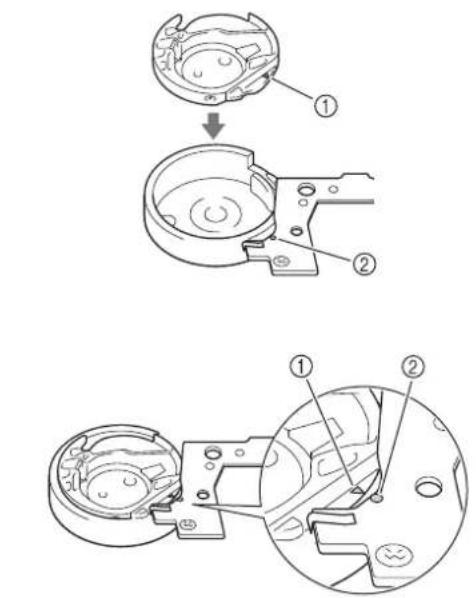
text_image
Technical diagram showing mechanical assembly steps with numbered components and cross-sectional views①▲ mark
② mark

Note
- The bobbin case (gray) cannot be used for sewing in any way other than bobbin work. After sewing bobbin work, refer back to the steps in "Preparing the Bobbin Thread" for removing and cleaning the bobbin case (gray), and then reinstall the standard bobbin case (black).

CAUTION
- Be sure to use the bobbin case (gray) when creating bobbin work. Using any other bobbin case may result in the thread becoming tangled or damage to the machine.
- Make sure that the bobbin case is correctly installed. If the bobbin case is incorrectly installed, the thread may become tangled or the machine may be damaged.

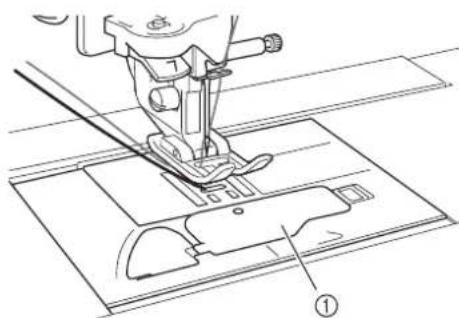
Install the needle plate cover.
For details on installing the needle plate cover, refer to "Cleaning the Race" in the Instruction and Reference Guide.
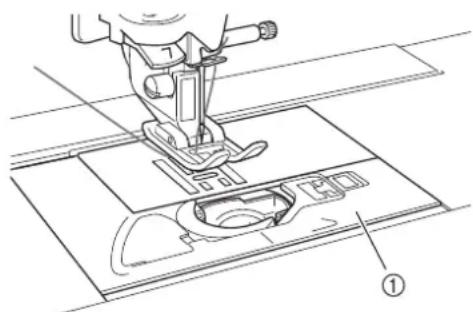
text_image
Technical diagram of a sewing machine with labeled parts, showing mechanical components and part number ①.①Needle plate cover

CAUTION
- When creating bobbin work, use the cord guide bobbin cover (for bobbin work and attaching cords), otherwise the thread may become tangled or the needle may break.

Install the flat bed attachment.

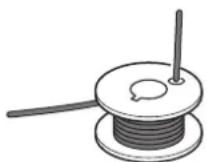
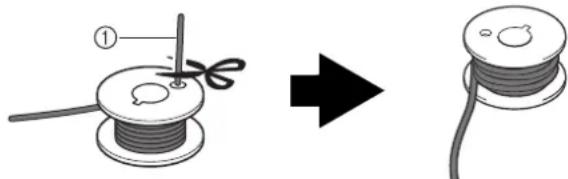
Insert the thread tail from the spool of thread through the hole in the bobbin from the inside to the outside. Hold the thread tail while winding the thread around the bobbin by hand. After winding the bobbin so it is filled as shown below (about 80%), cut the thread.

CAUTION
- Be sure to use the included bobbin or one designed specifically for this machine (Class 15). Using any other bobbin may result in damage or injuries.
11.5 mm (approx. 7/16 inch)
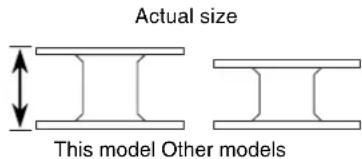
text_image
Actual size This model Other models
Note
- Slowly and evenly wind the thread around the bobbin.
- For best results, wind the bobbin so the thread is not twisted.

Using scissors carefully trim the thread tail as close to the bobbin as possible.
natural_image
Illustration of a wire spool being sewn into a cable, showing the process from spool to final cable (no text or symbols)①Beginning of wound thread

CAUTION
- If thread extends beyond the top of the bobbin too much, the thread may become tangled or the needle may break.

Memo
If inserting thread tail through bobbin hole is difficult bobbin can be wound by holding tail and wrapping thread around inside base. Then carefully trim thread tail so it does not extend from the side of the bobbin.

Install the bobbin wound with thread.
Whether or not tension should be applied to the bobbin thread depends on the type of thread used.
■When tension is applied to the bobbin thread
Insert bobbin into bobbin case so the thread unwinds from the left side. Pass the thread carefully through groove of needle plate cover as shown below.
text_image
Technical diagram showing a sewing machine's internal mechanism with labeled component and rotation arrow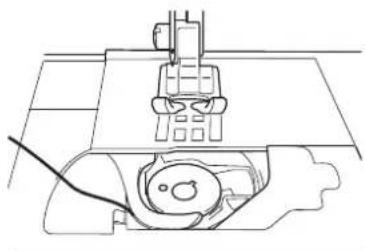
natural_image
Technical line drawing of a sewing machine with no visible text or symbols①Groove of needle plate cover

CAUTION
- When winding the bobbin, make sure the thread is not frayed. Sewing with frayed thread may result in the thread catching on the tension spring of the bobbin case, the thread completely becoming tangled or damage to the machine.
- Do not guide the bobbin thread completely through the groove in the needle plate cover, otherwise the lower threading will not be done correctly. Thread only as far as shown below.
natural_image
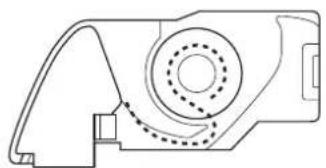
Technical line drawing of a mechanical component with dashed circular features and internal structure (no text or symbols)■When tension is not applied to the bobbin thread
If the bobbin thread in the trial stitching is too tight and adjusting the bobbin case tension does not help, do not pass the thread through the tension spring.
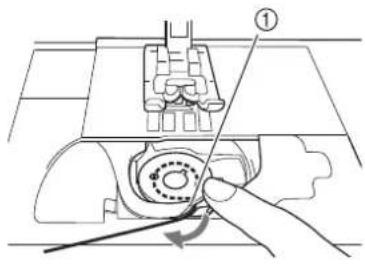
Hold the bobbin with your left hand so the thread unwinds from the right side and hold the end of the thread with your right hand.
natural_image
Line drawing of hands using a tool to adjust or install a small electronic component (no text or symbols visible)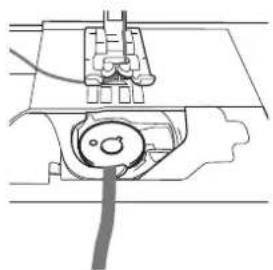
natural_image
Pure mechanical diagram showing a cable inserted into a component, no text or symbols present13 Pull out about 8 cm (approx. 3 inches) of bobbin thread.
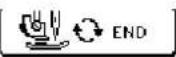
14 Turn on the sewing machine, and then press
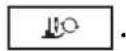
→ The screen changes, and all keys and operation buttons are locked.

Note
- If "OPENING DISPLAY" in the Settings Screen is turned "ON" press anywhere on the LCD screen
before pressing the

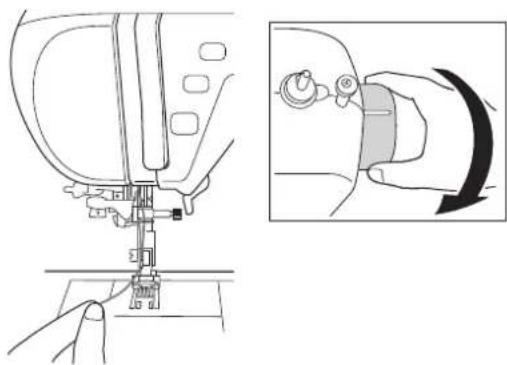
15 Lightly hold the end of the upper thread while turning the handwheel toward you (counterclockwise) until the mark on the handwheel aligns with the line on the machine.
natural_image
Line drawing of a sewing machine needle and its side view showing the mechanism (no text or symbols)16 Gently pull the upper thread to pull up the bobbin thread through the needle plate.
natural_image
Line drawing of a sewing machine needle stitching fabric (no text or symbols)→ A loop of the bobbin thread comes out through the hole in the needle plate.
17 Use the presser foot lever to raise the presser foot.
18 Insert tweezers through bobbin thread loop and pull bobbin thread above the needle plate.
19 Align the upper thread and bobbin thread, and then pull out about 10 cm (approx. 4 inches) of the threads and pass them under the presser foot toward the rear of the machine.
natural_image
Technical line drawing of a sewing machine needle and fabric (no text or symbols)20 Install the the cord guide bobbin cover (for bobbin work and attaching cords).
natural_image
Technical line drawing of a sewing machine needle and base plate (no text or symbols)①Cord guide bobbin cover (for bobbin work and attaching cords)
21 Press or on the END
screen.
→ All keys and operation buttons are unlocked, and the previous screen is displayed.
Positioning the Fabric and Sewing
Note • Reco
- Recommended stitches for bobbin work are open "airy" type stitches.
- Be sure to sew trial stitches using same fabric and threads as project in order to check the sewing results.
- The bobbin thread may become tangled due to the type of pattern and thread that are being used. Since this may cause the needle to break, immediately stop sewing if this occurs. Turn off the machine, and then cut out the tangled thread with scissors. Then, clean the race and bobbin case as described in "Preparing the Bobbin Thread" on page 9.
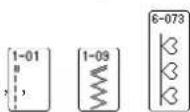
1 Select a stitch. For this example, press
Memo • For be
- For best results, select a longer stitch length and a wider stitch width. Depending on the selected stitch, it may not be possible to change the stitch length and stitch width.
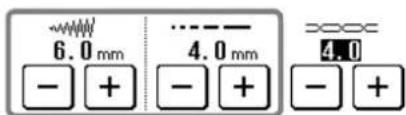
text_image
6.0 mm 4.0 mm - + - + - + 4.0- Depending on the fabric, bunched stitches may result. We recommend selecting a simple stitch and sewing trial stitches to check the sewing results.
Examples of simple stitches:
2 Adjust the upper thread tension.
For details on adjusting the upper thread tension, refer to "Adjusting the Thread Tension" in the Instruction and Reference Guide.
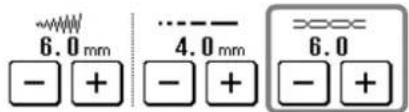
text_image
6.0 mm - + 4.0 mm - + 6.0 - +
Memo
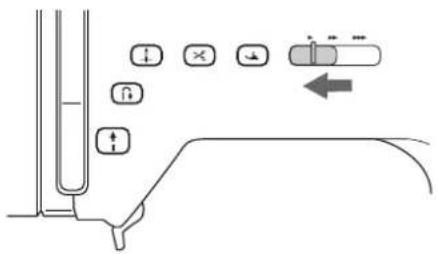
We recommend a setting between 6 and 8 for the upper thread tension.
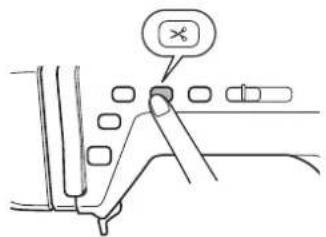
3 Make sure that automatic thread cutting
( ) and automatic reinforcement/reverse stitching ( ) have been turned off.
CAUTION
- Before sewing, make sure that automatic thread cutting has been turned off. If sewing is started with automatic thread cutting turned on, the thread may become tangled or the machine may be damaged.
4 Place stabilizer on top (wrong side) of the fabric.

Note
- Type and weight of stabilizer will depend on fabric and thread being used.
5 If thread is too thick to pull through fabric to machine surface use an awl to punch a hole in the fabric at the beginning of stitching so the bobbin thread can be fed through the opening.
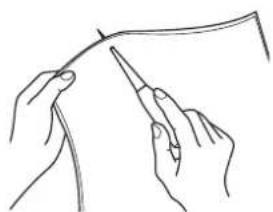
natural_image
Line drawing of two hands holding a thin wire or cable, no text or symbols present6 Press
→ The screen changes, and all keys and operation buttons are locked.
7 Use the presser foot lever to raise the presser foot.
8 With the wrong side facing up, place the fabric under the presser foot.

natural_image
Technical line drawing of a sewing machine with base and cutting tool (no text or symbols)①Wrong side of fabric
9 Turn the handwheel toward you (counterclockwise) to feed the needle into the fabric or punched hole. Position the upper thread over the presser foot and lightly hold then, lower the presser foot lever.
text_image
Technical diagram showing sewing process with labeled parts and a magnified inset showing mechanical assembly detail①Punched hole
②Upper thread over the presser foot
10 Pulling the upper thread gently, turn the handwheel toward you (counterclockwise) until the mark on the handwheel aligns with the line on the machine.
natural_image
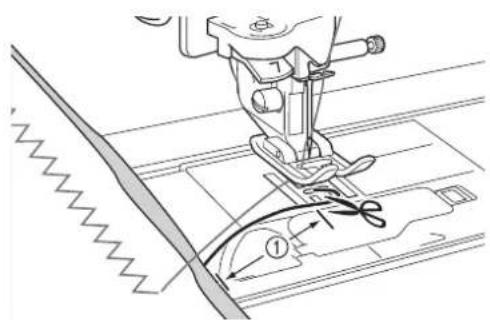
Illustration of a sewing machine needle being inserted, with an inset showing the insertion process (no text or symbols)→ A loop of the bobbin thread comes out through the hole in the fabric.

Note
- If the bobbin thread does not come up, hold the upper thread as shown below to pull up the bobbin thread.

natural_image
Line drawing of a sewing machine needle stitching a fabric (no text or symbols)①Upper thread
11
Raise the presser foot lever, and then use tweezers to pull up the bobbin thread and bring the end of the thread to the top of the fabric.

Note
- Pull the thread while holding down the fabric so it does not move out of place.
12
Align the upper thread and bobbin thread, and then pass them under the presser foot toward the rear of the machine.
natural_image
Technical line drawing of a sewing machine needle and screw (no text or symbols)13
While gently holding threads at the rear of the machine, turn the handwheel to feed the needle into the fabric or punched hole again, and then lower the presser foot lever.
14
Press or in the screen.
→ All keys and operation buttons are unlocked, and the previous screen is displayed.
15
Select a low speed, gently hold the threads behind the presser foot and start sewing.
text_image
Diagram showing mechanical or fluid system components with directional arrows and symbols, likely illustrating a valve or actuator mechanism.
Note
- Before sewing, check that there is enough thread in the bobbin.
16
When you have reached the end of the stitching area, stop the machine.

Note
- Do not sew reinforcement/reverse stitches at the end of the stitching, otherwise the threads may become tangled or the needle may break. In addition, it may be difficult to pull the bobbin thread up to the wrong side of the fabric.
17
Raise the needle and presser foot.
18
Leaving about 10 cm (approx. 4 inches) of thread at the ends, use scissors to cut the threads.
text_image
Technical diagram of a sewing machine with labeled parts and measurement annotations①10 cm (approx. 4 inches)

Note
- Do not press the "Thread Cutter" button to cut the threads, otherwise the machine may be damaged.
■Finishing the thread ends
1 At the end of the stitching, use a hand sewing needle to bring the bobbin thread up to the wrong side of the fabric.
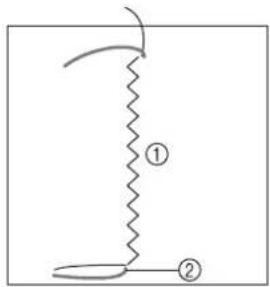
natural_image
Simple line drawing of a zigzag line with two labeled points (① and ②) and a curved arrow, no text or symbols present.①Wrong side of fabric
②Bobbin thread

Note
- If it is difficult to place bobbin thread through the eye of a hand sewing needle, use a ribbon embroidery needle to pull the thread up to the wrong side of the fabric. Otherwise, use an awl to pull up the bobbin thread.
2 Working from the wrong side of the fabric, tie the bobbin and upper threads together by hand. Cut away excess threads with scissors.
natural_image
Pure zigzag line diagram without any text, numbers, or symbols①Wrong side of fabric
②Right side of fabric

Note
- To ensure threads do not come undone after being tied place a drop of fabric glue on knots.
3 If the desired results could not be achieved, adjust the tension of the bobbin thread and of the upper thread, and then try sewing the stitching again.
For more details, refer to "Adjusting the Thread Tension".
Adjusting the Thread Tension
After sewing trial stitches and checking the sewing results, adjust the thread tensions if necessary. After adjusting the tensions, be sure to sew trial stitches in order to check the sewing results.
■Adjusting the upper thread tension
Refer to "Adjusting the Thread Tension" in the Instruction and Reference Guide. We recommend a setting between 6 and 8 for the upper thread tension.
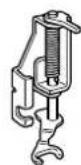
■Adjusting the tension of the bobbin thread
If the desired stitching cannot be achieved after adjusting the upper thread tension, adjust the tension of the bobbin thread. The tension of the bobbin thread can be adjusted by turning the slotted-head (−) screw on the bobbin case (gray) for bobbin work.
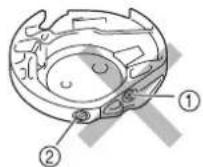
①Do not turn the phillips screw (+).
②Adjust with a screwdriver (small).
To increase the tension of the bobbin thread, turn the slotted-head (−) screw 30° to 45° clockwise.
natural_image
Diagram of a car's front wheel and side seats with an arrow indicating direction (no text or symbols)To decrease the tension of the bobbin thread, turn the slotted-head (−) screw 30° to 45° counterclockwise.
natural_image
Simple line drawing of a car's front wheel and side door (no text or symbols)
Note
- Turning the screw on the bobbin case (gray) may push up the spring plate, as shown below. If this occurs, gently press down the spring plate with a screwdriver so it is lower than the top surface of the bobbin case (gray), and then insert the bobbin case into the machine.

natural_image
Illustration of a hand using a pipette to apply a small object onto a surface (no text or symbols present)①Spring plate

CAUTION
- DO NOT adjust the position of the phillips (+) screw on the bobbin case (gray) as this may result in damage to the bobbin case, rendering it useless.
- If the slotted screw (-) is difficult to turn, do not use force. Turning the screw too much or providing force in either (rotational) direction may cause damage to the bobbin case. Should damage occur, the bobbin case may not maintain proper tension.

Note
- If the bobbin thread tension is tight, the thread cannot be passed through the tension spring when the bobbin is installed in the bobbin case. (Refer to "When tension is not applied to the bobbin thread" on page 11.)
Troubleshooting
Several solutions for minor problems are described below. If the problem persists, contact your nearest authorized retailer.
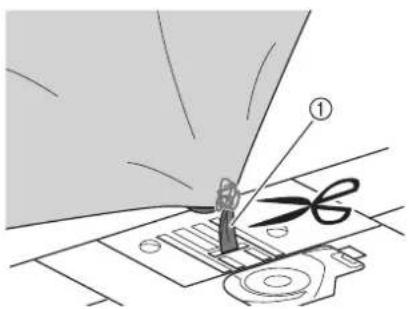
■The thread was accidentally cut automatically and the bobbin thread is caught inside the machine
1 Cut the thread near the fabric above the needle plate, and then remove the fabric.
text_image
Technical diagram showing sewing process with labeled component ① and scissors cutting into a sewing machine①Thread
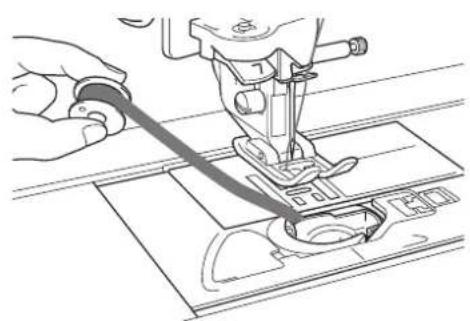
2 Remove the bobbin, and then hold it out toward the left side of the machine.
natural_image
Line drawing of a sewing machine needle stitching fabric (no text or symbols)3 Lower the presser foot.

Apply slight tension on bobbin thread by holding thread out to the left side of presser foot. Press the "Thread Cutter" button again.
text_image
Diagram showing a car's seatbelt mechanism with a cross symbol and directional arrow, likely illustrating vehicle safety or steering system.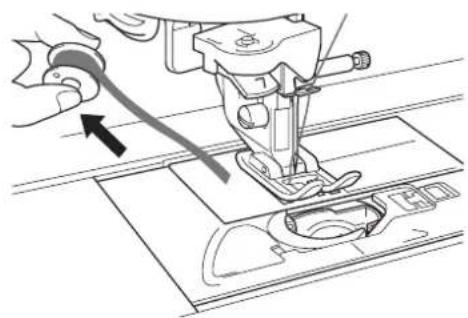
natural_image
Line drawing of a sewing machine needle stitching fabric, with no text or symbols present
CAUTION
- Do not pull on the thread with excessive force, otherwise the machine may be damaged.
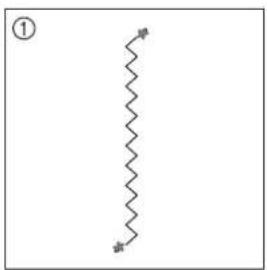
■The pattern is misaligned
Refer to "Adjusting the thread tension" and increase the upper thread tension. If the pattern is still misaligned, reduce the tension of the bobbin thread.

natural_image
Two identical patterned line segments labeled ① and ②, no text or symbols present.①Correct tension
②The upper thread tension is too loose, or the bobbin thread tension is too tight.
■The bobbin thread catches on the tension spring of the bobbin case
Sew with no tension applied to the bobbin thread. (Refer to "When tension is not applied to the bobbin thread" on page 11.)
LIST OF STITCHES THAT CANNOT BE USED WITH THE CIRCULAR ATTACHMENT
| Category Stitches that cannot be used | |||
 | 1* - All usable | ||
| [0HA4] | 2*- All usable | ||
| 3 - All usable | |||
 | 4 - All not usable | ||
 | 5 - 01, 03, 04, 05, 06, 08, 09, 10 | ||
| [XXT4] | Q All usable | ||
 | 6 -  | 015, 016, 017, 018, 019, 020, 022, 023, 024, 025, 026, 027, 028, 029, 030, 032, 033, 034, 035, 036, 037, 038, 039, 040, 041, 042, 043, 044, 045, 046, 051, 052, 053, 054, 055, 056, 057, 058, 059, 063, 064, 065, 066, 067, 068, 069, 071, 072, 075, 076, 077, 078, 079, 080, 081, 082, 083, 084, 085, 086, 087, 088, 089, 090, 091, 092, 093, 094, 095, 096, 097, 098, 099, 100, 101, 102, 103, 104, 105, 106, 107, 108, 109, 110, 111, 112, 113, 114, 117, 118, 119, 121, 124, 125, 126, 127, 128, 129, 130, 131, 132, 133, 134, 135, 136, 137, 138, 139 | |
 | 064, 082, 084, 085, 086, 087, 088, 089, 090, 091, 092, 093, 094, 095, 096, 097, 098, 099, 100, 101, 103, 104, 105, 106, 107, 108, 109, 110, 111, 112, 113, 114, 126 | ||
 | 7 - All usable | ||
 | 8 -  | 01, 02, 03, 04, 06, 07, 09, 10, 11, 12, 13, 14, 15, 16, 17, 18, 19, 20, 21, 22, 24, 25, 26, 28, 29, 30, 31, 32, 33, 34, 36, 37, 38, 39, 40, 41, 42, 43, 44, 47, 48, 50, 51, 52, 53, 54, 56, 57, 58, 60 | |
 | 09, 10, 11, 12, 13, 14, 15, 16, 17, 18, 19, 20, 24, 25, 28, 29, 30, 53 | ||
 | 9 - All usable | ||
| [ZZWD] | 10 - 04, 09 | ||
 | 11 - All usable | ||
 |   Alphabet patterns Alphabet patterns | All not usable | |
* Do not use overcasting foot "G", side cutter "S" or blind stitch foot "R" even if they appear in the screen as the presser foot to be used with the selected stitch.
TABLE DES MATIÈRES
INTRODUCTION....19
UTILISATION DU GUIDE POUR COUTURE CIRCULAIRE POUR COUDRE DES MOTIFS
CIRCULAIRES....19
text_image
40 30 in cm
text_image
Technical diagram of a sewing machine with labeled parts and an inset showing a sewing machine needle inserted into the main body.①Vis de fixation

text_image
Technical diagram showing a sewing machine needle insertion into a component, with labeled parts and directional arrow indicating insertion direction.natural_image
Technical line drawing of a mechanical assembly with no visible text or symbols
natural_image
Line drawing of a hand holding a small component next to a mechanical device (no text or symbols visible)
Remarque
text_image
Diagram illustrating hand positioning with arrows and a central symbol, showing alignment between two crossed lines.text_image
Diagram showing a pin with three labeled parts: ①, ②, and ③, with a dashed oval path inside a rectangular frame.text_image
Technical diagram showing mechanical assembly with numbered components and dimension annotationsnatural_image
Hand holding a small circular object with a downward arrow, placed on a textured surface (no text or symbols)natural_image
Technical line drawing of a sewing machine with a foot and fabric, no text or symbols presenttext_image
Technical diagram showing mechanical assembly with labeled parts and measurement scaletext_image
Diagram of a polar coordinate system with numbered components and an inset showing a curved scale with measurement annotations.natural_image
Geometric pattern of a circular frame with radial segments and a labeled point (①), no text or symbols present.① Fin du point
natural_image
Mechanical assembly diagram showing a lever mechanism with a curved blade and housing (no text or symbols)natural_image
Mechanical assembly diagram showing a lever mechanism with no visible text or symbolsnatural_image
Pure mechanical diagram showing a linkage mechanism with no text or symbols■PIED POUR CORDONNET
natural_image
Technical line drawing of a mechanical clamp assembly with no visible text or symbols
Remarque
natural_image
Diagram of a sewing machine stitching fabric with visible stitching and stitching details (no text or symbols)natural_image
Close-up of three white knitted fabric swatches on a dark textured background (no text or symbols)natural_image
Close-up of white knitted plant roots on a dark textured background (no text or symbols)
natural_image
Abstract pattern of white wavy lines on a black textured background (no text or symbols)Matériel nécessaire
Ruban tissé flexible

natural_image
Technical line drawing of a sewing machine (no text or symbols)text_image
Diagram showing a hand holding a device with labeled parts and an arrow indicating direction, marked as figure ①.text_image
Diagram showing a hand holding a device with a magnified view of an electronic device, labeled with number ①.text_image
Technical diagram showing a mechanical component with labeled parts, including a top view and a side view.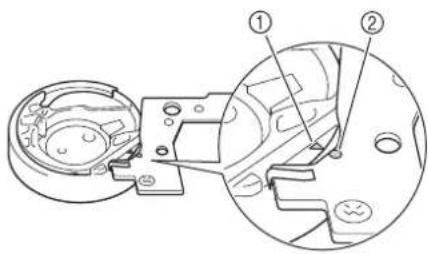
text_image
Technical diagram of a mechanical assembly with numbered components, likely illustrating a gear or cam mechanism.①Marque ▲
②Marque ●

Remarque
natural_image
Technical line drawing of a sewing machine on a cutting board (no text or symbols)natural_image
Illustration of a wire being sewn into a spool, showing the process from spool to final cable (no text or symbols)text_image
Technical diagram showing a sewing machine with labeled component and directional arrow indicating rotation or movement.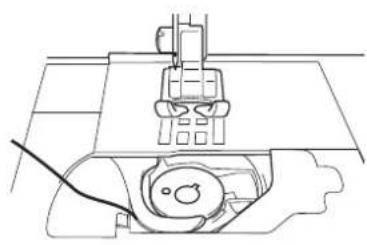
natural_image
Technical line drawing of a sewing machine with no visible text or symbolsnatural_image
Technical line drawing of a mechanical component with dashed circular features and internal structure (no text or symbols)natural_image
Line drawing of hands using a tool to adjust or install a component on a flat surface (no text or symbols)
natural_image
Pure mechanical diagram showing a component with a cable and housing, no text or symbols presentnatural_image
Line drawing of a sewing machine with a close-up inset showing the hand adjusting the base (no text or symbols)natural_image
Line drawing of a sewing machine needle stitching fabric (no text or symbols)natural_image
Technical line drawing of a sewing machine needle and base mechanism (no text or symbols)text_image
Technical diagram of a sewing machine with labeled parts, showing needle and base mechanismnatural_image
Line drawing of two hands holding a thin wire or cable, no text or symbols present6 Appuyez sur .
text_image
Technical diagram of a sewing machine with labeled parts, showing mechanical components and alignment lines.①Envers du tissu
text_image
Technical diagram showing sewing machine tool path with numbered annotations and a magnified detail viewnatural_image
Illustration of a sewing machine needle being sewn, with an inset showing the hand adjusting the blade (no text or symbols present)natural_image
Line drawing of a sewing machine needle stitching a fabric (no text or symbols)①Fil supérieur
natural_image
Line drawing of a sewing machine needle stitching fabric (no text or symbols)text_image
Diagram showing a mechanical or fluid system with labeled icons and directional arrows indicating flow or movement.
Remarque
natural_image
Technical line drawing of a sewing machine needle and fabric (no text or symbols)text_image
Diagram showing a zigzag line with two labeled points (① and ②) indicating positions or sections of a structure.①Envers du tissu
②Fil de la canette

Remarque
natural_image
Simple zigzag line diagram with two arrows pointing upward (no text or symbols)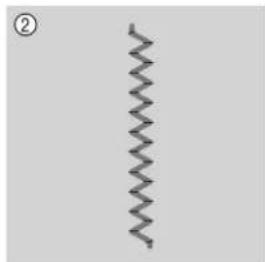
natural_image
Simple zigzag line pattern on a plain background (no text or symbols)①Envers du tissu
②Endroit du tissu

Remarque
natural_image
Diagram of a car's side profile with an arrow indicating direction (no text or symbols)natural_image
Diagram showing a car interior with directional arrows and circular markers (no text or symbols)
Remarque
natural_image
Illustration of a hand using a pipette to apply a small object onto a surface (no text or symbols present)①Lame ressort
ATTENTION
text_image
Technical diagram showing sewing process with labeled component '①' and scissors cutting into a machine①Fil
natural_image
Line drawing of a sewing machine needle stitching fabric (no text or symbols)text_image
Diagram showing a hand pressing a button labeled 'X' on a vehicle's side panel, with other components visible.
natural_image
Line drawing of a sewing machine needle stitching on a fabric mat, with no visible text or symbolsATTENTION
natural_image
Two identical abstract patterned shapes with dot patterns, no text or symbols presenttext_image
40 30 in cm
text_image
Technical diagram of a sewing machine with labeled parts and an inset showing a sewing machine needle inserted into the main body.text_image
Technical diagram showing a sewing machine needle insertion into a component, with labeled parts and directional arrow indicating insertion direction.natural_image
Technical line drawing of a mechanical assembly with no visible text or symbols
natural_image
Line drawing of a hand holding a small component next to a mechanical device (no text or symbols visible)
Nota
text_image
Diagram illustrating hand positioning with arrows and a central symbol, showing alignment or movement around a central point.text_image
Diagram showing a pin inserted into a circular target with three labeled parts: ①, ②, and ③.text_image
Technical diagram showing mechanical assembly with numbered components and directional arrows indicating motion or movement.natural_image
Hand holding a small mechanical component with a downward arrow, no text or symbols presentnatural_image
Technical line drawing of a robotic arm and a small mechanical component on a curved surface (no text or symbols)text_image
Technical diagram showing mechanical assembly with labeled components and directional arrows indicating movement or forcetext_image
Diagram of a circular coordinate system with numbered components and an inset magnified view showing measurement scales.natural_image
Geometric pattern of a circular frame with triangular segments, no text or symbols present① Fin de la puntada
natural_image
Mechanical assembly diagram showing a lever mechanism with a rotating shaft and housing (no text or symbols)natural_image
Mechanical assembly diagram showing a lever mechanism with no visible text or symbolsnatural_image
Technical diagram showing a mechanical assembly with a circular component and a dashed arc (no text or symbols)■PIE PARA CORDONES
natural_image
Technical line drawing of a mechanical clamp and ring assembly (no text or symbols)
Nota
natural_image
Diagram of a sewing machine stitching fabric with visible stitching and stitching details (no text or symbols)natural_image
Close-up of three white wavy fabric swatches on a dark textured background (no text or symbols)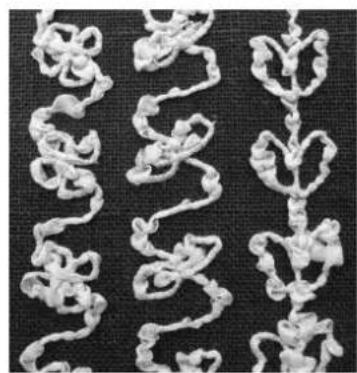
natural_image
Close-up of white knitted fabric swatches arranged in vertical columns on a dark textured background (no text or symbols)
natural_image
Abstract pattern of white wavy lines on a black background, resembling stylized organic shapes (no text or symbols)natural_image
Technical line drawing of a sewing machine (no text or symbols)text_image
Diagram showing a hand holding a device with labeled parts and an arrow indicating direction, marked as figure ①.text_image
Diagram showing a hand holding a device with labeled parts, likely illustrating a mechanical or electrical component assembly.① Caja de la bobina
text_image
Technical diagram showing a mechanical component with labeled parts, including a top view and a side view.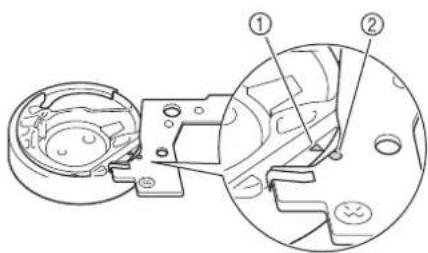
text_image
Technical diagram of a mechanical assembly with labeled parts, showing cross-sectional and top views①Marca ▲
②Marca ●

Nota
natural_image
Technical line drawing of a sewing machine needle and base plate (no text or symbols)text_image
Diagram showing a wire being sewn into a spool, with the number ① indicating the thread's position.①Extremo del hilo enrollado

PRECAUCIÓN
text_image
Technical diagram showing a sewing machine's internal mechanism with labeled parts and directional arrows indicating rotation or adjustment.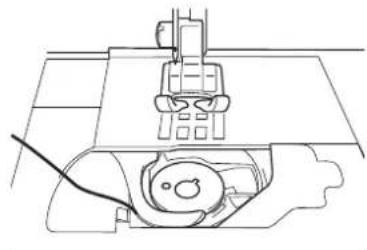
natural_image
Technical line drawing of a mechanical assembly with no visible text or symbolsnatural_image
Technical line drawing of a mechanical component with dashed circular features and internal structure (no text or symbols)natural_image
Technical line drawing showing hands using a tool to adjust or install an electrical component (no text or symbols present)natural_image
Line drawing of a sewing machine with a close-up inset showing the hook mechanism (no text or symbols)natural_image
Line drawing of a hand operating a sewing machine needle (no text or symbols)natural_image
Line drawing of a sewing machine needle stitching a circular component (no text or symbols)text_image
Technical diagram of a sewing machine with labeled parts, showing needle and base mechanismnatural_image
Line drawing of two hands holding a thin wire or cable, no text or symbols present6 Pulse
text_image
Technical diagram of a sewing machine with labeled parts, showing mechanical components and alignment lines.①Revés de la tela
text_image
Technical diagram showing sewing machine tool path with numbered components and a close-up inset highlighting the mechanism.natural_image
Illustration of a sewing machine needle being adjusted, showing the blade and handle (no text or symbols)natural_image
Line drawing of a sewing machine needle and screwdriver (no text or symbols)①Hilo superior
natural_image
Line drawing of a sewing machine needle and fabric (no text or symbols)text_image
Diagram showing a mechanical or fluid system with labeled icons and directional arrows indicating flow or movement.
Nota
text_image
Technical diagram of a sewing machine with labeled parts and measurement annotationstext_image
Diagram showing a zigzag line with two labeled points (① and ②) indicating positions or transitions.①Revés de la tela
②Hilo de la bobina

Nota
text_image
Diagram showing a car interior with directional arrow and circular symbols, likely indicating movement or change in vehicle parts.natural_image
Diagram showing a curved road with circular markers and an arrow indicating direction (no text or symbols)
Nota
natural_image
Illustration of hands using a pipette to apply a small object onto a surface (no text or symbols present)①Placa del resorte

PRECAUCIÓN
text_image
Technical diagram showing sewing process with labeled parts and a numbered annotation①Hilo
natural_image
Line drawing of a sewing machine needle stitching fabric (no text or symbols)text_image
Diagram showing a hand pressing a button labeled 'X' on a vehicle's side panel, with other components visible.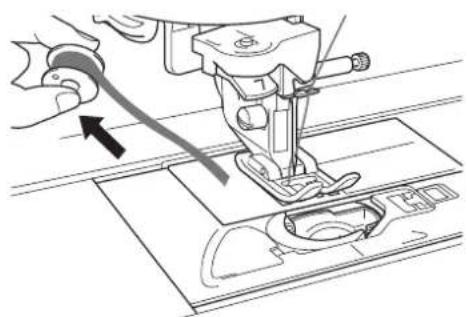
natural_image
Line drawing of a sewing machine needle stitching on a fabric mat, with no visible text or symbols