
KSW 345 - Refrigerator BOMANN - Free user manual and instructions
Find the device manual for free KSW 345 BOMANN in PDF.

| Product type | Wine refrigerator |
| Brand | Bomann |
| Model | KSW 345 |
| Net capacity | 54 L |
| Bottle capacity | 18 bottles of 0.75 L |
| Dimensions (H x W x D) | 63.6 x 34.5 x 51.5 cm |
| Net weight | 15.1 kg |
| Power supply | 220-240 V, 50/60 Hz |
| Power consumption | 70 W |
| Annual energy consumption | 189.0 kWh |
| Electricity consumption / 24h | 0.517 kWh |
| Energy efficiency class | B |
| Climate class | N (+16°C to +32°C) |
| Noise level | 39 dB(A) |
| Adjustable temperature range | +11°C to +18°C |
| Interior lighting | LED, 1 W |
| Defrost | Automatic |
| Number of shelves included | 5 chrome shelves |
| Main materials | Metal, glass and plastic |
| Recommended maintenance | Clean with baking soda solution |
| Safety | Automatic shutdown on failure, child lock (not specified) |
Frequently Asked Questions - KSW 345 BOMANN
User questions about KSW 345 BOMANN
0 question about this device. Answer the ones you know or ask your own.
Ask a new question about this device
Download the instructions for your Refrigerator in PDF format for free! Find your manual KSW 345 - BOMANN and take your electronic device back in hand. On this page are published all the documents necessary for the use of your device. KSW 345 by BOMANN.
USER MANUAL KSW 345 BOMANN
natural_image
Black BOMANN 3D refrigerator with white rack and red wine bottles on top (no visible text or symbols on main body)
PRODUCTBESCHRIJVING 20
Leveringsomvang 21
Specifications 21
INSTALLATIE 21
Locatie 21
Voeding 22
OPSTARTEN/BEDIENING 22

MEANING OF THE "DUSTBIN" SYMBOL 29
IMPORTANT USE AND SAFETY INSTRUCTIONS 30
General safety precautions 30
Risk of injury 30
Intend use 31
Unpacking and Packaging material 31
Removing the transport protection 32
PRODUCT DESCRIPTION 32
Delivery scope 32
Specifications 32
INSTALLATION 33
Location 33
Power supply 34
Prior to first use 34
Turning on the device 35
Defrosting 36
Turning off 36
TIPS FOR ENERGY SAVING 36
MAINTENANCE AND CLEANING 37
Cleaning and care 37
Interior light 37
Transportation 37
Repairs 38
What if . . . Troubleshooting 38
OVERVIEW

Please read this user manual thoroughly before first time operation. It includes important information with regard to installation, operation and maintenance of the device. Improper use may cause hazard-ous situations, especially for children.
Keep this manual for future reference. Pass it on to any future owner of this product. In case of any doubt regarding questions or topics which are not extensively described in this manual, please contact your distributor or a technician.
MEANING OF THE "DUSTBIN" SYMBOL
This product is marked in accordance with the European waste regulation
2002 / 96 / EC - WEEE
It regulates the proper disposal of the product. Environmentally friendly
disposal will prevent possible negative consequences to health caused by improper disposal.
This symbol on the product or its packaging indicates that this product must not be disposed of with the regular household waste. The user has to return the product to a collection point for the recycling of electric and electronic equipment.
The disposal must comply with the local regulations in place.
For further information please contact your local authorities or waste collection service.
Disable waste equipment before disposal:
- Disconnect the mains plug from the wall socket.
- Disconnect the plug from the mains cable.
- Remove or disable any existing spring or latch locks.
This will prevent children from locking themselves (risk of suffocation!) or from getting into perilous situations. Children might not understand the risks that arise from handling household devices. Therefore, observe children and make sure they do not play with the device.
IMPORTANT USE AND SAFETY INSTRUCTIONS
General safety precautions
All safety information in this user manual are marked with a warning symbol. They indicate possible dangers precociously. It is imperative to read and follow this information.
WARNING
Do not touch the plug at the mains cable with wet or moist hands when connecting or disconnecting. Risk of death by electric shock!
- In case of emergency, unplug the device immediately.
- Hold the plug when disconnecting the mains cable; do not pull the cable.
- Disconnect the plug before cleaning or servicing.
- Regularly check the device and cable for signs of damage. Do not continue to operate the device in case of damage.
- A damaged mains cable must be replaced by the manufacturer or a technician and without any delay. Do not use the device with a damaged cable or plug.
- Do not repair the device by yourself. Please contact authorized personnel. In order to avoid hazards a damaged mains cable must be replaced with an equivalent cable by the manufacturer or qualified specialist.
- Except for cleaning and maintenance work described in this manual, no other alterations of this device must be executed.
- Do not place vases or other containers filled with liquids on the device.
Risk of injury
- So that you can disconnect the appliance quickly in event of an emergency, do not use extension cables.

CAUTION
- This appliance can be used by children aged from 8 years and above if they have been given supervision or instruction concerning the safe use of the appliance understands the hazards involved.
- Cleaning and maintenance by the user shall not be made by children unless they are older 8 years and supervised.
- Keep the appliance and its cord out of reach of children less than 8 years.
• Children shall not play with the appliance. - Appliances can be used by persons with reduced physical, sensory or mental capabilities or lack of experience and knowledge if they have been given supervision or instruction concerning use of the appliance in a safe way and if they understand the hazards involved.
- Never transport the unit with content.
 | WARNINGPackaging materials (e.g. plastic bags, polystyrene) are dangerous for children.Risk of suffocation! Keep packaging materials out of reach of children. |
 | WARNINGContainers with flammable gases or liquids can leak due to cold ambient temperatures. Risk of explosion! Do not store combustible materials such as aerosol cans or refill cartridges for lighters in your device. |
Intend use
- Only use the appliance in a dry, indoor area. It is intended for domestic use and similar areas. This device is not intended for use outside areas.
- For safety reasons, alterations or modifications of the device are prohibited.
- Please keep in mind that the manufacturer is not reliable for any damage resulting from incorrect or any other use then cooling/storing beverages.
Unpacking
The packaging must be undamaged. Check the device for any possible transport damage. Do not install a damaged device. In case of damage, please contact your distributor.
Packaging material
The packaging for transportation of the device and individual parts is produced of recyclable materials.
• corrugated cardboard / paperboard (mainly of waste paper)
• form part of PS (foamed, CFC-free polystyrene)
• Films and bags of PE (polyethylene)
• Strapping strips of PP (polypropylene)
IMPORTANT
Make sure you dispose of packaging materials environmentally friendly (see page 29).
Removing the transport protection
The device and parts of the interior are protected for transport. Remove all adhesive tapes from the right and left side of the door. You may remove adhesive residue with a cleaning solvent. Also remove any adhesive tapes and packaging materials from the inside of the device.
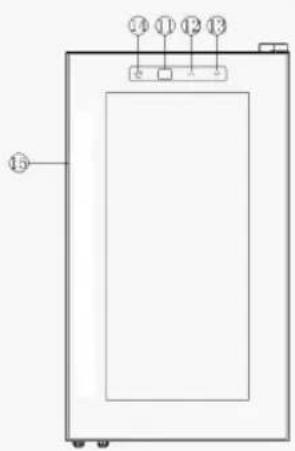
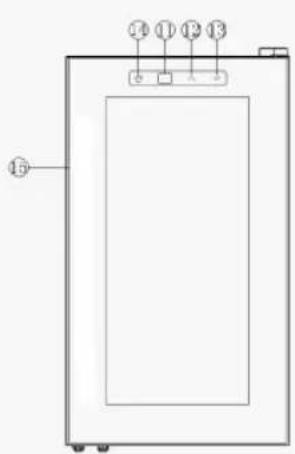
PRODUCT DESCRIPTION
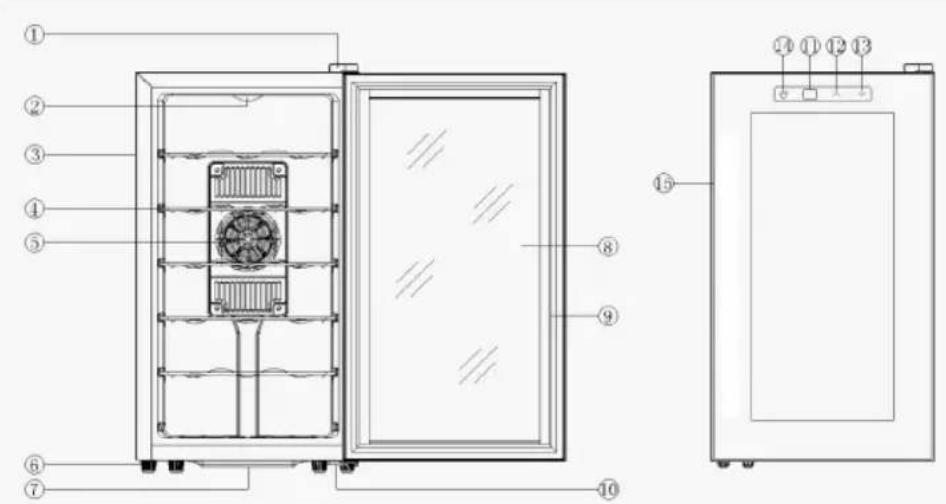
- Upper hinge
- Light cover
- Housing
- Shelves
-
Cold fan mask
-
Adjustable feet
- Water tray
- Door seal
- LED-Display
-
Temperature up (warmer)
-
Temperature down (colder)
- Light
- Handle
Delivery scope
The delivery scope of this device includes 5 chrome shelves and this user manual.
Specifications
| BOMANN Model No. KSW 345 | |
| Bottle capacity 18 à 0,75 l | |
| Net capacity 54 l | |
| Energy consumption / 24h^(1) | 0.517 kWh |
| Energy consumption / year 189.0 kWh | |
| Climate class N (+16°C up to +32°C) | |
| Noise level 39 dB(A) re 1 pW | |
| Type Free-standing | |
| Power supply 220-240 V, 50/60 Hz | |
| Input power 70 W | |
| Fuse protection 1 A | |
| Light, LED 1 W | |
| Dimensions H x W x D 63.6 x 34.5 x 51.5 cm | |
| Net weight 15.1 kg | |
| (1) The actual energy consumption depends on the use and installation of the device. | |
All device-specific energy data have been determined by the manufacturer under laboratory conditions in accordance with pan-European standardized measuring methods. These are regulated by EN ISO 15502. The actual energy consumption depends on the usage and might therefore also be above the values determined by the manufacturer under standard conditions.
An expert knows these relations and will execute the tests with special measurement instruments in accordance with the regulations in place.
MANUFACTURER DATA
Product is subject to changes and improvements.
INSTALLATION
Location
Sufficient ventilation around the device is necessary in order for the heat to dissipate properly and to guarantee efficient cooling operation at low power consumption. For this purpose, leave sufficient space around the device.
• Minimum clearance of 5 cm between rear side and wall,
- at least 20 cm on both sides and on the top of the device.
- Leave proper space in front of the device in order to open the door at an angle of 120^ .
IMPORTANT
- Do not expose the device to direct sunlight.
- Do not place near heaters, next to a stove or any other heat sources.
- Do not use the device outdoors.
- Only install at a location with an ambient temperature suitable for the climate class of the device.
For information on the climate class, please refer to chapter "Specifications" or to the rating label located in the interior or on the rear side of the device. -
Avoid installation at locations with high humidity (e.g. outdoors, cellar, bathroom), as metal parts would be susceptible to corrosion under such circumstances.
-
Do not place the device near volatile or combustible materials (e.g. gas, fuel, alcohol, paint, etc.) and in rooms which may have poor air circulation (e.g. garages).
- Only place on a steady and safe surface.
- This appliance is equipped with non-slip rubber feet. As furniture surfaces are made of a variety of materials and are treated with many different types of cleaning agents, it cannot be completely ruled out that some of these substances may contain ingredients which could corrode the rubber rests and soften them. If possible place an antislip material under the feet of the device.
- If the device is not horizontally leveled, adjust the feet accordingly.
Power supply
The kind of current (AC) and the voltage must be conform to the data of the rating label, located inside or outside on the back of the unit. In case of heavy voltage fluctuations, it is recommended to use an automatic alternating current regulator.
The plug, together with the grounding conductor, must fit into the wall socket. The mains plug must be freely accessible. The cord should be secured behind the wine refrigerator and not let exposed or dangling to prevent accidental injury.
STARTUP/OPERATION
Prior to first use

IMPORTANT: Before connecting the appliance to the power source, let it stand ht for ap-proximately 2 hours. This will reduce the possibility of a malfunction in the ng system from handling during transportation.
- Clean the interior of the device including all accessory parts located inside with lukewarm water and by using a soft cloth.
Connect the device to the mains supply
 | IMPORTANTThe device must be earthed properly. For this purpose the plug of the mains cable has been fitted with the intended lead. |
 | IMPORTANTContact an electrician if the plug does not fit in the wall socket. |
 | IMPORTANTIn case you disconnect the device or in case of power failure: Wait for 5 minutes before restarting the device. |
Turning on the device
Turn on the device by connecting the plug to a wall socket.
Operate the temperature control, which is located on the control panel at the front of the unit.
Please also refer to the following chapter "Settings".
Settings
Light
"button turns on or off the interior light.
LED Display
The display indicates your temperature setting and the actual internal temperature.
- When the device turned on the LED always shows the standard setting 17^ . Short time after the LED indicates the internal temperature.
Temperature setting
Regulate the internal temperature by pressing the buttons“▲” and “▼” to increases or decreases the set temperature by 1°C-steps. About 5 seconds after the last button press the electronic switch automatically and the actual internal temperature will be indicated in display.
- The temperature range can be regulating between +11°C and +18°C, max. +14°C below the ambient temperature. The optimal room temperature is approx. +20°C.
- It is recommended that you installed the wine refrigerator in a place where the ambient temperature is between +16°C - +26°C. When the ambient temperature around +25°C or less, unit can maintain a temperature range between +11°C - +18°C.
- If the ambient temperature is above or below recommended temperatures, the performance of the unit may be affected. For example, placing in extreme cold or hot conditions may cause interior temperature to fluctuate. The range of +11°C - +18°C may not be reached.
- The temperature may fluctuate depending on whether or not the interior light is on or off or whether the bottles are located on the upper, middle or lower section.
• We recommend always switching off the light.
Storing/Tempering
- Fill the device from the bottom tot he top, this cools the bottles faster.
- The following specifications are only recommendations and are optional:
| Wine Temperature | |
| Champagne, sparkling wine 7 – 10°C | |
| Fruit wine 10 – 12°C | |
| Light red wine / white wine 12 – 13°C | |
| Dessert wine 14 – 15°C | |
| Red wine 14 – 17°C | |
- We suggest serving wine cool than too warm; white wines less cool in winter and red wines cooler in summer.
- The temperature in the device will be warmer at the top of the cooling zone and cooler at the bottom. If you are going to store a mixture of wine types in the device, it is recommended that the red wines are stored at the top of the cooling zone, white wine in the middle of the cooling zone and sparking wines at the bottom.
- Ultimately, the correct temperature is a matter of personal taste.
Defrosting
The device has an automatic defrosting system.
The arising condensate during the operation runs through the drain opening to the outside into the water tray, where it will evaporate.
Turning off
Unplug the device in order to turn it off.
If the device will not be operated for a longer period of time:
- Remove the entire content from the device.
- Disconnect the plug or turn off / unscrew the fuse.
- Thoroughly clean the device (refer to chapter of "Cleaning and Care").
- Keep the door open in order to prevent bad odors.
TIPS FOR ENERGY SAVING
- Disconnect the plug if you do not use the device.
- Do not install the device near stoves, heaters or other heat sources. In case of higher ambient temperatures, the ventilator will run more frequently and longer.
- Ensure sufficient ventilation at the bottom and rear side of the device.
Never block any ventilation openings.
• Always keep the ventilation openings at the rear side clean. - Only set the temperature as low as needed.
- The temperature in the device will be warmer at the top of the cooling zone and cooler at the bottom. If you are going to store a mixture of wine types in the device, it is recommended that the red wines are stored at the top of the cooling zone, white wine in the middle of the cooling zone and sparking wines at the bottom.
- Pre-cool the wine for 2 hours in refrigerator before storing inside the device.
- Only switch the interior light on if necessary.
- Do not open the door longer then necessary.
- Make sure the door sealing is in good order for the door to close properly.
Cleaning and care
For hygienic reasons, clean the interior and accessory parts regularly.
 | WARNINGAlways disconnect the plug or turn off/ unscrew the fuse before cleaning.Pull the plug and not the cable. |
 | WARNINGDo not use steam cleaners for cleaning the device; moisture could enter electrical components. Risk of electric shock! Hot steam could damage the plastic parts. The device must be dry before restarting operation. |
 | IMPORTANTEssential oils and organic solvents, such as the juice of lemon or orange skin, butanoic acid or cleaning agents containing acetic acid can damage plastic parts. Prevent contact of any part with such substances. Do not use abrasive cleaning agents. |
- Remove the contents and keep covered at a cool location.
- Wash the inside with a warm water and baking soda solution. The solution should be about 2 tablespoons of baking soda to a quart of water.
- The outside of wine cooler should be cleaned with mild detergent and warm water.
- Cleaning the water box at the bottom outside.
• After thorough drying, restart operation. - Clean the ventilation openings on the rear side by using a soft brush or vacuum cleaner.
Interior light
The light contributes to a warming of the interior. Therefore we recommend, switch the light off if it is not needed. This also saves energy!

IMPORTANT
The light diodes of the device have an extremely long lifespan. It is not necessary and also not possible, to exchange them. The light diodes are firmly assembled into the light. Under no circumstances should you open the light! This would irreparably damaged the device.
Transportation
For transportation the device must secure.
- Remove all bottles.
- Securely tape down all loose items inside your wine refrigerator.
- Turn the leveling legs up to the base to avoid damage.
- Tape the door.
- Be sure the wine refrigerates stays in the upright position during transportation.
Repairs

WARNING
Servicing of electric devices must be conducted by qualified experts only. Incorrect or improper repairs constitute a risk for the user and will void the warranty!
What if ... Troubleshooting
The design of the device ensures a trouble-free operation as well as a long life cycle. Nevertheless, if any defect occurs during operation, please check if it is caused by improper operation.
The following problems can be solved by you by checking for the possible cause.
| PROBLEM POSSIBLE CAUSE SOLUTION | ||
| The device is not working properly or at all | Is the plug securely connected to the mains?Is the temperature control properly set?Is the place unqualified? Check the Do bottles or shelves prevent the door from closing properly?Is the ventilation of the device hedged? | Connect the plug properly to the socket.Check the settings.e ambient temperature.Arrange the bottles and shelves properly.Clear the ventilation openings, install the device freely |
| Wine refrigerator is not cold enough | Temperature is not setting? CheckIs the ambient temperature too warm or cold?Are bottles or shelves preventing door the closing?Is the ventilation openings covered?Was door open for long time? OnlyIs the door seal loosing? | the temperature control setting-External environments may require a higher setting or another place.Arrange the bottles and shelves properly.Clear the ventilation openings, install the device freelyopen the door longer is then necessary. |
| Loud noise du-ring operation | Does the device not stand horizontal? | Adjust the feet accordingly. Use a water level. |
| Vibrations Does | the device not stand horizontal? | Adjust the feet. Use a water level to check. |
| The door doesn't close | Does the device not stand horizontal? | Adjust the feet accordingly. |
| The ventilation runs often or always. | The temperature has been pro-grammed to a very low tempe-rature, or the difference between the ambient and programmed temperature is very large. | Then it is normal that the ventila-tor is running. It is not a malfunc-tion. |
| Water on the bottom. | Is the temperature control set pro-perly?Is the drain opening logged? Clean | Check the temperature settings.the drain opening with a pipe cleaner or knitting needle. |
| Interior lamp does not work. | Is the plug not connected to the mains?Is the illuminant defect? Contact a | Connect the plug properly to the socket.technician. |
Note. On days of high humidity, condensation might occur on the outer surface of the device. This is no malfunction; you may simply wipe the water off.
If a problem still persists after following the steps above, please contact your distributor and/or a technician.
Are you interested in other Bomann products? Please visit our website:
www.bomann.de
PRODUCT FICHE OF HOUSEHOLD REFRIGERATORS
ACCORDING EU DIRECTIVE (EU) 1060/2010
| Brand Bomann | ||
| Model KSW 345 | ||
| Category 10 | ||
| Energy efficiency class ^1) | B | |
| A+++ (highest efficiency) to G (lowest efficiency). | ||
| Consumption data | ||
| Annual energy consumption ^2) | kWh | 189.0 |
| Net capacity cooling total I 54 | ||
| Net capacity freezing I - | ||
| Star rating ^3) | - | |
| Frost-free - | ||
| Temperature rise time h - | ||
| Freezing capacity kg/24h - | ||
| Climate class ^4) | N | |
| Noise level dB(A) re 1pW 39 | ||
| Design Free-standing | ||
| Measures and weights | ||
| Height cm 63.6 | ||
| Width cm 34.5 | ||
| Depth cm 51.5 | ||
| Net weight kg 15,1 | ||
| Electrical connection | ||
| Compressor | - | |
| Connection voltage | 220-240V~ / 50Hz | |
| Connection power | 70 W | |
1) A+++ (highest efficiency) to G (lowest efficiency).
2) Annual energy consumption „XYZ“ kWh per year based on standard test results for 24 h.
Actual energy consumption will depend on how the appliance is used and where is located.
3) * = compartment: a frozen-food storage compartment in which the temperature is not warmer than -6°C.
** = compartment: a frozen-food storage compartment in which the temperature is not warmer than -12°C.
*** = compartment: a frozen-food storage compartment in which the temperature is not warmer than -18°C.
^ ( ^** ) = food freezer compartment in which the temperature is not warmer than -18^ C and a minimum freezing capacity in 24 h.
4) Climate class SN: ambient temperature of +10°C up to +32°C.
Climate class N: ambient temperature of +16°C up to +32°C.
Climate class ST: ambient temperature of +16°C up to +38°C.
Climate class T: ambient temperature of +16°C up to +43°C.
TABLE DES MATIERES
APERÇU 42
SIGNIFICATION DU SYMBOLE DE "POUBELLE" 43
INFORMATIONS IMPORTANTES D'UTILISATION ET DE SECURITE 43
- PRODUCTBESCHRIJVING 20
- INSTALLATIE 21
- OPSTARTEN/BEDIENING 22
- MEANING OF THE "DUSTBIN" SYMBOL 29
- IMPORTANT USE AND SAFETY INSTRUCTIONS 30
- PRODUCT DESCRIPTION 32
- INSTALLATION 33
- TIPS FOR ENERGY SAVING 36
- MAINTENANCE AND CLEANING 37
- OVERVIEW
- MEANING OF THE "DUSTBIN" SYMBOL
- Disable waste equipment before disposal:
- IMPORTANT USE AND SAFETY INSTRUCTIONS
- General safety precautions
- WARNING
- Risk of injury
- CAUTION
- Intend use
- Unpacking
- Packaging material
- IMPORTANT
- Removing the transport protection
- PRODUCT DESCRIPTION
- Delivery scope
- MANUFACTURER DATA
- INSTALLATION
- Location
- Power supply
- STARTUP/OPERATION
- Prior to first use
- Connect the device to the mains supply
- Turning on the device
- Settings
- Light
- LED Display
- Temperature setting
- Storing/Tempering
- Defrosting
- Turning off
- Unplug the device in order to turn it off.
- TIPS FOR ENERGY SAVING
- Cleaning and care
- Interior light
- Transportation
- Repairs
- What if ... Troubleshooting
- PRODUCT FICHE OF HOUSEHOLD REFRIGERATORS
- ACCORDING EU DIRECTIVE (EU) 1060/2010
- TABLE DES MATIERES
- APERÇU 42
- SIGNIFICATION DU SYMBOLE DE "POUBELLE" 43
- INFORMATIONS IMPORTANTES D'UTILISATION ET DE SECURITE 43
Brand : BOMANN
Model : KSW 345
Category : Refrigerator