
K111D - Coffee machine GAGGIA - Free user manual and instructions
Find the device manual for free K111D GAGGIA in PDF.

| Product type | Capsule espresso coffee machine |
| Brand | Gaggia |
| Model | K111D |
| Use | Domestic |
| Rated voltage | 220-240 V ~ 50 Hz |
| Power | 900 W |
| Protection class | I |
| Operating temperature | 10 – 40 °C |
| Capsule system | Caffitaly System (exclusive) |
| Coffee types | Espresso (30 ml), Café-crème (125 ml), Filter coffee (125 ml) |
| Programmable quantities | Yes, customizable per coffee type |
| Steam function | Yes, for frothy milk and cappuccino |
| Hot water function | Yes |
| Water tank | Removable, capacity approx. 1 L |
| Capsule holder | Removable, two parts |
| Maintenance and cleaning | Regular cleaning of capsule holder, tank, drip tray and steam nozzle |
| Descaling | Recommended with suitable coffee machine product |
| Safety | Burn protection, safe capsule extraction |
| Non-slip feet | Yes |
| Warranty | Valid under conditions (see manual) |
Frequently Asked Questions - K111D GAGGIA
User questions about K111D GAGGIA
0 question about this device. Answer the ones you know or ask your own.
Ask a new question about this device
Download the instructions for your Coffee machine in PDF format for free! Find your manual K111D - GAGGIA and take your electronic device back in hand. On this page are published all the documents necessary for the use of your device. K111D by GAGGIA.
USER MANUAL K111D GAGGIA
natural_image
Line drawing of a hand operating a valve or pump component with a pipe and base (no text or symbols)Fig. 1
natural_image
Illustration of a hand using a tool to adjust or install a mechanical component, with no visible text or symbols.Fig. 2

natural_image
Line drawing of a hand holding a small object with an arrow indicating rotation (no text or symbols)Fig. 3
natural_image
Technical diagram of a mechanical assembly with a rotating component and textured base (no text or symbols)Fig. 4
natural_image
Technical line drawing of a mechanical device with two arrows indicating assembly or movement (no text or symbols present)Fig. 5
natural_image
Line drawing of a hand holding a small object inside a container, with no visible text or symbolsFig. 6

natural_image
Line drawing of a hand using a tool to press or adjust a component, no text or symbols presentFig. 7
natural_image
Technical line drawing of a mechanical device with arrows indicating assembly or component (no text or symbols)Fig. 8

natural_image
Line drawing of a hand holding a tool interacting with a container (no text or symbols)Fig. 9
natural_image
Illustration of hands using a tool to adjust or install a mechanical component, with no visible text or symbols.Fig. 10
Preparazione
natural_image
Line drawing of a hand adjusting a mechanical component with a black arrow indicating the direction (no text or symbols present)Fig. 11
Dopo l'utilizzo
natural_image
Illustration of a hand pressing down on a mechanical component with a downward arrow (no text or symbols)Fig. 12
natural_image
Line drawing of hands using a mechanical device to adjust a component (no text or symbols visible)Fig. 15
natural_image
Line drawing of hands using a mechanical device to adjust or install a component, with no visible text or symbols.Fig. 16
Nota:
natural_image
Line drawing of a mechanical assembly with a central component and textured base (no text or symbols)Fig. 17
natural_image
Line drawing of a hand using a mechanical device to press or adjust a cup, with no visible text or symbols.Fig. 19
natural_image
Simple line drawing of a curved fan or umbrella with five circular buttons arranged around it (no text or symbols)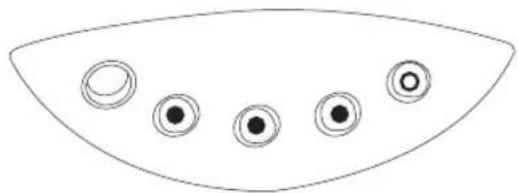
natural_image
Simple line drawing of a curved shape with five circular elements, no text or symbols present.natural_image
Simple line drawing of a curved fan or dome shape with five circular buttons arranged in the center (no text or symbols)natural_image
Simple line drawing of a curved shape with five circular symbols inside, no text or labels present.natural_image
Simple line drawing of a curved shape with five circular elements, no text or symbols present.natural_image
Simple line drawing of a curved shape with five circular symbols inside, no text or labels present.Errore Legenda spie:
natural_image
Simple line drawing of a curved fan or umbrella with five circular buttons (no text or symbols)natural_image
Line drawing of a hand adjusting a mechanical component with an arrow indicating direction (no text or symbols present)Fig. 21
natural_image
Technical line drawing of a mechanical component with a black arrow indicating rotation (no text or symbols)Fig. 22
natural_image
Line drawing of a hand holding a mechanical component with an arrow indicating rotation (no text or symbols)Fig. 23
natural_image
Hand holding a pipette with a magnified view of a circular component (no text or symbols visible)Fig. 24
natural_image
Diagram of a pipette pressing down on a perforated surface with directional arrows indicating motion (no text or symbols)Fig. 25

natural_image
Technical line drawing of a mechanical assembly with no visible text or symbolsFig. 26
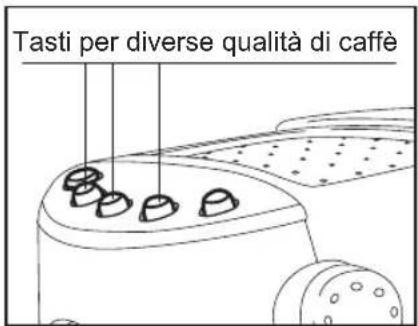
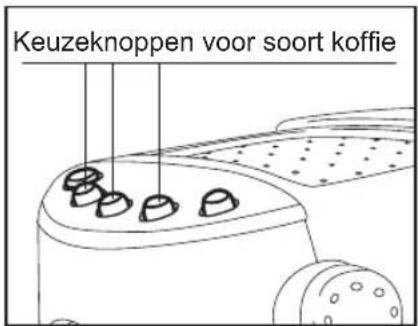
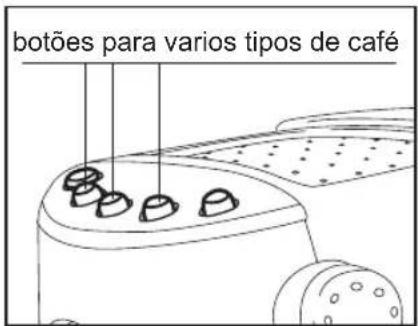
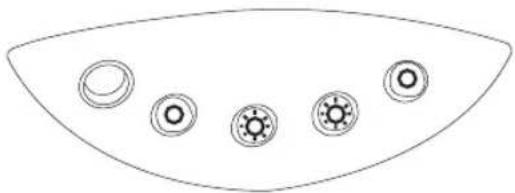
Control panel
Push-buttons and their respective functions (from left to right)
ON/OFF button
Espresso selection button
Cream coffee selection button
Caffè lungo selection button
Steam/hot water switch
Except for the ON/OFF button,
all buttons incorporate an indicator light.
8
Text contained in this booklet has been accurately checked through. However, should any printing mistakes be found, you are kindly requested to inform the manufacturer. As part of our effort to constantly improve our products, we reserve the right to make any amendments to and update this publication without prior notice. No part of this booklet may be reproduced in any way of form, without the prior permission of the manufacturer.
All instructions that are important for user safety are marked with the symbol ⚠️!
This coffee-machine is equipped with safety devices. To prevent accidents or damage, you are strongly advised to read all the notices and to use the machine according to the instructions given in this manual. Retain this manual in a safe place for future reference. If the coffee machine is transferred to another user, the owner's manual should be supplied to the new owner with the appliance.
Technical data
Rated voltage 220-240 V – 50 Hz
Power 900 Watt
Protection class I
Operating temperature 10 – 40 °C
For a correct disposal of the machine, please follow the instructions contained on the last pages of the manual.
Intended use
The coffee machine is designed to be used with “CAFFITALY SYSTEM” capsules only and for:
- Making caffè lungo, cream coffee and espresso coffee
• Frothing milk and making cappuccino - Dispensing hot water
This coffee machine has been developed for home use and is therefore not suitable for a more intensive use.
Safety instructions

Electrical hazards
- To prevent electric shock, do not immerse the appliance, plug or power cable in water.
- Do not use the coffee-machine out in the open.
- Connect the machine to a power outlet with grounding system. The voltage must correspond to the value indicated in the technical data section.
- Do not use the coffee machine if the appliance itself, the power cable or the plug is damaged or after the machine has been knocked down.
- Do not make any alterations to the coffee machine or power cable. The coffee machine should only be repaired by authorized service centres or qualified personnel to avoid any risks resulting from inappropriate repair.
- The machine should be sited in a place that is inaccessible to children.
- Never leave the machine ON while unattended.

Always remove the power cable from the power outlet:
• Before removing or re-installing the water tank
• To fill the water tank
• In the event of a malfunction
- When the coffee machine is not being used for long periods of time
• Before cleaning the machine.

Do not pull the power cable to disconnect the plug from the power outlet.

Precautions against burns
- Steam and/or hot water can cause burns.
Do not aim the steam jet toward yourself and/or other people, animals, materials that are sensitive to high temperatures and/or to humidity.
In the event that boiling water and/or steam escapes, beware of the danger of burns! Do not touch the hot parts of the coffee machine, i.e. the steam wand. Use the steam function or froth function only if the steam wand is immersed in a suitable container.
- When coffee is being made, water is pushed at high pressure through the coffee capsule in the capsule holder. Before turning ON the machine, always ensure that the capsule holder is correctly introduced and that the lever is pulled down completely.
- Do NOT lift the lever or remove the capsule-holder while the coffee machine is operating.

Safety notice – cutting hazard
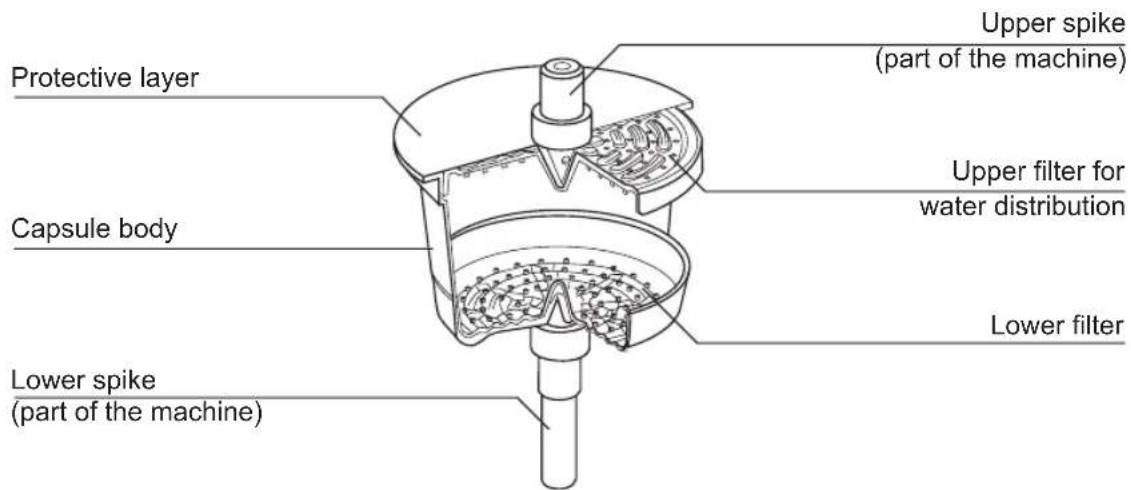
A spike is fitted in the capsule holder and another one in the capsule holder support. The purpose of the spikes is to pierce the coffee capsule at the top and at the bottom when the capsule is introduced in the capsule holder. Should you need to move the coffee machine to another location, you are strongly advised to grab it from the casing.

Caution. Follow the instructions given below in order to prevent damage to the hine:
- Do not install or store the machine close to sources of heat.
- Rest the machine on a level surface that is resistant to dampness and heat.
The coffee machine is fitted with anti-slip feet. Beware that worktops are coated or finished with a variety of different materials and protective products, some of which may contain aggressive substances that are likely to damage or soften the feet. If in doubt, place an anti-slip mat under the machine. - Do not expose the coffee machine to temperatures lower than 1 °C, as the water remaining inside the water heating system may freeze and cause damage to the appliance.
- Route the power cable in such a way as to avoid the risk of being caught up in it. Keep the power cable away from sharp edges and sources of heat.
- Use cold tap water only to fill the water tank. Use fresh water at all times. Do not use fizzy mineral water or other liquids.
- To prevent the pump from working with no load and overheating, the water tank should never be left without water.

Caution
The manufacturer accepts no liability for damage caused by:
- Improper use outside the defined operating parameters;
• Repairs carried out by anyone other than authorized service centres; - Tampering with the power cable;
- Tampering with any component of the machine;
- Use of non original spare parts and accessories;
In such cases the warranty shall be null and void.
Preliminary operations
Unpacking:
Check the appliance for damage after you have taken it out of its packing.
If in doubt, do not use the appliance and contact the retailer.
The packaging materials should never be left within the reach of children since these materials can pose a hazard. They should be disposed of or stored in accordance with local environment protection regulations.
Assembling the parts of the machine that are supplied separately.
Essential and safety components of the coffee machine are factory-assembled. Some secondary elements of the appliance may be supplied in a separate packaging. The user should assemble these parts in accordance with the assembly instructions given in this booklet.
Caution: rest the coffee machine on a level surface that is resistant to dampness and heat, in a place that is out of the reach of children.
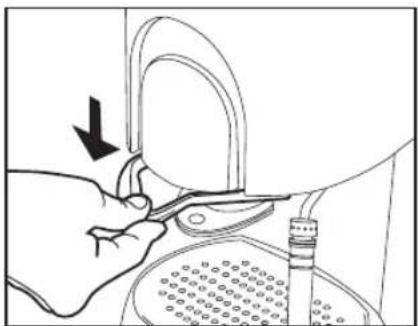
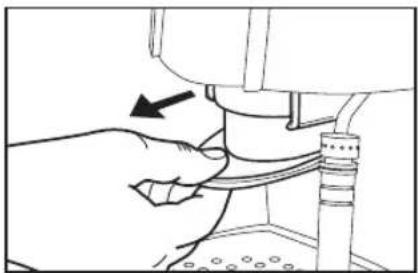
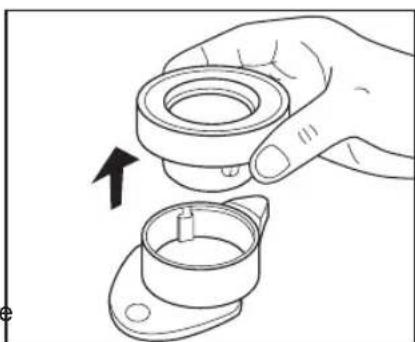
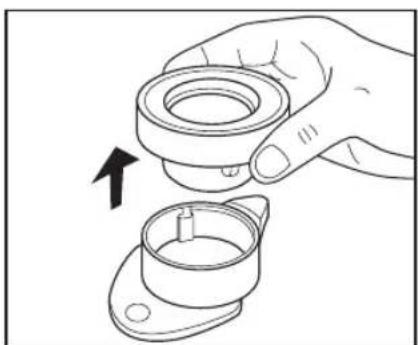
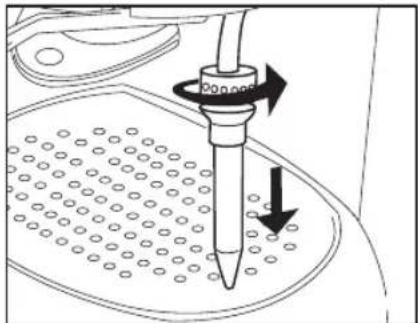
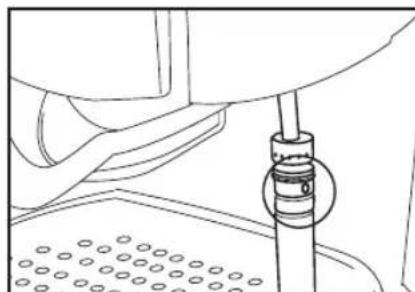
- Introduce the capsule holder into the coffee machine (Fig. 1).
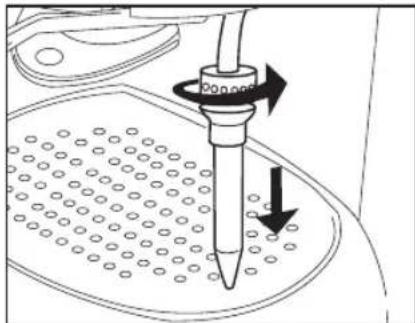
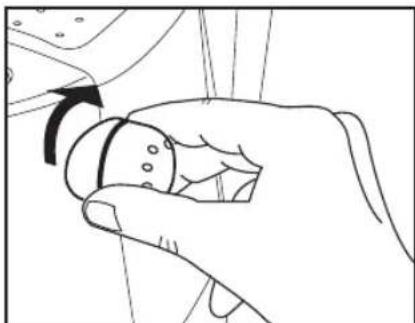
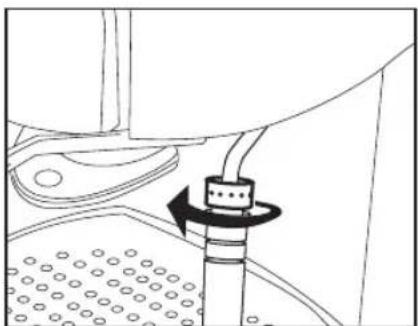
• Pull the lever down completely (Fig. 2). - Ensure that the steam and hot water dispenser knob is in the closed position. Rotate the knob fully clockwise. (Fig. 3)
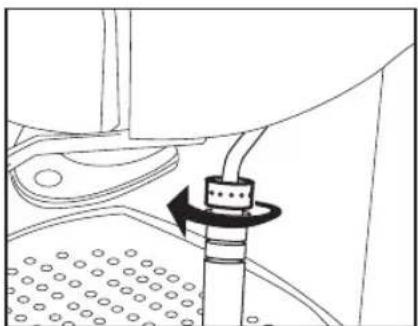
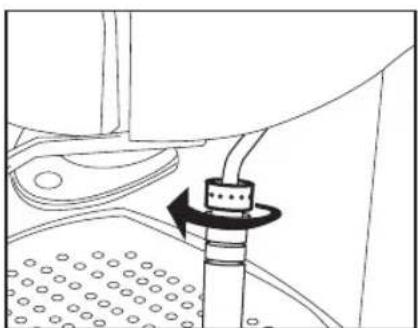
- Ensure that the steam wand is locked. The hand nut should be tightened in the direction shown by the arrow. (Fig. 4)
- Connect the power cable plug to a power outlet with grounding system.
The power outlet should be easily accessible.
natural_image
Line drawing of a hand operating a mechanical device with a pipe and base (no text or symbols)Fig. 1
natural_image
Illustration of a hand using a tool to adjust or install a mechanical component, with no visible text or symbols.Fig. 2
Filling the boiler
Caution
- Use cold tap water only to fill the water tank. Do not use fizzy mineral water or other liquids!
- To prevent the pump from working with no load and overheating, the water tank should always have water in it.
Before using the coffee machine for the first time, or if the appliance has been inoperative for a lengthy period, it is recommended to dispense a cup of hot water first.
natural_image
Line drawing of a hand holding a small object with an arrow indicating rotation (no text or symbols)Fig. 3

natural_image
Technical line drawing of a mechanical assembly with a rotating component (no text or symbols)Fig. 4
- Remove the cable plug from the power outlet.
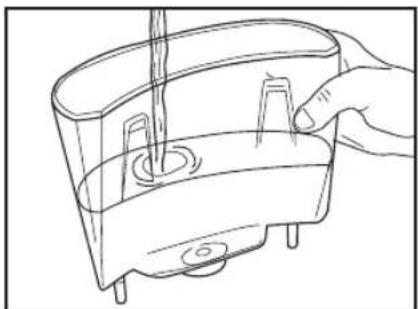
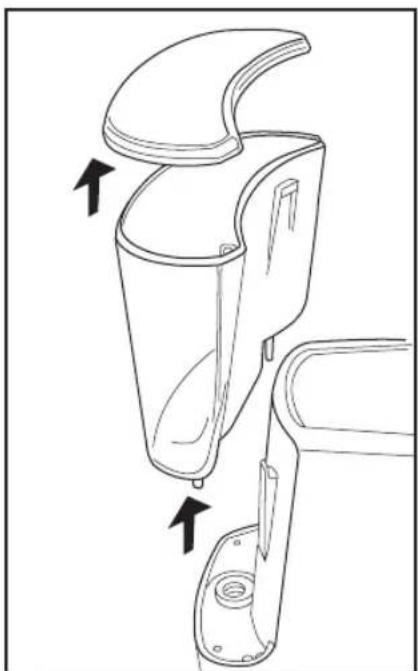
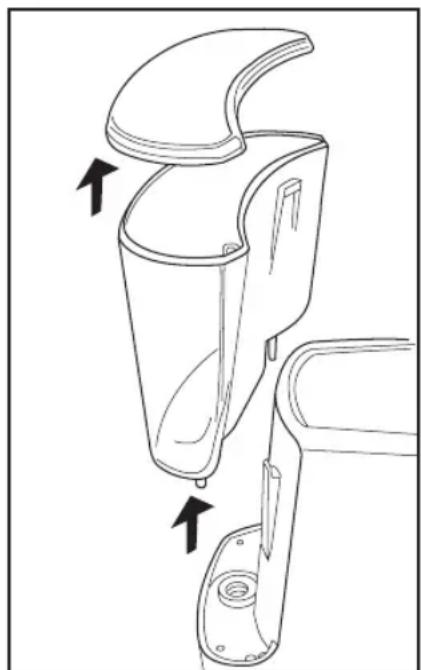
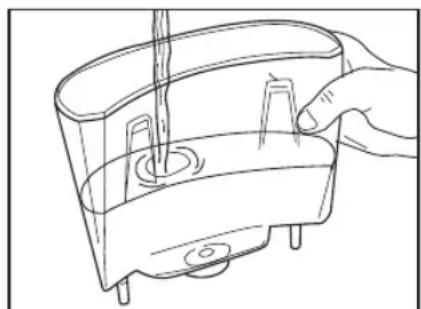
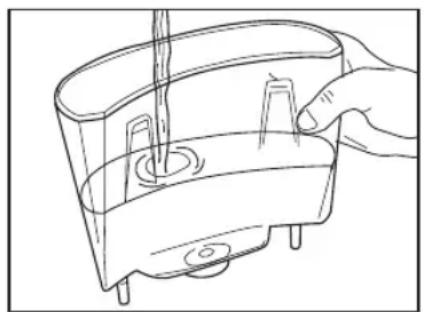
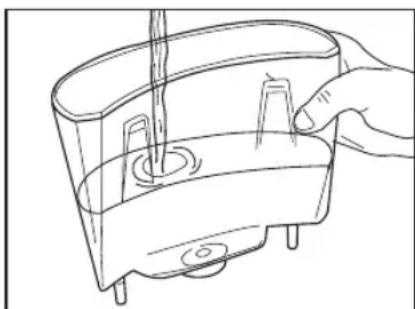
- Lift the water tank and remove it by pulling upwards. Remove the tank lid (Fig. 5).
- Fill the tank with cold water (Fig. 6). Put the water tank back in place and close the lid.
- Connect the cable plug to the power outlet.
- Press the ON/OFF switch. The buttons with the cup symbols will start blinking.
Note
Some water may dribble out of the capsule holder while the water is being heated.
This is perfectly normal and does not jeopardize the operation of the appliance.
Caution
The appliance will start heating water as soon as it is switched on. If you notice that the heating process is slow, then the water in the machine may already be hot. In this case, there may be a danger of burns from sprinklings of hot water.
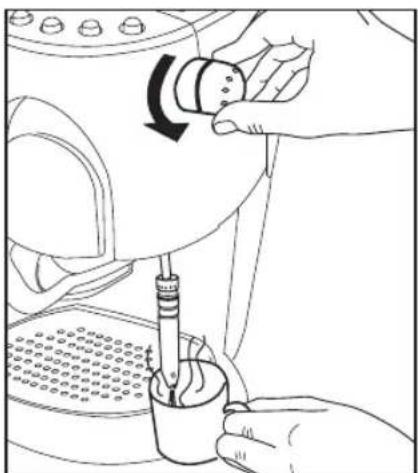
- Rotate the knob anti-clockwise to dispense a cup of hot water. (Fig. 7)
- When the cup is full, rotate the knob fully clockwise. The flow of hot water will stop.
- Press the ON/OFF switch to turn OFF the machine.
Before making your first cup of coffee, read these instructions and the information regarding the brand new technology incorporated in this appliance.
This coffee machine uses a single-cup capsule concept. The appliance operates with "CAFFITALY SYSTEM" capsules of fresh aromatic coffee. To provide a full, delicious aroma, one capsule makes one cup of coffee.
natural_image
Technical line drawing of a mechanical device with two arrows indicating assembly or movement (no text or symbols present)Fig. 5

natural_image
Line drawing of a hand holding a small object inside a container with a curved handle (no text or symbols)Fig. 6

natural_image
Line drawing of hands using a tool to adjust or install a component, no text or symbols presentFig. 7
All capsules are pre-packaged and sealed. You can choose from different flavours of coffee capsules depending on your preference.
Capsules can be easily identified by the Logo “CAFFITALY SYSTEM” which is a commercial product.
When the lever is pulled down, the capsule holder and the capsule in it are pushed upwards. During this step, the capsule is pierced from the bottom and from the top by two small spikes to let the water through.
Because different types of coffee require different pressures, the coffee machine is fitted with various buttons, one for each type of coffee.
The coffee making process starts once the desired button has been pressed. Hot water is pushed through the top hole into the capsule, out of the lower hole and into the cup.
As easy as that! Your caffè lungo, cream coffee or espresso is ready to drink.
Insert the capsules as they are. Do not open or pierce the capsules.
The advantages of using the "CAFFITALY SYSTEM" coffee capsules
The capsules of the exclusive "CAFFITALY SYSTEM" offer the following advantages:
• different flavours to choose from
• always ready to use
- quick coffee-making without mess
- fresh coffee sealed in ready-to-use single-cup packages.
Operating the coffee machine
Before starting the machine
• Each capsule contains the correct amount of coffee for one cup of caffè lungo, cream coffee or espresso coffee.
- The amount of water dispensed by the machine varies depending on the type of coffee your are making: caffè lungo: 125 ml, cream coffee: 125 ml, espresso: 30 ml
- The above amounts are factory-calibrated but they can be changed to suit your personal taste. You can choose whether to increase or decrease the amount of water for each variety of capsule. More information about this option is contained in the section of this manual called “User settings according to user taste”.
- Caffè lungo and espresso are more flavoursome if served in a warm cup. To pre-heat the cup, you simply need to fill the cup with hot water and empty it before use.
- Once the coffee machine is ON and a capsule is inside the holder, it is advisable not to wait too long before using the capsule so as not to lose the flavour of the coffee.
- A used capsule should never be left inside the machine. The damp coffee that remains in the capsule after use is bound to mould just like any ground coffee or food stuff. If a used capsule is inadvertently left in the machine for a few days, clean the capsule holder in accordance with the instructions given in this manual and, if necessary, clean the spike inside the capsule-holder support, being careful not to cut yourself.
- If the machine remains out of use for more than a week, dispense a cup of hot water (as described on Page 31) before using it to make coffee.
Filling the water tank
- Remove the cable plug from the power outlet.
- Lift the water tank and remove it by pulling upwards. Remove the tank lid (Fig. 8) and fill the tank with cold water. (Fig.9)
- Put the water tank back in place and close the lid.
- Connect the plug to the power outlet.
- Turn ON the machine by pressing the ON/OFF switch; the buttons with the cup symbols will start blinking. When the buttons stop blinking and light steadily, the machine is ready for use.
Note:
Some water may dribble out of the capsule holder while the water is being heated.
This is perfectly normal and does not jeopardize the operation of the appliance.
natural_image
Technical line drawing of a mechanical device with arrows indicating assembly or component (no text or symbols)Fig. 8
natural_image
Line drawing of a hand holding a container with a tool, no text or symbols presentFig. 9
Inserting a capsule
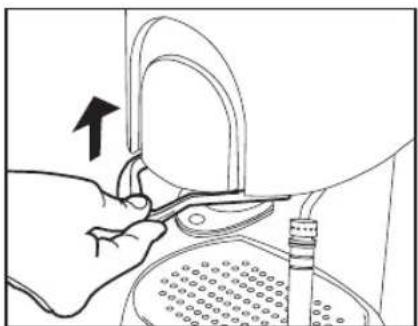
- Push up the lever. The capsule holder will be released and lowered slightly. (Fig. 10)
- Draw the capsule holder out of the coffee machine. (Fig. 11)
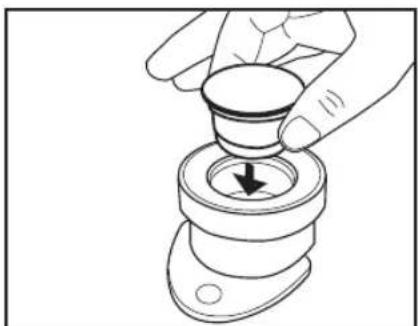
- Insert the capsule into the capsule holdere (Fig. 12).
The capsule must be intact. Do not pierce or open the capsule! - Re-introduce the capsule holder into the coffee machine and pull down the lever completely.
natural_image
Illustration of hands using a tool to adjust or install a mechanical component (no text or symbols visible)Fig. 10
Making coffee
- Place a cup in the middle of the drip tray grating right under the spout of the capsule holder.
- Press the button corresponding to the desired type of coffee (Fig. 13).
- Once pressed, the button will start blinking, indicating that the selected type of coffee is being prepared. The coffee will flow into the cup.
- Once the selected type of coffee has been made, the coffee selection buttons will illuminate again in a steady manner.
- Push up the lever.
- Remove the capsule holder and turn it upside down to remove the used capsule.

natural_image
Line drawing of a hand adjusting a mechanical component with a black arrow indicating the direction (no text or symbols present)Fig. 11
natural_image
Illustration of a hand pressing a button into a mechanical component with a downward arrow (no text or symbols)Fig. 12
What to do after
- If no more cups of coffee are needed, press the ON/OFF switch to turn OFF the machine.
- Insert the capsule holder without pulling down the lever. This way, the capsule holder will not weigh on the machine.
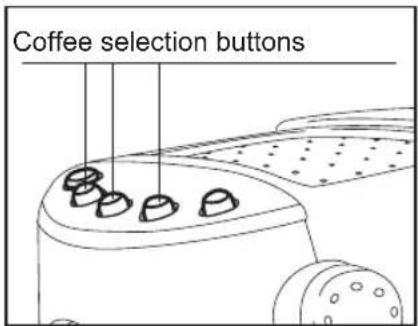
Fig. 13
The key ingredients for preparing cappuccino, espresso macchiato and latte macchiato are frothed milk and freshly made espresso.
Prepare an espresso as described on page 28.
Note:
The reason why the espresso should be prepared first is that the temperature required to make it is lower than the temperature required for frothing the milk, and the machine is quicker to heat up than to cool down.
For best frothing results, use cold milk (warmed up milk will not froth). Any type of milk can be used, depending on taste, as long as fat content does not exceed 3.5%.
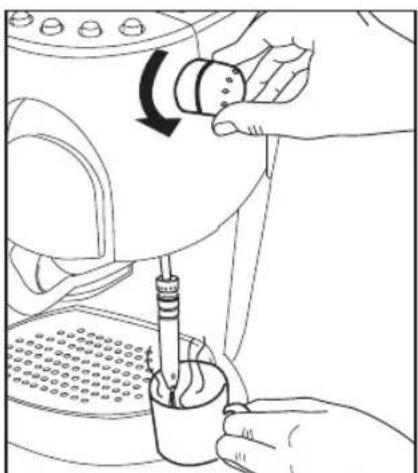
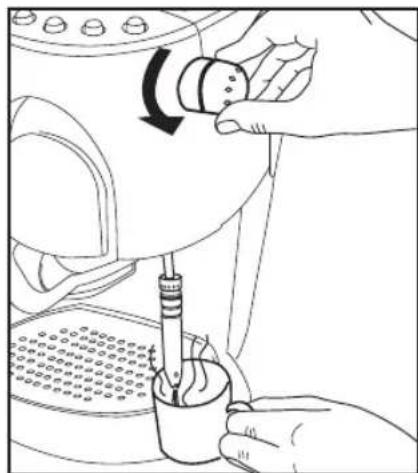
Dispensing steam

Caution
Steam and hot water can cause scalding. Never aim the steam or hot water flow towards parts of your body. Do not touch the hot parts of the coffee machine, i.e. the steam wand. Do not use the steam function unless you have placed a suitable receptacle under the steam wand.
- Press the button with the steam symbol (Fig.14). The button light will start blinking and the machine will start heating the water to generate steam. When the button stops blinking and lights steadily, the machine is ready for use.
Note: some drops of water may come out of the capsule holder while water is being heated. This is perfectly normal and will not jeopardize the operation of the machine.
- Place a suitable container that is resistant to high temperatures under the steam wand and hold it by the handle. Slowly rotate the knob anti-clockwise. (Fig. 15).
A small amount of water will flow out of the steam wand.
Note:
Steam may come out mixed with water at first This is perfectly normal and will not jeopardize the operation of the machine.
- When the flow of hot water turns into a flow of steam, stop the function turning the knob clockwise.
The coffee machine is now ready to froth milk.
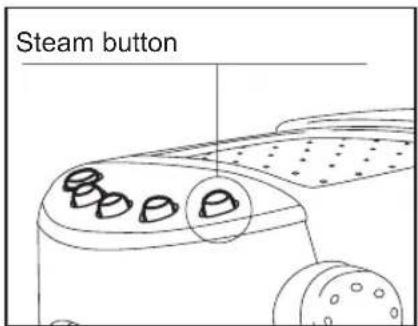
Fig. 14
natural_image
Line drawing of a hand using a tool to press or install a mechanical component, no text or symbols presentFig. 15
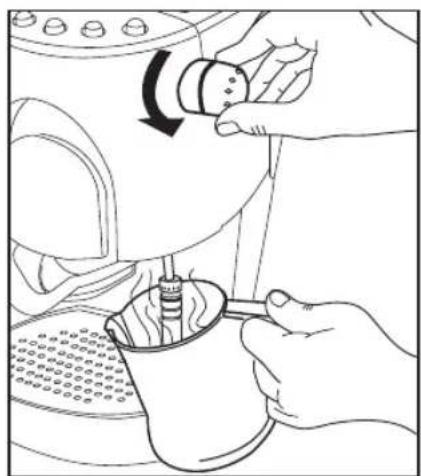
Frothing milk
- Fill a cup or small jug half way with cold milk.
- Place the receptacle under the steam wand so as to place the nozzle of the steam wand in the milk to be heated. Turn the knob slowly anti-clockwise while gently rotating the receptacle. Ensure that the steam nozzle remains just below the milk surface at all times during this step. (Fig. 16)
- When a sufficient amount of froth has been dispensed, turn the knob clockwise.

Caution:
The steam wand is hot after use. Do not touch it with bare hands but use a cloth.
natural_image
Line drawing of hands using a lathe machine to press or adjust a coffee cup (no text or symbols present)Fig. 16
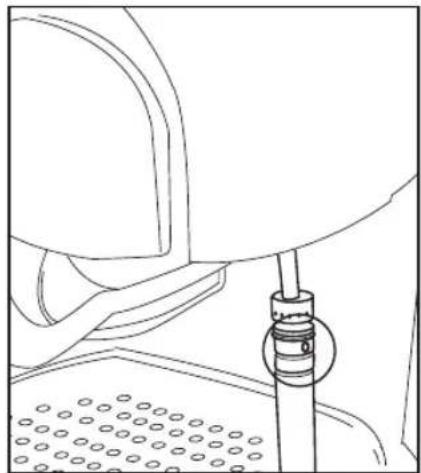
Note:
Do not wait too long before cleaning the steam wand. Milk deposits are hard to remove. Once the froth has been made, we recommend placing a cup with water under the steam wand and starting the steam dispensing function again for a few 1-2 seconds. This way, any residue of milk will be easily removed from the nozzle.
Make sure the lateral hole of the steam wand is not clogged (Fig. 17).
natural_image
Line drawing of a mechanical assembly with a central component and textured base (no text or symbols)Fig. 17
Cooling the coffee machine
Caution
Steam and hot water can cause burns.
Never aim the steam or hot water flow towards parts of your body. Do not touch the hot parts of the coffee machine, i.e. the steam wand. Do Not use the steam function unless a suitable receptacle has been placed under the steam wand.
The coffee making function requires a lower temperature than the steam dispensing and froth making functions.
If you wish to make a coffee and you have just used the steam function, you should allow the appliance to cool down first. However, a short-cut is possible:
- Press the button with the steam symbol (the light in it should be steady).
The steam button and the espresso button will start blinking (Fig. 18).
- Place and hold a suitable receptacle under the steam wand.
Turn the knob slowly anti-clockwise (Fig. 19). The steam wand will dispense steam first and then hot water.
- When the coffee selection buttons illuminate steadily and the steam button light turns out, turn the knob full clockwise.
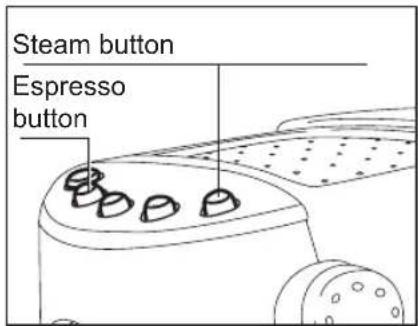
Fig. 18
natural_image
Line drawing of a hand using a mechanical device to press or adjust a cup, with no visible text or symbols.Fig. 19
Hot water function
This function is convenient to prepare tee and hot beverages.
- Press the ON/OFF button to turn ON the appliance. The coffee selection buttons will blink. When they stop blinking and light steadily, the appliance will be ready for use.
- Place a suitable receptacle under the steam wand. Slowly rotate the knob anticlockwise.(Fig.19). Hot water will flow out of the steam wand.
- Once the desired amount of hot water has been dispensed, stop the function turning the knob fully clockwise.
Default settings control the amount of water that is dispensed for each type of coffee.
These settings can be changed by the user to his /her liking in order to make a stronger or weaker coffee.
For each type of coffee, the user can set one amount of water only.
User settings according to user taste
- Insert the capsule into the capsule holder.
- Pull the lever down.
- Place a cup in the middle of the drip tray grating.
- Press the ON/OFF switch button to turn ON the appliance. The button will start blinking.
When the button stops blinking and lights steadily, the machine is ready for use.
- Press the button corresponding to the amount of water to be set.
Default settings can be changed for caffe lungo, cream coffee and espresso coffee.
- When the desired amount of water has been dispensed, release the button. The machine will then learn the new amount.
- Check if the new setting is correct. If not, repeat the procedure.
Note:
The coffee machine incorporates an advanced electronic system to control its numerous functions for making coffee and dispensing steam.
To prevent malfunctions, do not turn on the coffee machine immediately after turning it off. Wait about 10 seconds before switching it on again. Also, adhere to the operating instructions.
Resetting the default settings
The Reset function allows the user to return to factory settings after he/she has made personalised settings.
- Press the ON/OFF switch button to turn OFF the appliance.
Press and hold the two buttons shown by the figure simultaneously (Fig. 20).
- Turn ON the machine by pressing the ON/OFF switch.
- Release the buttons after 5 seconds.
- Press the ON/OFF switch button to turn OFF the appliance.
- Turn ON the machine again by pressing the ON/OFF switch.
The default settings are now reset.
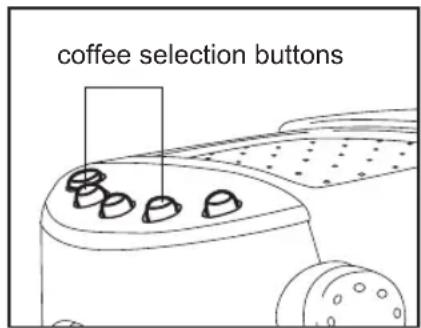
Fig. 20
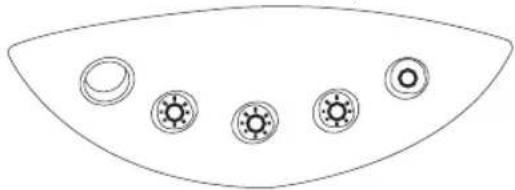
Meaning of the indicator lamps on the control panel
The lamps incorporated into the control panel buttons are used to inform the user about the function that is being performed.
As illustrated below, their meaning changes depending on whether one or more buttons are blinking or are steadily illuminated.
Heating Machine ready

natural_image
Simple line drawing of a curved fan or wing shape with five circular buttons arranged in rows (no text or symbols)
natural_image
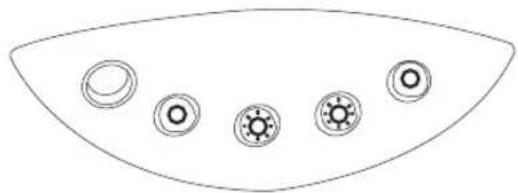
Simple line drawing of a curved shape with five circular elements, no text or symbols present.Heating water to dispense steam
Making coffee
(the blinking button is the one corresponding to the selected control)
natural_image
Simple line drawing of a curved fan or dome shape with five circular buttons arranged in rows (no text or symbols)
natural_image
Simple line drawing of a curved shape with five circular symbols on its surface (no text or labels)Machine ready to dispense steam

natural_image
Simple line drawing of a curved fan or umbrella with five circular buttons (no text or symbols)Cooling

natural_image
Simple line drawing of a curved fan or umbrella with five circular buttons (no text or symbols)Error Key to indicator lamps:

natural_image
Simple line drawing of a curved fan or umbrella with five circular buttons (no text or symbols)Lamp ON steadily
①amp OFF
lamp blinking
Cleaning the machine

Danger
•Before attempting to clean the appliance, remove the plug from the power outlet.
- Do not immerse the machine, plug and/or power cable in water or other liquids.

Caution
- Allow the machine to cool before starting the cleaning procedure.
Cleaning the casing and shelf
Clean the casing and shelf with a soft damp cloth. The shelf can be removed and washed by hand or in the dishwasher.
Cleaning the drip tray and grating
The drip tray and grating can be washed by hand or in the dishwasher.
- Slightly lift the tray at the front and remove it from the appliance.
- Clean the drip tray and grating and dry.
- Reinstall the grating to the drip tray and insert them into the coffee machine.
Cleaning the water tank
Clean the water tank at least once a week:
- Remove the water tank from the appliance.
- Rinse it under running water and then dry.
The water tank is not dishwater safe. - Reinstall the water tank to the appliance.
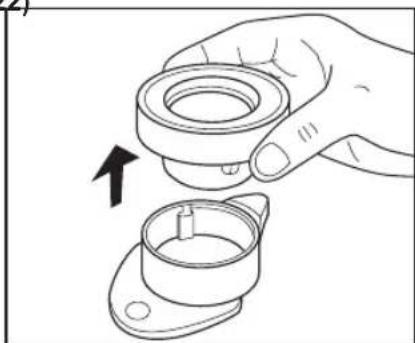
Cleaning the capsule holder
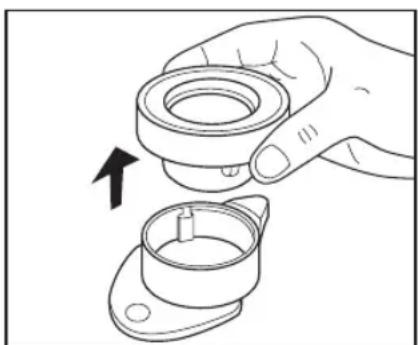
The capsule holder consists of two elements, both of which should be removed before cleaning.
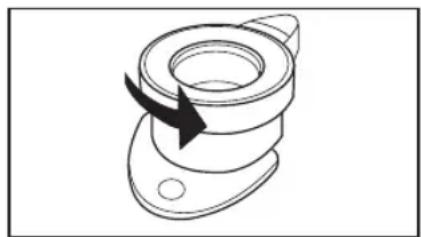
- Remove the capsule holder from the coffee machine (Fig.21).
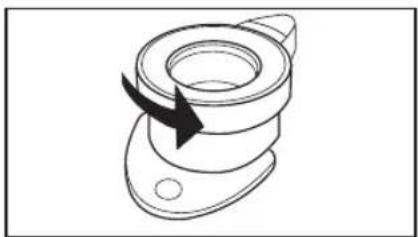
- Rotate the top of the capsule holder anti-clockwise to the stop.(Fig.22)
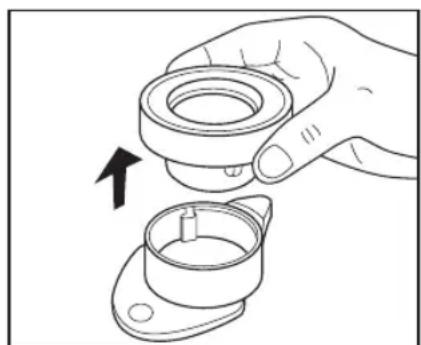
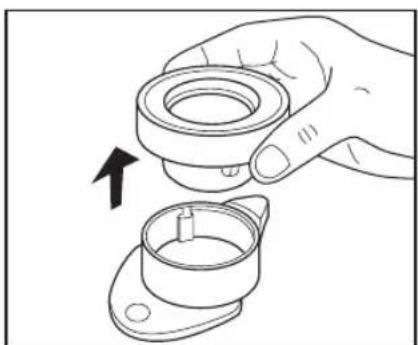
- Extract the top of the capsule holder by pulling it upwards (Fig.23).
- Wash both elements using warm water and a small amount of soap. Rinse thoroughly with water and then dry. The capsule holder is not dishwater safe.
- Introduce the top into the lower portion of the capsule holder and rotate the top clockwise to the stop. Check both elements for proper installation.
- Re-introduce the capsule holder into the coffee machine leaving the lever in the up position.
natural_image
Line drawing of a hand adjusting a mechanical component with a black arrow indicating the direction (no text or symbols present)Fig. 21
natural_image
Technical line drawing of a mechanical component with a curved arrow indicating rotation (no text or symbols)Fig. 22
natural_image
Line drawing of a hand holding a mechanical component with an arrow indicating rotation (no text or symbols)Fig. 23
Cleaning the steam wand
To ensure the best hygiene conditions, we recommend cleaning the parts that come into contact with milk immediately after use.

Caution
The steam wand is hot after dispensing steam.
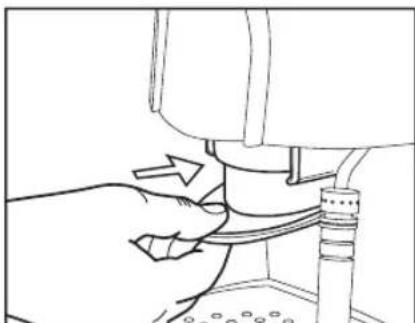
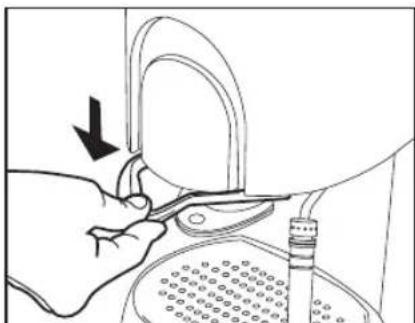
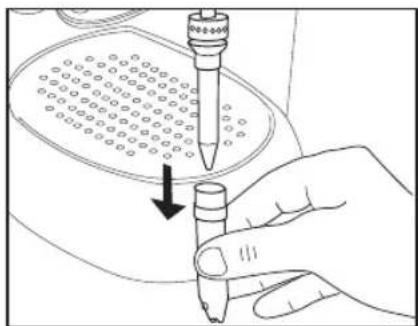
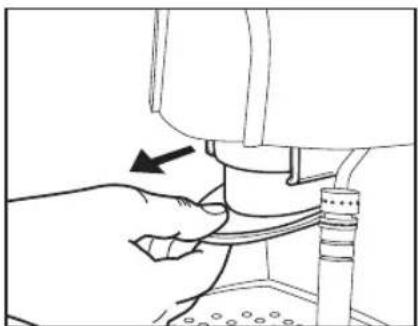
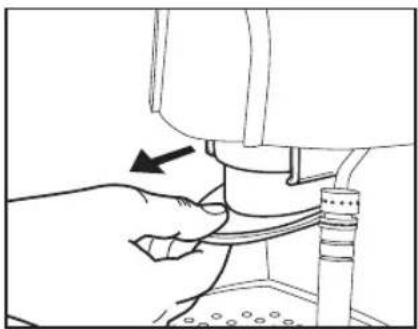
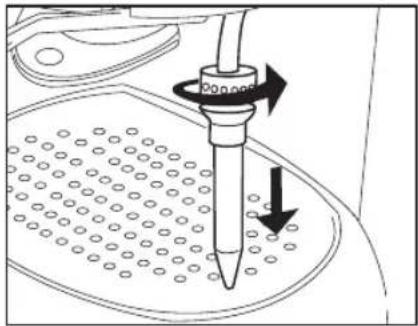
- Remove the cap from the steam wand by pulling the cap downwards (Fig.24).
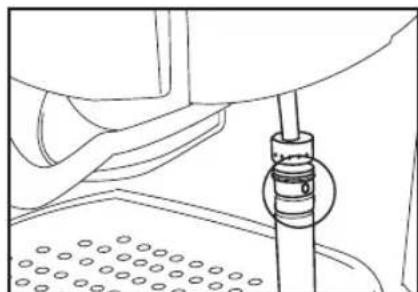
- Loosen the hand nut on the inner hose and remove the hose by pulling it down. (Fig.25).
- Clean the steam wand. If the nozzle is clogged, free the hole using a needle or similar object.
- Thoroughly clean the hose and cap with hot water. Hose and cap are not dishwasher safe.
Rinse both parts thoroughly under running water and then dry.
Note:
Make sure the lateral hole of the steam wand is not clogged (Fig. 26).
- Reinstall both parts. Installation is the reverse procedure of removal.
Finally, check for proper installation
De-scaling

Caution
By de-scaling the machine at regular intervals, you will ensure longer machine durability. Moreover, a regularly de-scaled machine reduces power consumption.
How often the machine needs to be de-scaled depends on how often it is used and on water hardness.
Contact the competent local board to find out the water hardness level in your area.
The machine should be de-scaled when you notice a general slowing down paired with unusual noises.
natural_image
Hand holding a pipette with a downward arrow indicating a process (no text or symbols present)Fig. 24

natural_image
Diagram of a pipette pressing down on a perforated surface with directional arrows indicating motion (no text or symbols)Fig. 25

natural_image
Technical line drawing of a mechanical assembly with no visible text or symbolsFig. 26

Notice
- Use a commercially available de-scaling fluid that is environmentally-friendly and suitable for automatic coffee machines.
- Follow the manufacturer's directions on the package.
- Do not use formic-acid-based de-scaling agents
To de-scale the machine, carry out the following procedure:
- Mix the de-scaling agent with water according to manufacturer's instructions and pour the mix into the machine's water tank.
- Place a suitable receptacle under the steam wand.
- Press the ON/OFF button and wait until the heating process is completed, i.e. when the buttons with the coffee symbols illuminate steadily.
- Turn the knob and dispense a cup of hot water. Turn off the machine by the ON/OFF button and leave in the de-scaling agent for about 10-15 minutes. Repeat steps 3 and 4 until the full amount of de-scaling mix has been ejected.
- When the de-scaling procedure is complete, turn the knob clockwise to the stop and turn OFF the machine.
- Slightly lift the water tank and remove it from the machine.
- Thoroughly rinse the water tank, fill it under running water and reinstall it to the machine.
- Press the ON/OFF button to turn ON the machine and wait until the buttons with the coffee symbols stop blinking.
- Place a receptacle of adequate capacity under the steam wand.
- Turn the knob until 2/3 of the water has been dispensed.
- Return the knob to the zero position and allow the machine to reach its operating temperature again.
- Use the knob again to dispense the remaining amount of water.
- Do not forget to return the knob to the off position at the end by turning it clockwise!
- The final step of the de-scaling process consists in letting hot water flow through the capsule holder. To do this, simply follow the standard procedure for making caffè lungo, with the capsule holder installed but with no coffee capsule in it.
| Trouble Solution | |
| The machine will not operate when the coffee selection buttons are pressed | The lever was not properly pulled down. Pull down the lever. |
| No coffee comes out There is no water in the tank. Fill it up | |
| Coffee comes out slowly, in drips Scale has built up in the machine. De-scale the machine. | |
| The amount of coffee dispensed is inadequate | ·You have pressed the wrong button (if the “caffè espresso” button is pressed, the machine will only dispense 30 ml / 1.05 ounces of water). Press the right one.·The amount of water was improperly set. Set the amount of water as described in the section “User settings according to user taste” |
| Coffee does not taste good ·There is a used capsule in the machine. Each capsule can only be used once. Use a new one.·The amount of water was improperly set. Set the amount of water as described in the section “User settings according to user taste”. | |
| Froth is not creamy enough, or the froth-making process takes too long | ·The milk used is too hot, off, or contains an excessively high percentage of fat. Use fresh cold milk (max.3.5 % fat)·The steam wand is dirty. Clean it.·Scale has built up in the machine. De-scale the machine. |
| The machine will not dispense steam | ·The water tank is empty. Fill it!·The machine has not reached the required temperature. Wait till the steam button illuminates steadily |
| The selection buttons for caffè lungo and cream coffee are blinking | An error has occurred. Turn off the machine and then turn it on again. |
DISPOSAL
This product complies with EU Directive 2002/96/EC.
The symbol on the product or on its packaging indicates that this product may not be treated as household waste. Instead it shall be handed over to the applicable collection point for the recycling of electrical and electronic equipment. By ensuring this product is disposed of correctly, you will help prevent potential negative consequences for the environment and human health, which could otherwise be caused by inappropriate waste handling of this product. For more detailed information about recycling of this product, please contact your local city office, your household waste disposal service or the shop where you purchased the product.
natural_image
Line drawing of a mechanical component with multiple circular features and a curved top (no text or symbols)natural_image
Line drawing of a hand adjusting a mechanical component with arrows indicating motion (no text or symbols)Abb. 1

natural_image
Illustration of a hand using a tool to adjust or install a mechanical component, with no visible text or symbols.Abb. 2
natural_image
Line drawing of a hand holding a small object with an arrow indicating rotation (no text or symbols)Abb. 3

natural_image
Technical diagram of a mechanical assembly with a rotating component and textured base (no text or symbols)Abb. 4
natural_image
Technical line drawing of a mechanical device with two arrows indicating assembly or movement (no text or symbols present)Abb. 5

natural_image
Line drawing of a hand holding a small object inside a container with a curved handle (no text or symbols)Abb. 6

natural_image
Line drawing of a hand using a tool to press or adjust a component, no text or symbols presentAbb. 7
natural_image
Line drawing of a blender with handle and spout, showing internal components and arrows indicating motion (no text or symbols)Abb. 8

natural_image
Line drawing of a hand holding a tool interacting with a container (no text or symbols)Abb. 9
Kapsel einsetzen
natural_image
Illustration of a hand using a tool to adjust or install a mechanical component, with no visible text or symbols.Abb. 10
natural_image
Line drawing of a hand operating a mechanical device with a black arrow indicating the direction (no text or symbols present)Abb. 11

natural_image
Illustration of a hand pressing down on a mechanical component with a downward arrow (no text or symbols)Abb. 12
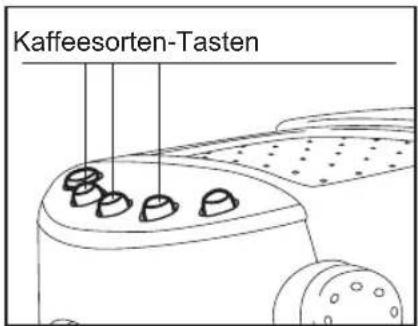
Abb. 13
natural_image
Line drawing of hands using a mechanical device to adjust or install a component (no text or symbols visible)Abb. 15
Milch aufschäumen
natural_image
Line drawing of hands using a mechanical device to adjust or install a component, with no visible text or symbols.Abb. 16
Bemerkung:
natural_image
Line drawing of a mechanical assembly with a central component and textured base (no text or symbols)Abb. 17
natural_image
Line drawing of hands using a mechanical device to adjust a component (no text or symbols present)Abb. 19
Heißwasser-Funktion
natural_image
Simple line drawing of a curved fan or wing shape with five circular buttons arranged in rows (no text or symbols)
natural_image
Simple line drawing of a curved shape with five circular elements, no text or symbols present.natural_image
Simple line drawing of a curved fan or dome shape with five circular symbols on the sides (no text or labels)natural_image
Simple line drawing of a curved shape with five circular symbols on its sides (no text or labels)natural_image
Simple line drawing of a curved shape with five circular elements, no text or symbols present.natural_image
Simple line drawing of a curved shape with five circular symbols inside, no text or labels present.natural_image
Simple line drawing of a curved fan or umbrella with five circular buttons on the sides (no text or symbols)natural_image
Line drawing of a hand adjusting a mechanical component with an arrow indicating direction (no text or symbols present)Abb. 21
natural_image
Technical line drawing of a mechanical component with a black arrow indicating rotation (no text or symbols)Abb. 22
natural_image
Line drawing of a hand holding a mechanical component with an arrow indicating rotation (no text or symbols)Abb. 23
natural_image
Hand holding a pipette with a downward arrow indicating a process (no text or symbols present)Abb. 24

natural_image
Diagram of a pipette pressing down on a perforated surface with directional arrows indicating motion (no text or symbols)Abb. 25

natural_image
Technical line drawing of a mechanical assembly with no visible text or symbolsAbb. 26

Achtung
natural_image
Line drawing of a hand adjusting a mechanical component with arrows indicating motion (no text or symbols)Dessin 1

natural_image
Illustration of a hand using a tool to adjust or install a mechanical component, with no visible text or symbols.Dessin 2
natural_image
Line drawing of a hand holding a small object with an arrow indicating rotation (no text or symbols)Dessin 3

natural_image
Technical diagram of a mechanical assembly with a rotating component and textured base (no text or symbols)Dessin 4
natural_image
Technical line drawing of a mechanical device with two arrows indicating assembly or movement (no text or symbols present)Dessin 5

natural_image
Line drawing of a hand holding a small object inside a container with a handle (no text or symbols)Dessin 6

natural_image
Line drawing of a hand using a tool to press or adjust a component, no text or symbols presentDessin 7
natural_image
Technical line drawing of a mechanical device with arrows indicating assembly or component (no text or symbols)Dessin 8

natural_image
Line drawing of a hand holding a tool interacting with a mechanical component (no text or symbols)Dessin 9
Introduction de la capsule
natural_image
Illustration of hands using a tool to adjust or install a mechanical component, with no visible text or symbols.Dessin 10
Préparation
natural_image
Line drawing of a hand adjusting a mechanical component with a black arrow indicating the direction (no text or symbols present)Dessin 11

natural_image
Illustration of a hand pressing down a mechanical component with a downward arrow (no text or symbols)Dessin 12
Après l'utilisation
natural_image
Line drawing of hands using a tool to adjust or install a mechanical component, no text or symbols presentDessin 15
natural_image
Line drawing of hands using a lathe machine to adjust or install a cup (no text or symbols present)Dessin 16
Note:
natural_image
Line drawing of a mechanical component with a central pin and textured base (no text or symbols)Dessin 17
Refroidir la machine

Attention
natural_image
Line drawing of a hand using a tool to press or adjust a mechanical component, no text or symbols presentDessin 19
Fonction eau chaude
natural_image
Simple line drawing of a curved fan or umbrella with five circular buttons arranged around it (no text or symbols)
natural_image
Simple line drawing of a curved object with five circular indentations on its surface (no text or symbols)natural_image
Simple line drawing of a curved fan or dome shape with five circular buttons arranged in rows (no text or symbols)natural_image
Simple line drawing of a curved shape with five circular elements, no text or symbols presentnatural_image
Simple line drawing of a curved shape with five circular elements, no text or symbols present.natural_image
Simple line drawing of a curved shape with five circular symbols inside, no text or labels present.natural_image
Simple line drawing of a curved fan or umbrella with five circular buttons arranged in the center (no text or symbols)natural_image
Line drawing of a hand adjusting a mechanical component with a black arrow indicating the direction (no text or symbols present)Dessin 21
natural_image
Technical line drawing of a mechanical component with a black arrow indicating rotation (no text or symbols)Dessin 22
natural_image
Line drawing of a hand holding a mechanical component with an arrow indicating rotation (no text or symbols)Dessin 23
natural_image
Hand holding a pipette with a downward arrow indicating a process (no text or symbols present)Dessin 24

natural_image
Diagram of a pipette pressing down on a perforated surface with directional arrows indicating motion (no text or symbols)Dessin 25
natural_image
Technical line drawing of a mechanical assembly with no visible text or symbolsDessin 26
natural_image
Line drawing of a hand adjusting a mechanical component with arrows indicating motion (no text or symbols)Fig. 1

natural_image
Illustration of a hand using a tool to adjust or install a mechanical component, with no visible text or symbols.Fig. 2

natural_image
Line drawing of a hand holding a small object with an arrow indicating rotation (no text or symbols)Fig. 3

natural_image
Technical diagram of a mechanical assembly with a rotating component (no text or symbols)Fig. 4
natural_image
Technical line drawing of a mechanical device with two arrows indicating assembly or movement (no text or symbols present)Fig. 5

natural_image
Line drawing of a hand holding a small object inside a container, with no visible text or symbolsFig. 6

natural_image
Line drawing of a hand using a tool to press or adjust a component, no text or symbols presentFig. 7
natural_image
Technical line drawing of a mechanical device with arrows indicating assembly or component (no text or symbols)Fig. 8
natural_image
Line drawing of a hand holding a container with a tool inserted, no text or symbols presentFig. 9
natural_image
Illustration of hands using a tool to adjust or install a mechanical component, with no visible text or symbols.Fig. 10
Preparación
natural_image
Line drawing of a hand adjusting a mechanical component with a black arrow indicating the direction (no text or symbols present)Fig. 11

natural_image
Illustration of a hand pressing down a mechanical component with a downward arrow (no text or symbols)Fig. 12
Después del uso
natural_image
Line drawing of hands using a mechanical tool to adjust or install a component, no text or symbols presentFig. 15
natural_image
Line drawing of hands using a lathe machine to press or adjust a coffee cup (no text or symbols present)Fig. 16
Nota:
natural_image
Line drawing of a mechanical component with a central pin and textured base (no text or symbols)Fig. 17
Enfriar la máquina

Atención
natural_image
Line drawing of a hand using a tool to press or adjust a mechanical component, no text or symbols presentFig. 19
natural_image
Simple line drawing of a curved fan or umbrella with five circular buttons arranged in the center (no text or symbols)natural_image
Simple line drawing of a curved shape with five circular indentations on the sides (no text or symbols)natural_image
Simple line drawing of a curved shape with five circular symbols inside, no text or labels present.natural_image
Simple line drawing of a curved shape with five circular symbols on its sides (no text or labels)natural_image
Simple line drawing of a curved shape with five circular elements, no text or symbols present.natural_image
Simple line drawing of a curved shape with five circular symbols inside, no text or labels present.natural_image
Simple line drawing of a curved fan or umbrella with five circular buttons arranged in the center (no text or symbols)natural_image
Line drawing of a hand adjusting a mechanical component with a black arrow indicating the direction (no text or symbols present)Fig. 21

natural_image
Technical line drawing of a mechanical component with a black arrow indicating rotation (no text or symbols)Fig. 22
natural_image
Line drawing of a hand holding a mechanical component with an arrow indicating rotation (no text or symbols)Fig. 23
natural_image
Hand holding a pipette with a downward arrow indicating a process (no text or symbols present)Fig. 24
natural_image
Diagram of a pipette pressing down on a perforated surface with directional arrows indicating motion (no text or symbols)Fig. 25

natural_image
Technical line drawing of a mechanical assembly with no visible text or symbolsFig. 26
natural_image
Line drawing of a hand adjusting a mechanical component with arrows indicating motion (no text or symbols)Fig. 1

natural_image
Illustration of a hand using a tool to adjust or install a mechanical component, with no visible text or symbols.Fig. 2

natural_image
Line drawing of a hand holding a small object with an arrow indicating rotation (no text or symbols)Fig. 3
natural_image
Diagram of a mechanical device with a rotating knob and textured base (no text or symbols)Fig. 4
natural_image
Technical line drawing of a mechanical device with two arrows indicating assembly or movement (no text or symbols present)Fig. 5

natural_image
Line drawing of a hand holding a tool interacting with a device inside a container (no text or symbols)Fig. 6

natural_image
Line drawing of a hand using a tool to press or adjust a component, no text or symbols presentFig. 7
natural_image
Line drawing of a mechanical device with arrows indicating assembly or component (no text or symbols)Fig. 8
natural_image
Line drawing of a hand holding a container with a tool, no text or symbols presentFig. 9
natural_image
Illustration of hands using a tool to adjust or install a mechanical component, with no visible text or symbols.Fig. 10
natural_image
Line drawing of a hand adjusting a mechanical component with a black arrow indicating the direction (no text or symbols present)Fig. 11

natural_image
Illustration of a hand pressing down a mechanical component with a downward arrow (no text or symbols)Fig. 12
natural_image
Line drawing of hands using a mechanical device to adjust a component (no text or symbols visible)Fig. 15
Melk opschuimen
natural_image
Line drawing of hands using a lathe machine to press or adjust a coffee cup (no text or symbols present)Fig. 16
Opmerking:
natural_image
Line drawing of a mechanical component with a central pin and textured base (no text or symbols)Fig. 17
natural_image
Line drawing of hands using a tool to adjust or install a mechanical component, no text or symbols presentFig. 19
Heetwaterfunctie
natural_image
Simple line drawing of a curved fan or wing shape with five circular components (no text or symbols)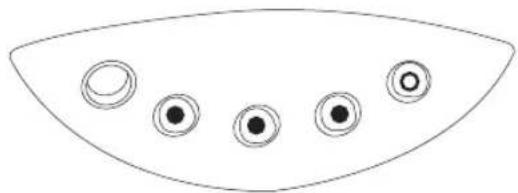
natural_image
Simple line drawing of a curved object with five circular indentations on its surface (no text or symbols)natural_image
Simple line drawing of a curved fan or dome shape with five circular buttons arranged in the center (no text or symbols)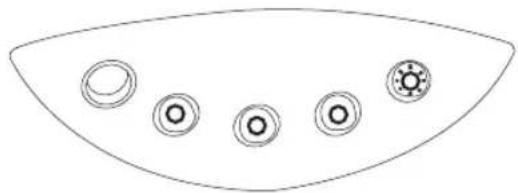
natural_image
Simple line drawing of a curved shape with five circular symbols on its surface (no text or labels)natural_image
Simple line drawing of a curved shape with five circular elements, no text or symbols present.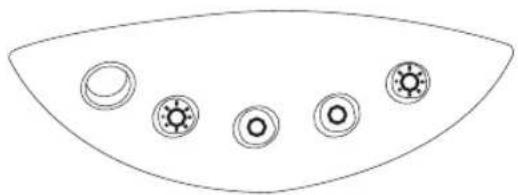
natural_image
Simple line drawing of a curved shape with five circular elements, no text or symbols present.natural_image
Simple line drawing of a curved fan or umbrella with five circular buttons on the sides (no text or symbols)Lamp continu AAN
Qamp UIT
amp knippert
De machine reinigen

Let op, gevaar!
natural_image
Line drawing of a hand adjusting a mechanical component with a black arrow indicating the direction (no text or symbols present)Fig. 21

natural_image
Technical line drawing of a mechanical component with a curved arrow indicating rotation (no text or symbols)Fig. 22

natural_image
Line drawing of a hand holding a mechanical component with an arrow indicating rotation (no text or symbols)Fig. 23
natural_image
Hand holding a pen tip with a circular grid pattern, pointing downward (no text or symbols visible)Fig. 24

natural_image
Diagram of a pipette pressing down on a perforated surface with directional arrows indicating motion (no text or symbols)Fig. 25
natural_image
Technical line drawing of a mechanical assembly with no visible text or symbolsFig. 26
natural_image
Line drawing of a hand adjusting a mechanical component with arrows indicating motion (no text or symbols)Fig. 1

natural_image
Illustration of a hand using a tool to adjust or install a mechanical component, with no visible text or symbols.Fig. 2
natural_image
Line drawing of a hand holding a small object with an arrow indicating rotation (no text or symbols)Fig. 3
natural_image
Technical diagram of a mechanical assembly with a rotating component and textured base (no text or symbols)Fig. 4
natural_image
Technical line drawing of a mechanical device with two arrows indicating assembly or movement (no text or symbols present)Fig. 5

natural_image
Line drawing of a hand holding a small object inside a container with a curved handle (no text or symbols)Fig. 6
natural_image
Line drawing of a hand using a tool to press or adjust a component, no text or symbols presentFig. 7
natural_image
Technical line drawing of a mechanical device with arrows indicating assembly or component (no text or symbols)Fig. 8

natural_image
Line drawing of a hand holding a tool interacting with a container (no text or symbols)Fig. 9
natural_image
Illustration of hands using a tool to adjust or install a mechanical component, with no visible text or symbols.Fig. 10
Preparação
natural_image
Line drawing of a hand adjusting a mechanical component with a black arrow indicating the direction (no text or symbols present)Fig. 11
Após a utilização
natural_image
Illustration of a hand pressing down on a mechanical component with a downward arrow (no text or symbols)Fig. 12
natural_image
Line drawing of hands using a mechanical tool to adjust or install a component, no text or symbols presentFig. 15
natural_image
Line drawing of hands using a mechanical device to adjust or install a component, with no visible text or symbols.Fig. 16
Nota:
natural_image
Line drawing of a mechanical component with a central pin and textured base (no text or symbols)Fig. 17
Arrefecer a máquina

Atenção
natural_image
Line drawing of a hand using a tool to press or adjust a mechanical component, no text or symbols presentFig. 19
natural_image
Simple line drawing of a curved fan or wing shape with five circular buttons arranged in rows (no text or symbols)
natural_image
Simple line drawing of a curved shape with five circular elements, no text or symbols present.natural_image
Simple line drawing of a curved fan or dome shape with five circular buttons arranged in the center (no text or symbols)natural_image
Simple line drawing of a curved shape with five circular symbols on its sides (no text or labels)natural_image
Simple line drawing of a curved shape with five circular elements, no text or symbols present.natural_image
Simple line drawing of a curved shape with five circular symbols inside, no text or labels present.Erro Legenda dos LEDs:
natural_image
Simple line drawing of a curved fan or umbrella with five circular buttons on the sides (no text or symbols)natural_image
Line drawing of a hand adjusting a mechanical component with a black arrow indicating the direction (no text or symbols present)Fig. 21

natural_image
Technical line drawing of a mechanical component with a black arrow indicating rotation (no text or symbols)Fig. 22 (2)
natural_image
Line drawing of a hand holding a mechanical component with an arrow indicating rotation (no text or symbols)Fig. 23
Limpeza do bico de vapor
natural_image
Hand holding a pipette with a downward arrow indicating a process (no text or symbols present)Fig. 24
natural_image
Diagram of a pipette dispensing liquid into a perforated plate (no text or symbols)Fig. 25

natural_image
Technical line drawing of a mechanical assembly with no visible text or symbolsFig. 26

- Preparazione
- Dopo l'utilizzo
- Nota:
- Control panel
- Technical data
- Intended use
- Safety instructions
- Electrical hazards
- Precautions against burns
- Safety notice – cutting hazard
- Caution. Follow the instructions given below in order to prevent damage to the hine:
- Caution
- Preliminary operations
- Unpacking:
- Assembling the parts of the machine that are supplied separately.
- Filling the boiler
- Note
- The advantages of using the "CAFFITALY SYSTEM" coffee capsules
- Operating the coffee machine
- Before starting the machine
- Filling the water tank
- Note:
- Inserting a capsule
- Making coffee
- What to do after
- Dispensing steam
- Frothing milk
- Caution:
- Cooling the coffee machine
- Hot water function
- User settings according to user taste
- Resetting the default settings
- Meaning of the indicator lamps on the control panel
- Cleaning the machine
- Danger
- Cleaning the casing and shelf
- Cleaning the drip tray and grating
- Cleaning the water tank
- Cleaning the capsule holder
- Cleaning the steam wand
- De-scaling
- Notice
- DISPOSAL
- Kapsel einsetzen
- Milch aufschäumen
- Bemerkung:
- Heißwasser-Funktion
- Achtung
- Introduction de la capsule
- Préparation
- Après l'utilisation
- Refroidir la machine
- Attention
- Fonction eau chaude
- Preparación
- Después del uso
- Enfriar la máquina
- Atención
- Melk opschuimen
- Opmerking:
- Heetwaterfunctie
- De machine reinigen
- Let op, gevaar!
- Preparação
- Após a utilização
- Arrefecer a máquina
- Atenção
- Limpeza do bico de vapor
Brand : GAGGIA
Model : K111D
Category : Coffee machine