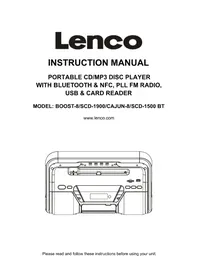
CAJUN8 - Hi-fi system LENCO - Free user manual and instructions
Find the device manual for free CAJUN8 LENCO in PDF.

User questions about CAJUN8 LENCO
0 question about this device. Answer the ones you know or ask your own.
Ask a new question about this device
Download the instructions for your Hi-fi system in PDF format for free! Find your manual CAJUN8 - LENCO and take your electronic device back in hand. On this page are published all the documents necessary for the use of your device. CAJUN8 by LENCO.
USER MANUAL CAJUN8 LENCO
Please read and follow these instructions before using your unit.
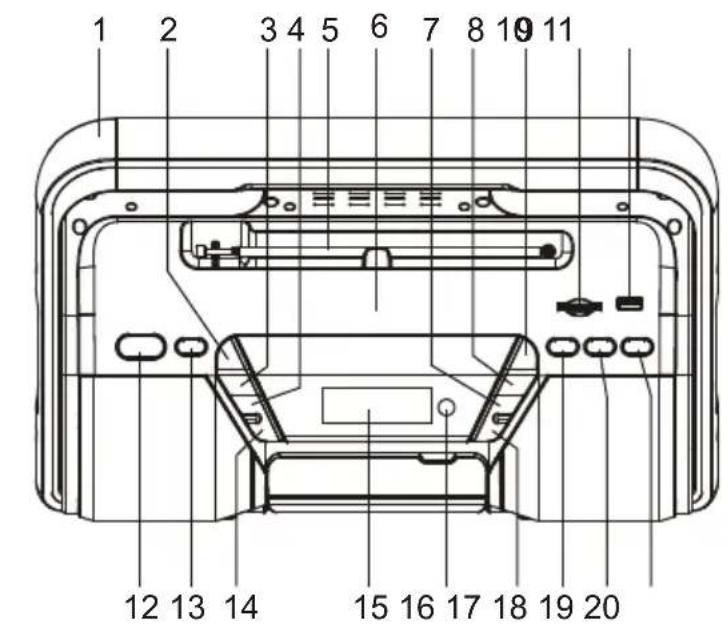
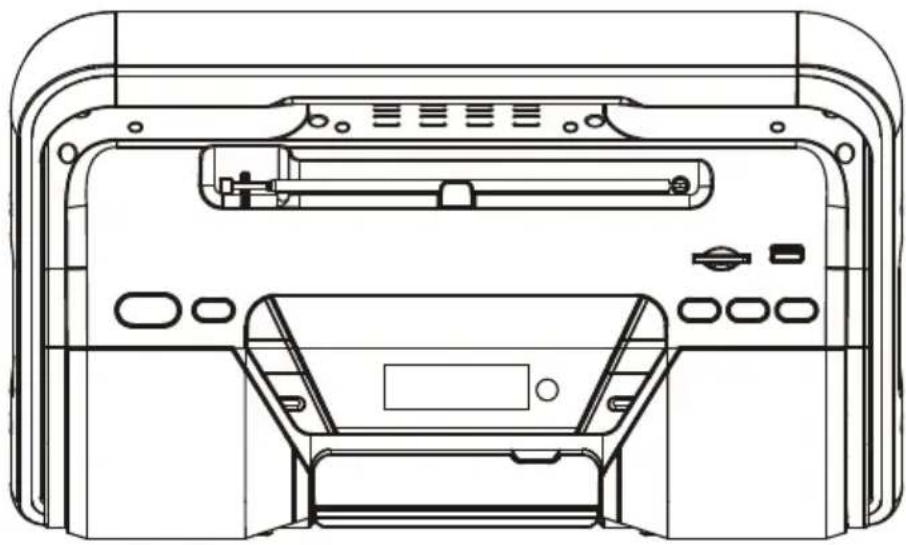
OVERVIEW OF THE PLAYER
- HANDLE
2.CHANNEL+ BUTTON
3.CHANNEL-B BUTTON - VOLUME+ BUTTON
- FM TELESCOPIC ANTENNA
- NFC SCANNING AREA
- PLAY/PAUSE/BLUETOOTH PAIR & ST/MONO BUTTON
- TUNING-/PREVIOUS BUTTON
- TUNING+/NEXT BUTTON
- CARD SLOT
- USB PORT
- STANDBY BUTTON
- FUNCTION BUTTON
- VOLUME-B BUTTON
- LCD DISPLAY
- REMOTE SENSOR
- STOP BUTTON
- SLEEP/HR/MIN BUTTON
- CLOCK/MEM BUTTON
- TIMER/TONE BUTTON
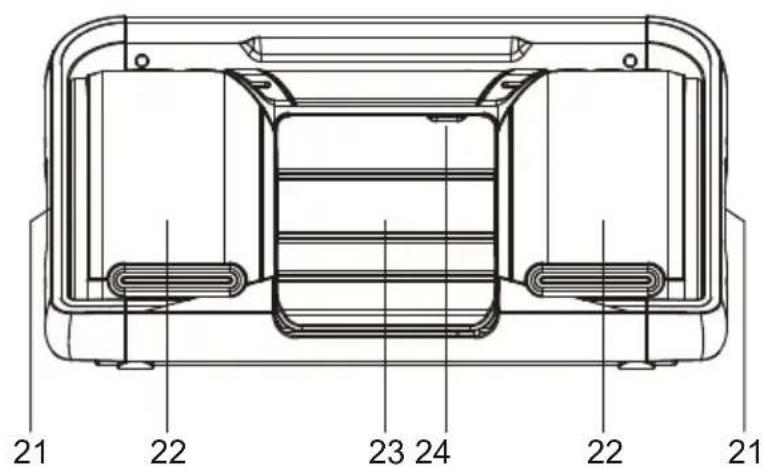
- BASS SPEAKERS
- TREBLE SPEAKERS
- CD DOOR
- PUSH TO OPEN CD DOOR
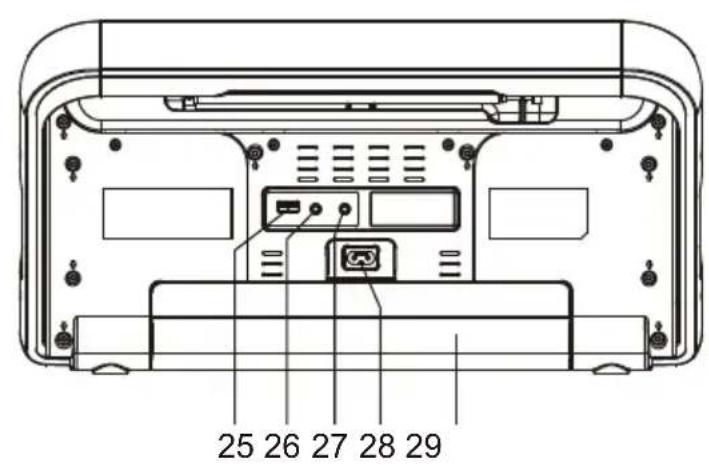
- USB CHARGING PORT
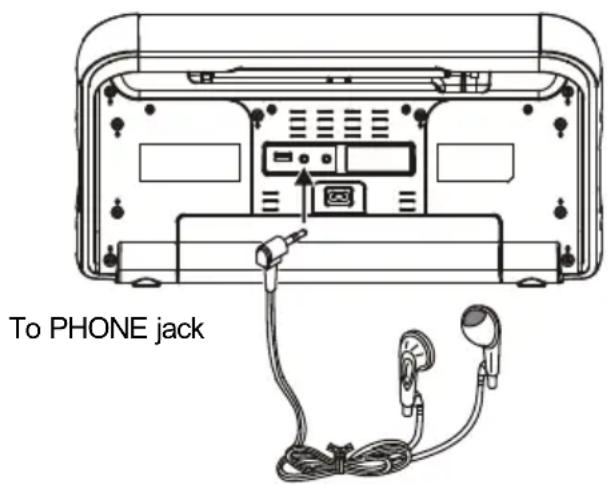
- PHONE JACK
- AUX IN JACK
- AC SOCKET
- BATTERY COMPARTMENT
REMOTE CONTROL
- SLEEP BUTTON
- CARD BUTTON
3.CD BUTTON - FM BUTTON
- REP BUTTON
- RAN BUTTON
- PREVIOUS BUTTON
- NEXT BUTTON
- TUNE+ BUTTON
- TREBLE+ BUTTON
- TUNE- BUTTON
- TREBLE- BUTTON
- MEM BUTTON
- ID3 BUTTON
- CH+ BUTTON
- HR BUTTON
- CH-BUTTON
-
TIMER BUTTON
-
STANDBY BUTTON
- USB BUTTON
- AUX IN BUTTON
- BT BUTTON
- DISPLAY BUTTON
- ST/MO BUTTON
- PAIR/PLAY/PAUSE BUTTON
- STOP BUTTON
- VOL+ BUTTON
- BASS+ BUTTON
- VOL- BUTTON
- BASS- BUTTON
- FOLDER UP BUTTON
32.PROGB BUTTON - FOLDER DOWN BUTTON
- MIN BUTTON
- MUTE BUTTON
- CLOCK BUTTON
POWER SUPPLY
BATTERY OPERATION
- Remove the battery compartment cover gently.
- Install 8 x 'D' size batteries (UM-1 or equivalent) while observing the correct polarities.
- Replace the battery compartment cover.
NOTE:
- The AC cord must be detached from the AC socket of the player.
- Leaking batteries may damage the battery cabinet and the player as a whole, so they should be removed from the cabinet when becoming flat or when the player is not to be played on batteries for some time.
AC OPERATION
Insert the AC cord to the AC socket of the player, and plug the other end to an applicable wall outlet.
NOTE: During playback, if no audio input to the unit and not any operation in about one hour, the unit will switch to standby mode automatically.
Two AA/R6 size batteries are required for the backup power for the clock. Follow the instructions of "BATTERY OPERATION" to install the batteries.
A stereo headphones jack has been provided at the back of the unit so that you can enjoy music without disturbing others. To use this jack, plug in the headphones/earphones (3.5mm in diameter, not included) and adjust the volume to a comfortable level.
NOTE: When external headphones/earphones are connected, the sound to the unit's main speakers will be made mute.
AUX IN
Follow the below steps to connect the unit to another audio device such as MP3 player and the like:
- Connect the Phones jack of the MP3 player or Audio Out jack of other audio device to AUX IN jack on the back of the unit with an audio cable.
- Press the STANDBY button to turn the unit on.
- Press the FUNCTION button on the unit repeatedly or press AUX IN button on the remote to switch the unit to AUX mode.
- Operate the external audio device to start playback.
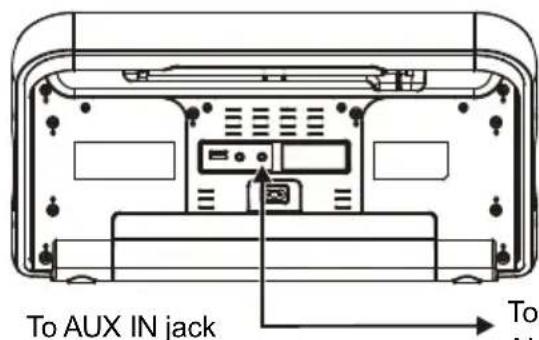
To PHONES jack on MP3 player / AUDIO OUT jack on audio device
MUTE THE UNIT
During playback, press MUTE button to switch off the audio. Press the button again to resume the audio.
TREBLE/BASS EFFECT ADJUSTING
During playback, press the TONE button on the unit repeatedly to select BASS or TREBLE, and adjust the effect of bass or treble via pressing VOLUME +/- button continuously. The effect of the treble and bass can also be adjusted by pressing TREBLE+/- button or BASS+/- button directly.
VOLUME LEVEL
During playback, press VOLUME+/- button to adjust the volume level accordingly.
TIME DISPLAY
- Connect the unit to power supply, the unit will enter standby mode. When the unit is connected to AC main power, clock time will show on the LCD all the time until you press STANDBY button to turn on the unit. When the unit is under DC power supply (Battery operated), clock time will show on the LCD for a while and then disappear, you can press any button (except STANDBY button) to check the clock time.
- When the unit is switched on by pressing the STANDBY button, if you want to check the clock time, press the DISPLAY button on the remote control.
- In CD mode and when the playing disc is in CD format (not for MP3 disc), press DISPLAY button will cycle through the following time display: the elapsed time of current track, the remaining time of current track, the remaining time of the whole disc, the elapsed time of the whole disc.
SLEEP FUNCTION
Press SLEEP button at power on mode. Each time SLEEP button is pressed, the sleep time changes on the display. When your desired sleep time shows on the screen, release the SLEEP button. When the sleep time is expired, the unit will switch off automatically.
CLOCK SETTING
- In standby mode, press CLOCK button and use SLEEP/HR/MIN button on the unit or press HR button on the remote to switch between the time modes (12 hours and 24 hours) accordingly. Then press CLOCK button to confirm your selection.
- The hour flashes on the display. Press SLEEP/HR/MIN button on the unit repeatedly to set the hour and press CLOCK button to confirm.
- The minute flashes on the display. Set the minute by pressing SLEEP/HR/MIN button on the unit repeatedly, confirm your setting by pressing CLOCK Button.
NOTE: When the hour or minute flashes on the display, the clock can also be set by pressing HR button or MIN button on the remote directly. After setting, press CLOCK button to confirm.
TIMER SETTING
-
In standby mode, press TIMER button on the unit or on the remote.
-
"T" shows on the LCD display with hour flashing. Adjust the hour by pressing SLEEP/HR/MIN button on the unit continuously and press TIMER Button to confirm.
- The minute flashes on the display. Set the minute by pressing SLEEP/HR/MIN button on the unit continuously. Confirm your setting by pressing TIMER button. The timer "ON" shows on the display to indicate the timer is activated (Press TIMER button again to disable the timer).
Note: When the hour or minute flashes on the display, the time can also be set by pressing HR button or MIN button on the remote directly. After setting, press TIMER button to confirm.
- The unit will be turned on automatically at the time you set for the timer.
FM RADIO
TUNING THE FM RADIO
- Press STANDBY button to turn the unit on.
- Press FUNCTION button on the unit repeatedly or press FM button on the remote to switch the unit to FM mode.
- Press TUNING+/- button to fine tune the radio station. Press and hold TUNING+/- button to automatically tune the radio frequency forward and backward respectively. When an available station is found, the unit will broadcast it immediately.
- Press the PLAY/PAUSE button on the unit or ST/MO button on the remote to switch the radio between MONO and STEREO.
- Fully extend the telescopic antenna and adjust its direction for best radio reception.
SAVING FM RADIO STATIONS TO THE UNIT'S MEMORY
- After tuning the FM radio to the desired stations, press MEM button, a number of a memory cell flashes on the screen.
- Press CHANNEL+/- button to select the radio memory cell.
- Press MEM button again to save the current radio station to the selected memory cell. Up to 20 FM radio stations can be saved.
- To recall the preset station frequency, press CHANNEL+/- button repeatedly.
HANDLING AND MAINTENANCE OF A DISC
Follow the instructions below to handle and maintain your disc in order that long time and trouble free performance can possibly be obtained:
- Ensure not to caress the rain bow side of the disc; handle the disc by the edge.
- Long time exposure to sunshine, high temperatures and humidity will damage the disc. And keep storage area clean.
- Avoid sticking labels on both sides of a disc. Writing with pointed articles on the disc should be strictly avoided.
- Clean the disc wiping the centre and then working out to the edge with a dry & soft cloth or a disc brush. Avoid any cleansing lotion or chemical eradicator.
- Store them in their cases when they are not to be used.

- Open the CD door by pressing the PUSH TO OPEN area.
- Load a disc on the disc tray with the label side facing outside.
- Close the CD door.
PLAY A DISC
- Follow the instructions above to load a disc.
- Press the FUNCTION button on the unit repeatedly or press CD button on the remote to switch the unit to CD mode. "READING" shows on the screen to indicate the disc is being read.
-
When the disc is read successfully, playback will start from the first track.
-
Press PLAY/PAUSE button once to halt music playback, the elapsed time of the current track flashes to indicate the player in pause mode; press STOP button to cease music playback, the LCD shows the total number of the tracks and the total playing time.
SKIP TRACKS AND SEARCH FOR A SPECIFIC POINT TO PLAY
- Press NEXT button once in music playback to skip to the next track. To skip to a specific track ahead, press this button several times.
- Press PREVIOUS button once to skip to the beginning of the current track, press the button twice continuously to skip to the previous track. To skip to a specific track at back, press this button several times.
- Hold NEXT button in music playback to search forward at quick rate for a specific point to play.
- Hold PREVIOUS button in music playback to search backward at quick rate for a specific point to play.
REPEAT A SINGLE TRACK
To repeat a preferred track in playback, press REP button once, "TRK REPEAT" shows on the LCD. Then select the preferred track using NEXT/PREVIOUS button. The unit will repeat the chosen track until you press STOP button.
REPEAT ALL TRACKS
To repeat all tracks, press REP button twice in play mode, "REPEAT ALL" shows on the LCD. The player will repeat all tracks until you press STOP button.
Press REP button again to cancel repeat playback and resume normal playback.
You can also press REP button in stop mode to select "TRK REPEAT" or "REPEAT ALL" and then press PLAY/PAUSE button to start repeat playback.
RANDOM PLAY
Random play is that tracks on the disc are played by the unit at random. Press RAN button to enter this mode during playback, "RANDOM" shows on the LCD. Tracks on the disc will be selected at random for playback and the player stops automatically after all tracks are played.
MP3-CD PLAYBACK
- Load an MP3 disc onto the unit following the instructions of "LOAD A DISC".
- Press the FUNCTION button on the unit repeatedly or press CD button on the remote to switch the unit to CD mode. "READING" shows on the screen to indicate the disc is being read.
- After the MP3-CD is successfully read, playback begins from the first track of the first folder.
- Press ID3 button to enable or disable the ID3 function. The LCD will show the corresponding information of the current track at ID3 ON mode.
EXTERNAL MEMORY MEDIA OPERATION (USB/CARD)
- Power on the unit.
- Insert a USB data traveller into the USB port or Insert a card into the card slot; press FUNCTION button on the unit repeatedly or press CARD button or USB button on the remote to switch the unit to CARD or USB mode respectively.
- After the inserted USB or card is successfully read, playback begins from the first track of the first folder.
- Press ID3 button to enable or disable the ID3 function. The LCD will show the corresponding information of the current track at ID3 ON mode
SKIP TRACKS AND SEARCH FOR A SPECIFIC POINT TO PLAY (MP3/USB/CARD)
-
Press NEXT button once in music play to skip to the next track. To skip to a specific track ahead, press this button several times.
-
Press PREVIOUS button once to skip to the beginning of the current track, press the button twice continuously to skip to the previous track. To skip to a specific track at back, press this button several times.
- Hold NEXT button in music play to search forward at quick rate for a specific point to play.
- Hold PREVIOUS button in music play to search backward at quick rate for a specific point to play.
- Press FOLDER UP/DOWN button to select your desired folder for playback.
REPEAT A SINGLE TRACK (MP3/USB/CARD)
To repeat a preferred track in playback, press REP button once, "TRK REPEAT" shows on the LCD. Then select the preferred track using NEXT/PREVIOUS button. The player will repeat the chosen track until you press STOP button.
REPEAT A FOLDER (MP3/USB/CARD)
To repeat a preferred album in playback, press REP button twice, "FOLDER REPEAT" shows on the LCD. Then select the preferred track using NEXT/PREVIOUS buttons. The player will repeat the chosen folder until you press STOP button.
REPEAT ALL TRACKS (MP3/USB/CARD)
To repeat all tracks, press REP button thrice in play mode, "REPEAT ALL" shows on the LCD. The player will repeat all tracks until you press STOP button.
Press REP button again to cancel repeat playback and resume normal playback.
You can also press REP button in stop mode to select "TRK REPEAT", "FOLDER REPEAT" or "REPEAT ALL" and then press PLAY/PAUSE button to start repeat playback.
RANDOM PLAY (MP3/USB/CARD)
Random play is that tracks on the disc are played by the unit at random. Press RAN button to enter this mode during play, "RANDOM" shows on the LCD. Tracks on the disc will be selected at random for playback and the player stops automatically after all tracks are played.
PROGRAMMED PLAY (CD/MP3/USB/CARD)
Programmed play is that tracks can be edited for playback in a preferred order with the use of PROG button.
- In stop mode, press PROG button once, track number and the program sequence indication "P01" show on the LCD with "MEMORY" flashing.
- Select the first track to be programmed using NEXT/PREVIOUS buttons, and press PROG button again to store and advance to the next programming step. The program sequence indication changes to "P02" waiting for your next input.
- Repeat the steps above to program more tracks. A maximum of 80 tracks can be programmed in memory in a preferred order.
- Press PLAY/PAUSE button to begin programmed play in the preferred order after you are done with programming.
- You can press STOP button to terminate the programmed playback. In programmed stop mode, press PLAY/PAUSE button to start playing the tracks programmed previously, if otherwise press STOP button will clear the programmed tracks.
BLUETOOTH OPERATING
This unit can receive stereo audio signal from a Bluetooth audio source device.
- Power on the unit. Switch to BT mode by pressing the FUNCTION button on the unit repeatedly or press the BT button on the remote.
- "PAIRING" shows on the display while Bluetooth is pairing.
-
Enable the Bluetooth function of the Bluetooth audio source device.
-
Pair and connect to Lenco BOOST-8/Lenco SCD-1900/Lenco CAJUN-8/Lenco SCD-1500 BT on the audio source device. If prompted for passcode, enter "0000".
- When pairing is successful, "CONNECT" shows on the display, and it is ready to stream music. Press the PLAY/PAUSE button if the playback does not start automatically, or operate the audio source device to start playback.
- During playback, press the PLAY/PAUSE button to cease or resume the playback.
- During playback, use the NEXT or PREVIOUS button to skip to the next/previous tracks.
NOTE: The above steps for Bluetooth connection and playback are intended for reference purpose only.
Please refer to the instruction manual of the Bluetooth audio source device for more details.
DISCONNECTION/RECONNECTION TO THE BLUETOOTH AUDIO SOURCE
Press the STANDBY button to turn off the unit, and to disconnect the Bluetooth device.
Turn on the unit and switch to BT mode to automatically retrieve the last paired Bluetooth device.
NOTE:
- When the external Bluetooth source device is moved out of the Bluetooth receiving range of the unit, the Bluetooth connection will be disconnected. Moving again into the receiving range will resume connection and restart playback through the unit automatically. If the connection does not resume automatically, please operate as above to reconnect and start playback.
- Simultaneous connection of two external Bluetooth audio devices to the unit is not supported. First disconnect the current Bluetooth connection, then press and hold the PLAY/PAUSE/BLUETOOTH PAIR button to launch a new pairing, operate another audio source device to make Bluetooth connection with the unit and start playback.
NFC (Near Field Communication)
This unit has NFC function, which allows an NFC-enabled Bluetooth audio source device to rapidly connect with the unit and play the audio signal through the unit. Operate as below:
- Turn the unit on. Activate the NFC function of a Bluetooth audio source device such as a smartphone.
- Hold the audio source device close to the NFC scanning area of the unit (in a range within 10cm ). The audio source device will pair and connect with the unit instantly. If the unit is in other modes, it will be switched to Bluetooth mode automatically.
- Operate the audio source device to select your desired music to play through the unit. Please refer to the instruction manual of your NFC audio source device for more details.
USB CHARGING PORT
The USB charging port on the back of the unit acts as a 5V/1A power supply for the purpose of charging an external USB device such as a smartphone via the device's original USB charging cable.
NOTE:
- As long as the unit is connected to AC main supply, the charging function is available any time no matter unit is at power on or standby mode.
- When unit is under DC operation, the charging function only available at unit powered up for emergency use while the charging function is blocked whenever unit is switched to standby mode in order to save battery power.
IMPORTANT SAFETY INSTRUCTIONS
- The apparatus shall not be exposed to dripping or splashing and that no objects filled with liquids, such as vases, shall be placed on the apparatus.
- When the mains plug or an appliance coupler is used as the disconnect device, the disconnect device shall remain readily operable. To be completely disconnected the power input, the mains plug of the apparatus or the appliance coupler shall be disconnected from the mains completely.
- No naked flame sources, such as lighted candles, should be placed on the apparatus.
- Minimum distances 2.0cm around the apparatus for sufficient ventilation. The ventilation should not be impeded by covering the ventilation openings with items, such as newspapers, table-cloths, curtains, etc.
The use of apparatus is in moderate climate. - Attention should be drawn to the environmental aspects of battery disposal.
- CAUTION: Danger of explosion if battery is incorrectly replaced. Replace only with the same or equivalent type.
- Battery shall not be exposed to excessive heat such as sunshine, fire or the like.
- The marking plate is located at the back of the apparatus.
SPECIFICATION
GENERAL
Power requirement.. AC 100-240V 50/60Hz
DC 12V UM-1/D"x8pcs
Power consumption. 33 W
Remote control battery. CR2025
Dimensions . Approx. 422mm(L) x 209.3mm(W) x 215.8mm(H)
Operation temperature +5^ +35^
RECEIVER SECTION
Receiving band.FM
Tuning range.. FM 87.5 - 108.0 MHz
CD PLAYER SECTION
Playback system............Compact Disc Digital Audio System
AUDIO SECTION
Output power. RMS at 10% THD: Treble 5W x 2, Bass 10W x 2
Speaker impedance.Treble 8 ohms, Bass 6 ohms
Bluetooth compatible.. V. 3.0 + A2DP
Compatible with.. USB, SD card
Specifications are subject to change without notice.
Service and support
For information: www.lenco.com
For support: http://lencosupport.zendesk.com
Lenco helpdesk:
Germany 0900-1520530 (Local charges)
The Netherlands 0900-23553626 (Local charges + 1ct p/min)
Belgium 02-6200115 (Local charges)
France 03-81484280 (Local charges)
The helpdesk is accessible from Monday till Friday from 9 AM till 6 PM.
When contacting Lenco, you will always be asked for the model and serial number of your product. The serial number can be found on the back of the device. Please write down the serial number below:
Model: BOOST-8/SCD-1900/CAJUN-8/SCD-1500 BT
Serial number:
Lenco offers service and warranty in accordance to European law, which means that in case of repairs (both during and after the warranty period) you should contact your local dealer.
Important note: It is not possible to send products that need repairs to Lenco directly.
Important note: If this unit is opened or accessed by a non-official service center in any way, the warranty expires.
This device is not suitable for professional use. In case of professional use, all warranty obligations of the manufacturer will be voided.

This symbol indicates that the relevant electrical product or battery should not be disposed of as general household waste in Europe. To ensure the correct waste treatment of the product and battery, please dispose them in accordance to any applicable local laws of requirement for disposal of electrical equipment or batteries. In so doing, you will help to conserve natural resources and improve standards of environmental protection in treatment and disposal of electrical waste (Waste Electrical and Electronic Equipment Directive).

Products with the CE marking comply with the EMC Directive (2004/108/EC) and the Low Voltage Directive (2006/95/EC) issued by the Commission of the European Community.
This product operates at 2400 - 2483.5 MHz and is designated only to be used inside a normal household environment. This product is suited for this purpose within all EU counties.
Hereby, STL Group BV, Ankerkade 20 NL 5928 PL Venlo, declares that this product is in compliance with the essential requirements and other relevant provisions of Directive 1999/5/EC.
The declaration of conformity may be consulted at https://lencosupport.zendesk.com/forum/22413161-CE-Documents
Lenco
NFC (Near Field Communication)
MANUEL D'INSTRUCTION
LECTEUR PORTABLE DISQUE CD/MP3 AVEC BLUETOOTH ET NFC, RADIO FM PLL, USB ET LECTEUR DE CARTE
MODELE: BOOST-8/SCD-1900/CAJUN-8/SCD-1500 BT
www.lenco.com
NFC(Near Field Communication):
NFC (Near Field Communication)
This product operates at 2400 - 2483.5 MHz and is designated only to be used inside a normal
EC-Declaration of Conformity

marking
We, Manufacturer/Importer (full address)
STL Group BV
Ankerkade 20
5928PLVenloNL
declare that the product
(description of the apparatus, system, installation to which it refers)
CD/MP3 Boombox with Bluetooth and NFC
Lenco model(s): Boost-8, Cajun-8, SCD-1500BT, SCD-1900
Is in conformity with
Council Directive 2004/108/EC (EMC Directive)
R&TTE Directive 1999/5/EC
Standards to which conformity is declared:
EN 300 328V1.8.1 (2012:06)
Compatibility and Radio spectrum Wide band Transmitter systems in the 2,4 GHz ISM band and using spread spectrum modulation techniques under article 3.2 of the R&TTE Directive
EN 302 291-1/-2V1.1.1 (2005-07)
Electromagnetic compatibility and Radio spectrum Matters, Short Range Devices, Close Range Inductive Data Communication equipment operating at 13,56 MHz
ETSI EN 301 489-1V1.9.2 (2011-09)
Electromagnetic compatibility and Radio spectrum Matters (ERM) - Electromagnetic Compatibility (EMC) standard for radio equipment and services - Part 1: common technical requirements ERM, EMC standard for radio equipment and services
ETSI EN 301 489-17V2.2. (2012-09)
1ERM, EMC standard for radio equipment and services Part 17:Specific condition for 2.4GHz wideband transmission systems and 5GHz high performance RLan equipment
EN62479:2010
Human Exposure to Electromagnetic Fields from Multimedia Products (10MHz to 300GHz)
EN 60065:2002
Information technology equipment - Safety - Part 1: General requirements
+A1:2006+A11:2008
+A2:2010+A12:2011
IEC 60065:2001+
+A1:2005+A2:2010
EN55020:2007 +A11:2011
EN 61000-3-2:2006
+A1:2009 +A2:2009
EN 61000-3-3:2013
(Seventh Edition)
Sound and television broadcast receivers and associated equipment -immunity Characteristics - Limits and methods of measurement
Electromagnetic compatibility (EMC); Part 3: Limits; Section 2: Limits for harmonic current emissions (equipment input current ≤ 16 Ampere per phase)
Electromagnetic compatibility (EMC); Part 3: Limits; Section 3: Limitation of voltage fluctuation and flicker in low-voltage supply systems for Equipment with rated current ≤ 16 Ampere.
Manufacturer/Importer STE-group BV
Date:
August 01, 2014
Signature:
Name:
G. Moors
This product is designated only to be used inside a normal household environment. This product is suited for this purpose within all EU counties.