
DNX600 - Mixer DENON - Free user manual and instructions
Find the device manual for free DNX600 DENON in PDF.
| Product type | Digital DJ mixer |
| Brand | Denon |
| Model | DN-X600 |
| Dimensions (W x D x H) | 250 x 315 x 90 mm |
| Weight | 4.0 kg |
| Power supply | AC 120 V / 230 V, 50/60 Hz |
| Power consumption | 24 W (standby < 0.3 W) |
| Audio inputs | 2 x PHONO (RCA), 2 x CD (RCA), 1 x AUX1 (RCA), 1 x AUX2/EFX RETURN (RCA), 1 x MIC (balanced XLR) |
| Audio outputs | 2 x MASTER (balanced XLR and RCA), 1 x BOOTH/EFX SEND (RCA), 1 x PHONES (6.35 mm jack) |
| USB interface | USB B, 8-channel audio (4 stereo) 24-bit/96 kHz, MIDI |
| Built-in effects | 8 effects: Reverb, Flanger, Echo, Delay, Loop, BeatBreaker, Filter, Beat Scratch |
| Equalizer | 3-band per channel (HI, MID, LOW) with isolators |
| Main functions | Fader start, DVS, microphone ducking, auto standby, MIDI output |
| FADER connector | For controlling compatible DJ CD players |
| Signal-to-noise ratio | PHONO: 89 dB, CD: 100 dB |
| Operating temperature | +5 °C to +35 °C |
| Operating humidity | 5% to 85% (non-condensing) |
| Cleaning | Soft dry cloth; avoid solvents, insecticides |
| Safety | Unplug before cleaning; do not block ventilation openings |
| Included accessories | User manual, CD-ROM, USB cable, warranty |
Frequently Asked Questions - DNX600 DENON
User questions about DNX600 DENON
0 question about this device. Answer the ones you know or ask your own.
Ask a new question about this device
Download the instructions for your Mixer in PDF format for free! Find your manual DNX600 - DENON and take your electronic device back in hand. On this page are published all the documents necessary for the use of your device. DNX600 by DENON.
USER MANUAL DNX600 DENON
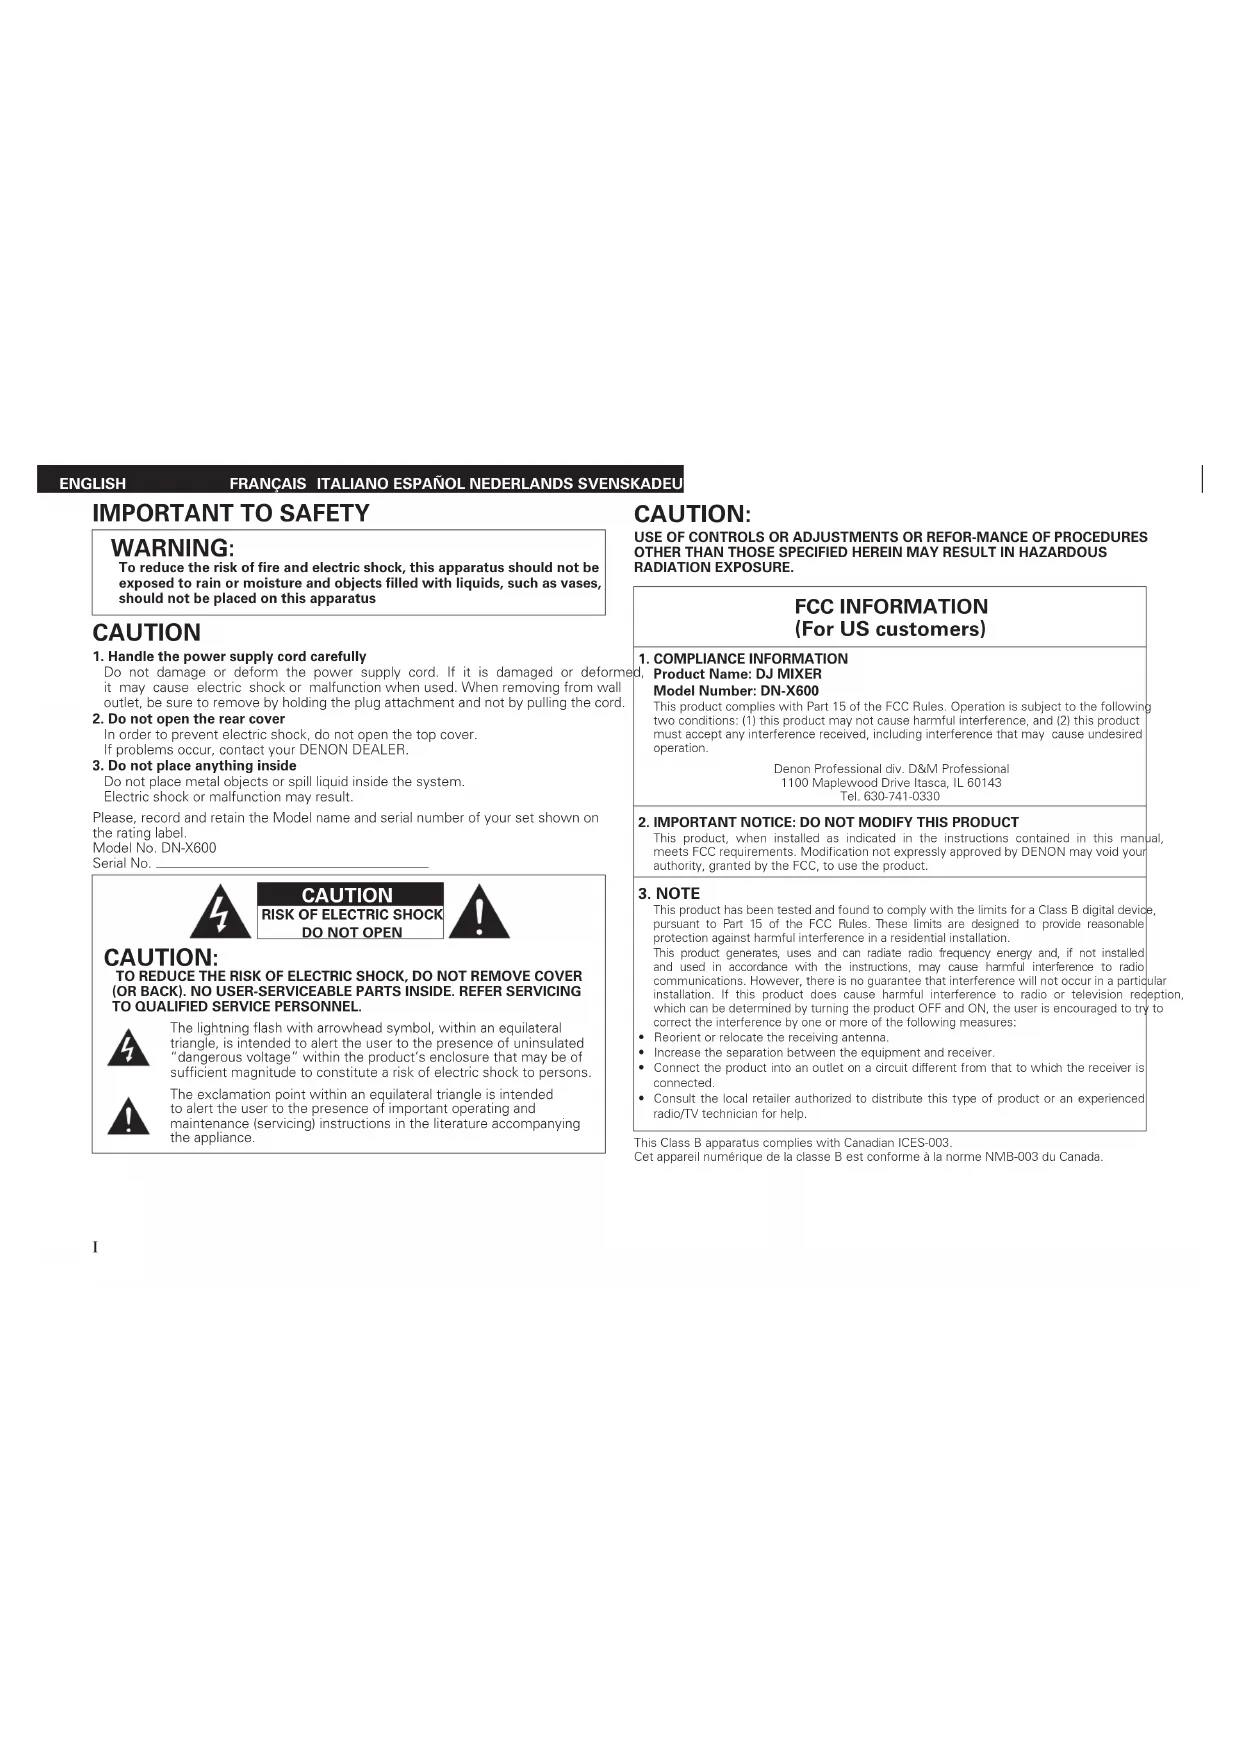
To reduce the risk of fire and electric shock, this apparatus should not be exposed to rain or moisture and objects filled with liquids, such as vases, should not be placed on this apparatus
CAUTION
- Handle the power supply cord carefully
Do not damage or deform the power supply cord. If it is damaged or deformed, it may cause electric shock or malfunction when used. When removing from wall outlet, be sure to remove by holding the plug attachment and not by pulling the cord.
- Do not open the rear cover
In order to prevent electric shock, do not open the top cover. If problems occur, contact your DENON DEALER.
- Do not place anything inside
Do not place metal objects or spill liquid inside the system. Electric shock or malfunction may result.
Please, record and retain the Model name and serial number of your set shown on the rating label. Model No.DN-X600 Serial No.

CAUTION
RISK OF ELECTRIC SHOCK DO NOT OPEN

CAUTION:
TO REDUCE THE RISK OF ELECTRIC SHOCK, DO NOT REMOVE COVER (OR BACK). NO USER-SERVICEABLE PARTS INSIDE. REFER SERVICING TO QUALIFIED SERVICE PERSONNEL.

The lightning flash with arrowhead symbol, within an equilateral triangle, is intended to alert the user to the presence of uninsulated "dangerous voltage" within the product's enclosure that may be of sufficient magnitude to constitute a risk of electric shock to persons.

The exclamation point within an equilateral triangle is intended to alert the user to the presence of important operating and maintenance (servicing) instructions in the literature accompanying the appliance.
CAUTION:
USE OF CONTROLS OR ADJUSTMENTS OR REFOR-MANCE OF PROCEDURES OTHER THAN THOSE SPECIFIED HEREIN MAY RESULT IN HAZARDOUS RADIATION EXPOSURE.
FCC INFORMATION
(For US customers)
1.COMPLIANCE INFORMATION
Product Name: DJ MIXER Model Number: DN-X600
This product complies with Part 15 of the FCC Rules. Operation is subject to the following two conditions: (1) this product may not cause harmful interference, and (2) this product must accept any interference received, including interference that may cause undesired operation.
Denon Professional div. D&M Professional
1100 Maplewood Drive Itasca, IL 60143
Tel.630-741-0330
- IMPORTANT NOTICE: DO NOT MODIFY THIS PRODUCT
This product, when installed as indicated in the instructions contained in this manual, meets FCC requirements. Modification not expressly approved by DENON may void your authority, granted by the FCC, to use the product.
- NOTE
This product has been tested and found to comply with the limits for a Class B digital device, pursuant to Part 15 of the FCC Rules. These limits are designed to provide reasonable protection against harmful interference in a residential installation.
This product generates, uses and can radiate radio frequency energy and, if not installed and used in accordance with the instructions, may cause harmful interference to radio communications. However, there is no guarantee that interference will not occur in a particular installation. If this product does cause harmful interference to radio or television reception, which can be determined by turning the product OFF and ON, the user is encouraged to try to correct the interference by one or more of the following measures:
Reorient or relocate the receiving antenna.
- Increase the separation between the equipment and receiver
- Connect the product into an outlet on a circuit different from that to which the receiver is connected.
- Consult the local retailer authorized to distribute this type of product or an experienced radio/TV technician for help.
This Class B apparatus complies with Canadian ICES-003.
IMPORTANT SAFETY INSTRUCTIONS
READ BEFORE OPERATING EQUIPMENT
This product was designed and manufactured to meet strict quality and safety standards. There are, however, some installation and operation precautions which you should be particularly aware of.
- Read these instructions.
- Keep these instructions.
- Heed all warnings.
- Follow all instructions.
- Do not use this apparatus near water.
- Clean only with dry cloth.
- Do not block any ventilation openings. Install in accordance with the manufacturer's instructions.
- Do not install near any heat sources such as radiators, heat registers, stoves, or other apparatus (including amplifiers) that produce heat.
- Do not defeat the safety purpose of the polarized or grounding-type plug. A polarized plug has two blades with one wider than the other. A grounding type plug has two blades and a third grounding prong. The wide blade or the third prong are provided for your safety. If the provided plug does not fit into your outlet, consult an electrician for replacement of the obsolete outlet.
- Protect the power cord from being walked on or pinched particularly at plugs, convenience receptacles, and the point where they exit from the apparatus.
-
Only use attachments/accessories specified by the manufacturer.
-
Use only with the cart, stand, tripod, bracket, or table specified by the manufacturer, or sold with the apparatus. When a cart is used, use caution when moving the cart/apparatus combination to avoid injury from tip-over.
- Unplug this apparatus during lightning storms or when unused for long periods of time.
- Refer all servicing to qualified service personnel. Servicing is required when the apparatus has been damaged in any way, such as power-supply cord or plug is damaged, liquid has been spilled or objects have fallen into the apparatus, the apparatus has been exposed to rain or moisture, does n has been dropped.
- Batteries shall not be exposed to excessive heat such as sunshine, fire or the like.

ENGLISH
FRANCAIS ITALIANO ESPANOL NEDERLANDS SVENSKADEU
CAUTION: (English)
To completely disconnect this product from the mains, disconnect the plug from the wall socket outlet.
The mains plug is used to completely interrupt the power supply to the unit and must be within easy access by the user.
Do not expose batteries to excessive heat such as sunshine, fire or the like.
VORSICHT: (Deutsch)
The ventilation should not be impeded by covering the ventilation openings with items, such as newspapers, tablecloths, curtains, etc.
No naked flame sources, such as lighted candles, should be placed on the apparatus.
- Attention should be drawn to the environmental aspects of battery disposal
The apparatus shall not be exposed to dripping or splashing for use.
- No objects filled with liquids, such as vases, shall be placed on the apparatus.
- DECLARATION OF CONFORMITY (English)
We declare under our sole responsibility that this product, to which this declaration relates, is in conformity with the following standards:
EN60065, EN55013, EN55020, EN61000-3-2 and EN61000-3-3.
Following the provisions of Low Voltage Directive 2006/95/EC and EMC Directive 2004/108/ EC, the EC regulation 1275/2008 and its frame work Directive 2009/125/EC for Energy-related Products (ERP).
A NOTE ABOUT RECYCLING:
This product's packaging materials are recyclable and can be reused. Please dispose of any materials in accordance with the local recycling regulations.
When discarding the unit, comply with legal rules or regulations.
Batteries should never be thrown away or incinerated but disposed of in accordance with the local regulations concerning battery disposal.
This product and the supplied accessories, excluding the batteries, constitute the applicable product according to the WEEE directive.
HINWEIS ZUM RECYCLING:
CAUTIONS ON INSTALLATION
LOW (plage basset: -15 + 15 dB
4 stérel8 monaural) 24 bits.
e. : 44,1/48/96 kHz
USBB
(1: masse, 2: point chaud,
3:pointfroid
Segment avancé de
surrechantillonnage 32 bits.
128 fois
supérieure à 600 Ω
+4dBuMax+24dBu
20Hz-20kHz(±0.5dB)
féféure à 0,05 %
[KHz]


Brand : DENON
Model : DNX600
Category : Mixer