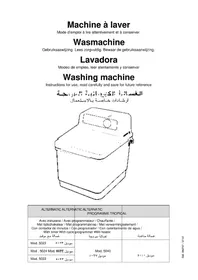
5023 - Washing machine CALOR - Free user manual and instructions
Find the device manual for free 5023 CALOR in PDF.
User questions about 5023 CALOR
0 question about this device. Answer the ones you know or ask your own.
Ask a new question about this device
Download the instructions for your Washing machine in PDF format for free! Find your manual 5023 - CALOR and take your electronic device back in hand. On this page are published all the documents necessary for the use of your device. 5023 by CALOR.
USER MANUAL 5023 CALOR
Instructions for use, read carefully and save for future reference

| ALTERNATIC ALTERN | ATIC ALTERNATIC PROGRAMME TROPICAL | |
| Avec minuterie / Avec pro met tijschakelaar / Met pro Con contador de Minutes / Con With timer With cycle | programmateur / Chauffante / programmaknop / Met verwarming selement / con programador / Con calentamie programmer With heater | selen/te to de agua / ti#i#te |
| Mod. 5023 | Mod. 5040 | # • • • • |
| Mod. 5024 Mod. 5027 | ||
| Mod. 5033 |
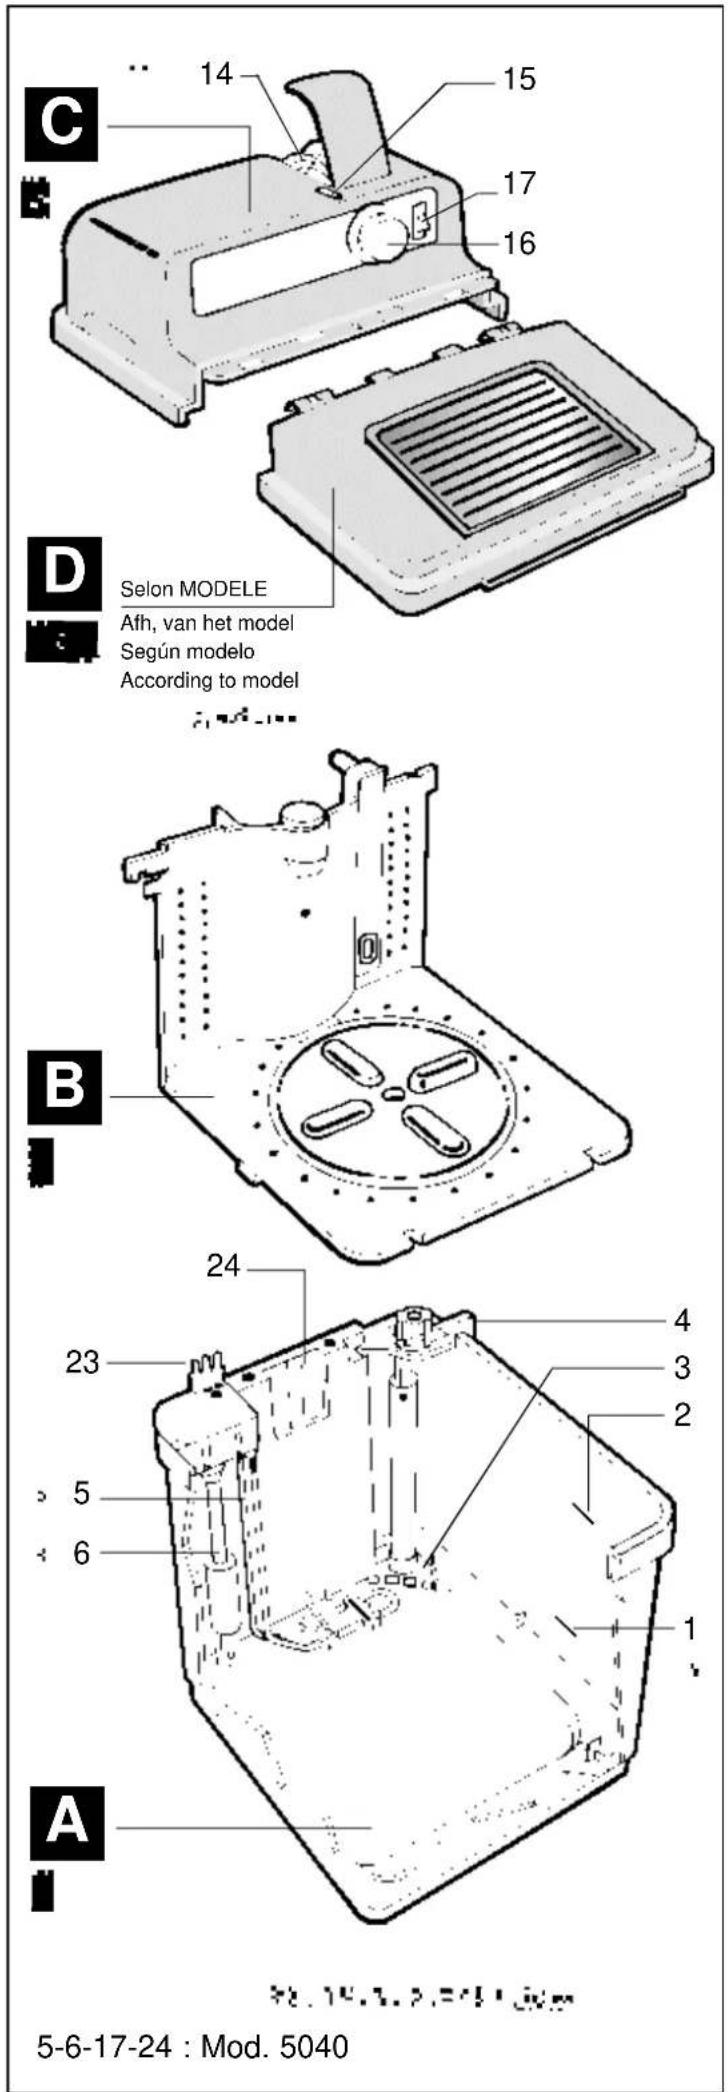
A. UNE CUVE EN PLASTIQUE
- Low-water mark
- High-water mark
- Drain hole
- Drain Handle
- Heater (according to model)
- Floater (according to model)
- Prongs (according to model)
- Drain Opening (according to model)
B. AN EASY-TO-REMOVE WASHER UNIT
- Roller Track
- Rotor Plate
- Roller Ring
10.Rotor - Partition
- Drive Shaft
- Drive Shaft Funnel
- Pinion
C.A MOTOR UNIT
- Power Cord Storage Cassette
- Timer Display or Programmer Display (according to model)
- Timer or Programmer Knob (according to model)
- On/Off Switch (according to model)
- Drive gear
- Pegs (two at the back)
- Tab (one at the front)
- Electric connector (according to model)
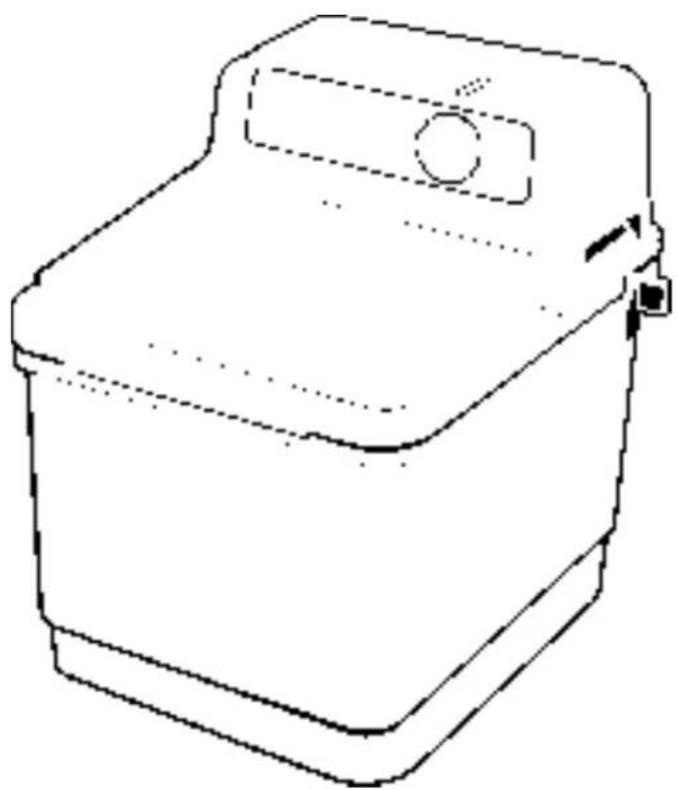
D. LID WITH VIEWING WINDOW
(according to model)
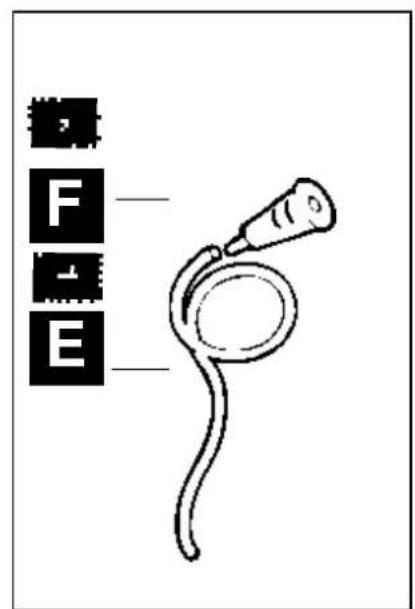
E. FILL HOSE with
F. FILL HOSE END-PIECE

Model 50.40 Alternatic Tropical
40^ C = bonte was en tere synthetische weefsels.
60^ = bonte was en stevige synthetische weefsels.
7 - MEERDERE WASBEURTEN NA ELKAAR
- Modellen 50.23, 50.24, 50.33, 50.40.
1 - DESCRIPTION (see exploded view) :
Your machine is composed of:
A plastic tub (A) which has:
- two water level marks: the low water mark (1) indicates the lowest acceptable water level for any size load (always fill to this mark even if the load is small) and the high water mark (2) indicates the highest level (water plus laundry) to which the machine may be filled. It is important to use the right proportion of water for the amount of laundry otherwise the laundry may not be agitated vigorously enough,
- a drain orifice (3) at the bottom right of the machine to drain water from the tub,
- an emptying system controlled by a drain handle (4) on the top right of the machine.
In addition, on Model 50.40: A heater (5) on the left of the machine with a three-prong plug, an overheat switch and a floater to prevent heater operation when the water level in the tub is too low
- An opening at the top centre of the machine to discharge water during rinsing.
A motor unit (C), which has:
- a motor with overheat protection that stops the motor in case of accident, overheating or incorrect positioning; the motor will start once parts have cooled (which may take up to 15 minutes),
- a power cord storage cassette.
In addition, on Models 50.23, 50.24, 50.33 and 50.40:
- a timer (16) and timer display (15) to automatically stop the machine after the desired wash time.
On model 50.40:
- an ON/OFF switch (17) for the heater.
On Model 50.27:
- an automatic programmer (16) and programmer display (15) to select any of three wash cycles.
- pre-wash; - soak or; - wash and single, double or triple rinse; the machine stops automatically once the selected cycle is complete.
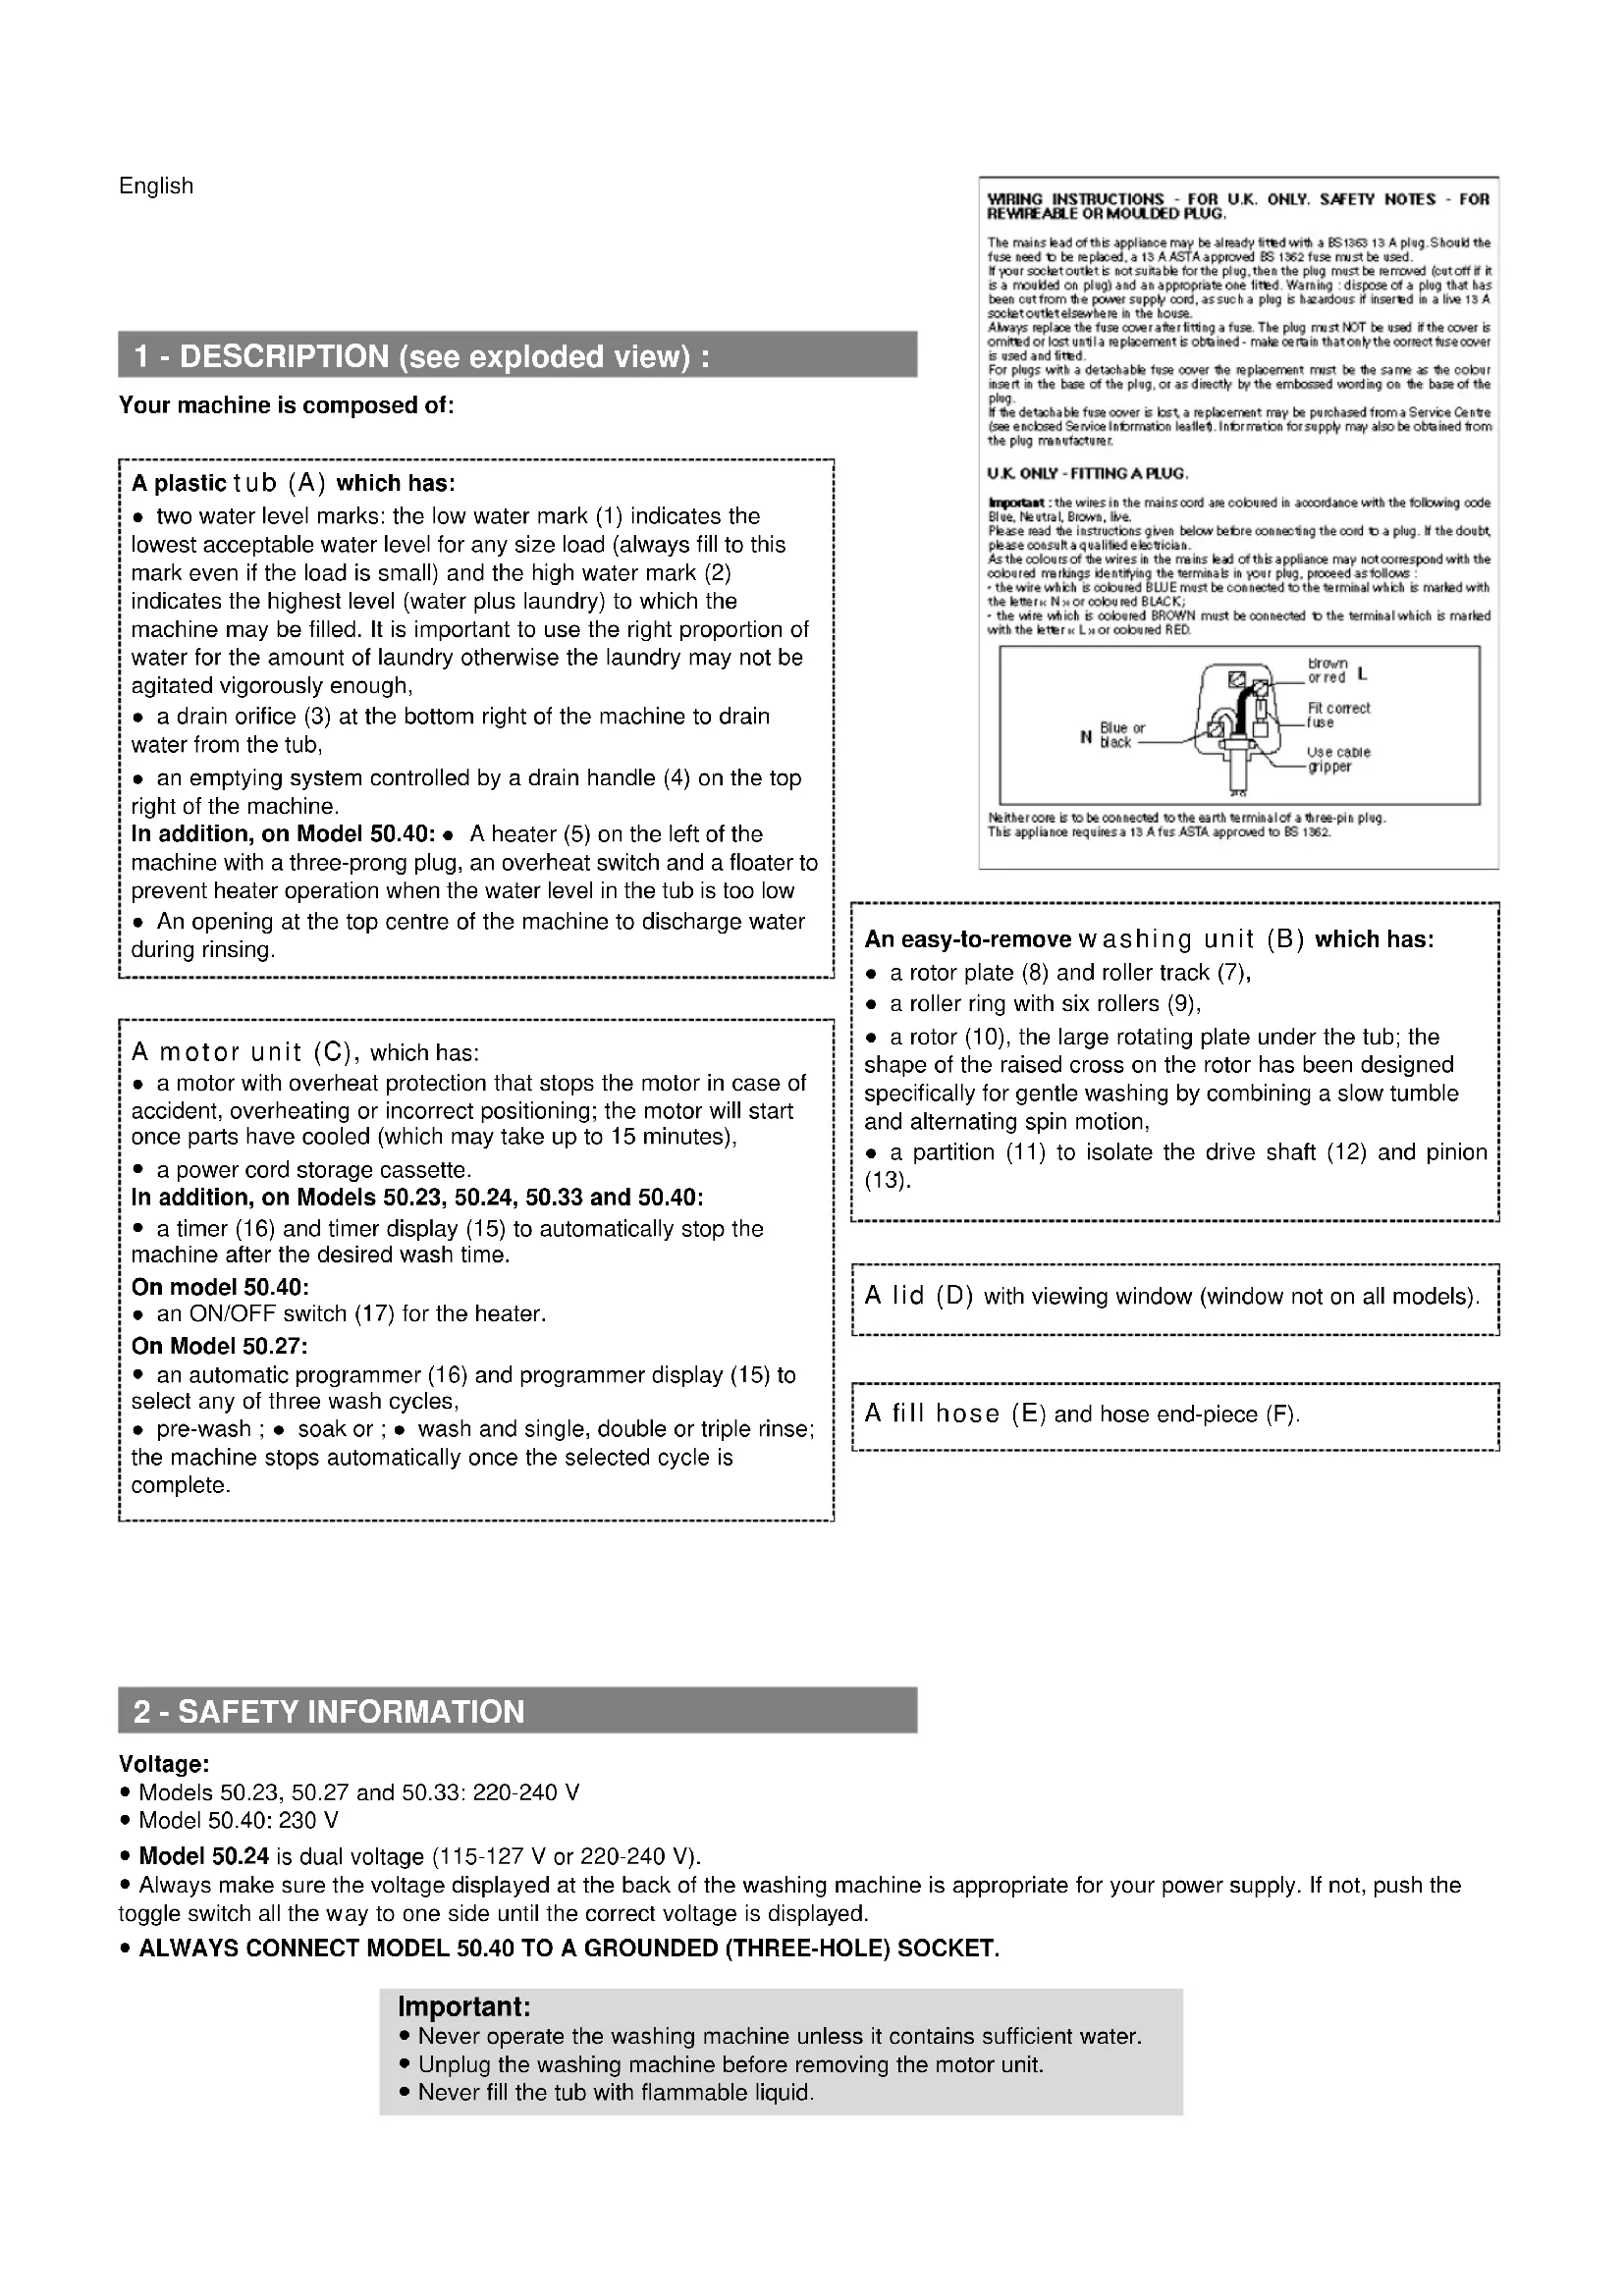
WIRING INSTRUCTIONS - FOR U.K. ONLY. SAFETY NOTES - FOR REWIREABLE OR MOULDED PLUG.
The mains lead of this appliance may be already fitted with a BS 1363 13 A plug. Should the fuse need to be replaced, a 13 A ASTA approved BS 1362 fuse must be used. If your socketlet is not suitable for the plug, then the plug must be removed (cut off if it is a moulded on plug) and an appropriate one fitted. Warning: dispose of a plug that has been cut from the power supply cord, as such a plug is hazardous if inserted in a live 13 A socketlet elsewhere in the house.
Always replace the fuse cover after fitting a fuse. The plug must NOT be used if the cover is omitted or lost until a replacement is obtained - make certain that only the correct fuse cover is used and fitted.
For plugs with a detachable fuse cover the replacement must be the same as the colour insert in the base of the plug, or as directly by the embossed wording on the base of the plug.
If the detachable fuse cover is lost, a replacement may be purchased from a Service Centre (see enclosed Service Information leaflet). Information for supply may also be obtained from the plug manufacturer.
U.K. ONLY-FITTING A PLUG.
Important: the wines in the main cold are coloured in accordance with the following code: Blue, Neutral, Brown, Live
Please read the instructions given below before connecting the cord to a plug. If the doubt, please consult a qualified electrician.
As the colours of the wires in the mains lead of this appliance may not correspond with the coloured markings identifying the terminals in your plug, proceed as follows: -the wire which is coloured BLUE must be connected to the terminal which is marked with the letter N_X or colour black.
the wine which is coloured BROWN must be coaxed to the terminal which is marked with the letter K L or coloured RED.

Nethercore is to be connected to the earth terminal of a three-pin plug. This appliance requires a 13 A fes ASTA approved to BS 1636.
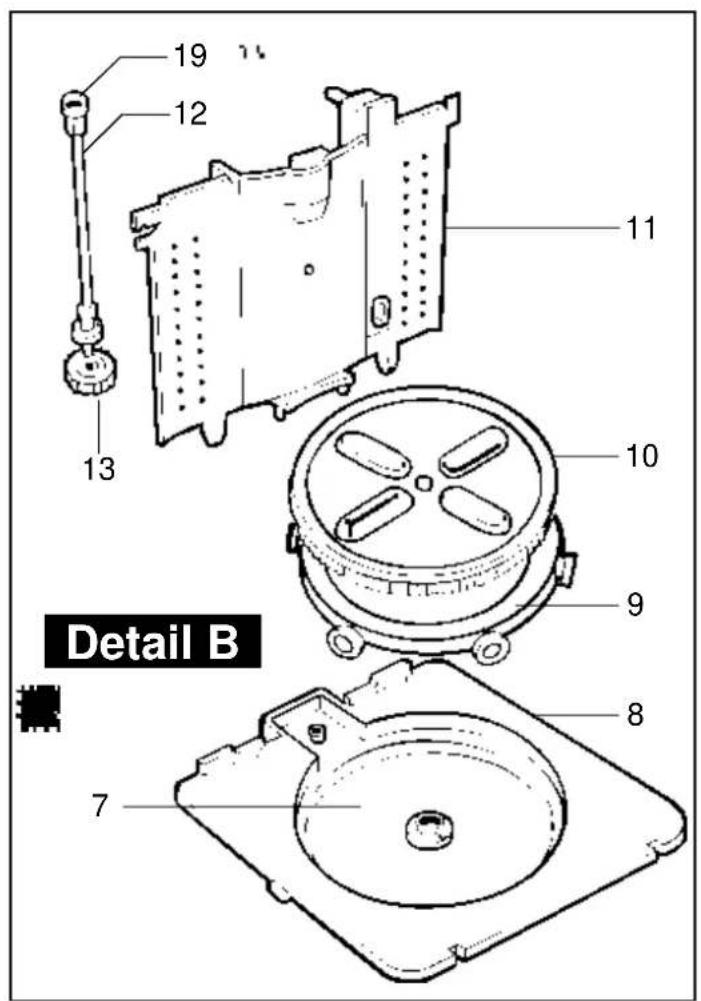
An easy-to-remove washing unit (B) which has:
- a rotor plate (8) and roller track (7),
a roller ring with six rollers (9), - a rotor (10), the large rotating plate under the tub; the shape of the raised cross on the rotor has been designed specifically for gentle washing by combining a slow tumble and alternating spin motion,
- a partition (11) to isolate the drive shaft (12) and pinion (13).
A lid (D) with viewing window (window not on all models).
A fill hose (E) and hose end-piece (F).
2 - SAFETY INFORMATION
Voltage:
- Models 50.23, 50.27 and 50.33: 220-240 V
- Model 50.40:230 V
- Model 50.24 is dual voltage (115-127 V or 220-240 V).
- Always make sure the voltage displayed at the back of the washing machine is appropriate for your power supply. If not, push the toggle switch all the way to one side until the correct voltage is displayed.
- ALWAYS CONNECT MODEL 50.40 TO A GROUNDED (THREE-HOLE) SOCKET.
Important:
- Never operate the washing machine unless it contains sufficient water.
- Unplug the washing machine before removing the motor unit.
- Never fill the tub with flammable liquid.
3 - BEFORE FIRST USE
Caution: Never operate your washing machine unless it contains enough water
- Place the machine in a sink or on a shower base and make sure the drain hole on the right under the tub is not obstructed. Check that the drain water will not splash outside the sink or shower.
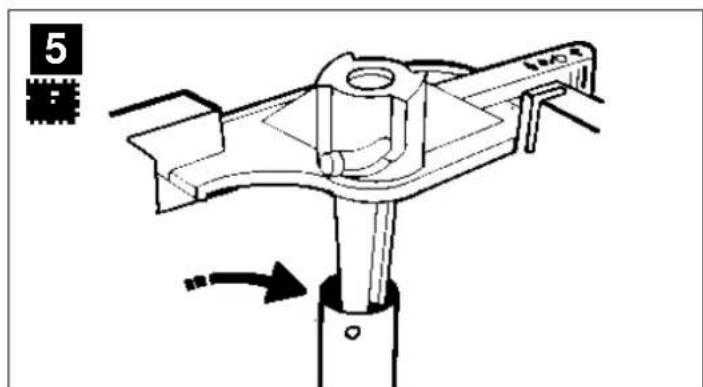
- Make sure the washer unit is correctly installed. Both pins on the front of the rotor plate should be inserted in the corresponding notches.
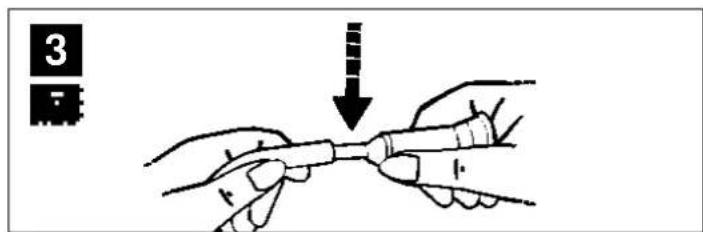
- Connect the fill hose (E) on the inlet (Drawing 2) located next to the drain handle (4). Place the end-fitting (F) on the other end of the hose (See drawing 3).
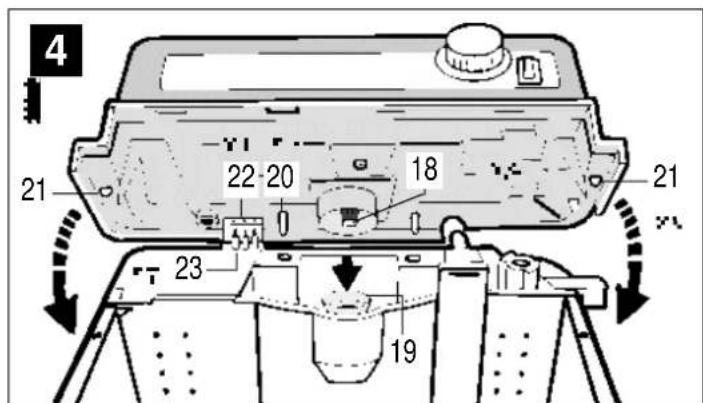
- Place the motor unit on the tub. Make sure the drive gear (18) from the motor shaft is inserted in the drive shaft funnel (19). Check also that both pegs at the back (20) and the tab at the front (21) are inserted in the corresponding holes in the tub (See drawing 3).
Model 50.40
- Insert the three prongs (23) into the motor unit connector (22). You will need to push against the back of the motor unit to slide on the connector (See drawing 4).
4 - PREPARING LAUNDRY
- Sort clothes according to colour and type of fabric.
For example separate them into different loads:
- delicate fabric and wool,
- white and colourfast fabrics,
- non-colourfast fabrics.
Thick white and colourfast fabric should be soaked before washing in the machine.
- Your machine is designed to wash up to 2kg of laundry. We have listed the approximate weights of typical laundry items below to help you determine the correct quantity per load:
- Handkerchief 25 to 50 g
- Pair of socks or briefs 50 to 75 g
T-shirt, small face towel or child's pinafore 75 to 100 g - Dishcloth, bathroom towel or child's dress and pinafore 100 to 150 g
Cotton blouse, dinner napkin or night-gown 150 to 200 g - Man's shirt, child's pyjamas or large bath towel 200 to 300 g
Woman's overalls 300 to 400 g
Man's pyjamas or large cotton overalls 400 to 500 g - Small (160 x 160 cm) linen tablecloth 500 to 600 g
Man's overalls or work cloths 600 to 700 g
Remember that very dirty clothes will need two full wash cycles.
USE
5 - WATER TEMPERATURE
- You can add water at any temperature (including boiling water) to your washing machine unless you have a Model 50.40. In that case, add cold water only.
Water temperature should be selected based on the type of fibres in the laundry to be washed and on the instructions printed on your box of laundry detergent.
Model 50.40 - Tropical Heated Model
The water heater system can heat wash water to between about 20^ and 60^ .
1 - Select the wash water temperature based on the instructions on the control panel:
30^ for delicate fabrics and wool
40^ for delicate colours and synthetics
60^ for colourfast and resistant synthetics
Heating water to 60^ will take from 30 minutes, for minimum water volume, to about 50 minutes, for maximum water volume.
2 - If you feel that the water temperature is high enough, just switch off the heater.
Safety: the floater will interrupt heater power if the water level in the tub is too low. The temperature controller in the heater (5) will keep temperature from exceeding 70^ if you forget to turn off the heater.
6 - WASHING
USEFUL TIPS
- Make sure the drain handle is in the position (See drawing 2)
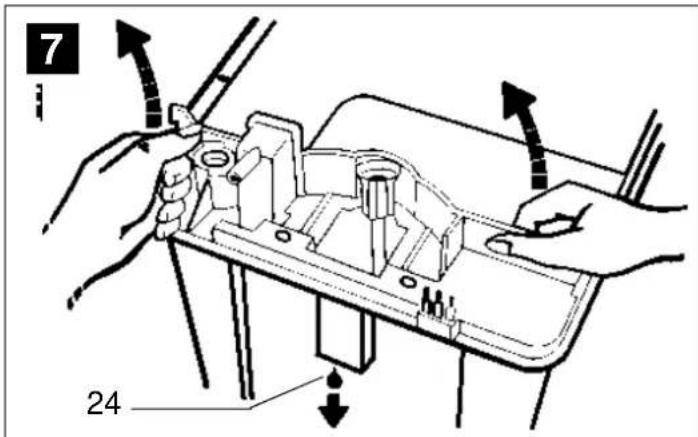
- Fill the tub to the desired level. Remember, never fill to below the low water mark, even for small loads, or above the high water mark for 2kg of laundry. Your washing machine has an overflow system in case you forget to turn off the water (See drawing 5 for all models except Model 50.40: Drawing 7 No. 24).
- Add detergent: Use one to two cups depending on the size of the load and condition of items to be washed.
- If you have more than 2kg of laundry, always wash in several loads rather than overloading the machine. Your clothes will come out cleaner.
CAUTION:
If you live near a beach, avoid putting sandy clothes in the machine. Rinse the tub and washing unit regularly to remove any sand before it can damage your washing machine.
Note:
If you want to interrupt the washing cycle, rotate the knob to the 0 position. The machine may not stop immediately. The motor may continue operating for up to 20 seconds to complete a cycle.
STARTING THE WASHING MACHINE
- Model 50.24 and 50.33 Alternatic
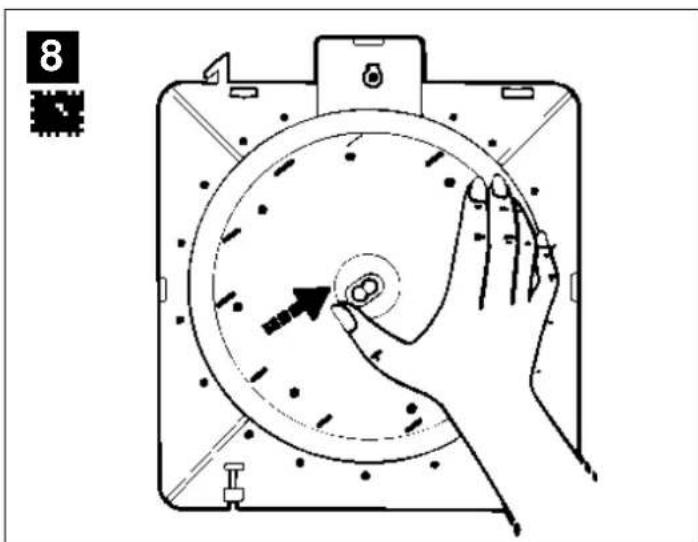
Turn the timer button (16) in the direction shown by the arrow until the motor starts.
In case of error, never turn the knob back. Turn it one full turn and start again.
- Model 50.27 and 50.33 Programmer Alternatic
Set the programmer button (16) to pre-wash and the machine will start automatically.
The programmer knob may be turned forward or backward.
- Model 50.40 Tropical Alternatic
Switch on the heater. Once the water has reached the desired temperature, turn the timer button in the direction of the arrow and the machine will start automatically.
In case of error, never turn the knob back. Turn it one full turn and start again.
- Put the items of laundry into the tub one by one. Each item should be completely submerged.
Close the washing machine lid (D).
PROGRAMMING THE WASH CYCLE
- Model 50.23, 50.33 and 50.40
-
Turn the timer until the desired number of minutes of washing time is displayed on the timer display (15).
-
The machine will stop automatically after the selected washing time. There is no need to keep track of the time, but it is not advisable to leave your machine completely unsupervised.
-
Make sure nothing interferes with operation of the washing unit until you hear the click of the timer, which stops the motor after the selected washing time.
Model 50.27
-
Select the desired washing cycle (1, 2 or 3) and start the machine.
-
You can stop the machine at any time. If you want to perform all three cycles in order, the machine will operate automatically for 17 minutes. After the end of the program, you will be able to drain the machine manually.
7 - SUCESSIVE LOADS
Models 50.23, 50.24, 50.33 and 50.40
You can wash several loads of laundry in the same water. Add water if necessary to change the water temperature. You may also add more detergent if necessary.
8 - DRAINING THE MACHINE
- You should drain the machine before you rinse your laundry.
You may start the rinse function when: - Models 50.23, 50.24 and 50.33: The wash cycle is completed (the timer has clicked)
- Model 50.27: The knob is on the manual drain position
- Model 50.40: The wash cycle is completed. Switch off the heater switch (17).
- Draining the Machine
- Pull the drain handle (4) up slightly and push to the right () position (See drawing 2)
This will open the drain orifice and let the machine drain. If the machine is on a sink drain board, you may want to adjust drain flow by setting the drain handle to an intermediate position between and to prevent splashing.
9 - RINSING
- Push the drain handle (4) to the left () position (See drawing 1) to stop draining.
- We recommend that you use the fill hose to add the rinse water. This is a fast, convenient and easy method.
- Once the tub is full, the rinse water will come out the overflow (See drawing 5 for Models 50.23, 50.24, 50.27 and 50.33 or drawing 7 No. 24 for Model 50.40)
- Your clothes will be rinsed when the overflow water is clear.
You can then drain the machine.
Model 50.27
There are three rinse programs available: single, double or triple rinse cycle.
- Set the programme knob to the desired rinse duration (There is a two-minute pause between each rinse; the total duration for three rinse cycles is 16 minutes).
You may start the rinse program on any of the three rinse programmes, stop the machine at any time during a cycle and even skip a rinse cycle.
10 - STORAGE
If you plan to store the washing machine in a cupboard, first make sure all the water has been drained and then:
- Remove the lid (D),
- Store the power cord in the power cord cassette (14),
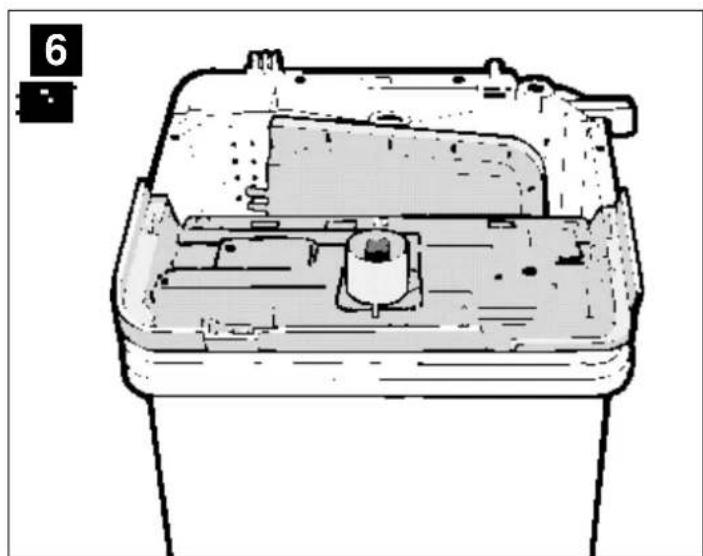
- Turn the motor unit upside down and put it in the tub as shown in drawing 6.
- Slide the cover into the tub (see drawing 6).
The washing machine will now take up less storage space.
11 - MAINTENANCE - CLEANING
Never perform maintenance or clean the washing machine when it is plugged in or still warm after washing. You new washing machine requires very little care. Just rinse the washing unit components and tub with tap water.
- Dismantling and Cleaning the Washing Unit
-
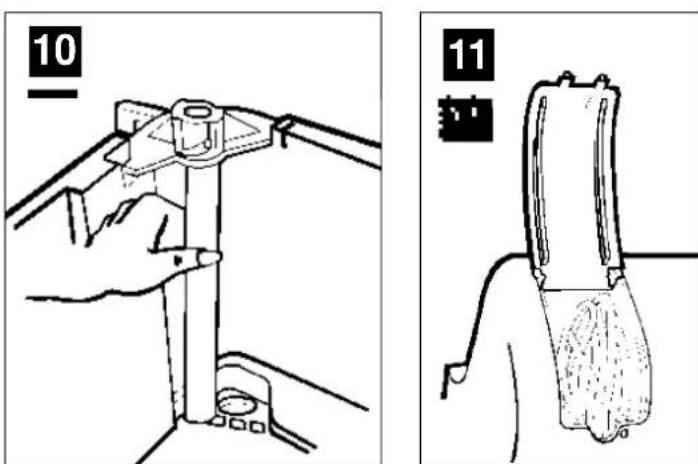
Pinch the left tab in the partition (11) as shown in drawing 7 and lift out the washing unit. Turn it upside down.
-
Push against the plastic clip under the rotor plate as shown in drawing 8. This will separate the rotor plate (10), the roller ring (9) and roller track (7).
-
Remove all fluff that may have been trapped on the components and rinse them with tap water.
It will often be sufficient to remove only the rotor plate, however it may also be necessary to:
-
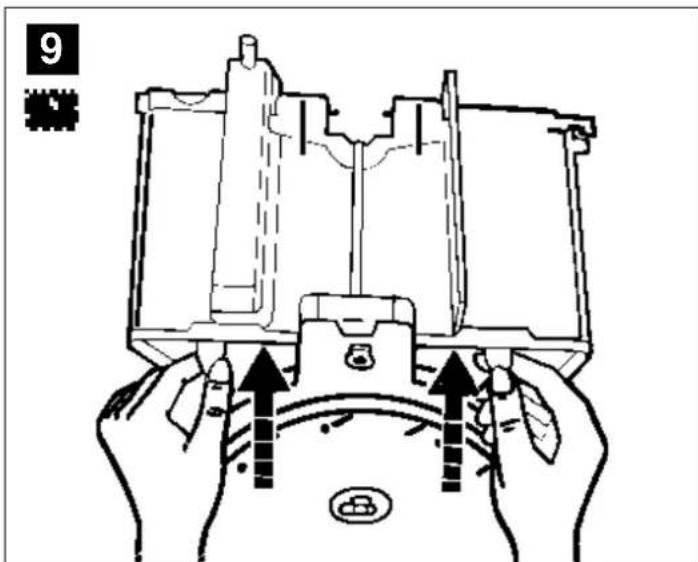
make sure that no threads are wound around the pinion. If threads are present but are difficult to remove, pinch both bottom tabs to allow separation of the partition from the rotor plate (See drawing 9) and remove the drive shaft (12).
-
Reinsert the drive shaft all the way into the bearing and assemble the partition. Make sure both partition tabs are secured into the rotor plate.
-
Place the roller ring and then the rotor plate on the roller track. Assemble them using the plastic clip under the rotor plate.
- Reassembling the Washing Unit
Replace the washing unit inside the tub and clip the partition to the tub.
- Motor Unit
Never remove the motor unit. It requires no maintenance or lubrication.
- Cleaning the Tub
- Make sure that no threads are trapped in the drain hole to keep your machine completely leak-tight. You can get access to the hole by lifting the hose (drawing 10).
Model 50.40
- Once the heater is cool, check it to make sure no fluff is stuck to it. Be careful not to damage the heater or to move the two heater supports. Never remove the heater or the floater, otherwise your washing machine may no longer be safe to operate.
- Remove all fluff that may have been trapped by these components and rinse them with tap water.
IMPORTANT
If the motor stops operating at any time during operation (power failure, fuse or circuit-breaker tripped, plug pulled out, failure of a safety feature, or other reason), take the laundry items out of the tub (particularly if the machine is full) and let the machine finish the 20 second cycle empty.
If you replace the power cord at any time, always use the following:
Models 50.23, 50.24, 50.33, 50.27:
H 05 VVH 2F 2 x 0.75 mm²
Model 50.40: H 05 VV F 3 x 1 mm²