CD7657 - Car stereo Renkforce - Free user manual and instructions
Find the device manual for free CD7657 Renkforce in PDF.
| Product type | Car stereo with CD player, FM radio, USB, SD/MMC card |
| Brand | Renkforce |
| Model | CD7657 |
| Mounting dimensions | 182 x 53 mm (standard DIN) |
| Mounting depth | 180 mm |
| Weight | 1.2 kg |
| Power supply | 12 V DC (on-board network, negative to chassis) |
| Fuse | 10 A (car blade fuse) |
| Max current consumption | 10 A |
| Output power | 4 x 40 W max. |
| Speaker impedance | 4 to 8 ohms |
| Radio reception | FM 87.5-108.0 MHz, RDS, PLL tuner |
| Preset stations | 18 (3 bands x 6 stations) |
| Supported audio formats | Audio CD, CD-R/RW, MP3, MP3 files via USB/SD |
| Interfaces | USB (max 16 GB, 500 mA), SD/MMC card reader (max 16 GB, FAT32), AUX IN (3.5 mm jack), LINE outputs (RCA) |
| Connector | ISO (connector A for power, B for speakers) |
| Special functions | RDS (AF, TA, PTY, EON), RDS clock, bass/treble/balance/fader adjustment, Loudness function, DSP (Flat/Pop/Rock/Classic), detachable faceplate |
| Display | Alphanumeric DOT-Matrix LCD screen, ID3 display for MP3 |
| Maintenance | Clean with a dry, soft cloth. Do not use harsh detergents. |
| Repairability | Repairs by a qualified technician. User-replaceable fuse (10 A, blade). |
| Safety | Disconnect battery before installation. Use only on 12 V system with negative ground. Do not open the case (risk of laser and electric shock). |
| Package contents | Car stereo, mounting sleeve, release keys, detachable faceplate, faceplate case, mounting hardware, user manual. |
Frequently Asked Questions - CD7657 Renkforce
User questions about CD7657 Renkforce
0 question about this device. Answer the ones you know or ask your own.
Ask a new question about this device
Download the instructions for your Car stereo in PDF format for free! Find your manual CD7657 - Renkforce and take your electronic device back in hand. On this page are published all the documents necessary for the use of your device. CD7657 by Renkforce.
USER MANUAL CD7657 Renkforce
These operating instructions are a publication by Corrad Electronic SE, Klaus-Corrad-S1, D-92240 Hirschau (www.ceram.com). All rights including translation reserved. Reproduction by any method, e.g. photopolymer, microfilm, or the capture in electronic data processing systems requires the prior written approval by the editor. Reprintings also in part, is prohibited. These operating instructions represent the technical status at the time of printing. Changes in technology and equipment reserved.
Copyright 2011 by Conrad Electronic SE.
F Information legales
Copyright 2011 by Conrad Electronic SE.
N Colofon
Deze bepnuanaanang jin e pubicane van de tma Contral Eneon SCAus-Contr-1D.D2420 Hinschau (wond comr).
Ae rchter, vahing nepeepen, boenoeutner. Repreductions van wae stand dan ook, xiecoedrol biopieke. microwerifing of de registatie in elektronische gepeveerwerkingapparatur, venation de activitie lsteitering der do angevier. Kaunik, ook van ultraseps, venoader.
Programm Identification (PI)
- Stationstasten 1-6 (4)
Installation Position 41
Removing and Replacing the Front Control Panel 42
Installation in the Radio Slot 43
Removal 44
Electric Connection 45
Connecting the Speakers and the Power Supply 46
Connecting the Aerial 47
Connecting the LINE Outputs 48
AUX IN Connection 48
Operation 49
General Operation 49
Menu Settings 52
Radio Mode 54
CD Operation 59
USB/Memory Card Operation 61
Maintenance 62
Handling 63
Disposal 63
Troubleshooting 63
Technical Data 65
Introduction
Dear Customer,
Thank you for purchasing this product.
This product complies with the national and European legal requirements. We kindly request the user to follow the operating instructions, to preserve this condition and to ensure safe operation!
These operating instructions relate to this product. They contain important information concerning commissioning and handling. Please bear this in mind when passing on the product to a third party. Keep these operating instructions for future reference!
All company names and product names are trademarks of the respective owner. All rights reserved.

Fon. +49 9604 / 40 88 80
Fax +49 9604/40 88 48
e-mail: tkb@conrad.de
Mon to Thurs 8.00am to 4.30pm
Fri 8.00am to 2.00pm
Intended Use
With the Renkforce CD-7657 CD Tuner you can receive radio programmes in vehicles, play audio CDs and audio data from suitable media and amplify the audio signals.
The CD Tuner must be connected to speakers.
This product is only approved for the connection to 12 V direct current on-board networks with the negative pole of the battery to the car body. The product may only be installed and operated in vehicles with this kind of on-board voltage.
The user must make sure that the way the product is installed protects the product from humidity and wetness.
Any use other than that described above can damage the product and may involve additional risks such as short circuits, fire and electric shocks.
No part of the product may be modified or rebuilt, and the housing must not be opened.

Observe all safety instructions in these operating instructions!
Symbols

The exclamation mark symbol on the device indicates that the user should read these operating instructions prior to using the product.

The "Hand" symbol indicates special advice and operating information.

In case of damage caused by non-compliance with these safety instructions, the warranty/ guarantee will become void. We do not assume any responsibility for consequential damage!
Nor do we assume any liability for damage to property or personal injury caused by improper use or failure to observe the safety notices. In such cases the guarantee/warranty will be void.

- The unauthorized conversion and/or modification of the product is inadmissible because of safety and approval reasons.
- The device may only be used with the 12 V DC vehicle power supply (with the negative terminal of the battery connected to the body of the vehicle). Never connect the device to a different power supply.
- The device must be set up correctly. Please also follow these operating instructions.
- When the product is opened or the safety circuit is jumpered, invisible laser radiation may be emitted. Caution - if proceeding in a different way or using any other controls than those specified in this manual, you may expose yourself to hazardous radiation.
- This product is not a toy and should be kept out of the reach of children! Children cannot judge the dangers involved when handling electrical devices.
- Do not expose the device to any high temperatures, dripping or splashing water, strong vibrations or heavy mechanical stress.
- Do not operate the device unattended.
- Do not leave packaging material unattended. It may become a dangerous toy for children.
- Comply with the safety and operating instructions of any other appliances that are connected to the device.
- If you are not sure about the correct connection or if there are any questions that are not covered by the operating instructions, do not hesitate to contact our technical support or another specialist.
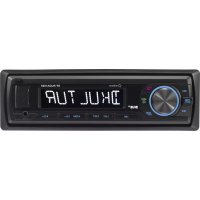
Operating Controls

Operating Instructions
English
Operating Controls
(1) Button
(2) SELECT button
(3)VOLUME rotary control
(4) Station buttons 1-6
(5) AF (ALTERNATIVE FREQUENCY) button
(6) TA (TRAFFIC ANNOUNCEMENT) button
(7) PTY (PROGRAMME TYPE) button
(8) DISP (DISPLAY) button
(9) MODE button
(10) BD/LD button
(11) and buttons
(12) AS/PS button (AUTO SEEK/PROGRAMME SEEK)
(13) SCAN key
(14) MUTE key
(15) LC display
(16) Button
(17) CD slot
(18) Button
(19) PAU (PAUSE) button
(20) RPT (REPEAT) button
(21) INT (INTRO) button
(22) RDM (RANDOM) button
(23) Track -10 button (only for MP3 replay)
(24) Track +10 button (only for MP3 replay)
(25) USB interface
(26) Memory card reader
(27) AUX Connection
Product Description
This product is equipped with a removable front control panel, an FM stereo radio unit, a USB interface, an MMC/ SD card reader and a CD/CD-R/CD-RW/MP3-player with the following features:
High output (4 x 40 W max.)
- Preamp output for the connection of a power amplifier
- Front AUX for connecting external audio sources
- Electronic volume, bass, treble, fader and balance control
- Digital signal processor for the adaptation of the sound characteristics to various music styles
- Loudness correction
FM-tuner with RDS-function
- Exact electronic tuning of the stations with a PLL-tuner
18 programmable station memories
- Manual/automatic station scan in both directions
Automatic station storage/programme memory search
- Electronic suppression of vibrations to prevent interruptions in CD-replay
- Alphanumeric DOT-matrix display
ID3-day display for MP3-replay
Time setting by means of the RDS system
ISO terminal
Mechanical Installation
In most vehicles the producers plan an installation cut-out for the car radio. The choice of the location depends on safety aspects. Therefore we recommend that you actually install the radio in this place.
The CD tuner requires a DIN installation cut-out with the dimensions 182x53mm; these dimensions are standardized and usually the vehicle manufacturers comply with them.
Should there be no slot, please ask your car dealer about the correct place of installation for your car radio.

Please select the place of installation carefully so that the CD tuner neither influences the driver's activity nor distracts him from the traffic.
Only use the supplied installation material to guarantee a safe installation.
Any changes in the vehicle that become necessary for the installation of the CD tuner or other components must be carried out in such a way that neither traffic security nor the stability of the car are affected. With many cars, the type approval will lapse if you merely saw out a section of the sheet metal.
Since the CD tuner creates heat during operation, the place of installation must be heat-resistant.
Before drilling the attachment holes, make sure that no electric cables, brake lines, the fuel tank or similar are damaged.
When using tools to install your car hi-fi components, observe the manufacturer's safety instructions.
When installing the car hi-fi system, take into consideration the risk of accident which can arise from devices being torn away in the case of an accident. Therefore, you should secure every component in a place where it cannot be dangerous to passengers.

Before you install the system, check the depth of the installation recess.
Installation Position
The angle of installation to the horizontal must be under 20^ . A CD tuner that is inclined too much may cause problems when playing CDs.
Mechanical Installation
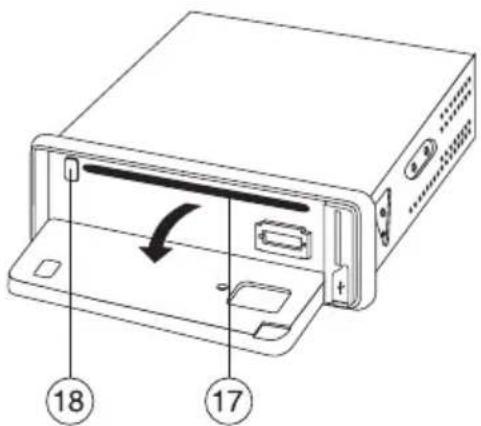
Removing and Replacing the Front Control Panel
The front control panel can be removed to prevent theft.
- Before you remove the front control panel, press the button (1) to turn the product off.
- Press the button (16) to fold down the operating panel.
- Press the operating panel to the left and unhook it from the holder on the right.
- Remove the front control panel and put it into the supplied protective cover.
- For replacing the control panel, place the left side into the holder as illustrated in the figure below (step 1) and press it slightly to the left.
- Then lock the right side of the operating panel in its holder (step 2).
- Fold up the operating panel again and slightly press the upper right side until it latches.
- Do not press on the display or the buttons.
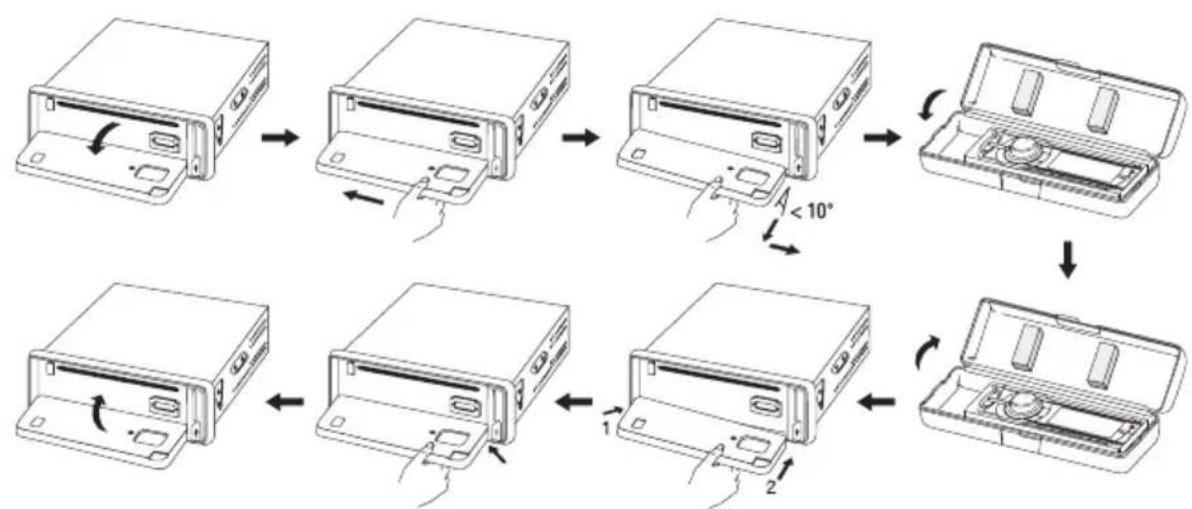

Make sure to insert the front control panel in the correct way.
Do not press the front against the unit too hard. It can be easily attached by pressing it slightly against the device at the upper right until it latches.
When you remove the front control panel, please put it into the supplied protective cover.
Mechanical Installation
Installation in the Radio Slot
- Remove the front control panel.
- Carefully remove the plastic frame in the front of the system by bending it slightly to the outside and pulling it off from the unit.

- Remove the two locking screws of the CD drive (fig. 1, no. 1).
- Unlock the installation frame with the two unlocking keys (fig. 1, no. 2).
- Remove the installation frame towards the back of the system (fig. 1, no. 3).
- Insert the frame into the respective cut-out in the vehicle (fig. 2).
- Bend down some clips in the installation frame until the frame is securely fastened in the recess.
- When you have made all the electrical contacts (see "Electric Connection") insert the CD tuner into the frame until it locks in (fig. 4).
- Attach the plastic frame to the front of the device again.

Keep the two unlocking keys. You will need them for a later removal of the CD tuner.
Mechanical Installation
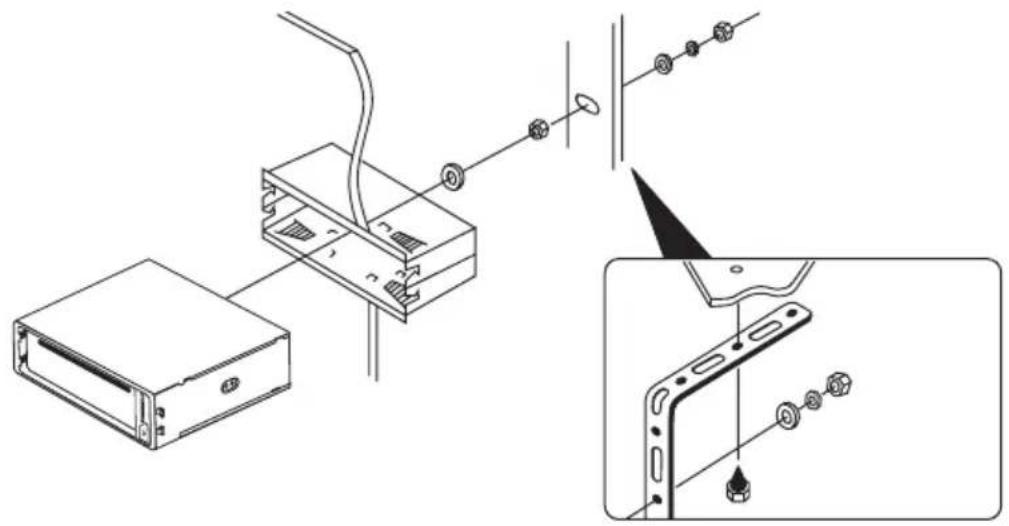
- Protect your CD tuner from vibrations with the bolt at the back of the unit.
- In most vehicles, such a safety fastening is provided for. If this is not the case in your car, fasten the CD tuner with the enclosed punched metal strip.
For the fastening, proceed as shown in the following figure.
Removal
- Remove the front control panel.
Carefully remove the plastic frame in the front of the system by bending it slightly to the outside and pulling it off from the unit. - Insert the two unlocking keys into the lateral slots between the CD tuner and the installation frame, until the CD tuner unlocks.
- Remove the fastening screw at the back of the unit.
- Carefully pull out the radio with the unlocking keys from the installation frame.
- Disconnect the ISO plug, the aerial plug and the LINE connections.

The electric connection should be made by a specialist.
To avoid short-circuits and resulting damage to the CD tuner, the negative pole (ground) of the vehicle battery must be disconnected during connection.
Only connect the negative pole of the battery when you have completely connected the system and checked the connections.
You should only use a voltmeter or a diode test lamp for checking the voltage on the on-board cables as normal test lamps consume excessive currents and can thus damage the electronic system of the car.
When laying the cables, make sure that they are not squeezed or scoured on sharp edges. Use rubber grommets for the feed-though points.
The line towards the speakers must be a bifilar cable. Insulate the bare wires at the connecting terminals. Ensure there are no sharp edges which could damage the cables.
Only use speakers with a sufficiently high load capacity (see „Technical Data").
Make sure that all speakers have the correct polarity, i.e. the plus and minus signs must match.
The connecting cables of the speakers are usually coded: Some speaker manufacturers indicate the (+) wire by means of an additional colour stripe, others use a corrugated cable for the (+) terminal and a smooth one for the (-) terminal.
The system was designed for the operation at speaker impedances of at least 4 Ohm. Never connect speakers with a lower impedance.

In most vehicles the cables for the electric connection and the connection of the speakers have been laid directly to the mounting slot.
If this is not the case, please make sure that any cables placed later are secured by the respective onboard fuses (see vehicle operation manual).
Electric Connection
Connecting the Speakers and the Power Supply
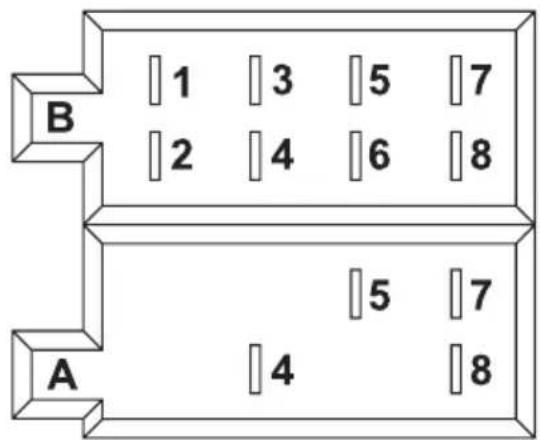
The CD tuner has an ISO system plug.
Vehicles equipped with such a system plug can be connected directly to the system if the plug assignment is the same (please check beforehand!). If the plug assignment differs, use a vehicle-specific adapter from a specialist vendor for connection.
Please refer to the following illustrations for the contact assignment of the CD tuner socket.
Please ask you car dealer for the respective assignment of your vehicle system plug.
System connector B (speaker connection)
(1) Speaker rear right (+)
(2) Speaker rear right (-)
(3) Speaker front right (+)
(4) Speaker front right (-)
(5) Speaker front left (+)
(6) Speaker front left (-)
(7) Speaker rear left (+)
(8) Speaker rear left (-)
System plug A (power supply)
(1) (Not assigned)
(2) (Not assigned)
(3) (Not assigned)
(4) Continuous current +12V
(5) Aerial control output
(6) (Not assigned)
(7) Ignition +12V
(8) Ground
Electric Connection
- The constant current terminal +12V (4) must be connected to a cable that also supplies 12V permanently when the ignition is off (terminal 30 of the on-board network). This terminal serves to save the user settings, time, etc.
- The aerial control output (5) supplies a voltage of +12V when the device is switched on. This cable can be used for the power supply of an electrical aerial, an amplifier aerial and for the voltage for switching on a performance amplifier.
- The ignition terminal +12V (7) must be connected to a cable that is only live with +12V when the ignition is on (terminal 15 of the on-board networks).

Do not connect this terminal to continuous current; otherwise the on-board battery could be discharged when the vehicle is parked for a longer period of time.
- Connect the ground connection (8) with the vehicle body.

Adhesive techniques which become ever more common and painted metal parts impair the electric conductivity. Therefore, not every metal part is a suitable grounding point.
Connecting the Aerial
- Connect the aerial plug of your vehicle with the aerial socket at the back of the radio (socket next to the LINE terminals).
- If your vehicle has a different aerial plug, please use a suitable adapter, available in specialist shops.
Connecting the LINE Outputs
The CD tuner has a LINE outputs for connecting a power amplifier.

For the connection of the cinch sockets only use the shielded cinch wires. The use of other cables might cause interferences.
Keep the distance of the cables as short as possible.
Do not place the cables near other cables to avoid interferences in the cables.
To avoid distortions or mismatches that could damage the unit, the cinch connector must only be connected to devices with the suitable cinch terminals. For this, observe also the connection data in the section "Technical Data".
- Connect the sockets LINE OUT on the back of the device with the inputs of a power amplifier.

The red socket is a terminal for the right channel
The white socket is a terminal for the left channel
AUX IN Connection
You can connect an external audio device (e.g. portable MP3 player) to the port AUX (27) whose signal is played back via the vehicle speakers.
- Connect the port AUX (27) with the audio output of the external device.
Operation

Do not turn on the device before you have read and understood these operating instructions.
Check all the connections again. When you have done so, reconnect the negative pole of the car battery.
General Operation
- Button (1)
This button switches the radio on and off.

To switch the CD tuner on, you can also press any other button.
- SELECT button (2) and VOLUME rotary control (3)
In standard operation, the VOLUME rotary control (3) is for setting the volume.
Press the SELECT button (2) once or several times to change the parameters BAS (bass control), TRB (treble control), BAL (balance control) and FAD (fader control) by turning the VOLUME rotary control (3).

- MODE Button (9)
With this you can select various audio sources. Every time the button is pressed, the radio switches to the next source: AUX > TUNER > CD > USB > SD

When one of the sources is not active, i.e. no medium inserted, this source will be skipped in the selection.
Operation
- LC Display (15)
The LC-display (15) shows all the information, depending on the audio source that is being played (radio, CD-player etc.).
DISP button (8)
With this button various information can be displayed on the LC display (15). Press the button once more to move to the next display.
When the button is not activated anymore, the display returns to the original information after a little while.
When an RDS station is being received
Radio operation: Station name > Time > Program type
CD-/MP3-player operation: Track display > Time > Station name > Transmission frequency > Program type
When no RDS station is being received
Radio operation: Transmission frequency > Time > PTY NONE
CD-/MP3-player operation: Track display > Time > Transmission frequency > PTY NONE
MUTE button (14)
This button activates the mute function.
Press the button if you want to interrupt the current playback for a short time, for example if you want to ask someone for the way.
To de-activate the mute function, press the MUTE button (14) again.
Operation
BD/LD button (10)
This button is used to switch the loudness function on/off.
Press and hold the button to trigger the loudness function:
LOUD ON: The loudness function is active.
LOUD OFF: The loudness function is inactive. The sound is not influenced.

At low volumes the human ear does not perceive very low and very high sounds well. An increase of the frequency range for low volume (loudness correction) counteracts this effect and the music replay sounds more natural.
- Bation (16)
Press this button to fold down the operating panel.
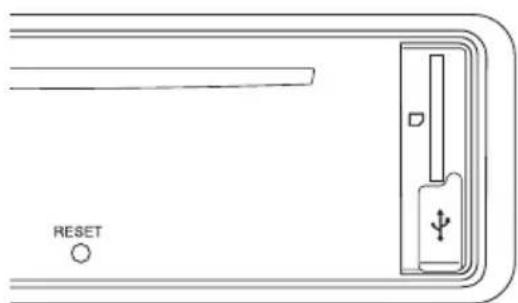
- RESET button
This button is behind the front cover and resets all the settings to the original settings that were made in the factory. Press this button in the following cases:
- when you have completed the installation and connection
- when the CD tuner does not react to the operation of buttons anymore
- when the display shows undefined characters
Menu Settings
- SELECT button (2) and VOLUME rotary control (3)
To select the menu settings, please press the SELECT button (2) a little longer (>2 seconds) and then press this button once more, but only very shortly, until the desired function appears on the display:
Choose the options for the respective settings by turning the VOLUME rotary control (3).
TA SEEK/ALARM
TA SEEK: When the radio has lost the traffic information, it will seek a new station with Traffic Announcement coding.
TA ALARM: When the radio cannot receive the TA code anymore, there will be an alarm signal.
PI SOUND/MUTE
Device reaction when a transmission area is reached where 2 different stations with different programme identification are transmitting the same AF (alternative frequency:
PI SOUND: The radio switches to the new station for a few seconds and then back.
PI MUTE: The new station is muted.
RETUNE S/L
RETUNE S: When the radio does not receive traffic announcements anymore, the auto-scan starts 30 seconds later.
RETUNE L: When the radio does not receive traffic announcements anymore, the auto-scan starts 90 seconds later.
MASK DPI/ALL
Device reaction during channel search:
MASK DPI: Alternative frequencies with different programme information (PI) are not considered.
MASK ALL: Alternative frequencies with different programme information (PI) and alternative frequencies with a high signal strength but without RDS information are not considered.
Operation
EON ON/OFF
Here you define whether the RDS-EON function is activated or deactivated (explanation see "RDS as reception concept" further down in this manual).
EON ON: The RDS-EON function is activated.
EON OFF: The RDS-EON function is deactivated.
BEEP ALL/OFF/2ND
BEEP ALL: Every activation of a button is confirmed by an audio signal.
BEEP OFF: The sound confirmation function is deactivated.
BEEP 2ND: The button confirmation sound only sounds when a button is pressed for a longer period to activate its additional function.
TAVOL
In case of traffic reports and activated TA function, the preset volume is selected where the volume set is lower.
Set the desired volume by turning the VOLUME rotary control (3).
ADJ (time settings)
Turn the VOLUME rotary control (3) clockwise to set the hours.
Turn the VOLUME rotary control (3) counter-clockwise to set the minutes.
This setting is applied automatically when the display returns to the basic setting.

When receiving an RDS station with time transmission, the clock adjusts automatically to the correct time and the manually set time is overwritten with the RDS time.
DSP
DSP OFF: The digital signal processor is switched off.
DSP FLAT: DSP is active, but there is no sound adaptation.
DSP POP: The sound characteristic is adapted to pop music.
DSP ROCK: The sound characteristic is adapted to rock music.
DSP CLAS: The sound characteristic is adapted to classical music.
Radio Mode
Receiving concept RDS
The abbreviation RDS stands for Radio Data System, i.e. inaudible, additional information codes are transmitted by the FM RDS station.
The CD tuner is able to evaluate these coded data that are transmitted by most of the radio stations.
The following important data is transmitted:
- Program Identification (PI)
- Traffic Program (TP)
- Traffic Announcement (TA)
- Program Service (PS)
- Alternative Frequencies (AF)
- Program Type (PTY)
- EON Information (enhanced other networks)
- Clock time (CT)
Program Identification (PI)
This information helps the receiver to identify a station. It enables the radio to differentiate between areas where the same programme is transmitted. The car radio only switches to a stronger station when the reception grows weaker if the stronger station transmits the same programme identification
Traffic Programme (TP)
This signal enables the receiver to detect that a station with a traffic programme is being received.
Traffic Announcement (TA)
With this signal the receiver can detect a traffic announcement and interrupt the current replay of a different audio source.
Operation
Program Service (PS)
This information tells the receiver which station it is receiving. It is directly displayed in the display of the car radio, e.g. BAYERN 3.
Alternative Frequencies (AF)
A list of alternative frequencies that send the same programme is transmitted. If the transmitter station currently received becomes too weak, the receiver detects from the AF signal on which frequencies it must search for a better transmitter.
Program Type (PTY)
This code gives the receiver information on the type of the transmitted programme (e.g. sports, classic, news etc.). The listener can select his favourite programme more directly.
A national disaster alarm can also be sent this way. However, not all the radio stations offer the PTY service.
EON Information
Many radio station chains with various programmes only have one programme with traffic information. If EON information is transmitted, a radio equipped with an EON function switches to the Traffic Announcement station whenever such announcements are made, even if a different programme of this chain is being played.
If you listen to Bayern 4 for example (no traffic announcement) and the TA button is activated, the radio will switch to Bayern 3 (with traffic announcements) for the time of a traffic announcement.
Clock time (CT)
Many stations transmit the current time in the RDS data. If a radio receives this signal, it sets the in-built clock automatically.
Therefore, when you leave the transmission area, the RDS system has the advantage that it switches to a similar transmitter station that can be better received. However, it only changes when it finds a better transmitter station with the same programme.
Short signal attenuations due to the reception cannot be eliminated by the RDS system either, since this would mean that the car radios permanently switches back and forth. The listener would feel much more disturbed by this than by short-term reception problems.
Another advantage of the RDS system is that the station name is displayed. The station name of an RDS station is displayed in the car radio.
Key functions
- BD/LD button (10)
With this button you can select the band range of the radio unit. There are 3 FM ranges:
$$ F 1 > F 2 > F 3 $$

On each of the three band ranges, 6 stations can be stored on the station button 1-6 (4).
and buttons (11)
With these buttons the receiving frequency can be changed to adjust stations in radio operation.
Briefly pressing a button starts the automatic station search (display shows SEARCH).
The auto-scan only stops at the next station that can be received well.
By pressing a button longer, you activate manual station scan.
The display shows MANUAL.
In this mode, the frequency is changed until you release the corresponding button again. Brief presses of this button changes the frequency step by step.

If buttons are not pressed for a longer period of time, the devices switches back to automatic station search. The display shows AUTO.
- Station buttons 1-6 (4)
If you shortly press these buttons, you can select a station you have pre-set.
If you want to store a station you are listening to, simply press the desired button for more than 1 second.

Every one of the three FM ranges (F1-3) has six station buttons. Therefore you can assign 18 station buttons.
Operation
- AF button (5)
The AF button (5) activates the automatic transmitter station tracking.
"AF" will be displayed. If the reception of an RDS transmitter station gets weaker or the radio does not receive and RDS station at all, the display flashes. When a station can be received well, the symbol is displayed continuously.
When an RDS station is being received, the name of the station is displayed.
When you leave a transmission area, the radio can only switch to a station with better reception when the AF function is activated.
Regional identification
Press the AF button (5) for about 2 seconds until the display shows REG ON or REG OFF. Press the AF button again to switch between these two operating modes. The normal display reappears automatically after a few seconds.
If REG ON is on and the reception gets weaker, the radio only switches to a different frequency with exactly the same program.
When the regional identification is off (REG OFF), and the reception gets weaker, the radio switches to a different transmitter station with the same regional identification.
- TA button (6)
Press the TA button (6) once shortly > TA is activated
Press the button again > TA is deactivated.
When you receive a traffic programme station, the display shows TP (traffic programme).
When you keep the TA button pressed, TA is displayed. Now you can only receive stations with a traffic programme.
If a different audio source is being played (a CD for instance), the programme is set to mute during the traffic announcement.
When you listen to a radio program at a very low volume, the volume is automatically increased to an easily audible level (see TAVOL in the „Menu settings“). When the traffic announcement is over, the volume you were hearing before is restored.
Depending on whether you have set TA SEEK or TA ALARM (see "Menu Settings") the radio automatically seeks a new traffic programme station or gives an alarm signal.
- PTY button (7)
This button activates the PTY function. You can recognize it by the PTY display.
When you have pressed the PTY button, the display shows the type of programme you have selected and the autoscan for a station with this kind of programme starts after a short delay. If this scan does not find any station with the selected programme type, the display shows PTY NONE and several signal sounds are played.
There are two different groups of PTY (MUSIC and SPRACHE (LANGUAGE)). Select them by pressing the PTY button (7) once more:
PTY group MUSIC > PTY group LANGUAGE > PTY OFF
To change the type of programme, press on of the station buttons 1-6 (4) one or several times. The buttons are assigned to the following programme types.
Button PTY group MUSIC PTY group LANGUAGE
1 POP M, ROCK M NEWS, AFFAIRS, INFO
2 LIGHT M, EASY M SPORT, EDUCATE, DRAMA
3 CLASSICS, OTHER M CULTURE, SCIENCE, VARIORED
4 JAZZ, COUNTRY WEATHER, FINANCE, CHILDREN
5 NATION M, OLDIES SOCIAL, RELIGION, PHONE IN
6 FOLK M TRAVEL, LEISURE, DOCUMENT
AS/PS button (12)
If you press this button shortly, the stations stored on the station storage buttons 1-6 (4) are played for 5 seconds each. To stop the auto-scan, press the button again.
When you keep the button pressed, all the stations that can be received well are stored on the station storage buttons 1-6 (4).
After this procedure, the stored stations are played for 5 seconds each, as described above.
- SCAN Key (13)
This button starts the auto-scan.
When a station has been found, it is played for 5 seconds and then the auto-scan is continued.
Press the button again to stop the auto-scan to listen to the currently played station.
Operation
CD Operation
CD slot (17)
Insert your CD for replay in the CD drive.

Always insert the CD with the printed side up.
Baton (18)
Press this button to eject a CD.
and buttons (11)
With these buttons you can select individual tracks of a CD or search for a certain section within one track.

The arrows on the buttons indicate the search direction (up or down).
Only press the buttons shortly to jump to the next or previous track.
Press the buttons longer to search a certain section within one track.
- PAU button (19)
Press this button to interrupt the CD replay shortly.
When you confirm the button again, replay will begin at the point where it was interrupted.
RPT button (20)
Press this key to activate the repeat function. By pressing this button repeatedly, you can select how this function works:
RPT ONE: Repeat of the current track
RPT DIR: Repeat the current directory (only for MP3 operation and data carries with a directory structure)
RPT ALL: The complete data carrier is played and then repeated (normal playback)
Operation
- INT button (21)
Press this button to play each track in the CD for 10 seconds. INT appears on the display.
To de-activate this function, press INT (21) again. Replay will be normal from this point onward.
- RDM button (22)
Press this key for random replay. The tracks will be played in a random order. RDM appears on the display.
To de-activate this function, press RDM (22) again. Replay will be normal from this point onward.
- Track -10 (23) button and track +10 (24) button
Press these buttons to jump up and down by 10 tracks quickly. It functions like the and buttons (11), but skips 10 tracks every time.

These buttons are only active in MP3 mode.
AS/PS button (12)
This button activates the search function in MP3 operation.
Track search:
Press the AS/PS button (12) once. MP3 Tx appears on the display.
Set the desired track number with the rotary control VOLUME (3) and press the SELECT (2) button.
Folder search:
Press the AS/PS button (12) twice. The display indicates the current folder name.
Use the VOLUME rotary control (3) to select the desired folder and press the button SELECT (2).
If applicable, use the VOLUME rotary control (3) to select the desired subfolder and then the desired track, press the button SELECT (2).
USB/Memory Card Operation
The CD tuner is equipped with a USB interface and a memory card reader for SD/MMC cards,
MP3 files stored on these media can be played.

Do not connect any MP3-player to the USB interface if it is battery-operated.
The USB interface power supply may load the inserted batteries and cause overheating or explosion of a battery.

USB media up to 16GB and a power intake of up to max. 500mA can be connected to the USB interface.
Only USB storage media can be operated at the USB socket. MP3 players with a USB port usually switch into PC mode when this port is connected. In this mode, music files cannot be played. However, you may connect the audio output of your MP3 player to the AUX (22).
Supports SD/MMC-cards and SDHC-cards up to 16GB.
The media must be formatted in FAT 32.
Due to the great variety of systems with USB and SD/MMC card interfaces and their different functions that are sometimes producer-specific, we cannot guarantee that all media will be recognized and that all the operational functions are available in this CD tuner.
If the storage medium is not recognised, remove it and insert it again.
- Connect your USB storage medium with the USB port (23).
- If you use a memory card, insert it into the memory card reader (12).
- The player switches to the respective input automatically and starts replay.
- The last inserted medium is selected automatically.
- further operation corresponds to CD replay.
Maintenance
Regularly check the technical safety of the CD tuner, e.g. for damage of the cables or the housing.
If it can be assumed that safe operation is no longer possible, the device must be turned off and precautions are to be taken to ensure that it is not used unintentionally. Disconnect the car power system!
It must be assumed that safe operation is no longer possible if:
- the device shows visible damage
- if the appliance does not function for some reason, or
- following considerable stress during transportation.
Before cleaning the CD tuner or performing maintenance, the following safety instruction must be observed:

Live components may be exposed if covers are opened or components are removed.
The device must be disconnected from all power sources before any servicing or repair work is carried out.
Capacitors inside the device may still carry voltage even though they have been disconnected from all power sources.
Only qualified experts familiar with the hazards involved and the relevant regulations may perform repairs.
If it becomes necessary to replace a fuse, make sure that only fuses of the prescribed type and nominal current are used (see "Technical Data").

Never repair fuses or bridge the fuse holder.
- When the power supply has been disconnected (disconnect ISO plug!) carefully remove the fuse from the fuse holder next to the ISO plug.
- Replace it with a fuse of the same type.
- Only then can you re-connect the CD tuner to the electric on-board system.
- Should the fuse trigger again, have the CD tuner repaired in a specialised workshop.
Apart from this, the device does not need any servicing. The device's outside should only be cleaned with a soft, dry cloth or a brush.
Never use any aggressive cleaning agents or chemical solutions that may damage the surface of the housing.
Handling
- If the volume inside your car is too high, you will not hear any acoustic warning signals. This constitutes a danger to yourself and other road users. Therefore, make sure the volume is at a suitable level.
- Inattentiveness on the road may cause serious accidents. Operation of the hi-fi system may therefore only take place if the traffic situation permits and you are not unduly distracted by operating the system.
- Do not listen to excessively loud music over an extended period of time. This may damage your hearing.
Disposal
At the end of its service life, dispose of the product according to the relevant statutory regulations.
Troubleshooting
The Renkforce CD-7657 CD tuner you have purchased is equipped with state-of-the-art technology and is safe to operate.
Nevertheless, problems or errors may occur.
Therefore, we would like to describe how to eliminate possible faults here:

Please observe the safety notes!
No replay, no display, and the lights are out:
The vehicle fuse is defective. Look up the respective fuse in the operation manual of your car. Check the fuse.
- The fuse of the CD tuner is defective. Remove the CD tuner and check the fuse.
- The positive line/ground line is loose. Remove the CD tuner and check the connections of the cables.
Replay only through one speaker:
- The balance control is wrongly adjusted. Adjust the balance control as described.
- The speaker connection has come loose. Remove the CD tuner and/or speakers and check the connections.
Troubleshooting
Replay only through the front or rear speakers:
- The fader control is not adjusted correctly. Adjust the fader control.
- The speaker connection has come loose. Remove the CD tuner and/or speakers and check the connections.
In radio operation hardly any stations can be received:
- The aerial is not pulled out completely. Pull out the aerial to its full length.
- The aerial connection has come loose. Remove the CD tuner and check the connection.
- The aerial is defective. Check the connection, earthing and the aerial itself.
Interference noise during radio and CD replay:
Interferences reach the CD tuner via the positive line. Install an additional interference suppression coil into the positive line. If necessary, also equip the vehicle with spark-plug suppressor sockets, distributor arms etc. to suppress interferences.
When you press a station button, you only hear hissing:
- No station has been programmed. Program the stations as described above.
Every time you switch off the CD tuner, the station programming gets lost:
- The continuous positive line is not connected, or has come loose. Connect or check the continuous positive line as explained in the instructions or check whether the cable is correctly connected. Check the fuse.

Repairs other than those described above should only be carried out by an authorised specialist.
Technical Data
General Information
Operating voltage 12V=
Power input 10A (max.)
Fuse . Vehicle flat fuse 10A
Output power 4 x 40W (max.)
Speaker impedance 4-8Ohm
LINE OUT 1.5V/10 kOhm
Interfaces USB and SD/MMC card
Mounting depth 180mm
Weight 1.2kg
FM Tuner
Reception range: FM 87.5-108.0MHz
Frequency step 50kHz
Sensitivity 2.8μV
Stereo separation 30dB
Signal-to-noise ratio 50dB
CD-/MP3-Player
Frequency range 20-20,000Hz
Signal-to-noise ratio. >60 dB
Channel separation. >50dB (1kHz)
Admissible Media CD/CD-R/CD-RW
USB/SD/SDHC/MMC (max. 16GB)
Supported formats: CD-Audio/MP3
Table des matieres
Page
Chere cliente, cher client,
$$ A U X > S Y N T O N I S E U R > C D > U S B > S D $$