LEDB13HU32H - Television AKIRA - Free user manual and instructions
Find the device manual for free LEDB13HU32H AKIRA in PDF.


| Product Type | LED TV with built-in DVD player |
| Brand | Akira |
| Model | LEDB13HU32H |
| Screen Size | 31.5 inches (80 cm) |
| Resolution | 1920 x 1080 pixels (Full HD) |
| Display Type | TFT LED |
| Aspect Ratio | 16:9 |
| Power Supply | AC 100-240 V, 50/60 Hz, 120 W |
| Dimensions with stand (W x H x D) | 790 x 564 x 200 mm |
| Dimensions without stand (W x H x D) | 790 x 499 x 47 mm |
| Net Weight | 11.5 kg |
| Connectivity | HDMI (x2), VGA, SCART, YPbPr, AV, USB, COAXIAL, headphone jack, CI |
| Main Features | DVB-T digital TV, USB recording, time shift, EPG, teletext, parental control |
| DVD Player | Plays CD, CD±R/RW, DVD, DVD±R/RW, PAL/NTSC formats |
| Audio Power | 2 x 8 W |
| Maintenance | Clean with a soft, dry cloth. Unplug before cleaning. Do not use solvents. |
| Safety | Do not block ventilation openings. Use on a stable surface. Avoid moisture and heat sources. |
| Operating Temperature | 5°C to 35°C |
| Remote Control Batteries | 2 AAA batteries (not included) |
| Warranty | 24 months (parts and labor) in eligible countries |
Frequently Asked Questions - LEDB13HU32H AKIRA
User questions about LEDB13HU32H AKIRA
0 question about this device. Answer the ones you know or ask your own.
Ask a new question about this device
Download the instructions for your Television in PDF format for free! Find your manual LEDB13HU32H - AKIRA and take your electronic device back in hand. On this page are published all the documents necessary for the use of your device. LEDB13HU32H by AKIRA.
USER MANUAL LEDB13HU32H AKIRA
natural_image
Black ARISA TV displaying a sunset over a calm river with silhouetted hills and boats (no text or symbols visible)User Manual
Thanks you for purchasing this AKIRA™ product and for your confidence in our company. This product meets applicable safety requirements and has undergone stringent testing during manufacture.
However, should there occur a defect, the product or its defective part(s) (excluding accessories and consumables) will be repaired free of charge (labor, parts and transportation within the boarder of the below mentioned countries) or, at AKIRA™ discretion, exchanged for a similar item, provided that it has been returned with 24 (twenty four) months from the date of original purchase (date of receipt), is defective in material and/or workmanship and has been bought in any of the following countries: France (metropolitan territory), Spain, Italy, Portugal, Belgium, Germany, Austria, Switzerland or in a duty-free shop in named countries.
This guarantee will be granted only upon presentation of the original invoice or cash receipt, indicating the date of purchase and dealer's name, and of this guarantee card with the product type and serial number. The benefit of this guarantee may be refused if the invoice, cash receipt or guarantee card has been altered in any way, deleted or made illegible after the original purchase.
Online registration: please register your AKIRA™ product within 30 days of purchase at http://akiraeurope.com/en/Supp/Enregistrement/
This guarantee does not apply to the following:
- Damage caused by accidents including, but not limited to, lightening, fire, water.
- Damage to the product resulting from neglect, misuse, use against the operating manual instructions, repair and/or install wrongly performed (non exhaustive list). Especially any burned panel from too long still picture display such as computer inputs or channel logos, as described in the operating manual, will not be guaranteed.
- Modification, adaptations or alterations of the product to operate in a country other than for which it was originally designed and manufactured, or any damage resulting from such modifications.
- Usage other than usual consumer home usage.
- Defect on individual pixels when the number of defective is below the following numbers: Dark pixel: 7 / Bright or flickering pixel: 3 / Total defective pixels: 8
These statements do not affect your statutory rights as a consumer under applicable national legislation in force, nor your consumer's rights against the dealer from whom you bought the product.
If you need service, whether or not under guarantee, please approach the dealer who sold you the product.
In your own interest, we advise you to read the instruction booklet for your AKIRA™ product carefully before contacting your dealer or service center.
Should you have any question that your dealer is unable to answer, please contact AKIRA hotline (please check out the phone number on our web site http://akiraeurope.com/en/Supp/AideSAV/).
Texte de Garantie
Cher client,
TROUBLESHOOTING AND ADVICE
41
10
SPECIFICATIONS
42
1.PREFACE
Thank you for buying this TV! Please read this manual thoroughly before operating the TV. Make sure the TV was not damaged in transit. Should the TV is damaged, do no install it and contact your dealer. Check that you have all the accessories according to the model.
2.SAFETY PRECAUTIONS

Put the TV on a stable surface.

natural_image
Simple line drawing of a computer monitor with a cross symbol above it (no text or labels)Do not place any material on the TV.
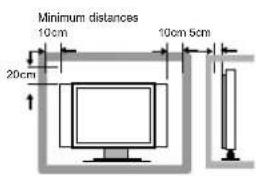
Do not use the TV with fixtures other than those provided or suggested by the manufacturer.
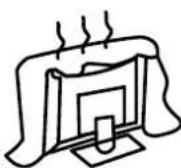
Do not block or cover the ventilation openings on the TV. If you have a wall mount, check that it is steady.

Power cord and cables must be properly routed and protected to prevent people from stepping on them and causing the TV to fall.
natural_image
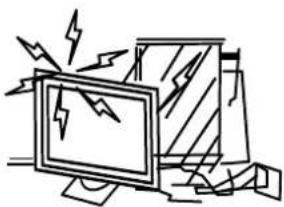
Cartoon illustration of a computer monitor with broken-out fragments and lightning bolts (no text or symbols)Keep the TV dry and away from humidity.
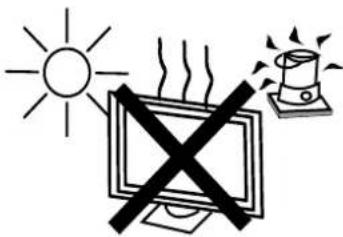
Keep the TV away from heat sources.
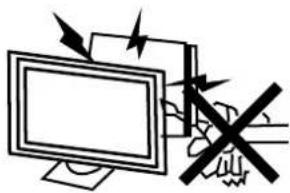
natural_image
Illustration of a computer monitor with arrows indicating motion and a crossed-out hand (no text or symbols)Unplug the TV before cleaning it. Do not use solvent or liquid to clean the TV.
Only clean the TV with a soft and dry cloth.
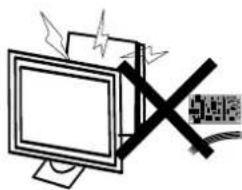
In case of troubleshooting, do not use spare parts other than those suggested by the manufacturer. Using inadequate spare parts can lead to electric shocks, short-circuits fire or other incidents.
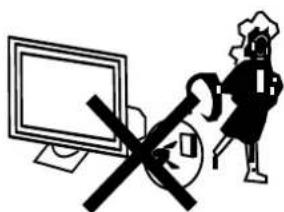
Unplug the TV during lightening storms or when unused for long periods of time.
- where the MAINS plug or an appliance coupler is used as the disconnect device, the disconnect device shall remain readily operable;
2.A warning that batteries (battery pack or batteries installed) shall not be exposed to excessive heat such as sunshine, fire or the like.
3.A warning that an apparatus with CLASS I construction shall be connected to a MAINS socket outlet with a protective earthing connection.
3. IN THE CARTON
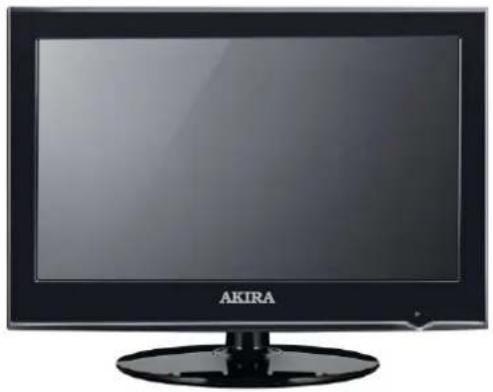
natural_image
Front view of a black rectangular TV with 'AKIRA' branding on the front panel (no additional text or symbols visible)LED TV SETLED TV SET
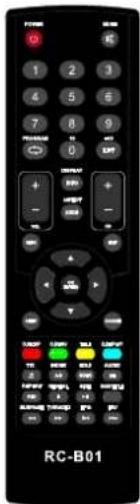
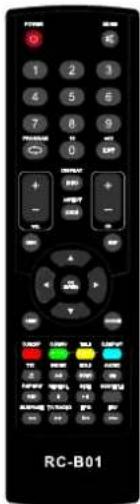
Remote Control Remote Control
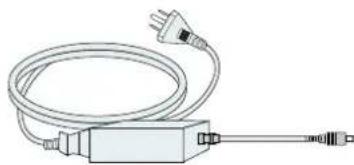
natural_image
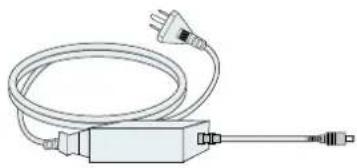
Line drawing of a coiled electrical plug with a power outlet, no text or symbols presentAdapter & Power Cord
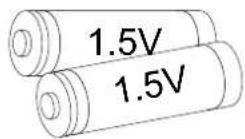
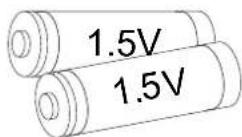
AAA Batteries
USER'S MANUAL
User Manual
4 FRONT, BACK, CONNECTIONS OF LED.
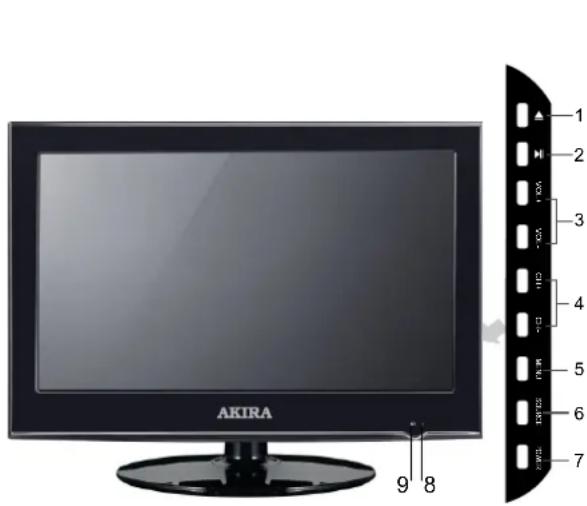
Front View
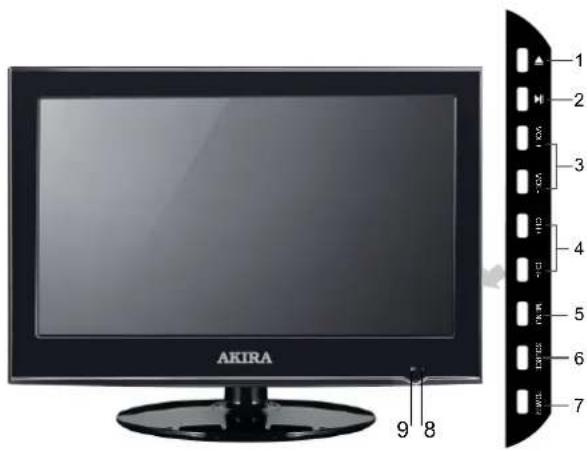
- ▲ OPEN/CLOSE in DVD mode;
- ▶ PLAY/PAUSE in DVD mode;
- Press "VOL+" or "VOL-" to increase or decrease the sound level.
- Press "CH+" or "CH-" to scan through channels.
- Press "MENU" to bring up the main menu on the screen.
- Press "SOURCE" to select the input source.
- Press "POWER" button to turn the TV on or off.
- POWER INDICATOR: When the TV will display in standby or turn Green or blue.
- REMOTE SENSOR: infrared sensor for the remote control.
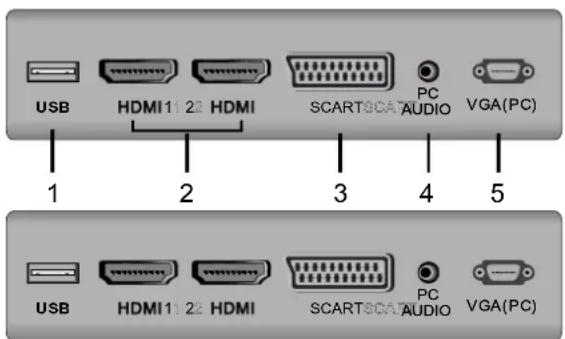
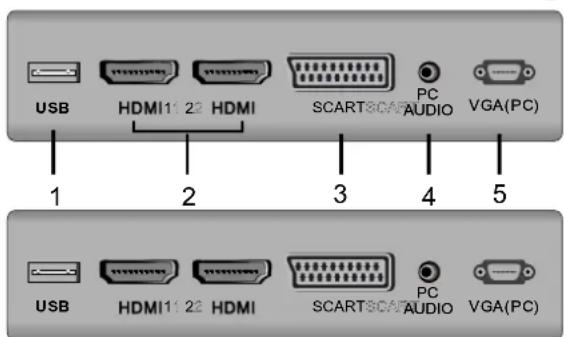
Back View and Control Connections
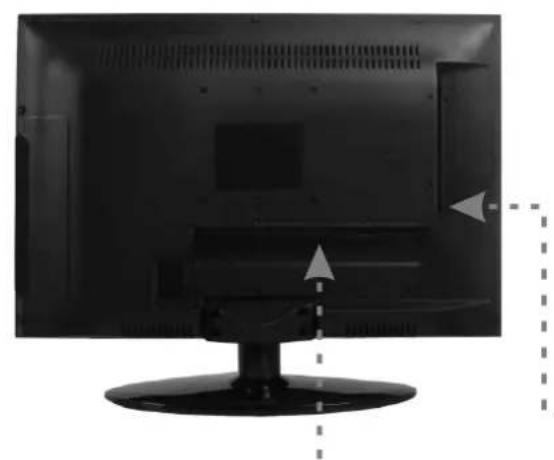
natural_image
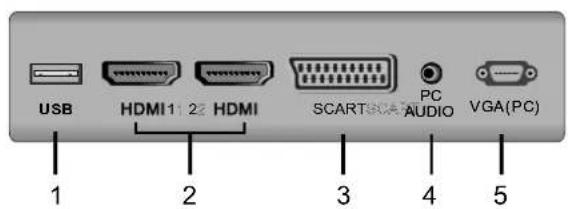
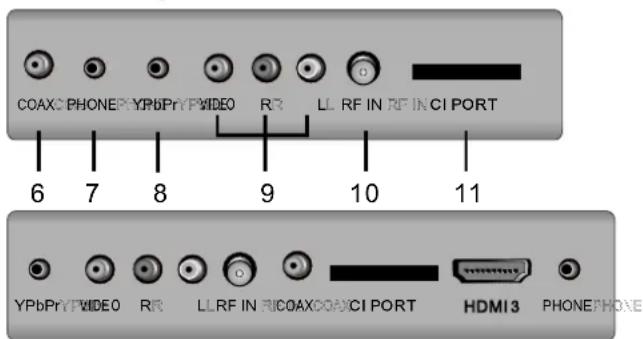
Front view of a computer monitor with visible screen and stand, showing directional arrows (no text or symbols)- USB: Connect to the External drive.
- HDMI: Connect the HDMI output jack of DVD.
- SCART: Connect the SCART jack of VCR or DVD.
- PC AUDIO : Connect the right Audio out put jack of PC.
- VGA(PC): Connect the PC-RGB output jack of PC.
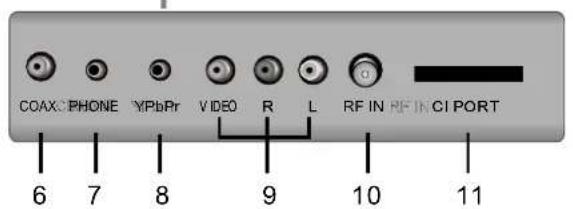
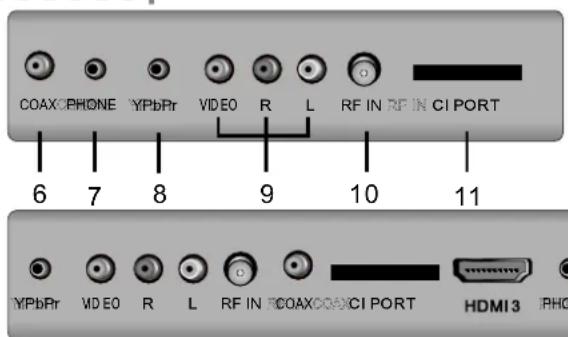
- COAX: Connect the SPDIF receiver.
- PHONE: Connect the headphone.
- YPbPr: Connect the YPbPr output jack of DVD or VCR.
- VIDEO/AUDIO: Connect the Video/Audio output jack of DVD or VCR.
10 RF IN: Connect the antenna. - CI PORT: Connect to the CI card.
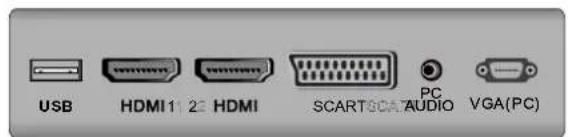
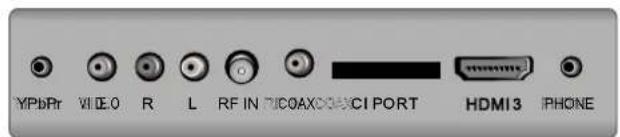
Power Cord Connection
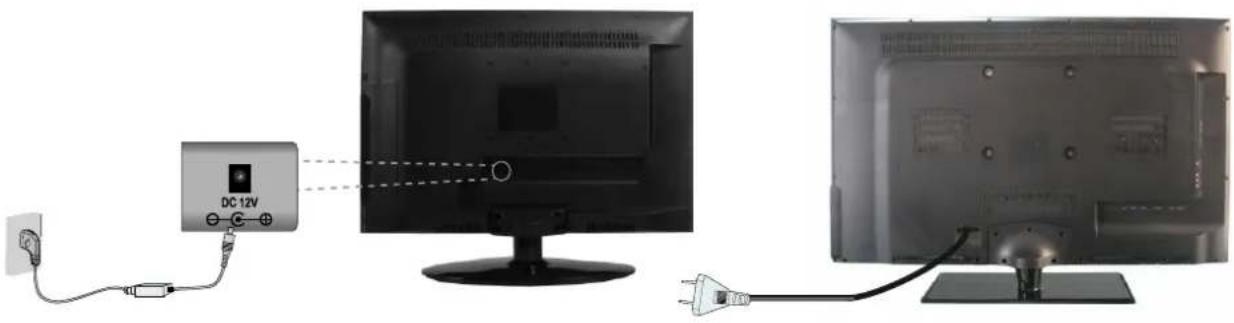
natural_image
Diagram showing connection between a DC-12V power supply and two monitors (no text or symbols on devices)- Connect the power cord correctly as shown.
- Press the POWER button of your LED TV to switch on the LED TV. The power indicator on the front panel lights up in Green or Blue.
Antennas Connection
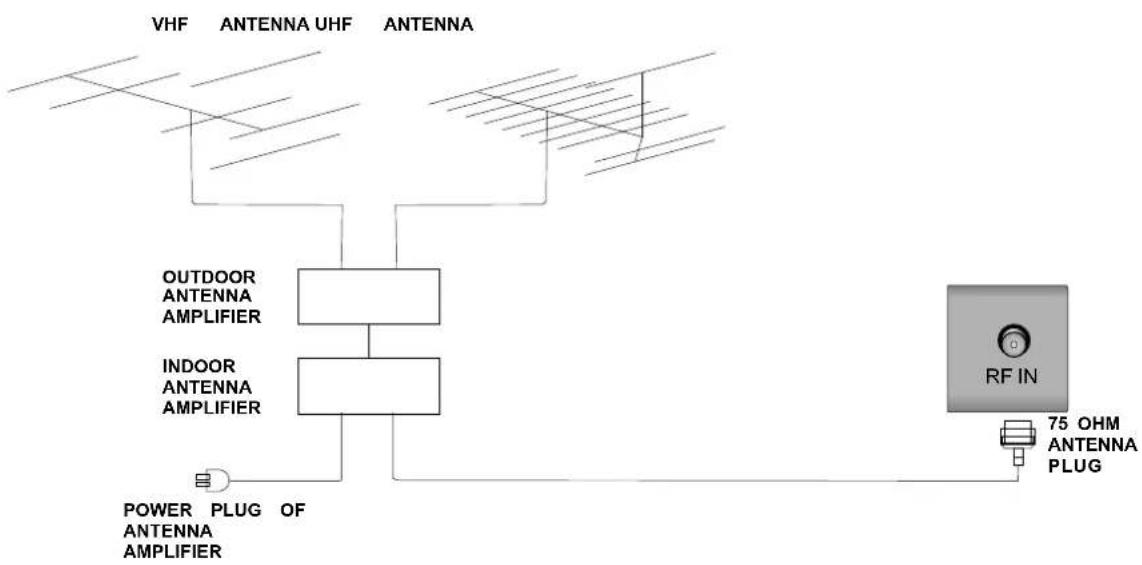
flowchart
graph TD
    A["VHF"] --> B["OUTDOOR ANTENNA AMPLIFIER"]
    C["ANTENNA UHF"] --> B
    D["ANTENNA"] --> B
    E["INDOOR ANTENNA AMPLIFIER"] --> B
    F["POWER PLUG OF ANTENNA AMPLIFIER"] --> G["RF IN"]
    H["75 OHM ANTENNA PLUG"] --> I["RF IN"]
To ensure good picture and sound, TV antenna system needs to be installed. The antenna system as shown can be sourced from TV equipment shops, which will provide service for correct installation and connection. After installation, insert the 75-ohm antenna plug into the antenna jack as shown.
SCART Connection
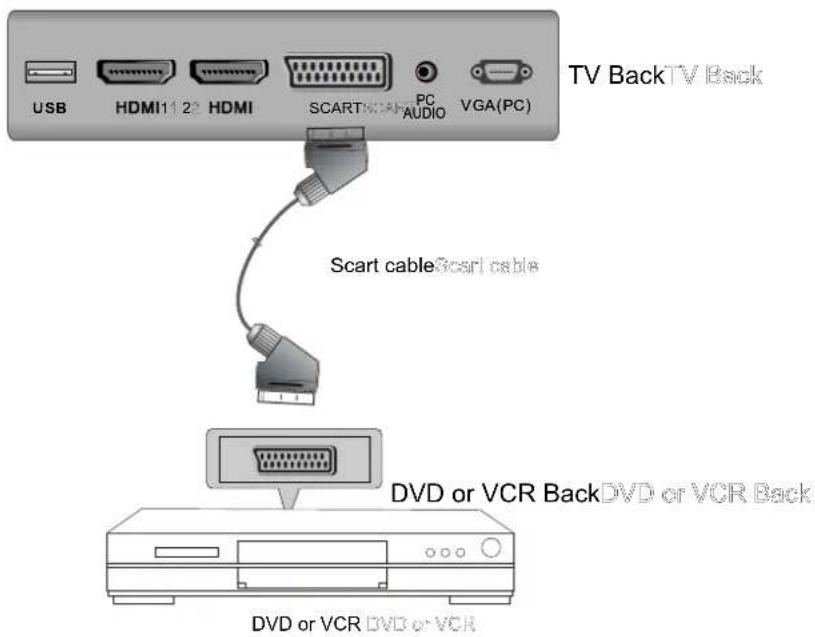
Connect the SCART connector to the external video item and the SCART connector on the tv. The SCART lead operates as an Input/Output connection. If the tv does not select the SCART input automatically, select SCART using the SOURCE button on the remote control or TV.
VGA(PC) Connection
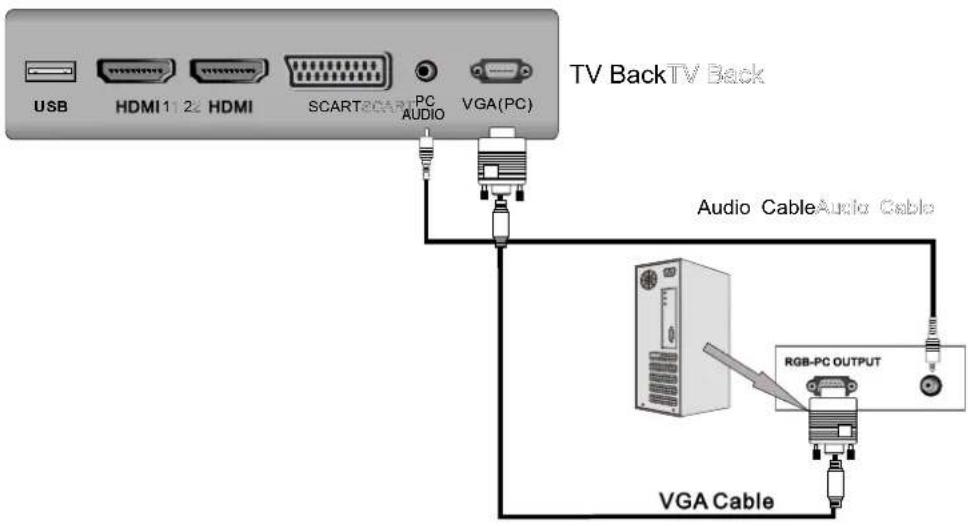
Connect the RGB output of the PC to the VGA jack on the TV set. Connect the AUDIO output of the PC to the PC AUDIO jack on the TV set. Select the VGA input source via the SOURCE button on the remote control.
AV Connection
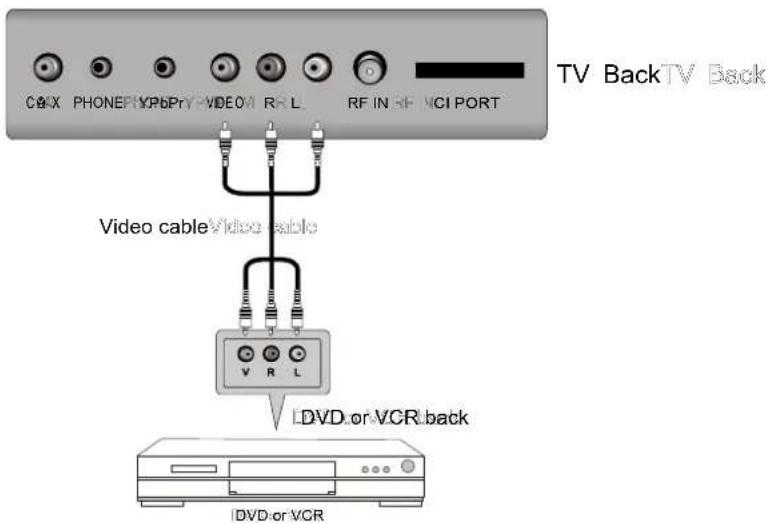
Connect the VIDEO and AUDIO output jack of the DVD or VCR to the VIDEO jacks on the TV set using the RCA cable. Match the jack colors: Video is yellow, Audio left is white, and Audio right is red. Select the AV input source via the SOURCE button on the remote control.
YPbPr Connection
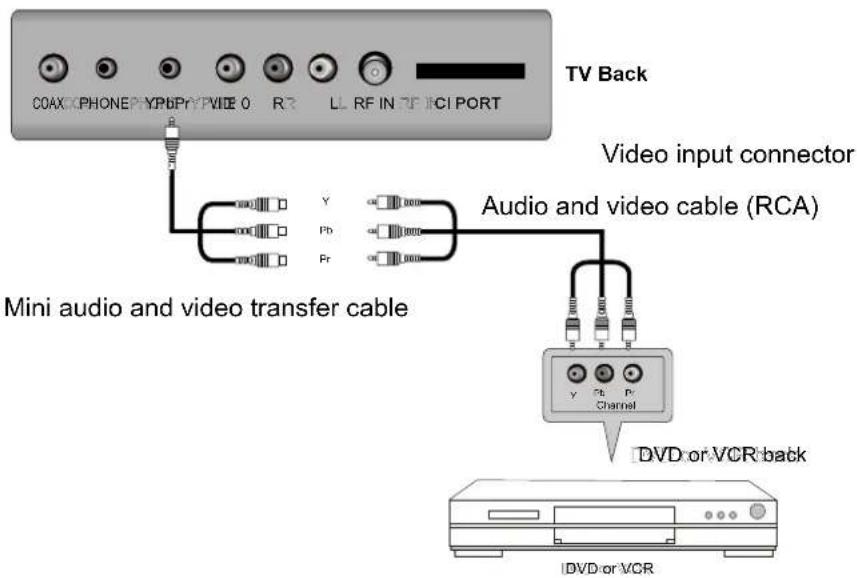
Connect the YPbPr output of the DVD or VCR to the YPbPr input on the TV set. Connect the Audio output of the DVD or VCR to the Audio input jacks on the TV set using the RCA cable. Match the jacks colors: Y is green, Pb is blue, Pr is red, Audio left is white and Audio right in red. Select YPbPr input source via the SOURCE button on the remote control.
HDMI Connection
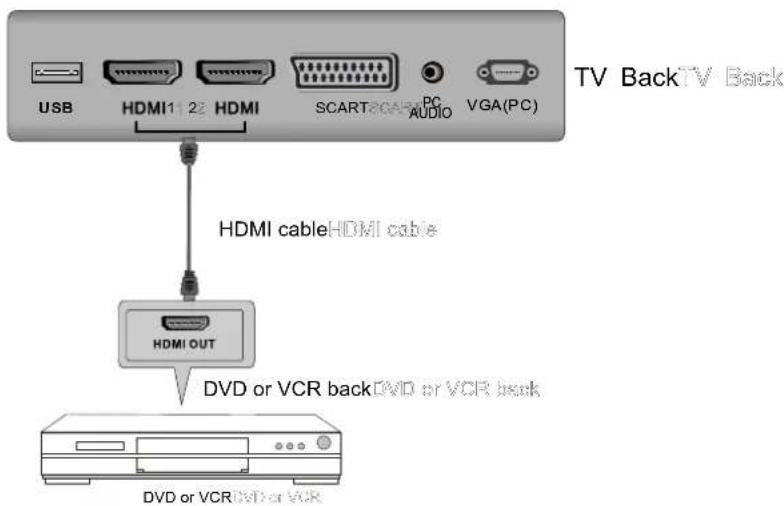
The HDMI input connection enables the digital transfer of audio/video/control signals through one cable only.
COAX Connection
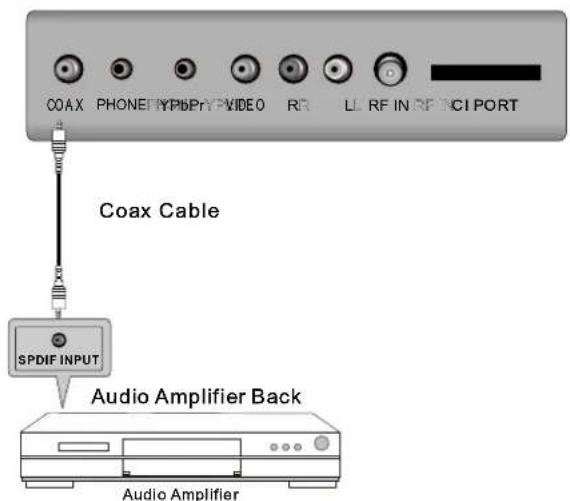
Connect to Audio Amplifier device to the COAX output jack on the TV.
USB PORT FUNCTION
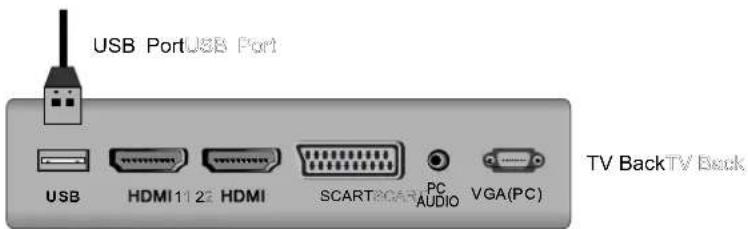
Insert the USB flash drive to the USB port. Select USB channel source via the SOURCE button on the remote control.
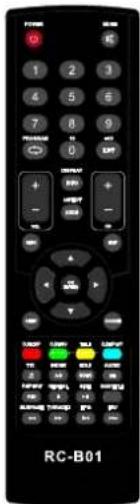
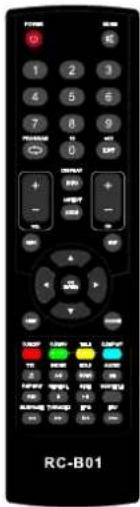
6 REMOTE CONTROL.
Remote control instructions in TV mode
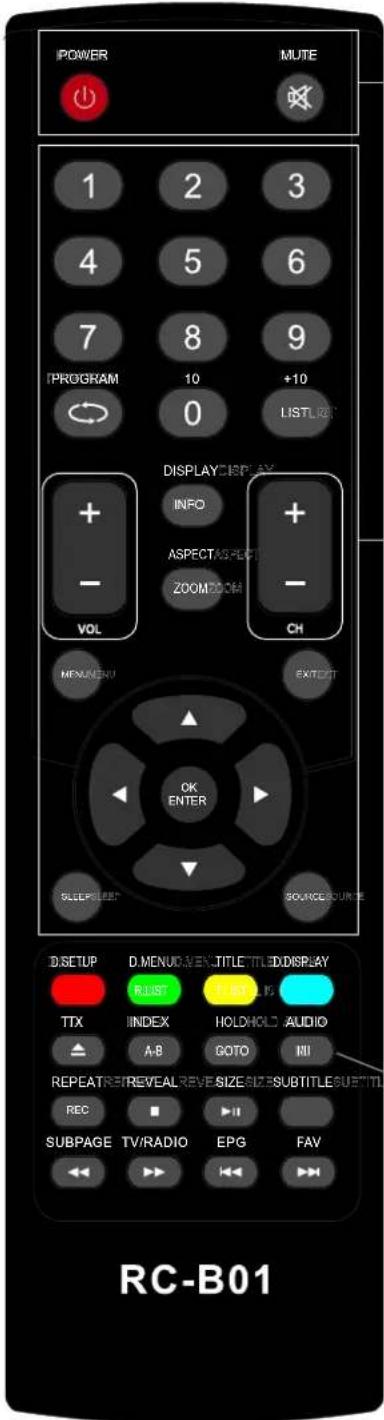
POWER
Turn the LED TV ON or OFF.
MUTE
Press to mute the sound. Press again or press VOL+ to un-mute the TV.
NUMBER BUTTONS
Press 0-9 to select a TV channel directly when you are watching TV. The channel change after 2 seconds.

Return to the previous channel viewed.
LIST
Press to display the TV program list.
DISPLAY
Press to display the source and channel's information.
ASPECT
Selects screen display ratio.
VOL+/VOL-
Press to increase / decrease the sound level.
CH+/CH-
Press to scan through channels.
MENU
Brings up the main TV menu to the screen.
SOURCE
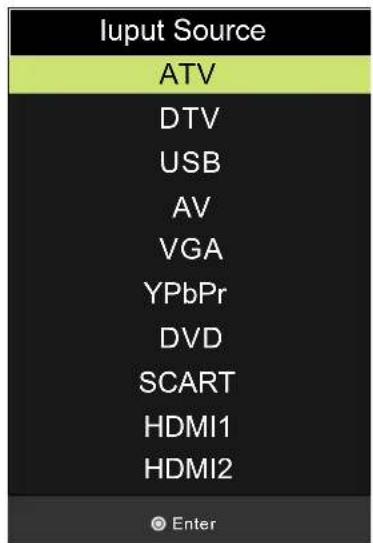
Press SOURCE to display the OSD input source,
Press ▲▼ to select an input source, and then press
OK to confirm.
THUMBSTICK( ▲/ ▼/◀ / ▶/ OK ENTER )
Allows you to navigate the on-screen menus and adjust the system settings to your preference.
SLEEP
Lets you select amount of time before your TV turn itself off automatically.
EXIT
Exit the main TV menu to the screen.
AUDIO(I/II)
Press to search the NICAM modes.
Remote control instructions in DTV/USB mode
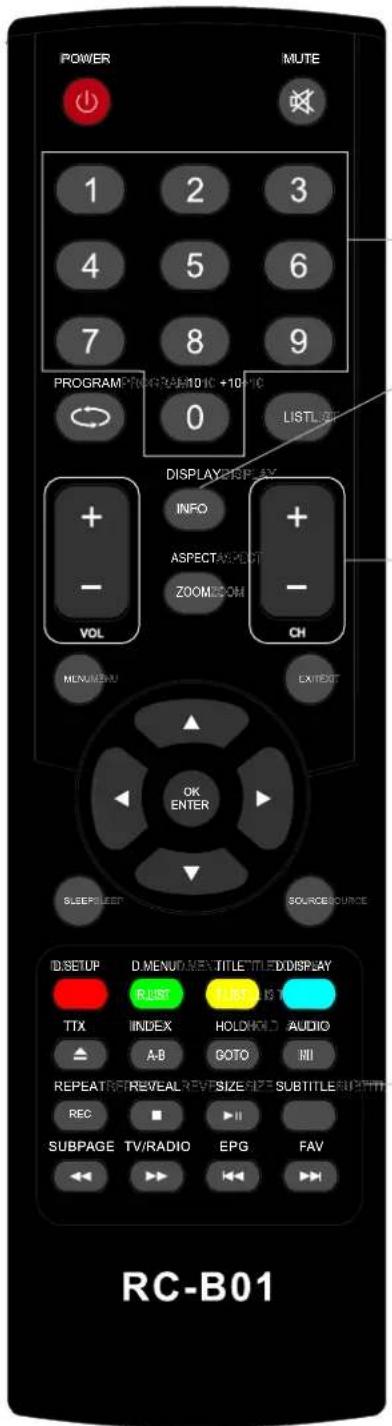
NUMBER BUTTONS
Press 0-9 to select a channel.
INFO
Press to display the source and channel's information.
CH+/CH-
When watching a channel, changes the channel.
COLOR BUTTONS
Color buttons (respectively red, green, yellow and blue) used in a few sub-menus.
T.LIST
Press to display the Record Timer Schedule List.
R.LIST
Display the recorded file list.
SUBTITLE
To display subtitle in DTV mode.
FAV
Favorite program list.
REC
Press to record the TV program in DTV mode.
EPG
Launches the EPG(Electronic Program Guide)in DTV mode.
AUDIO
To display audio menu.
TV/RADIO
When watching a channel, allows you switch between TV and Radio modes.
▶|| (Timeshift)
Play or pause.
Press to enter Timeshift, the image paused and it start record from the paused position.

Stop playing or stop recording.

Fast reverse and Fast forward.

Previous / next chapter in USB mode, or play the Previous /next scene of the recorded programs, jump by 30 seconds.
REPEAT
Press to select the repeat mode in USB mode.
Remote control instructions in TELETEXT mode
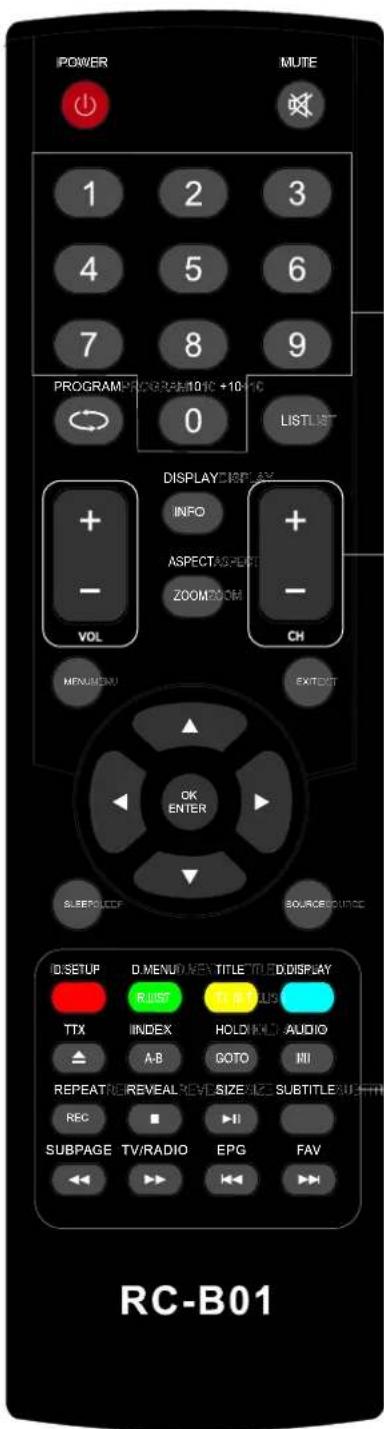
NUMBER BUTTONS
Press 0-9 to select a teletext page.
CH+/CH-
Page up and Page down.
TTX
Press to switch between TV and Teletext mode.
COLOR BUTTONS
Select 4 Preferred TELETEXT page.
SUBTITLE
To display subtitle.
HOLD
Freeze the current page.
SIZE
Change the picture size.
REVEAL
Reveal or hide the hidden words.
INDEX
Request index page when index link is valid.
SUBPAGE
TELETEXT Subpage.
Remote control instructions in DVD mode
Note: Please ensure that the TV you have bought with DVD loader, otherwise, all these parts with no effect.
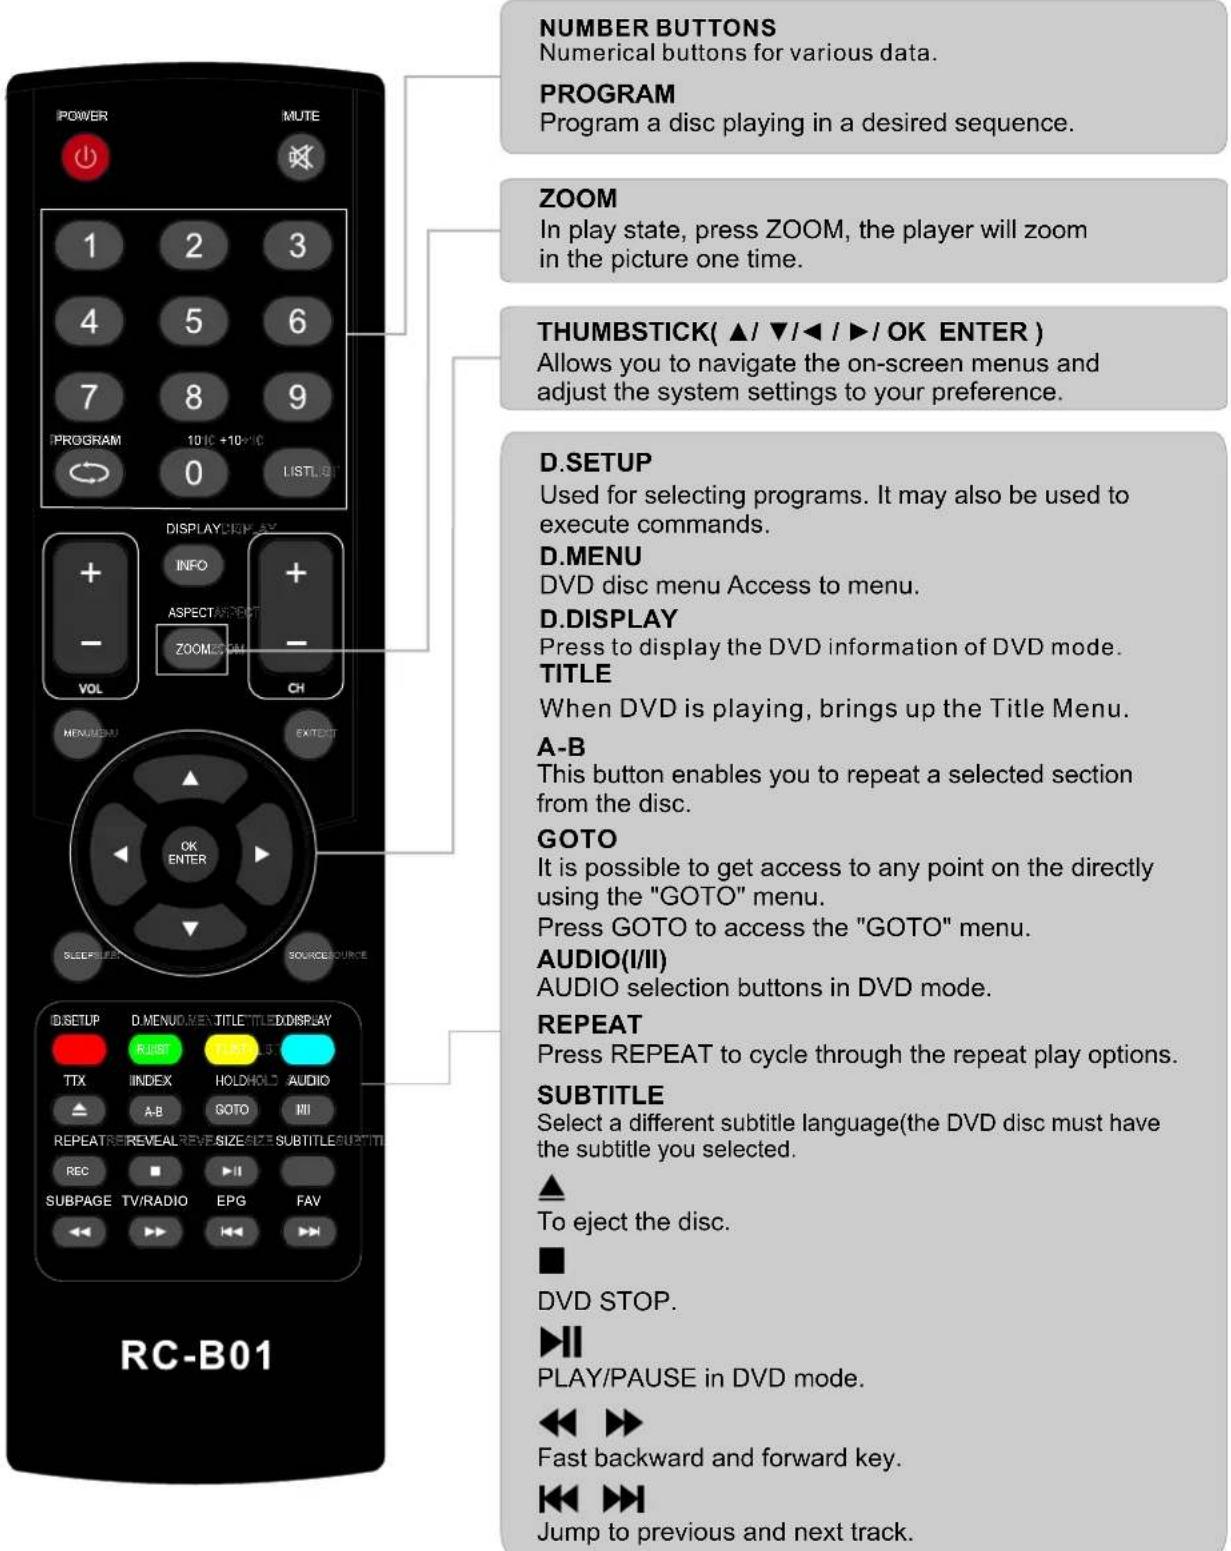
Remote control setup
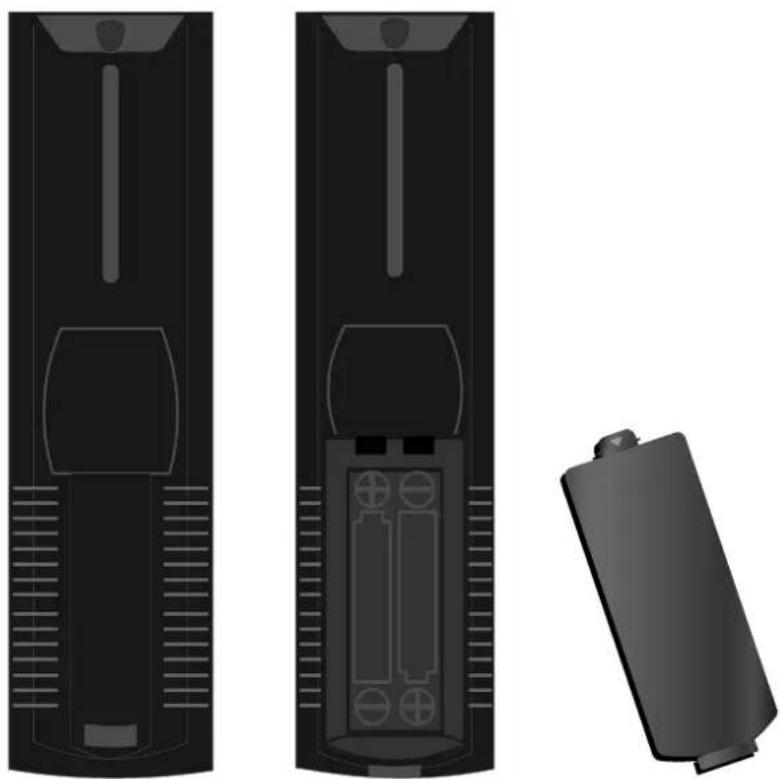
- Open the cover.
- AAA size batteries, When inserting the batteries, make sure correct polarities as per“+”and “-” marks on the batteries and within the battery compartment.
- Replace the battery cover.
To prevent battery leakage which may result in bodily injury or damage to the remote:
- Install all batteries correctly, and as marked on the remote control.
- Do not mix batteries:(OLD and NEW or CARBON and ALKALINE, etc)
- Remove batteries when the remote is not used for a long time.
natural_image
Three views of a remote control panel showing internal components and battery casing (no text or symbols)7. MENU OPERATION
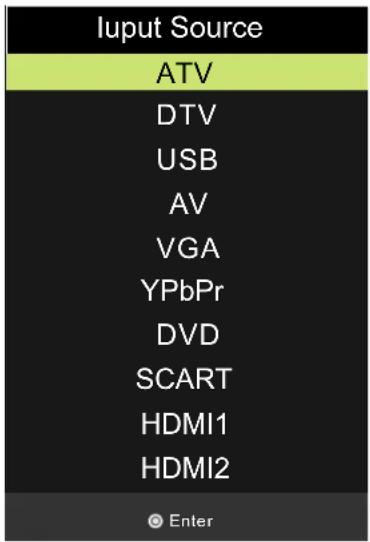
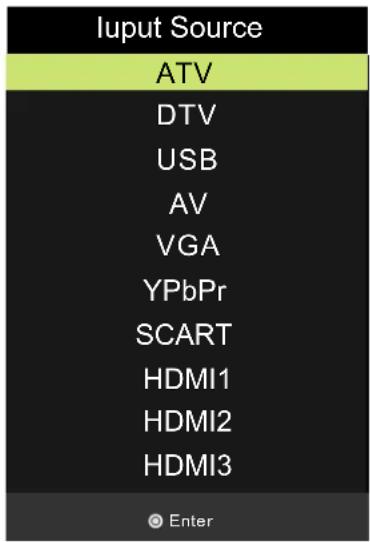
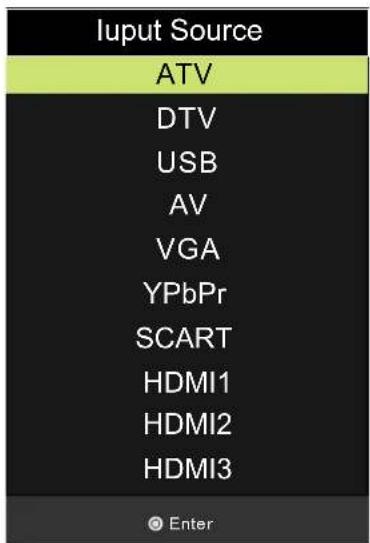
INPUT SOURCE
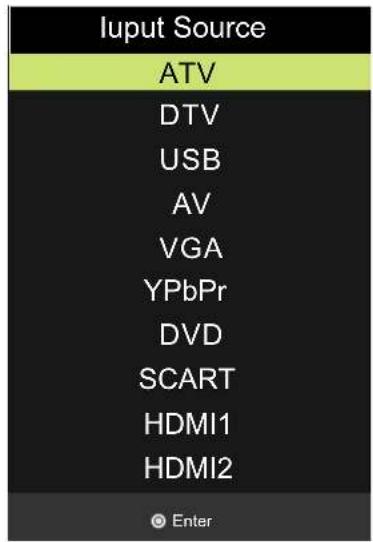
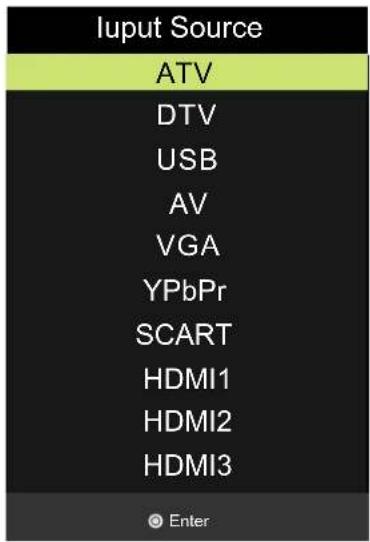
Press SOURCE button to display the input source list;
Press ▼ / ▲ or SOURCE button to select the input source you want to watch;
Press OK button to enter the input source;
Press EXIT button to quit;
CHANNEL MENU
Press MENU button to display the main menu.
Press ◀ / ▶ button to select CHANNEL in the main menu, it will highlight the first option.
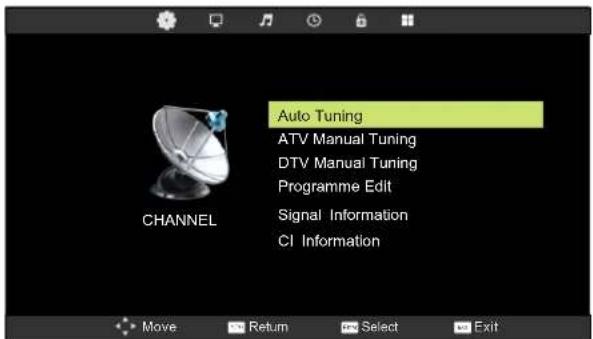
- Press ▼ / ▲ button to select the option that you want to adjust in the CHANNEL menu.
- Press OK button to adjust.
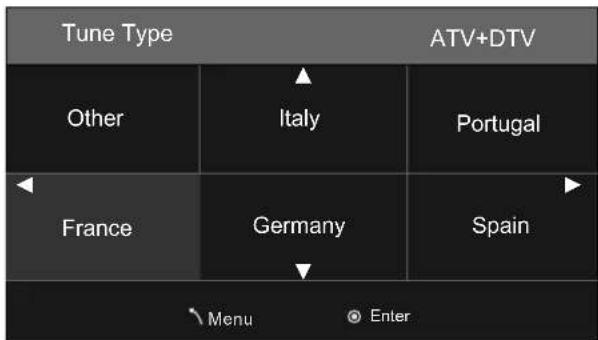
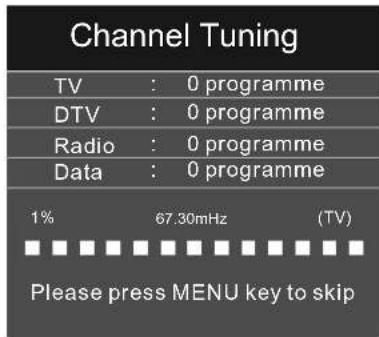
Auto Tuning
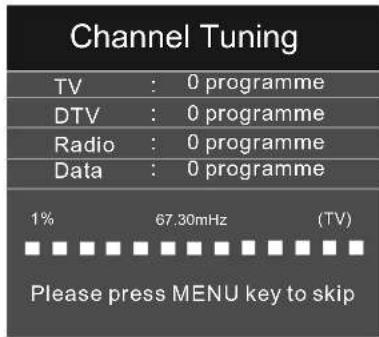
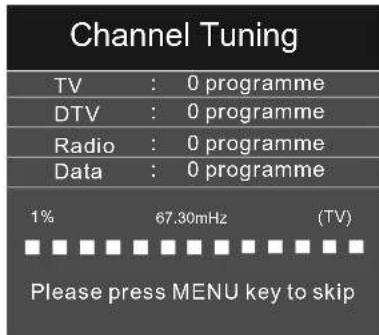
Press ▼ / ▲ button to select Auto Tuning, then press OK button to start auto search.
DTV Manual Tuning
Press ▼/▲ button to select DTV Manual Tuning, then press OK button to enter Sub-menu.
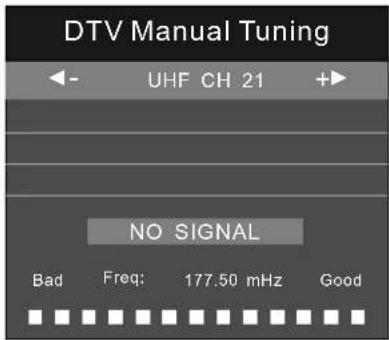
Press ◀ / ▶ button to select channel, then press OK button to search program.
ATV Manual Tuning
Press ▼ / ▲ button to select ATV Manual Tuning, then press OK button to enter Sub-menu.
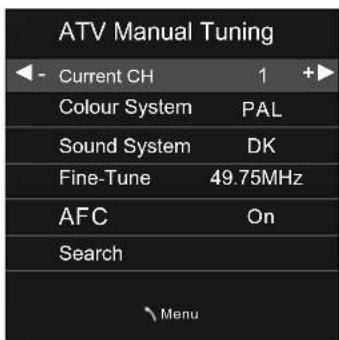
Press ◀ / ▶ button to select channel number you want to store.
Press ◀ / ▶ button to select colour system.
Press ◀ / ▶ button to select audio system.
Press ◀ / ▶ button to select search, then press OK button to start tuning.
Press ◀ / ▶ button to select Fine-Tune.
Press ◀ / ▶ to ON or OFF automatic frequency control.
Programme Edit
Press ▼ / ▲ button to select Program Edit, then press OK button to enter sub-menu.
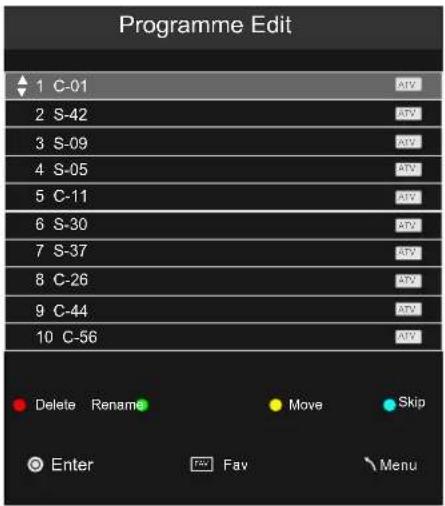
- Use Red button to delete the current channel.
- Use Green button to set the current channel to Rename.
- Use Yellow button and the ▲/▼arrow button to move the current channel.
- Use Blue button to skip the current channel.
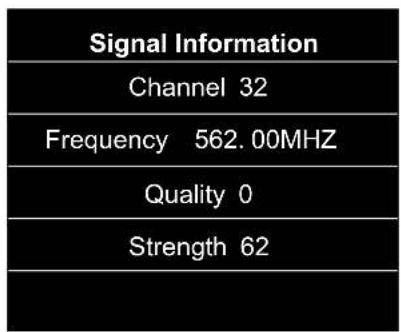
Signal Information
Press ▼ / ▲ button to select Signal Information, then press OK button to display signal details, Including Channel, Frequency, Quality and Strength.
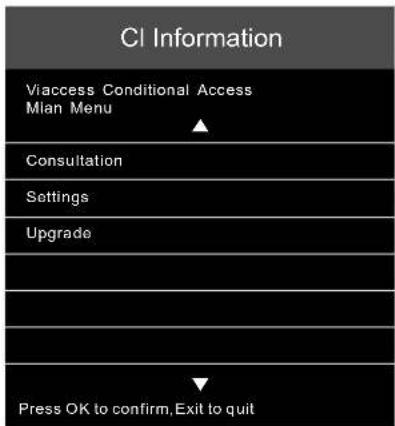
CI Information
Press ▼ / ▲ button to select CI Information, then press OK button to display details if you has inserted the CI card.
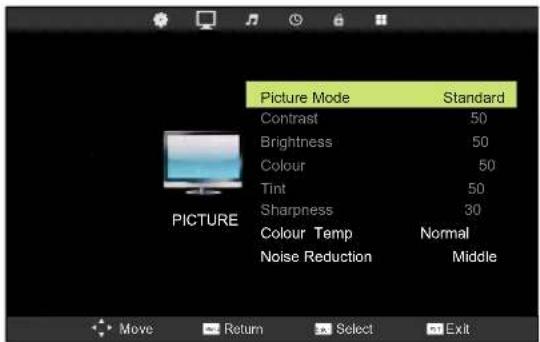
PICTURE MENU
Press MENU button to display the main menu.
Press ◀ / ▶ button to select PICTURE in the main menu, it will highlight the second option.
- Press ▼ / ▲ button to select the option that you want to adjust in the PICTURE menu.
- Press OK button to adjust.
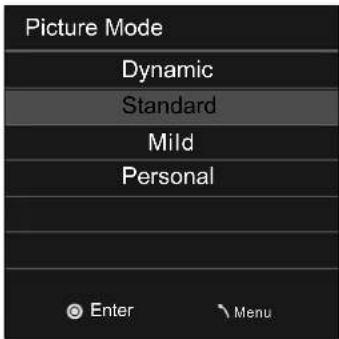
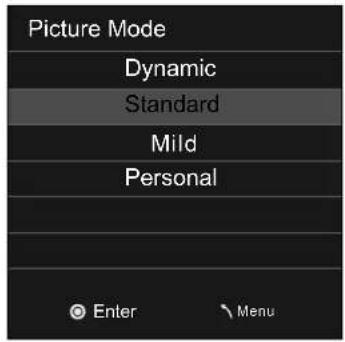
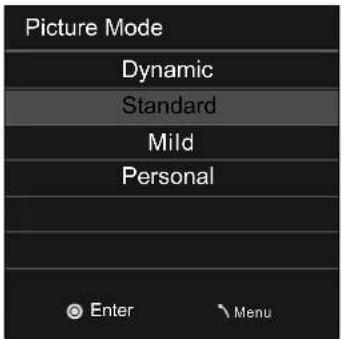
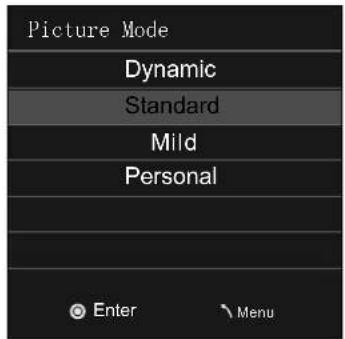
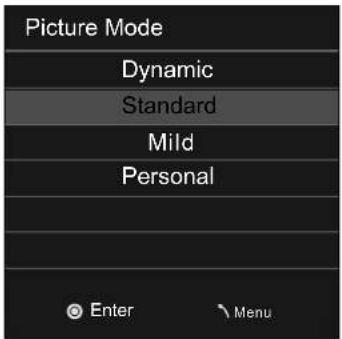
Picture Mode
Press ▼/▲ button to select Picture Mode, then press OK button to enter sub-menu. Press ▼/▲ button to select.
You can change the value of contrast, brightness, colour and sharpness when the picture is in Personal mode.
Contrast
Press ▼/▲ button to select Contrast, then press OK button to enter sub-menu. Press ◀/▶ button to adjust.
Brightness
Press ▼/▲ button to select Brightness, then press OK button to enter sub-menu. Press ◀/▶ button to adjust.
Colour
Press ▼/▲ button to select Colour, then press OK button to enter sub-menu. Press ◀/▶ button to adjust.
Tint
Press ▼ / ▲ button to select Tint, then press OK button to enter sub-menu. Press ◀/▶ button to adjust.
(Only available in NTSC mode.)
Sharpness
Press ▼/▲ button to select Sharpness, then press ◀/▶ button to adjust.
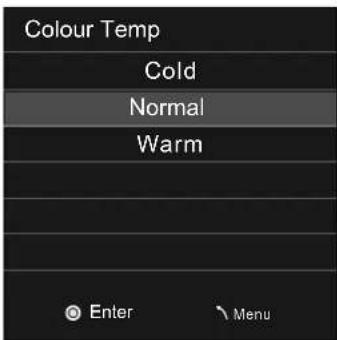
Colour Temp
Press ▼ / ▲ button to select Colour Temp, then press OK button to select.
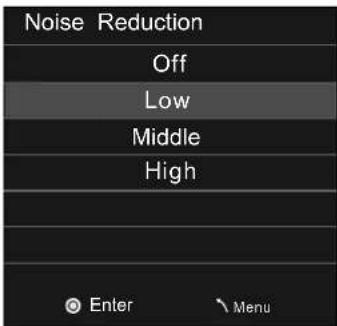
Noise Reduction
Press ▼ / ▲ button to select Noise Reduction, then press OK button to select.
SOUND MENU
Press MENU button to display the main menu.
Press ◀ / ▶ button to select Sound in the main menu, it will highlight the third option.
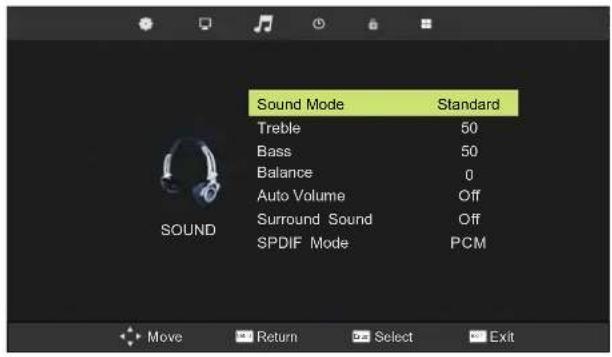
- Press ▼ / ▲ button to select the option that you want to adjust in the SOUND menu.
- Press ◀ / ▶ button to adjust.
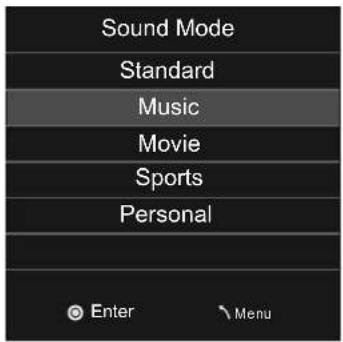
Sound Mode
Press ▼/▲ button to select Sound Mode, then press OK button to enter sub-menu.
Press ▼/▲ button to select.
You can change the value of Treble and Bass when the sound is in Personal mode.
SPDIF Mode
Press ▼/▲ button to select SPDIF MODE, then press OK button to select Off/PCM/Auto.
Treble
Press ▼/▲ button to select Treble, then press OK button to enter sub-menu. Press ◀/▶ button to adjust.
Bass
Press ▼/▲ button to select Bass, then press OK button to enter sub-menu. Press ◀/▶ button to adjust.
Balance
Press ▼/▲ button to select Balance, then press OK button to enter sub-menu. Press ◀/▶ button to adjust.
Auto Volume
Press ▼/▲ button to select Auto Volume, then press OK button to select On of Off.
Surround Sound
Surround Sound settings, Press ◀ / ▶ to set ON/OFF.
TIME MENU
Press MENU button to display the main menu.
Press ◀ / ▶ button to select TIME in the main menu, it will highlight the fourth option.
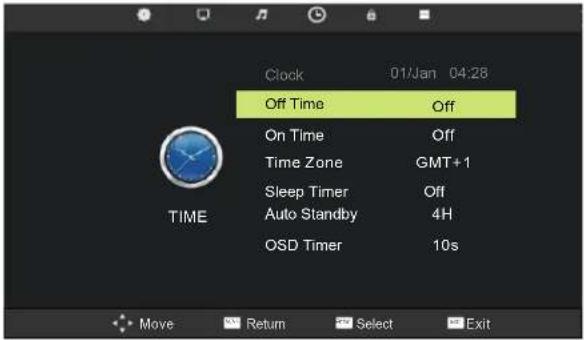
- Press ▼ / ▲ button to select the option that you want to adjust in the TIME menu.
- Press ◀ / ▶ button to adjust.
Clock
Display the current system time. It's not available.
Time Zone
Press ▼/▲ button to select Time Zone, then press OK button to enter sub-menu.
Sleep Timer
Press ▼/▲ button to select Sleep Timer, then press OK button to enter sub-menu. Press ▼/▲ button to select.
Press ◀ / ▶ button to select LOCK in the main menu, it will highlight the fifth option.
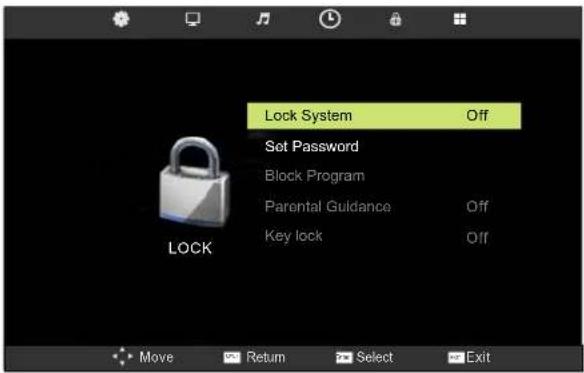
- Press ▼ / ▲ button to select the option that you want to adjust in the LOCK menu.
- Press ◀ / ▶ button to adjust.
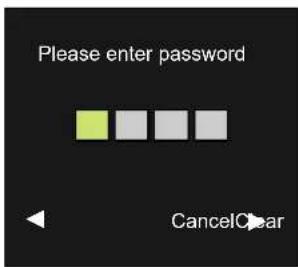
Lock System
Press ▼ / ▲ button to select Lock System, then press OK button To make the following options valid.(Default password is '0000'.)
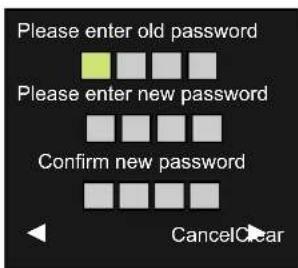
Set Password
Press ▼ / ▲ button to select Set Password, then press OK button to enter sub-menu to set new password.
Block Program
Press ▼ / ▲ button to select Block Program, then press OK button to enter sub-menu.
Press ▼ / ▲ button to select the program you want to lock, then press green button on your remote control. (To unlock program, input the password you set.)
Press OK button to save setting and menu button to back to the previous menu.
Parental Guidance
Press ▼ / ▲ button to select Parental Guidance, then press OK button to enter sub-menu to select. (Available options are: Off, 4-18)
Key Lock
Press ▼ / ▲ button to select Key Lock, then press OK button to select on or off.
SETUP MENU
Press MENU button to display the main menu.
Press ▼ / ▲ button to select Setup in the main menu, it will highlight the sixth option.
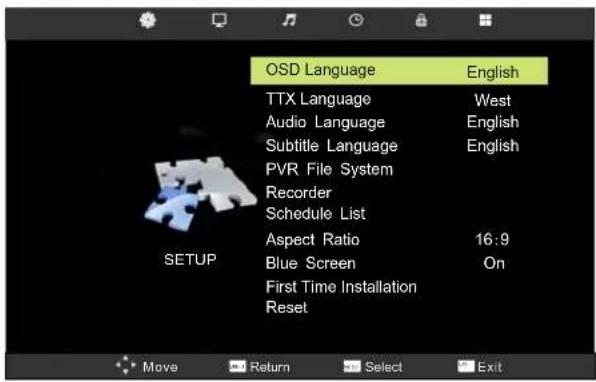
- Press ▼/▲ button to select the option that you want to adjust in the SETUP menu.
- Press ◀/▶ button to adjust.
OSD Language/Audio Language/Subtitle Language
Press ▼/▲ button to select OSD/Audio/Subtitle Language, then press OK button to enter sub-menu.
Press ▼/▲/◄/► button to select OSD language, default setting is English.
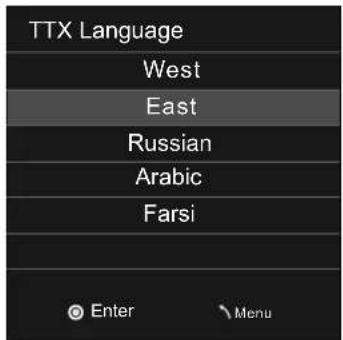
TTX Language
Press ▼/▲ button to select TTX Language, then press OK button to enter sub-menu.
Press ▼/▲ button to select TTX Language
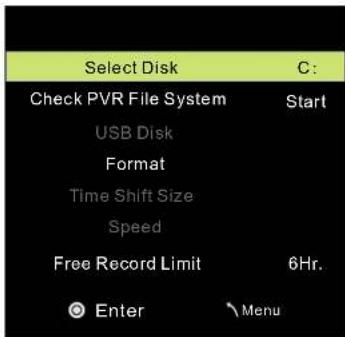
PVR File System
Press ▼ / ▲ button to select PVR File System, then press OK button to enter sub-menu.
Schedule List
Press ▼ / ▲ button to select Schedule List, then press OK button to enter sub-menu.
| Schedule List 14:27 31th May Delete Menu | |||||
| Time Date | Program Title | Channel Name | |||
| 13:30-15:30 Thurs. 31 May Before Winter Comes | 5 Five | ||||
Recorder
Press MENU button on the remote control to display the main menu; Use ◀/▶ button to select SETUP, and use ▼/▲ button to select Recorder. Then press OK button enter the sub-menu.
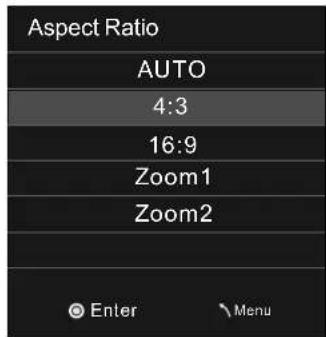
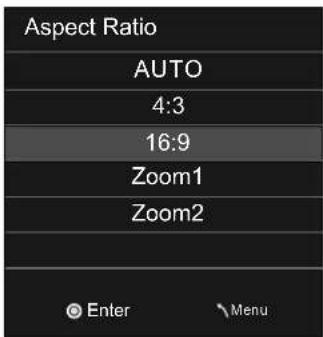
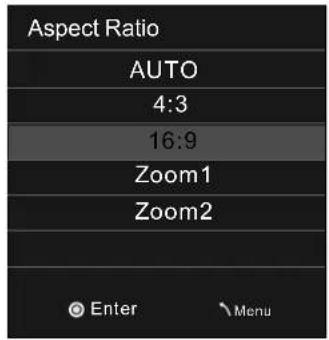
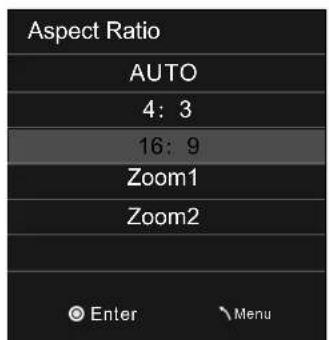
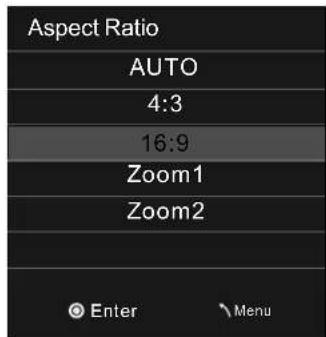
Aspect Ratio
Press ▼ / ▲ button to select Aspect Ratio, then press OK button to enter sub-menu.
Blue Screen
Press ▼ / ▲ button to select Blue Screen, then press ◀/▶ button to select on or off.
First Time Installation
Press ▼ / ▲ button to select First Time Installation, then press OK button to set relevant options including OSD language, country and tuning.
Reset
Press ▼ / ▲ button to select Reset, then press OK button to enter a dialogue. Press ◀/▶ button selecting Yes or No.
SCREEN MENU
Press MENU button to display the main menu.
Press ◀/▶ button to select Screen in the main menu, it will highlight the first option.(Only available when inputting PC-RGB signal)
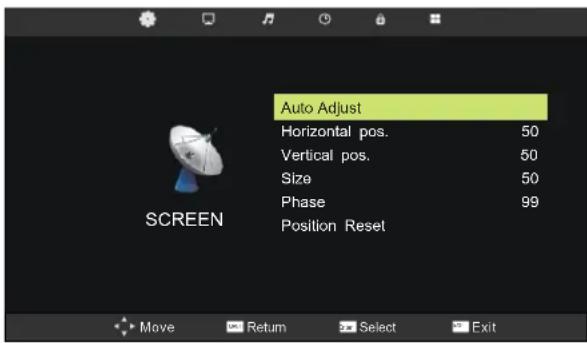
- Press ▼/▲ button to select the option that you want to adjust in the SCREEN menu.
- Press OK button to adjust.
Auto Adjust
Press ▼/▲ button to select Auto Adjust, then press OK button to start adjusting automatically.
Horizontal Pos.
Press ▼/▲ button to select Horizontal Pos. , then press OK button to enter sub-menu.Press ◀/▶ button to adjust.
Vertical Pos.
Press ▼/▲ button to select Vertical Pos. , then press OK Button to enter sub-menu.Press ◀/▶ button to adjust.
Size
Press ▼/▲ button to select Size, then press OK button to enter sub-menu. Press ◀/▶ button to adjust display size.
Phase
Press ▼/▲ button to select Phase, then press OK button to enter sub-menu. Press ◀/▶ button to adjust.
VGA(PC)
Notes:
- Noise Reduction in PICTURE option is invalid.
- SOUND menu and description are the same as that for DTV mode.
- LOCK menu and description are the same as that for DTV mode.
4 .PVR File System in SETUP menu is invalid.
AV/SCART/HDMI/YPbPr
Notes:
- PICTURE menu and description are the same as that for DTV mode.
- SOUND menu and description are the same as that for DTV mode.
- LOCK menu and description are the same as that for DTV mode.
- PVR File System in SETUP menu is invalid.
MEDIA(USB) MENU
Note: Before operating MEDIA menu, Plug in USB device, then press SOURCE button to set the Input Source to USB, then press OK button to enter.
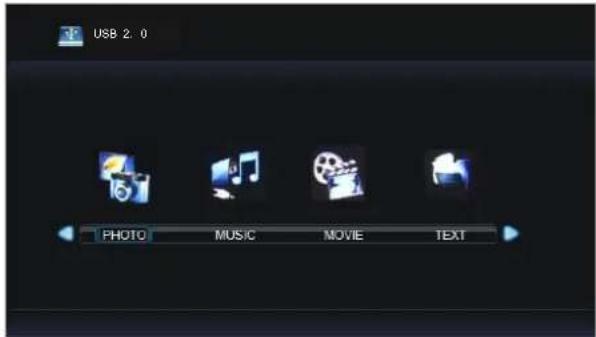
Press ◀/▶ button to select the option you want to adjust in the main MEDIA menu, then press OK button to enter.
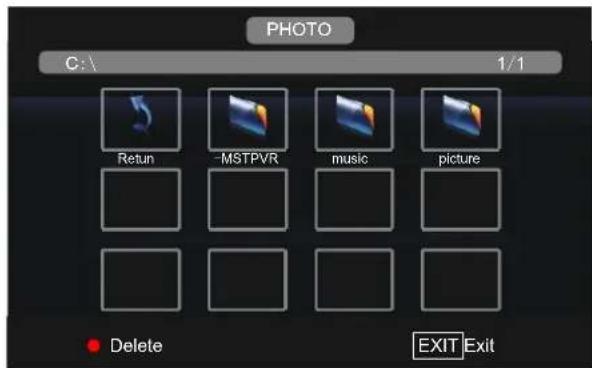
PHOTO Menu
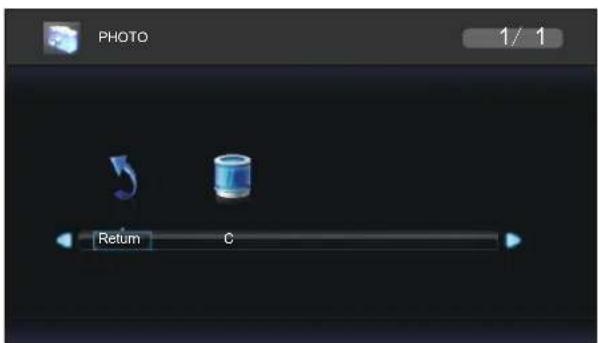
Press ◀/▶ button to select PHOTO in the main menu, then press OK button to enter.
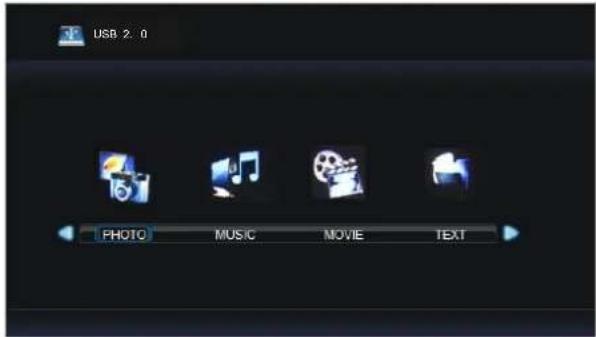
Press ◀ / ▶ button to select drive disk you want to watch, then press OK button to enter.
Press ◀ / ▶ button to select return option to back to the previous menu.
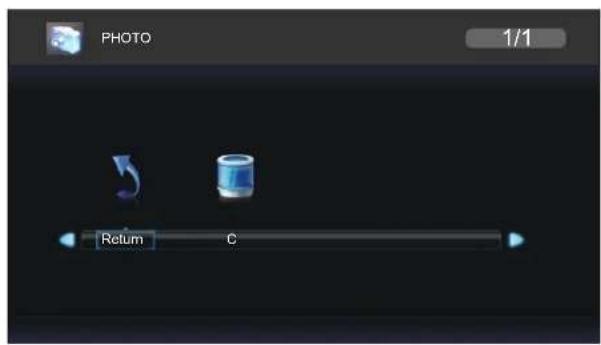
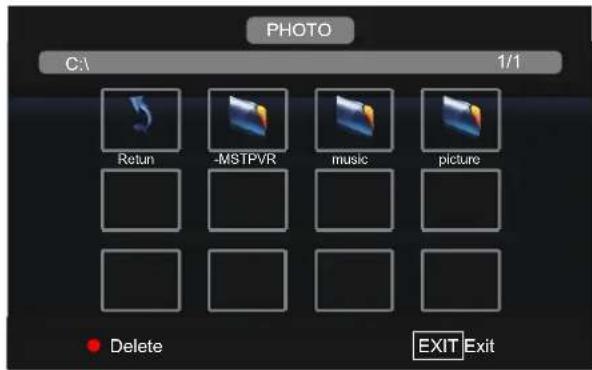
Press EXIT button to return back to the previous menu.
Press ◀/▶ button to select the file you want to watch in the file selecting menu, then press OK button to display picture. When highlighting the option you select, the file information will appear on the right and picture will be previewed in the center.
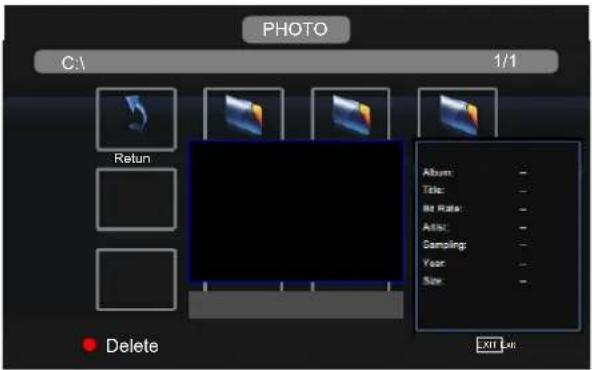
Press ◀/▶ button to select the file folder you want to search in the file selecting menu, then press
OK button on your remote control to enter sub-menu.
Press ◀/▶ button to select the file you want to delete in the file selecting menu, then press red button
On your remote control to delete files.
MUSIC Menu
Press ◀/▶ button to select MUSIC in the main menu, then press OK button to enter.
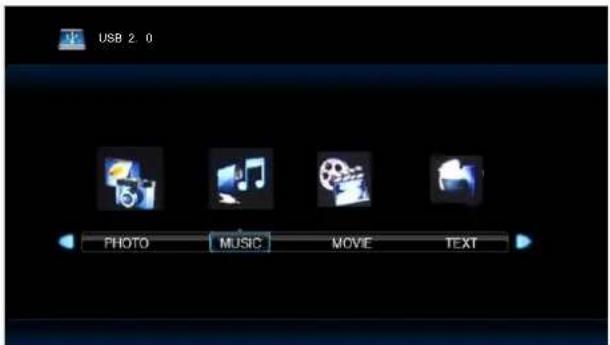
Press ◀/▶ button to select drive disk you want to watch, then press OK button to enter.
Press ◀/▶ button to select return option to back to the previous menu.
When highlighting the option you select, the file information will appear on the right.
previewed in the center.
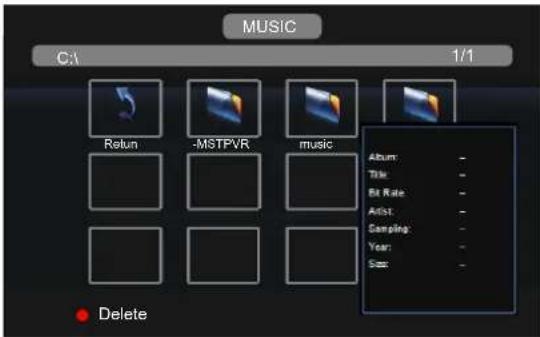
Press EXIT button to return back to the previous menu.
Press ◀/▶ button to select the file you want to watch in the file selecting menu, then press OK button to play the selected music.
MOVIE Menu
Press ◀/▶ button to select MOVIE in the main menu, then press OK button to enter.
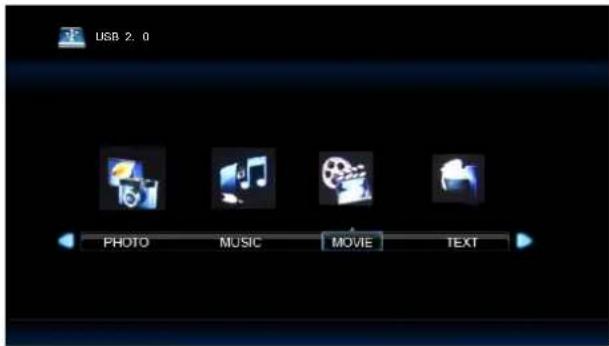
Press ◀ / ▶ button to select drive disk you want to watch, then press OK button to enter.
Press ◀ / ▶ button to select return option to back to the previous menu.
![MOVIE C:\ 1/1 Return -MSTPVR music picture .avi MPEG2 311F 720X5- [3.av] Delete EXIT Exit](/content/2026/02/378756/images/c2c51a0029f58a939f91bc9493589a33e507454b001f87b0661c14cfd18b516d.jpg)
Press EXIT button to return back to the previous menu.
When highlighting the option you select, the file information will appear on the right and movie will be previewed in the center.
Press OK button to play the selected movie.
TEXT Menu
Press ◀ / ▶ button to select TEXT in the main menu, then press OK button to enter.
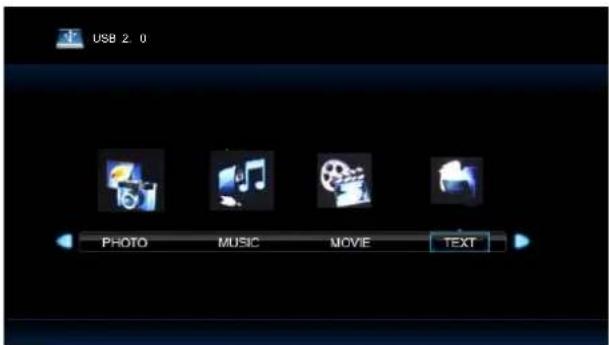
Press ◀ / ▶ button to select drive disk you want to watch, then press OK button to enter.
Press ◀ / ▶ button to select return option to back to the previous menu.
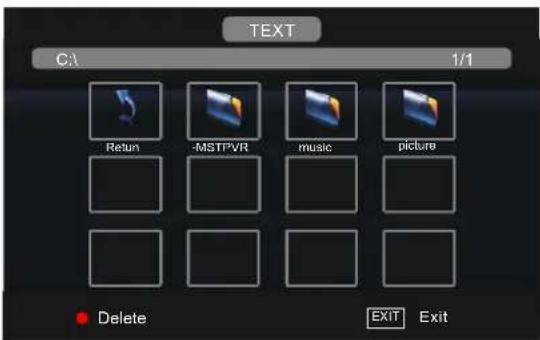
Press EXIT button to return back to the previous menu.
When highlighting the option you select, the file information will appear on the right and text will be previewed in the center.
Press OK button to view the selected text.
PVR MENU
Instant Recorder Instant Recorder
Note: Make sure you have insert the USB device to the TV board before you start to do the recording.
Press REC button on your remote control to start record whenever you want to start.
There will be a recording iron on the bottom of the display screen during recording:
![Play FB FF Next Next Preause Pre-Stop Stop [00:00:20] (0001:57:29) 5 Five Before Winter Comes 14:28](/content/2026/02/378756/images/523466b00abd6e813fd0ccb9560c378b5f7ba93e1a464e728d67c11109e6d72d.jpg)
Press REC button to display the control bar or hide it.
Press ◀/▶ button to select stop or press stop button on your remote control to stop recording.
There will be a dialog as follows:
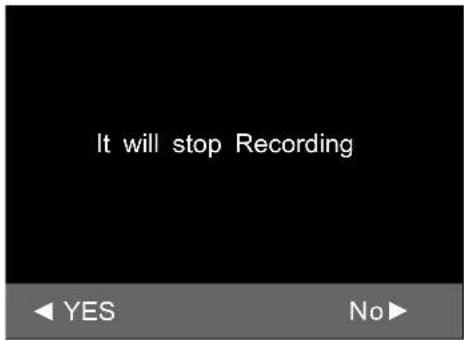
Press button to select stop VR or not.
Press ◀/▶ button to select ▶ to play the recorded program during recording.
![[00:00:20/00:02:13] Play FB FF Prev. Next Pause Stop 14:28](/content/2026/02/378756/images/0660c10d65b19daf9e08b72001ff5b501fc564619aad03476902059576f9427b.jpg)
You can press the button on the control bar to play, fastback, fastforward, play previous, play next, pause or stop playing.
Note: you can also play the recorded program in the file named " _MSTPVR" under the MOVIE file in the USB Source.
PVR File System
Press MENU button on the front of panel or MENU on the remote control to display the main menu. Press ▼/▲ button to select SETUP in the main menu, then press OK button to enter.
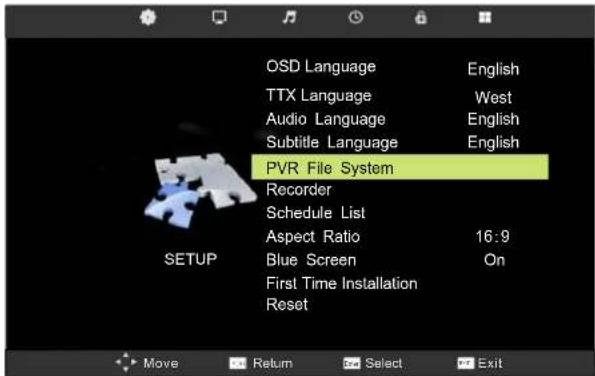
- Press ▼/▲button to select PVR File System;
- Press OK button to enter and press ▼/button to edit.
- After finishing your adjustment, Press Menu button to save and back to the previous menu.
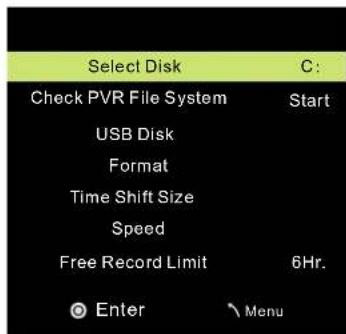
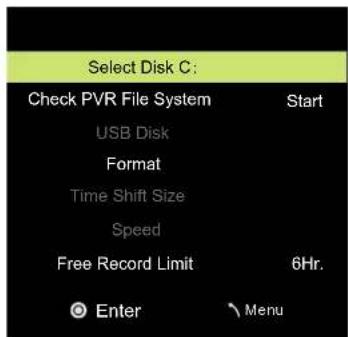
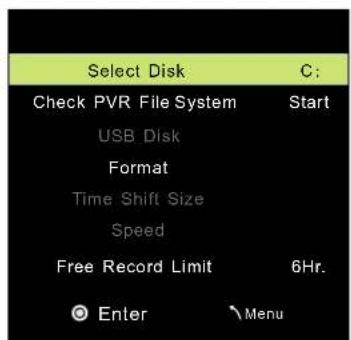
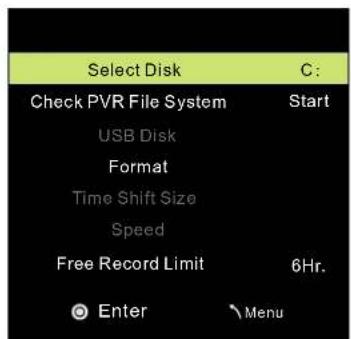
Select Disk
Press ▼/▲ button to select Select Disk, then press OK button to enter and press ▼/▲ button to select the disk you want to check.
Check PVR File System
Press ▼/▲ button to select Check PVR File System, then press OK button to check the disk you have selected.
Format
Press ▼/▲ button to select Format, then press OK button to enter the sub menu:
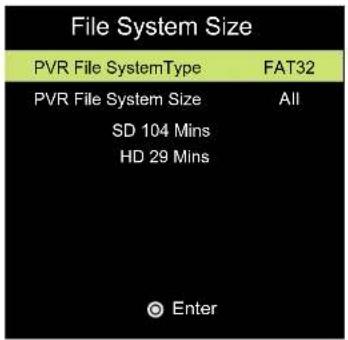
Press button to select PVR File System Type, then press button to select the system type, press OK button to format the disk, a dialog will be displayed as follows:
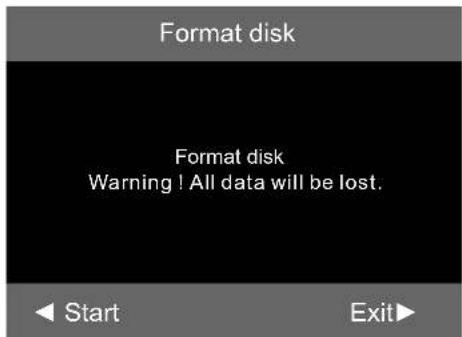
Press ◀button to start format or press ▶button to cancel format and back to the previous menu.
Recorder
Press MENU button on the remote control to display the main menu; Use ◀/▶ button to select SETUP, and use ▼/▲ button to select Recorder. Then press OK button enter the sub-menu.
- Press ▼ button to select the item;
- Press button to adjust.
- After finishing your settings, Press OK button to save .Then there will display a save successful dialog and a Schedule List which display the recording schedules you just set, you can press RED button to cancel you setting.
You can select Mode Auto\Mode Once\Mode Everyday\Mode Weekly for recording.
Start Time
Start recording time;
End Time
Recording end time.
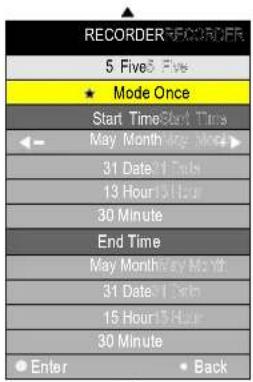
TimeshiftTimeshift
Press ▶button to start Timeshift, there will be a control bar as follows:
![Play FB FF Prev. Next Pause Stop [00:00:20] (0001:57:29) 5 Five Before Winter Comes 14:28](/content/2026/02/378756/images/39fb734901fb494d43fa09c823abdf07a0d51f77732a8119a9a935d0bf193283.jpg)
The program will stop when you start timeshift, you can continue watching the program by press the PLAY ▶ button whenever you want to watch it within the acquired timeshift time.
You can press the button on the control bar or remote control to play、fastback、fastforward、play previous、play next、pause or stop timeshifting.
Note: During Timeshift, you can not callout Input Source, Menu, Text, FAV List and so on unless you stop it first. During recording, you can't change the channel unless you stop it first;
Press POWER button will stop the Timeshift;
The Timeshift function doesn't support Timeshift Radio Channel and locked channel.
Record List
Press R.LIST button on the remote control to display the Recorded List.
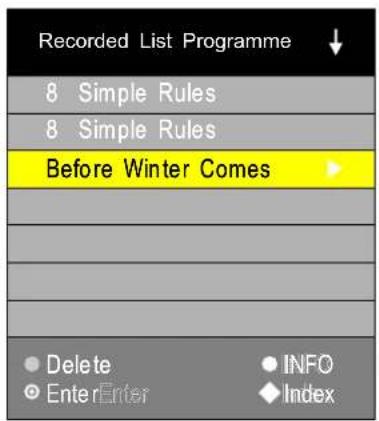
EPG Menu
Press EPG button in the Remote control.
![PROGRAMME GUIDE 31 May 2007 13:00-15:30 31 May 2007 14:38 Comedy drama starring David Niven An officer in charge of a displaced persons came faces a dilemma when a Russian cosser to is ordered back.(1960[S]) 31 May 1 Five 13:30-15: 30 Before Winter Comes 2 Five Life 15:30-17: 30 Battle of The V.1 3 Five US 17:30-18: 00 Five News Followed By Weather Record Display Schedule Remild Move View Next Day Prev Day Enter](/content/2026/02/378756/images/4ed8e41b8457089b784665650e0b44aa93243183eb25dc61197783f6b7e8b1c4.jpg)
Record
Record programme. It show record mode when selected, check PVR manual details.
Display
Display shows all the information.
Schedule List
pattern for reference the menu is as follows:
| Schedule List 14:27 31th May Delete Back | |||||
| Time Date | Program Title | Channel Name | |||
| 13:30-15:30 | Thurs. 31 May | Before Winter Comes | 5 Five | ||

Up and down to move Focus to select programme.

DELETE DELETE
Delete Focused programme.

BACKBACK
Back to EPG menu.
Remind
Programme reserved. Choose Remind to show the settings menu.
Use up and down to choose setted programme.
8.DVD Operation

Note : please ensure that the TV you have bought bought is with DVD loader, otherwise all this part does not apply.
Basic Operation
- Press Source button on the remote controller to select DVD input source.
- Press OPEN / CLOSE button to load from into disc tray.
Hold the disc without touching either or its surfaces, insert the DVD with the label toward the device's back panel into the DVD slot on the right side of you TV set.
Only push the DVD slightly until the unit feeds it automatically.
DVD Setup Mode
- Setup Mode provides the menu for the configuration of General Setup Page, Audio Setup Page, and Preference Page.
- Item selection in the Setup Menu is done by using the Navigation Arrows, D.SETUP button and the OK button.
- Press the D.SETUP button first, enter into SETUP menu, then press the DIRECTION RIGHT button, you can enter into the next Sub-menu.
- Press the D.SETUP button again to exit the Setup Menu.
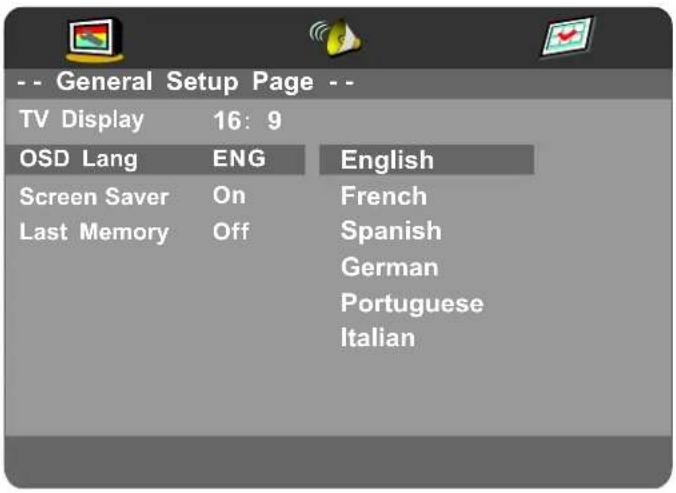
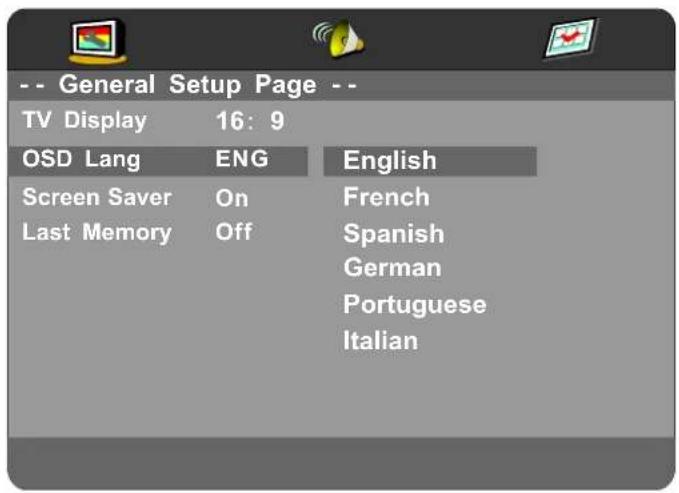
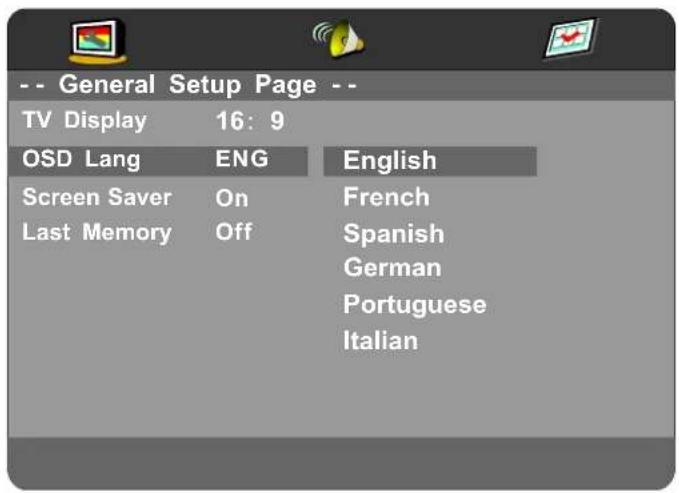
General Setup
TV Display
This is used to select the aspect 4:3/PS, 4:3/LB, 16:9.
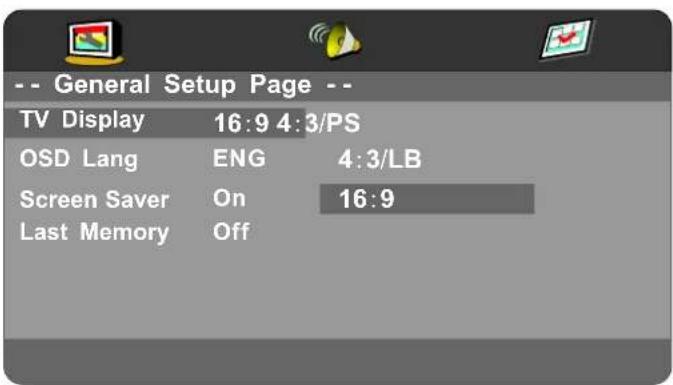
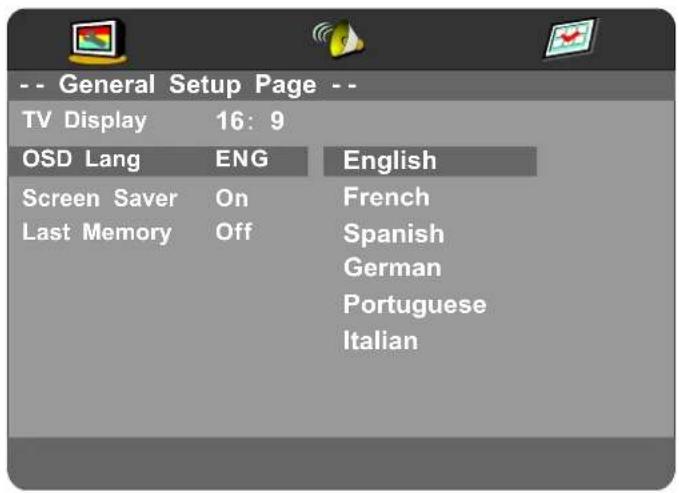
OSD Language
This is used to select the OSD language.
- English
- French
- Spanish
• German - Portuguese
- Italian
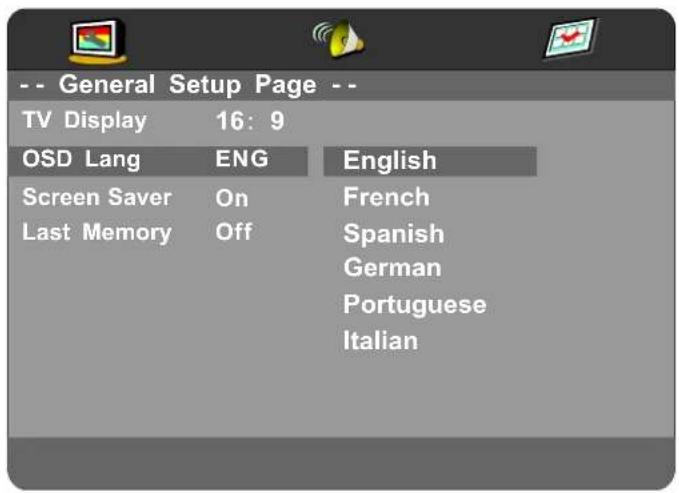
Screen Saver
Start the screen saver, the screen saver image will appear when the player stops or the picture is frozen for a few minutes. This saver can keep the screen from being damaged.
- On (Start the screen saver).
- Off (Remove the screen saver).
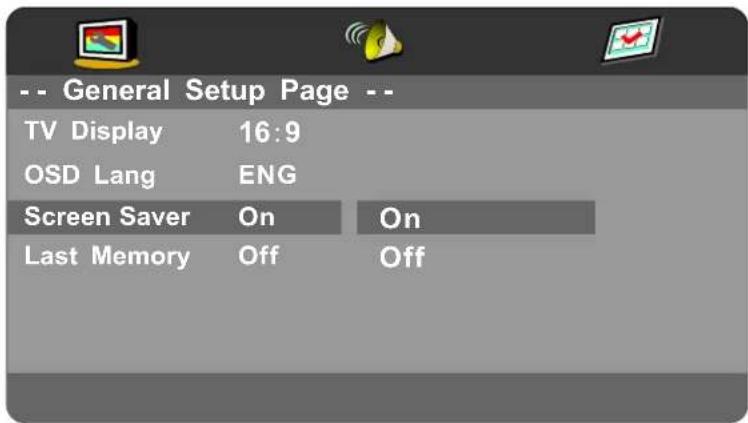
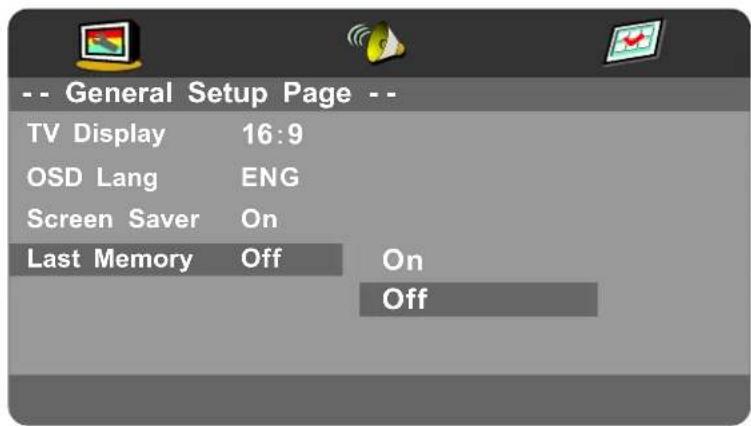
Last Memory
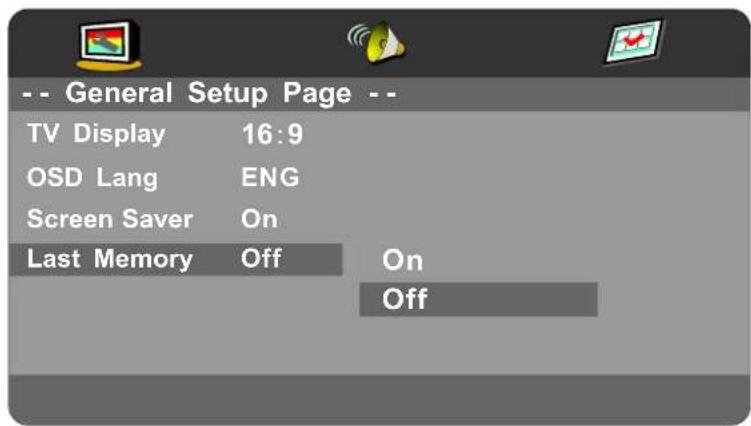
Can set the items on the last memory, "on" and "off" option.
Select "on", shutdown the machine before the settings for memory, re-boot the machine setting.
Set near the same time.
Select "off", every time the machine automatically switched back to the default settings.
- On (Start the Last Memory).
- Off (Remove the Last Memory).
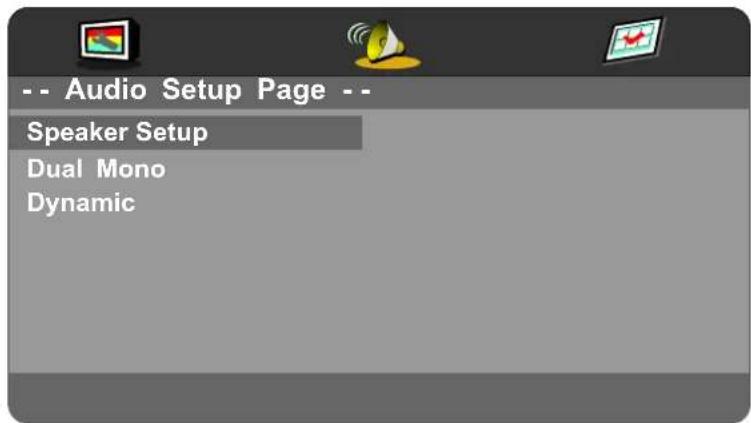
Audio Setup
- Speaker Setup
In the "Audio Setup page" press "▼" button to select "Speaker Setup" item, press the "OK ENTER" or "▶" button (play) into the "Speaker Setup Page".
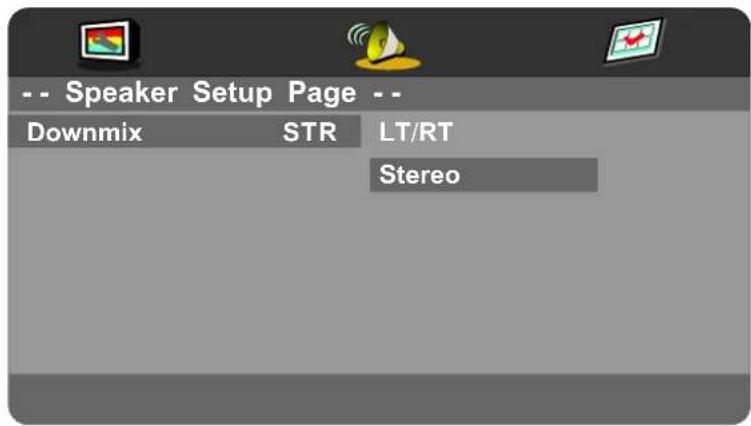
Downmix
• LT/RT
A disc recorded multi channel soundtrack, the output signal will be incorporated to left and right channel.
- Stereo
A disc recorded multi channel soundtrack, The output signal will be incorporated to stereo.
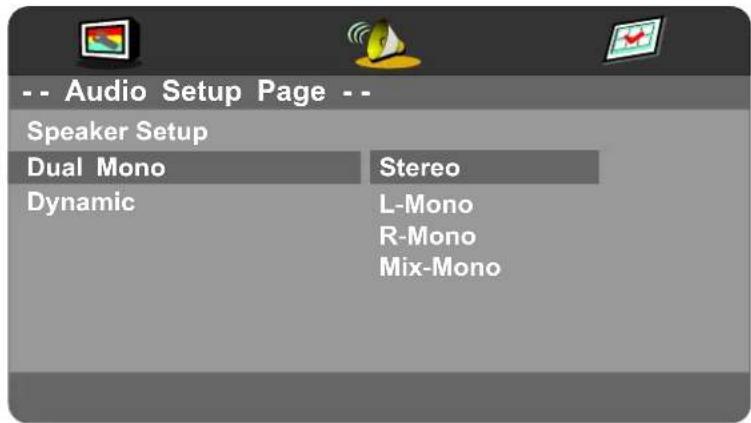
Dual Mono
This is used to select the Stereo, L-MONO, R-MONO and MIX-MONO.
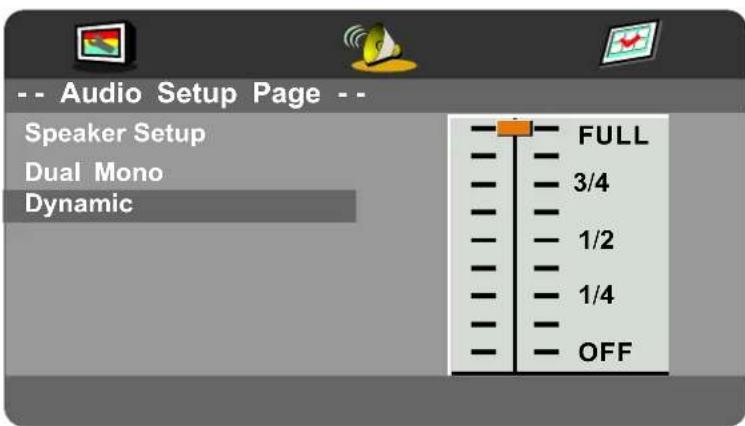
Dynamic
This option is used to set the compression ratio in order to control the sound (Volume) contrast.
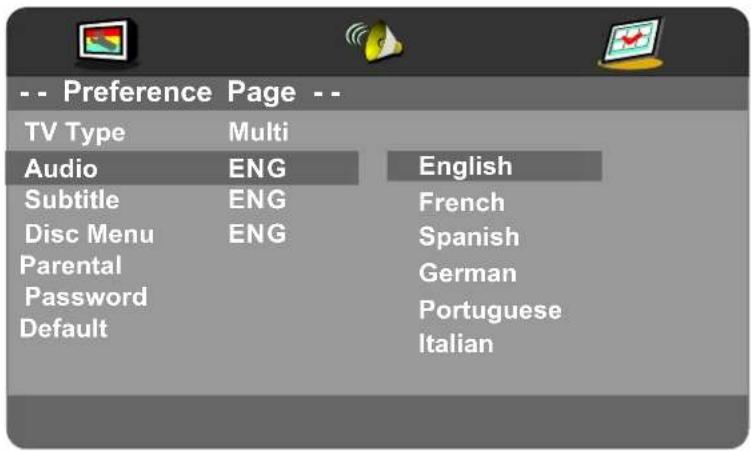
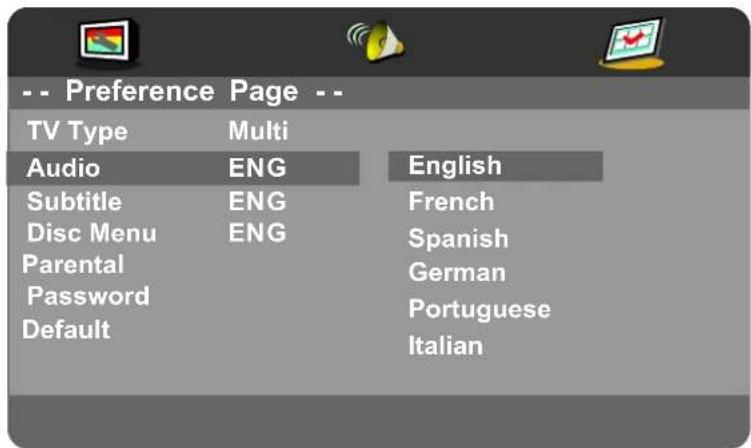
Preference Setup
You must sure no disc in the DVD then you can select Preference Page.
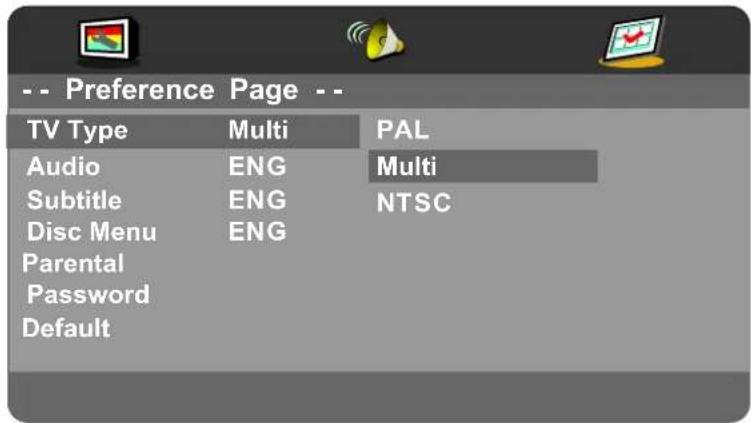
TV Type
• PAL
This is selected when the player is connected to an PAL System TV.
- MULTI
The player will set the TV system according to the disc in the tray.
• NTSC
This is selected when the player is connected to a NTSC System TV.
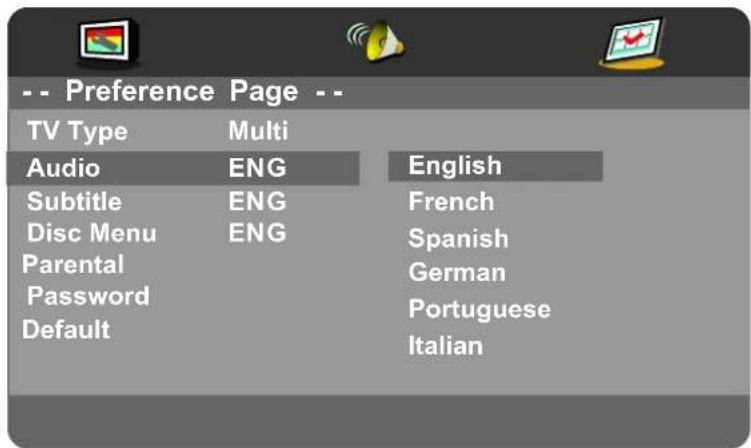
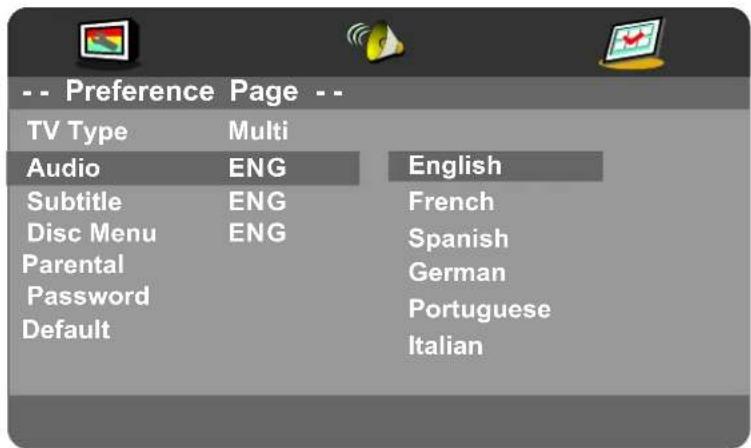
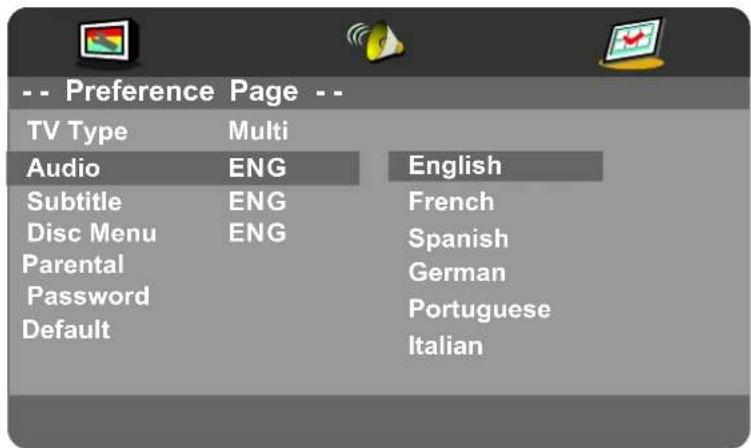
Audio
If a language listed below is recorded on the disc, you can play the sound in such language. If not, the language recorded will be used.
- English
- French
- Spanish
• German - Portuguese
- Italian
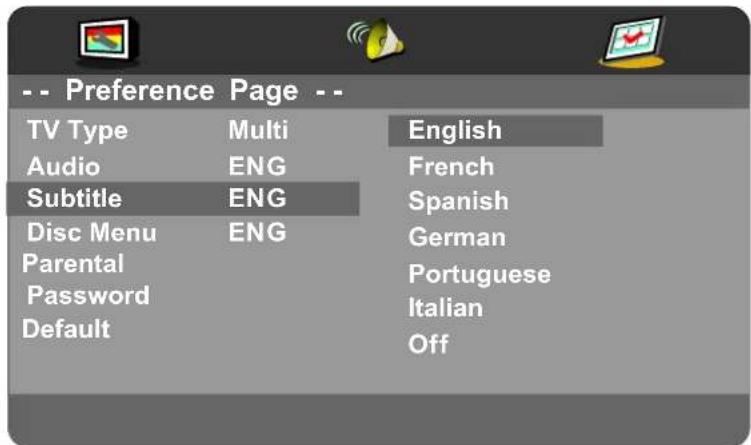
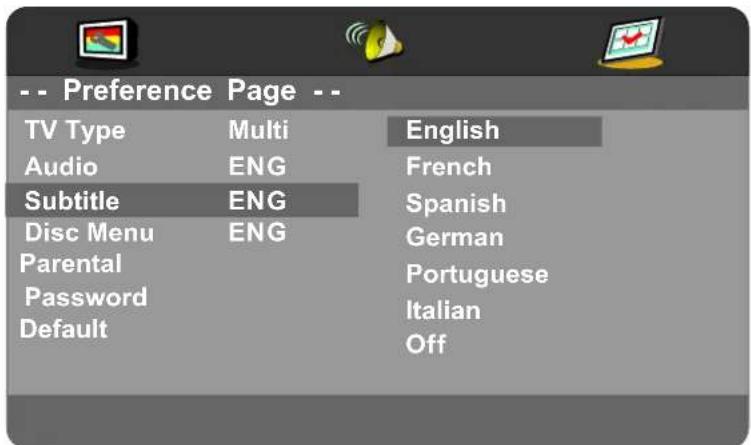
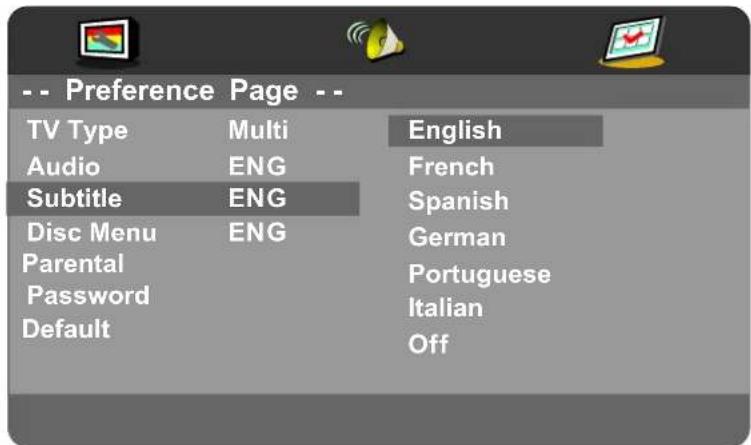
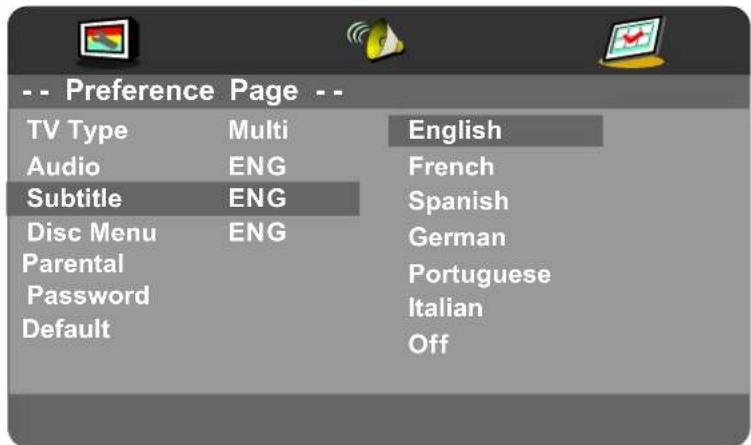
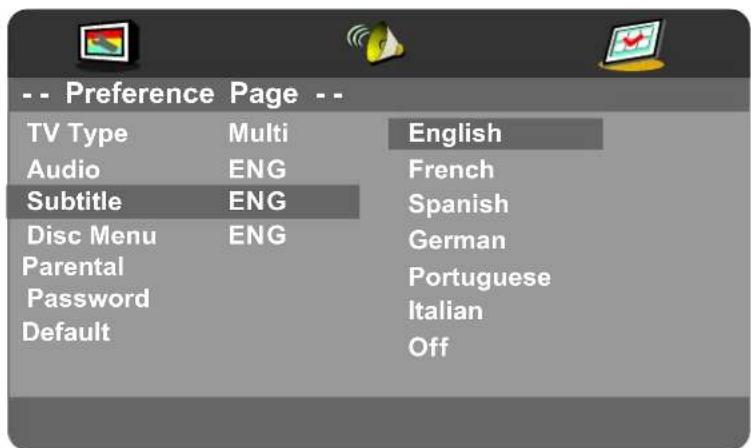
Subtitle
If a language listed below is recorded on the disc, you set the subtitle to be displayed in such language. If not, the language recorded will be used.
- English
- French
- Spanish
• German - Portuguese
• Italian - Off
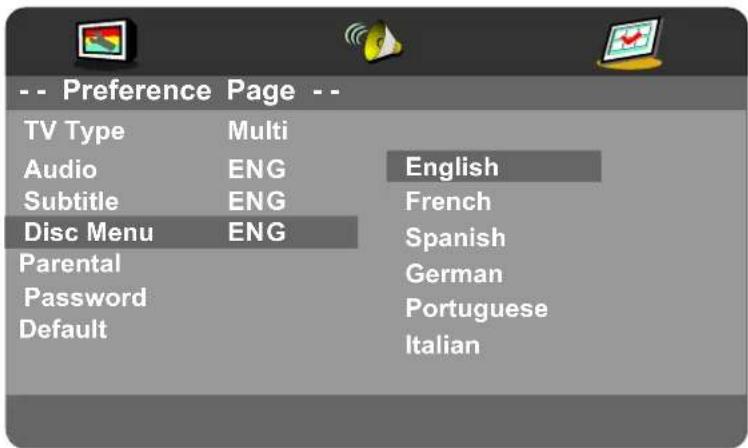
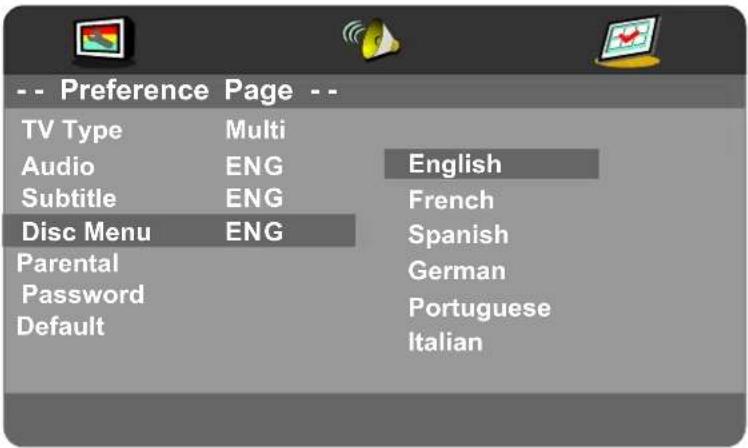
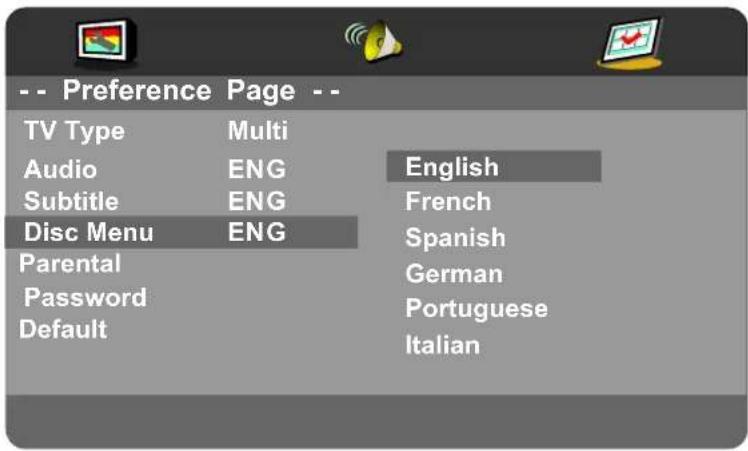
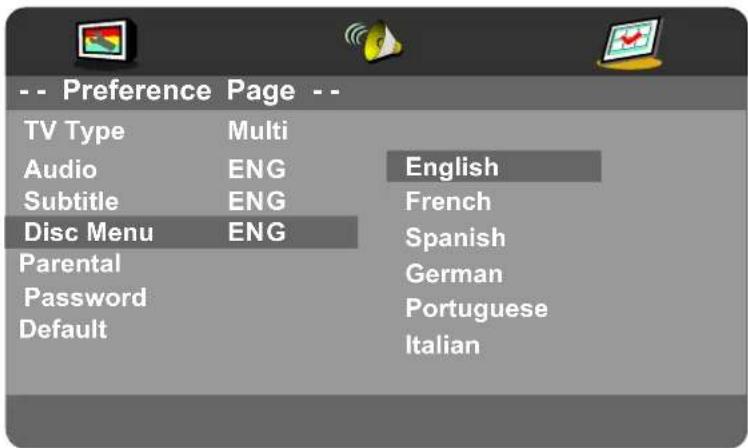
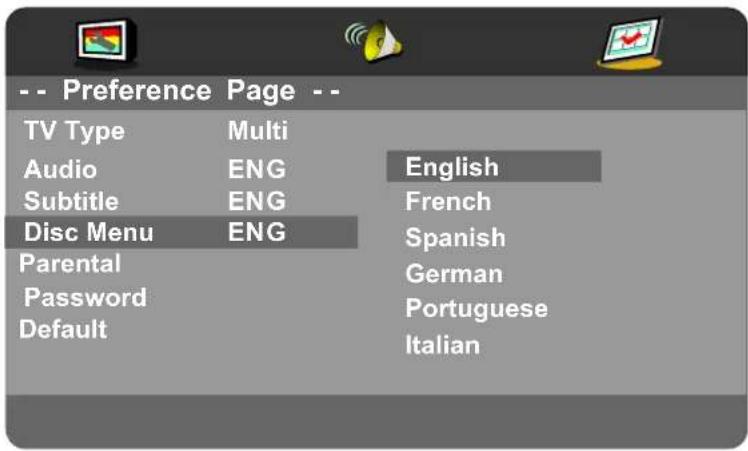
Disc Menu
If a language listed below is record on the disc, you can set the Menu to be displayed in such language. If not, the language recorded will be used.
- English
- French
- Spanish
• German - Portuguese
- Italian
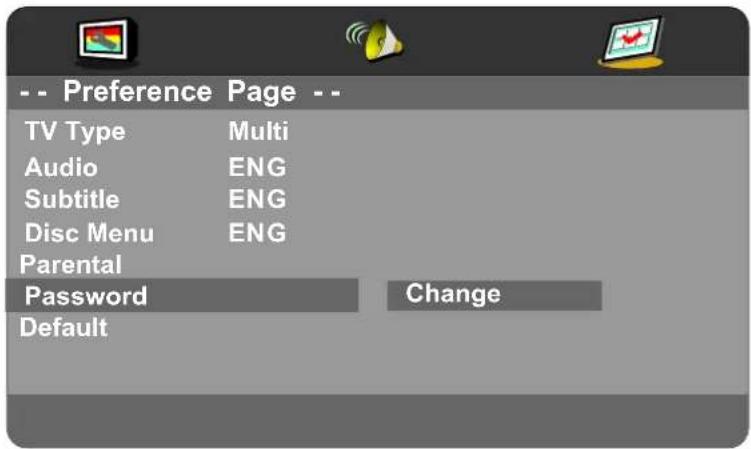
Parental
When playing disc with parental lock function, you may select an Age Control Grade according to grade of disc and your own preference. For example, if PG is selected, DVD Video disc rated higher than the PG grade cannot be played.
User can change the password that is required when the user wants to change the Age Control Grade in the Parental Lock function.
NOTE:(Default password is 123456)
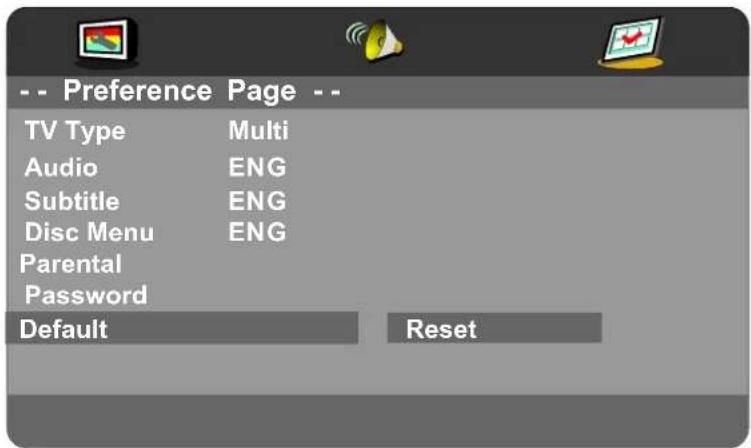
Default
User can load the original factory setting by choose RESET and press OK button.
9. TROUBLESHOOTING AND ADVICE
Please check if you can solve the issue by yourself.
| Troubleshooting | Control |
| No signal | Please check that all cables and cords are correctly plugged in. |
| No color shades | Adjust the contrast, the color and the brightness. |
| Stain showing on the screen | Maybe result from a lighting signal from car, motor, neon light and other electrical devices or appliances. |
| Double or multiple display image | Maybe the result of an electrical wave disturbance from other TV, Computer and Game machine or Radio. |
| Snow on the screen | The cables of the antenna are not correctly plugged in. |
| The remote control does not work | Please check the batteries order and alignment.Check that the IR of the remote control is not hidden by something. |
| No sound | Make sure that you have not pressed the MUTE button on the panel or the remote control. |
| No DVD | Make sure if the TV Set have been switched to DVD mode |
| DVD player not working properly | Ensure disc is correctly inserted into the player. Ensure the disc does not damaged and with correct format. Please wait patiently as some discs need longer time to play. |
10.SPECIFICATIONS
This manual is only for your reference, any change to the design and specification will not be advised.
| Mode | LED-B13TU19H | LED-B13TU22H | LED-B13HU22H | LED-B13TDU22H | |
| Screen Size | 18.5Inch 21.6 | Inch 21.6Inch | 21.6Inch | ||
| Display Type | TFT LED | ||||
| Resolution(Pixel) | 1366 X 768 | ||||
| Aspect Ratio | 16:9 | ||||
| Power Supply | AC 100-240V 50/60Hz | DC 12V | |||
| Power Consumption | 40W | 48W | |||
| TV System | PAL/SECAM | ||||
| Video Input Format | PAL/NTSC/SECAM | ||||
| Audio Output Power | L / R 2X3W | ||||
| SUPPORT | ANTENNA | YES | |||
| AV-IN | YES | ||||
| YPbPr - IN | YES | ||||
| HDMI - IN | YES | ||||
| VGA(PC) - IN | YES | ||||
| VGA(PC) AUDIO - IN | YES | ||||
| SCART - IN | YES | ||||
| SCART - OUT | YES | ||||
| EARPHONE - OUT | YES | ||||
| S-VIDEO - IN | -- | ||||
| COAXIAL - OUT | YES | ||||
| COMMON INTERFACE | YES | ||||
| USB | YES | ||||
| IPOD | -- | ||||
| DVD | Disc Physical Format | -- | -- | -- | CD/CD±R/RWDVD/DVD±R/RW |
| DVD Video Output Format | -- | -- | -- | PAL/NTSC | |
| Dimensions | Inc Stand (LxWxHmm) | 466x182x366 | 534x183x403534x | 183x403 534x183x40 | |
| Exc Sand (LxWxHmm) | 466x49x309 | 534x49x349534x | 49x349 534x49x349 | ||
| Weight | Net (Kgs) | 4.0 | 4.8 | 4.8 | 5.3 |
| Gross (Kgs) | 5.0 | 6.4 | 6.4 | 6.9 | |
| Mode | LED-B13TU24F | LED-B13HU24F | LED -B13H U32H | LED -B13H U42F | |
| Screen Size | 23Inch | 23Inch | 31.5Inch | 42Inch | |
| Display Type | TFT LED | ||||
| Resolution(Pixel) | 1920 X 1080 | ||||
| Aspect Ratio | 16:9 | ||||
| Power Supply | AC 100-240V 50/60Hz | ||||
| Power Consumption | 48W | 120W 140W | |||
| TV System | PAL/SECAM | ||||
| Video Input Format | PAL/NTSC/SECAM | ||||
| Audio Output Power | L / R 2X3WL / R 2X8W | ||||
| SUPPORT | ANTENNA | YES | |||
| AV-IN | YES | ||||
| YPbPr - IN | YES | ||||
| HDMI - IN | YES | ||||
| VGA(PC) - IN | YES | ||||
| VGA(PC) AUDIO - IN | YES | ||||
| SCART - IN | YES | ||||
| SCART - OUT | YES | ||||
| EARPHONE - OUT | YES | ||||
| S-VIDEO - IN | -- | ||||
| COAXIAL - OUT | YES | ||||
| COMMON INTERFACE | YES | ||||
| USB | YES | ||||
| IPOD | -- | ||||
| DVD | Disc Physical Format | -- | -- -- -- | ||
| DVD Video Output Format | -- | -- -- -- | |||
| Dimensions | Inc Stand (LxWxHmm) | 587x183x438 | 587x183x438 | 790x200x564 | 1019x260x697 |
| Exc Sand (LxWxHmm) | 587x49x385 | 587x49x385 | 790x47x499 | 1019x50x629 | |
| Weight | Net (Kgs) | 5.2 | 5.2 | 11.5 | 17.2 |
| Gross (Kgs) | 6.8 | 6.8 | 12.0 | 18 | |
natural_image
Simple line drawing of a computer monitor with a cross symbol above it (no text or labels)natural_image
Cartoon illustration of a computer monitor with broken-out fragments and lightning bolts (no text or symbols)natural_image
Illustration of a computer monitor with arrows indicating motion and a crossed-out hand (no text or symbols)natural_image
Front view of a black rectangular TV with 'AKIRA' branding on the front panel (no additional text or symbols visible)natural_image
Line drawing of a coiled electrical plug with a terminal connector (no text or symbols)natural_image
Back view of a computer monitor with a stand and screen, showing an upward arrow indicating orientation (no text or symbols visible)natural_image
Diagram showing connection between a DC-12V power supply and two monitors (no text or symbols present)natural_image
Illustration of a remote control panel with internal components and a separate battery pack (no text or symbols)7. UTILISATION DU MENU7. UTILISATION DU MENU
SOURCE D'ENTREESOURCE D'ENTREP
Réglage manuel DTV
| Signal Information |
| Channel 32 |
| Frequency 562.00MHZ |
| Quality 0 |
| Strength 62 |
Informations CI
MENU IMAGEMENU IMAGE
Mode image
MENU SONMENU SON
Programme Bloqué
Système Fichier MN
| Schedule List 14:27 31th May Delete \Menu | |||||
| Time Date | Program Title | Channel Name | |||
| 13:30-15:30 | Thurs. 31 May | Before Winter Comes | 5 Five | ||
Enregistreur
Heure de début
Menu GEPMenu GEP
Enregistrer
| Schedule List 14:27 31th May Delete Back | |||||
| Time Date | Program Title | Channel Name | |||
| 13:30-15:30 | Thurs. 31 May | Before Winter Comes | 5 Five | ||

- English
- French
- Spanish
• German - Portuguese
• Italian
Fond d'écran
- English
- French
- Spanish
• German - Portuguese
• Italian
Sous-titres
- English
- French
- Spanish
• German - Portuguese
- Italian
• Off
Menu du disque
- English
- French
- Spanish
• German - Portuguese
• Italian
Contrôle parental
natural_image
Simple line drawing of a computer monitor with a cross symbol above it (no text or labels)natural_image
Cartoon illustration of a computer monitor with broken-out fragments and lightning bolts (no text or symbols)natural_image
Illustration of a computer monitor with arrows indicating motion and a crossed-out hand (no text or symbols)natural_image
Front view of a black Akira TV monitor with a blank screen and stand (no visible text or symbols on the screen)LED TVLED TV
natural_image
Line drawing of a coiled electrical component with a power outlet and terminal connector (no text or symbols)natural_image
Back view of a computer monitor with a stand and directional arrows indicating orientation (no text or symbols visible)- USB: Conectar a disco externo.
- HDMI: Conectar al conector de salida HDMI del DVD.
- SCART: Conectar el conector de salida SCART (EUROCONECTOR) del VCR o DVD.
- PC AUDIO : Conectar al conector de salida de Audio del PC.
- VGA(PC): Conectar al conector de salida PC-RGB del PC.
- COAX: Conecte el receptor SPDIF.
- PHONE: Conectar los auriculares.
- YPbPr: Conectar al conector de salida YPbPr del DVD o VCR.
- VIDEO/AUDIO: Connectez la sortie vidéo / audio prise de DVD.
10 RF IN: Conectar la antena. Admite entrada de señal de TV analógica y HD DVB-T digital.
11 CI PORT: Conectar la tarjeta Cl.
natural_image
Diagram showing connection between a DC-12V power supply and two monitors (no text or symbols on devices)Press to display the Record Timer Schedule List.
R.LIST
natural_image
Illustration of a remote control panel with internal components and a separate battery pack (no text or symbols)7. MANEJO DEL MENÚ7. MANEJO DEL MENÚ
INPUT SOURCE
| Signal Information |
| Channel 32 |
| Frequency 562.00MHZ |
| Quality 0 |
| Strength 62 |
Información de CI
MENÚ DE IMAGEN
Picture Mode (Modo Imagen)
Press ▼ / ▲ button to select Colour Temp, then press OK button to select.
Temperatura del color
MENÚ DE SONIDO
Bloquear programa

Sistema de ficheros PVR (PVR File System)
| Schedule List 14:27 31th May Delete Menu | |||||
| Time Date | Program Title | Channel Name | |||
| 13:30-15:30 | Thurs. 31 May | Before Winter Comes | 5 Five | ||
Grabadora
Press EXIT button to return back to the previous menu.
When highlighting the option you select, the file information will appear on the right and movie will be previewed in the center.
Start recording time;
Menú EPG
| Schedule List 14:27 31th May Delete Back | |||||
| Time Date | Program Title | Channel Name | |||
| 13:30-15:30 | Thurs. 31 May | Before Winter Comes | 5 Five | ||

- English
- French
- Spanish
• German - Portuguese
- Italian
Salvapantallas
- English
- French
- Spanish
• German - Portuguese
- Italian
Subtítulos
- English
- French
- Spanish
• German - Portuguese
- Italian
- Off
Menú del disco
- English
- French
- Spanish
• German
• Italian
- Portuguese
Control paterno
natural_image
Simple line drawing of a computer monitor with a flower on top and a crossed X marks on the screen (no text or symbols)natural_image
Cartoon illustration of a computer monitor with broken-out fragments and lightning bolts (no text or symbols)natural_image
Illustration of a computer monitor with arrows indicating motion and a crossed-out hand (no text or symbols)natural_image
Front view of a black Akira TV monitor with a circular base (no visible text or symbols on the screen)TELEVISOR LEDTELEVISOR LED
natural_image
Line drawing of a coiled electrical plug with a terminal connector (no text or symbols)Adapter &Power Cord
Pilhas AAAPihas AAA
MANUAL DO UTILIZADOR
Manual do Utilizador Manual do Utilizador
4 LIGAÇÕES DIANTEIRAS E TRASEIRAS DO LED. 4. LIGAÇÕES DIAN
Vista Frontal
natural_image
Back view of a computer monitor with a stand and indicator lights, showing no text or symbols on the screen or body.- USB: Liga à unidade Externa.
- HDMI: Liga a tomada de saída HDMI do DVD.
- SCART: Liga a tomada de saída SCART de videogravador ou DVD.
- PC AUDIO: Liga a tomada de saída Áudio do PC.
- VGA(PC): Liga a tomada de saída PC-RGB do PC.
- COAX: Ligue o receptor SPDIF.
- PHONE: Connect the headphone.
- YPbPr: Liga a tomada de saída YPbPr do DVD ou VIDEOGRAVADOR.
- VIDEO/AUDIO: Connect the Video/Audio output jack of DVD or VCR.
- RF IN: Liga a antenna. Suporta a entrada de sinal de TV analógica e HD DVB-T digital.
- CI PORT: Connect to the CI card.
natural_image
Diagram showing connection between a DC-12V power supply and two monitors (no text or symbols on devices)Lets you select amount of time before your TV turn itself off automatically.
EXIT
When watching a channel, allows you switch between TV and Radio modes.
▶|| ( Timeshift )
Play ou pausa.

natural_image
Three views of a remote control panel showing internal components and battery casing (no text or symbols)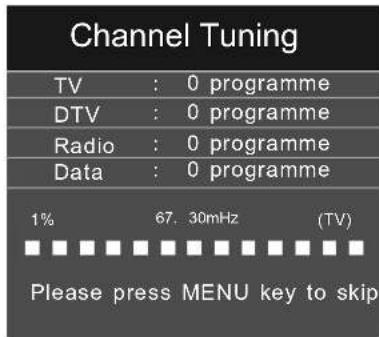
Sintonia Manual DTV
| Signal Information |
| Channel 32 |
| Frequency 562.00MHZ |
| Quality 0 |
| Strength 62 |
Informação CI
PICTURE MENU
Modo de Imagem
SOUND MENU
Definir Password
Press ◀ / ▶ button to select return option to back to the previous menu.
TTimeshift
The program will stop when you start timeshift, you can continue watching the program by press the PLAY ▶ button whenever you want to watch it within the acquired timeshift time.
You can press the button on the control bar or remote control to play、fastback、fastforward、play previous、play next、pause or stop timeshifting.
Note: During Timeshift, you can not callout Input Source, Menu, Text, FAV List and so on unless you stop it first. During recording, you can't change the channel unless you stop it first; Press POWER button will stop the Timeshift; The Timeshift function doesn't support Timeshift Radio Channel and locked channel.
Lista de Gravações
MENU EPG
| Schedule List 14:27 31th May Delete Back | |||||
| Time Date | Program Title | Channel Name | |||
| 13:30-15:30 | Thurs. 31 May | Before Winter Comes | 5 Five | ||

- English
- French
- Spanish
• German - Portuguese
- Italian
Protecção de Ecrã
- On (Iniciar o Last Memory).
- Off (Eliminar o Last Memory).
- English
- French
- Spanish
• German - Portuguese
• Italian
Legendas
- English
- French
- Spanish
• German - Portuguese
- Italian
• Off
Menu Disco
- English
- French
- Spanish
• German - Portuguese
- Italian
Parental (Controlo Parental)
natural_image
Simple line drawing of a computer monitor with a cross symbol above it (no text or labels)natural_image
Cartoon illustration of a computer monitor with broken-out fragments and lightning bolts (no text or symbols)natural_image
Illustration of a computer monitor with arrows indicating motion and a crossed-out hand (no text or symbols)natural_image
Front view of a black rectangular TV with 'AKIRA' branding on the front panel (no additional text or symbols visible)TV LED TV LED
TelecomandoTelecomando
natural_image
Line drawing of a cable and connector device (no text or symbols)Adapter &Power Cord
natural_image
Back view of a computer monitor with a stand and directional arrows indicating orientation (no text or symbols)natural_image
Diagram showing connection between a DC-12V power supply and two monitors (no text or symbols on devices)natural_image
Illustration of a remote control panel with internal components and a separate battery pack (no text or symbols)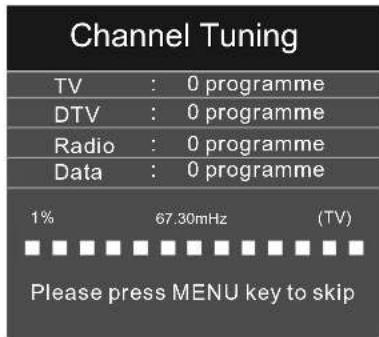
| Signal Information |
| Channel 32 |
| Frequency 562.00MHZ |
| Quality 0 |
| Strength 62 |
Informazioni CI
IMMAGINE
Modalità immagine
You can change the value of contrast, brightness, colour and sharpness when the picture is in Personal mode.
Contrasto
MENU AUDIO
Blocco programma
Sistema File PVR
| Schedule List 14:27 31th May Delete Menu | |||||
| Time Date | Program Title | Channel Name | |||
| 13:30-15:30 | Thurs. 31 May | Before Winter Comes | 5 Five | ||
Registratore
Differita
Menu EPG
Registrazione
| Schedule List 14:27 31th May Delete Back | |||||
| Time Date | Program Title | Channel Name | |||
| 13:30-15:30 | Thurs. 31 May | Before Winter Comes | 5 Five | ||

- English
- French
- Spanish
• German - Portuguese
• Italian
Screen Saver
- English
- French
- Spanish
• German - Portuguese
- Italian
Sottotitoli
- English
- French
- Spanish
• German - Portuguese
- Italian
• Off
Disc Menu (Menu disco)
- English
- French
- Spanish
• German - Portuguese
- Italian
Controllo genitori
Thank you for choosing AKIRA
Check out our web site www.akiraeurope.com

- Texte de Garantie
- 1.PREFACE
- 2.SAFETY PRECAUTIONS
- IN THE CARTON
- FRONT, BACK, CONNECTIONS OF LED.
- Front View
- Back View and Control Connections
- Power Cord Connection
- Antennas Connection
- SCART Connection
- VGA(PC) Connection
- AV Connection
- YPbPr Connection
- HDMI Connection
- COAX Connection
- USB PORT FUNCTION
- REMOTE CONTROL.
- Remote control instructions in TV mode
- POWER
- MUTE
- NUMBER BUTTONS
- LIST
- DISPLAY
- ASPECT
- VOL+/VOL-
- CH+/CH-
- MENU
- SOURCE
- THUMBSTICK( ▲/ ▼/◀ / ▶/ OK ENTER )
- SLEEP
- EXIT
- AUDIO(I/II)
- Remote control instructions in DTV/USB mode
- INFO
- COLOR BUTTONS
- T.LIST
- R.LIST
- SUBTITLE
- FAV
- REC
- EPG
- AUDIO
- TV/RADIO
- ▶|| (Timeshift)
- REPEAT
- Remote control instructions in TELETEXT mode
- TTX
- HOLD
- SIZE
- REVEAL
- INDEX
- SUBPAGE
- Remote control instructions in DVD mode
- Remote control setup
- MENU OPERATION
- INPUT SOURCE
- CHANNEL MENU
- Auto Tuning
- DTV Manual Tuning
- ATV Manual Tuning
- Programme Edit
- Signal Information
- CI Information
- PICTURE MENU
- Picture Mode
- Contrast
- Brightness
- Colour
- Tint
- Sharpness
- Colour Temp
- Noise Reduction
- SOUND MENU
- Sound Mode
- SPDIF Mode
- Treble
- Bass
- Balance
- Auto Volume
- Surround Sound
- TIME MENU
- Clock
- Time Zone
- Sleep Timer
- Lock System
- Set Password
- Block Program
- Parental Guidance
- Key Lock
- SETUP MENU
- OSD Language/Audio Language/Subtitle Language
- TTX Language
- PVR File System
- Schedule List
- Recorder
- Aspect Ratio
- Blue Screen
- First Time Installation
- Reset
- SCREEN MENU
- Auto Adjust
- Horizontal Pos.
- Vertical Pos.
- Phase
- VGA(PC)
- Notes:
- AV/SCART/HDMI/YPbPr
- MEDIA(USB) MENU
- PHOTO Menu
- MUSIC Menu
- MOVIE Menu
- TEXT Menu
- PVR MENU
- Instant Recorder Instant Recorder
- Select Disk
- Check PVR File System
- Format
- Start Time
- Record List
- EPG Menu
- Record
- Remind
- 8.DVD Operation
- Basic Operation
- DVD Setup Mode
- General Setup
- TV Display
- OSD Language
- Screen Saver
- Last Memory
- Audio Setup
- - Speaker Setup
- Downmix
- Dual Mono
- Dynamic
- Preference Setup
- TV Type
- Disc Menu
- Parental
- Default
- TROUBLESHOOTING AND ADVICE
- 10.SPECIFICATIONS
- UTILISATION DU MENU7. UTILISATION DU MENU
- SOURCE D'ENTREESOURCE D'ENTREP
- Réglage manuel DTV
- Informations CI
- MENU IMAGEMENU IMAGE
- Mode image
- MENU SONMENU SON
- Programme Bloqué
- Système Fichier MN
- Enregistreur
- Heure de début
- Menu GEPMenu GEP
- Fond d'écran
- Sous-titres
- Menu du disque
- Contrôle parental
- MANEJO DEL MENÚ7. MANEJO DEL MENÚ
- Información de CI
- MENÚ DE IMAGEN
- Picture Mode (Modo Imagen)
- Temperatura del color
- MENÚ DE SONIDO
- Bloquear programa
- Sistema de ficheros PVR (PVR File System)
- Grabadora
- Menú EPG
- Salvapantallas
- Subtítulos
- Menú del disco
- Control paterno
- LIGAÇÕES DIANTEIRAS E TRASEIRAS DO LED. 4. LIGAÇÕES DIAN
- Sintonia Manual DTV
- Informação CI
- Modo de Imagem
- Definir Password
- TTimeshift
- Lista de Gravações
- MENU EPG
- Protecção de Ecrã
- Legendas
- Menu Disco
- Parental (Controlo Parental)
- Informazioni CI
- IMMAGINE
- Modalità immagine
- Contrasto
- MENU AUDIO
- Blocco programma
- Sistema File PVR
- Registratore
- Differita
- Registrazione
- Sottotitoli
- Disc Menu (Menu disco)
- Controllo genitori
- Thank you for choosing AKIRA
Brand : AKIRA
Model : LEDB13HU32H
Category : Television