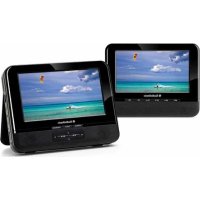
DV1822 - Portable DVD Player AudioSonic - Free user manual and instructions
Find the device manual for free DV1822 AudioSonic in PDF.


| Product type | Portable DVD player |
| Brand | AudioSonic |
| Model | DV1822 |
| Supported formats | DVD, DVD-RW, Audio CD, MP3, MPEG4, JPEG, Kodak Picture CD |
| Screen | TFT LCD screen |
| Power supply | Mains adapter (AC), 12V car adapter, built-in rechargeable lithium battery |
| Battery | Rechargeable lithium, charges only when device is off |
| Ports | USB, SD/MMC, AV output (RCA), headphone jack |
| Functions | Programmed playback, repeat, zoom, search, multi-angle, subtitles, audio languages |
| Remote control | Yes, with battery |
| Included accessories | Mains adapter, car adapter, A/V cable, remote control, battery |
| Safety | Do not expose to water, do not block ventilation, do not use solvents |
| Maintenance | Soft, dry cloth |
| Repairability | Contact an authorized repair center |
| Disc handling instructions | Hold by edges, avoid fingerprints |
| Environment | Do not dispose with household waste, recycle according to WEEE directive |
Frequently Asked Questions - DV1822 AudioSonic
User questions about DV1822 AudioSonic
0 question about this device. Answer the ones you know or ask your own.
Ask a new question about this device
Download the instructions for your Portable DVD Player in PDF format for free! Find your manual DV1822 - AudioSonic and take your electronic device back in hand. On this page are published all the documents necessary for the use of your device. DV1822 by AudioSonic.
USER MANUAL DV1822 AudioSonic
natural_image
Two black audio/video monitor screens displaying tropical beach scenes with sky and water reflections (no text or symbols visible)INSTRUCTION MANUAL
GEBRUIKERSHANDLEIDING
BEDIENUNGSANLEITUNG
MODE D'EMPLOI
MANUAL DE INSTRUÇÕES
INSTRUKCJE OBS UGIŁ
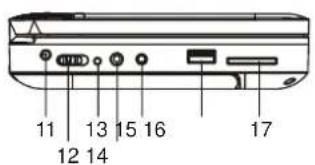
OVERVIEW OF THE DVD PLAYER:



natural_image
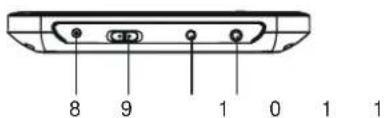
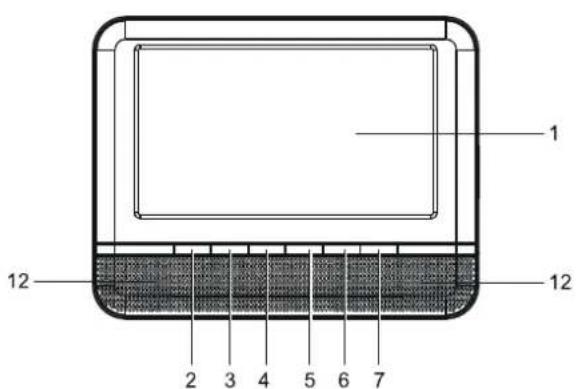
Technical line drawing of a mechanical component with labeled part 21 (no text or symbols beyond label)SLAVE SCREEN:
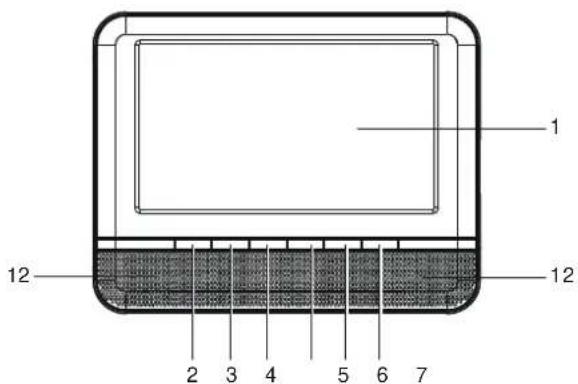
- NAVIGATION UP KEY
- PLAY/PAUSE KEY
- PREVIOUS/F.BWD KEY
- NAVIGATION LEFT/VOL- KEY
- NAVIGATION DOWN KEY
- NAVIGATION RIGHT/VOL+ KEY
- NEXT/F.FWD KEY
- STOP/USB/CARD KEY
- OK/SETUP KEY
- TFT SCREEN
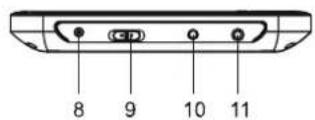
- DC IN JACK
- POWER ON/OFF SWITCH
- POWER/CHARGE INDICATOR
- PHONE JACK
- AUDIO/VIDEO OUT JACK
- USB PORT
- SD/MMC CARD SLOT
- BRACKET
- SPEAKERS
- REMOTE SENSOR
-
DISC COVER OPEN AREA
-
DISPLAY
- BRIGHTNESS DOWN KEY
- BRIGHTNESS UP KEY
- COLOR DOWN KEY
- COLOR UP KEY
- VOL - KEY
- VOL + KEY
- DC IN JACK
- POWER ON/OFF SWITCH
- AV INPUT JACK
- PHONE JACK
- SPEAKERS
REMOTE CONTROL UNIT:

-
MUTE button
-
VOLUME+ button
-
VOLUME- button
-
REPEAT 1/ALL&A-B button
-
MENU button
-
SUBTITLE button
-
PLAY button
-
TITLE button
-
AUDIO button
-
PAUSE/STEP button
-
F.BWD button
-
F.FWD button
-
ANGLE button
-
ZOOM button
-
DISPLAY button
-
SETUP button
-
TFT SET button
-
NUMERIC buttons
-
CLEAR button
-
STOP&DVD/SD/USB button
-
ENTER button
-
NAVIGATION buttons
-
SLOW button
-
NEXT button
-
PREVIOUS button
-
SEARCH button
-
PROGRAM button
BASIC CONNECTION
- It is recommended to connect a multi-system TV.
- Ensure that this player and other equipment to be connected are set to OFF mode and disconnect the AC power cords before commencing connection.
- Do not block ventilation holes of any of the equipment and arrange them so that air can circulate freely.
- Read through the instructions before connecting other equipment.
- Ensure that you observe the color coding when connecting audio, video cables. If the RCA adapter is supplied only, the audio/video RCA cable is required. Plug one end of the RCA adapter to the unit. Then connect the audio/video RCA cable to the RCA adapter and the television.
Note:
- During DVD play, the TV volume may be at a lower level than during TV broadcasts, etc. If this is the case, adjust the volume to the desired level.
- If the DVD/CD player is connected to the TV through a video cassette recorder, the picture may not be played back normally with some DVDs. If this is the case, do not connect the player via the VCR.
- The mother unit of the DVD player is designed to be used both for indoor and in-car, the slave is only for in-car usage.
CONNECTING TO A STEREO TV SET
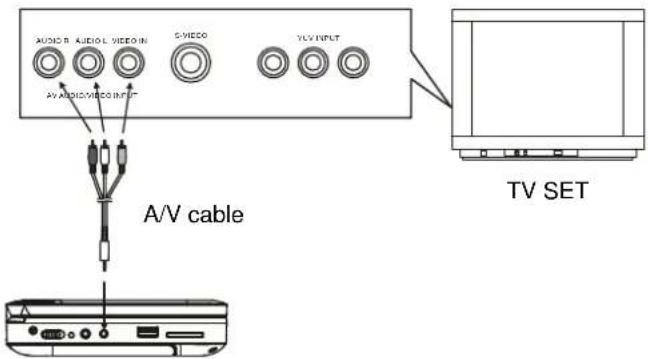
After connection is firmed and securely done, plug AC ADAPTER to an applicable wall outlet and turn on the player.
CONNECTING TO AN AFFILIATED SCREEN
This unit is equipped with another affiliated screen, you can use the affiliated screen and player to appreciate the programme at the same time, the connecting method is illustrated as below using the in car adapter.

CHARGE THE BUILT-IN BATTERY
The player is with a rechargeable lithium battery. Before using the battery, please make sure it is charged. If not, charge it first. Slide the power switch to OFF position and then connect one end of the supplied adapter to the wall outlet and the other end to the unit for charging the built-in battery. Note:
- The battery only could be charged at powering off mode.
- If the unit is not in use for a prolonged period of time, it is recommendable to charge the built-in battery each three months.
CONNECTING TO A CAR ADAPTOR
The car power adaptor is designed for use with vehicles that have a 12V, negative ground electrical system.
WARNING:
Disconnect the car power adaptor when not in use. Not in use in 24V vehicles.

To the cigarette lighter socket
CAUTIONS:
- Use the unit only with the recommended car power adaptor, use with other car power adaptor might damage the unit.
- The recommended car power adaptor is for use with this unit only. Do not use it with other equipment.
- In the interests of road traffic safety, do not operate the unit or view video software while driving a vehicle.
- Make sure the unit is fastened securely to prevent from moving outside of the vehicle in an accident
- When the inside of the cigarette lighter socket is dirty with ashes or dust, the plug section may become hot due to poor contact. Be sure to clean the cigarette lighter socket before use.
- After use, disconnect the car power adaptor from both the unit and cigarette lighter socket.
FUSE REPLACEMENT
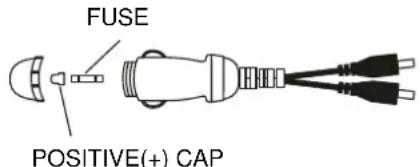
NOTE: Don't throw out the positive(+) cap when replace the fuse.
OPERATIONS
PREPARATION
Power on the TV set and select video input mode.
Power on the audio system which is connected to the player.
GET STARTED
- Slide POWER switch to turn on the player.
- Open the disc tray by hand.
- Place a disc onto the disc tray.
- Close the disc tray by hand and the playback starts automatically.
- When a menu screen appears on the TV, move the navigation buttons or press the numeric buttons to select a preferred track number, then press ENTER/OK button to start playback.
ADJUST THE VOLUME
Press the VOLUME+/- button on the remote or press and hold VOL+/- button on the unit to increase or reduce the volume.
MUTE
While the power is on, the audio output of the main unit is to be shut off by pressing the button. Press it again to resume sound output.
SKIP AHEAD OR BACK
Press PREV button during play to skip previous chapter (DVD) or a track (CD), Press NEXT button during play to skip next chapter (DVD) or a track (CD).
COLOR AND BRIGHTNESS ADJUSTMENT (FOR THE LCD SCREEN)
Press TFT SET button on the remote repeatedly to adjust the color intensity and brightness respectively via navigation left/right button.
Press and hold this button for a moment to turn on or off the TFT display.
RAPID ADVANCE/REVERSE
During playback, press and hold F.FWD button or F.BWD button on the unit or press these two buttons on the remote respectively to scan the disc forward or backward at X2, X4, X8, X20 normal speed.
Press PLAY button to resume normal play.
PAUSE/STEP PLAY
Press pause/step button during playback to pause. During pause mode, each time the pause/step button is pressed, the player will only play one frame; to resume normal play, press play button.
STOP PLAYBACK
Press STOP button during playback to stop playback; the player activates its resume function when STOP is pressed in STOP mode; press PLAY button again, playback resumes at the point it stopped previously; open the disc tray or press the STOP button one more time to clear the resume function.
Press SLOW button during playback, the disc will be played at 1/2 normal speed at first, each time this button is pressed, the play speed becomes slower (down to 1/7 normal speed.) Press PLAY button, normal play will resume.
REPEAT
Press REPEAT 1/ALL&A-B button during play, it will repeat play one chapter/title or repeat all (for DVD disc), or repeat play a track or all tracks (for CD), or repeat the sections between two specific points (A-B).
SEARCH FOR PREFERRED SCENE
- Press SEARCH button during play and highlight the item to be played (Title, Chapter, or Chapter time) by navigation buttons.
- Input the desired number or time via the numeric buttons.
- Press OK button to confirm and the playback from the located scene starts.
- To exit search menu, press SEARCH button directly.
PROGRAM PLAY (UP TO 16 MEMORIES)
- Press PROGRAM during playback to display the program menu.
- Select location(s) to be memorized via navigation buttons and then enter desired Titles/Chapters numbers via numeric buttons.
Example: Track 3, press "3"
Track 12, press "+10" and then "2"
Track 21, press "+10" twice and then "1" - To start programmed playback, select PLAY on the menu; pressing PROGRAM button again to exit programming.
- To clear a programmed item, enter program menu and scroll to the item you want to clear, press CLEAR button on the remote to clear the selected item. To clear all items, select the
on the menu, and then press OK button on remote control. - You can also cancel program mode by clearing all the items in the program menu.
ZOOM PLAY
Press ZOOM button continuously to zoom in the picture by 2, 3, and 4 times, zoom out by 1/2, 1/3, 1/4 normal size.
Press this button once more when the picture is at 1/4 size to return to the normal size display.
Scroll to view the enlarged picture using Navigation buttons.
ON SCREEN DISPLAY INFORMATION
When the player is in operation, press DISPLAY button continuously, the screen will display parts of information (current disc type, title number, chapter number, playtime, audio language, audio type, subtitle language and multi angle, etc) in a sequence.
CHANGING AUDIO SOUNDTRACK LANGUAGE (DVD DISC)
It is possible to change the audio soundtrack language to a different language from the one selected at the initial settings (This operation works only with discs on which multiple audio soundtrack languages are recorded).
Press AUDIO button during DVD disc play, the sound track will be changed with a selected sound track showing on the screen.
NOTE: When no soundtrack languages are recorded, pressing this button will not work.
MULTI-ANGLE VIEWING (DVD ONLY)
Press ANGLE button to select your desired angle to view the scene.
Note: only the DVDs shot with multi-angle scenes have this function.
CHANGING SUBTITLE LANGUAGE (DVD ONLY)
Press SUBTITLE button several times during DVD playback, the subtitle language will be changed with the selected subtitle language showing on the screen;
When the desired language appears, release the button to view the subtitle in that language.
Note: this function only works on the DVDs recorded with multi-language subtitles.
RETURN TO MAIN MENU AND PLAY THE TITLE (DVD)
During playback, press MENU button to return to main menu and press TITLE button to play the title.
MP3/MPEG 4 PLAYBACK
- Load the MP3/MPEG 4 disc onto the disc tray, then select a corresponding format (music, picture, video) to play the disc with navigation left/right button and press OK Button to confirm. Then the TV screen will show folders of the selected format on the disc.
- Select the folder you want by the navigation buttons and then press OK button to confirm.
- The files in this folder are displayed and select your favourable track via navigation buttons and press ok button to start playback.
- Press NEXT and PREV button to select track directly.
- Press REPEAT1/ALL&A-B button change play mode.
KODAK PICTURE CD / JPEG CD PLAYBACK
Load a Kodak picture CD/JPEG CD disc onto the disc tray, then select picture format to play the disc with navigation left/right button and press OK Button to confirm.
Slide show of Kodak Picture CD begins automatically; Folders of JPEG picture CD are displayed on the TV screen; use the navigation buttons on the remote to select the desired folder and then press OK button to confirm.
The files in this folder are displayed and you can select your favourable pictures using the up/down navigation buttons on the remote and press ENTER/OK button to start playback.
Preview of the picture, resolution, size, date will be displayed while you scroll across the file names.
KODAK PICTURE CD / JPEG CD OPERATIONS
1. PLAY MODES
Press REPEAT 1/ALL&A-B button to change play mode. During playback, press STOP to enter preview mode.
2. SKIP TO NEXT/PREVIOUS PICTURE
Press NEXT button to skip to the next picture or PREV button to the previous picture.
3. PICTURE ROTATIONS
Press RIGHT and LEFT navigation buttons to rotate the picture Clockwise and anti-clockwise respectively.
4. PICTURE FLIP AND TURN
Press UP navigation button to flip the picture up or down. Press DOWN navigation button to flip the picture left or right.
5. PICTURE ZOOM IN/OUT
Press ZOOM button continuously, the picture zooms in by 2, 3, 4 times or zooms out by 1/2, 1/3, 1/4 the original size. Press this button once more when the picture getting 1/4 size to return to the normal play. If the picture is enlarged, you may use the navigation buttons to view blocked parts of the picture.
6. SLIDE SHOW TRANSITION MODES
During slide show playback, press the PROGRAM button cyclically to select one play mode to play picture.
EXTERNAL MEMORY MEDIA OPERATION (USB&SD/MMC CARD)
Prepare the player for External Memory media operation
-
Slide the POWER switch to ON position, Insert a USB data traveller filled with media files into the USB port or plug the SD/MMC card into the card slot, the USB or the SD/MMC card is successfully detected, select a corresponding format via navigation right/left button for play and press ENTER Button to confirm. Folders show on the screen and use navigation buttons to select your desired folder and track to play.
-
Press NEXT or PREVIOUS button to skip forward or backward.
Note: Press and hold STOP button to call out the source menu and make selection among USB, card and disc via navigation RIGHT/LEFT button, press ENTER/OK button to enter the selected mode.
CAUTION: To avoid electronic static discharge, don't touch the USB port and card slot during playback.
INITIAL SETTINGS
Initial settings page is for you to make your preferred settings up for your player. Once the initial settings are done they are retained in the CPU of the player until otherwise modified.
COMMON PROCEDURES FOR INITIAL SETTINGS
- Press SETUP button on the remote or press and hold OK/SETUP button on the unit to enter the setup menu.
- Use the navigation buttons to select the item you want to modify, setting page with further setting items displayed shows on the TV screen. Again use navigation buttons to make changes. Press ENTER/OK button to confirm modifications.
- Use navigation buttons to switch to another setting on the main setting page.
- Press SETUP button on the remote or press and hold OK/SETUP button on the unit to exit main setting page.
1. SYSTEM SETUP
1.1 TV SYSTEM - it is used to select the TV mode.
Please select this option as per your TV set.
1.2 SCREEN SAVER - when the player is not in used for several minutes, a running DVD logo will move across the TV screen to protect the TV screen.
Options: On: Screen saver is enabled
Off: Screen saver is disabled
1.3 TV TYPE - it is used to select the TV scan mode, please set as per your TV set.
Options: 4:3PS : Normal Pan & scan mode
4:3LB : Normal Letter box mode
16:9 : 16:9 wide screen mode
1.4 PASSWORD - input password to unlock the system. The steps are as follows:
1.4.1 Enter SYSTEM SETUP, select the PASSWORD item by scrolling the down navigation button, and then press the right navigation button to select the input box.
1.4.2 Input user's password "0000" to unlock it, in this case, select the input box again to change the password by inputting another new four numeric numbers and then press ENTER/OK button to confirm. When the password is changed, you are needed to input the new one to unlock the system.
1.4.3 Once you forget your own password, use the supervisor's password "8200" to unlock it.
NOTE: If wrong password was input in unlock status, the system will lock.
1.5 RATING - Set the rating of this player. If you want to change the rating of parental lock, please input the password to unlock first.
Options: 1 KID SAFE / 2 G / 3 PG / 4 PG 13 / 5 PG-R / 6R / 7 NC-17 / 8 ADULT
1.6 DEFAULT - Reset to factory settings.
Options: RESTORE
2. LANGUAGE SETUP
2.1 OSD LANGUAGE - It is used to select different On Screen Display language for different user.
2.2 AUDIO LANG - select preferred audio language. (DVD only, need disc software support)
2.3 SUBTITLE LANG - Select preferred subtitle language. (DVD only, need disc software support)
2.4 MENU LANG - Select preferred disc menu language.
(DVD only, need disc software support)
3. VIDEO SETUP
3.1 BRIGHTNESS - to set the brightness for the display.
Options: 0/2/4/6/8/10/12
3.2 CONTRAST - to set the contrast effect for display.
Options: 0/2/4/6/8/10/12
3.3 HUE - to set the colour impression for display.
Options: -6/-4/-2/0/+2/+4/+6
3.4 SATURATION - to set the saturation level for display.
Options: 0/2/4/6/8/10/12
4. SPEAKER SETUP
4.1 DOWNMIX
Options: LT/RT - Left/Right mix mode
STEREO - Select this option if you don't have a 5.1 channels amplifier.
DISC HANDLING PRECAUTIONS


- Hold the disc by the edge so the surface will not be soiled with finger prints. Finger prints, dirt and scratches can cause skipping and distortion.
- Do not write on the label side with a ball-point pen or other writing utensils.
- Do not apply benzine, thinner, and liquid that prevents against static electricity.
- Be careful not to drop or bend the disc.
• Install only one disc on the disc tray. - Do not try to close the disc tray when the disc is not installed properly.
- Be sure to store the disc in its case when not in use.
TROUBLESHOOTING
If your DVD player does not seem to be functioning properly, check the items below before you contact an authorized service center.
| Symptom | Check |
| Power does not turn on or suddenly turns off. | Make sure the adapter is securely plugged in.Turn the power off and then back on. |
| Battery pack is in place but the power does not turn on or suddenly turns off. | Check that the battery pack is charged. If not, recharge it. |
| Remote control won't work | Check that the battery is inserted in the "+" and "-" direction properly.The battery may be flat. Replace it with a new one.Check that the signal transmission is directed at the remote control sensor on the DVD player.Remove the obstacle between the remote controller and remote control sensor. |
| No picture or sound | Check that the A/V cables are securely connected.Check that the disc is a DVD, DVD-RW or AUDIO CD.Do not use a disc that has scratches or dirt.Check that the label-side of the disc is facing up.The pick-up lens of the DVD player may be dirty. Contact the service center for lens cleaning.Check that the TV channel is set to VIDEO or AV if viewing with a TV. |
| No picture | Check that the LCD display is turned on. |
| No sound | Check the volume setting. If set to zero, turn up volume level.Check that the headphones are plugged into the PHONES socket. Speakers cannot be used with the headphones. |
| No picture and sound | Check that the battery is properly installed and the Adapter is properly connected. |
| Distorted video or sound | Use a disc without scratches or dents. |
WARNING
- No flame sources, such as lighted candles, should be placed on the apparatus.
- Do not place the product in closed bookcases or racks without proper ventilation.
- The mains plug is used as the disconnect device, the disconnect device shall remain readily operable.
- The ventilation should not be impeded by covering the ventilation openings with items, such as newspapers, table-cloths, curtains, etc.
- It shall not be exposed to dripping or splashing and that no objects filled with liquids, such as vases, shall be placed on the apparatus.
- The unit should not be exposed to direct sunlight, very high or low temperature, moisture, vibrations or placed in dusty environment.
- Do not use abrasive, benzene, thinner or other solvents to clean the surface of the unit. To clean, wipe it will mild non-abrasive detergent solution and clean soft cloth.
- Never attempt to insert wires, pins or other such objects into the vents or opening of the unit.
Do not dispose of the device with the household waste. This product must be disposed of according to EU directive 2002/96/EC-WEEE (Waste Electrical and Electronic equipment). Return the device to a collection point. Observe the applicable regulations. Contact your municipality, if in doubt.

CAUTION
- Danger of explosion if battery is incorrectly replaced.
- Replace only with the same or equivalent type of battery.
- Batteries shall not be exposed to excessive heat such as sunshine, fire or the like.
- Attention should be drawn to the environmental aspects of battery disposal.
OVERZICHT VAN DE DVD-SPELER:


natural_image
Technical line drawing of a mechanical component with labeled part 21 (no text or symbols beyond label)EXTRA SCHERM:


- PIJLTJESTOETS OMHOOG
- WEERGAVE/PAUZE TOETS
- TERUG/SNEL TERUGSPELEN TOETS
- PIJLTJESTOETS LINKS/VOLUME -
- PIJLTJESTOETS OMLAAG
- PIJLTJESTOETS RECHTS/ VOLUME +
- VOLGENDE/SNEL DOORSPELEN TOETS
- STOP/USB/CARD TOETS
- OK/SETUP TOETS
- TFT SCHERM
- DC IN CONTACTBUS
- STROOM AAN/UIT SCHAKELAAR
- STROOM/OPLAAD INDICATOR
- KOPTELEFOONAANSLUITING
- AUDIO/VIDEO UIT CONTACTBUS
- USB-POORT
- SD/MMC KAARTSLEUF
- STEUN
- LUIDSPREKERS
- SENSOR AFSTANDSBEDIENING
-
AFSCHERMING DISK RUIMTE
-
BEELDSCHERM
- TOETS HELDERHEID –
- TOETS HELDERHEID +
- TOETS KLEUR -
- TOETS KLEUR +
- VOLUME - TOETS
- VOLUME + TOETS
- DC IN CONTACTBUS
- STROOM AAN/UIT SCHAKELAAR
- AV INPUT CONTACTBUS
- KOPTELEFOONAANSLUITING
- LUIDSPREKERS
AFSTANDSBEDIENING:

- MUTE knop
- VOLUME+ knop
- VOLUME- knop
- HERHAAL 1/ALLES & A-B knop
- MENU knop
- ONDERTITELING knop
- AFSPEEL knop
- TITEL knop
- AUDIO knop
- PAUZE/STAP knop
- Snel terugspelen knop
- Snel vooruitspelen knop
- INVALIDSHOEK knop
- ZOOM knop
- WEERGAVE knop
- SETUP knop
- TFT SET knop
- NUMERIEKE knoppen
- WIS knop
- STOP&DVD/SD/USB knop
- ENTER knop
- PIJLTJESTOETSEN
- LANGZAAM knop
- VOLGENDE knop
- VORIGE knop
- ZOEK knop
- PROGRAMMEER knop
BASISAANSLUITING
WEERGAVE PROGRAMMEREREN (TOT 16 GEHEUGES)
Opties: -6/-4/-2/0/+2/+4/+6
natural_image
Technical line drawing of a mechanical component with labeled part 21 (no text or symbols beyond label)natural_image
Technical line drawing of a mechanical component with labeled part 21 (no text or symbols beyond label)- TOUCHE DE NAVIGATION HAUT
- BOUTON LIRE/PAUSE
- BOUTON PRÉCÉDENT/R.RAP.
- TOUCHE DE NAVIGATION GAUCHE/VOL-
- TOUCHE DE NAVIGATION BAS
- TOUCHE DE NAVIGATION DROITE/VOL+
- BOUTON SUIVANT/A. RAP.
- BOUTON ARRÊT/USB/CARTE
- BOUTON RÉGLAGE/OK
- ÉCRAN TFT
- PRISE ENTRÉE CC
- BOUTON MARCHE/ARRÊT
- TÉMOIN D'ALIMENTATION/CHARGE
- PRISE TÉLÉPHONE
- PRISE SORTIE AUDIO/VIDÉO
- PORT USB
- LOGEMENT POUR CARTES SD/MMC
- SUPPORT
- HAUT-PARLEURS
- CAPTEUR À DISTANCE
- OUVERTURE DU COUVERCLE À DISQUES
ÉCRAN ESCLAVE :
- ÉCRAN
- BOUTON LUMINOSITÉ BAS
- BOUTON LUMINOSITÉ HAUT
- BOUTON COULEURS BAS
- BOUTON COULEURS HAUT
- BOUTON VOL -
- BOUTON VOL +
- PRISE ENTRÉE CC
- BOUTON MARCHE/ARRÊT
- PRISE ENTRÉE AV
- PRISE TÉLÉPHONE
- HAUT-PARLEURS
TÉLÉCOMMANDE:

-
Bouton MUET
-
Bouton VOLUME+
-
Bouton VOLUME-
-
Bouton RÉPÉTER 1/TOUT&A-B
-
Bouton MENU
-
Bouton SOUS-TITRES
-
Bouton LIRE
-
Bouton TITRE
-
Bouton AUDIO
-
Bouton PAUSE/ETAPE
-
Bouton R.RAP
-
Bouton A.RAP
-
Bouton ANGLE
-
Bouton ZOOM
-
Bouton AFFICHAGE
-
Bouton RÉGLAGE
-
Bouton TÉLÉVISEUR TFT
-
Touches NUMÉRIQUES
-
Bouton EFFACER
-
Bouton ARRÊT&DVD/SD/USB
-
Bouton ENTRER
-
Boutons NAVIGATION
-
Bouton RALENTIR
-
Bouton SUIVANT
-
Bouton PÉCÉDENT
-
Bouton RECHERCHE
-
Bouton PROGRAMME
BRANCHEMENT SIMPLE
REPLACEMENT DE FUSIBLE
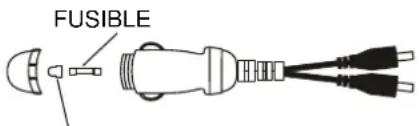
CAPUCHON POSITIF (+)
3. ROTATIONS D'IMAGE
natural_image
Technical line drawing of a mechanical component with labeled part 21 (no text or symbols beyond label)TELA ESCRAVA:


- TECLA DE NAVEGAÇÃO ACIMA
- TECLA DE PLAY/PAUSAR
- TECLA DE PRÉVIO/F.BWD
- TECLA DE NAVEGAÇÃO DE ESQUERDO/VOL-
- TECLA DE NAVEGAÇÃO BAIXA
- TECLA DE NAVEGAÇÃO DE DIREITO/VOL+
- TECLA DE SEGUINTE/F.FWD
- TECLA DE PARAR/ USB/CARTÃO
- TECLA DE OK/CONFIGURAÇÃO
- TFT TELA
- DC IN JACK
- INTERRUPTOR DE LIGAR/DESLIGAR
- INDICADOR DA FONTE DE ALIMENTAÇÃO/CARREGAR
- FONE JACK
- JACK DA SAÍDA DE AUDIO/VIDEO
- PORTO USB
- SD/MMC SLOT DE CARTÃO
- SUPORTE
- ALTO-FALANTES
- SENSOR REMOTO
-
ÁREA ABRIDA DA TAMPA DO DISC
-
EXIBIÇÃO
- TECLA DE BRILHO MINOR
- TECLA DE BRILHO MAIOR
- TECLA DE COR MINOR
- TECLA DE COR MAIOR
- VOL-TECLA
- VOL+TECLA
- DC IN JACK
- INTERRUPTOR DE LIGAR/DESLIGAR
- AV ENTRADA JACK
- FONE JACK
- ALTO-FALANTES
5. FIGURA ZOOM IN/OUT
natural_image
Diagram of a plug assembly showing internal components and terminal connectors (no text or labels)2. INSTALACJA JEZYKA


- REMOTE CONTROL UNIT:
- BASIC CONNECTION
- Note:
- CONNECTING TO A STEREO TV SET
- CONNECTING TO AN AFFILIATED SCREEN
- CHARGE THE BUILT-IN BATTERY
- CONNECTING TO A CAR ADAPTOR
- CAUTIONS:
- OPERATIONS
- PREPARATION
- GET STARTED
- ADJUST THE VOLUME
- MUTE
- SKIP AHEAD OR BACK
- COLOR AND BRIGHTNESS ADJUSTMENT (FOR THE LCD SCREEN)
- RAPID ADVANCE/REVERSE
- PAUSE/STEP PLAY
- STOP PLAYBACK
- REPEAT
- SEARCH FOR PREFERRED SCENE
- PROGRAM PLAY (UP TO 16 MEMORIES)
- ZOOM PLAY
- ON SCREEN DISPLAY INFORMATION
- CHANGING AUDIO SOUNDTRACK LANGUAGE (DVD DISC)
- MULTI-ANGLE VIEWING (DVD ONLY)
- CHANGING SUBTITLE LANGUAGE (DVD ONLY)
- RETURN TO MAIN MENU AND PLAY THE TITLE (DVD)
- MP3/MPEG 4 PLAYBACK
- KODAK PICTURE CD / JPEG CD PLAYBACK
- KODAK PICTURE CD / JPEG CD OPERATIONS
- PLAY MODES
- SKIP TO NEXT/PREVIOUS PICTURE
- PICTURE ROTATIONS
- PICTURE FLIP AND TURN
- PICTURE ZOOM IN/OUT
- SLIDE SHOW TRANSITION MODES
- EXTERNAL MEMORY MEDIA OPERATION (USB&SD/MMC CARD)
- Prepare the player for External Memory media operation
- INITIAL SETTINGS
- COMMON PROCEDURES FOR INITIAL SETTINGS
- SYSTEM SETUP
- LANGUAGE SETUP
- VIDEO SETUP
- SPEAKER SETUP
- DOWNMIX
- DISC HANDLING PRECAUTIONS
- TROUBLESHOOTING
- WARNING
- CAUTION
- OVERZICHT VAN DE DVD-SPELER:
- EXTRA SCHERM:
- AFSTANDSBEDIENING:
- BASISAANSLUITING
- WEERGAVE PROGRAMMEREREN (TOT 16 GEHEUGES)
- ÉCRAN ESCLAVE :
- TÉLÉCOMMANDE:
- BRANCHEMENT SIMPLE
- ROTATIONS D'IMAGE
- TELA ESCRAVA:
- FIGURA ZOOM IN/OUT
- INSTALACJA JEZYKA
Brand : AudioSonic
Model : DV1822
Category : Portable DVD Player