DVDKIT16 - Portable DVD Player Marquant - Free user manual and instructions
Find the device manual for free DVDKIT16 Marquant in PDF.
| Product Type | Portable DVD Player |
| Brand | Marquant |
| Model | DVDKIT16 |
| Dimensions (L × H × D) | 255 × 175 × 41 mm |
| Weight | 970 g |
| AC Power Supply | AC 100-240 V, 50/60 Hz |
| Car Adapter Input | DC 12 V 2 A |
| Lithium Battery | 7.4 V / 2800 mAh |
| Screen | 10.1-inch TFT Screen |
| Disc Compatibility | DVD, VCD, CD, MP3, JPEG |
| Supported Formats | DVD, VCD, CD, MP3, MP4, JPEG |
| Ports | 1 × USB, 1 × SD/MMC, 1 × AV output, 1 × AV input, 1 × headphone |
| Remote Control | Yes, with battery |
| Speakers | 2 × 0.8 W |
| Playback Functions | Play, pause, stop, fast forward/reverse, track skip, A-B repeat, zoom |
| Settings | Language (OSD, audio, subtitles, menu), parental control, video (brightness, contrast, hue, saturation, sharpness), audio (stereo, mono) |
| Video Output | Composite 1 Vpp, 75 ohms |
| Audio Output | 0.5 Vrms |
| Frequency Response | 100 Hz - 20 kHz |
| Operating Temperature | 5°C to 35°C |
| Operating Humidity | 5% to 90% |
| Maintenance and Cleaning | Unplug before cleaning, use a soft dry cloth, avoid abrasive products |
| Safety | Do not expose to moisture, do not open, use supplied adapter, moderate headphone volume |
| Included Accessories | User guide, remote control, AV cable, power adapter, car connection kit |
Frequently Asked Questions - DVDKIT16 Marquant
User questions about DVDKIT16 Marquant
0 question about this device. Answer the ones you know or ask your own.
Ask a new question about this device
Download the instructions for your Portable DVD Player in PDF format for free! Find your manual DVDKIT16 - Marquant and take your electronic device back in hand. On this page are published all the documents necessary for the use of your device. DVDKIT16 by Marquant.
USER MANUAL DVDKIT16 Marquant
TO REDUCE THE RISK OF FIRE OR ELECTRIC SHOCK, DO NOT EXPOSE THIS APPLIANCE TO RAIN OR MOISTURE.
CAUTION
Use of controls or adjustments or performance of procedures other than those specified herein may result in hazardous radiation exposure.
This Compact Disc player is classified as CLASS 1 LASER product.
CAUTION!
Invisible laser radiation when open and interlocks defeated. Avoid exposure to beam.

- Do not damage the mains lead.
When not in use, disconnect the mains lead from the outlet. Grasp the plug, not the mains lead, when disconnecting the unit. - If water should enter the unit, electrical shock or a malfunction may result. Use in an area where there is low humidity and little dust.
- Do not disassemble or alter the unit in any way.
- Do not use the unit in areas where extremes in temperature occur (below 5^ or exceeding 35^ ), or where it may be exposed to direct sunlight.
- Because of the CD player's extremely low noise and wide dynamic range, there is a tendency to turn the volume on the amplifier higher than necessary. Doing so may produce an
excessively high output from the amplifier which can cause damage to your speakers. Please be careful in this regard.
- Sudden changes in the surrounding temperature can cause dew to form on the optical pickup lens inside the unit. Under this condition the unit may be unable to operate properly. If this should occur, remove the disc and allow the player to adjust to the surrounding temperature.
- This unit must be operated in a horizontal position.
- Please use the original DVD or VCD or CD or MP3 software, and any copy discs are not recommendable for use.
- The ventilation should not be impeded by covering the ventilation openings with items, such as newspapers, table-cloths, curtains, etc;
- No naked flame sources, such as lighted candles, should be placed on the apparatus;
- It shall not be exposed to dripping or splashing and that no objects filled with liquids, vases, shall be placed on the apparatus;such as
- Do not place the product in closed bookcases or racks without proper ventilation.
- Where the mains plug or an appliance coupler is used as the disconnect device, device shall remain readily operable. the disconnect
- Batteries (battery pack or batteries installed) shall not be exposed to excessive heat such as sunshine, fire or the like.
- Excessive sound pressure from earphones and headphones can cause hearing loss.
To prevent fire or shock hazard, do not expose this appliance to dripping or splashing. No objects filled with liquids, such as vases, shall be placed on the apparatus.
THIS UNIT SHOULD NOT BE ADJUSTED OR REPAIRED BY ANYONE EXCEPT PROPERLY QUALIFIED SERVICE PERSONNEL.
POWER SUPPLY
There are two ways for power supply: AC power supply and Lithium battery power supply.
AC power operation
Connect one end of the mains lead to the DC IN socket and the other end to an AC outlet, and set the POWER ON/POWER OFF by select switch to POWER ON.
Lithium battery power supply
When the lithium battery be full charged, push the POWER ON/POWER OFF select switch to POWER ON, the unit will start work.
Charging the built-in lithium battery:
Your DVD player is equipped with a built-in rechargeable lithium battery.
Fully charge the battery before using it for the first time.
- Plug the AC / DC or car adaptor into the jack on the back of the DVD player and insert the plug into a mains wall socket or car cigarette lighter. When the unit is turned on, the power indicator is red.
- Once you connect the unit to the AC/DC adaptor or car adaptor, the lithium battery will be charged.
- When the battery is being charged, the battery indicator flashes green.
- When the battery is fully charged, the indicator becomes green lights on.
CHARGING TIME / PLAYBACK TIME
Charging time: Approx. 4 to 5.5 hours
Playback time: Approx. 112 to 2 hours
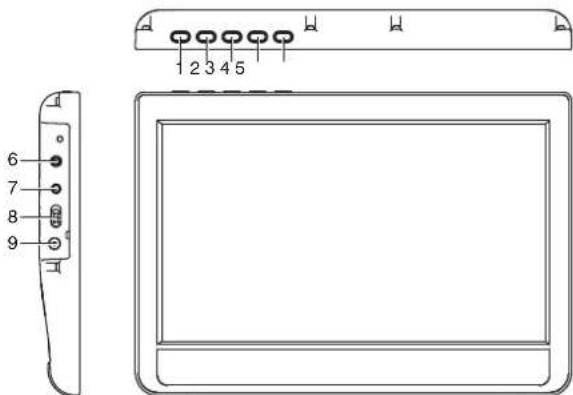
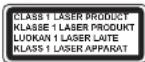
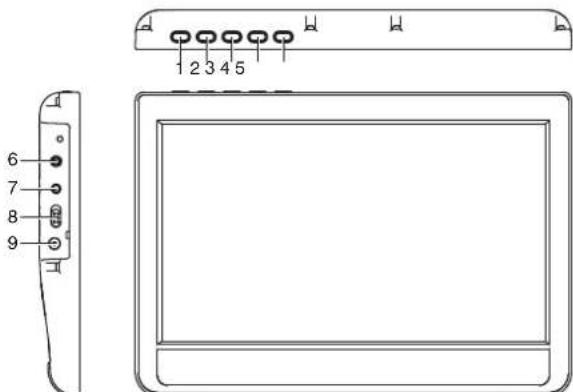
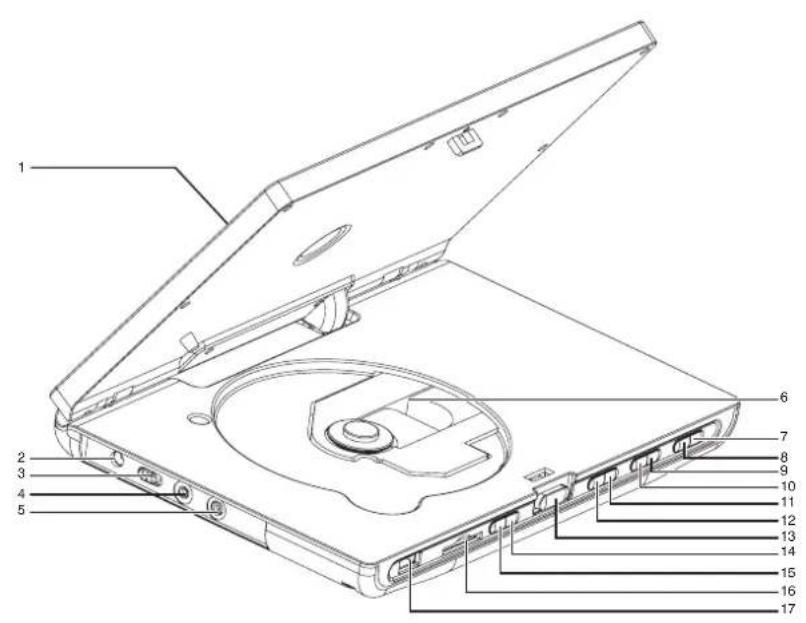
THE FUNCTION PARTS OF THE UNIT
- TFT screen
- DC~IN socket
- POWER ON/OFF select switch
- AV out socket
- Earphone socket
- CD/VCD/DVD Compartment Lid
- SETUP button
- USB/SD button
- Volume- button
-
Volume+/ button
11.Upward/Previous song button: In the menu interface, press the key to move up the option, then press"ENTER" key to enter the current location. In the CD/VCD/DVD play interface, press the key to enter previous song -
Downward/ Next button
In the menu interface, press the key to move down the option, then press
"ENTER" key to enter the current location. In the CD/VCD/DVD play interface, press the key to enter next song.
- OPEN Switch
- STOP button
- PLAY/PAUSE/ENTER button
- SD/MMC card socket
- USB socket
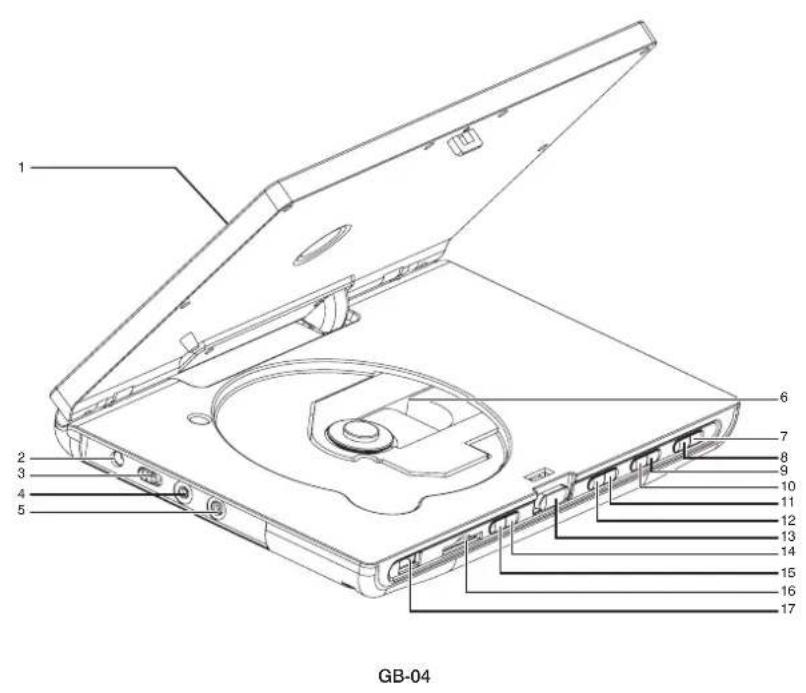
REMOTE CONTROL
1.TFTON/OFF button
2. USB/CARD button
3. DISPLAY button
4. MUTE button
5.Number button
6. REPEAT button
7.A-B button
8. GOTO br
9. TITLE button
10. STOP button
11. SETUP button
12. / button
13. button
14. OK button
- ZOOM button
- VOL/++ button
- AUDIO button
- SUBTITLE button
- PLAY/PAUSE button
- 一 button
- button
- button
- button
- ANGLE button
25.P/N button
26.PROG button. - Menu/PBC button
CAUTION
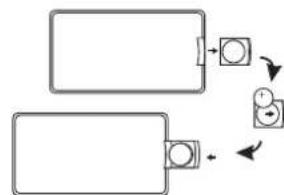
- When using the remote controller, make sure the remote controller directly to the remote sink of the unit and avoid operating in the 45^ c and 5m range having no any bar.
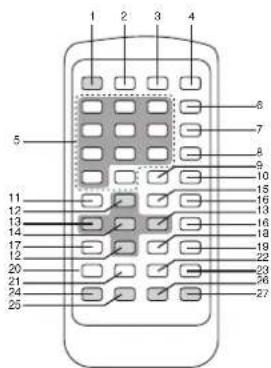
- When the remote controller doesn't use, change the battery as right picture.
3.If the battery isn't used for a long time, take out it.
GB-06
KEYS INSTRUCTION OF REMOTE CONTROLLER
- TFT ON/OFF: switch display on/off the TFT display.
- USB/CARD: press this button to select among DISC, CARD and USB.
- Display button: display the information of current song.
- Mute: mute control
5.number button press any number, direct play the desired track. - Repeat button:
Each press of the REPEAT button will change the repeat mode. During MP4/VCD/CD playback, there are three modes: Repeat single, Repeat all and off. During DVD playback, there are four modes: Repeat chapter, Repeat Title, Repeat all and off. Note: During VCD playback, the PBC mode must be set to off. - A-B button:
Repeat play between A-B point for all discs.
1) Press "A-B" button once at the point where repeat play is started. ("Repeat A-" appears on the TV screen
2) Press "A-B" button again at the point where repeat play is stopped. ("Repeat A-B")
appears on the TV screen)
3) To cancel, press "A-B" button again. (A-B cancel appears on the TV screen.)
8. GOTO button:
Press this button to set the play start bit. Press the button, the screen will display the play information, press left or right button to move high light to select item you desired, then press number buttons to set the value. 9. Title button: press this button to display disc's played title.
- Stop button: stop play.
- Setup button: enter into the DVD setup interface.
- Upward/Downward button: press the key to move up/down the option, then press OK button to enter the current location.
- Left/Right button: press the key to move left/right the option, then press "OK" button to enter the current location.
- OK button: press to enter an item in the menu or to confirm and execute a selection.
-
Zoom button: repeat this button in turn to Zoom 2, Zoom 3, Zoom4, Zoom 1/2, Zoom 1/3, Zoom1/4, Zoom: off.
-
Vol-/+: turn down/up the volume.
-
audio button: CD/VCD Mode, enter into Audio setup menu, repeat press this button to select left, right, stereo audio.
-
Subtitle button: The button's function is switch subject title in DVD disc play mode. (One DVD disc has over 32 kind of language). 19. Play/Pause button: Switch between Play and Pause.
-
button:
fast backward search button
- button:
fast forward search button
- 卡 button,
pre-view skip button
- button
next-view skip button
24 angle button
when you watch match, musical or drama is DVD DISC.
you can press this key to choose many difference angle to watch in detail.
25.P/N button
switch between PAL mode ad NTSC mode 26.PROG button: press PROG button, enter desired track in sequence by setting the program play.
Press this button enter into program play
interface, such as:
When playing DVD:
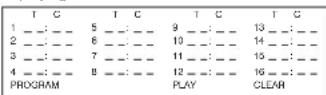
"T" denotes Title, "C" denotes chapter
When playing CD/VCD
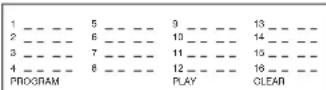
Press upward/downward/left/right button to move high light to design point, then press number button to set title and chapter which you desired. Move the high light to "play" after finishing the setup of the program play, then press OK button, the unit will play the DVD DISC in sequence according to the program sequence you just do. If you want to cancel the program play, move the high light to "Clear program", then press OK button.
Tip: When play DVD disc, you must input title and chapter, and when play MP3/MP4/ CD/VCD, you just only input chapter.
- Menu/PBC:
In CD/VCD play mode, open or close PBC.
In DVD play mode, enter song play menu.
GENERAL OPERATION
- Connect one end of the mains lead to the DC IN socket and the other end to an AC outlet, the indicator light will display green.
- Press the CD/VCD/DVD Compartment Lid open button to open the Compartment Lid, put the DISC in.
- Set the POWER ON/OFF select
switch to POWER ON, the indicator light will display red, and the unit will automatically play the DISC.
4. Press the Play/Pause button to pause the play, press twice to resume play.
5. Press Stop button to stop the play.
6. Press power button to switch off the unit.
- Open the unit, after inserting the disc, close the cover, then the unit will play automatically.
(Press some invalid button, the screen will show "INVALID KEY".)
- Title/Chapter Search
(1) Some discs will have many title, each title will have many chapters. Press Title button on the remote controller in playing, the screen will show title.
(2) Press upward/downward/left/right button to select expected title, then press "OK" button to play.
(3) Select playing tracks chapter with
number key "0-9" and "10+" (the entering number must less than the total chapter number), then press "ENTER" to play.
3. Previous and next
During playing, press " button of the remote controller, each time press the button, jump a chapter to playing.
Press " , playing from the next chapter; press " , playing from the previous chapter. 4. Fast forward and fast backward
(1)Press the" button or " button to activate fast forward or fast backward function.
(2)Each time you touch the "the fast forward speed goes from forward X2, forward
X4, forward X8, for ward X20 to normal playback.
(3)Each time you touch the "the fast backward speed goes from backward X2, backward X4, backward X8, backward X20 to normal playback.
- Pausing disc play
(1)Press the " button to make the disc pause.
(2)Press the " button again to start playing again.
- Stopping playback
(1)Press the " button once, stop playing, press the button again to stop all I play backs without last memory.
(2)Press the " button to resume from where it is stopped or start play.
- Change the subtitle
This function only available when there are two or more subtitle languages recorded in the disc.
Press "SUBTITLE" button on the remote controller while playing to change between available subtitle languages. Repeatedly press the button, the subtitle language change among languages the DISC supported.
Some discs record most 32 languages. Please see most subtitle marks on the disc, the number show how many languages had recorded.
- Repeat function
Press the "REPEAT" button on the remote controller to repeat playing.
Press the first time, showing current repeat mode, select repeat mode according to pressing times, repeat mode is circle as below: repeat chapter -repeat title -repeat All -repeat off.
9.Repeat segment
Press "A-B" button on the remote controller to select expected playing segment, the default is off.
Press once, the repeat begin from A Press twice, the repeat end from B
Press third, close the repeat function.
10.Screen display playing status
When playing and then press "DISPLAY" button on the remote controller, the screen will display the playing status: title playing time, title remainder time, chapter playing time, chapter remainder time.
SETUP THE DVD MENU FUNCTION
Press "SETUP" button on the remote controller or the unit, the screen will show setup menu. Press direction key (upward/ downward/lef/right button) to move the high light and set the items, press OK button to confirm. Press the "SETUP" button for the second time, the unit will exit setup interface.
- System setting
(1) TV system NTSC PAL
(2) Screen saver ON OFF
(3) TV type 4:3 PS 4:3 LB 16:9
(4) Password
(5) Rating
KID SAFE
G
PG
PG13
PG-R
R NC-17 ADULT
(6) Default RESTORE
- Language settings
(1) OSD Language
ENGLISH
FRENCH
GERMAN
DUTCH
(2) Audio language
ENGLISH
FRENCH
GERMAN
DUTCH
(3) Subtitle language
ENGLISH
FRENCH
GERMAN
DUTCH
(4) Menu language
ENGLISH
FRENCH
GERMAN
DUTCH
- Video setting
(1) Brightness
12
10
8
6
4
2
(2) Contrast
12
10
8
6
4
2
0
(3) Hue
+6
+4
+2
0
-2
-4
Saturation
12
10
8
6
4
2
0
(5) Sharpness
8
6
4
2
0
- Digital setting
(1) Output mode
Line out
BE REMOD
(2) DYNAMIC RANGE
Full
6/8
4/8
2/8
off
(3) DUAL MONO
Stereo
MONO L
MONO B
MIX MONO
After selecting the disc, the playing mode auto form according to the type of the disc.
- VCD Title/Chapter playing (The disc must have PBC function and the PBC is on)
When playing, press "Menu/PBC" button, the screen will show title. Press number key "0-9" and "10+" to select expected chapter (the entering number must less than the total chapter number).
- Select number to play at first hand in playing CD.
Press number button "0~9" and "10+" on the remote controller to select song according to track number (if the track number over the disc range, the input is invalid).
Eg: If you select twelfth track, press "10+" first and then press "2" to select it.
- Previous and next
During playing, press "▶ button of the remote controller, each time press the button, jump a chapter to playing.
Press " 喜 , playing from the next chapter; press 喜 , playing from the previous chapter.
- Fast forward and fast backward
(1)Press the " button or " button to activate fast forward or fast backward function.
(2)Each time you touch the"the fast forward speed goes from forward X2, forward X4,forward X8,for ward X20 to normal playback.
(3)Each time you touch the "the fast backward speed goes from backward X2, backward X4, backward X8, backward X20 to normal playback.
- Pausing disc play
(1)Press the " button to make the disc pause.
(2)Press the "▶" button again to start playing again.
- Stopping playback
(1)Press the " button once, stop playing, press the button again to stop all play backs without last memory.
(2)Press the " button to resume from where it is stopped or start play.
- Repeat function
Press the "REPEAT" button on the remote
controller to repeat playing.
Press the first time, showing current repeat mode, select repeat mode according to pressing times, repeat mode is circle as below: repeat single repeat DIR repeat all repeat off.
- Repeat segment
Press "A-B" button on the remote controller to select expected playing segment, the default is off.
Press once, the repeat begin from A
Press twice, the repeat end from B
Press third, close the repeat function.
- Screen display playing status
When playing and then press "DISPLAY"
button on the remote controller, the screen will display the playing status: Track, chapter playing time, chapter remainder time.
- Change the audio output
Press the "audio" Button when playing, each time you press, the sound modes will change in sequence. Switch among: Left, Right,
Stereo
JPEG disc is formed by many lists, each list has many JPEG pictures.
After selecting disc and play it, the unit will auto play JPEG disc.
Press "Upward" or "Downward" or "Left" or
"Right" button on the remote controller to select different picture.
Press "OK" button to play selected picture.
Press "left" button to return menu.
- MP3/MP4 is formed by many lists (folders), each list has many MP3/MP4 tracks.
After selecting disc and play it, the unit will auto play MP3/MP4 mode.
Press "upward" or "downward" button to select page.
Press "upward", "downward", "left" and "right" button to select track.
Press "OK" to playing selected track. Press "left" button to return folder. - Fast forward and fast backward
(1)Press the " button or " button to activate fast forward or fast backward function.
(2)Each time you touch the "the fast forward speed goes from forward X2, forward X4,forward X8, for ward X16 to normal playback.
(3)Each time you touch the "the fast backward speed goes from backward X2, backward X4, backward X8, backward X16 to normal playback. -
Pausing disc play
(1)Press the " button to make the disc pause.
(2)Press the " button again to start playing again. -
Stopping playback
(1)Press the " button once, stop playing, press the button again to stop all I play backs without last memory.
(2)Press the " button to resume from where it is stopped or start play.
- Repeat function
When playing, press "repeat" to select repeat function. Press once to select a track repeat; Press twice to select folder or dir repeat; Press third to select repeat all disc; Press four close.
Repeat mode: repeat "OFF" repeat "ONE" repeat "DIR" repeat "ALL".
- Repeat segment
Press "A-B" button on the remote controller to select expected playing segment, the default is off.
Press once, the repeat begin from A
Press twice, the repeat end from B
Press third, close the repeat function.
7. Screen display playing status
When playing or stop, press "display" button on the remote controller to show current track playing time.
USB/SD/MMC CARD PALY
Insert the USB or SD/MMC card to the USB socket or SD/MMC socket, press "USB/CARD" button on the remote controller, the unit will read the information on the USB or SD/MMC card. The next steps as operation DVD.
SPECIFICATIONS
Compatibility:
DISC DVD/VCD/MP3
USB port
SD card slot
System: PAL/NTSC
Screen size: 10.1 inch
Frequency response: 100Hz 20KHz
Video Output: 1VP-P(750HM)
Audio Output: 1000mVRms
Power: 0.8Wx2
DC power supply: 12V 2A
Work temperature: 535℃
Lithium Battery: 7.4V/2800mAh
Dimensions (approx): 255 × 175 × 41 mm
(W) x (H) x (D)
weight (approx) : 970g
Accessory: instruction manual,
remote controller, AV cord, power adaptor,
car kit plug.
- Specifications subject to change without notice.
DISPLAY DESCRIPTION
THE FUNCTION PARTS OF THE UNIT
- VOL-/LEFT button
- VOL+/RIGHT button
3.MEUN button - UP button
-
DOWN button
-
Headphone's output jack
- AV input jack
- Power ON / OFF switch
- DC IN 12V adaptor jack
Power connection
Use the AC / DC adaptor (AC 100V -240V 50 / 60Hz) or the car adaptor (DC 12V) to connect the display to DC12V socket.
Headphones connection
On the right side of the unit is a headphones socket, suitable for any normal earphones. When the headphones are in use, the speakers are turned off. CAUTION: Too high volume, especially when using headphones, can damage your hearing. For this reason, please turn the volume down before connecting the headphones.
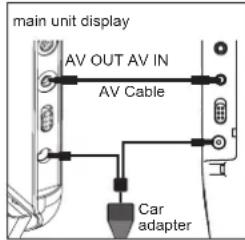
AV input connection
Suitable for normal AV cable to connect the display to other units. How to connect with the main unit
AV IN jack via AV cable to connect with the main unit AV OUT jack
KEY FUNCTIONS
Volume
Press the VOL+ or VOL- keys to increase or decrease the volume.
SETUP
Press the MENU key into system settings.
BRIGHTNESS
- CONTRAST
COLOR
TFTMODE
STANDARD
BBIGHT
SOFT
Press the MENU key to select a option.
Press the LEFT/RIGHT or UP/DOWN keys to
increase or decrease the setup
SPECIFICATIONS
GENERAL
Power source:AC~100V-240V 50/60Hz
DC12V2A
Power consumption: 10W
External dimensions: 255 × 177 × 23mm
(W)×(H)×(D)
Screen size: 10.1 inches
Weight: 485g
Operating temperature 5^ to 35^ (41^ to 95^)
Operating humidity 5% to 90%
AUDIO:
Power: 0.8W× 2
Frequency response: 100Hz - 20kHz
INPUT
Composite video 1.0V P-P 75ohm negative sync
Audio input 0.5Vrms
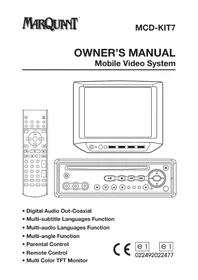
MARQUANT
MCDKIT-16
GUIDE D'UTILISATION
SYSTEME DVD PORTABLE
FR-01
LES ELEMENTS OPERATIONNELS DE L'APPAREIL
DISPLAY BESCHRIJVING
BEDIENINGSELEMENTEN VAN HET TOESTEL