
MCDKIT7 - Portable DVD Player Marquant - Free user manual and instructions
Find the device manual for free MCDKIT7 Marquant in PDF.

| Product Type | Portable DVD player with TFT LCD screen |
| Brand | Marquant |
| Model | MCDKIT7 |
| Power supply | 12V DC (11V-15V), consumption <3A, AC/DC adapter or cigarette lighter plug |
| Compatible disc formats | DVD single/double sided/layer, Audio CD, VCD, MP3 CD |
| Audio output | 2 channels, 600 Ohm, 2.0 Vrms, frequency 20 Hz - 20 kHz, signal-to-noise ratio 80 dB |
| Video output | Composite video 1.0 Vp-p 75 Ohm |
| Screen | Color TFT LCD, color/contrast/sharpness settings |
| Built-in speakers | Yes, with mute button |
| Remote control | Infrared, AAA batteries (2x), range +/-30° |
| Main functions | DVD/CD/MP3 playback, search, repeat, programming, zoom, subtitles, angles, audio menu |
| Settings | OSD language, subtitles, audio, parental control, TV type (PAL/NTSC/Auto), password |
| Cleaning | Discs: soft cloth from center to edges; device: damp cloth |
| Safety | Class 1 laser, CaA/A3 diode, wavelength 650 nm, power 7 mW; do not open the case |
| Included accessories | PVC cable (black), 9-pin mini-DIN connector, mounting brackets |
Frequently Asked Questions - MCDKIT7 Marquant
User questions about MCDKIT7 Marquant
0 question about this device. Answer the ones you know or ask your own.
Ask a new question about this device
Download the instructions for your Portable DVD Player in PDF format for free! Find your manual MCDKIT7 - Marquant and take your electronic device back in hand. On this page are published all the documents necessary for the use of your device. MCDKIT7 by Marquant.
USER MANUAL MCDKIT7 Marquant
natural_image
Front view of a remote control with various function keys and buttons (no text or symbols visible)
natural_image
Line drawing of a flat-screen monitor with control buttons and ports (no text or symbols)
natural_image
Front panel of a computer monitor with control buttons and display (no text or symbols visible)• Digital Audio Out-Coaxial
- Multi-subtitle Languages Function
- Multi-audio Languages Function
- Multi-angle Function
- Parental Control
- Remote Control
- Multi Color TFT Monitor
□ Features
Compatible with PAL DVD (Video CD) and NTSC DVD (Video CD)
This player can play discs recorded in either PAL or NTSC format.
- A single LSI chip now integrates all major DVD playback circuit functions including MPEG2 decoder, video D/A converter, and audio decoders.
- L/R stereo analog audio outputs for connection to existing head unit aux inputs. Video output is composite video.
- Supplied remote handles multi-function software (multi-language audio-track/subtitle, multi-angle, multi-story, etc.), plus all basic functions.
□ Use This Product Safely
When Driving
Keep the volume level low enough to be aware of road and traffic conditions.
When Car Washing
Do not expose the product to water or excessive moisture. This could cause electrical shorts, fire or other damage.
When Parked
Parking in direct sunlight can produce very high temperatures inside your vehicle. Give the interior a chance to cool down before starting playback.
Use the Proper Power Supply
This product is designed to operate with a 12 volt DC, negative ground battery system the regular system in a North American car).
Protect the Disc Mechanism
Avoid inserting any foreign objects into the slot of this player. Failure to observe this may cause malfunction due to the precise mechanism of this unit.
Use Authorized Service Centers
Do not attempt to disassemble or adjust this precision product. Please refer to the Service Center list included with this product for service assistance.
For Installation
The unit should be installed in a horizontal position with the front end up at a convenient angle, but not more than 30^ .
CONTENTS
Safety Information....4
Disc Notes ....5
The Player 6
Front View....6
Back View....6
Installation....7
Electric Connection....8
Remote Control 9
Location and Function of Keys....9
Preparing the Remote Control....11
Loading a disc ....11
Ejecting a disc ....11
Operation....12
Basic Play....12
On-Screen Display Function....14
Multi-audio Language Function....15
Menu Function....15
Title Menu Function 15
Subtitle Language Function....15
Multi-angle Function....15
MP3 Disc Play 16
Setup....17
Initial Setup....17
General Setup....17
Speaker Setup....19
Audio Setup....19
Preferences Setup ....20
Defaults Table 22
Specifications 23
Monitor 24
CAUTION:
MOBILE DVD PLAYER IS A CLASS I LASER PRODUCT. HOWEVER THIS MOBILE DVD PLAYER USES A VISIBLE/INVISIBLE LASER BEAM WHICH COULD CAUSE HAZARDOUS RADIATION EXPOSURE IF DIRECTED. BE SURE TO OPERATE THE MOBILE DVD PLAYER CORRECTLY AS INSTRUCTED.
USE OF CONTROLS OR ADJUSTMENTS OR PERFORMANCE OF PROCEDURES OTHER THAN THOSE SPECIFIED HEREIN MAY RESULT IN HAZARDOUS RADIATION EXPOSURE. DO NOT OPEN COVERS AND - DO NOT REPAIR YOURSELF. REFER SERVICING TO QUALIFIED PERSONNEL.
WARNING:
• TO REDUCE THE RISK OF FIRE OR ELECTRIC SHOCK, DO NOT EXPOSE THIS EQUIPMENT TO RAIN OR MOISTURE.
• TO REDUCE THE RISK OF FIRE OR ELECTRIC SHOCK, AND ANNOYING INTERFERENCE, USE ONLY THE RECOMMENDED ACCESSORIES.
- THIS DEVICE IS INTENDED FOR CONTINUOUS OPERATION.
This product incorporates copyright protection technology that is protected by method claims of certain U.S. patents and other intellectual property rights owned by Macrovision Corporation and other rights owners. Use of this copyright protection technology must be authorized by Macrovision Corporation, and is intended for home and other limited viewing uses only unless otherwise authorized by Macrovision Corporation. Reverse engineering or disassembly is prohibited.
Region Management Information
Region Management Information: This Mobile DVD Player is designed and manufactured to respond to the Region Management Information that is recorded on a DVD disc. If the Region number described on the DVD disc does not correspond to the Region number of this Mobile DVD Player, this Mobile DVD Player cannot play this disc.
Disc formats supported by this player

DVD
12 cm disc
(Single-sided disc only)

Video CD
12 cm disc

CD
12 cm disc

MP3
12 cm disc
Discs which cannot be played with this player
- DVD-ROM
- DVD-R/ DVD-RAM
• CDV - CD-G
Handling and Cleaning
- Dirt, dust, scratches and warping discs will cause misoperation.
- Do not place stickers or make scratches on discs.
- Do not warp discs.
- A disc should always be kept in its case when not in use to prevent from damaging.
-
Do not place discs in the following places:
-
Direct sunlight.
- Dirty, dusty and damp areas.
- Near car heaters.
- On the seats or dashboard.
Disc Cleaning
Use a dry soft cloth to wipe the surface. If the disc is quite dirty, use a soft cloth slightly moistured with isopropyl (rubbing) alcohol. Never use solvents such as benzine, thinner or conventional record cleaners as they may mar the surface of the disc.
Note:
A disc may become somewhat scratched (although not enough to make it unusable) depending on you handle it and conditions in the usage environment. Note these scratches are not an indication of any problem with the player.


Do not touch the underside of the disc
Do not bend

natural_image
Simple line drawing of a hand holding an object with a black X mark, no text or symbols present
Wipe the disc from center toward the outside edge
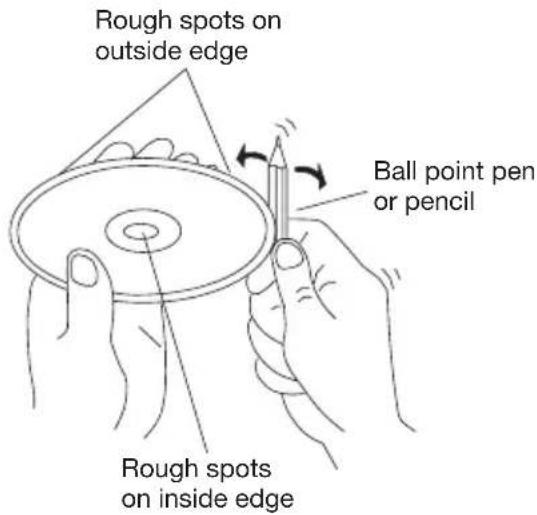
Preparing New Discs with Rough Spots
A new disc may have rough edges on its inside and outside edges. If a disc with rough edges is used, the proper setting will not be performed and the player will not play the disc. Therefore, remove the rough edges in advance by using a ballpoint pen or pencil as shown on the right. To remove the rough edges, press the side of the pen or pencil against the inside and outside edges of the disc.
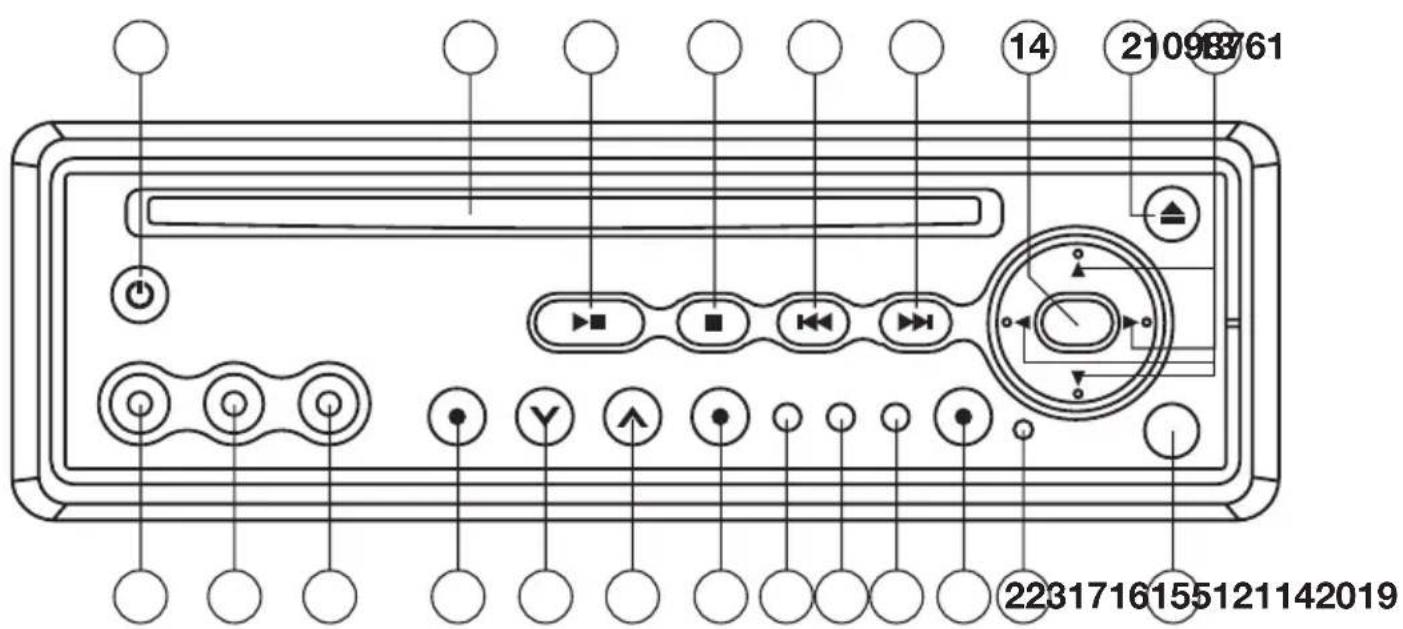
FRONT VIEW
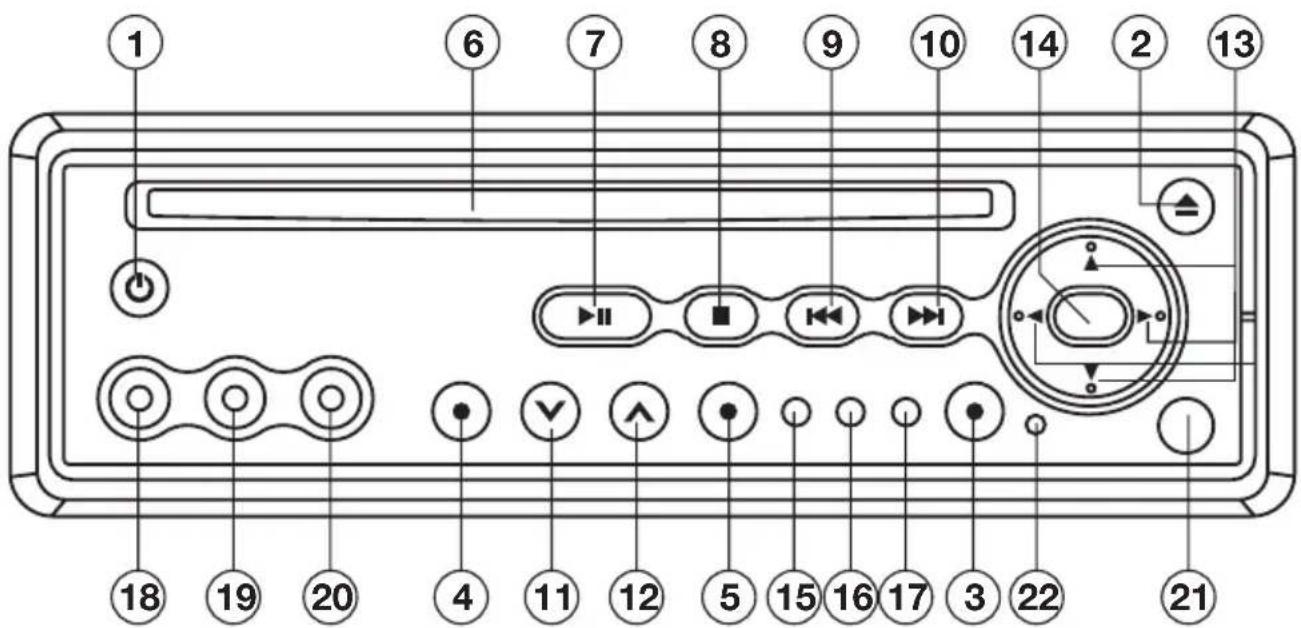
- Power ( ) ⏻
- EJECT( )
- SETUP
- AUDIO
- SOURCE
- Disc Slot
- PLAY/PAUSE ( )▶II
- STOP ( )
- PREVIOUS( )
- NEXT(▶)
-
VOLUME √
-
VOLUME
- ↗, ↗ cursor buttons
- ENTER
- Indicator Light for DVD
- Indicator Light for AV INPUT 1
- Indicator Light for AV INPUT 2
- VIDEO IN 1
- AUDIO IN 1 L
- AUDIO IN 1 R
- IR
- Reset button
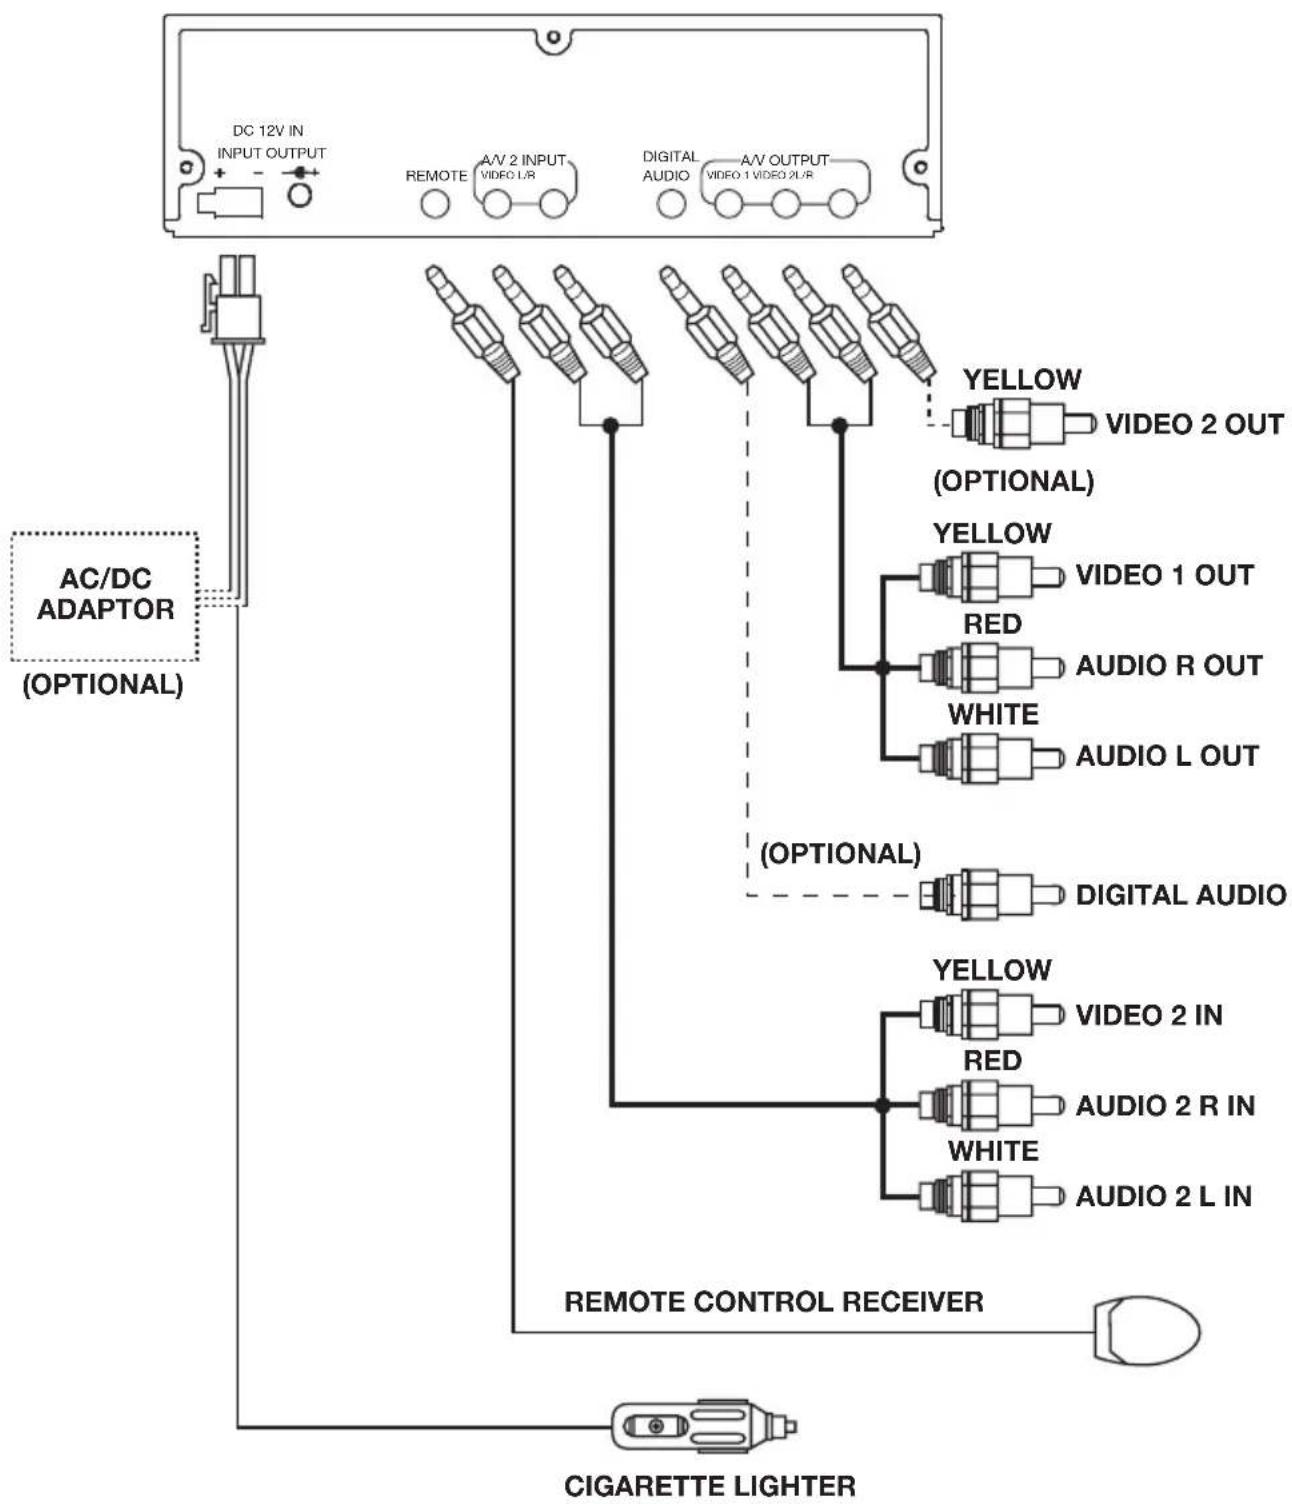
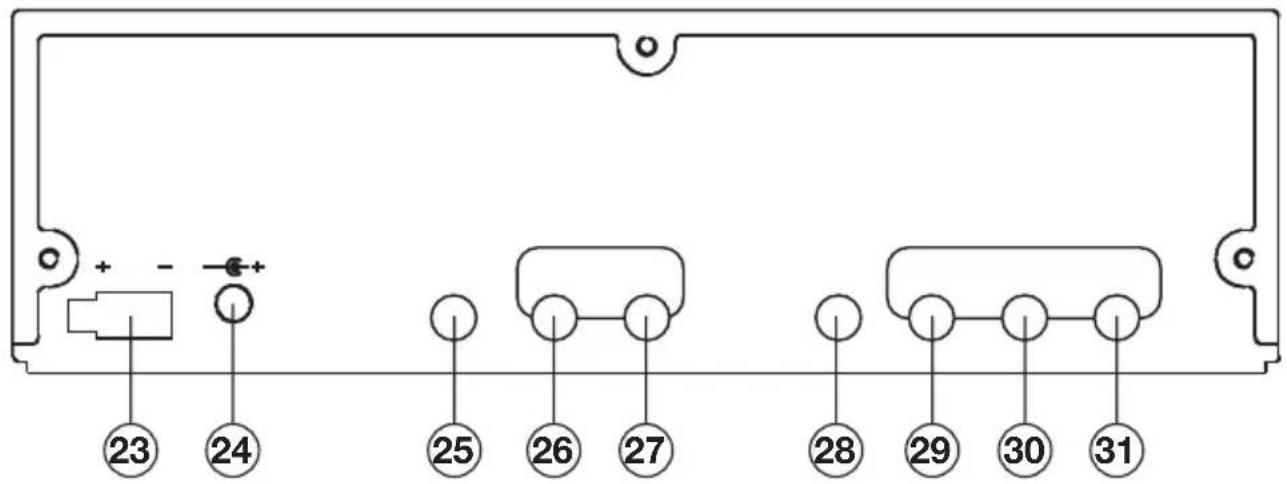
BACK VIEW
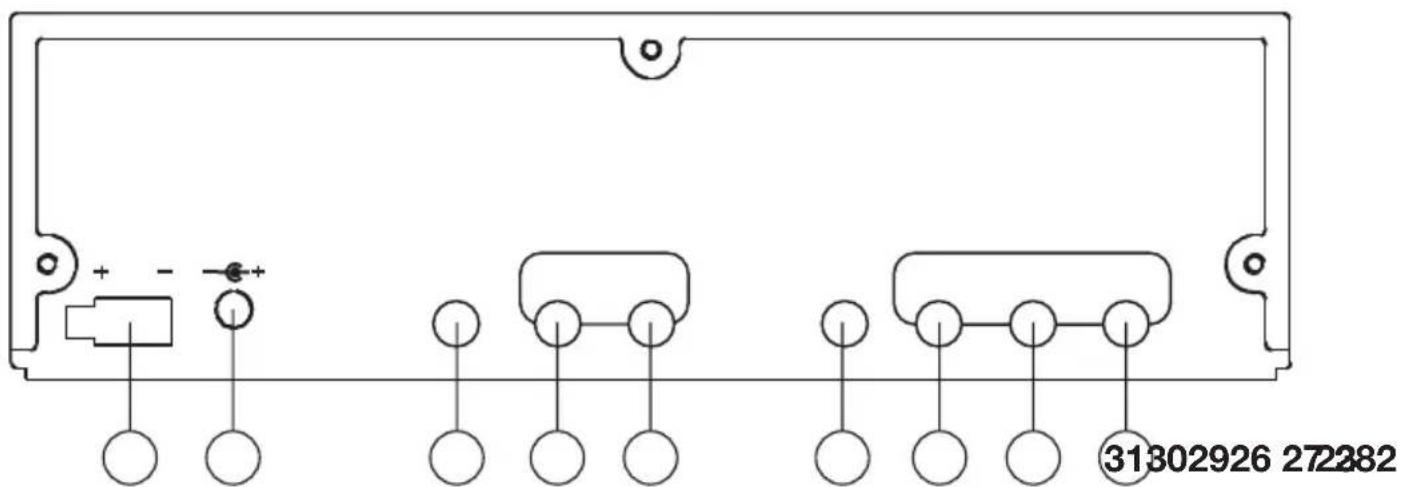
- DC 12V INPUT Socket
- DC 12V OUTPUT Socket
- REMOTE Socket
- VIDEO 2 INPUT
-
AUDIO 2 INPUT L/R
-
DIGITAL AUDIO
- VIDEO 1 OUTPUT
- AUDIO OUTPUT L/R
- VIDEO 2 OUTPUT
This unit is designed for home-use and car-use. When installed on the car, please follow the installation instruction below.
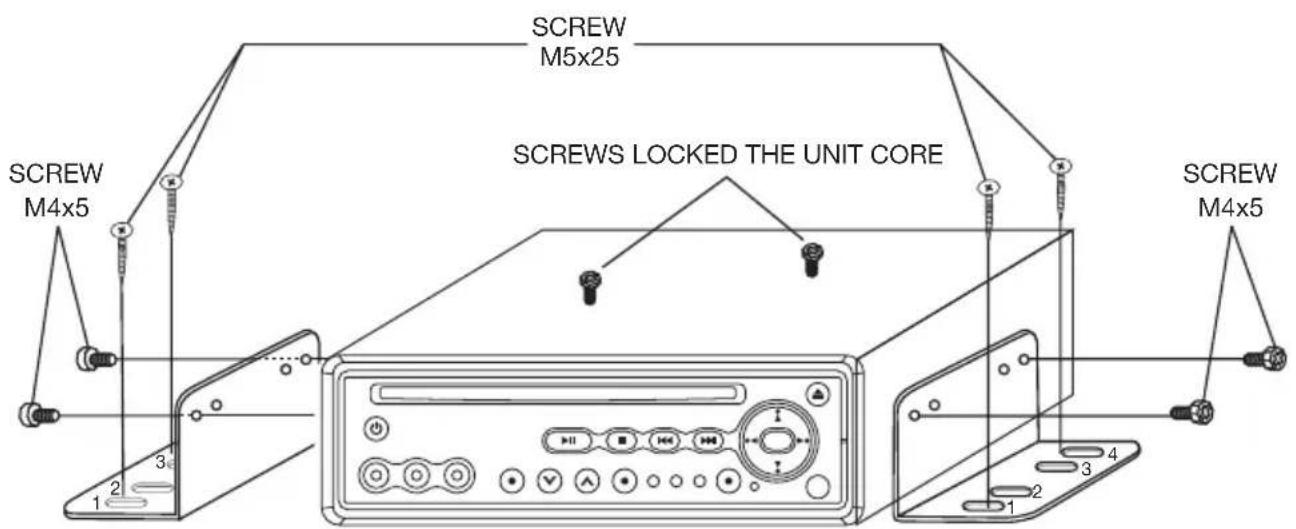
Note:
- First remove the two screws that lock the unit core, then attach the brackets on both sides of unit with screws (M4x5), last install the unit with screws (M5x25).
- When fix the unit, you can slide the screw (M5x25) to left side or right side to meet your needed position. In the figure below, select two holes among the positions that marked 1,2,3 and 4 to fix the bracket.
DVD PLAYER
flowchart
graph TD
    A["AC/DC ADAPTOR (OPTIONAL)"] --> B["DC 12V IN INPUT OUTPUT"]
    B --> C["REMOTE"]
    C --> D["A/V 2 INPUT VIDEO L/R"]
    D --> E["DIGITAL AUDIO"]
    E --> F["A/V OUTPUT VIDEO 1 VIDEO 2 L/R"]
    F --> G["YELLOW VIDEO 2 OUT (OPTIONAL)"]
    G --> H["YELLOW VIDEO 1 OUT"]
    H --> I["RED AUDIO R OUT"]
    I --> J["WHITE AUDIO L OUT"]
    J --> K["DIGITAL AUDIO"]
    K --> L["YELLOW VIDEO 2 IN"]
    L --> M["RED AUDIO 2 R IN"]
    M --> N["WHITE AUDIO 2 L IN"]
    N --> O["CIGARETTE LIGHTER"]
    O --> P["REMOTE CONTROL RECEIVER"]
    P --> Q["AC/DC ADAPTOR (OPTIONAL)"]
    Q --> R["REMOTE CONTROL RECEIVER"]
    R --> S["CIGARETTE LIGHTER"]
LOCATION AND FUNCTION OF KEYS
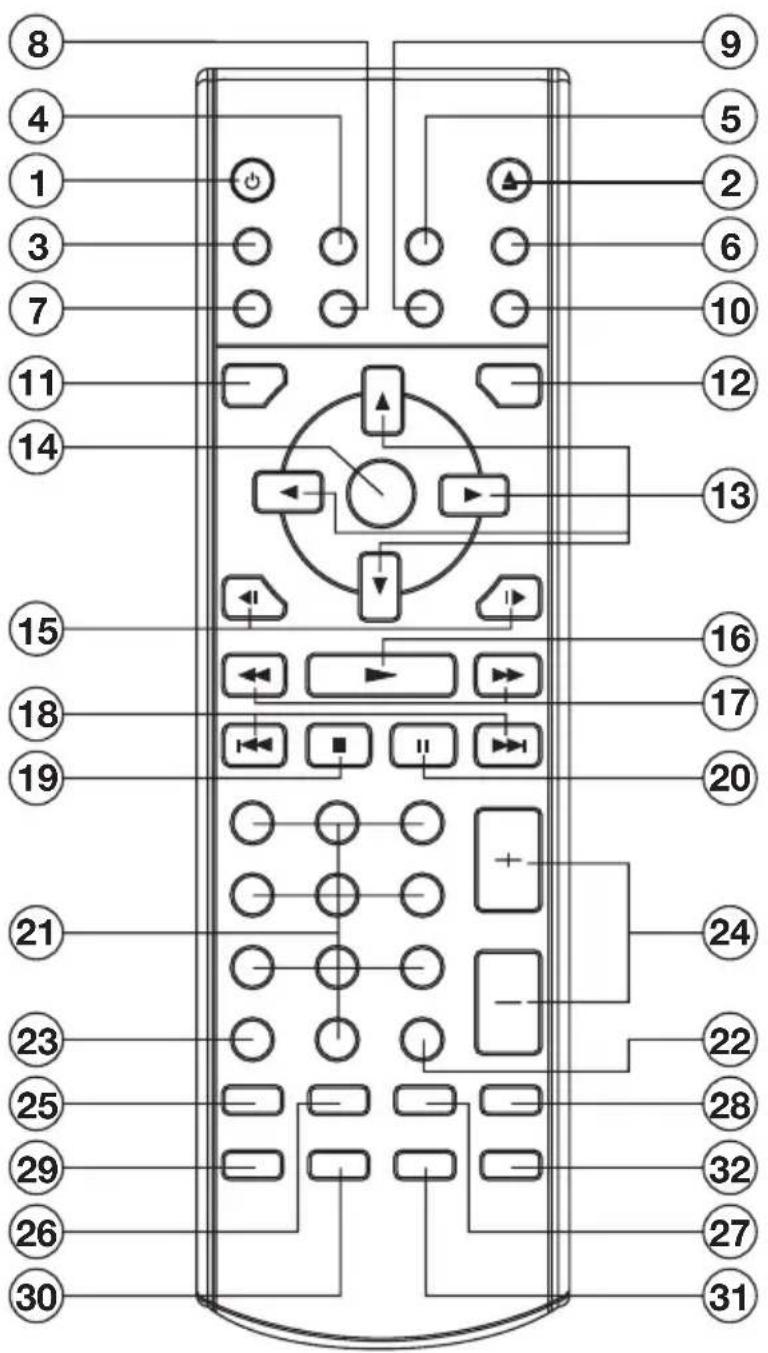
- POWER Press POWER to turn the unit ON or OFF.
- EJECT Press to eject the disc.
- MUTE Press to mute the sound.
- SUBTITLE Changing of the SUBTITLE language on multi-subtitle language DVD disc.
- ANGLE Changing of the view angle on multi-angle DVD disc.
- DISPLAY Display statistical disc information during playback.
- MODE Changing between DVD mode, AV1 mode and AV2 mode.
- SETUP Display the SETUP menu.
- PAL/NTSC Switch between PAL mode and NTSC mode.
-
AUDIO Changing of the AUDIO soundtrack on multi-audio soundtrack DVD disc.
Changing of the sound mode of the VCD/CD discs. -
TITLE Display the TITLE menu that is stored in DVD disc.
-
MENU Display the root menu that is stored on the DVD disc.
-
◀/▶, ▲/▼ In case of MENU mode, ◀/▶, ▲/▼ buttons served as cursor buttons to select item left/right, ahead/back.
-
ENTER Confirm the Track/Chapter selected with the numeric buttons or selected with the cursor buttons on TV screen.
-
▶/◀| Changing for slow forward/ reverse playback motion.
-
▶ Press to play the disc.
-
◀◀/▶▶ Press▶▶ to search forward rapidly & ◀◀ to search reverse rapidly.
-
▶▶▶/▶◀◀ Press ▶▶▶ to skip to the next track & press ◀◀◀ to skip back one track.
-
■ Press it to stop playback.
-
■■ Press it to pause playback.
-
0-9 Numeric buttons
-
10+ Digital selecting button, cooperatively used with numeric buttons.
-
CLEAR When you input a number in error, press the button to clear it.
-
VOLUME+/- Press VOLUME+/- button to increase or decrease the volume level.
-
ZOOM Allows the picture to be increased or decreased in size.
-
RESUME When in stop mode, press the button, the play can be resumed from the stop point.
-
GOTO Disc search button, cooperatively used with numeric buttons.
-
PBC Changing between PBC ON and PBC OFF on the VCD disc.
-
RANDOM Allows the track played in random order.
-
PROGRAM Allows the track played in the order you programmed.
-
REPEAT Switch the Repeat mode of discs.
-
A-B A-B repeat allows a passage to be repeated continuously.
Preparing the Remote Control
Inserting the Batteries
- Open the battery compartment cover.
-
Insert the new batteries. Make sure that the positive and negative terminals of the batteries are oriented indicated.
-
Close the cover.
- Battery: Two AAA size battery
Using the Remote Control
Face the remote control towards the player front face IR mark (remote control signal receiver).
Operation angle: About ±30 degree in each the direction of the front of the IR mark.
Loading a Disc
- Turn the ignition on to the accessory position.
- Press the POWER button (1).
- Insert the disc with printed side facing up into the disc slot (2).
- The player will start playback automatically.
Ejecting a Disc
Press ▲(EJECT) button (3) to eject the disc.
BASIC PLAY
Stopping play
- Brief press the ■ (Stop) button to stop the unit playback, when press the ▶ (Play) button it can continue normal playback.
- P r ■(Stop) button twice, it will stop the playback and go back to initial Track/Chapter.
Rapid forward / Rapid reverse
Press ▶▶ & ◀ during play.
Each time the button is pressed, the speed of rapid forward /reverse changes according to the disc as follow.
DVD:

flowchart
graph LR
    A["Normal Playback 2X 4X 6X 8X"] --> B["Feedback Loop"]
    B --> C["End"]
VCD/CD:

flowchart
graph LR
    A["Normal Playback 1X 2X 3X 4X"] --> B["-->"]
    B --> C["-->"]
MP3:

flowchart
graph LR
    A["Normal Playback 2X-4X"] --> B["→"]
    B --> C["→"]
Skipping track
Press ▶▶▶/◀ in the remote handset or buttons on the front panel during playback.
Press ▶ to skip to next track, and to back one track.
Note: For some VCD2.0 discs (PBC-playback control), ▶▶▶/▶▶tons may be unavailable.
Slow motion play
Press ▶ / ◀ during play.
Each time the button is pressed, the speed of slow forward /reverse changes according to the disc as follow.
DVD:

Pause (still picture)
Pressing || on the remote control or ▶|| on the front panel during playback will stop play temporary. To return to normal playback, press ▶ on the remote control or ▶ on the front panel.
MUTE
Will mute the sound, but the disc continues playing. When you unmute the sound (press MUTE again), a later passage will be playing.
REPEAT
FOR DVD:
Press REPEAT button to select repeat mode as follow:

flowchart
graph LR
    A["CHAPTER REPEAT ON TITLE REPEAT ON"] --> B["REPEAT OFF"]
    B --> A
FOR VCD/CD:
Press the REPEAT button to select repeat mode as follow.

- Continuously repeat at the current chapter/track, when selected REP-ONE mode.
- Select REP-ALL mode to continuously repeat all chapter/track on the current disc.
- When the player finish playback the current disc last chapter/track, it will stop display the elapsed time. When selected REPEAT OFF mode, REP-ONE & REP-ALL disappear at the screen display.
- REPEAT feature not support VCD2.0 (with PBC ON).
A-B
A-B repeat allows a passage to be repeated continuously. Press A-B button at the start of the required passage, then press A-B button again at the end of the passage. To revert to normal playing, press
A-B button again. Each time the button pressed, the screen will display as follows:
A TO B SET A → A TO B SET B → A TO B CANCELLED
Disc Search (GOTO)
FOR DVD
Press GOTO button twice, the screen will display the following message:
TITLE 01/01 TIME -- : -- : --
00:00:25
You can select the item you want to watch through TIME setting by using numeric buttons and ENTER key.
FOR CD/VCD (WITH PBC OFF):
Press GOTO button once, the screen will display the following message:
GOTO -- : --
00:00:25
Use numeric buttons to input the time directly.
ZOOM
Allows the picture to be increased or decreased in size. Press ENTER to toggle among 1.5 scale, 2.0 scale and 3.0 scale.
RANDOM
Press RANDOM button, track selection will be made in random order. The display screen will show "SHUFFLE ON" on the right-top corner. Press RANDOM button again, "SHUFFLE OFF" appears and release the mode.
PROGRAM
In stop mode, press PROGRAM button, the screen will display "PROGRAM P00:00". For example: press numeric button 4 and ▶ button, "PROGRAM P01:04" appears. It means track 4 will be played first.
MODE SELECTION
Press SOURCE button on the front panel of the unit or MODE button on the remote control to select among DVD, AV1 and
AV2 mode. When select one mode, the corresponding indicator on the front panel will be illuminated.
Volume Level Adjustment
Press VOLUME ∧ / ∨ on the front panel or VOLUME +/- on the remote control to increase or decrease the volume level.
Remote Sensor (IR)
Point the remote handset to the remote sensor IR on the front panel. Receive the signal from remote handset.
Turning the player on/off
Press the ⏻ (POWER) button on the front panel or on the remote control to turn the player on or off.
Reset
Reset button is placed on the front panel and must be activated with either a ballpoint pen or thin metal object. The reset button is to be activated for the following reasons:
- Initial installation of the unit when all wiring is completed.
- All the function buttons do not operate.
- Error symbol on the display.
On-Screen Display function
Press the DISPLAY button during playback to display the contents of the current disc on the screen.
Example:
DVD:
(1) Press DISPLAY for the first time:
TITLE 01/03 CHAPTER 002/025
00:02:25
Title Number, Total Title Number, Chapter Number, Total Chapter Number of this Title of the disc currently being played will be shown on the screen, along with the elapsed time.
(2) Press DISPLAY for the second time:
TITLE REMAIN
01:46:58
(3) Press DISPLAY for the third time:
CHAPTER ELAPSED
00:00:24
(4) Press DISPLAY for the fourth time:
CHAPTER REMAIN
00:01:39
(5) Press DISPLAY for the fifth time: The message on the screen will be cleared.
VCD:
(1) Press DISPLAY for the first time:
SINGLE ELAPSED
00:00:25
(2) Press DISPLAY for the second time:
SINGLE REMAIN
00:03:15
(3) Press DISPLAY for the third time:
TOTAL ELAPSED
00:00:25
(4) Press DISPLAY for the fourth time:
TOTAL REMAIN
00:40:35
(5) Press DISPLAY for the fifth time: The message on the screen will be cleared.
CD:
(1) Press DISPLAY for the first time:
SINGLE ELASPED
00:00:25
TOTAL TRACK : 14
TRACK : - 01
(2) Press DISPLAY for the second time:
SINGLE REMAIN
00:03:15
TOTAL TRACK : 14
TRACK : - 01
(3) Press DISPLAY for the third time:
TOTAL ELASPED
00:00:25
TOTAL TRACK : 14
TRACK : - 01
(4) Press DISPLAY for the fourth time:
TOTAL REMAIN
00:40:35
TOTAL TRACK : 14
TRACK : - 01
(5) Press DISPLAY for the fifth time: The message on the screen will be cleared.
MP3 (when set to NO MENU in SMART NAV item):
(1) Press DISPLAY for the first time:
CHAPTER ELASPED 00:00:25
TOTAL TRACK : 123
TRACK : - 01
(2) Press DISPLAY for the second time:
CHAPTER REMAIN 00:04:25
TOTAL TRACK : 123
TRACK : - 01
(3) Press DISPLAY for the third time: The message on the screen will be cleared.
Multi-audio language function
For DVD
Press AUDIO on the remote control or on the front panel during playback. Each time the button is pressed, number of the audio soundtrack language changes on sequential order.
Notes:
- The language number is different according to the disc.
- Some discs only contain one language soundtrack.
- When no different language soundtrack are recorded, ⏻ will be displayed at screen left top corner.
For VCD/CD
Press AUDIO during playback. It is possible to switch the sound between
monaural and stereo sound.

MENU function (For DVD Only)
Press MENU button while the disc is playing and the disc root menu will be displayed. You can navigate with the remote control navigation keys and select a feature with the ENTER key.
TITLE menu function (For DVD Only)
If the DVD has multiple titles recorded on the disc. It can select preferred title from the title menu to start playback.
- Press TITLE during playback.
- The title menu is display.
- Press the cursor button shown in TV screen, select preferred title by the cursor button and confirmed by ENTER key.
Multi-subtitle language function (For DVD only)
Press SUBTITLE during playback. Each time the button is pressed, number of the subtitle language changes in sequential order.
Notes:
- The language number is different according to the disc.
- Some discs only contain one subtitle language.
- When no different subtitle language are recorded, ⏻ will be displayed at screen left top corner.
Multi-angle function (For DVD only)
Press ANGLE during playback.
Each time the button is pressed, number of the angle changes in sequential order.
Notes:
- The angle number is different according to the disc.
- The function only works for discs having scenes recorded at different
angles.
- When no different angle is recorded,

will be display at screen left top rner.
MP3 Disc Play
MP3 disc is playing as the format of FOLDER. For example:
SMART NAVI

ROOT

ROOT 0

MP3 MUSIC 1

SKY
PLAY MODE
MP3 HEAR YOUR
DISC
Use ◀/▶, ▲ of the remote control or on the front panel of the unit to select the item or folder, then press ENTER button.
Pressing REPEAT button repeatedly can select three kind of repeat play mode.
REP-ONE: Play the same song over and again.
FOLDER REP: Play all songs in the current directory in sequence, over and again.
FOLDER: Play all songs in the current directory once.
When select PLAY MODE, press ▲ / ▼ to change between the following mode:
SINGLE REP-ONE FOLDER FOLDER REP
DISC SCAN-DISC DISC REP RANDOM
SHUFFLE ON PROGRAM PXXX
In the playback, use or to skip an item ahead or back.
◀◀ : Rapid reverse, ▶▶ Rapid advance.
Note: The FOLDER cannot be selected during playing. It can be selected after ■ (Stop) button pressed.
INITIAL SETUP
SETUP MANU --- MAIN PAGE
GENERAL SETUP
SPEAKER SETUP
AUDIO SETUP
PREFERENCES
EXIT SETUP
- Press SETUP on the remote control or on the front panel in the stop mode. (Press the stop button twice to ensure the player under STOP mode.)
- The initial SETUP menu is displayed.
- Select the preferred item by using the ▲ /▼ buttons.
- Press ENTER buttons.
a/.GENERAL SETUP
This setup page includes all the item of TV display & Audio output feature. The detail please refer to GENERAL SETUP MENU.
b/.SPEAKER SETUP
This is to activate the audio output from DOLBY AC3 5.1 DOWNMIX to 2 channel mode. Please refer to SPEAKER SETUP MENU.
c/.AUDIO SETUP
This setup page includes all the items for AUDIO. Please refer to AUDIO SETUP MENU.
d/.PREFERENCES SETUP
This setup page includes all the configuration of support feature. The detail please refer to PREFERENCES SETUP MENU.
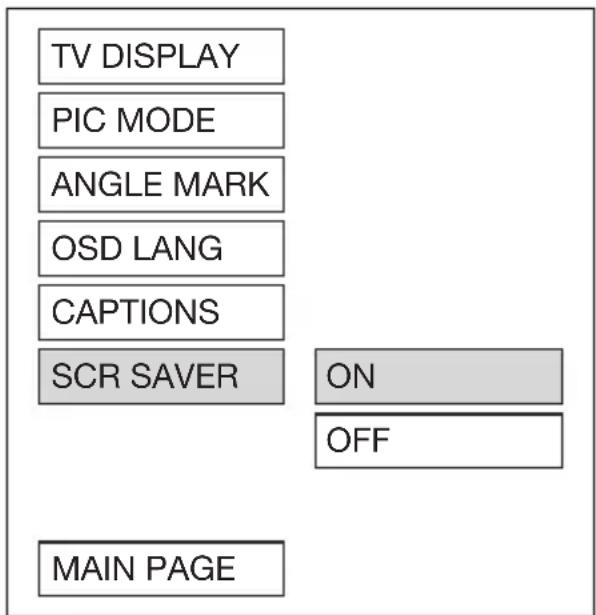
GENERAL SETUP
-- GENERAL PAGE --
TV DISPLAY
NORMAL/PS
PIC MODE
NORMAL/LB
ANGLE MARK
WIDE
OSD LANG
CAPTIONS
SCR SAVER
MAIN PAGE
| Video Material | TV Screen | |||
| 4:3 Wide (16:9) | ||||
| Normal | Pan Scan Letter-box | |||
 |  |  |  |  |
 |  |  |  |  |
TV display setup
This is to select the appropriate TV aspect (4:3 or 16:9) according to the connected TV set.
Normal/PS (For 4:3 TV)
Played back in the PAN & SCAN style. (If connected to wide-screen TV, the left and right edges are cut off.)
Normal/LB (For 4:3 TV)
Played back in letterbox style. (If connected to wide-screen TV, black bands appear at top and bottom of the screen.)
Wide (For 16:9 TV)
Select when a wide-screen TV set is connected.
-- GENERAL PAGE --
TV DISPLAY
PIC MODE
ANGLE MARK
OSD LANG
CAPTIONS
SCR SAVER
MAIN PAGE
AUTO
HI-RES
N-FLICKER
PIC mode setup
Select AUTO, the player PIC mode will depend on DVD disc.
Select HI-RES format for best image resolution.
Select N-FLICKER format on image or picture under noise affect.
-- GENERAL PAGE --
TV DISPLAY
PIC MODE
ANGLE MARK
OSD LANG
CAPTIONS
SCR SAVER
MAIN PAGE
ENGLISH
OSD LANG type setup
Select the preferred OSD language by using the ▲/▼buttons.
-- GENERAL PAGE --
TV DISPLAY
PIC MODE
ANGLE MARK
OSD LANG
CAPTIONS
SCR SAVER
MAIN PAGE
ON
OFF
ANGLE MARK display setup
If it is set to ON, when the multi-angle DVD disc is playing, “💡” (the angle mark) will appears on the screen; if is set to “OFF”, the mark will not appear.
-- GENERAL PAGE --
TV DISPLAY
PIC MODE
ANGLE MARK
OSD LANG
CAPTIONS
SCR SAVER
ON
OFF
MAIN PAGE
CAPTIONS setup
Activate the CAPTIONS feature by selecting ON. And release this feature by selecting OFF.
-- GENERAL PAGE --
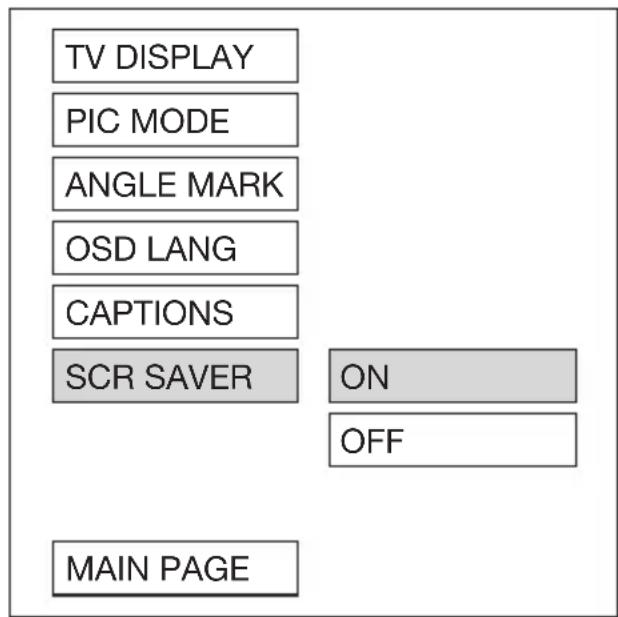
SCR SAVER setup
Select the SCR SAVER output ON/OFF.
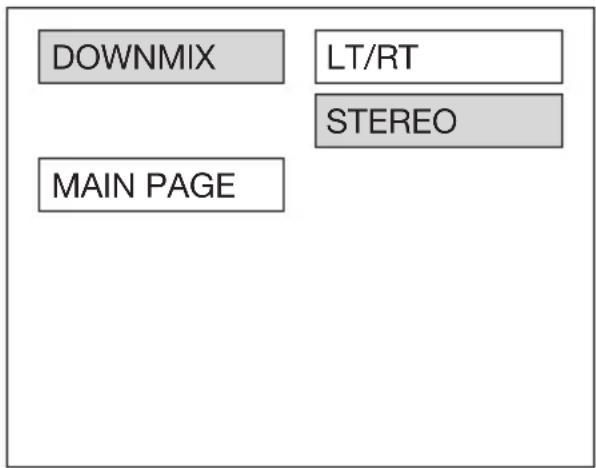
SPEAKER SETUP
-- SPEAKER SETUP PAGE --
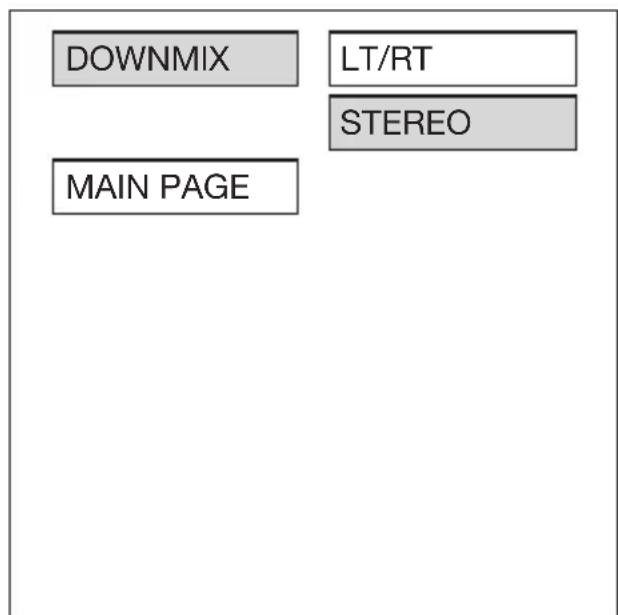
This is to activate the audio output from DOLBY AC3 5.1 DOWNMIX to 2 channel mode.
Select the preferred SPEAKER connection by using the cursor buttons.
- Select the LT/RT to activate the Dolby surround compatible output.
- Select the STEREO to activate simple stereo mode.
AUDIO SETUP
-- AUDIO SETUP --
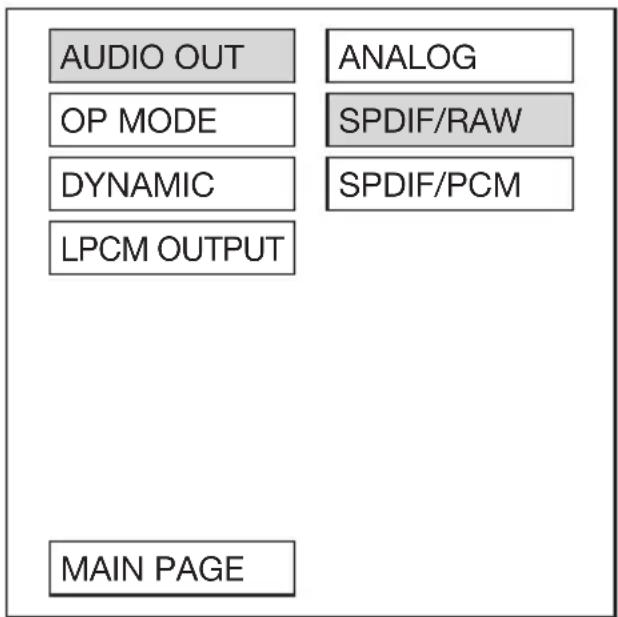
AUDIO OUT
This is to activate the audio output from ANALOG mode to SPDIF/RAW mode to SPDIF/PCM mode.
-- AUDIO SETUP --
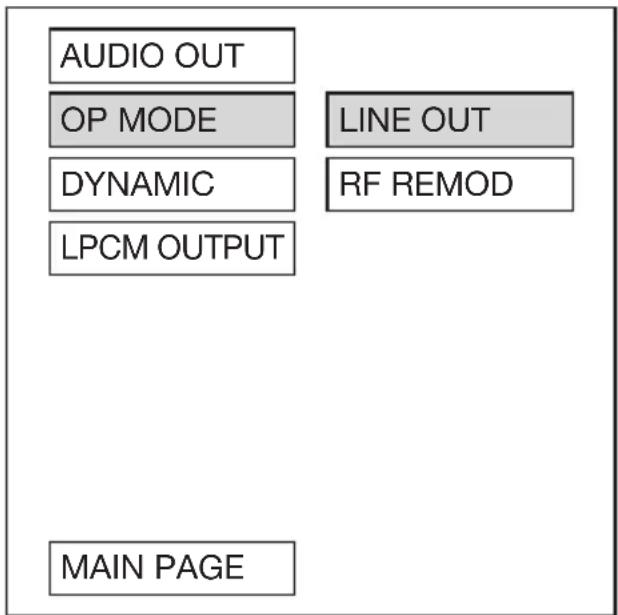
OP MODE
There are two operating modes for the Dolby Digital decoder: LINE OUT and RF REMOD.
-- AUDIO SETUP --
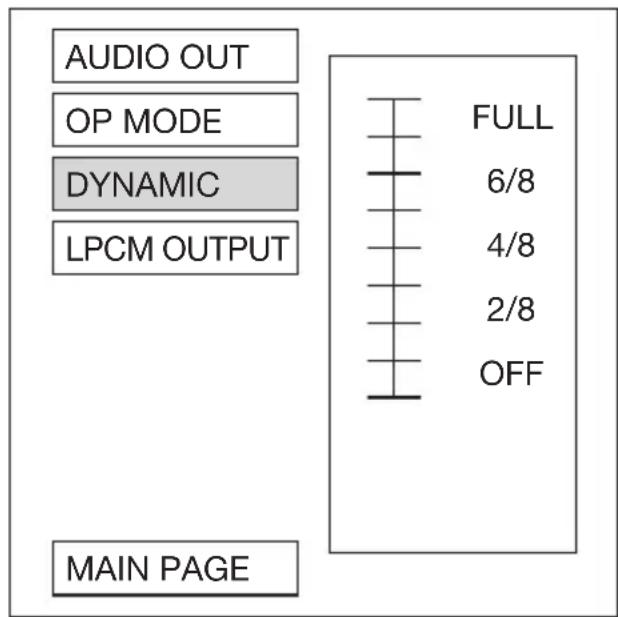
Dynamic range Control
Select DYNAMIC and adjust the dynamic range of a Dolby Digital encoded program. There are 8 steps between full compression and off compression.
-- AUDIO SETUP --
LPCM OUTPUT
Select the LPCM OUTPUT between LPCM 48K and LPCM 96K.
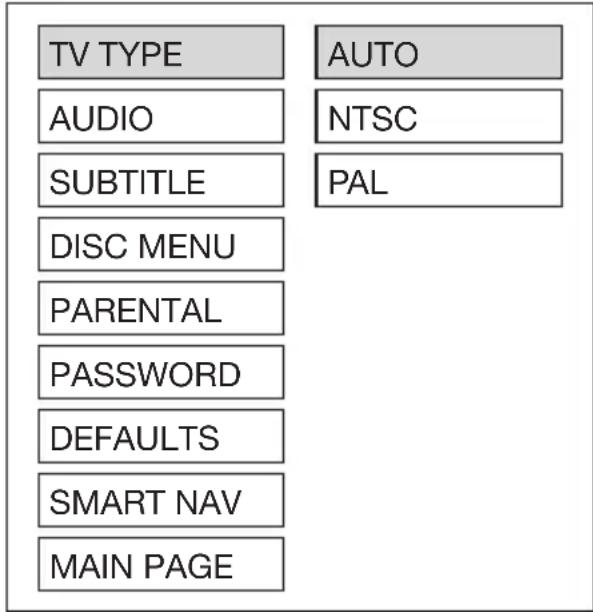
PREFERENCES SETUP
-- PREFERENCES PAGE --
TV type setup
This player can play discs recorded in either PAL or NTSC format.
Select NTSC format, when you connected to NTSC TV.
Select PAL format, when you connected to PAL TV.
Select AUTO format, the player TV output format will accord the DVD disc format.
--PREFERENCES PAGE--
AUDIO language setup
Select the preferred AUDIO soundtrack by using the cursor buttons.
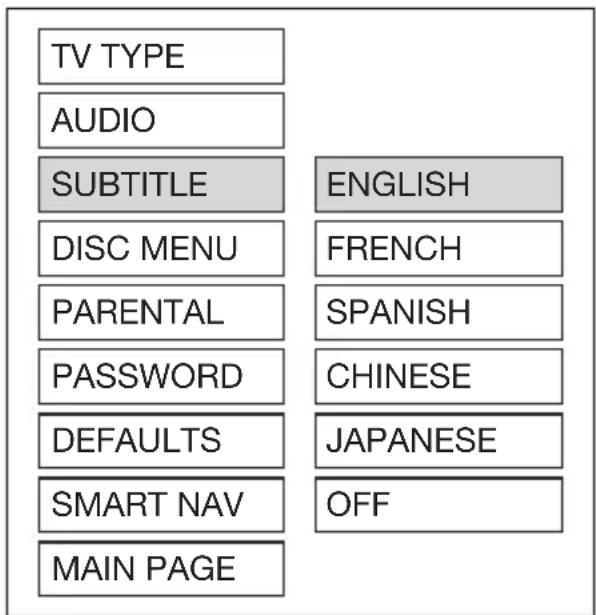
-- PREFERENCES PAGE --
SUBTITLE language setup
Select the preferred SUBTITLE language by using the cursor buttons.
-- PREFERENCES PAGE --
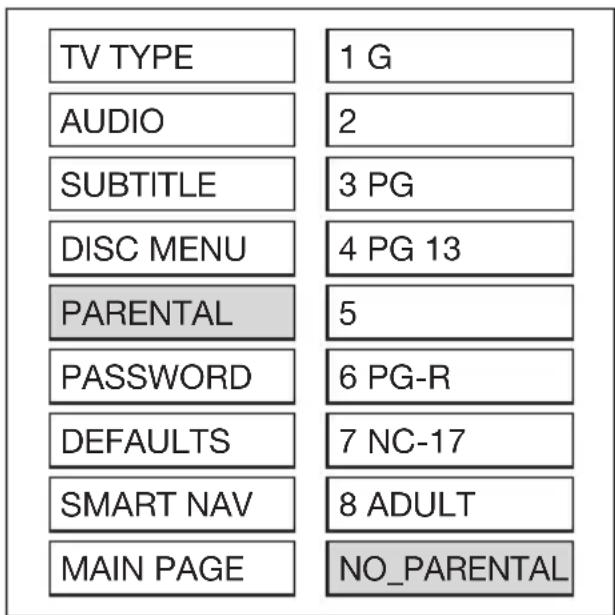
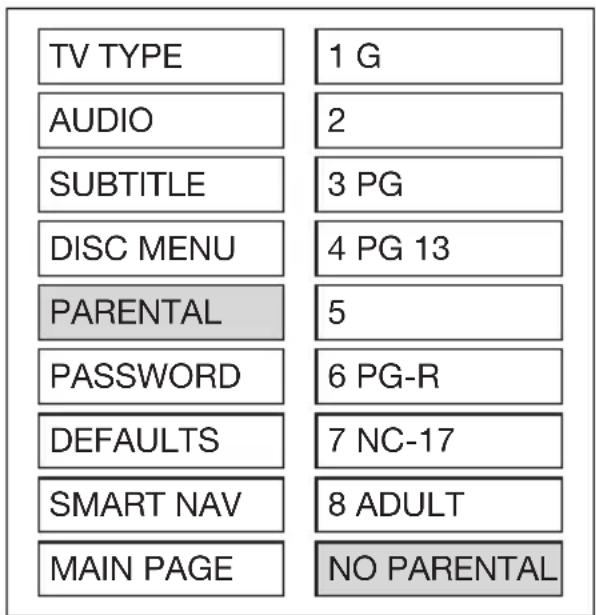
PARENTAL
Select suitable parental guidance by the cursor buttons and conformed by pressing ENTER button.
-- PREFERENCES PAGE --
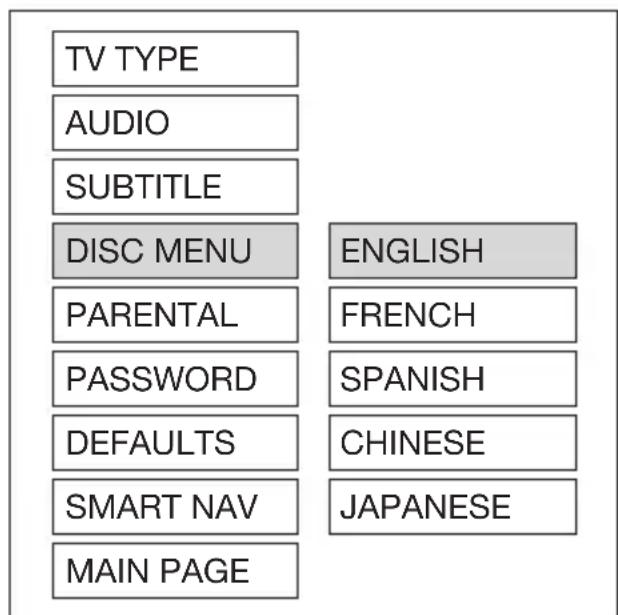
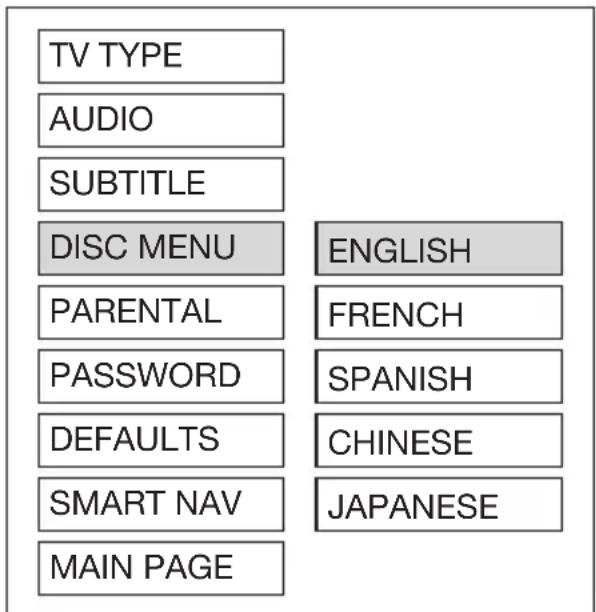
DISC MENU language setup
Select the preferred DISC MENU language by using the cursor buttons.
-- PREFERENCES PAGE --
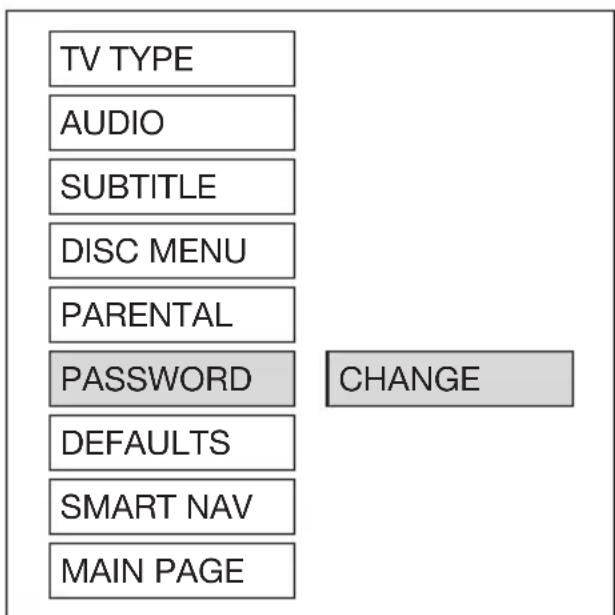
PASSWORD
Select CHANGE and press ENTER button. Type the old password (The initial factory code is 3308) and key in 4 characters password now you want to use, and retype again to confirm key in correctly.
-- PREFERENCES PAGE --
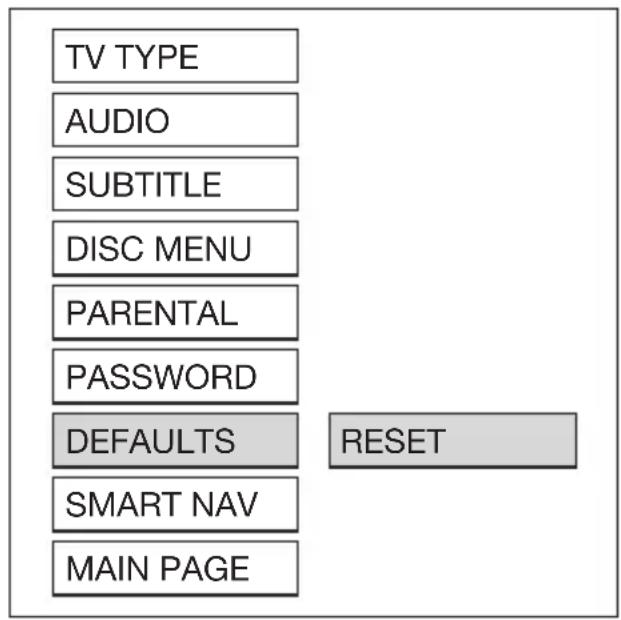
DEFAULTS
Select reset to become factory initial setting.
-- PREFERENCES PAGE --

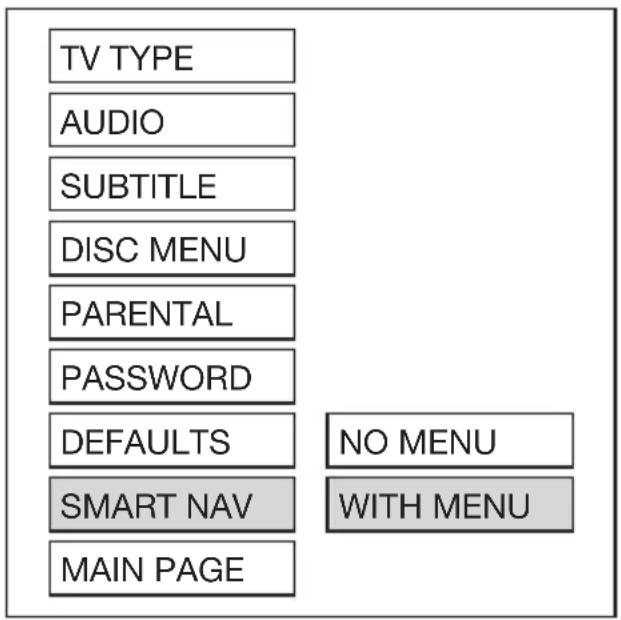
SMART NAV
In this item, you can select NO MENU mode or WITH MENU mode.
DEFAULTS TABLE
| General Setup TV Display Normal/LB | ||
| PIC Mode AUTO | ||
| Angle Mark ON | ||
| OSD Language English | ||
| Captions ON | ||
| SCR Saver ON | ||
| Speaker Setup Downmix Stereo | ||
| Audio Setup Audio Out SPDIF/RAW | ||
| OP Mode Line Out | ||
| Dynamic FULL | ||
| LPCM Output LPCM 96K | ||
| Preferences | TV Type | AUTO |
| Audio | English | |
| Subtitle | English | |
| DISC Menu | English | |
| Parental | NO Parental | |
| Password | 3308 | |
| Smart NAV With Menu | ||
Supply voltage: 12V DC (11V-15V), test voltage 14.4V, negative ground
Current consumption: Less than 2A
Signal system: Compositive video 1.0Vp-p 75Ω
Discs played: (1) DVD-VIDEO disc
5"(12 cm) single-sided, single-layer
5"(12 cm) single-sided, double-layer
(2) Compact disc (CD-DA)
5"(12 cm) disc
Audio output level: 600Ω (2 ch 2.0 Vrms)
Audio signal output
characteristics: (1) Frequency response: 20 Hz-20 kHz
(2) S/N ratio: 80 dB (JIS)
(3) Wow and Flutter: Below measurable limits
Note:
Specifications and design are subject to modification, without notice, due to improvements in technology.
This product incorporates copyright protection technology that is protected by method claims of certain U.S. patents and other intellectual property rights owned by Macrovision Corporation and other rights owners. Use of this copyright protection technology must be authorized by Macrovision Corporation, and is intended for home and other limited viewing uses only unless otherwise authorized by Macrovision Corporation. Reverse engineering or disassembly is prohibited.
ELECTRICAL CONNECTION
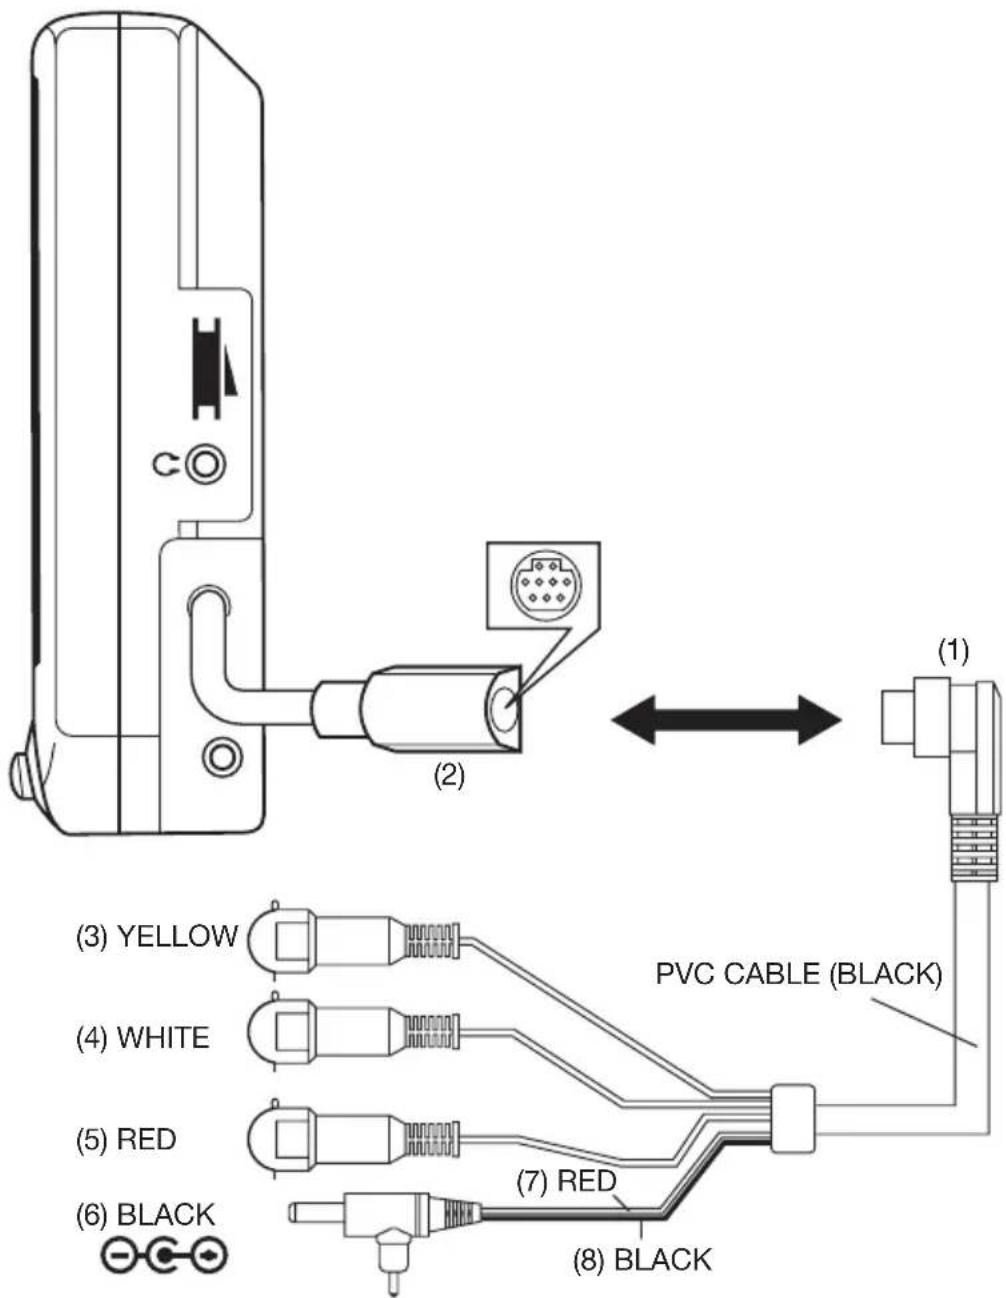
CAUTION:
- Put the 9-pin mini din plug (1) into the 9-pin mini din socket (2) on the back of the display.
- The yellow socket (3) is connected to the VIDEO socket. The white socket (4) is connected to the AUDIO Out-Left socket and the red socket (5) is connected to the AUDIO Out-Right socket.
- When you want to use the unit, please cut the (7) and (8) two wires from the DC plug (6). Then connect the red wire (7) to the positive (+) terminal of the power supply and the black wire (8) to the negative (−) of the power supply.
CONTROL & FUNCTION KEYS
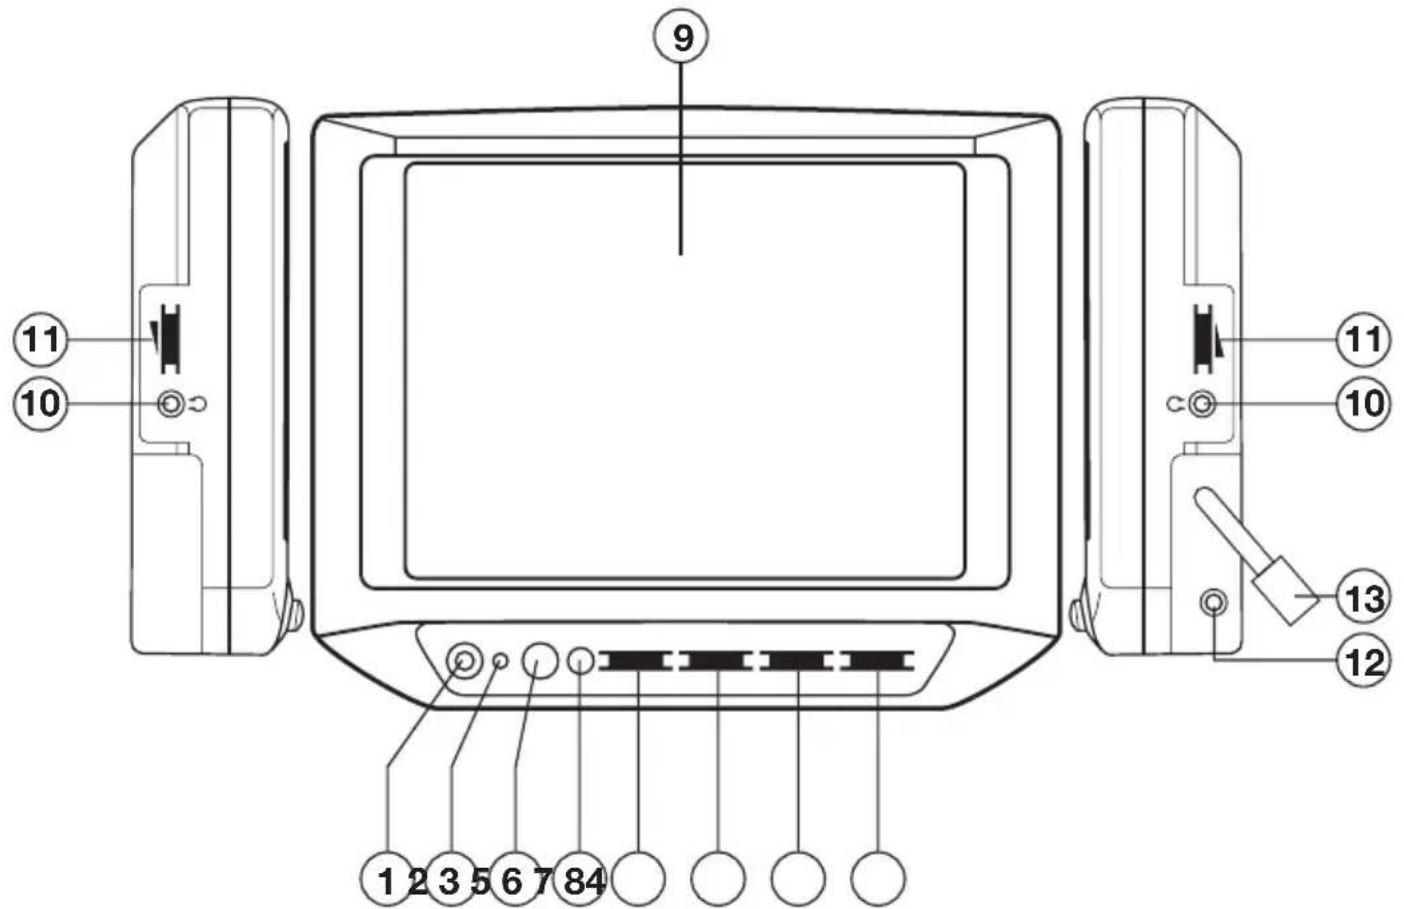
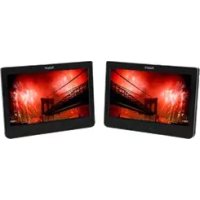
7 inch COLOR TFT LCD MONITOR
1. POWER
Press POWER button (1) to turn on the unit. Press it again to turn it off.
2. POWER INDICATOR LIGHT
When the system is on, the indicator light (2) will be illuminated.
3. REMOTE SENSOR
Point the remote control handset to the remote sensor (3).
Press the function keys on the handset to control the TV, it would be worked for connecting the TV unit or DVD only.
4. SPEAKER
Press the SPEAKER button (4) to turn on the speaker. Press it again to turn it off.
5. VOLUME
Slide the VOLUME knob (5) right to increase volume level, and slide the knob left to decrease volume level.
6. COLOR
Slide the COLOR knob (6) right or left to adjust the color level.
7. CONTRAST
Slide the CONTRAST knob (7) right or lift to adjust the contrast level.
8. BRIGHT
Slide the BRIGHT knob (8) right or left to adjust the bright level.
9. TFT LIQUID CRYSTAL DISPLAY
The 5 inch color TFT LCD (9) can show the current state of the unit.
10. JACKS FOR EARPHONE
There are two jacks (10) for earphone. You can connect earphone to any one of the jacks to receive sound signal.
11. EARPHONE VOLUME CONTROL KNOB
Slide the knob (11) to change the volume of the earphone.
12. REMOTE
When connect DVD unit or another unit to the monitor through the jack (12), you can control the DVD unit or another unit by pointing the remote control handset directly to the remote sensor (3).
13. 9-PIN MINI DIN SOCKET
The socket is used for AUDIO IN, VIDEO IN and power supply input. Through the socket (13), you can connect audio/video system to the unit.
GEBRUIKSAANWIJZING
Auto / Mobiele DVD Speler
natural_image
Front view of a remote control with various function keys and buttons (no text or symbols visible)
natural_image
Line drawing of a flat-screen monitor with control buttons and ports (no text or symbols)
natural_image
Front panel of a media player interface with buttons, sliders, and playback controls (no text labels or symbols)WAARSCHUWING:
STEL HET APPARAAT NIET NIET BLOOT AAN REGEN OF VOCHT OM HET GEVAAR VOOR BRAND OF EEN ELECTRISCHE SCHOK TE VOORKOMEN.
WAARSCHUWING:
©1992-1997 Dolby Laboratories, Inc.
natural_image
Line drawing of a hand holding a circular object with a pointer, no text or symbols present
RAAK DE ONDERZIJDE NIET AAN


VEEG VAN HET MIDDEN NAAR DE RAND
Afstandsbediening
| Disc | Sound recording format | coaxial digital audio output from connector |
| DVD | Dolby Digital | Dolby Digital bitstream (2-5.1ch) or PCM (2ch)(48kHz/16bit) |
| Linear PCM (48/96 kHz 16/20/24 bit ) | Linear PCM(2ch)(48kHz sampling/16 bit only)*2or no output*1 | |
| MPEG1 MPEG2 | MPEG2 audio bitstream or PCM(2ch)(16 bit)*1 | |
| VCD | MPEG1 | PCM (44.1 kHz sampling) |
| CD | Linear PMC | Linear PCM (44.1 kHz sampling) |
Confidential Unpublished Works.
©1992-1997 Dolby Laboratories, Inc.
SINGLE ELAPSED → SINGLE REMAIN TOTAL ELAPSED → TOTAL REMAIN → OFF
- MP3
SETUP - GENERAL - TV DISPLAY
TV DISPLAY
TV TYPE
PIC MODE
ANGLE MARK
OSD LANG
SPDIF
CAPTIONS
MAIN PAGE
NORMAL/PS
NORMAL/LB
WIDE
| Video Material | TV Screen | |||
| 4:3 Wide (16:9) | ||||
| Normal | Pan Scan Letter-box | |||
 |  |  |  |  |
 |  |  |  |  |
SETUP - GENERAL - TV TYPE
TV DISPLAY
TV TYPE
PIC MODE
ANGLE MARK
OSD LANG
SPDIF
CAPTIONS
MAIN PAGE
MULTI
NTSC
PAL
SETUP – PREFERENCES – DEFAULTS

SETUP – PREFERENCES – SMART NAV
ATTENTIE :
natural_image
Front view of a remote control with various function keys and buttons (no text or symbols visible)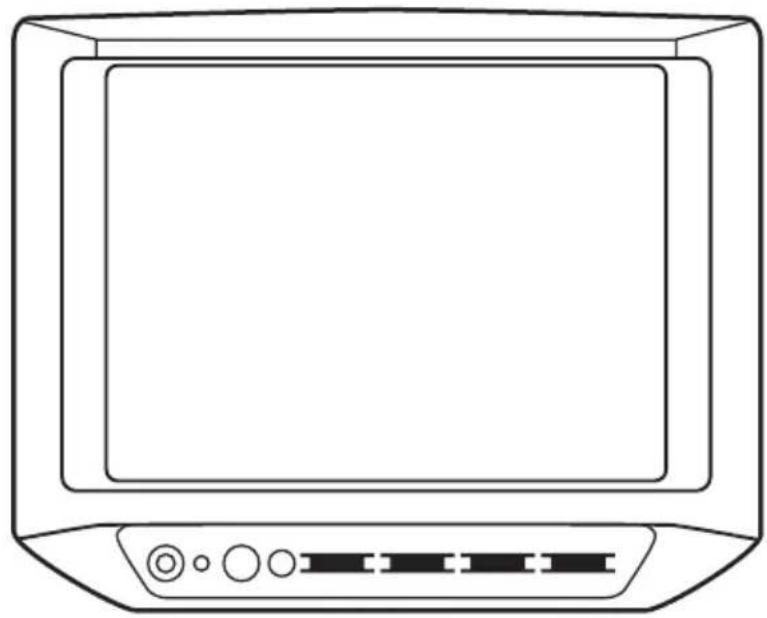
natural_image
Line drawing of a flat-screen monitor with ports and buttons (no text or symbols)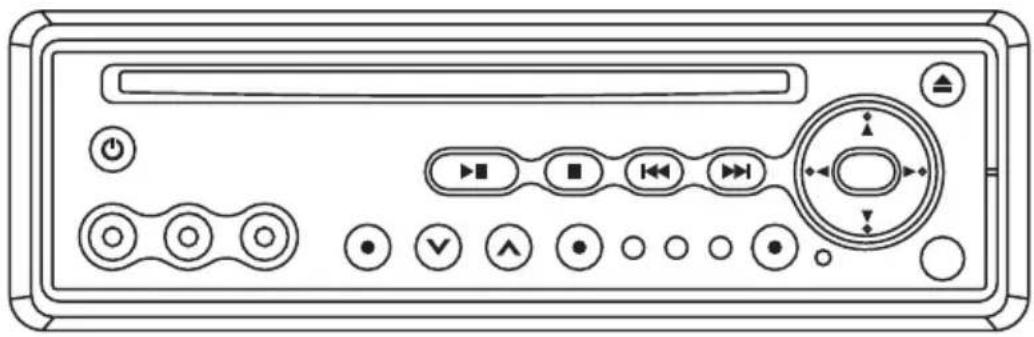
natural_image
Front panel of a media player interface with buttons, sliders, and playback controls (no text labels or symbols)Table des Matières
Sécurité....52
natural_image
Illustration of a hand using a tool to interact with a circular device (no text or symbols visible)
- Power (⏻)
- EJECT(▲)
- SETUP
- AUDIO
- SOURCE
- Fente disque
- PLAY/PAUSE (▶II)
- STOP (■)
- PREVIOUS(I◄◄)
- NEXT(▶▶)
- VOLUMEV
-
VOLUME
-
◀/▶, ▲/▼ cursor buttons
- ENTER
- Téemoin DVD
- Temoin AV INPUT 1
- Temoin AV INPUT 2
- VIDEO IN 1
- AUDIO IN 1 L
- AUDIO IN 1 R
- IR
- Bouton Reset
- Connecteur DC 12V INPUT
- Connecteur DC 12V OUTPUT
- REMOTE
- VIDEO 2 INPUT
-
AUDIO 2 INPUT L/R
-
DIGITAL AUDIO
- VIDEO 1 OUTPUT
- AUDIO OUTPUT L/R
- VIDEO 2 OUTPUT
flowchart
graph LR
    A["Normal Playback 2X 4X 6X 8X"] --> B["→"]
    B --> C["→"]
VCD/CD

flowchart
graph LR
    A["Normal Playback 1X 2X 3X 4X"] --> B["->"]
    B --> C["->"]
MP3

flowchart
graph LR
    A["Lecture Normale 2X4X"] --> B["-->"]
    B --> C["-->"]
VCD

Touche Repeat (11)
REP-ONE REP-ALL REPEAT OFF
A TO B SET A-A TO B SET B A TO B CANCELLED
GOTO
Pour DVD/VCD:
INITIAL SETUP
SETUP MENU --- MAIN PAGE
GENERAL SETUP
SPEAKER SETUP
AUDIO SETUP
PREFERENCES
EXIT SETUP
Fonction Setup Menu
--- GENERAL PAGE ---
TV DISPLAY
NORMAL/PS
PIC MODE
NORMAL/LB
ANGLE MARK
WIDE
OSD LANG
CAPTIONS
SCR SAVER
MAIN PAGE
| Video Material | TV Screen | |||
| 4:3 Wide (16:9) | ||||
| Normal | Pan Scan Letter-box | |||
 |  |  |  |  |
 |  |  |  |  |
TV display setup
--- GENERAL PAGE ---
TV DISPLAY
PIC MODE
ANGLE MARK
OSD LANG
CAPTIONS
SCR SAVER
AUTO
HI-RES
N-FLICKER
MAIN PAGE
PIC mode setup
--- GENERAL PAGE ---
TV DISPLAY
PIC MODE
ANGLE MARK
OSD LANG
CAPTIONS
SCR SAVER
ON
OFF
MAIN PAGE
ANGLE MARK
--- GENERAL PAGE ---
TV DISPLAY
PIC MODE
ANGLE MARK
OSD LANG
CAPTIONS
SCR SAVER
MAIN PAGE
ENGLISH
OSD LANG
--- GENERAL PAGE ---
TV DISPLAY
PIC MODE
ANGLE MARK
OSD LANG
CAPTIONS
SCR SAVER
ON
OFF
MAIN PAGE
CAPTIONS setup
--- GENERAL PAGE ---
SCR SAVER setup
--- SPEAKER PAGE ---
Dynamic Range Control
--- PREFERENCES PAGE ---
TV type
--- PREFERENCES PAGE ---

AUDIO
--- PREFERENCES PAGE ---
--- PREFERENCES PAGE ---

--- PREFERENCES PAGE ---
--- PREFERENCES PAGE ---
DISC MENU
--- PREFERENCES PAGE ---
| TV TYPE |
| AUDIO |
| SUBTITLE |
| DISC MENU |
| PARENTAL |
| PASSWORD |
| DEFAULTS |
| SMART NAV |
| MAIN PAGE |
DEFAULTS (RESET)
--- PREFERENCES PAGE ---
| TV TYPE | |
| AUDIO | |
| SUBTITLE | |
| DISC MENU | |
| PARENTAL | |
| PASSWORD | |
| DEFAULTS | NO MENU |
| SMART NAV | WITH MENU |
| MAIN PAGE |
SMART NAV
2. TEMOIN MARCHE/ARRET
- □ Features
- Compatible with PAL DVD (Video CD) and NTSC DVD (Video CD)
- □ Use This Product Safely
- When Driving
- When Car Washing
- When Parked
- Use the Proper Power Supply
- Protect the Disc Mechanism
- Use Authorized Service Centers
- For Installation
- CONTENTS
- Safety Information....4
- Disc Notes ....5
- The Player 6
- Installation....7
- Electric Connection....8
- Remote Control 9
- Operation....12
- Setup....17
- Specifications 23
- Monitor 24
- CAUTION:
- WARNING:
- Region Management Information
- Disc formats supported by this player
- Discs which cannot be played with this player
- Handling and Cleaning
- Disc Cleaning
- Note:
- Preparing New Discs with Rough Spots
- LOCATION AND FUNCTION OF KEYS
- Preparing the Remote Control
- Inserting the Batteries
- Using the Remote Control
- Loading a Disc
- Ejecting a Disc
- BASIC PLAY
- Stopping play
- Rapid forward / Rapid reverse
- Skipping track
- Slow motion play
- Pause (still picture)
- MUTE
- REPEAT
- A-B
- Disc Search (GOTO)
- ZOOM
- RANDOM
- PROGRAM
- MODE SELECTION
- Volume Level Adjustment
- Remote Sensor (IR)
- Turning the player on/off
- Reset
- On-Screen Display function
- Multi-audio language function
- For DVD
- Notes:
- For VCD/CD
- MENU function (For DVD Only)
- TITLE menu function (For DVD Only)
- Multi-subtitle language function (For DVD only)
- Multi-angle function (For DVD only)
- MP3 Disc Play
- SMART NAVI
- INITIAL SETUP
- GENERAL SETUP
- TV display setup
- Normal/PS (For 4:3 TV)
- Normal/LB (For 4:3 TV)
- Wide (For 16:9 TV)
- PIC mode setup
- OSD LANG type setup
- ANGLE MARK display setup
- CAPTIONS setup
- SCR SAVER setup
- SPEAKER SETUP
- AUDIO SETUP
- AUDIO OUT
- OP MODE
- Dynamic range Control
- LPCM OUTPUT
- PREFERENCES SETUP
- TV type setup
- AUDIO language setup
- SUBTITLE language setup
- PARENTAL
- DISC MENU language setup
- PASSWORD
- DEFAULTS
- SMART NAV
- Audio signal output
- ELECTRICAL CONNECTION
- CONTROL & FUNCTION KEYS
- POWER
- POWER INDICATOR LIGHT
- REMOTE SENSOR
- SPEAKER
- VOLUME
- COLOR
- CONTRAST
- BRIGHT
- TFT LIQUID CRYSTAL DISPLAY
- JACKS FOR EARPHONE
- EARPHONE VOLUME CONTROL KNOB
- REMOTE
- 9-PIN MINI DIN SOCKET
- GEBRUIKSAANWIJZING
- Auto / Mobiele DVD Speler
- WAARSCHUWING:
- Afstandsbediening
- ATTENTIE :
- Table des Matières
- Sécurité....52
- VCD/CD
- MP3
- VCD
- Touche Repeat (11)
- GOTO
- Fonction Setup Menu
- ANGLE MARK
- OSD LANG
- TV type
- AUDIO
- DISC MENU
- DEFAULTS (RESET)
- TEMOIN MARCHE/ARRET
Brand : Marquant
Model : MCDKIT7
Category : Portable DVD Player