
Pixma MP520 - Printer CANON - Free user manual and instructions
Find the device manual for free Pixma MP520 CANON in PDF.
| Product type | Inkjet multifunction printer (copy, print, scan) |
| Dimensions (W x D x H) | 455 x 378 x 172 mm (without tray deployment) |
| Weight | Approx. 7.5 kg |
| Power supply | 100-240 V AC, 50/60 Hz |
| Power consumption | Printing: approx. 17 W; Standby: approx. 2.4 W; Off: approx. 1.0 W |
| Maximum print resolution | 4800 x 1200 dpi |
| Interface | USB 2.0 Hi-Speed; Bluetooth 1.2 (optional) |
| Main functions | Copy, print, scan, direct print via memory card and PictBridge |
| Paper capacity | Rear tray: up to 100 sheets; front tray: up to 150 sheets |
| Supported paper sizes | A4, A5, B5, Letter, 10x15 cm, 13x18 cm, 20x25 cm, envelopes, etc. |
| Scan resolution (optical) | 2400 x 4800 dpi |
| Scan resolution (interpolated) | 19200 x 19200 dpi |
| Number of print head nozzles | 1600 nozzles (320 PgBK, 256x2 C/M, 256 Y) |
| Supplies | PGI-5BK (black), CLI-8C, CLI-8M, CLI-8Y (color) ink tanks |
| Supply availability | 5 years after discontinuation |
| Maintenance | Print head cleaning, alignment, ink tank replacement |
| Safety | Do not touch internal metal parts; keep inks out of reach of children; unplug with dry hands |
| Repairability | Standard supplies; online guides available; Canon customer support |
| Copier specifications | Multiple copies 1-99; zoom 25-400%; 9 intensity levels |
| PictBridge specifications | Direct printing from compatible camera; sizes: 10x15, 13x18, credit card, A4, Letter |
Frequently Asked Questions - Pixma MP520 CANON
User questions about Pixma MP520 CANON
0 question about this device. Answer the ones you know or ask your own.
Ask a new question about this device
Download the instructions for your Printer in PDF format for free! Find your manual Pixma MP520 - CANON and take your electronic device back in hand. On this page are published all the documents necessary for the use of your device. Pixma MP520 by CANON.
USER MANUAL Pixma MP520 CANON
| Introduction 1 | |
| How to Use the Documentation Provided 3 | |
| Preparing the Machine 4 | |
| Installing the MP Drivers 6 | |
| Reading the On-screen Manuals 8 | |
| Loading Printing Paper 9 | |
| How to Navigate Menus on the LCD 11 | |
| Copying 14 | |
| Printing from a Memory Card 15 | |
| Photo Printing from Printed Photo 19 | |
| Printing from Your Computer 21 | |
| Scanning Images 23 | |
| Printing Photographs Directly from a PictBridge Compliant Device 25 | |
| Replacing an Ink Tank | 31 |
| Specifications | 33 |

natural_image
Symbol of a trash bin crossed with no text or numbers, representing waste sorting or disposal (no text present)This symbol indicates that this product is not to be disposed of with your household waste, according to the WEEE Directive (2002/96/EC) and your national law. This product should be handed over to a designated collection point, e.g., on an authorized one-for-one basis when you buy a new similar product or to an authorized collection site for recycling waste electrical and electronic equipment (EEE).
Improper handling of this type of waste could have a possible negative impact on the environment and human health due to potentially hazardous substances that are generally associated with EEE. At the same time, your cooperation in the correct disposal of this product will contribute to the effective usage of natural resources. For more information about where you can drop off your waste equipment for recycling, please contact your local city office, waste authority, approved WEEE scheme or your household waste disposal service.
For more information regarding return and recycling of WEEE products, please visit www.canon-europe.com/environment.
(EEA: Norway, Iceland and Liechtenstein)
For Customers in Europe, Middle-East, Africa and Russia only
For Canon Customer Support contacts, please see the back cover of the European Warranty Systems (EWS) Booklet or visit www.canon-europe.com.


АЯ46
Introduction
This Quick Start Guide uses the following symbols to indicate important information. Always observe the instructions indicated by these symbols.
Warning
Instructions that, if ignored, could result in death or serious personal injury caused by incorrect operation of the equipment. These must be observed for safe operation.
Caution
Instructions that, if ignored, could result in personal injury or material damage caused by incorrect operation of the equipment. These must be observed for safe operation.
Important
Instructions that must be observed for safe operation.
Depending on your application program, operations may differ. For details, refer to the instruction manual of your application. The steps described in this manual are in Windows Vista™ operating system Ultimate Edition (hereafter referred to as "Windows Vista") and Mac® OS X v.10.4.x.
Trademark Notices
● "Microsoft" is a registered trademark of Microsoft Corporation.
● “Windows” is a trademark of Microsoft Corporation, registered in the U.S. and other countries.
● "Windows Vista" is a trademark of Microsoft Corporation.
● “Macintosh” and “Mac” are trademarks of Apple Inc., registered in the U.S. and other countries.
- “Memory Stick”, “Memory Stick PRO”, “Memory Stick Duo” and “Memory Stick PRO Duo” are trademarks of Sony Corporation.
- "xD-Picture Card" is a trademark of Fuji Film Co. Ltd.
- "MultiMediaCard" is a trademark of the MultiMediaCard Association.
- “SD Card”, “miniSD Card” and “microSD Card” are trademarks of SD Association.
- “Bluetooth” is a trademark of Bluetooth SIG, Inc., U.S.A. and licensed to Canon Inc.
© CANON INC. 2007
All rights reserved. No part of this publication may be transmitted or copied in any form whatsoever without the express written permission.
Model Number: K10310 (MP520)
Exif Print
This machine supports Exif Print.
Exif Print is a standard for enhancing the communication between digital cameras and printers. By connecting to an Exif Print-compliant digital camera, the camera's image data at the time of shooting is used and optimized, yielding extremely high quality prints.
International ENERGY STAR® Program

As an ENERGY STAR ^® Partner, Canon Inc. has determined that this product meets the ENERGY STAR ^® guidelines for efficiency.
Power Requirements
Be sure to use the power cable included with the machine.
Never use a power supply voltage other than that supplied in the country of purchase. Using the incorrect voltage could cause a fire or electric shock. The correct power supply voltages and frequencies are as follows:
AC 100-240V, 50/60Hz
About Consumables
Consumables (ink tanks / FINE Cartridges) are available for 5 years after production has stopped.
Safety Precautions
Warning
- This product emits low level magnetic flux. If you use a cardiac pacemaker and feel abnormalities, please move away from this product and consult your doctor.
- Never attempt to plug the power cord into the power outlet or unplug the power cord when your hands are wet.
- Never damage, modify, stretch, or excessively bend or twist the power cord. Do not place heavy objects on the power cord.
- Never use any power supply other than the standard power supply available in the country of purchase. Using the incorrect voltage and frequency could cause a fire or electric shock.
● Always push the plug all the way into the power outlet.
Caution
● For safety reasons, store ink tanks out of the reach of small children.
- Do not drop or shake ink tanks as this may cause the ink to leak out and stain your clothes and hands.
Also read the Safety Precautions in the User's Guide on-screen manual. Observe the warnings and cautions to avoid personal injury or damage to the machine.
How to Use the Documentation Provided

Printed Documentation
Setup Sheet
Be sure to read this sheet first.
This sheet includes instructions for setting up your machine and getting it ready for use.
Quick Start Guide (This guide)
Read this guide when starting to use the machine.
After following instructions in your setup sheet, we recommend you read this guide to familiarize yourself with the basic operation of some of the main functions that can be performed on your machine.

On-screen Manuals
User's Guide
Read this guide when starting to use the machine.
If the Quick Start Guide does not provide you enough information please refer to the User's Guide which can be installed from the Setup CD-ROM. This guide provides detailed instructions for:
- copying
- printing from a memory card
- printing from your computer
- scanning
Additional guides are also available for advanced features.
Scanning Guide
Refer to this guide for full instructions on scanning operation and settings.
PC Printing Guide
Refer to this guide for full instructions on printer driver setting.
PC Photo Printing Guide (Windows® only)
Refer to this guide for full instructions on using the various application software included on the Setup CD-ROM.
Bluetooth Guide
Refer to this guide for full instructions of printing from computers and devices that support Bluetooth communication, and on troubleshooting them.
Preparing the Machine
Be sure to read your setup sheet first for setting up your machine and getting it ready for use.
Unpack the machine
Please confirm the included items against the illustration printed on the lid of the packing box.

Important
A USB cable is necessary to connect the machine with your computer.
1 Turn on the machine.

Caution
Be sure to remove the tapes before you turn on the machine.

Note
- Plug the power cord all the way in, since it may be difficult to plug.
- If an unintended language is displayed on the LCD, press the Back button to return to the Language selection screen.
2 Install the Print Head.

Caution
Do not touch internal parts other than the Print Head Lock Lever.

Important
- If you could not install the Print Head properly, lift the Print Head Lock Lever, remove it, and then install it again properly.
- Do not reattach the protective cap once it has been removed.

Note
There might be some transparent or light blue ink on the inside of the bag the print head comes in, or the inside of the protective cap - this has no effect on print quality. Be careful not to get ink on yourself when handling these items.
3 Install the ink tanks.

Important
- If the Scanning Unit (Printer Cover) is left open for more than 10 minutes, the Print Head Holder moves to the right side. Close and reopen the Scanning Unit (Printer Cover) to return the holder to the center.
● Make sure that all the ink tanks are installed in the correct position, matching the label. The machine cannot be used unless all the ink tanks are installed. - When the "Perform head alignment if colors/lines are misaligned" message is displayed, then press the OK button. This message takes about two minutes until it is displayed. After pressing the OK button, the copy standby screen will be displayed.
- Do not squeeze the side of ink tanks as this may cause the ink to leak out and stain your clothes and hands.
- Do not reattach the protective cap once you have removed it.

Note
- Be sure to remove the clear film from the ink tank in the exact order as shown in step 3 of your setup sheet.
- An error message will be displayed on the LCD if an ink tank is not installed properly. Open the Scanning Unit (Printer Cover) and make sure that position of all the ink tanks match the label.
- After prepared the machine, the preparation process takes one or two minutes at the first print or second print.
1 Press the HOME button. Wait for about 5 seconds, select 🔊, and then press the OK button.
2 Press the ▶ button to select [icon], then press the OK button.
3 Press the ▼ button three times, then press the OK button.
If the Bluetooth unit is connected to the machine, press the ▼ button five times, and then press the OK button.
4 Press the ▲ or ▼ button to select the language for the LCD, then press the OK button.
■ Information Common to Windows and Macintosh®
Notes on the Installation Process
- If the Select Language screen appears, select a language, then click Next.
- If the Select Your Place of Residence screen appears, select your place of residence, then click Next.
- There are two ways of installing the MP Drivers and other software*:
Easy Install: the items included on the Setup CD-ROM are installed automatically
Custom Install: you can select particular items to install
* The available software programs included on the Setup CD-ROM may vary depending on the country or region of purchase.
- When the User Registration screen appears, click Next. If your computer is connected to the Internet, the on-screen instructions to register your product will appear.
To register your product, you need the serial number inside of the machine.
Registration can also be performed from the icon on the desktop after installation is completed.
- The User Registration screen will only be displayed when Europe, Middle East, Africa is selected on the Select Your Place of Residence screen.
Notes on the Print Head Alignment
- If the straight line is misaligned or print quality is not satisfactory after installing the MP Drivers, you may need to align the Print Head. Refer to “Aligning the Print Head” in the User’s Guide on-screen manual.
■ Information for Windows
- Log into a user account with the administrator privilege.
- Before installing the MP Drivers, disable all anti-virus programs and automatically loading programs.
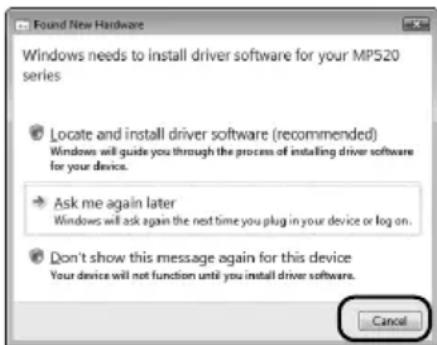
- If the Found New Hardware or Found New Hardware Wizard screen appears automatically, remove the USB cable connected to your computer. Click Cancel to quit the screen. In Windows Vista, the screen may close automatically when the USB cable is unplugged. Then turn off the machine and start the installation process again. For details on the installation process, refer to your setup sheet.
- If the AutoPlay screen appears, click Run Msetup4.exe. In Windows XP and Windows 2000, this screen will not appear.
- If the User Account Control screen appears, click Continue. In Windows XP and Windows 2000, this screen will not appear.
- When a message asking for your confirmation to restart your computer appears during the installation process, click OK. The system is restarted automatically. While restarting, do not remove the Setup CD-ROM.
- We would appreciate it if you would take part in the PIXMA Extended Survey Program regarding the use of Canon printers. For details, refer to the on-screen instructions.
- If the connection is not recognized, refer to “Cannot Install the MP Drivers” in the User’s Guide on-screen manual.
Users in Asia
- Scan Soft OmniPage SE can be installed only on an English operating system.
text_image
Windows needs to install driver software for your MP520 series Locate and install driver software (recommended) Windows will guide you through the process of installing driver software for your device. Ask me again later Windows will ask again the next time you plug in your device or log on. Don't show this message again for this device Your device will not function until you install driver software. Cancel■ Information for Macintosh
- Since Mac OS 9, Mac OS X Classic environments, or Mac OS X v.10.2.7 or earlier are not supported, do not connect the machine to these.
- Before installing the MP Drivers, disable all anti-virus programs and automatically loading programs or remove them from your system folder.
When using Mac OS X v.10.2.8 to v.10.3.x:
- Before using the Operation Panel on the machine to save originals scanned from the Platen Glass to the computer, it is necessary to select MP Navigator EX 1.0 or MP Navigator EX 1 as the launch application on Image Capture under Applications. For details, refer to "Scanning Images" in the User's Guide on-screen manual.
When using Mac OS X v.10.2.8 to v.10.3.3:
- Restarting the computer while connected to the machine may cause the machine not to be detected. To resolve this, either unplug the USB cable then plug it back in again, or turn the machine off then back on again.
Users in Asia
- To install the User's Guide on-screen manual in a language other than the installed one, double-click the Manual folder in the Setup CD-ROM, Canon folder, and then copy a language folder to your hard disk.
Reading the On-screen Manuals
For detailed instructions on installing the on-screen manuals, refer to your setup sheet.
You can view the on-screen manuals in the following way:
Windows
To view the on-screen manual, double-click the XXX On-screen Manual shortcut icon on the desktop, or click Start > All Programs (or Programs) > Canon XXX Manual > XXX On-screen Manual (where "XXX" is your machine's name).
System Requirements
Browser: Windows HTML Help Viewer

Note
- Microsoft® Internet Explorer 5.0 or later must be installed.
- The on-screen manual may not be displayed properly depending on your operating system or Internet Explorer version. We recommend that you keep your system up to date with Windows Update.
Macintosh
To view the on-screen manual, double-click the XXX On-screen Manual alias (where "XXX" is your machine's name) on the desktop.
Note
Users in Asia
If you installed the User's Guide from the Manual folder in the Setup CD-ROM, open the folder in which you copied the User's Guide and double-click top.htm.
System Requirements
Browser: Help Viewer

Note
- The on-screen manual may not be displayed properly depending on your operating system. We recommend that you keep your system up to date.
- We recommend using Safari as your Web browser to view the HTML format on-screen manuals. If Safari is not installed on your computer, download it from Apple Inc. website and install it.
Loading Printing Paper
This machine offers two paper sources to load printing paper; the Rear Tray, found at the top of the machine, and the Front Tray, found at the front of the machine.

Important
- When Printing for the first time
At purchase, the machine is set to feed from the Rear Tray.
If you are printing without changing paper source setting, load paper in the Rear Tray.
- If you cut plain paper to 4" x 6" / 101.6 x 152.4 mm, 5" x 7" / 127.0 x 177.8 mm, or 2.13" x 3.39" / 54.0 x 86.0 mm (credit card-size) for a trial print, it can cause paper jams.
● Always load paper in portrait orientation. Loading paper in landscape orientation can cause the paper to be jammed.
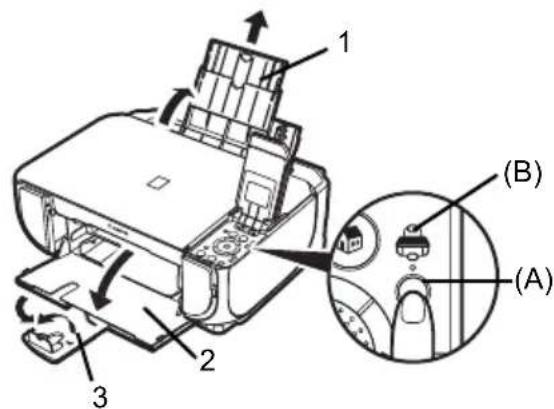
Loading Printing Paper in the Rear Tray
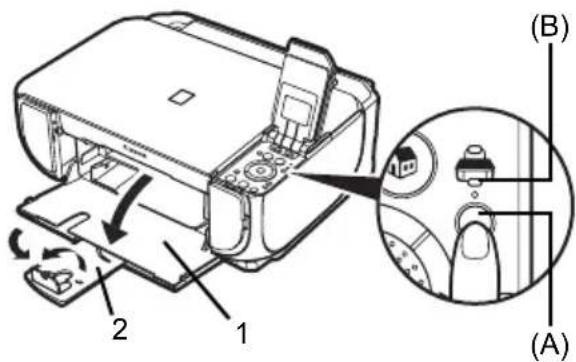
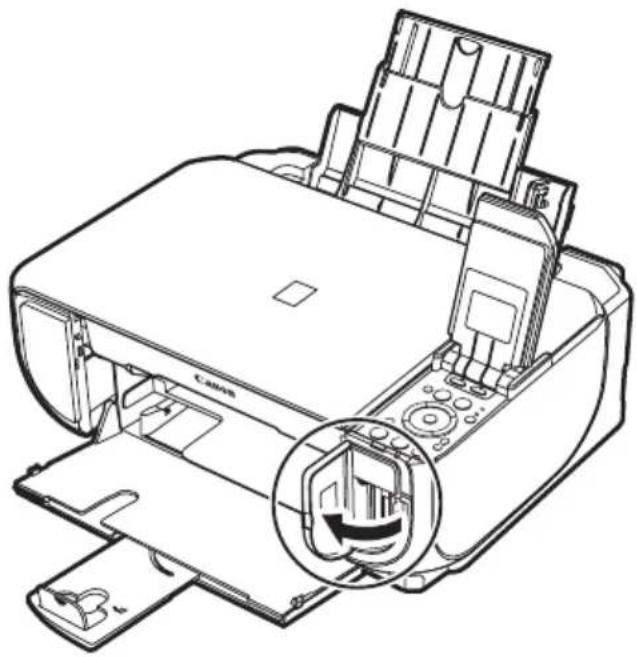
1 Open the Rear Tray, then pull out the Paper Support.
2 Open the Front Tray.
3 Extend the Output Paper Support.
4 Press the Paper Feed Switch (A) so that the Rear Tray lamp (B) lights.
5 Load the paper in the Rear Tray with the print side facing UP.
Do not load higher than the Load Limit Mark (C).
6 Align the paper stack against the Cover Guide on the right side of the Paper Support.
7 Pinch the Paper Guide and slide it against the left side of the paper stack.
text_image
Technical diagram of a printer with labeled parts and an inset showing component (A) and (B)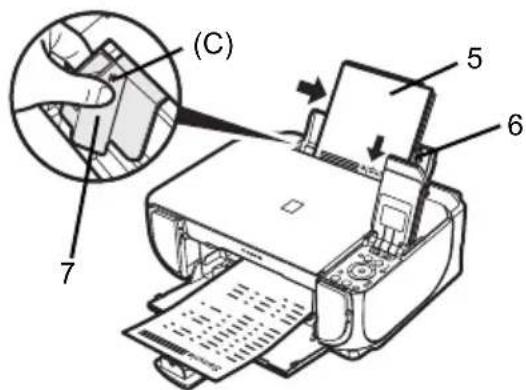
text_image
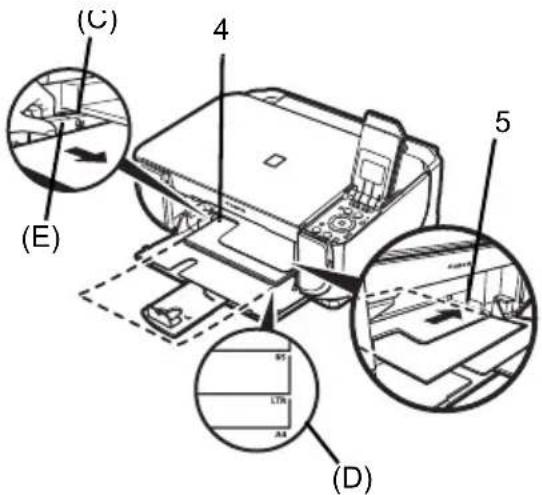
(C) 7 5 6You can load A4, Letter, or B5-sized plain paper in the Front Tray. You cannot load any other paper in the Front Tray.
1 Open the Front Tray.
2 Extend the Output Paper Support.
3 Press the Paper Feed Switch (A) so that the Front Tray lamp (B) lights.
text_image
Diagram of a printer with labeled parts and a magnified inset showing hand positioning and adjustment mechanism.4 Load the paper in the Front Tray with the print side facing DOWN and the leading edge to the far side.
Do not load higher than the Load Limit Mark (C).
5 Align the paper stack against the right edge of the Front Tray, and the near and left edges with the Paper Size Mark (D).
6 Pinch the Paper Guide (E) and slide it against the left side of the loaded paper stack.
text_image
(C) 4 5 (E) (B) LTR A4 (D)How to Navigate Menus on the LCD
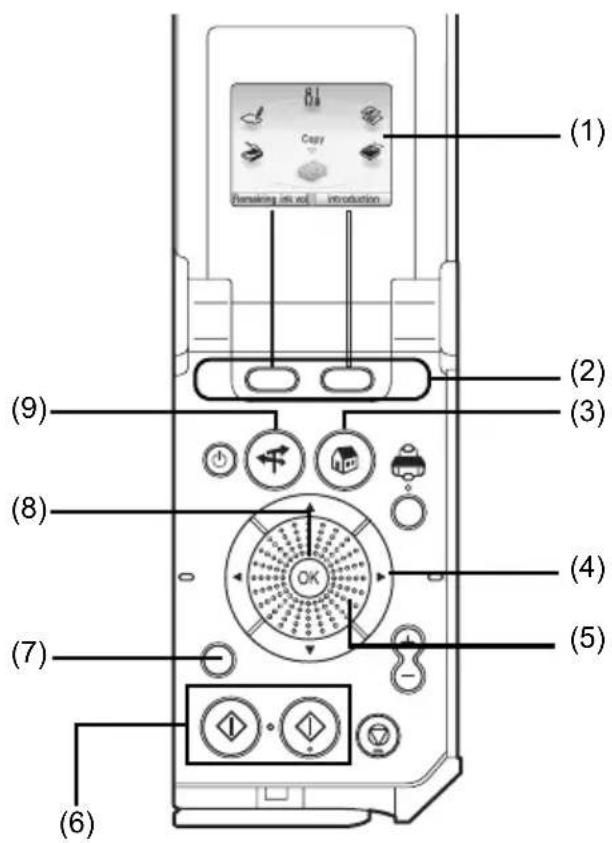
(1) HOME screen
(2) Function buttons
See "Operation of Other Buttons" on page 12.
(3) HOME button
(4) ▲, ▼, ◀, and ▶ buttons
(5) Easy-Scroll Wheel
(6) Black button (left) / Color button (right)
(7) Back button
See "Operation of Other Buttons" on page 12.
(8) OK button
(9) NAVI button
See "Operation of Other Buttons" on page 12.
text_image
(1) Copy Remaining mini roll Introduction (2) (3) (4) (5) (6) (7) (8) (9)■ Basic Operation
This section describes the operation to navigate menus with the Easy-Scroll Wheel, ◀, ▶, and OK buttons, taking the HOME screen as an example.
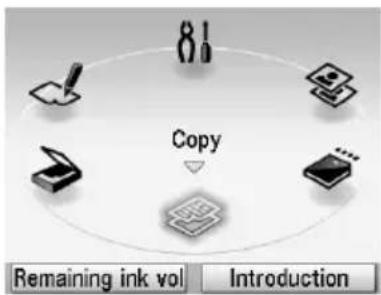
1 Press the HOME button.
The HOME screen will be appeared.
text_image
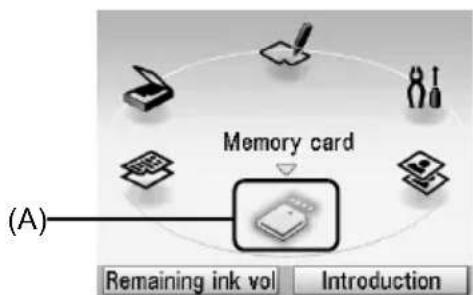
8! Copy Remaining ink vol Introduction2 Turn the Easy-Scroll Wheel to select the mode, then press the OK button.
You can turn the Easy-Scroll Wheel left or right. You can also use the ◀ or ▶ button to select setting items.
Move the icon of the desired mode to position (A).
The selected mode screen will be appeared.
You can select the following modes on the HOME screen:
flowchart
graph TD
    A["Input Ink"] --> B["Memory card"]
    C["Input Paper"] --> B
    D["Input Printer"] --> B
    E["Input Display"] --> B
    F["Input Audio"] --> B
    G["Input Sound"] --> B
    H["Input Print"] --> B
    I["Input Audio"] --> B
    J["Input Display"] --> B
    K["Output Sound"] --> B
    L["Output Print"] --> B
    M["Output Audio"] --> B
    N["Output Display"] --> B
    O["Output Print"] --> B
    P["Output Audio"] --> B
    Q["Output Sound"] --> B
    R["Output Print"] --> B
    S["Output Audio"] --> B
    T["Output Sound"] --> B
    U["Output Print"] --> B
    V["Output Audio"] --> B
    W["Output Sound"] --> B
    X["Output Print"] --> B
    Y["Output Audio"] --> B
    Z["Output Sound"] --> B
    AA["Output Print"] --> B
    AB["Output Audio"] --> B
    AC["Output Sound"] --> B
    AD["Output Print"] --> B
    AE["Output Audio"] --> B
    AF["Output Sound"] --> B
    AG["Output Print"] --> B
    AH["Output Audio"] --> B
    AI["Output Sound"] --> B
    AJ["Output Print"] --> B
    AK["Output Audio"] --> B
    AL["Output Sound"] --> B
    AM["Output Print"] --> B
    AN["Output Audio"] --> B
    AO["Output Sound"] --> B
    AP["Output Print"] --> B
    AQ["Output Audio"] --> B
    AR["Output Sound"] --> B
    AS["Output Print"] --> B
    AT["Output Audio"] --> B
    AU["Output Sound"] --> B
    AV["Output Print"] --> B
    AW["Output Audio"] --> B
    AX["Output Sound"] --> B
Copy: You can copy in various layouts. See "Copying" on page 14.
Scan: You can save the scanned data to a connected computer using the Operation Panel. See “Scanning Images” on page 23.
Photo index sheet: You can easily print the photos from a memory card using the Photo Index Sheet. See “Printing by Using the Photo Index Sheet” on page 18.
Settings: You can perform the maintenance or change the various settings of the machine. For details, refer to "When Printing Becomes Faint or Colors Are Incorrect", "Cleaning Your Machine", or "Changing the Machine Settings" in the User's Guide on-screen manual.
Easy photo reprint: You can scan printed photos and then print them. See "Photo Printing from Printed Photo" on page 19.
Memory card: Print the photo data saved on a memory card of a digital camera. See "Printing from a Memory Card" on page 15.
■ Operation of Other Buttons
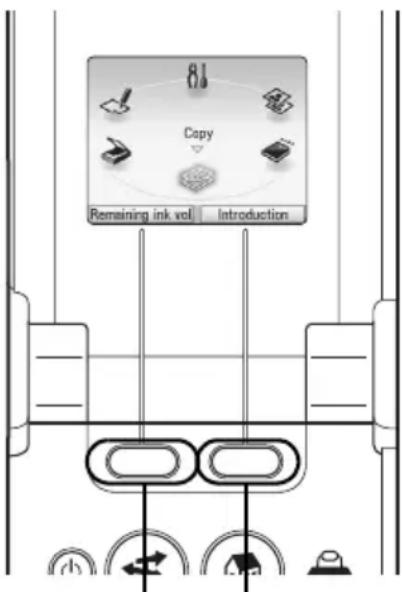
- Function Buttons
Two Function buttons enable you to select menus displayed at the bottom of the LCD.
The screen that appears when you press a Function button depends on the screen that is displayed and which Function button you press.
(1) Left Function button
When you press the left Function button on the HOME screen, the remaining ink volume screen is displayed.
(2) Right Function button
When you press the right Function button on the HOME screen, the introductions for the selected mode functions are displayed.
When you press them on screens other than the HOME screen, an operation procedure or menus is displayed.
text_image
81 Copy Remaining ink vol Introduction(1) (2)
- Back Button
You can return the LCD to the previous screen.
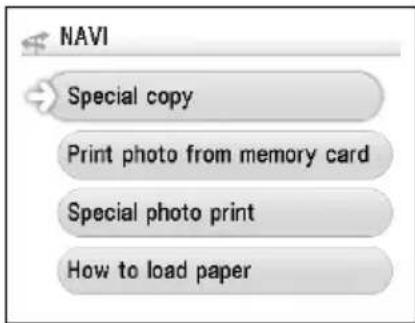
● Display the Print Instruction Using the Navigation Menu
When you do not know how to use the print function for the frequent use or how to refill paper, you can easily get the explanation from the navigation menu.
1 Press the NAVI button.
The NAVI screen is displayed.
2 Select a menu you would like to use, then press the OK button.
The explanation about the work flow is displayed. Operate as the explanation.
You can select various menus on the NAVI screen.
text_image
NAVI Special copy Print photo from memory card Special photo print How to load paperCopying
Making Copies
This section describes the basic procedure to make copies. For details, refer to "Copying" in the User's Guide on-screen manual.
1 Turn on the machine.
2 Make sure that Copy is selected on the HOME screen, then press the OK button.
3 Load paper.
4 Load the original document on the Platen Glass.
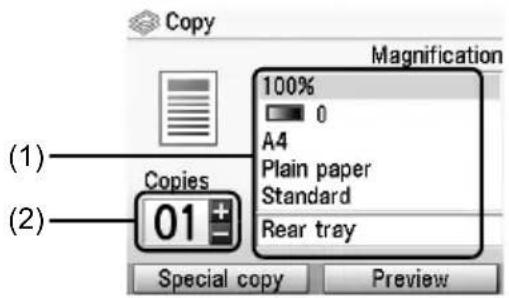
5 Specify copy settings.
(1) Confirm the paper source, page size, media type, and other settings. To change the settings, select the item and press the OK button.
(2) Press the [+] or [-] button to specify the number of copies.
6 Press the Color button for color copying, or the Black button for black & white copying.
text_image
Copy Magnification (1) Copies 100% 0 A4 Plain paper Standard Rear tray (2) Special copy PreviewUsing Useful Copy Functions
For details, refer to "Using Useful Copy Functions" in the User's Guide on-screen manual.
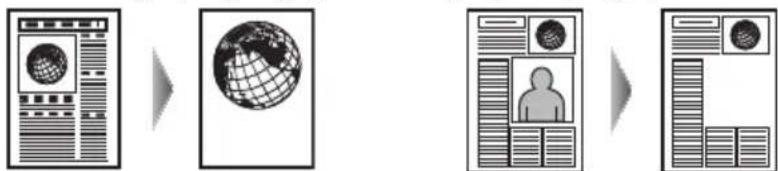
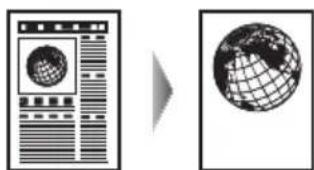
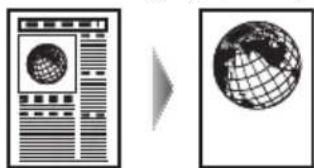
Reduced/Enlarged copy
text_image
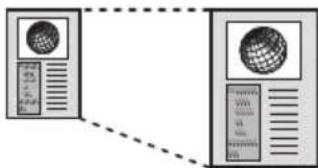
Diagram showing two server units connected by a dashed line, with one displaying a globe icon and the other displaying text labels.Borderless copy
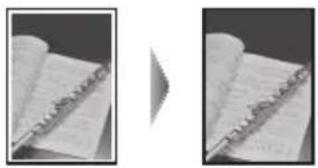
natural_image
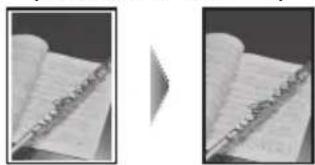
Two grayscale images showing open notebook pages, one with a pen resting on it (no visible text or symbols)2-on-1 copy
flowchart
graph LR
    A["Server Rack"] --> B["Central Globe Icon"]
    B --> C["Server Unit"]
    style A fill:#f9f,stroke:#333
    style C fill:#bbf,stroke:#333
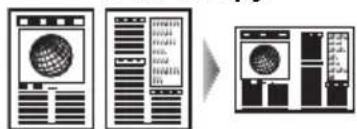
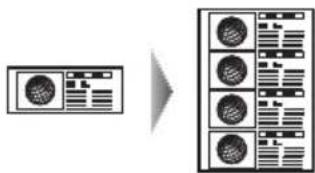
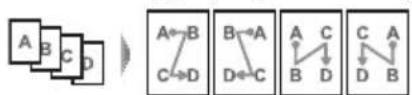
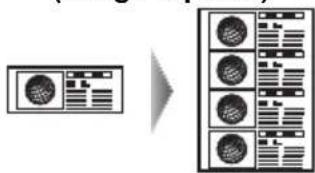
4-on-1 copy
Image repeat
flowchart
graph LR
    A["Input Device"] --> B["Processing Module"]
    B --> C["Output Module"]
    style A fill:#f9f,stroke:#333
    style B fill:#bbf,stroke:#333
    style C fill:#dfd,stroke:#333
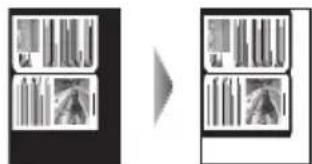
Frame erase
natural_image
Two abstract diagrams showing vertical bar patterns before and after transformation, with no text or symbols present.Trimming Masking

natural_image
Two abstract diagrams: one showing a grid of circular elements on a wall, the other showing a globe with grid lines (no text or symbols)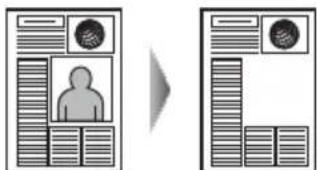
flowchart
graph TD
    A["User Profile"] --> B["Mobile Device"]
    style A fill:#f9f,stroke:#333
    style B fill:#bbf,stroke:#333
Printing from a Memory Card
Inserting the Memory Card
1 Turn on the machine.
2 Open the Card Slot Cover.
natural_image
Line drawing of a printer with internal components and a magnified inset showing the printer's internal structure (no text or symbols)3 Insert one and only one memory card into the Card Slot.
- How to insert
Insert a memory card with the labeled side facing to the right.
| Card Type Inserting Card | |
| Compact Flash (CF) cardMicrodrivexD-Picture card*1 | The Access lamp lights up.Insert into the left Card Slot. |
| SD Secure Digital memory cardSDHC memory cardminiSD Card*1microSD Card*2Memory StickMemory Stick PROMemory Stick Duo*1Memory Stick PRO Duo*1MultiMediaCardRS-MMC*1 | The Access lamp lights up.Insert into the right Card Slot. |
*1 Be sure to attach the memory card to the special adapter before inserting it into the Card Slot.
*2 Use "SD Card Adapter" provided with the card.

Caution
- The memory card will stick out of the Card Slot, but do not force it into the slot any further. Doing so damages the machine and the memory card.
- Make sure that the memory card is correctly oriented before inserting it into the Card Slot. If you force the memory card into the Card Slot in the wrong orientation, you may damage the memory card and/or the machine.
4 Confirm that the Access lamp has lit up.
5 Close the Card Slot Cover.
Removing the Memory Card
1 Open the Card Slot Cover.
2 Make sure that the Access lamp is lit, then remove the memory card.
3 Close the Card Slot Cover.

Important
The Access lamp flashes while the machine is reading or writing data from/to the memory card. Removing the memory card or turning off the machine while the Access lamp is flashing may damage the data saved on the memory card. Do not remove the memory card while the Access lamp is flashing.
Printing Photographs Saved on a Memory Card
1 Prepare for printing.
(1) Turn on the machine.
(2) Load paper.
2 Insert the memory card.
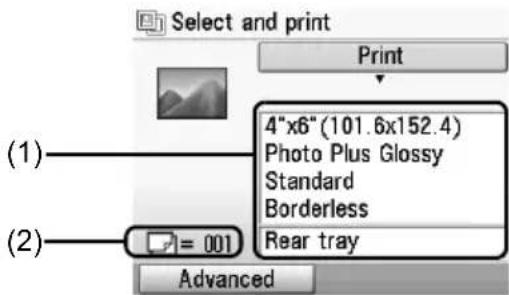
(1) Select Memory card on the HOME screen, then press the OK button.
(2) Insert the memory card into the Card Slot. See "Inserting the Memory Card" on page 15.
3 Select the print menu.
(1) Make sure that Select and print is selected, then press the OK button.
(2) Confirm the paper source, page size, media type, and other settings. To change the settings, select the item and press the OK button.
(3) Select Next, and then press the OK button.
4 Select the photo to print and specify the number of copies for each photo.
(1) Use the Easy-Scroll Wheel or the ◀ or ▶ button to display a photo to print.
(2) Press the [+] or [-] button to specify the number of copies.
(3) Repeat steps (1) and (2) to specify the number of copies for each photo.
(4) Press the OK button.
5 Start printing.
(1) Confirm the print setting.
To change the settings, select the item and press the OK button.
(2) Confirm the total number of copies for the selected photos.

Note
For details on the functions associated with Advanced and Check photo, refer to "Printing Photographs Saved on a Memory Card" in the User's Guide on-screen manual.
text_image
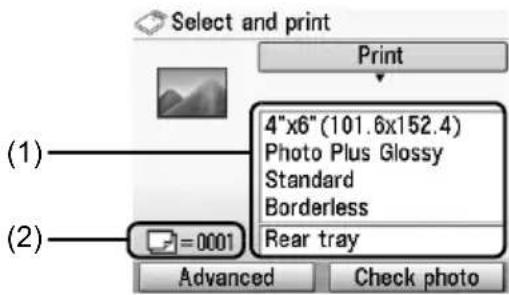
Select and print Print 4"x6"(101.6x152.4) Photo Plus Glossy Standard Borderless Rear tray (1) (2) =0001 Advanced Check photo(3) Press the Color button.
The specified number of copies of each photo will be printed.
Using Useful Printing Functions
Layout print
Prints photos you pasted in the specified layout.
Sticker print
Prints your favorite photo with a frame on Canon Photo Stickers.
DPOF print
Prints according to the Digital Print Order Format (DPOF) settings on your digital camera, if you have specified them.
Captured info print
Prints information on photographs at the time of its shooting (Exif info) in the margin of Photo index print or selected individual photos.
Photo index print
Prints an index of all the photos saved on a memory card.
Print all photos
Prints all photos saved on the memory card.
Using Useful Display Functions
Change display
The display method of a photograph can be changed.
Trimming
Edits images displayed on the LCD by cropping them.
Search
When there are a lot of photos saved on the memory card, displays and prints only photos shot on the specified date or within the specified range of dates.
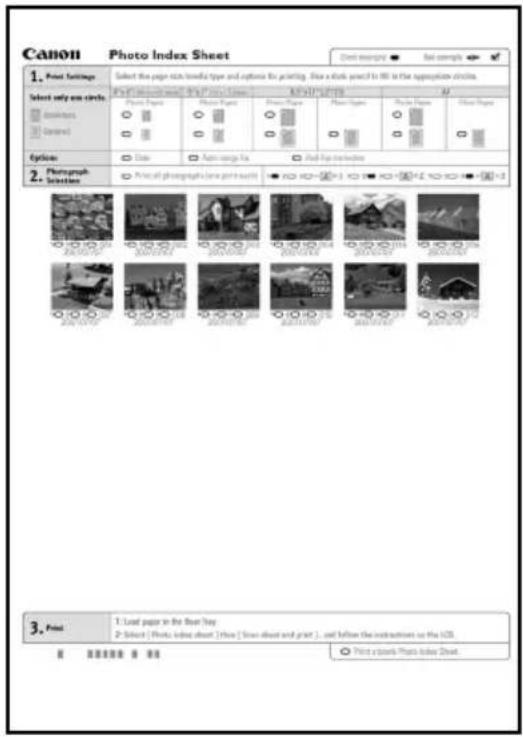
1 Turn on the machine, and load A4 or Letter-sized plain paper.
2 Make sure that the proper paper source is selected.
3 Select Photo index sheet on the HOME screen, then press the OK button.
4 Make sure that Index sheet print is selected, then press the OK button.
5 Insert a memory card into the Card Slot. See "Inserting the Memory Card" on page 15.
6 Select a range of images to include in the Photo Index Sheet, then press the OK button.
7 Press the Color button.
The Photo Index Sheet(s) will be printed.
8 Fill in the appropriate circles in the Photo Index Sheet.
9 Load paper as you specified in the Photo Index Sheet in the Rear Tray.
10 Make sure that Scan sheet and print is selected, then press the OK button.
11 Place the Photo Index Sheet face-down on the Platen Glass, then press the OK button.
text_image
Canon Photo Index Sheet Direct example ▼ Real examples ▼ 1. Print Settings Select the page size/ towns type and options for printing. Draw a dark panel to fill in the approximation circle. Print (P) Print name: 95% Print Circle: MP/HP/PT/HP Select only one circle. Print Paper Print Image Print Paper Print Image Print Paper Options: Date Auto range 1x Post-Print series 2. Photograph Selections Print all photographs have point size 3. Print: 1. Load paper in the floor size. 2. Select [Photo: logo sheet] [Show [Show sheet and print ] , and below the instructions on the LCD. Print a dark Photo Index Sheet.Photo Printing from Printed Photo
You can scan printed photos, specify the number of copies with viewing them on the LCD, and print them.
1 Turn on the machine.
2 Select Easy photo reprint on the HOME screen, then press the OK button.
3 Lift the Document Cover and load the photos on the Platen Glass.
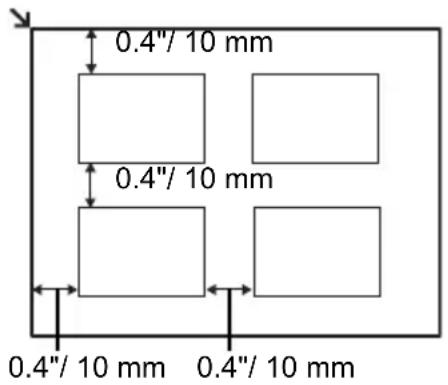
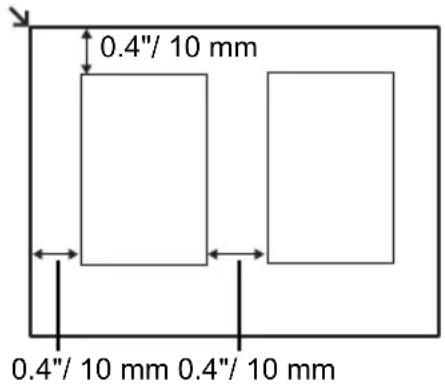
Place the photos face down on the Platen Glass as follows.
Credit card-sized originals
text_image
0.4"/ 10 mm 0.4"/ 10 mm 0.4"/ 10 mm 0.4"/ 10 mm4"x 6"/ 101.6 x 152.4 mm or
5"x 7"/ 127.0 x 177.8 mm originals
text_image
0.4"/ 10 mm 0.4"/ 10 mm 0.4"/ 10 mm4 Gently close the Document Cover and press the OK button.
The photographs are scanned.
5 Load paper in the Rear Tray.
See "Loading Printing Paper" on page 9.
6 Select the print menu.
(1) Make sure that Select and print is selected, then press the OK button.
(2) Confirm the paper source, page size, media type, and other settings. To change the settings, select the item and press the OK button.
(3) Select Next, and then press the OK button.
7 Select the photo to print and specify the number of copies for each photo.
(1) Use the Easy-Scroll Wheel or the ◀ or ▶ button to display a photo to print.
(2) Press the [+] or [-] button to specify the number of copies.
(3) Repeat steps (1) and (2) to specify the number of copies for each photo.
(4) Press the OK button.
8 Start printing.
(1) Confirm the print setting.
To change the settings, select the item and press the OK button.
(2) Confirm the total number of copies for selected photos.

Note
For details on the function associated with Advanced, refer to the User's Guide on-screen manual.
text_image
Select and print Print 4"x6"(101.6x152.4) Photo Plus Glossy Standard Borderless Rear tray (1) (2) = 001 Advanced(3) Press the Color button to print in color, or the Black button to print in black & white. The specified number of copies of each photo will be printed.
Using Useful Printing Functions
Sticker print
Prints your favorite photo on Canon Photo Stickers to create your own stickers.
Print all photos
Prints all scanned photos.
Using Useful Display Functions
Change display
The display method of a photograph can be changed.
Trimming
Edits images displayed on the LCD by cropping them.
Printing from Your Computer
This section describes procedure for basic printing.
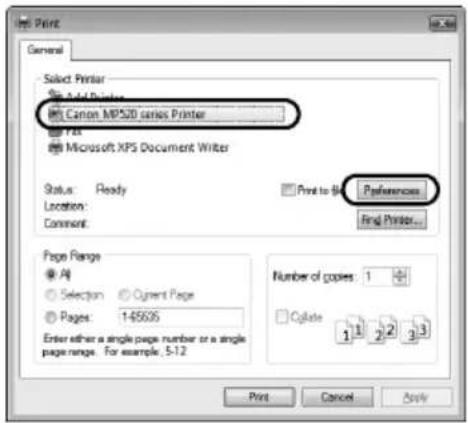
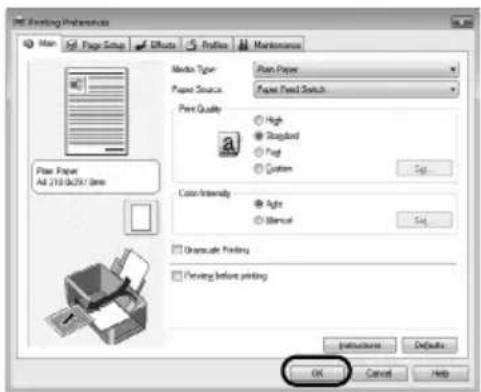
Printing with Windows
1 Turn on the machine and load the paper in the machine.
2 Create a document or open a file to print using an appropriate application software.
3 Select Print on the application software's File menu.
4 Make sure that Canon XXX Printer (where "XXX" is your machine's name) is selected in Select Printer, and click Preferences (or Properties).
5 Specify the required settings and click OK.
You can change the paper source to be used with the printer driver as well as the Operation Panel on the machine. For details, refer to "Changing the Paper Source" in the User's Guide on-screen manual.
text_image
Print General Select Printer Canon MPS2D series Printer Print Microsoft XPS Document Writer Status: Ready Location: Comment: Print to file Preferences Final Printer... Page Range ● All ○ Selection ○ Current Page ○ Pages: 145635 Enter either a single page number or a single page range. For example, 5-12 Number of copies: 1 ○ Delete 1 2 3 1 2 3 1 2 3 1 Print Cancel Apply
Note
- If you select Front for Plain Paper, the machine will automatically switch to the Front Tray when Plain Paper is specified for Media Type. You cannot load paper other than A4, Letter, or B5-sized plain paper in the Front Tray.
- For details on other printer driver functions, click Help or Instructions to view the online help or the PC Printing Guide on-screen manual. Instructions is only displayed when the on-screen manuals are installed.
6 Click Print (or OK).
text_image
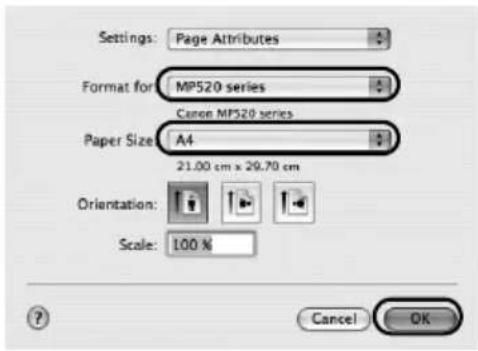
Print Setting Preferences Main Adj. Page Setup Effects Profiles Maintenance Market Type: Paper Paper Paper Source: Paper Fixed Switch Print Quality High Standard Foot System Color Intensity Light Shuttle Onset Onset Onset Printing Printing before printing OK Cancel Help1 Turn on the machine and load the paper in the machine.
2 Create a document or open a file to print using an appropriate application software.
3 Select Page Setup on the application software's File menu.
4 Make sure that your machine's name is selected in Format for.
5 Select the page size of the loaded paper in Paper Size.
6 Click OK.
7 Select Print on the application software's File menu.
8 Select Quality & Media in the pop-up menu.
9 Specify the required settings.
You can change the paper source to be used with the printer driver as well as the Operation Panel on the machine. For details, refer to "Changing the Paper Source" in the User's Guide on-screen manual.
text_image
Settings: Page Attributes Format for MP520 series Canon MP520 series Paper Size A4 21.00 cm x 29.70 cm Orientation: Scale: 100 % Cancel OK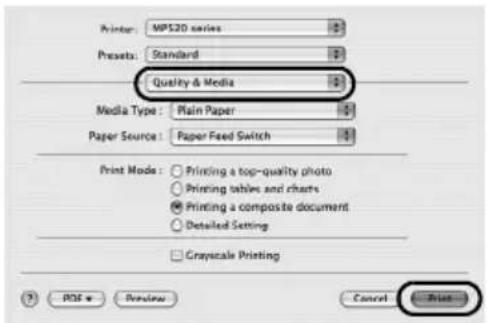
text_image
Printer: MP520 series Presets: Standard Quality & Media Media Type: Main Paper Paper Source: Paper Feed Switch Print Mode: Printing a top-quality photo Printing tables and charts Printing a composite document Detailed Setting Grayscale Printing ? POS & Preview Cancel PrintNote
- If you select Front for Plain Paper, the machine will automatically switch to the Front Tray when Plain Paper is specified for Media Type. You cannot load paper other than A4, Letter, or B5-sized plain paper in the Front Tray.
- For details on other printer driver functions, click to view the PC Printing Guide on-screen manual. If the on-screen manuals are not installed, the PC Printing Guide on-screen manual is not displayed even if is clicked.
10 Click Print.
Scanning Images
You can scan images from the machine to a computer without printing them and save them in popular image types such as JPEG, TIFF, bitmaps, or PDF. If you are scanning printed text, you can use the OCR (Optical Character Recognition) software to convert it to text data.
Scanning Methods
You can select from the various scanning methods.
- If You Want to Scan Originals Easily From the Machine
You can scan originals by using the Operation Panel of the machine.
See "Scanning Using the Operation Panel of the Machine" on page 23.
- If You Want to Edit or Print the Scanned Images
MP Navigator EX enables you to edit the scanned images, such as optimizing or trimming.
You can also start application software from MP Navigator EX to edit or print the scanned images.
For detailed operations of MP Navigator EX, refer to the Scanning Guide on-screen manual.
- If You Want to Scan Originals with Advanced Settings
ScanGear enables you to scan originals with advanced settings such as the resolution.
For detailed operations of ScanGear, refer to the Scanning Guide on-screen manual.
Besides the above-mentioned methods, you can use a TWAIN- or WIA- (Windows Vista and Windows XP only) compliant application software and the Control Panel (Windows Vista and Windows XP only) to scan originals with this machine. For detailed operations, refer to the Scanning Guide on-screen manual.
■ Scanning Using the Operation Panel of the Machine
For details, refer to "Scanning Methods" in the User's Guide on-screen manual.
1 (Macintosh only) Prepare your computer before scanning.
This operation is not necessary for Mac OS X v.10.4.x.
For details, refer to "Scanning Methods" in the User's Guide on-screen manual.
2 Turn on the machine.
3 Load the original document on the Platen Glass.
For scanning documents, refer to "Handling the Original Document" in the User's Guide on-screen manual.
For scanning printed photos, see "Photo Printing from Printed Photo" on page 19.
4 Select Scan on the HOME screen, then press the OK button.
5 Select the document type, then press the OK button.

Important
Make sure that the document has been loaded correctly according to the document type that you have selected.
For details, refer to "Scanning Methods" in the User's Guide on-screen manual.
6 Select the scan operation, then press the OK button.
7 Press the Color or Black button.
The operation to be performed after scanning the original depends on the scan operation setting you have selected in step 6. For details on how to modify the operation settings, refer to the Scanning Guide on-screen manual.
Printing Photographs Directly from a PictBridge Compliant Device
You can connect a PictBridge compliant device such as a digital camera, camcorder, or mobile phone using a USB cable recommended by the device's manufacturer, and print recorded images directly without using a computer.
- Connectable Devices
PictBridge is an industry standard enabling a range of digital photo solutions, including the direct printing of photos from a digital still camera, camcorder or mobile phone* without the need to use a computer. A device can be connected to this machine for direct printing regardless of the manufacturer or the model as long as it complies with the PictBridge standard.
* PictBridge compliant digital still cameras, digital camcorders, and camera-equipped mobile phones are hereafter collectively referred to as "PictBridge compliant device".

A device with this mark is PictBridge compliant.
- Printable Image Data Format
This machine prints images taken with a DCF (Design rule for Camera File system) ver. 1.0/2.0-compatible digital camera (Exif ver. 2.2/2.21 compliant), as well as PNG files.
Printing Photographs Directly from a PictBridge Compliant Device
To connect a PictBridge compliant device to this machine, use a USB cable recommended by the device's manufacturer.

Warning
Do not connect any equipment other than PictBridge compliant devices or the optional Bluetooth Unit BU-20 to the Direct Print Port of the machine. If you do so, electric shock, fire, or damage to the machine could result.

Important
Never disconnect the USB cable during printing unless when explicitly allowed to by the PictBridge compliant device. When disconnecting the USB cable between the PictBridge compliant device and machine, follow the instructions given in the device's instruction manual.

Note
When printing photos with the PictBridge compliant device connected to the machine, we recommend the use of the AC adapter supplied with the device. If you are using the device battery, be sure to charge it fully.
1 Prepare for printing.
(1) Turn on the machine.
(2) Load paper in the Rear Tray.

Note
When printing directly from a PictBridge compliant device, you can only use the Rear Tray as the paper source. Do not load paper in the Front Tray.
2 Connect the PictBridge compliant device to the machine.

Note
Depending on the model or brand of your device, you may have to select a print mode compliant with PictBridge before connecting the device. You may also have to turn on the device or select Play mode manually after connecting the device to the machine.
Perform necessary operations on the PictBridge compliant device before connecting it to this machine according to instructions given in the device's instruction manual.
(1) Make sure that the PictBridge compliant device is turned off.
(2) Connect the PictBridge compliant device to the machine using a USB cable recommended by the manufacturer of the device.
The device turns on automatically.
If your device does not turn on automatically, turn it on manually.
(3) Set up the PictBridge compliant device for direct printing.
will appear on the LCD of the device when the machine is correctly connected.

natural_image
Diagram of a printer with a digital camera connected to a cable, showing internal components and wiring (no text or symbols)3 Specify the print settings such as paper type and layout.
See "About PictBridge Print Settings" on page 27.
You can make settings using the menu on the LCD of your PictBridge compliant device.
Select the size and type of paper that you loaded in the machine.
If your PictBridge compliant device does not have setting menu, change the setting from the machine. For details, see "Setting on the Machine" on page 29.
4 Start printing from your PictBridge compliant device.
■ Settings on a PictBridge Compliant Device
This section describes the print settings on a PictBridge compliant device. When operating the device, be sure to follow the instructions given in the instruction manual of your PictBridge compliant device.

Note
- In the following description, names of setting items are given according to those used in Canon-brand PictBridge compliant devices. Setting item names may be different depending on the brand or model of your device.
- Some setting items explained below may not be available on some devices. In this case, the settings made on the machine are applied. Also, when some items are set to Default on a PictBridge compliant device, the machine settings for these items are applied. For details, see “Setting on the Machine” on page 29.
● Paper Size and Paper Type Settings
The following sizes and types of printing paper can be used when printing from a PictBridge compliant device.
- Paper size
4" x 6" / 101.6 x 152.4 mm, 5" x 7" / 127.0 x 177.8 mm ^1 , Credit card, 8" x 10" / 203.2 x 254.0 mm, A4, Letter, Wide ^1
- Paper type
| Paper Type Setting | Loadable Paper*3 |
| Plain Paper*2 | Super White Paper or other plain paper |
| Photo Photo Paper Plus G | ossy |
| Glossy Photo Paper | |
| Glossy Photo Paper “Everyday Use” | |
| Photo Paper Glossy | |
| Photo Paper Plus Semi-gloss*4 | |
| Photo Stickers*5 | |
| Fast Photo Photo Paper Pro |
The available page sizes vary depending on the media type. For details, visit our website.
*1 Can be selected only on certain Canon-brand PictBridge compliant devices.
*2 Plain Paper can be selected for Paper type only when Paper size is set to A4 or 8.5" x 11" (Letter). When Paper type is set to Plain Paper, borderless printing will be disabled even when Layout is set to Borderless.
*3 You may not be able to purchase some Canon genuine papers depending on the country or region of purchase.
*4 When printing on Photo Paper Plus Semi-gloss 8" x 10" / 203.2 x 254.0 mm (SG-201), select 20 x 25 cm/8" x 10" for Paper size and Default for Paper type.
* Select Photo Plus Glossy for Media type in the PictBridge settings screen on the machine. See “Setting on the Machine” on page 29.
*5 Exclusively used to print photo stickers. When printing on sticker paper, select 10 x 15 cm/4" x 6" for Paper size and Photo for Paper type. Do not set Layout to Borderless.
- Layout Setting
Various layout options are available.
- Bordered/Borderless: You can select whether or not to print an image with a border.
- N-up: You can use this option when printing on sticker paper, or A4- or Letter-sized paper.
Sticker paper: When you select 10 x 15 cm/4" x 6" for Paper size, you can print 16 images on a single sheet of paper.
A4- or Letter-sized paper: When you select A4 or 8.5" x 11" (Letter) for Paper size, you can print 4 images on a single sheet of paper.
- Shooting Info (Exif Data): You can print shooting info (Exif Data) along with the image. The following two options are available.
1-up ^*1 : Prints the shooting info (Exif Data) in the margin of selected individual images.
20-up ^2 : Prints 20 images specified with DPOF ^3 and their shooting info (Exif Data) in list format on a single sheet of paper.
- 35 mm Film Style Layout (Contact Printing Layout) ^2 : You can print the multiple images specified with DPOF ^*3 in a list format that looks like a negative film.
Besides the above options, you can also specify to print an index of images in the DPOF ^*3 print settings menu.
*1 You can use this option only when 10 x 15 cm/4" x 6", 13 x 18 cm/5" x 7", 20 x 25 cm/8" x 10", A4 or 8.5" x 11" (Letter) is selected for Paper size.
*2 You can use this option only when A4 or 8.5" x 11" (Letter) is selected for Paper size.
*3 DPOF (Digital Print Order Format) is a standard format to record the specified information regarding images, such as which image or number of copies to print.
● Date/File No. Print Setting
You can specify whether the date and/or file number will be printed.

Note
- If the images already have dates superimposed when shot, set this PictBridge setting item to Off. If you select Date, File No., or Both, the date and/or file number will be printed over the date printed by the device's function.
- Depending on the paper size and layout, the date will only be printed even when Both is selected.
● Image Optimize Setting
You can select the optimization method to obtain high print quality.
When you select Default, the most suitable correction for each photo is made using the Auto image fix function of the machine. See "Setting on the Machine" on page 29.
When you select On, photos are optimized for printing using the Photo opt. pro function.
If you are using a Canon-brand PictBridge compliant device, the following additional options may be available, depending on the model.
– VIVID makes green and blue more lively.
- NR (Noise Reduction) reduces the noise on blue areas like the sky as well as on black areas.
- Face brightens a darkened face on the photo taken against the light.
- Red Eye corrects red eyes in portraits caused by flash photography.
- Trimming Setting
You can select an area to print.
■ Setting on the Machine
This section describes the PictBridge print settings on the machine.
Set the print settings to Default on the PictBridge compliant device when you want to print according to the settings on the machine.
- Displaying the PictBridge Settings Screen and Specifying the Settings
(1) Turn on the machine.
(2) Select Settings on the HOME screen, then press the OK button.
(3) Select Device settings, then press the OK button.
(4) Select PictBridge settings, then press the OK button.
(5) Select the item to set, then press the OK button.
(6) Select the item, then press the OK button.
(7) Confirm the print settings, select Next and then press the OK button.
(8) Select Auto image fix ON or Manual correction, then press the OK button.
When Auto image fix ON is selected, the scene or person's face of a shot photo is recognized and the most suitable correction for each photo is made automatically. It makes a darkened face by backlight brighter to print. It also analyzes a scene such as scenery, night scene, person, etc. and corrects each scene with the most suitable color, brightness, or contrasts automatically to print.
When Manual correction is selected, repeat steps (5) and (6) and then specify each item. After finishing all settings you need, select OK and then press the OK button. You can print from the PictBridge compliant device with specified settings.
- Setting Items
| No. | Setting Item | Description | Corresponding Setting of PictBridge Compliant Devices*1 |
| (1) Page size Select the page size, when printing directly from a PictBridge compliant device. | Paper size | ||
| (2) Media type Select the media type, when printing directly from a PictBridge compliant device. | Paper type | ||
| (3) Print quality Select the print quality, when printing directly from a PictBridge compliant device. | - | ||
| (4) Bordered/Borderless Select bordered or borderless print. Layout | |||
| (5) Photo opt. pro Automatically optimizes brightness and tone of a photo. | Image optimize | ||
| (6) Vivid photo Makes green and blue more lively. | |||
| (7) Face brightener Brighten s a darkened face on the photo taken against the light. | |||
| (8) Noise reduction Reduces the noise on blue areas like the sky as well as on black areas. | |||
| (9) Image optimizer | Corrects and smooths the jagged contours for printing. | ||
| (10) Red eye correc. | Corrects red eyes in portraits caused by flash photography. | ||
| (11) Brightness Adjust brightness. | |||
| (12) Contrast | Adjust contrast. | ||
| (13) Color hue | Adjust color hue. For example, you can increase red or yellow to adjust the skin tone. | ||
| (14) Effects | Applies special effects to the photo, such as printing in sepia tones or with a sketch illustration like effect. | ||
*1 Set the items in this column to Default on the PictBridge compliant device when you want to make settings on the machine.
*2 When Manual correction is selected, the items (5) to (14) are available to specify.
Replacing an Ink Tank
When ink tanks run out of ink, replace them using the following steps.
1 Open the Front Tray.
2 Make sure that the machine is turned on, and lift the Scanning Unit (Printer Cover), then pull the Scanning Unit Support (A) down into place.
Caution
- Do not hold the Print Head Holder to stop or move it.
- Do not touch the metallic parts inside the machine.
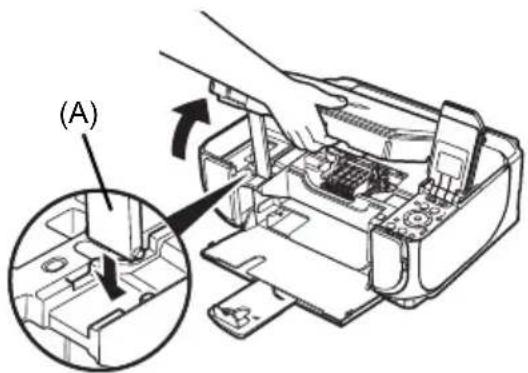
text_image
(A)3 Push the tab (B) of the ink tank whose lamp is flashing fast and remove it. Do not touch the Print Head Lock Lever (C).
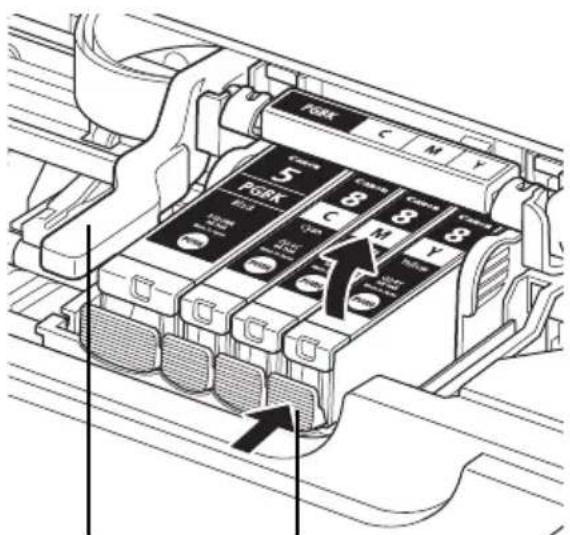
text_image
PORK 5 8 C M Y 7 8 M Y 10 9 11 12 13 14 15 16 17 18 19 20 21 22 23 24 25 26 27 28 29 30 31 32 33 34 35 36 37 38 39 40 41 42 43 44 45 46 47 48 49 50 51 52 53 54 55 56 57 58 59 60 61 62 63 64 65 66 67 68 69 70 71 72 73 74 75 76 77 78 79 80(C) (B)
4 Remove the new ink tank from its packaging, then pull the orange tape (D) in the direction of the arrow to peel off the protective film. Then remove the film (F) completely.
Important
Make sure that the protective film does not remain on the air hole (E). If the air hole is blocked with the remaining film, ink may leak out or may not eject properly.
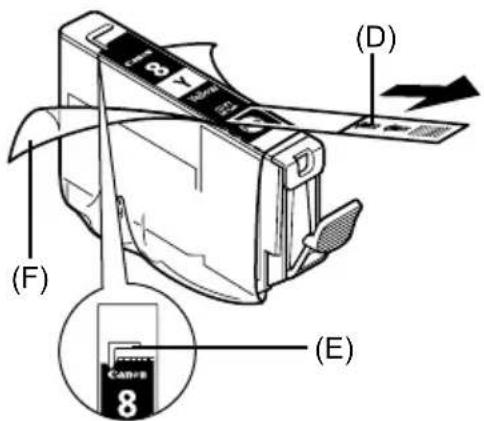
text_image
(F) (D) (E) 85 Remove the orange protective cap (G) from the bottom of the ink tank.
Carefully hold the protective cap when removing it to prevent the ink from staining your fingers.
Discard the cap once it is removed.

Important
Do not touch the electrical contacts (H) on the ink tank. Doing so can cause the machine to malfunction or become unable to print.
6 Insert the front end of the ink tank into the Print Head.
Make sure the position of the tank matches the label (I).

text_image
(G) (H)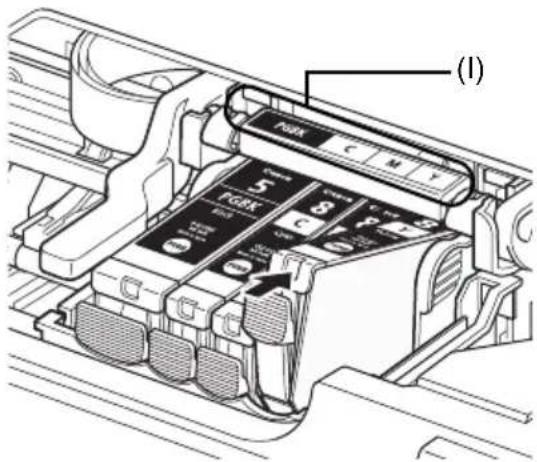
text_image
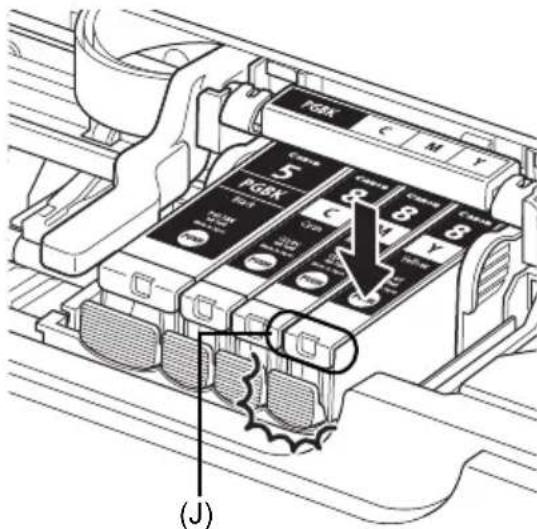
(1) 5 6 7 8 9 10 (1)7 Press on the mark on the ink tank until the ink tank snaps firmly into place.
Confirm that the ink lamp (J) lights up red.
text_image
Pdk C M Y 5 Pdk C 8 8 8 100V J8 Lift the Scanning Unit (Printer Cover) slightly to set the Scanning Unit Support back to its original position, and then gently close the Scanning Unit (Printer Cover).

Note
If the error message is still displayed after the Scanning Unit (Printer Cover) is closed, refer to "An Error Message Is Displayed on the LCD" in the User's Guide on-screen manual.
Specifications
| General Specifications | |
| Printing resolution (dpi) 4 | 800 (horizontal)* x 1200 (vertical)* Ink droplets can be placed with a pitch of 1/4800 inch at minimum. |
| Interface USB 2.0 High Speed | *1 /Bluetooth 1.2 (Option)*2*3/*1 A computer that complies with USB 2.0 Hi-Speed standard is required.Since the USB 2.0 Hi-Speed interface is fully upwardly compatible with USB Full-Speed (USB 1.1), it can be used at USB Full-Speed (USB 1.1).*2 JPEG only*3 Bluetooth connection is for printing only. |
| Print width 8 inches max. | (203.2 mm)(for Borderless Printing: 8.5 inches / 216 mm) |
| Acoustic noise level Approx. | 36.5 dB (A)* When printing in the highest print quality mode on Photo Paper Pro |
| Operating environment Temperature | 5 to 35°C (41 to 95°F)Humidity: 10 to 90%RH (no condensation) |
| Storage environment Temperature | 0 to 40°C (32 to 104°F)Humidity: 5 to 95%RH (no condensation) |
| Power supply AC 100-240 | V, 50/60 Hz |
| Power consumption Printing | (Copy): Approx. 17 WStandby (minimum): Approx. 2.4 WOFF: Approx. 1.0 W |
| External dimensions Approx. | 17.9 (W) x 14.9 (D) x 6.8 (H) inches /Approx. 455 (W) x 378 (D) x 172 (H) mm* With the Paper Support and Front Tray retracted. |
| Weight Approx. 7.5 kg (Approx. 16.5 lb.)* With the Print Head and ink tanks installed. | |
| Print Head | Total 1,600 nozzles (PgBK: 320 nozzles, C/M: each 256 x 2 nozzles, Y: 256 nozzles) |
| Copy Specifications | |
| Multiple copy | 1 - 99 pages |
| Intensity adjustment | 9 positions, Auto intensity (AE copy) |
| Zoom | 25% - 400% (1% unit) |
| Scan Specifications (Platen Glass) | |
| Scanner driver TWAIN / W | IA (Windows Vista or Windows XP only) |
| Maximum scanning size A | 4/Letter, 8.5" x 11.7" / 216 x 297 mm |
| Scanning resolution Optical | cal resolution (horizontal x vertical) max: 2400 dpi x 4800 dpiInterpolated resolution max: 19200 dpi x 19200 dpi |
| Gradation (Input/Output) | Gray: 16bit/8bitColor: 48bit/24bit (RGB each 16bit/8bit) |
| Camera Direct Print (PictBridge) | |
| Paper size 4" x 6" / 101.6 | x 152.4 mm, 5" x 7" / 127.0 x 177.8 mm*, Credit card, 8" x 10" / 203.2 x 254.0 mm, A4, Letter, Wide*Can be selected only on certain Canon-brand PictBridge compliant devices.NoteFeeding this paper from the Front Tray can damage the machine. Load in the Rear Tray. |
| Paper type | Default (Selections based on the machine setting), Photo (Photo Paper Plus Glossy, Glossy Photo Paper, Glossy Photo Paper “Everyday Use”, Photo Paper Glossy, Photo Paper Plus Semi-gloss, Photo Stickers), Fast Photo (Photo Paper Pro), Plain Paper (A4/Letter only) |
| Layout Default (Selections based on the machine setting), Borderless, Bordered, N-up (2, 4, 9, 16)*1, 35-up*2*1 Layout compatible with Canon-brand sticker above. See “Compatible Media Types” in the User's Guide on-screen manual.*2 Selected photos are printed in 35 mm film style layout (contact printing layout). This print setting is only available with certain Canon PictBridge compliant devices.You can print shooting Info (Exif Data) on photos in list format, or in the margins of specified photos.Select Layout, then select the item displayed with the [i] icon.(Note that this print setting cannot be used for some models.) | |
| Image optimize | Default (Selections based on the machine setting), On, Off, “VIVID”, “NR” (Noise Reduction)*, “Face*”, “Red eye** If using a Canon PictBridge compliant camera, you can select it. |
| Print date & file no. Default (Off: No printing), Date, File No., Both, Off | |
| Trimming | Default (Off: No trimming), On (follow camera's setting), Off |
Minimum System Requirements

Note
Conform to the operating system's requirements when higher than those given here.
| Windows | Macintosh | |
| Operating System Processor RAM | Windows Vista Pentium II (including compatible processors) 300 MHz 128 MB Windows XP SP1, SP2 Pentium II (including compatible processors) 300 MHz 128 MB Windows 2000 Professional SP2, SP3, SP4 Pentium II (including compatible processors) 300 MHz 128 MB Note: Operation can only be guaranteed on a PC pre-installed Windows Vista, XP or 2000. | Mac OS X v.10.4 Intel processor PowerPC G3 256 MB Mac OS X v.10.2.8 - v.10.3 PowerPC G3 128 MB Note: Hard disk must be formatted as Mac OS Extended (Journaled), Mac OS Extended. |
| Browser Internet Explorer 6.0- Safari | ||
| Hard Disk Space 800 MB Note: For bundled software installation. | 450 MB Note: For bundled software installation. | |
| CD-ROM Drive Required | ||
| Other restrictions XGA 1024 x 768 | ||
- OmniPage SE: Windows 2000 Professional SP2 and SP3 not supported
● MP Navigator EX: QuickTime v6.4 or later is needed (Macintosh only)
● Some functions may not be available with Windows Media Center. - To upgrade from Windows XP to Windows Vista, first uninstall software bundled with the Canon inkjet printer.
Users In Asia
ScanSoft OmniPage SE (OCR software) can work only with English operating system.
Additional System Requirements for On-Screen Manuals

Browser: Windows HTML Help Viewer
Note: Microsoft Internet Explorer 5.0 or later must be installed. The on-screen manual may not be displayed properly depending on your operating system or Internet Explorer version. We recommend that you keep your system up to date with Windows Update.

Browser: Help Viewer
Note: The on-screen manual may not be displayed properly depending on your operating system. We recommend that you keep your system up to date.
Specifications are subject to change without notice.
PIXMA MP520
natural_image
Abstract grayscale pattern with diagonal striped lines and a curved shape at the top (no text or symbols)
natural_image
Symbol of a trash bin crossed with no text or numbers, representing waste sorting or disposal (no text present)text_image
(C) 7 5 6text_image
Diagram of a printer with labeled parts and magnified view showing internal components, likely illustrating a printing or assembly process.
text_image
(C) 4 5 (E) (B) LTH A4 (D)text_image
Diagram showing two server units connected by a dashed line, with one displaying a globe icon and the other displaying text 'Wm' and 'Wn'.<4-on-1 copy> (Copie 4-sur-1)
natural_image
Two grayscale images showing open notebook pages, one with a pen resting on it (no visible text or symbols)
flowchart
graph LR
    A["Input Image"] --> B["Processing Unit"]
    B --> C["Output Image with Grid Blocks and Text Blocks"]
<2-on-1 copy>
(Copie 2-sur-1)

text_image
Diagram showing server rack and server tower with labeled components and a transformation arrownatural_image
Two identical grayscale images showing abstract patterns, one with vertical bars and the other with triangular shapes (no text or symbols)
flowchart
graph LR
    A["Desktop"] --> B["Global"]
    B --> C["User Profile"]
    C --> D["Data Storage"]
natural_image
Line drawing of a Canon printer with internal components and a magnified inset showing the paper's edge detail (no text or symbols present)natural_image
Diagram of a printer with a digital camera connected to a cable, showing internal components and wiring (no text or symbols)text_image
PDK C M Y 5 PDK C 8 8 8 Jnatural_image
Symbol of a trash bin crossed with no text or numbers, representing waste sorting or disposal (no text present)text_image
Windows needs to install driver software for your MP520 series Locate and install driver software (recommended) Windows will guide you through the process of installing driver software for your device. Ask me again later Windows will ask again the next time you plug in your device or log on. Don't show this message again for this device Your device will not function until you install driver software. Canceltext_image
(C) 7 5 6text_image
Diagram of a printer with labeled parts and a magnified inset showing internal components, likely illustrating a printing or assembly process.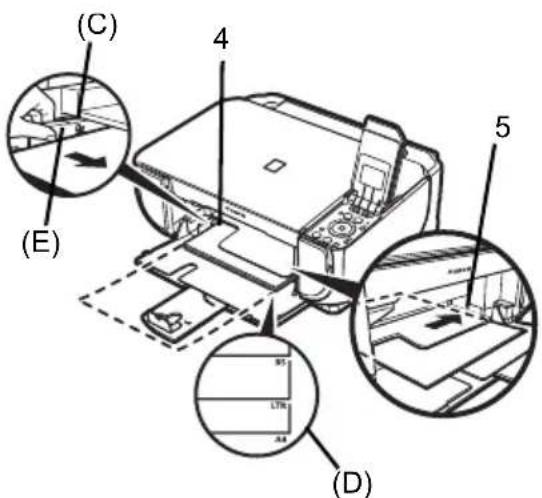
text_image
(C) 4 5 (E) (B) LTR A4 (D)text_image
8! Copy Remaining ink vol Introductionflowchart
graph TD
    A["Memory card"] --> B["Remaining ink vol"]
    A --> C["Introduction"]
text_image
NAVI Special copy Print photo from memory card Special photo print How to load paperCopiar
text_image
(1) Copies (2) 100% 0 A4 Plain paper Standard Rear tray Special copy Preview Magnificationtext_image
Diagram showing two communication devices with a globe icon and Chinese text labels on screens<4-on-1 copy> (Copia 4 en 1)

natural_image
Two grayscale images showing an open notebook with a spiral-bound notebook, no visible text or symbols.natural_image
Two identical grayscale images showing abstract patterns, one with vertical bars and the other with triangular shapes (no text or symbols)
natural_image
Diagram showing transformation from a server to a globe icon, no text or symbols present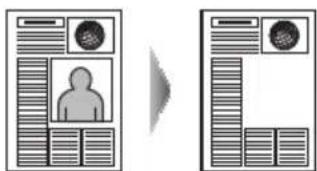
text_image
Diagram showing a person silhouette in front of a device and its side profile, with a magnified view on the right.natural_image
Line drawing of a Canon printer with internal components and a magnified inset showing the printer's internal structure (no text or symbols present)text_image
Select and print Print 4"x6" (101.6x152.4) Photo Plus Glossy Standard Borderless Rear tray (1) (2) =0001 Advanced Check phototext_image
Canon Photo Index Sheet 1. Print Savings Select the page skin/mouse type and options for printing. Use a blank format to fill in the appropriate clouds. Select only one unit. □ Preview □ Preview Option: Date: Auto Design File Print Paper 2. Photograph Selected 3. Print 1: Load paper in the Tour Day 2: Select | Photo index sheet | Photo | Steam sheet and print 1, and follow the text buttons on the PCB ● Print a Steam Photo Index Sheettext_image
Select and print Print 4"x6" (101.6x152.4) Photo Plus Glossy Standard Borderless Rear tray (1) (2) = 001 Advancedtext_image
Print General Select Printer Solid Printer Canon MP520 series Printer Print Microsoft XPS Document Writer Status: Ready Location: Comment: Print to file References Ring Printer... Page Range All Selection Current Page Pages: 145636 Enter either a single page number or a single page range. For example, 5-12 Number of copies: 1 Collapse: 1 1 2 2 3 3 Print Cancel Applytext_image
Edit Advertising Parameters Main Edit Page Setup Offices Profile Maintenance Media Type: Plan Paper Paper Source: Paper Fixed Switch Print Quality: High Standard Foot Custom Copy Color Intensity: Able Barnout Set Graphic Printing Printing before printing OK Cancel Help
Nota
text_image
Settings: Page Attributes Format for MP520 series Canon MP520 series Paper Size A4 21.00 cm x 20.70 cm Orientation: Scale: 100 % Cancel OK
text_image
Printer: MP320 series Presets: Standard Quality & Media Media Type: Plain Paper Paper Source: Paper Feed Switch Print Mode: Printing a top-quality photo Printing tables and charts Printing a composite document Detailed Setting Grayscale Printing PDF Review Cancel Blue
Nota
natural_image
Diagram of a printer connected to a digital camera via cable, showing internal components and wiring (no text or symbols)text_image
FSCK C M Y 5 FSCK 8 C M Y (3) (B)text_image
PGBK C M Y 5 PGBK J C 8 8 8 J J (J)natural_image
Abstract grayscale pattern with horizontal stripes and curved lines, no text or symbols present
natural_image
Symbol of a trash bin crossed with no text or numbers, representing waste sorting or disposal (no text present)text_image
Found New Hardware Windows needs to install driver software for your MP520 series Locate and install driver software (recommended) Windows will guide you through the process of installing driver software for your device. Ask me again later Windows will ask again the next time you plug in your device or log on. Don't show this message again for this device Your device will not function until you install driver software. Canceltext_image
Technical diagram of a printer with labeled parts and a magnified inset showing component (A) and (B)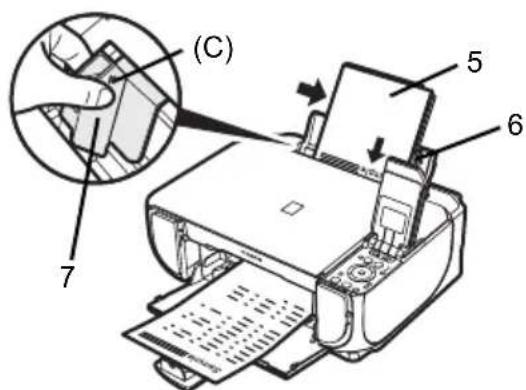
text_image
(C) 7 5 6text_image
Diagram of a printer with labeled parts and a magnified inset showing internal components, likely illustrating a printing or assembly process.
text_image
(C) 4 5 (E) 95 LTR A4 (D)Como navegar pelos menus do LCD
text_image
Copy Remaining ink vol Introduction(1) (2)
text_image
NAVI Special copy Print photo from memory card Special photo print How to load paperCópia
Como fazer cópias
text_image
Copy Magnification 100% 0 A4 Plain paper Standard Rear tray Copies (1) (2) Special copy Previewtext_image
Diagram showing two communication devices with a globe icon and text labels, connected by a dashed line indicating interaction.natural_image
Two grayscale images showing open notebook pages, one with a pen and the other with a spiral-bound notebook (no text or symbols visible)natural_image
Two identical rectangular panels showing abstract patterns, one with vertical bars and one with triangular shapes, both without any text or symbols.
natural_image
Diagram showing a server tower connected to a globe icon, both without any text or symbols.
text_image
Diagram showing a person silhouette in front of a document with a circular icon, alongside a separate layout with a document and circular icon.natural_image
Line drawing of a Canon printer with internal components and a magnified inset showing the printer's internal structure (no text or symbols present)text_image
Select and print Print 4"x6" (101.6x152.4) Photo Plus Glossy Standard Borderless Rear tray (1) (2) =0001 Advanced Check phototext_image
Canon Photo Index Sheet 1. Print Savings Select the page skin/midra type and options for printing. Use a dark panel to fill in the appropriate clothes. Select only one circle. □ Preview □ Untitled Option: Date Auto design file Real File name/notes 2. Photograph Selected: Print all photographs (same print icon) 3. Print 1: Load paper in the Tour Day 2: Select | Photo index sheet | Photo | Steam head and print | and follow the instructions on the USB Print selected Photo Index Sheettext_image
Select and print Print 4"x6" (101.6x152.4) Photo Plus Glossy Standard Borderless Rear tray (1) (2) = 001 Advancedtext_image
Print General Select Printer Canon MP520 series Printer Print Microsoft XPS Document Writer Status: Ready Location: Comment: Print to file References Print Printer... Page Range All Selection Current Page Pages: 145606 Enter either a single page number or a single page range. For example, S-12 Number of copies: 1 Collapse: 1 1 2 2 3 3 Print Cancel Applytext_image
Edit Advertising Parameters Main Page Setup Offices Profile Maintenance Media Type: Plan Paper Paper Source: Paper Fixed Switch Part Quality: High Standard Foot Custom Color Intensity: Agris Barnout Set Grayscale Printing Printing before printing OK Cancel Helptext_image
Settings: Page Attributes Format for: MP520 series Canon MP520 series Paper Size: A4 21.00 cm x 20.70 cm Orientation: Scale: 100 % Cancel OK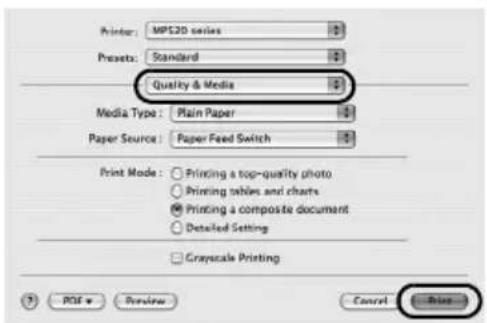
text_image
Printer: MPS20 series Presets: Standard Quality & Media Media Type: Plain Paper Paper Source: Paper Feed Switch Print Mode: Printing a top-quality photo Printing tables and charts Printing a composite document Detailed Setting Gray-scale Printing ? PDF Review Cancel PrintNote
natural_image
Diagram of a printer with an attached camera and cable, showing internal components and wiring (no text or symbols)text_image
KDK C M Y 5 KDK C 8 8 8 1200 (1) JRegulatory Information
FCC Notice (U.S.A. Only)
For 120V, 60Hz model
Model Number: K10310
This device complies with Part 15 of the FCC Rules. Operation is subject to the following two conditions: (1) This device may not cause harmful interference, and (2) this device must accept any interference received, including interference that may cause undesired operation.
Note: This equipment has been tested and found to comply with the limits for a Class B digital device, pursuant to Part 15 of the FCC Rules. These limits are designed to provide reasonable protection against harmful interference in a residential installation. This equipment generates, uses and can radiate radio frequency energy and, if not installed and used in accordance with the instructions, may cause harmful interference to radio communications.
However, there is no guarantee that interference will not occur in a particular installation. If this equipment does cause harmful interference to radio or television reception, which can be determined by turning the equipment off and on, the user is encouraged to try to correct the interference by one or more of the following measures:
■ Reorient or relocate the receiving antenna.
■ Increase the separation between the equipment and receiver.
■ Connect the equipment into an outlet on a circuit different from that to which the receiver is connected.
■ Consult the dealer or an experienced radio/TV technician for help.
Use of a shielded cable is required to comply with Class B limits in Subpart B of Part 15 of the FCC Rules.
Do not make any changes or modifications to the equipment unless otherwise specified in the manual. If such changes or modifications should be made, you could be required to stop operation of the equipment.
Canon U.S.A., Inc.
One Canon Plaza
Lake Success, NY 11042
1-516-328-5600
Users in Canada

Caution
The following ink tanks are compatible with this product.