G 7728 - Dishwasher MIELE - Free user manual and instructions
Find the device manual for free G 7728 MIELE in PDF.

User questions about G 7728 MIELE
0 question about this device. Answer the ones you know or ask your own.
Ask a new question about this device
Download the instructions for your Dishwasher in PDF format for free! Find your manual G 7728 - MIELE and take your electronic device back in hand. On this page are published all the documents necessary for the use of your device. G 7728 by MIELE.
USER MANUAL G 7728 MIELE
Operating Instructions
Dishwashers
Mode d'emploi
Lave-vaisselle
Gebruiksaanwijzing
natural_image
Simple circular diagram with a horizontal bar and directional arrows, no text or symbols present.3
text_image
°C M S DOStext_image
Diagram of a rotary dial with labeled components and directional arrows, including a valve mechanism and a circular component.text_image
Diagram of a rotary dial with labeled components and directional arrows, including a circular dial with internal components and a circular ring below.text_image
Diagram of a rotary switch mechanism with labeled components and directional arrowstext_image
°C S DOS ↑text_image
Diagram of a rotary switch mechanism with labeled components and directional arrowsWarning and Safety Instructions 20
Operation
Explanation of controls 22
Commissioning 24
Setting the water hardness selector for local water conditions 26
Notes:
Dispenser pumps 27
Plate, cup and cutlery baskets 27
Manual operation 27
Changing the water 28
Maintenance and Cleaning
Cleaning 29
Reactivating 29
Explanation of the symbols on the data plate 31
Installation
Electric heating 32
Screw feet 32
Water inlet/drainage 32
Electrical connection 32
The dishwasher must be installed only by a Miele engineer or a Miele authorized Service dealer.
Help to protect our environment
Disposal of the packaging material
The transport and protective packing is mostly manufactured from the following reusable
materials:
-corrugated paper/card
-untreated wood
-polypropylene
Rather that just throwing these materials away, please take them to the nearest local authority collection point for specific waste.
Disposal of an old machine
Old machines may contain material which can be reclaimed or recycled. Please contact your dealer, your local waste collection centre or scrap merchant about potential recycling schemes. Ensure that the machine presents no danger to children while being stored for disposal. See the appropriate section in the Warning and Safety instructions.
Before installation and before using the machine for the first time read the operating instructions carefully. This way you will avoid the risk of accidents and damage to the machine.
This special commercial dishwasher is only authorised for use in a commercial situation and for machine washable cutlery and crockery. Do not use it for purposes other than those for which it was designed.
The manufacturer cannot be held responsible for damage caused by improper use.
Do not let small children or unauthorised personnel access the machine or its controls.
The machine is built in accordance with current safety standards.
If the controls or the mains lead insulation of the machine are damaged the machine must be inspected and repaired by a competent service engineer before being used again.
Any repair work may only be carried out by a suitably qualified and competent engineer. Repairs by unqualified persons could be dangerous.
- Faulty components must only be exchanged for Miele original spare parts. Only when these parts are fitted can the safety standards of the machine be guaranteed.
The electrical safety of this machine can only be guaranteed if connected to a correctly installed earthing system. It is most important that this basic safety requirement for earth continuity is met and complies with local and national regulations. It should be checked by an expert if necessary. The manufacturer cannot be held responsible for damage caused by missing or defective earthing.
The machine is only completely isolated from the electricity supply when it is switched off at the wall socket, or the mains fuse has been withdrawn. This must be done before any repair work is carried out.
Do not open the hood while a programme is running.
Do not damage, remove or bypass the safety components and fixtures, and control elements of the machine.
Do not touch the heating elements in the wash cabinet during or directly after the end of a programme. You could burn yourself.
Only use detergents formulated for use in a commercial dishwasher which have been approved by the manufacturer. Do not use solvents as there may be a danger of explosion.
Take appropriate care when handling dishwasher detergent and rinse aid. Take note of the safety instructions on the packet. They contain irritant and/or corrosive ingredients and can cause burning in the mouth or throat if swallowed. Avoid contact with the skin or eyes. Store out of the reach of children.
A better cleaning result is obtained if cutlery is placed handle first into the basket. Be careful, however, when sorting cutlery with sharp pointed ends that you do not hurt yourself. If necessary, place the pointed end downwards with the handles pointing upwards.
Only put plastic items in the dishwasher if it is clearly stated that they are dishwasher safe. When in doubt first check with the plastics manufacturer.
Any removable outer panels must be put back in place, and all moving or electrical parts shielded before the machine is operated.
The water used for washing and rinsing in the machine must not be used as drinking water. Before re-filling with fresh water the used water solution must be directed into a proper drainage system.
From time to time clean the bend in the drain behind the machine, to avoid the tank overflowing.
Do not use a hose or high pressure spray to clean the dishwasher or its immediate surroundings.
In countries where there are areas which may be subject to intestation by cock-roaches or other vermin, pay particular attention to keeping the appliance and its surroundings in a clean condition at all times. Any damage which might be caused by cock-roaches or other vermin will not be covered by the appliance guarantee.
Accessories
Accessory parts may only be fitted when expressly approved by Miele. If other parts are used, guarantee, performance and product liability claims may be invalidated.
Disposal of an old machine
When disposing of an old machine, make sure the hood locking device is removed. This will prevent children at play from being accidentally locked in.
Any personnel who use the machine on commissioning or at a later date must be made aware of these safety instructions, and have them explained.
Keep these instructions in a safe place for future reference.
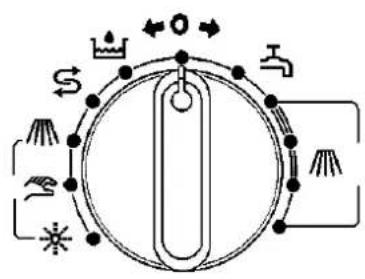
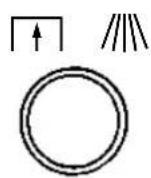
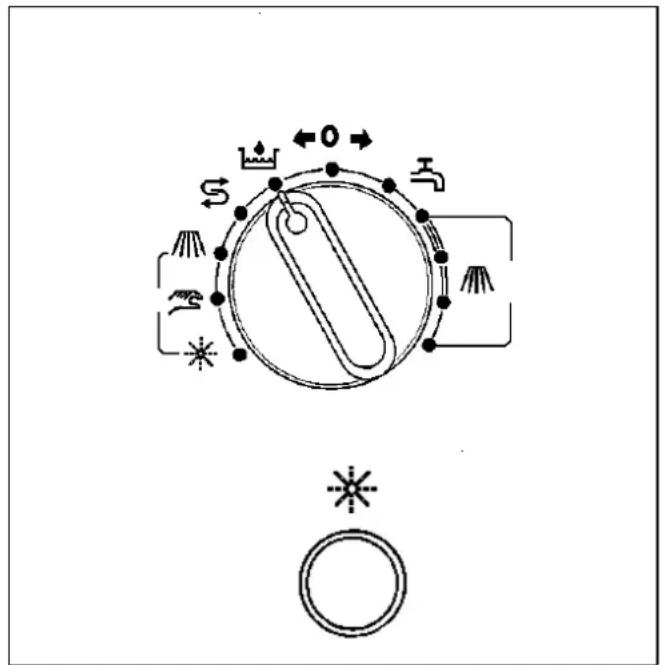
1
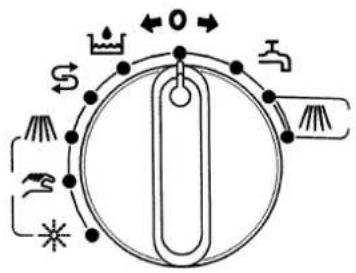
text_image
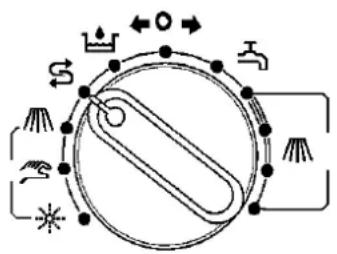
Diagram of a rotary switch mechanism with labeled components and directional arrows1 = Selector switch G 7726
0
Machine switched off
Programme → Ready to wash
Programme "Intenove"
Programme "Norm"2"
Programme SReactivate
Pre-select Manual dispensing for detergent and rinse aid
Pre-select ✱ Manual rinsing and wash cabinet cleaning
Pre-select //Manual wash

Basic position for manual wash operation and intervals between washes.
2
flowchart
graph TD
    A["Circle"] --> B["Crown"]
    B --> C["Valve"]
    C --> D["Water Source"]
    D --> E["Switch"]
    E --> F["Arrow to Center"]
    style A fill:#f9f,stroke:#333
    style B fill:#ccf,stroke:#333
    style C fill:#cfc,stroke:#333
    style D fill:#fcc,stroke:#333
    style E fill:#cff,stroke:#333
    style F fill:#ffc,stroke:#333
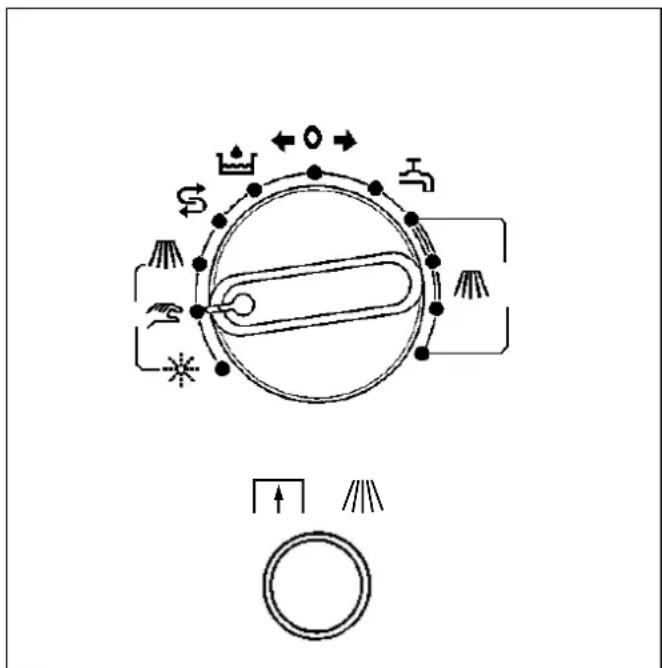
2 = Selector switch G 7727 / G 7728
0
Machine switched off
Programme → Ready to wash
Programme "Intensive"
Programme "Norma2"
Programme "Norma"
Programme "Shor
Programme SReactivate
Pre-select Manual dispensing for detergent and rinse aid
Pre-select ✱ Manual rinsing and wash cabinet cleaning
Pre-select / / / Manual wash

Basic position for manual wash operation and intervals between washes.
natural_image
Simple circular diagram with a horizontal bar and arrows, no text or symbols present3
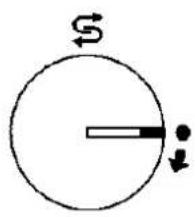
3 = Reactivation switch (only for machines with water softener) for water softening cycle counter.
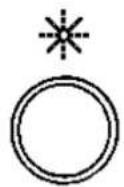
4
text_image
Diagram showing two cylindrical objects with temperature indicators and a star symbol, likely illustrating thermal or chemical process.G 7728
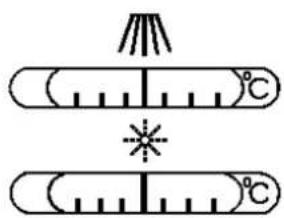
4 = Temperature indicator "Washing" (indicates the temperature of water in the tank).
5 = Temperature indicator "Rinsing" (indicates the temperature of water in the boiler).
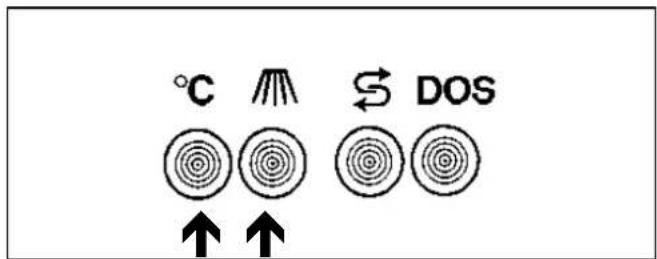
text_image
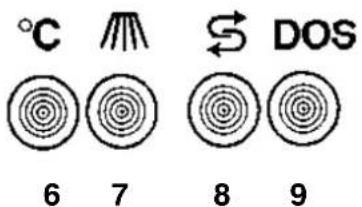
°C 6 7 8 DOS 96 = Indicator light "Operating temperature reached" (lights up when the operating temperature is reached).
7 = Indicator light "Wash programme in operation" (lights up when a wash programme is in operation or when the hood is closed during manual operation).
8 = Indicator light "Reactivate" (lights up when the water softener has run out and needs renewing). Only on machines with water softener.
9 = Indicator light "Empty" (only on machines with C 60 Module - lights up when the detergent needs renewing).
10 11
10 = Double function button (G 7728) "Dispense detergent" (G 7726/27/28) "Open hood manually" (G 7728)
11= Button "Draw up and dispense rinse aid manually"
COMMISSIONING
Read the enclosed "First commissioning" leaflet carefully when the machine is commissioned for the first time.
This machine should only be commissioned by the Miele Service Department or an authorised Miele Dealer.
When the machine is first commissioned the reactivate softener switch on the facia panel must by set to a value which represents the local water hardness level (see page 26).
Only use rinse aids specifically designed for use in commercial dishwashers in this machine and dispense according to the manufacturer's recommendations.
See relevant Technical Instructions for notes on connection and dispensing.
When changing rinse aid brands the dispenser system should first be flushed through with clean water and the dispenser amount reset accordingly.
■ The rinse aid dispenser is situated in the base of the dishwasher.
■ The on site suction hose should be shortened to the shortest length possible and the siphon re-fitted. Insert the siphon back into the rinse-aid container.
■ Open the on-site stopcock.
■ Close the hood.
flowchart
graph TD
    A["Power"] --> B["Switch"]
    B --> C["Capacitor"]
    C --> D["Return Line"]
    D --> E["Switch"]
    E --> F["Capacitor"]
    F --> G["Return Line"]
    G --> H["Switch"]
    H --> I["Capacitor"]
    I --> J["Return Line"]
    J --> K["Switch"]
    K --> L["Capacitor"]
    L --> M["Return Line"]
    M --> N["Switch"]
    N --> O["Capacitor"]
    O --> P["Return Line"]
    P --> Q["Switch"]
    Q --> R["Capacitor"]
    R --> S["Return Line"]
■ Set the selector switch to "Ready to wash".
text_image
°C M S DOS ↑ ↑The wash cabinet automatically fills with water (see separate instruction sheet, "Commissioning for the first time").
When the “operating temperature has been reached” and the “in operation” indicator lights have lit up, a wash programme proceeds.
When the "Programme in operation" indicator light goes out:
G 7728
The hood opens automatically.
G 7726 / G 7727
Open the hood manually.
Adding powder detergent
Do not use detergent intended for washing up by hand. Only use detergent specially formulated for use in a dishwasher.
Recommended quantity:
At least 2 grammes per litre of water, i.e. approx 100 grammes for a full wash tank. After every 10 cycles a further 50 grammes should be added.
Follow the detergent manufacturer's instructions on dosage.
■ Wearing protective gloves add detergent manually to the wash tank and mix with water in the tank immediately, by closing the hood and running a programme so that it is thoroughly mixed in.
Drawing up and adding Rinse aid
text_image
Diagram of a rotary switch mechanism with labeled components and directional arrows, including a circular dial and a ring.- Set the selector switch to the "Manual dispensing".
■ Close the hood.
■ On first commissioning:
Press "Drawing up and adding rinse aid" button for approx. 1 minute, to fill the dispenser hose.
■ Daily commissioning and water change:
Press the dispenser button for drawing up and adding rinse aid for about 6 seconds to add more rinse aid. In a normal programme cycle the rinse aid is dispensed automatically.
text_image
Diagram of a rotary dial with labeled components and directional arrows, including a circular dial with internal components and a circular ring below.G7728
Set the selector switch to "manual operation".
Press the "Open hood" button in.
G 7726 / G 7727
Open the hood manually.
Setting the Reactivate softener switch (only for machines with water softener).
When the machine is first commissioned the reactivate softener switch on the facia panel must by set to a value which represents the local water hardness level.
■ Pull the selector knob out.
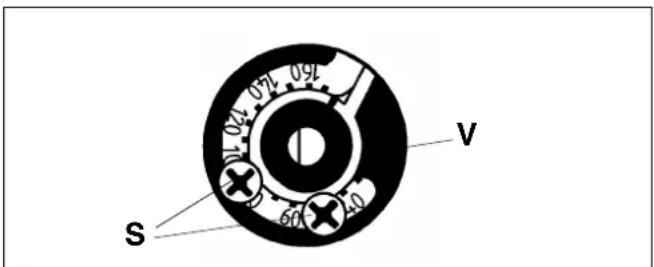
text_image
S V 04 10 17 24 31 07 12 18 25 32 60 40■ Loosen screw "S".
■ Set the yellow point on the adjusting ring "V" to the required value (if necessary repositioning screw "S").
■ Re-tighten the screw "S".
■ Replace the selector knob.
■ Using a coin turn the reactivate softener switch until a resistance is felt.
If your water hardness level is lower than 6^ dH (107 ppm) the selector switch can be pulled out twice before the softener is depleted.
- The machine is now ready to use. -
■ Insert the loaded basket into the machine.
■ Close the hood.
text_image
Diagram of a rotary dial with labeled buttons and icons around it■ Select a programme (eg. "Intensive").
- The preselected programme commences. -
Do not open the hood while the programme is in operation.
(With the G 7728 the hood is locked when a programme is running).
When the "Programme in operation" indicator light goes out:
■ G 7728: The hood opens automatically.
■ G 7726/27: Open the hood manually.
■ Remove the basket.
Switching off after a wash programme has finished:
■ Turn off the stopcock (on-site) and set the selector switch to "0".
text_image
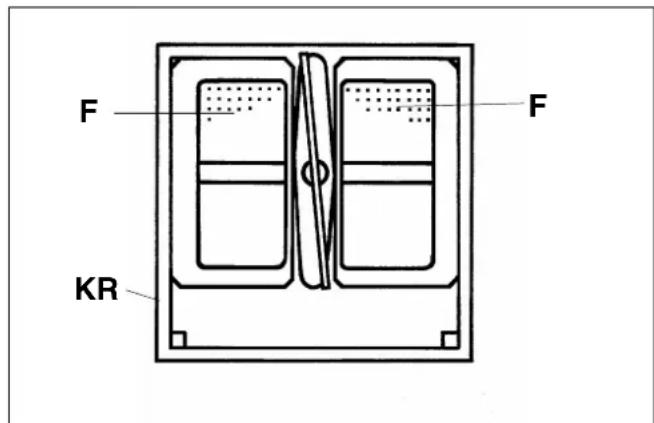
F F KR- Check the large surface area filter (F) for waste material and clean if necessary (remove basket runners (KR) before taking out the large surface area filter).
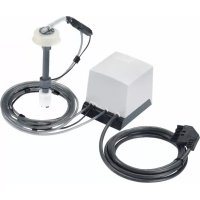
Appliances with electronic liquid detergent dispensing pumps (Optional extra).
Installation or adjustment of the electronic dispensing pump, (Miele accessory) should only be carried out by the Miele Service Department.
Only use detergents suitable for use in commercial dishwashers.
The container with the liquid detergent must be placed on the floor adjacent to the dishwasher. (See installation instructions for "Automatic dispenser for liquid detergent").
Plate basket:
Only suitable for accommodating large, flat and deep dishes (25 cm dia).
- Arrange plates with dirty side facing towards the middle -
Cup basket:
Only suitable for cups.
- Arrange cups with opening facing downwards -
Cutlery basket:
Only suitable for cutlery.
- Do not place spoons on top of each other -
Manual washing and rinsing
The machine can be operated by setting the selector switch to "Manual Wash" and "Manual Rinse". Manual wash should not last longer than 3 minutes per batch.
■ On completion turn the selector switch to "0".
Manual washing and rinsing can only be selected after:
- The “Programme in operation” indicator light has gone out.
G 7728:
- The hood has opened automatically.
Intervals between washes
While the machine is not in use the emission of steam can be reduced by turning the selector switch to “manual operation” and closing the hood.
When the machine is to be used again the hood should be opened (with the G 7728 press the "Open Hood" button in) and select a programme.
If wash results are unsatisfactory, change the water in the wash tank. (See “Cleaning” for how to drain).
Each time the wash tank water is changed, add detergent and rinse aid. (See daily “Commissioning” for adding detergent and rinse aid.
If possible, glasses should only be washed after the wash tank water has been changed. This gives better wash results.
The rinse aid container should never be allowed to get empty. Refill or replace it in good time.
CLEANING
Do not use a hose or high pressure spray to clean the dishwasher or its immediate surroundings.
The wash cabinet should be cleaned when necessary or after a number of programme cycles, using the "Manual rinse programme.
text_image
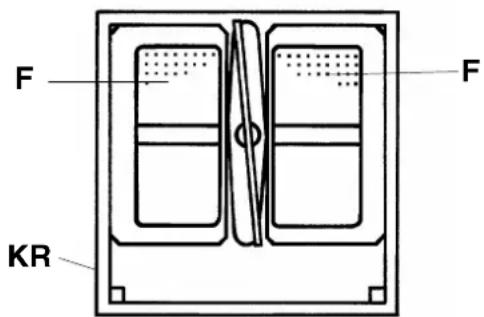
F F KR■ Remove the basket runners (KR), wide surface area filters (F)
text_image
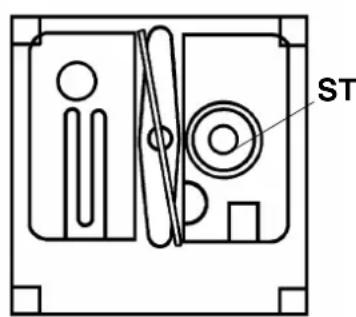
STand standpipe (ST).
■ Set the selector switch to the “manual operation” position.
■ Close the hood.
- Set the selector switch to "Manual rinse" and allow the dishwasher to wash for approx. 10 seconds to clean the wash cabinet through.
■ G 7728: Press the "Open hood" button.
■ G 7726 / 7727: Open the hood manually.
■ Replace the standpipe (ST), wide surface area filters (F) and basket runners (KR).
Depending on the degree of soiling the following should be cleaned from time to time:
text_image
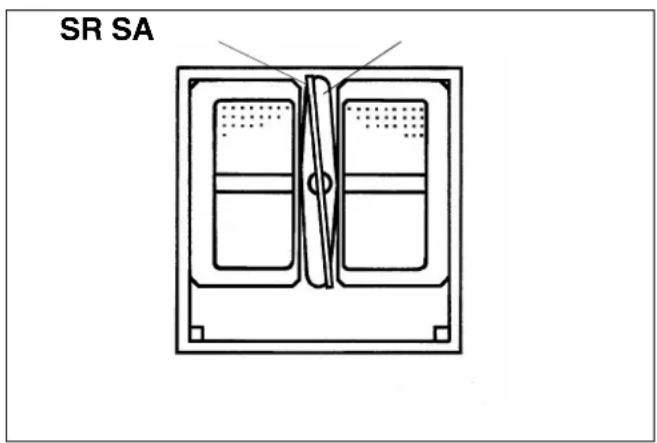
SR SA
text_image
SG S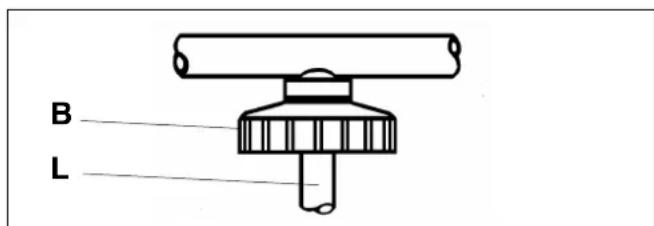
text_image
B L- Rinse arms (SR), spray arms (SA), - after undoing the securing nut (B), remove the rinse and spray arms. Check for particles of soiling when necessary and clean.
■ The mullion (SG) and Filter (S).
- be careful not to allow large particles of food to make their way into the circulation pump opening.
Caution
Protect the bearing surface (L) of the rinse arm from being damaged. Do not refit rinse arms with damaged bearings.
The filter situated between the water inlet and the connecting hose (inlet filter) should be cleaned from time to time.
This should be carried out by the Miele Service Department.
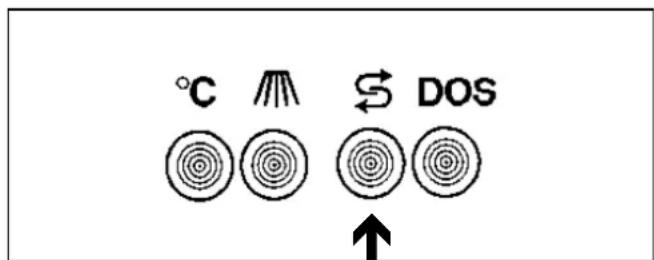
REACTIVATE
(Only for machines with a water softener)
text_image
°C S DOSA reactivate water softener programme should be carried out as soon as the "Reactivate" indicator light comes on.
If this is not immediately possible due to operating conditions and further batches have been washed, then the reactivate programme must be run twice in succession.
■ Remove the basket runners, large surface area filter and stand pipe in order to drain the machine.
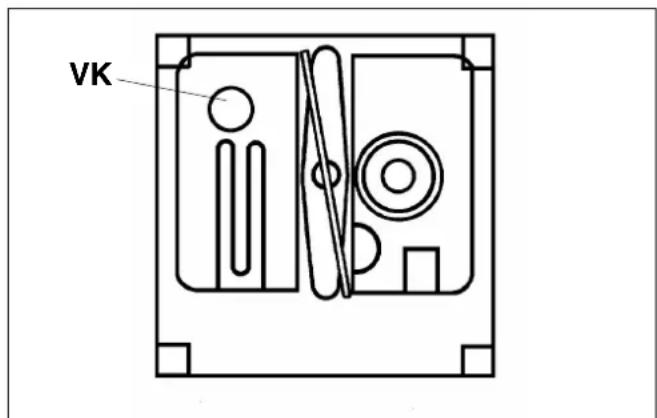
text_image
VK■ Unscrew the cap (VK) on the socket.
- Fill the salt container supplied with 2 kg of reactivation salt. Only use special reactivation salt ie. with a grain size of 1-4 mm.
Important
Only use special coarse grained dishwasher salt for reactivation, as any other salts may contain insoluble impurities or additives which can impair the functioning of the softener. If the only reactivation salt available is fine grain, please consult your Miele service representative. Reactivation salt with granules larger than 4 mm cannot be used.
Never fill the salt reservoir with dishwasher cleaning agent. This can damage the water softener and cause irritation and injury.
■ Screw the salt container on to the socket.
flowchart
graph TD
    A["Start"] --> B["S"]
    B --> C["Resistor"]
    C --> D["Capacitor"]
    D --> E["Return Line"]
    E --> F["Reset Valve"]
    F --> G["Ground"]
- Set the selector switch to the "Reactivate" position.
■ Close the hood.
Reactivation takes about 24 minutes.
The reactivation process is complete when this period has elapsed or when no more water inlet noises are audible.
G 7728
The hood opens automatically.
G 7726 / 7727
Open the hood manually.
■ Set the selector switch to "0".
■ After reactivation has taken place the reactivate softener switch should be turned in a clockwise direction using a coin until a resistance is felt. The “Reactivate” indicator light goes out.
The water pressure (flow pressure at the take off point) must be at least 2.5 bar. If the flow pressure is below 2.5 bar, or if it fluctuates, the water softener will not be set properly. There may be salt residues in the base of the salt container after reactivation has taken place. To use up the salt remains and to wash out the water softener the "Reactivation" programme will need to be run again.
Note:
The salt container should be opened gradually until water escapes thus allowing it to depressurize.
- Put the cap back on the socket and immediately remove any salt residues using the manual rinse programme.
■ Rinse out the salt container and the insert.
■ Refit the standpipe, large surface area filter and the basket runners.
- Fill the tank, add detergent and rinse aid. - See daily commissioning. -
Maintenance of the dispenser system
The dispensing pump hoses are subject to wear and tear, and should be checked at regular intervals, and when necessary replaced by your Miele dealer or the Miele Service dept. This should be done at least yearly, or after 3000 programmes at the latest.
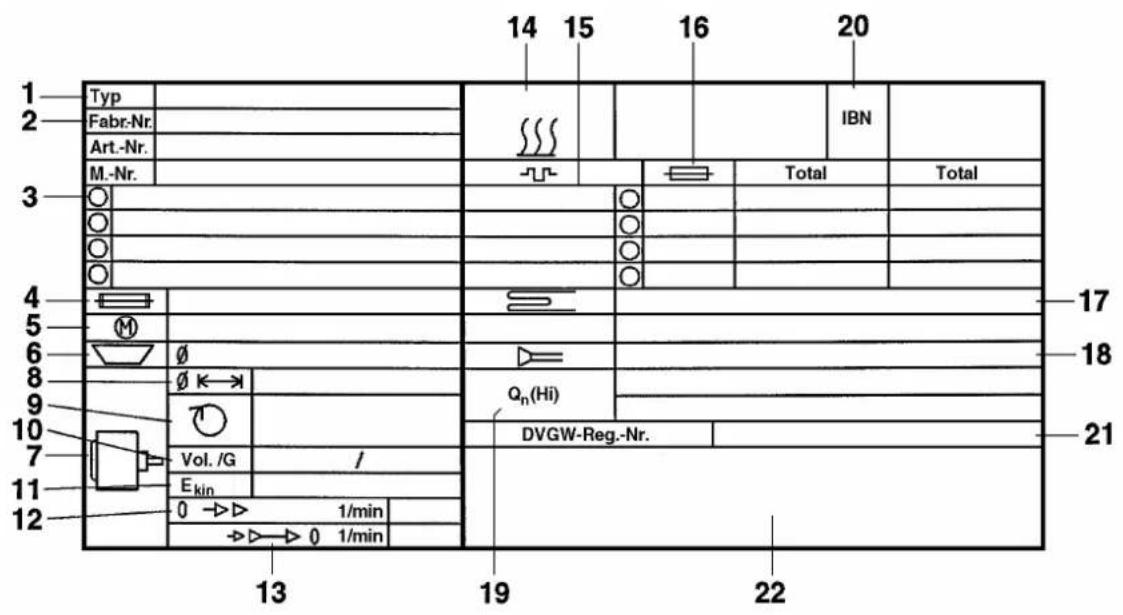
1 Machine type
2 Machine number (year of manufacture*)
3 Voltage/frequency
4 Control fusing
5 Drive motor
6 Plate diameter/plate qty.
7 Drum data*
8 Drum diameter/drum depth*
9 Spin speeds*
10 Drum volume/laundry dry weight*
11 Kinetic energy*
12 Top running time*
13 Braking time*
14 Heating
15 Electric heating
16 Fusing (to be installed on site)
17 Steam heating indirect*
18 Steam heating direct*
19 Gas heating*
20 Commissioning date
21 Water registration
22 Space for test certificate
*) Does not apply to these machines
In the event of any faults please contact your Dealer or the nearest Miele Service Department. When contacting the Service Department please quote the Model type (Typ) of the machine and where possible the Serial number (Fabr.-Nr.) and Part number (M.-Nr.).
Only use genuine Miele Spare Parts.
When ordering spare parts from the Miele Spare Parts Department please quote the Model type (Typ) of the machine and where possible the Serial number (Fabr.-Nr.) and Part number (M.-Nr.). Only use Spare Parts approved by the manufacturer.
Noise emission
Registered on the "A" scale.
G 7726 74.1 dB
G 7727 / 28 75.7 dB
Measured in Germany in accordance with DIN (IEC) 45 635, Machine noise regulations 3.GSGV para. 1.1.a.
Any work concerning electrical connection should only be carried out by a suitably qualified electrician, in accordance with national and local safety regulations.
Connection should be made via a suitable isolator, with an on-off switch which is easily accessible for servicing.
WARNING: THIS APPLIANCE MUST BE EARTHED
Connect the machine to the electrical supply making sure that it is connected to a correctly installed earthing system. The machine must be included in the overall bonding calculations. Consult the data plate and wiring diagram.
For extra safety it is advisable to install a residual current device with a trip current of 30 mA (in accordance with DIN VDE 0664, VDE 0100, Section 739).
When switched off there must be an all-pole contact gap in the isolator switch (including switch, fuses and relays according to VDE 0660).
Nominal rated load and fuse rating are given on the data plate. Ensure that these are compatible with the electricity supply.
The heater is set to 9 kW ex works (interlocked = boiler switched on in precedence to tank heating).
- reduced plate throughput -
The heater rating can be increased to 13.5 kW (unlocked = boiler and tank heating would then operate simultaneously).
The desired heater rating should be set before final installation of the machine.
Follow the wiring diagram (located behind the lower service panel).
Mark the set heater and fuse ratings permanently on the data plate with a “⊗”.
Connect water inlet and drain hoses (see installation plan).
| Model Version | Water-inlet | Pressure | Rinsing time water volume | ||
| G 7726 | Without softener | 12 l/min | 2,5 to 4 bar | 15 secs 3 l | |
| G 7727 | |||||
| G 7728 | With softener | 14 l/min | 2,5 bar 20 | secs 3 l | |
| 4 bar 15 sec | cs 3 l | ||||
The hot or cold water connection should have a minimum flow rate of 2.5 bar and 12 l/min, or 25 l/min if a pre-rinse spray head is also being installed. For hot or cold water connections the maximum permissible water pressure is 10 bar.
Warning
When using a water pressure pump ensure that there is a regulator installed in the water inlet (supplied with regulator fitted ex-works).
Install the filter supplied between the mains water supply and the inlet hose of the machine.
For most efficient throughput the dishwasher should be connected to hot water (min. 60^ C, max. 70^ C). Connection to cold water reduces throughput and also uses more energy.
The screw feet can be adjusted to compensate for any unevenness in the floor surface, and to ensure the machine stands level.
To ensure stability (only with installation without feed tables), clamping straps, securely fastened to the floor, must be fitted.
To avoid the possibility of frost damage, on no account install the machine in a room which is exposed to frost.
Page
natural_image
Simple circular diagram with a horizontal bar and arrows, no text or symbols present3
text_image
Diagram showing a thermometer and a star symbol above two cylindrical containers, each labeled with temperature in °C.G 7728
text_image
°C M S DOS ↑ ↑text_image
Diagram of a rotary dial with labeled components and directional arrows, including a circular dial indicator and star symbols.text_image
Diagram of a rotary dial with labeled components and directional arrows, including a circular dial and a ring symbol.text_image
S V 60 40text_image
Diagram of a rotary switch mechanism with labeled components and directional arrowstext_image
°C S DOS ↑text_image
Diagram of a rotary dial with labeled components and directional arrows, including symbols like '水', '水', '水', '水', and '0'flowchart
graph TD
    A["Switch"] --> B["Clock"]
    B --> C["Tap"]
    C --> D["Directional Arrow"]
    D --> E["Arrow to Pin 1"]
    E --> F["Arrow to Pin 2"]
    F --> G["Arrow to Pin 3"]
    G --> H["Arrow to Pin 4"]
    H --> I["Arrow to Pin 5"]
    I --> J["Arrow to Pin 6"]
    J --> K["Arrow to Pin 7"]
    K --> L["Arrow to Pin 8"]
    L --> M["Arrow to Pin 9"]
    M --> N["Arrow to Pin 10"]
chemical
Genetic cross diagram showing two chromosomes with temperature labels and a star symbol indicating a specific regiontext_image
Diagram of a rotary switch mechanism with labeled components and directional arrowstext_image
°C M S DOStext_image
Diagram of a rotary switch mechanism with labeled components and directional arrows, including a circular dial indicator.text_image
Diagram of a rotary switch mechanism with labeled components and directional arrows, including a circular dial and a ring.natural_image
Pure technical diagram of a mechanical or electrical component without any text, numbers, or symbols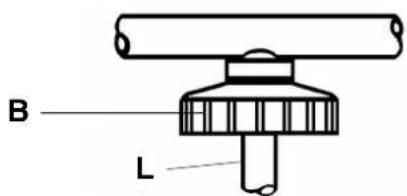
text_image
B Ltext_image
°C S DOS ↑text_image
Diagram of a rotary switch mechanism with labeled components and directional arrowsFairacres, Marcham Road, Abingdon Oxon OX14 1TW
Tel: Abingdon (01235) 554455 - Telefax: (01235) 554477
Service Office Abingdon (01235) 554466
Telephone calls may be monitored and recorded to improve our service.