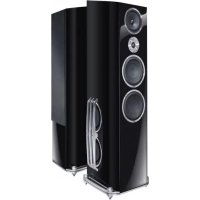
Ascade 300 BTX - Speaker HECO - Free user manual and instructions
Find the device manual for free Ascade 300 BTX HECO in PDF.
Download the instructions for your Speaker in PDF format for free! Find your manual Ascade 300 BTX - HECO and take your electronic device back in hand. On this page are published all the documents necessary for the use of your device. Ascade 300 BTX by HECO.
USER MANUAL Ascade 300 BTX HECO
Dear HECO Customer, Congratulations on your ne new loudspeakers and thank you very much for choosing HECO! You have made an excellent choice. The high-quality speakers produced by HECO are renowned all over the world. Please study the instructions and information below carefully before using your new loudspeakers.
IMPORTANT SAFETY PRECAUTIONS
- Please read through the instruction manual carefully before starting to use the device. This manual contains important information concerning operation and safety aspects. It is imperative you observe all of the information. Keep the manual in a safe location.
- WARNING NOTICES: All of the warning symbols on the speaker, accessories and in the instruction manual itself must be adhered to.
- EXPOSURE TO HEAT: Only operate the speakers and accessories in a temperature range from 10°C to 40°C.
- The speaker should not be positioned near heat sources (heaters, ovens, radiant heaters, naked ames, etc.). When setting up close to an amplier a minimum distance of 10 cm must be maintained.
- The aluminium plate of the amplier at the rear of the device serve to cool the built-in amplier; for this reason, they must not be covered (e.g. by a curtain).
- EFFECT OF MOISTURE: The speaker should not be exposed to dripping or splash water. Neither should it be used to support vases or other containers lled with liquid. Do not expose the speaker to water or high levels of humidity. There is a danger of electric shock. In the event of contact with moisture or liquids remove the mains adapter immediately.
- FOREIGN MATERIAL: Ensure that no foreign material enters through the speaker openings and into the interior. This could trigger short circuits and even result in electric shock and re.
- CLEANING: Please use a soft, dry cloth with no cleaning agents, sprays or chemical solvents, as these could damage the surfaces.
- ELECTRICAL CONNECTION: Please note the voltage levels on the information signs. The mains adapter for the speaker should only be operated with the voltage and frequency values specied on the signs.
- LIGHTNING PROTECTION/PREVENTIVE MEASURES: If the device is not going to be used for a prolonged period (e.g. when on holiday), it should be disconnected from the mains by removing the plug. The device should also be disconnected from the mains in the event of a thunderstorm. Doing this will prevent damage caused by lightning and overvoltage.
- MAINS CABLE: The mains cable must always be suitable for operation and it should only ever be laid out in a manner that prevents it from being trodden on. It should not be pinched by objects either, as this can damage the cable. When using plugs and power strips it must be ensured that the cable is not kinked at the point where it emerges from the socket. Do not connect or remove the mains cable with damp hands.
- OVERLOAD: Sockets, power strips and extension cables should not be overloaded. If an overload occurs, there is a risk of electric shock and re.
- SETTING UP: Please read the installation instructions.
- The speaker should only be positioned on a solid surface and not on moving base frames, otherwise there is a risk of injury. DAMAGE THAT MUST BE RECTIFIED BY A SPECIALIST: If any of the following damage occurs, disconnect the device from the mains immediately and contact a specialist to conduct the repair work:
- Damage to the mains cable or the mains plug. A damaged cable should not be repaired, but must be replaced.
- If moisture or water has entered the device or foreign objects have fallen into the device.
- If the speaker has fallen and the housing is damaged.
- If the device does not work properly, even though all of the information in the instruction manual has been observed. Only those subsequent alterations approved by the manufacturer may be conducted. Only original spare parts should be used for repair. After conducting any repairs the safety of device should be checked to ensure it is functioning correctly and safely. Repairs must always be conducted by qualied specialists, as you might otherwise be exposed to dangerous high voltage levels or other hazards.9 The triangle with a lightning symbol warns the user that high voltage is used within the device which can result in electric shock. The triangle with an exclamation mark informs the user that important operating and maintenance instructions (repair) are contained in the accompanying instruction manual, which must be observed. Do not open! Risk of electric shock! CAUTION: In order to avoid electric shock do not open the speaker housing/mains adapters or remove the covers. The user is not to conduct any repairs him/herself. Repairs should only be conducted by qualied technicians! Do not use any sockets or extension cables that do not fully accommodate the plug of the device.
INSTRUCTIONS FOR DISPOSAL
In accordance with European Directive 2002/96/EC all electrical and electronic appliances must be disposed of separately via local collection points. Please observe the local regulations and do not dispose of your old appliances with normal household waste. BATTERY DISPOSAL Old batteries are hazardous waste and must be disposed of in accordance with current regulations. CONTENTS (A) 1 pc. Active speaker incl. removable front grille (B) 1 pc. Mains adapter incl. power cable (C) 1 pc. Remote control including battery (button cell CR 2032) (D) 1 m Stereo audio cable, 3.5 mm stereo jack/RCA plug (E) 1 pc. Instruction manual
UNPACKING THE SPEAKER
Please unpack the speaker and accessories carefully and check the contents of the box using the list above. In the event of any transport damage, please contact your supplier. Keep the packing material in a safe location. The original packaging enables trouble-free transportation for any subsequent relocation and servicing requirements.
SETTING UP THE SPEAKER
To ensure optimum playback the speaker should be positioned on a rm, at surface (such as a table, shelf, etc.). A panel at the rear of the speaker reinforces the bass response through the rear bass radiator. To produce the best stereo image the front of the speaker should be directed towards the listener.10 SYSTEM INSTALLATION (FIG. 2) Connecting the power supply: Included in delivery are a universal, external mains adapter (B) (110 - 240 V / AC 50/60 Hz) and the most commonly used mains cable. The mains cable used in your country, however, may be different. If the mains cable is not compatible with your power sockets or if you are in any doubt, please contact your Magnat dealer.
1. Connect the output cable (jack connector) of the small external mains adapter to the power supply jack of the
2. Insert the mains cable into the jack on the mains adapter.
3. Insert the mains cable into the socket. Make sure that you are using the mains plug that is compatible with the socket (refer to the information above). Connecting an audio source to the audio input AUX IN: Use the supplied audio cable (D) and connect the audio output of the audio source to the audio input AUX IN (3). Connecting a mobile device (mobile phone, MP3 player, etc.) to the USB charging socket USB CHARGE (4): Devices that have a USB charging function can be connected to this socket and charged (Charging voltage: 5V, max. charging current: 2.1A). Please also refer to the instruction manual supplied with the corresponding device! Connecting the device to a Bluetooth audio source: Use the remote control to switch the ASCADA 300 BTX to the Bluetooth mode (Fig. 3, (10)). If you have previously connected a Bluetooth device, the ASCADA 300 BTX will automatically attempt to re-establish a connection with this device. If this is the case, you may be required to manually reconrm the connection on the source device. If a preious connection has not been established or the connection cannot be restored, the blue LED (Fig. 1, (1)) will ash slowly. To switch the ASCADA 300 BTX to the pairing mode manually, press the PAIRING button (Fig. 3, (11)) on the remote control. The blue LED status indicator will ash quickly whenever the pairing mode is active. Now activate the Bluetooth mode on your source device. The ASCADA 300 BTX will appear in the list of Bluetooth devices as „300 BTX“. If it is not displayed in the list, set your source device to search for Bluetooth devices manually and make sure that the ASCADA 300 BTX has been switched to the pairing mode. Depending on the source device, you may be asked whether the password is to be accepted during the pairing procedure. You can conrm this by simply pressing „Accept“. If you are still asked for a password, use the default passwords „0000“ or „1234“. If you are asked if you want to establish a connection after pairing, please select „Yes“. When the device has been paired and connected successfully the blue LED status indicator will illuminate continuously. The ASCADA 300 BTX supports the „aptx®“ high quality audio transmission standard. If your source device also supports this standard, „aptx®“ will be selected automatically as the transfer mode when establishing a Bluetooth connection. OPERATION Speaker controls (front) (Fig. 1): (1) Sensor for remote control and LED status display: Please aim at this sensor when using the remote control. The operating status is indicated by the colour of the LED:
- green: analogue input active
- blue: Bluetooth input active, connected to the source device
- blue, ashing quickly: Bluetooth input active, device in pairing mode
- ashing slowly: Mute mode is active (device muted) or there is no Bluetooth connection.11 Operation with the system remote control (fig. 3): (5) ON/STBY: Switches the device on when it is in the standby mode. Conversely the device can be switched from power operation to the standby mode. (6) VOLUME: Increases (+) or decreases (-) the volume. (7) MUTE: Switches the sound on and off. (8) LINEAR: Selection of the linear sound setting. (9) EQ: Selection of stored sound settings: ROCK, AMBIENT, VOCAL (10) SOURCE (input select button): Switches between the Bluetooth input and analogue stereo input (AUX IN). (11) Play, Pause, Pairing: Long actuation (approx. 3 seconds): Switches the device to the pairing mode when in Bluetooth operation to establish a connection to a Bluetooth source device. The blue LED status indicator (Fig. 1, (1)) ashes quickly. Brief actuation: The sound from the connected source device is paused or resumed when playing audio via Bluetooth. SPECIFICATIONS Conguration: 3 ways, stereo Output power RMS/Max.: 80/160 watts Frequency range: 32 — 28000 Hz Cross-over frequency: 180 Hz, 3800 Hz Dimensions (WxHxD): 380 x 222 x 263 mm Weight: 5.8 kg
1. The guarantee period commences with the purchase of the component and is applicable only to the original owner.
2. During the guarantee period we will rectify any defects due to faulty material or workmanship by replacing or repairing the defective part at our discretion. Further claims, and in particular those for price reduction, cancellation of sale, compensation for damages or subsequential damages, are excluded. The guarantee period is not altered by the fact that we have carried out guarantee work.
3. Unauthorized tampering with the equipment will invalidate this guarantee.
4. Consult your authorized dealer rst, if guarantee service is needed. Should it prove necessary to return the component
to the factory, please insure that • the component is packed in original factory packing in good condition • the quality control card has been lled out and enclosed with the component, • your enclose your receipt as proof of purchase.
5. Excluded from the guarantee are: • Illuminates • Wear parts • Shipping damages, either readily apparent or concealed
(claims for such damages must be lodged immediately with forwarding agent, the railway express ofce or post ofce).