USER MANUAL XF48 KLIPSCH
- READ these instructions.
- KEEP these instructions.
- HEED all warnings.
- FOLLOW all instructions.
- DO NOT use this apparatus near water.
- CLEAN ONLY with dry cloth.
- DO NOT block any ventilation openings. Install in accordance with the manufacturer's instructions.
- DO NOT install near any heat sources such as radiators, heat registers, stoves, or other apparatus (including amplifiers) that produce heat.
- DO NOT defeat the safety purpose of the polarized or grounding type plug. A polarized plug has two blades with one wider than the other. A grounding type plug has two blades and a third grounding prong. The wider blade or the third prong is provided for your safety. If the provided plug does not fit into your outlet, consult an electrician for replacement of the obsolete outlet.
- PROTECT the power cord from being walked on or pinched, particularly at plugs, convenience receptacles, and the point where they exit from the apparatus.
- ONLY USE attachments/accessories specified by the manufacturer.
- USE only with a cart, stand, tripod, bracket, or table specified by the manufacturer, or sold with the apparatus. When a cart is used, use caution when moving the cart/apparatus combination to avoid injury from tip-over.
- UNPLUG this apparatus during lightning storms or when unused for long periods of time.
- REFER all servicing to qualified service personnel. Servicing is required when the apparatus has been damaged in any way, such as the power-supply cord or plug is damaged, liquid has been spilled, objects have fallen into the apparatus, the apparatus has been exposed to rain or moisture, does not operate normally, or has been dropped.
- DO NOT expose this apparatus to dripping or splashing and ensure that no objects filled with liquids, such as vases, are placed on the apparatus.
- To completely disconnect this apparatus from the AC mains, disconnect the power supply cord plug from the AC receptacle.
- The mains plug of the power supply cord shall remain readily operable.

The exclamation point, within an equilateral triangle, is intended to alert the user to the presence of important operating and maintenance (servicing) instructions in the literature accompanying the product.

The lightning flash with arrowhead symbol within an equilateral triangle, is intended to alert the user to the presence of uninsulated "dangerous voltage" within the product's enclosure that may be of sufficient magnitude to constitute a risk of electrical shock to persons.
WARNING: To reduce the risk of fire or electrical shock, do not expose this apparatus to rain or moisture.
WARNING: No naked flame sources - such as candles - should be placed on the product.

WARNING RISK OF ELECTRIC SHOCK. DO NOT OPEN.

WARNING: Do Not Open! Risk of Electrical Shock. Voltages in this equipment are hazardous to life. No user-serviceable parts inside. Refer all servicing to qualified service personnel.
WARNING: This product is intended to be operated ONLY from the AC Voltages listed on the back panel or included power supply of the product. Operation from voltages other than those indicated may cause irreversible damage to the product and void the product's warranty. The use of AC Plug Adapters is cautioned because it can allow the product to be plugged into voltages in which the product was not designed to operate. If the product is equipped with a detachable power cord, use only the type provided with your product or by your local distributor and/or retailer. If you are unsure of the correct operational voltage, please contact your local distributor and/or retailer.
CAUTION: Place the equipment near a main power supply outlet and make sure that you can easily access the power breaker switch.
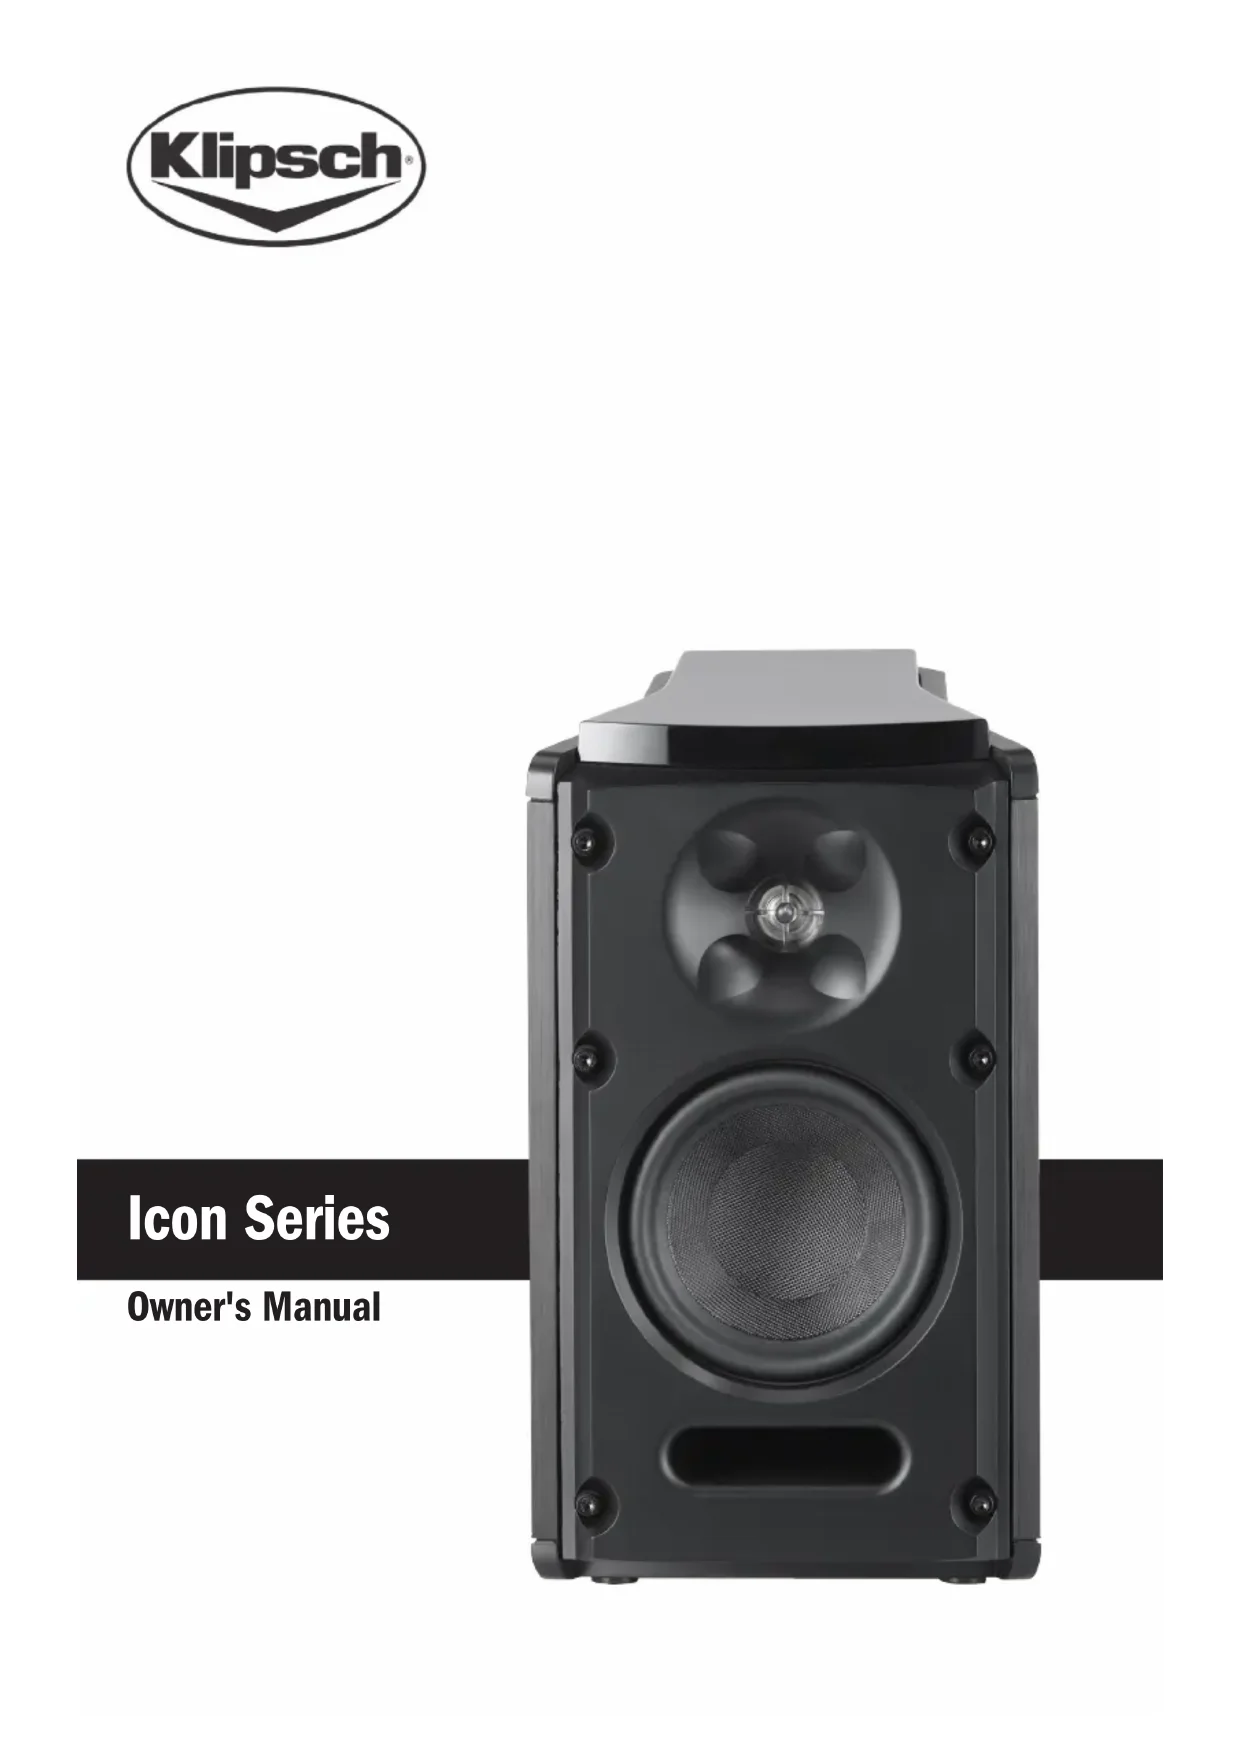
Icon Series Loudspeaker
Thank you for your purchase of this Icon Series Loudspeaker. In total, there are six models within the new Icon Series: the XF-48 fully-active floorstander, XL-23 left/center/right speaker, XL-12 left/ center/right speaker, XB-10 bookshelf/satellite speaker, as well as the XW-500d and XW-300d subwooers.
All of these speakers, except for the subwoofoers, utilize a new wide dispersion Tractrix® Horn-loaded tweeter with XT^M technology. This proprietary design diffuses sound in a smooth, enveloping 80-degree by 80-degree pattern from extremely thin cabinets. As with all Klipsch horn-loaded technology, this version also produces more output using less energy and delivers the company's signature dynamic sound.
Please be sure to fill out the warranty card included with this manual or online at www.klipsch.com so we are better able to serve you.
Inspection
Please check promptly for any transit damage. Carefully unpack your new speaker system and verify the components against the packing list. In extreme circumstances, items may have become damaged in transit. If any damage is discovered, notify the delivery service and dealer where the system was purchased. Make a request for inspection, and follow their instructions for evaluation. Be sure to keep the product's original shipping carton.
Bookshelf, Center and LCR Models
These models are supplied with self-stick rubber feet to prevent surface damage. (See Figure 1 for proper application.)
Room Placement
Your icon loudspeakers will perform well in a variety of locations, but best results will be achieved using the following guidelines:
- Place on a common wall 6 to 15 feet apart.
- If used in a home theater system, position the speakers flanking your video display.
- Position them equal distance from the back wall (if they are not wall-mounted).
- Position them at the same height above the floor (for non-floor standing models) with the high frequency drivers at seated ear height.
- Angle speakers toward the listener and even with or forward of any adjacent obstructions (if they are not wall-mounted).
- Placing them near a corner or wall provides the greatest amount of bass while moving the speakers away from room boundaries reduces bass energy.
- Asymmetrical placement of a pair of speakers from adjacent side walls can smooth room-induced bass unevenness.
- Bookshelf models may be placed on shelves or optional floor stands.
- Experiment with the above guidelines to suit your taste and to compensate for your room's acoustic characteristics.
- Place immediately above or below the center of your video display.
- These models are supplied with a tilt rod to compensate for placements above or below seated ear height.
- Use the supplied rubber pad to protect the front bottom edge of the speaker. (See Figure 3.)
- Place above seated ear height on side or rear walls (approximately 4-5 feet above the floor) or on optional floorstands.
- Attach wall bracket with an appropriately sized screw head screwed into a wall stud or wall anchor with a suitable weight bearing capacity. (See Figure 3.)
- See your Klipsch dealer for optional, adjustable wall mounts if required. These mounts utilize the threaded bushings on the rear of the cabinet.
- Icon LCR and bookshelf models may be wall-mounted using the included wall bracket.

Never use the wall bracket for mounting the speaker to the ceiling.
Connecting

Turn your amplifier off before making any connections.
- Your loudspeakers are equipped with positive (Red) and negative (Black) connection terminals on the rear of the cabinet. These correspond to the positive and negative terminals on the appropriate channel (left, right, center, rear etc.) of your amplifier.
- All speakers in your system must be connected in phase with the positive speaker terminal connected to the positive amplifier terminal. Repeat this for the negative speaker terminal and amplifier terminals. Most speaker wire has distinguishing markings on the insulation of one of the conductors to assist in correct hookup.
- Use 16 gauge (AWG), two conductor, copper wire at a minimum and larger gauge wire for longer runs. The connection terminals on your loudspeaker will accommodate bare wire, and spade terminals.

With all connection types, take care that there is no contact between the positive and negative terminals at the speaker and amplifier. Damage to your equipment may result.
Your floorstanding speakers have a built-in amplifier that needs to be connected to an AC outlet. Once plugged in, it will be either ON or in STANDBY depending upon the position of the AUTO POWER switch. You must unplug the power cord from the AC outlet to completely turn off your speaker during extended periods. (i.e. vacations.)
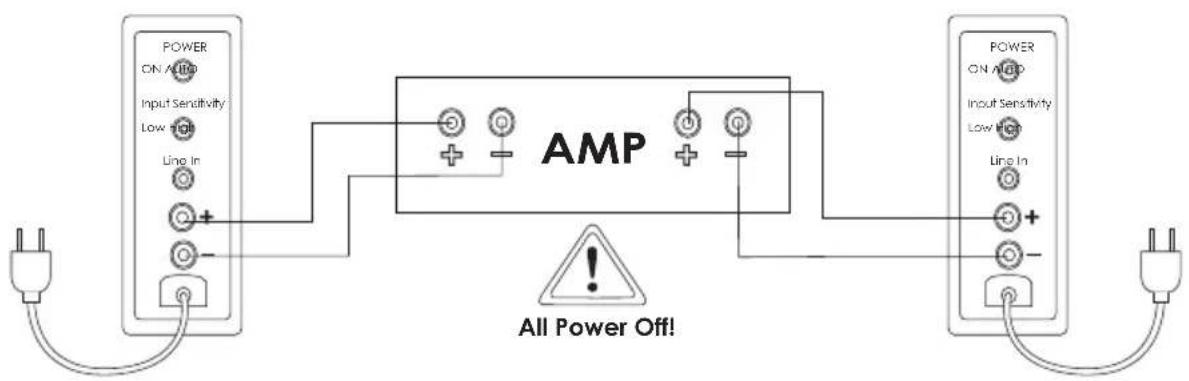
There are two methods of connection provided on the input panel of the XF-48. One is a single RCA-jack that functions as a line-level input and the other is a set of binding posts that function as a high-level input. Both are provided in order to connect to a wide variety of electronics. Depending upon your system, one or both of these connections may be available.

Do not connect both the standard SPEAKER IN and the LINE IN inputs at the same time as damage to your equipment could result.
In most applications, best performance will be attained by using the line-level input. Additionally, there is a "Sensitivity" switch on the input panel that will help match the line-level input signal to the source connected. Below are the recommended connection methods and sensitivity settings based upon the equipment source:
- When using with a source that has line-level preouts such as an AV receiver or preamplifier, connect the XF-48 line-level input to the line-level preouts of the source. In most cases, the sensitivity switch should be set to "LOW".
- In some instances, the source line-level voltage may be too low to get full output from the XF-48. In those cases, set the sensitivity switch to "HIGH".
- If your source does not have line-level preouts, you may connect the XF-48 to the source via the binding post high-level inputs. In this manner, the speaker would be connected to the amplifier outputs as if it were a traditional passive speaker. In most cases, the sensitivity switch should be set to "LOW".
In some rare cases, you may find it necessary to connect the XF-48 to the high-level binding posts and have the sensitivity switch set to "HIGH". In this manner, there may be slight audible noise from the speaker at very low levels.
Active Floorstander Controls (See figure 5)(XF-48 only)
Power - This switch allows you to select either "AUTO" or "ON" for the speakers built in amplifier. When "AUTO" is selected, the speaker will automatically turn on when it senses a signal. It will automatically turn off after 20 minutes if no signal is present. In the "ON" setting the speaker will remain on as long as the AC power cord is plugged into a wall socket. The power indicator LED on the front panel will illuminate BLUE when speaker is on and RED when the speaker is in standby. The LED will be off if the AC power cord is not connected to an AC outlet.
Input Sensitivity - This switch adjusts the level of the input signal to optimize the performance of the built-in amplifier. See "Active Floorstanding Connections" for more information.
Bass Management
When using your speakers in a home theater system, consult the owner's manual of your surround electronics for proper application of bass management settings.
- As a general rule, compact speakers (Bookshelf, Center Channel and Surrounds) are set to the "Small," or bass-limited setting.
- Floorstanding speakers are typically set to the "Large," or full-range setting.
- Also refer to the electronics instructions for adjusting the relative volume levels of the speakers so they are at the same level when in the listening position.
Care and Cleaning
- Occasional dusting or wiping of the cabinet with a cloth is all that is required. Never use abrasive or solvent type cleaners or harsh detergents.
- A vacuum cleaner with a soft brush attachment may be used to clean the grille fabric.
- Never spray polishes or cleaners on the drive units (woofer, midranges or tweeters).
NOTE: This equipment has been tested and found to comply with the limits for a Class B digital device, pursuant to Part 15 of the FCC Rules. These limits are designed to provide reasonable protection against harmful interference in a residential installation. This equipment generates, uses and can radiate radio frequency energy and, if not installed and used in accordance with the instructions, may cause harmful interference to radio communications. However, there is no guarantee that interference will not occur in a particular installation. If this equipment does cause harmful interference to radio or television reception, which can be determined by turning the equipment off and on, the user is encouraged to try to correct the interference by one or more of the following measures:
- Reorient or relocate the receiving antenna.
- Increase the separation between the equipment and receiver.
- Connect the equipment into an outlet on a circuit different from that to which the receiver is connected.
- Consult the dealer or an experienced radio/TV technician for help.
Approved under the verification provision of FCC Part 15 as a Class B Digital Device.
Caution: Changes or modifications not expressly approved by the manufacturer could void the user's authority to operate this device.
Eligible to bear the CE mark, Conforms to European Union Low Voltage Directive 73/23/EEC and 2006/95/EC; Conforms to European Union EMC Directives 89/336/EEC and 2004/108/EC.
WEEE Notice
Note: This mark applies only to countries within the European Union (EU) and Norway.

This application is labeled in accordance with European Directive 2002/96/EC concerning waste electrical and electronic equipment (WEEE). This label indicates that this product should not be disposed of with household waste. It should be deposited at an appropriate facility to enable recovery and recycling.

Figure 1
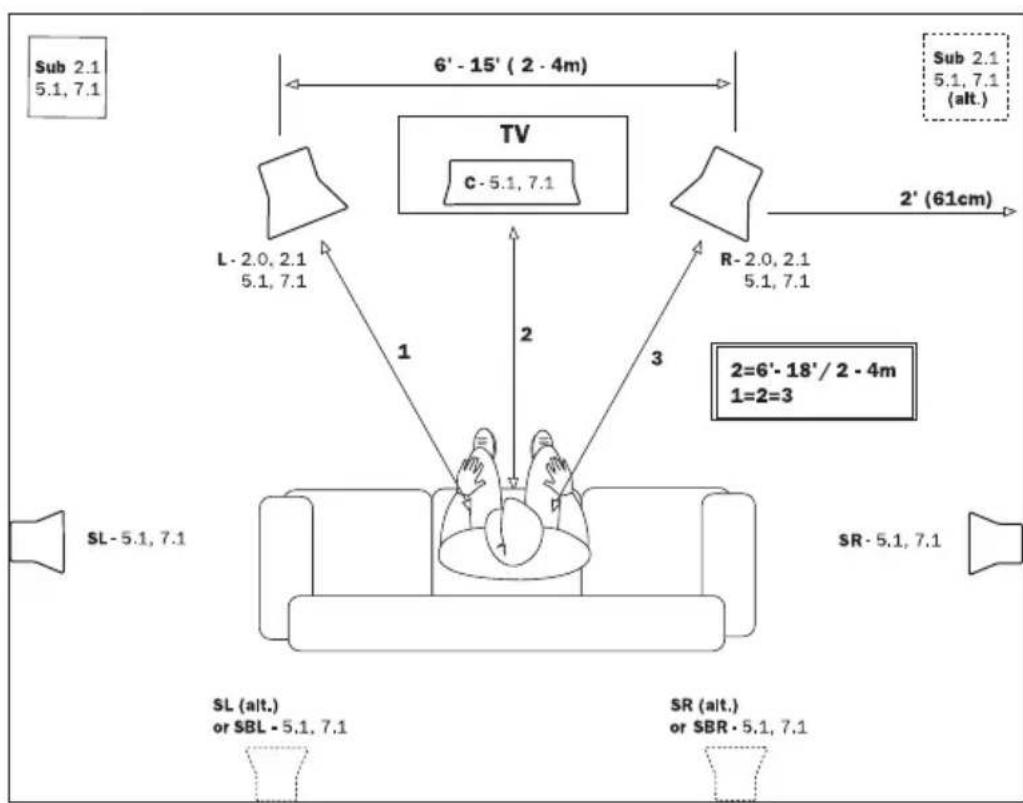
Figure 2A - Traditional Front Speaker Placement
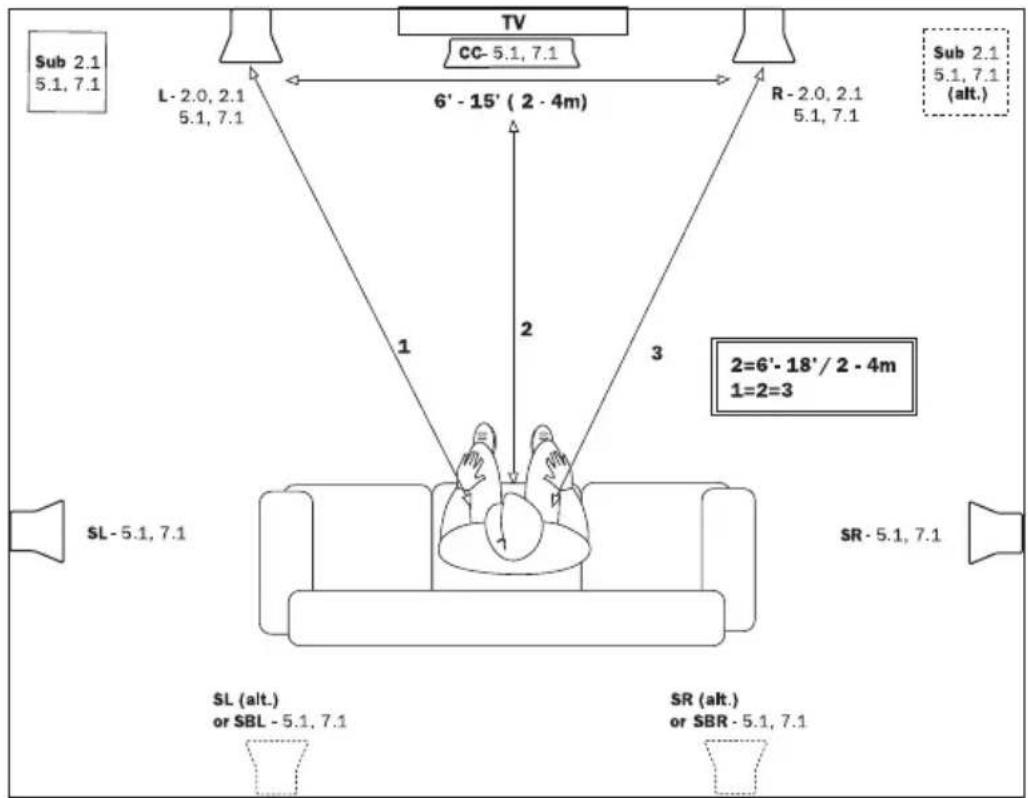
Figure 2B - On-Wall Front Speaker Placement
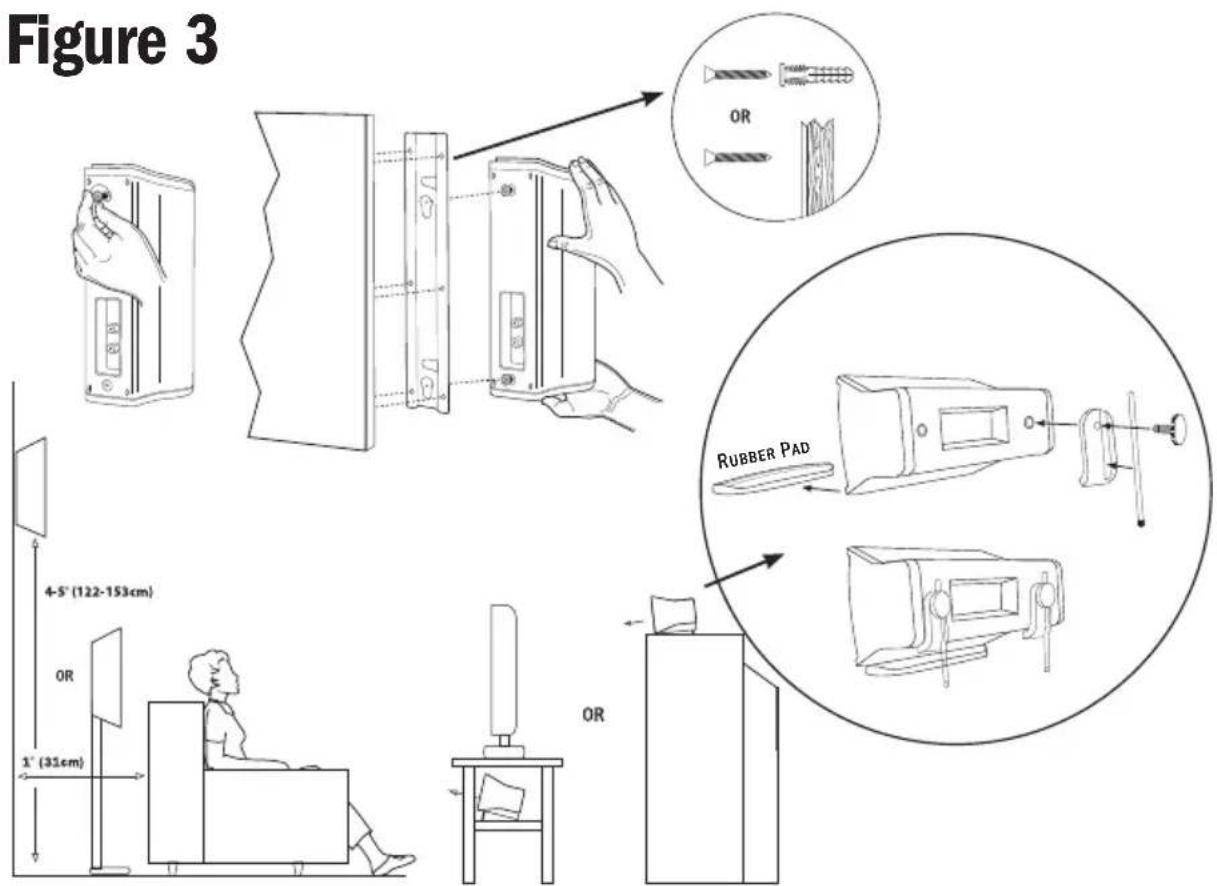
Figure 3
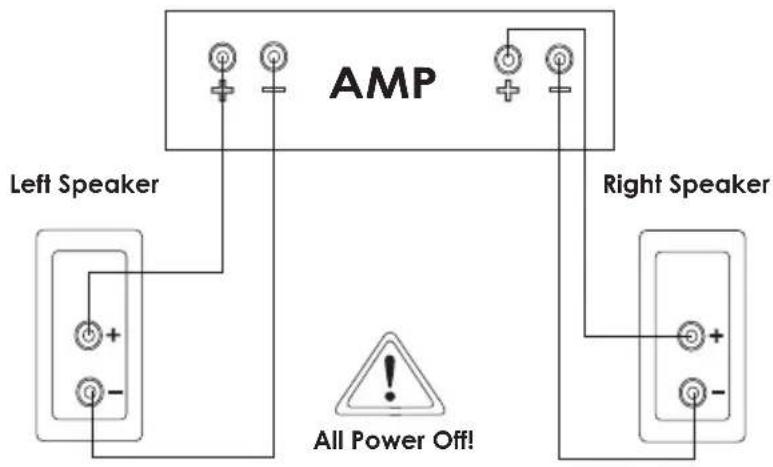
Figure 4
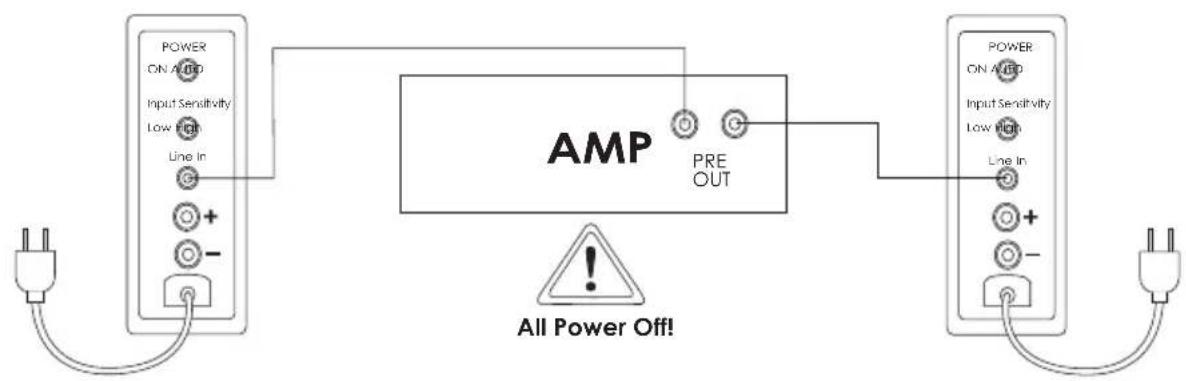
Figure 5
Or
For over 60 years, we've made speakers for people who are as passionate about great sound as we are. That's why every Klipsch speaker is horn-loaded to create a remarkably accurate listening experience for your music and movies. From our smallest satellites to our acclaimed professional theater installations, our speakers deliver sound that's so lifelike, you have to feel it to believe it.
THE ULTIMATE SOUND EXPERIENCE