
LAR354B - Car radio TOKAI - Free user manual and instructions
Find the device manual for free LAR354B TOKAI in PDF.

| Product Type | Car Radio |
| Brand | Tokai |
| Model | LAR354B |
| Dimensions (W x D x H) | 178 x 101.5 x 50 mm |
| Power Supply | 12 V DC, negative ground |
| Maximum Power Consumption | 10 A |
| Output Power | 4 x 45 W (at 14.4 V) |
| Channels | 2 stereo channels |
| Radio Frequency Ranges | FM: 87.5 - 108 MHz / AM: 522 - 1620 kHz |
| Supported Audio Formats | MP3, WMA (CD, USB, SD/MMC) |
| Connectivity | Bluetooth, USB, AUX input, SD/MMC card, antenna |
| RDS Functions | AF, TA, EON, PTY, regionalization |
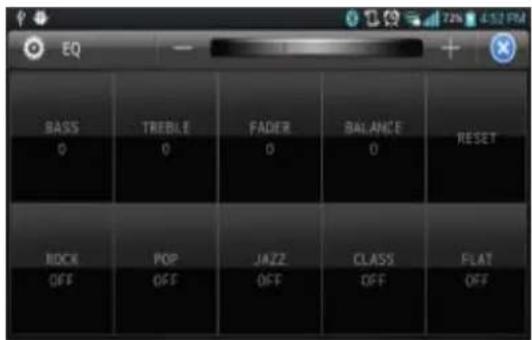
| Equalizer | Presets Rock, Pop, Jazz, Class, Flat + manual bass/treble adjustments |
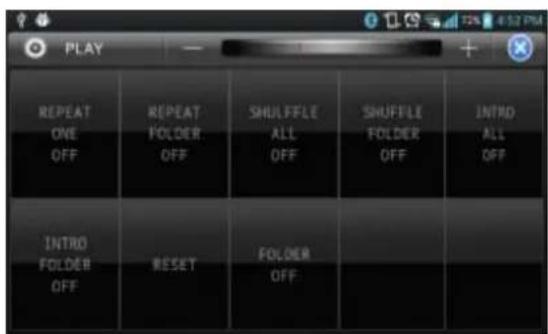
| Playback Functions | Repeat, random, intro, search by track/character/directory |
| Bluetooth | Hands-free, A2DP/AVRCP streaming, Android compatible (Radio View 1012) |
| Maintenance | Clean with a soft dry cloth; do not use solvents |
| Safety | Class 1 laser product; do not open the casing |
| Reset | RESET button with a pointed object |
| Disposal | WEEE compliant; do not dispose with household waste |
Frequently Asked Questions - LAR354B TOKAI
User questions about LAR354B TOKAI
0 question about this device. Answer the ones you know or ask your own.
Ask a new question about this device
Download the instructions for your Car radio in PDF format for free! Find your manual LAR354B - TOKAI and take your electronic device back in hand. On this page are published all the documents necessary for the use of your device. LAR354B by TOKAI.
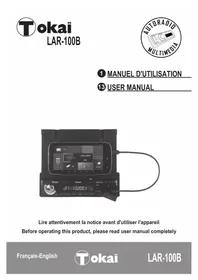
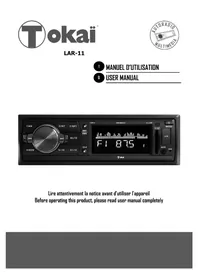
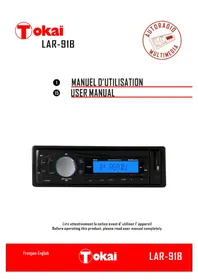
USER MANUAL LAR354B TOKAI
MANUEL D'UTILISATION
7 USER MANUAL
Lire attentivement la notice avant d'utiliser l'appareil Before operating this product, please read user manual completely
Français-English

LAR-354B
1. AVANT DE COMMENCER
CHER CLIENT
PRODUIT LASER CLASSE 1
E. VOL. -> VOLUME -> BASS (Basses) -> TREBLE (Aigus) -> BALANCE(Balance)
- VOL (volume): (MIN) 00, 01, ..., 45(MAX).
- BASS/ TRE (basses/aigus): -12....+12
-BAL (balance):10L,...,10R
-FAD (equilibre):10R,....10F
5. FONCTIONNEMENT GENERAL DES COMMANDES
PTY music group -PTY speech group
- POP M, ROCK M
- EASY M, LIGHT M
- CLASSICS, OTHER M
- JAZZ, COUNTRY
- NATION M, OLDIES
-
FOLK M
-
NEWS, AFFAIRS, INFO
- SPORT, EDUCATE, DRAMA
- CULTURE, SCIENCE, VARIED
- WEATHER, FINANCE, CHILDREN
- SOCIAL, RELIGION, PHONE IN
- TRAVEL, LEISURE, DOCUMENT
16. ENTREE AUXILI AI RE
Selecting fine audio equipment such as the unit you have just purchased is only the start of your musical enjoyment. Now it is time to consider how you can maximize the fun and excitement your equipment offers. We want you to get the most out of your equipment by playing it at a safe level. One that lets the sound come through loud and clear without annoying blaring or distortion - and, most importantly, without affecting your sensitive hearing.
Sound can be deceiving. Over time your hearing "comfort level" adapts to higher volumes of sound. So what sounds "normal" can actually be loud and harmful to your hearing.
Guard against this by setting your equipment at a safe level BEFORE your hearing adapts.
To establish a safe level:
. Start your volume control at a low setting
. Slowly increase the sound until you can hear it comfortably and clearly, and without distortion we want you listening for a lifetime.
Once you have established a comfortable sound level:
. Set the dial and leave it there.
Take a minute to do this now; it will help to prevent hearing damage or loss in the future. After all, we want you listening for a lifetime.
ABOUT THIS MANUAL
This product features a number of sophisticated functions ensuring superior reception and operation. All are designed for the easiest possible use, but many are not self-explanatory.
This operation manual is intended to help you benefit fully from their potential and to maximize your listening enjoyment.
We recommend that you familiarize yourself with the functions and their operation by reading through the manual before you begin using this product. It is especially important that you read and observe the "precaution" as follows.
In this operation manual, the Basic Operation for each sound source is outlined at the beginning of its explanation, covering simple operation for that source, such as merely playing music.
PRECAUTION
- Read through this instruction manual before installation and use.
- Do not touch the power plug with wet hand.
- Switch off the main power when the unit is not in use. (Disconnect the power plug from the power outlet when you do not intend to use the unit for a prolonged period of time.)
- Do not open the cover or touch any of the components exposed out of the unit, only for qualified technicians.
- Do not expose the unit under direct sunlight or nearby objects that radiate heat to avoid damage to the unit.
- Do not place the unit in moist and humid conditions, which affect the pick-up of the unit.
- Clear the panel and case with soft dry cloth only, do not apply any kind of thinner, alcohol or sprays.
CLASS 1 LASER PRODUCT
Laser product symbol: located on the rear panel of the unit, indicates this player is a class 1 laser product. It uses a weak laser that does not emit hazardous radiation outside of the unit.
INSTALLATION METHOD
This is an anti-theft installation method.
The main unit wears a METAL MOUNTING SLEEVE.
Please connect the wiring, eg, the Power Supply, the Speakers and the Antenna according to the requirements of this Instruction Manual, then install the metal mounting sleeve into the car as per the diagram illustrated below.
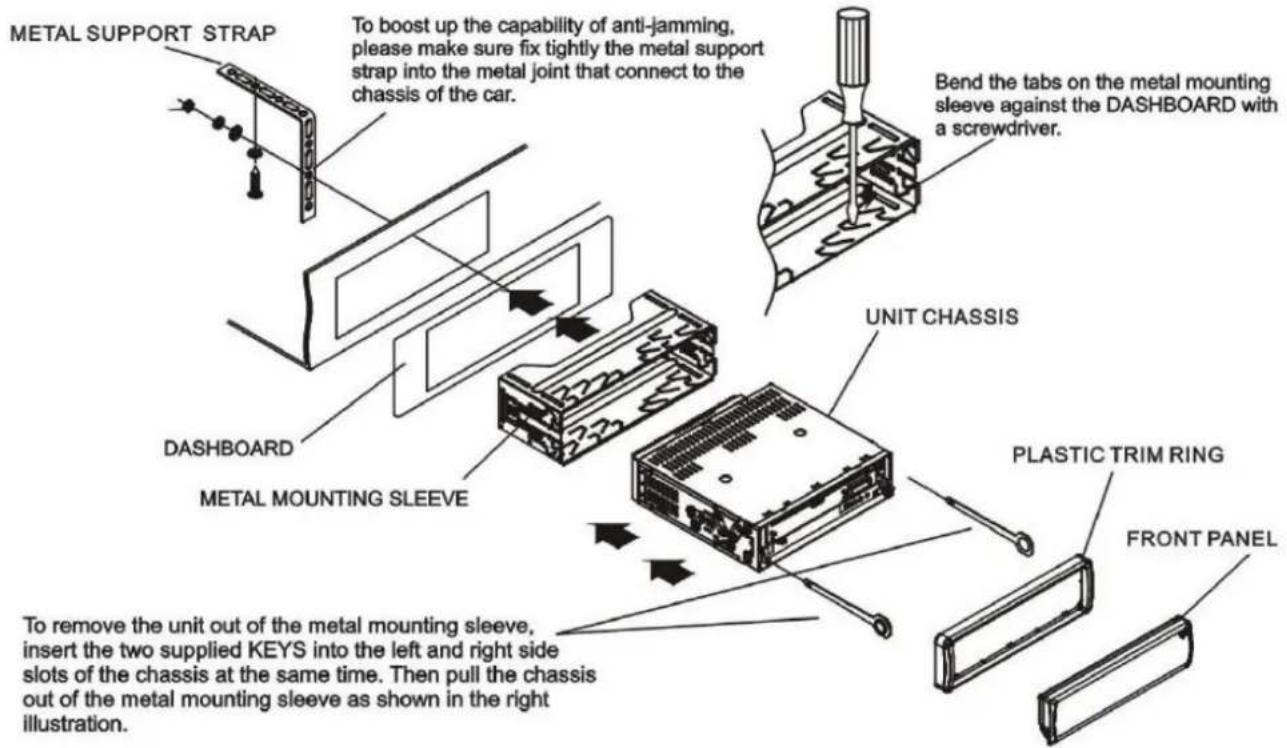
NOTE
DESCRIPTION OF THE BACK OF THE UNIT
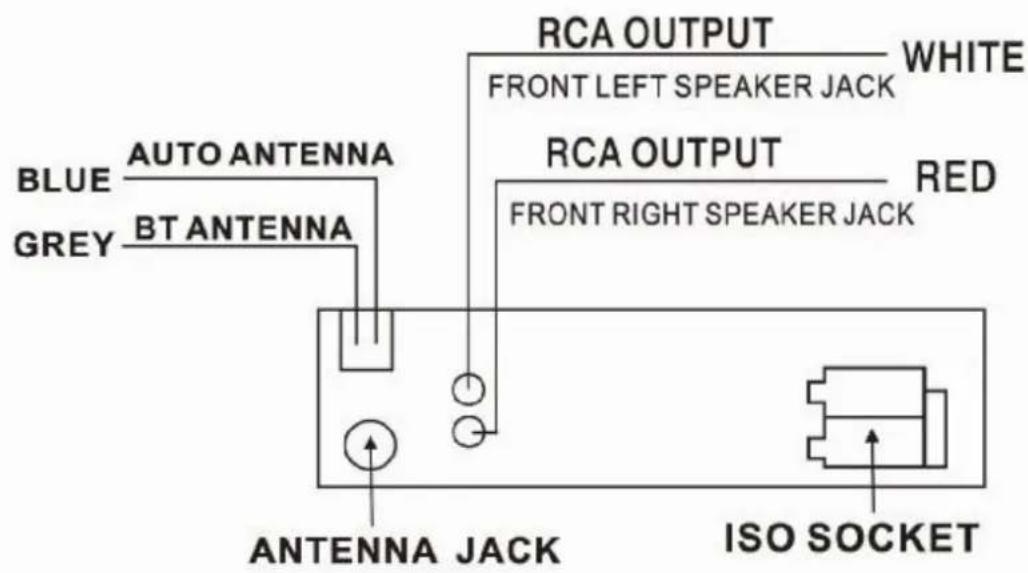
SPEAKER WIRING
FIXED-ISO CONNECTOR
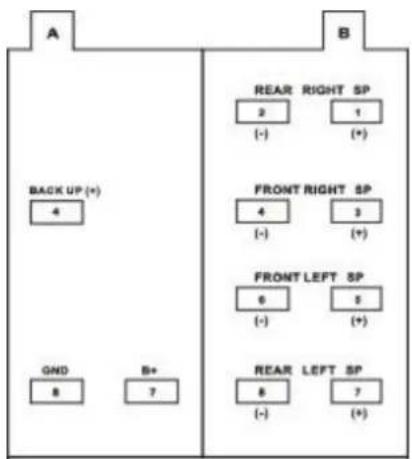
Note: IF YOUR CAR DOES NOT HAVE ISO CONNECTOR YOU CAN PROCURE IT FROM ANY ACCESSORY SHOP
Important
IF FIXED-ISO CONNECTOR IS CUT, THE GUARANTY WILL BE VOID.
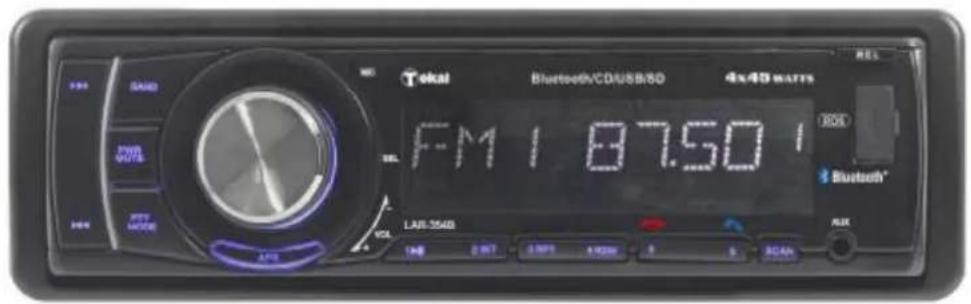
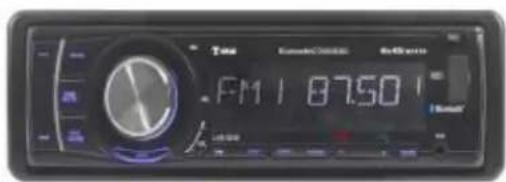
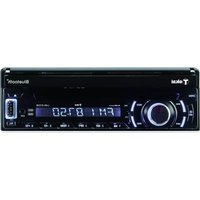
4. LOCATION AND FUNCTIONS OF CONTROLS
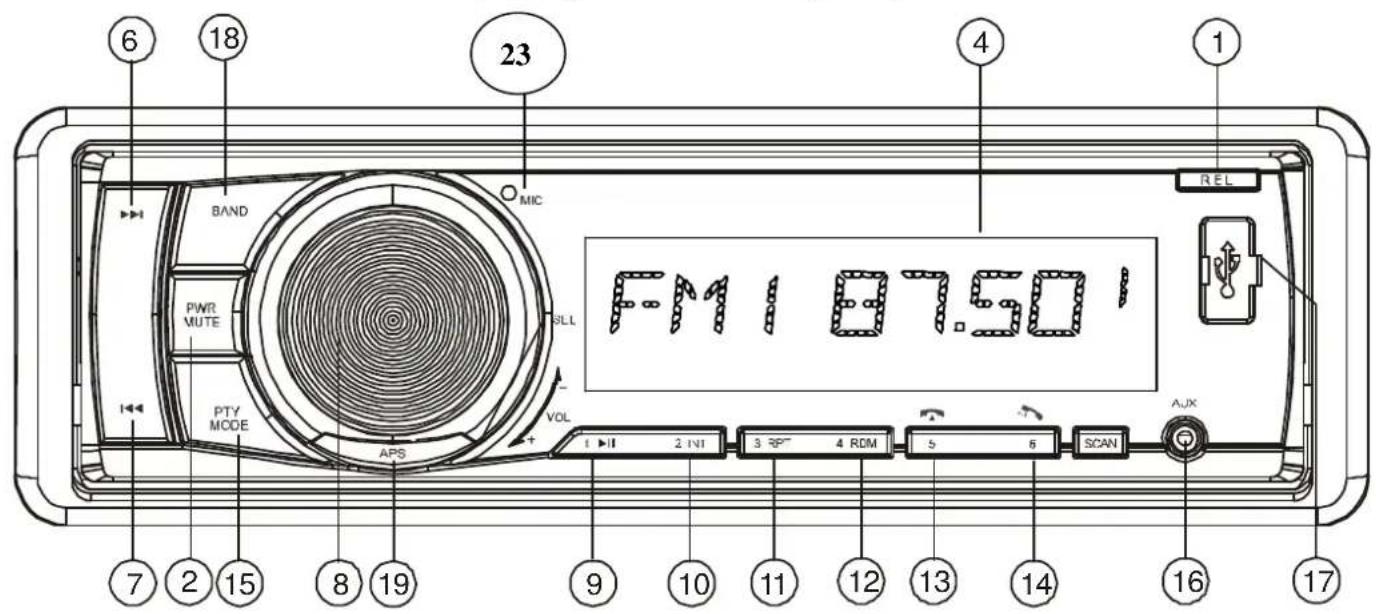
The figure of the front panel
The figure of the Unit Chassis Facet after removing the Front Panel
- RELEASE button
- POWER/MUTE button
- CD SLOT
- LCD DISPLAY
- EJECTION BUTTON
6 & 7. SKIP UP DOWN TUNE, SEEK, TRACK, - VOLUME/ SELECTION (MENU)
9-14.PRESET STATIONS BUTTONS 1-6, PLAY-PAUSE, INTRO, REPEAT, RANDOM -
MODE/PTY BUTTON
-
AUXIN
- USB COMPATIBLE PORT
- BAND
- APS
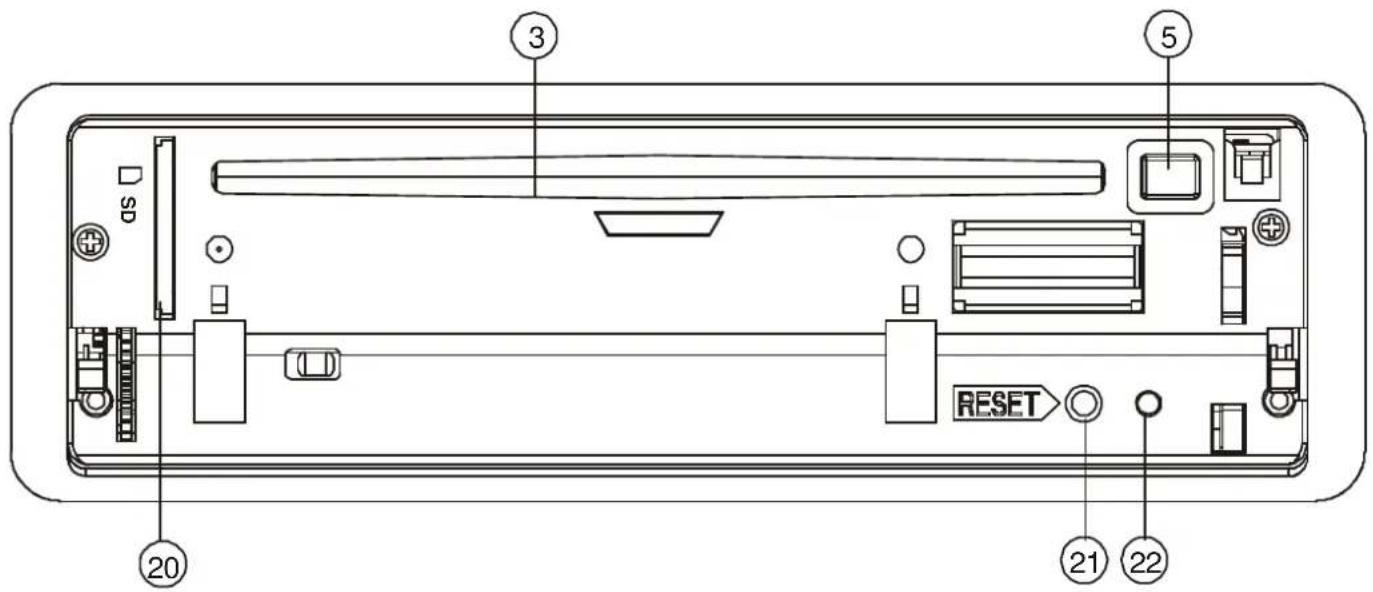
- SD/ MMC COMPATIBLE SLOT
- RESET
- FLASHING LED
- MICROPHONE BLUETOOTH
- SCAN
Press the REL button to flip down the front control panel from the unit chassis, and then pull it up a little to remove it from the unit.
2. POWER ON/OFF & MUTE
When the unit is OFF, press any button to turn on the unit except EJECT and RELEASE buttons. The unit will also turn on when a disc, SD card or USB stick is inserted.
When the unit is ON, press and hold the POWER button to turn off the unit.
When the unit is ON, press the POWER/ MUTE button to mute the sound. Press again to restore the sound. To resume the sound immediately, can also rotate the VOL knob.
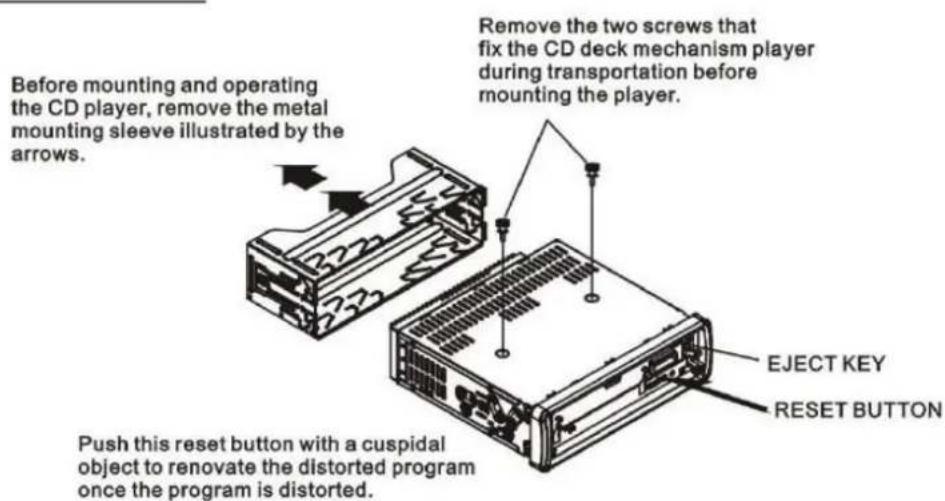
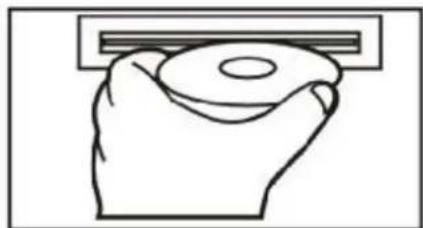
3. CD SLOT
4. LCD DISPLAY
5. CD EJECTION BUTTON
When unit is on, the loaded disc can be ejected by pressing the EJ key.
6 & 7. TUNE, SEEK, TRACK, SKIP UP / DOWN BUTTONS
a) During RADIO mode:
Press and hold the >> button to activate the MANUAL searching mode.
In MANUAL mode: Press the |<< or >>| button briefly to manual TUNE UP/ DOWN for the desired radio station frequency step by step.
In AUTO mode: Press the |<< or >>| button, to automatically TUNE UP/ DOWN for the radio station frequency. (If in MANUAL mode and without further operation, the unit will change to AUTO mode a few seconds later.)
b) During disc. USB playback mode
Press the >> button briefly to play next track.
Press the |<< button briefly to play the current track from the beginning of it if the playing time is more than 2 seconds.
Press the |<< button briefly to play the previous track if the playing time is less than 2 seconds.
Press the | < < or > | button and hold to skip forwards or backwards, release to resume normal playback.
8. SELECTION (MENU) BUTTON AND VOLUME UP (+)/DOWN (-) KNOB
a) Press the SEL button briefly; it activates as selecting each mode of E. VOL.
-> VOLUME -> BASS -> TREBLE -> BALANCE -> FADER ->
Once you select the desired audio mode; rotate the VOLUME knob to adjust the audio effect.
In each mode, the waiting time is about 5 seconds, once waiting time is over, the car audio returns to the last display in tuner or CD mode.
The control mode of E.VOL is operated with following numeric display.
- VOL: (MIN)0, .......45(MAX).
-BASS/TRE:-12,......+12
-BAL:10L, 10R
-FAD:10R,....10F
b) When you long press 2 seconds, it shows the time then it is activated as cyclical mode of following functions for user's selection.
INVOL EON (ON/OFF) DSP (Rotate the VOL knob to adjust TA (ON/OFF)
the HOUR or MINUTE) EQ ON/OFF BEEP (ALL/OFF/2ND) LOUD (ON/OFF) TAVOL->EON ON/OFF LOC ON/OFF (only for FM mode) REG ON/OFF MONO/STEREO (only for FM mode) AF (ON/OFF) AREA (EUR/USA)
After selecting the desired mode, rotate the VOL knob to select one setup item of the desired mode.
1) TA [TRAFFIC ANNOUNCEMENT]
When TA mode is on (TA is displayed on LCD), it will begin to seek TA station and TA SEEK will be displayed on LCD for a while.
When traffic announcement is transmitted:
(1) If the unit is in USB or disc mode, it will switch to radio mode temporarily. Temporarily switch over to an EON linked station when EON detects traffic announcement on that other program, and TP will be displayed on LCD.
(2) If volume level is below 20, volume level is raised to 20, and returns to its previous mode and volume level when the traffic announcement is over.
(3) If volume is adjusted during traffic announcement, only the traffic announcement volume is valid.
- TA interruption function:
The current traffic announcement is cancelled by pressing this key. But the TA mode will not be off.
- When TA is on, SEEK, (SCAN), AUTO MEMORY function can be received or saved only when traffic program identification code has been received.
2) AF [ALTERNATIVE FREQUENCI ES]
When AF switching mode is selected; AF indicator is displayed on LCD display.
AF indicator is off: AF switching mode off.
AF indicator is on: AF switching mode on, and has RDS information.
AF indicator is flashing: AF switching mode on, but RDS information is not received yet.
When AF switching mode is selected, the radio checks the signal strength of ALTERNATIVE FREQUENCI ES all the time. The interval of checking time of each ALTERNATIVE FREQUENCY depends on the signal strength of current station, from a few minute for strong station to a few seconds for weak station. Every time that new AF is stronger than current station, it switches over to that frequency for very short time, and NEW FREQUENCY is displayed for 1-2 seconds. Because the mute time of AF switching or checking time is very short, it is almost inaudible in case of normal program.
In FM mode, when AF is on, SEEK, (SCAN), AUTO-MEMORY function can only receive and save RDS program.
BEEP ALL: the beep is generated when every key is pressed (except the power button, REL key and EJECT key).
BEEP 2ND: the beep is only generated when an allotted double key is pressed long (1 second).
BEEP OFF: the beep sound is disabled.
5) EON: In case of RDS mode, when the EON ON, the EON programs will be scan automatically, select EON OFF to stop the scan.
6) LOUD: When the volume level is bellow half level, select LOUD ON mode to enhance bass sound. It is advised that LOUND ON mode not be select when the volume level is high.
7) LOC: LOC ON mode improves reception in some areas where the signal is too strong.
(Note: LOC function only for FM mode.)
8)STEREO/MONO
Select STEREO mode to improve the sound effect. Select MONO mode to decrease noise and make the sound more clear when the station signal is weak.
9) VOL LAST/ VOL DEFA
VOL LAST: The radio switches to last volume setting when the unit switches off.
VOL DEFA: After pressing SEL button, AVOL will be displayed. Then you can pre-select a constant switch-on volume by using the VOL knob.
9-14. PRESET STATION MEMORY AND PLAY-PAUSE, INT, RPT, RDM BUTTONS
a) In radio mode:
Go to any preset station by pressing one of the 6 preset station buttons (1-6).
If one of these buttons is pressed for more than 2 seconds, the current playing station will be memorized into the selected preset button.
b) In CD disc, SD or USB mode:
1) Press PLAY/ PAUSE button briefly to interrupt the playback of the disc, SD or USB. Press again to resume normal playback of the disc, SD or USB. Press and hold the PLAY/ PAUSE button to play the first track of the disc, SD or USB.
2) Press the INT button to play the 10 first seconds of each track in CD disc, SD or USB contains, and INTRO indicator will be displayed on LCD.
Press and hold the INT button to play the 10 first seconds of each track in desired folder, and D-INT indicator will be displayed on LCD. To disable the INTRO function, press again INT button and current track will be playing normally, and INT OFF indicator disappears from LCD.
3) Press RPT button once to play the current track repeatedly, and the RPT ONE indicator displays LCD. During MP3/WMA disc, SD or USB mode, press and hold the RPT button to play the current folder repeatedly, and the D-RPT will be visible on the LCD display.
In REPEAT mode, press RPT button again to disable the REPEAT function and RPT OFF displays on LCD.
4) Press the RDM button to play all tracks on disc in a random order, and RANDOM indicator displays on LCD.
In RDM mode, press RDM button again to stop playing in random order and the LCD will display RDM OFF. Press and hold the RDM button to play the current folder in random order, and the D-RDM will be visible on the LCD display.
5) Press the 5 or 6 button to move up and down by 10 tracks at a time. When the remained total track is less than 10, the both buttons are inactive. Press and hold 5 or 6 button to select & play next or the previous folder.
15. MODE BUTTON
Press MODE button to switch among following modes: TUNER (RADIO), DISC (when a disc is loaded), USB (when an USB stick is inserted), SD (when a memory card is inserted), and AUX mode.
16. AUXILIARY INPUT
Press the MODE button to select AUX mode. You can connect an external audio device to this socket.
Turn the VOLUME knob to adjust volume level.
17. USB SOCKET
To play the files contained in your USB stick, remove the plastic cover and insert the USB stick into the USB compatible port. The unit automatically switches to USB mode and the first file starts playing.
18. BAND/ TEL BUTTON
In radio mode, press this button briefly to select the radio broadcasting band you would like to hear.
The AM/FM band is toggled cyclically through the tuning bands: -> FM 1-> FM 2 -> FM 3 -> AM 1-> AM 2. In CD disc, SD or USB playback mode, press this button to display the time slider of current track played.
19. APS/ HANG UP BUTTON
1) In RADIO mode:
Press this button briefly to display for 5 seconds the preset station on LCD.
Press and hold this button to enter in APS mode, the radio searches from the current frequency and checks the signal strength level until 6 stations are found.
And then the 6 stations frequencies are preset to the corresponding preset memory numbered bank.
The auto-storage operation is implemented in the each selected band. When the auto-storage operation is finished, the radio executes the Preset Scan.
2) During MP3 file in disc, or USB/ SD mode:
In SD, USB or MP3/WMA disc playback mode, press APS button, it is activated as cyclical selecting song mode as follows:
TRACK SERIAL NUMBER SEARCH
FIRST CHARACTER SEARCH
->DIRECTORY SEARCH
A) In TRACK SERIAL NUMBER SEARCH mode, the LCD will display 001--- and flash the biggest digit 0 that the SD card, USB or MP3/WMA disc contains. Rotate the VOL knob to select the number of the flashing digit from 0 9 . Then press SEL button to confirm and flash next smaller digit 0. With the same means, select the number of the flashing digit. After finishing inputting the number of all flashing digit, press BND button to play the track of the corresponding number.
B) In FIRST CHARACTER SEARCH mode, the LCD will display A^** and flash the first character. Rotate the VOL knob to input character by the order of A Z and 0 9 . Press SEL button to confirm and flash the next character. With the same means, select the character of the flashing place. After finishing inputting all the 3 characters, press BND button and then matched files will be scrolling on the LCD by rotating the VOL knob. Finally press the BND button to play the track. If there is not any file matched, NO MATCH will be displayed and then it will return to the beginning of this track search mode for inputting again.
C) In DIRECTORY SEARCH mode, the LCD will display the root folder (if there is not the root folder, it will find a root folder named ROOT). Rotate the VOL knob to select your desired folder and press BND button to play the first track in the selected folder.
20. SD CARD SLOT
To play the files contained in your SD card, press the REL button to release the front control panel from the unit chassis & insert the SD card into the SD card slot. The system will change into the SD mode automatically, and then play the first file in the SD.
Note: when MMC/SD card and USB stick are both inserted into their slot or socket, the system will change into the playback mode of the latter one.
21. RESET BUTTON
Before operating the unit for the first time or after replacing the car battery or after changing the connections; you must reset the unit. Press this button with a sharp object. This operation will erase the clock setting and some stored contents.
22. FLASHING LED
When the front control panel is removed this indicator flashes.
Activate the Bluetooth mode of your mobile phone, and then select the function for Finding Bluetooth Device and enter it. If necessary to do so, refer to the user manual of your mobile phone. After finishing finding, it will show the name of Bluetooth Device TOKAI_BT if found, select it and enter it, then it will show an interface that asks you to input password. Input the password 0000 and enter it. When pairing is successfully completed "CONNECT" is displayed on LCD.
2. Connection or disconnection
A) Use mobile phone to do connection or disconnection
1) In connection status, find the paired and connected Bluetooth Device, and then press the disconnection button to do disconnection.
2) In disconnection status, find the paired and disconnected Bluetooth Device, then press the connection button to do connection.
B) When powering on (after the car switched off), the unit will search for mobile phone, pair and connect. This will take about 10-15 seconds.
Note:
(1) Bluetooth icon appears on LCD only when in connection status.
(2) In connection status: Mobile phone transfers to car audio player whenever a call takes place; Mobile phone transfers to car audio player whenever receiving a call.
3. Calling when in connection status
To make a call simply press the button, CALL is displayed on LCD.
Input the telephone numbers by using the mobile phone & press again. During the call, le calling time is displayed on LCD. To end the call, press button.
To redial, press , the last call number is displayed on the LCD, press again to call.
4. Accept/ Reject/ End Call
A) During ringing, press button to accept the call.
B) During ringing, press button to reject the call.
C) During talking, press button to end the call.
This operation works at BT mode & also BT Android mode. During ringing, PHONE is displayed on LCD and then the phone number. During talking, talking time is displayed on LCD.
5. Volume level setting calling
While talking, use volume control to adjust volume level, but this volume level cannot be saved.
6. Calling or receiving calls while the unit is in sleep mode
When the unit is in standby mode and you make or receive a call, it will power on automatically. Once the call is completed, the unit returns to standby mode.
7. AVRCP & A2DP MODE
To transfer the audio of a file played by Mobile Phone to the Car Audio Player If the mobile phone supports A2DP and could play audio files, when the Mobile Phone plays an audio file(For some Mobile Phones, you must first select Play by BT), the playback will be transferred to the Car Audio Player.
In A2DP mode, if the Bluetooth device of the Mobile Phone supports AVRCP, the functions of the 9 / : and PLAY/ PAUSE buttons are the same as one in media mode (no fast forward/backward functions for the9 / : buttons). The other buttons normally available in media mode are not available.
The unit supports mobile phone android APP. You can download CAR ANDROID APP with phone wireless download the application named Radio View 1012 to mobile phone and install it.
Operation android APP via Bluetooth pair
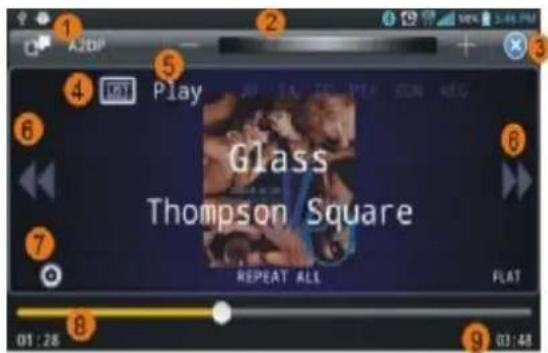
Once your mobile phone is connected in BLUETOOTH with the car audio system, touch icon on the phone screen to enter in the following interface.
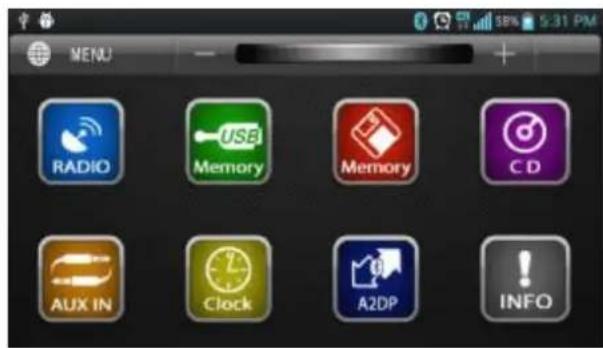
b. Touch one of the icons on mobile phone to open menu including "Connect a device" and "Make discoverable", select "Connect a device" to open a list show BT device available. Select the one desired to connect again.
When fail to connect the device, select Scan or select Make discoverable with phone to search the device.
1) Radio operation
Touch RADIO option to open Radio interface. The operation playback is the same as unit radio.
- Volume adjustment slide bar.
- Source.
3.Exit - Band selection:
FM1 = >FM2 >FM3 >MW1 >MW2.
- Touch to change the radio frequency step by step downwards/ upwards.
- Preset station buttons: touch to select station (1-6). You can drag the current station to the favorite preset number.
- Setup button
- Radio frequency currently playing
Press button to set EQ, PLAY, RDS and TUNER options. RDS and TUNER functions are only set in the RADIO mode.
Note: RDS (Radio Data System) service availability varies with areas. Please note if RDS service is not available in your area, the following service is not available, either.
When RDS is on, you can set the AF, PTY, TRAFFIC, TA VOL, PTY NEWS and EON etc.
When TUNER is on, you can enable the AMS function to search radio stations automatically.
3) MEDIA / CD Operation
Note: To enable MEDI A/ CD function, please first insert a media (as USB and SD card) or CD disc.
- Source (CD disc is selected)
- Volume adjustment slide bar.
3.Exit - Song list.
- PLAY/PAUSE status
- Skip to previous or next track.
- Setup button
- Current playback time
- Total playback time.
In this interface you can set Bass/ Treble up/ down, Fader Front/ Rear, Balance Left/ Right.
You can choose a predefined equalizer sound effect among the following options: Rock, Pop, Jazz, Class and Flat.
Choose playback mode: REPEAT mode, SHUFFLE mode, INTRO mode and ect.
Touch the RESET button to return to the unit initial.
5) AUX-IN Operation
Touch AUX IN icon to enter in AUX IN mode. AUX-IN jack will allow you to connect external music player or external sound source to unit.
6) Set Feature (Clock)
Touch CLOCK icon to check the current phone clock.
7) A2DP Operation
The unit can automatically download all songs from mobile phone.
- Source (A2DP is selected)
- Volume icon.
- Volume adjustment slide bar.
- EXIT source
- Song list.
- PLAY/ PAUSE status
- PLAY/ PAUSE button
- Skip to previous or next track.
- Setup button.
- Current playback time
- Total playback time.
8) Set Feature (INFO)
Touch INFO icon to scan APP version information
8. HANDLING AND MAINTENANCE OF A DISC
CARE FOR USING CD'S:
About CD-R/CD-R/W discs:
In addition to commercially-recorded audio CD's, this unit can play CD-R and CD-R/W discs. In some cases, particularly when recorded on older CD burners, some CD-R and CD-R/W discs may not play. Also, whenever you are recording a CD for playback in this receiver, it is recommended that you record at 24x or slower speed for CD-R and 4x or slower for CD-R/W to achieve higher signal quality and better playback performance.
- To keep the disc clean:
Do not attach any sticker or adhesive tape on the disc.
Handle the disc by its edge to keep the disc clean and do not touch the surface.
Before playing a disc, wipe it off with a clean, dust-free cleaning cloth.
Wipe the disc outwards from the disc center.
-
When one has already been inserted. Doing so may damage the unit. Insert a disc with labeled surface up, or it will damage the unit.
-
Do not expose the disc to direct sunlight or nearby heat sources such as heating vents, caliduct which can cause the disc to warp.
Do not leave disc in a car if it is parked in direct sunlight as that will lead to a considerable rise in the temperature inside the car.
-
Do not use any secondhand or rented disc, usually, there is glue on the surface of those discs, it will stop the unit working and damage it.
-
Always store the disc in its case for protection. Scratched up discs will produce poor sound performance and cause CD player to skip.
-
In raining day or wet area, the moisture may form on the disc or the optical parts, the playback may not be possible. If moisture forms on the disc, wipe it off with a soft cloth.
If moisture forms on the optical parts of the unit, allow the unit to sit for about one hour with power on.
- Do not use solvents such as benzine or thinners. Commercially available cleaners or anti-static spray will damage the unit.

9. TROUBLE SHOOTING
If a fault occurs, first check the points listed below before taking the set for repair. If you are unable to remedy a problem by following these hints, consult you dealer or service center.
WARNING: Under no circumstances should you try to repair the set yourself, as this would invalidate the guarantee.
| COMMON SYMPTOMS CAUSE | SOLUTION | |
| There is no power | The car ignition is switched off | If the power supply is properly connected to the car accessory, switch the ignition key to "ON" or "ACC" |
| The device does not work correctly | Temperature inside the car is too high | Cool off until the ambient temperature returns to normal. |
| There is no sound | The volume control is set too low | Turn up the Volume properly |
| The device has not been correctly connected | Check the power and earth connection according to the wiring diagram. | |
| The operation keys do not work | 1. The built in microcomputer is not operating properly due to noise2. Front panel is not properly fixed into its place. | 1. Switch the device off and on again. Or press the RESET button to resume the program.2. Reinstall the front panel |
| No radio reception | The antenna cable is not connected | insert the antenna cable firmly into the antenna socket of the device |
| In automatic search mode the radio does not stop at a transmitting station | The transmission signals are too weak | Tune in to a radio station manually |
| If none of the solutions described as above can solve your problems, perform a reset as described on page 27. | ||
10. SPECIFICATIONS
GENERAL
Supply Voltage DC
12V Negative Ground
Current Consumption
Max.10A
Power Output
45Watts × 4 (at DC 14.4V)
Number of Channels
2 STEREO channels
Unit Dimensions
178(W) x 108(D) x 50(H) mm
FM SECTION
Frequency Range
87.5MHz - 108MHz
Effective Sensitivity
3uV.
Signal to noise
50dB
AM SECTION
Frequency Range
522KHz - 1620KHz
Effective Sensitivity
40dB.
Signal to noise
40dB
RCA LINE OUT
Output
1000mV@MAX.
MMC/SD or USB PLAYBACK
System
MP3 audio system
Frequency Characteristics
20Hz-20KHz
Signal to Noise(MMC/SD & USB)
55dB (1KHz)
IMPORTANT: Due to continual revision and improvement on our products design, specifications are subject to change without further notice.

Warning! This logo set on the product means that the recycling of this apparatus comes within the framework of the Directive 2002/96/CE of January 27, 2003 concerning the Waste of Electrical and Electronic Equipment (WEEE).
This symbol means that used electrical and electronic products should not be mixed with general household waste. There is a separate collection system for these products.
If you want to dispose of this equipment, please do not use the ordinary dust bin!
- The presence of dangerous substances in the electrical and electronic equipments can have potential consequences on the environment and human health in the cycle of reprocessing this product.
- Therefore, at the end of its lifetime, this product shall not be disposed with other nonrecycled waste. Used electrical and electronic equipment must be treated separately and in accordance with legislation that requires proper treatment, recovery and recycling of used electrical and electronic equipment.
- Local authorities and resellers have set special procedures for the purpose of collecting and recycling this product (please contact your local authority for further details). You have the obligation to use the selective waste collection systems put in place by your local authority.
- If your used electrical or electronic equipment has batteries or accumulators, please dispose of these separately beforehand according to local requirements.
- By disposing of this product correctly you will help ensure that the waste undergoes the necessary treatment, recovery and recycling and thus prevent potential negative effects on the environment and human health which could otherwise arise due to inappropriate waste handling.
CE
This unit complies with European Council Directive 2006 / 95 CE (Electromagnetic Compatibility & Low Voltage Directives)

Tokai LAR-354B
www.tokai.fr

- AVANT DE COMMENCER
- CHER CLIENT
- PRODUIT LASER CLASSE 1
- FONCTIONNEMENT GENERAL DES COMMANDES
- PTY music group -PTY speech group
- ENTREE AUXILI AI RE
- ABOUT THIS MANUAL
- PRECAUTION
- CLASS 1 LASER PRODUCT
- INSTALLATION METHOD
- NOTE
- DESCRIPTION OF THE BACK OF THE UNIT
- SPEAKER WIRING
- FIXED-ISO CONNECTOR
- Important
- LOCATION AND FUNCTIONS OF CONTROLS
- The figure of the Unit Chassis Facet after removing the Front Panel
- POWER ON/OFF & MUTE
- CD SLOT
- LCD DISPLAY
- CD EJECTION BUTTON
- & 7. TUNE, SEEK, TRACK, SKIP UP / DOWN BUTTONS
- SELECTION (MENU) BUTTON AND VOLUME UP (+)/DOWN (-) KNOB
- 1) TA [TRAFFIC ANNOUNCEMENT]
- 2) AF [ALTERNATIVE FREQUENCI ES]
- 8)STEREO/MONO
- 9) VOL LAST/ VOL DEFA
- 9-14. PRESET STATION MEMORY AND PLAY-PAUSE, INT, RPT, RDM BUTTONS
- a) In radio mode:
- b) In CD disc, SD or USB mode:
- MODE BUTTON
- AUXILIARY INPUT
- USB SOCKET
- BAND/ TEL BUTTON
- APS/ HANG UP BUTTON
- 1) In RADIO mode:
- 2) During MP3 file in disc, or USB/ SD mode:
- SD CARD SLOT
- RESET BUTTON
- FLASHING LED
- Connection or disconnection
- Note:
- Calling when in connection status
- Accept/ Reject/ End Call
- Volume level setting calling
- Calling or receiving calls while the unit is in sleep mode
- AVRCP & A2DP MODE
- Operation android APP via Bluetooth pair
- 1) Radio operation
- 3) MEDIA / CD Operation
- 5) AUX-IN Operation
- 6) Set Feature (Clock)
- 7) A2DP Operation
- 8) Set Feature (INFO)
- HANDLING AND MAINTENANCE OF A DISC
- CARE FOR USING CD'S:
- About CD-R/CD-R/W discs:
- TROUBLE SHOOTING
- SPECIFICATIONS
- GENERAL
- FM SECTION
- AM SECTION
- RCA LINE OUT
- Tokai LAR-354B
Brand : TOKAI
Model : LAR354B
Category : Car radio