
LAR11 - Car radio TOKAI - Free user manual and instructions
Find the device manual for free LAR11 TOKAI in PDF.

| Product type | Car radio |
| Brand | Tokaï |
| Model | LAR11 |
| Dimensions (W x H x D) | 178 x 50 x 97 mm |
| Weight | 0.7 kg |
| Power supply | 12 V DC, negative ground |
| Fuse | 5 A |
| Maximum output power | 4 x 45 W |
| FM frequency range | 87.5 - 108 MHz |
| Playback modes | FM radio, USB, SD, AUX |
| Playback functions | Repeat (RPT), Intro (INT), Random play (RDM), Skip +/-10 tracks |
| Number of radio presets | 18 (6 per band, 3 bands) |
| Station search | Automatic (AMS) and manual |
| Display | LCD screen |
| Clock | Integrated with adjustment |
| Mute function | Yes (MUTE) |
| Auxiliary input | AUX (3.5 mm jack) |
| USB port | USB compatible (MP3 playback) |
| SD card reader | SD compatible (MP3 playback) |
| Installation | Metal mounting sleeve, tab fixing |
| Maintenance | Clean with a soft dry cloth, no solvents |
| Safety | Do not open, avoid exposure to moisture and heat |
| After-sales service | Importer LEMA S.A.S., 28 Boulevard Zéphirin Camélinat, 92230 GENNEVILLIERS, France |
| Audio outputs | RCA front and rear (left/right), direct speakers |
Frequently Asked Questions - LAR11 TOKAI
User questions about LAR11 TOKAI
0 question about this device. Answer the ones you know or ask your own.
Ask a new question about this device
Download the instructions for your Car radio in PDF format for free! Find your manual LAR11 - TOKAI and take your electronic device back in hand. On this page are published all the documents necessary for the use of your device. LAR11 by TOKAI.
USER MANUAL LAR11 TOKAI
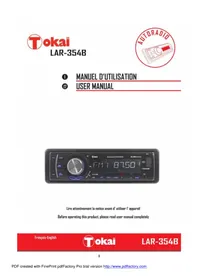
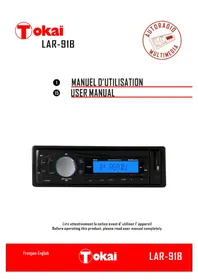
Lire attentivement la notice avant d'utiliser l'appareil Before operating this product, please read user manual completely
INTRODUCTION
Cher Client,
EnChoosingctappareil,youavesfaitlepremipas versleplaisirdel'ecoutemusicale.Maintenant,c'estlemomentdeyoudevoilercommpomiserles fonconsde cetéquipment.
Selecng ne audio equipment such as the unit you have just purchased is only the start of your musical enjoyment. Now it is me to consider how you can maximize the fun and excitement your equipment oers.
We want you to get the most out of your equipment by playing it at a safe level. One that lets the sound come through loud and clear without annoying blaring or distoron - and, most importantly, without aecng your sensitive hearing.
Sound can be deceiving. Over me your "hearing comfort level" adapts to higher volumes of sound. So what sounds "normal" can actually be loud and harmful to your hearing.
Guard against this by seng your equipment at a safe level BEFORE your hearing adapts.
To establish a safe level:
- Start your volume control at a low seng
. Slowly increase the sound unl you can hear it comfortably and clearly, and without distoron we want you listening for a lifeme.
Once you have established a comfortable sound level: set the dial and leave it there.
About this manual
This product features a number of sophisticated funcons ensuring superior reception and operation.
All are designed for the easiest possible use, but many are not self-explanatory.
This operacon manual is intended to help you benet fully from their potenal and to maximize your listening enjoyment.
We recommend that you familiarize yourself with the funcons and their operaoon by reading through
the manual before you begin using this product. It is especially important that you read and observe the «précaun «on the next page and in other secons. In this operaon manual, the Basic Operaon for each sound source is outlined at the beginning of its explanaon, covering simple operaon for that source, such as merely playing music.
1. PRECAUTIONS
Read through this instrucon manual before installaon and use.
CAUTION: TO REDUCE THE RISK OF ELECTRIC SHOCK, DO NOT REMOVE COVER (OR BACK). NO USER SERVICEABLE PARTS INSIDE. REFER SERVICING TO QUALIFIED SERVICE PERSONNEL.
- Keep the volume at the lowest level to maintain concentraon on trac & road conditions for enhanced driving safety.
- Do not touch the power plug with wet hand.
- If your car has been exposed to the sun for a while, please lower the temperature inside the vehicle before operang the unit.
- If the baery is disconnected, discharged or changed the memory will be erased and must be reprogrammed. The appliance must be installed in a horizontal posion for beer performance use.
- Do not open the cover or touch any of the components exposed out of the unit, only for qualified technicians.
- Do not expose the unit under direct sunlight or nearby objects that radiate heat to avoid damage to the unit.
- Do not place the unit in moist and humid conditions, which act the pick-up of the unit.
- Clear the panel and case with so dry cloth only, do not apply any kind of thinner, alcohol or sprays.
EXCLUSIVE IMPORTER
This product was imported by the Company: LEMA S.A.S.
For any quesons concerning the conformity of the product, thank you to send your request to:
LEMA S.A.S.
Insert mounting collar into the dashboard, and bend the mounting tabs out with a screwdriver.
Make sure that lock lever(※)is flush with the mounting collar(not projecting outward).
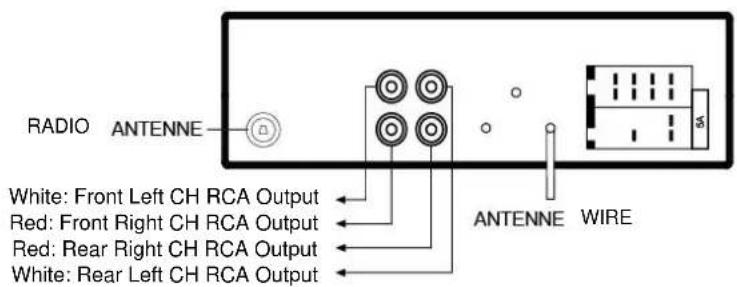
3. WIRING CONNECTION

(A)1 RIGHT REAR (+)
(A) 2 RIGHT REAR (-)
(A) 3 RIGHT FRONT (+)
(A) 4 RIGHT FRONT (-)
(A)5 LEFTFRONT(+)
(A) 6 LEFT FRONT (-)
(A)7 LEFT REAR (+)
(A) 8 LEFT REAR (-)
(B) 4 POWER B+(+)
(B)7 ACC (+)
(B) 8 GROUND (-)
4. LOCATION OF CONTROLS
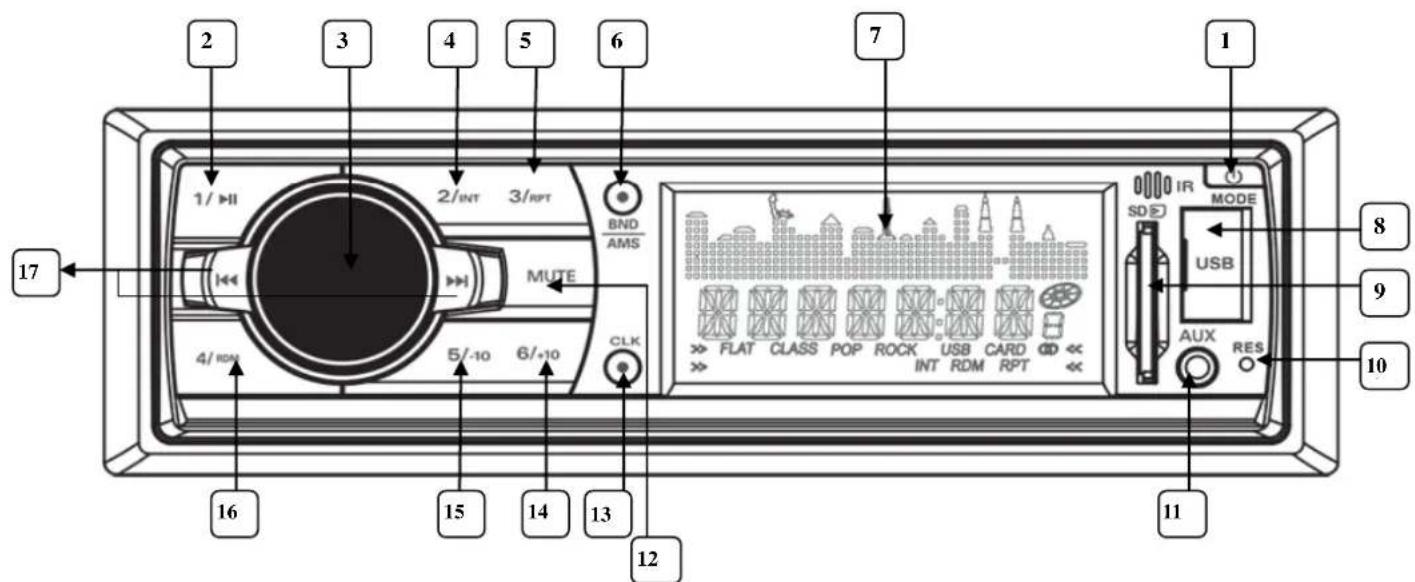
- POWER/MODE
- Preset 1/ PLAY - PAUSE
- VOLUME knob
- PRESET 2/INTRO
- Preset 3 / Touche REPETITION
6.BAND/AMS - LCD DISPLAY
- USB compatible Port
-
SD SLOT
-
RESET
11.AUX IN - MUTE
- CLOCK
- +10 / Preset 6
- -10 / Preset 5
- Preset 4 /RANDOM
- TUNE/SEEK /SKIP FORWARD - BACKWARD
5. FUNCTIONS OF THE CONTROLS
1. POWER/MODE
Press the POWER buon to turn on the unit. When the unit is power on, press and hold the power buon for more than 0.5 seconds, the unit goes into power o mode. When the unit is on, press the POWER/MODE buon to change among RADIO, USB (when an USB sck is inserted), SD (when an SD memory card is inserted) and AUX mode.
2. Preset 1/ PLAY-PAUSE
a) In Radio mode
Press briey to recall the staon programmed in 1st posion on the current frequency band.
If one of these buons is pressed for more than 2 seconds, the current playing radio staon will be memorized into the selected preset buoy.
b) In SD/USB mode
Presson briey to interrupt the playback of SD or USB. Press again to resume normal playback.
3. VOLUME
Turn the VOLUME knob to increase or decrease the volume.
4. Successively press the VOLUME knob to access the following audio sengs:
BALANCE FADER EQUALIZER (EQ OFF -
FLAT-POP-ROCK-CLASS) LOUDNESS (ON/OFF) LOC
(ON / OFF) STEREO / MONO VOLUME; then turn the VOLUME knob to adjust.
3. PRESET 2/INTRO
a) In Radio mode
Press briey to recall the staon programmed in 5 th posion on the current frequency band.
b) In SD/USB mode
Press the INT buon to sample the rst 10 seconds part of each track, and the INTRO will be visible on the LCD display. In the process of INT, press INT buon again to stop sampling and to connue playing the current track.
5. Preset 3 / REPETITION
a) In Radio mode
Press briey to recall the staon programmed in 3 rd posion on the current frequency band.
b) In SD/USB mode
Press the RPT buon once to play the current track repeatedly, and the RPT indicator will be visible on the LCD display.
6. BAND/AMS
A) In Radio mode
Press BAND/AMS buon briey to select the radio broadcasng band you would like to hear. The FM band is toggled cyclically through the tuning bands:
F1→F2→F3
b) In SD/USB mode
Press and hold BAND/AMS buoy for more than 1 second, the radio searches from the current frequency and checks the signal strength level until 6 staons are found. And then the 6 staons frequencies are preset to the corresponding preset memory numbered bank. The auto-storage operon is implemented in the each selected band. When the auto-storage operon is nished, the radio executes the Preset Scan.
7. LCD DISPLAY
- USB compatible Port
In order to play the le in the USB sck, turn over the plasc cover cap then insert the USB sck into the USB socket. The system will change into the USB mode automatically, and then play the rst le in the USB.
- SD SLOT
When you need to play the le in the SD card, insert the SD card into the SD card slot. The system will change into the SD mode automatically, and then play the rst le in the MMC/SD.
- RESET
Before operang the unit for the rst me, or aer replacing the car baery or changing the connecns, you must reset the unit. Press this buon with a cuspidal object. This operaon will erase the clock seng and some stored contents.
- AUX IN
Press the mode buoy to select auxiliary input playing mode. Then you can connect any matched external audio device to this socket. Use the volume knob to adjust
volume.
12. MUTE
Press MUTE to acvate the MUTE funcon: the sound is cut. To restore the sound, press MUTE again.
13. CLOCK
Press and hold the CLK buon to enter clock seng mode. The hours ash, use the / buons to set the hours. Press CLOCK button to conrm and to set minutes, use the key / to set the minutes. Press CLK again to conrm the sengs.
Briey press the CLK buon to display the current me.
- +10 / Preset 6
a) In RADIO mode: press briey to recall the staon programmed in 6^TH posion on the current frequency band.
b) In SD/USB mode: press this buons to move up 10 tracks at a me. When the remained total tracks are lack of 10, the both buons are inaccurely.
- -10 / Preset 5
a) In RADIO mode: press briey to recall the staon programmed in 5^TH posion on the current frequency band.
b) In SD/USB mode: press this buons to move down 10 tracks at a me. When the remained total tracks are lack of 10, the both buons are inaccurely.
- Preset 4 /RANDOM
a) In RADIO mode: press briey to recall the staon programmed in 4^TH posion on the current frequency band.
b) In SD/USB mode: press the RDM buon to play all tracks on disc in random order, and the RANDOM will be visible on the LCD display. In the process of RDM, press RDM buon again to stop playing in random order and the LCD will display OFF.
- TUNE/SEEK /SKIP FORWARD - BACKWARD
a) In RADIO mode: press the or buon briey to automacally tune up/down for the radio staon frequency of the strongest signal. Press and hold the or button for longer than 2 seconds, to manual tune up/down for the desired radio staon frequency step by step.
b) In USB /SD playback mode: press the button briey to play next track and press the buon briey to play the previous track.
6. TROUBLE SHOOTING
| NO POWER OR NO SOUND | The car's ignition switched o | If the power supply is properly connected to the car accessory, switch your ignition key to ACC or ON |
| Cable is not correctly connected. | Check connecn. | |
| Fuse is burnt | Replace the fuse. | |
| MUCH NOISE IN BROADCASTS | Staon or signal is too weak. | Select other staons of stronger signal level. |
| PRESET STATION IS RESET | Baery cable is not correctly connected. | Connect the baery cable to the terminal that is always live. |
| USB or SD CARD IS CONNECTING BUT NO SOUND | USB or SD card connecn is not good. | Take it out and insert again. |
| USB or SD car is damaged or no music le inside. | Change to another USB or SD or record music inside it. |
7. TECHNICAL SPECIFICATIONS
Supply Voltage DC 12 V. Negave Ground
Current Consumpon 5A
Power Output 4x 45Was
FM Frequency range 87.5MHz -108MHz
Unit Dimensions 178[W] X 165[D] X 50[H] mm.
Net weight 0.7kg
IMPORTANT:
If you want to leave your USB stick or memory card connected to your car audio, it is IMPORTANT to switch off the device before turning off the ignition key of your car otherwise sometimes the sound will be cut off.
In case no sound; please reset your car radio by folloing the RESET instruction (see RESET operating instructions in the manual).

- INTRODUCTION
- Cher Client,
- To establish a safe level:
- About this manual
- PRECAUTIONS
- EXCLUSIVE IMPORTER
- WIRING CONNECTION
- LOCATION OF CONTROLS
- FUNCTIONS OF THE CONTROLS
- POWER/MODE
- Preset 1/ PLAY-PAUSE
- a) In Radio mode
- b) In SD/USB mode
- VOLUME
- PRESET 2/INTRO
- Preset 3 / REPETITION
- BAND/AMS
- LCD DISPLAY
- MUTE
- CLOCK
- TROUBLE SHOOTING
- TECHNICAL SPECIFICATIONS
- IMPORTANT:
Brand : TOKAI
Model : LAR11
Category : Car radio