
Crossover CXQ 3 - Car stereo CALIBER - Free user manual and instructions
Find the device manual for free Crossover CXQ 3 CALIBER in PDF.
| Product type | Bass amplifier with parametric equalizer |
| Brand | Caliber |
| Model | Crossover CXQ 3 |
| Category | Car audio (subwoofer amplifier) |
| Dimensions (L × W × H) | 180 × 160 × 33 mm |
| Power supply | 12 V DC, 1 A fuse |
| Center frequency adjustment | 30 Hz - 400 Hz |
| Bandwidth adjustment (Q) | Q2 - Q20 |
| Input level adjustment | 250 mV - 7 V, boost up to 24 dB |
| Phase inversion | 0°, 90°, 180° |
| Stereo/mono selection | Yes |
| Remote control | Yes, with frequency, Q and level functions |
| Protections | Thermal, overload, short circuit |
| Signal-to-noise ratio | 96 dB |
| Channel separation | 65 dB |
| Output power | 15 V RMS |
| Inputs/outputs | RCA jacks (input and output), 4-position power terminal |
| Warranty | 12 months if installed by an authorized dealer, 30 days otherwise |
| Country of manufacture | Europe |
| Maintenance | Clean with a dry cloth, avoid moisture and direct sunlight |
| Safety | Disconnect the battery before any electrical work |
Frequently Asked Questions - Crossover CXQ 3 CALIBER
User questions about Crossover CXQ 3 CALIBER
0 question about this device. Answer the ones you know or ask your own.
Ask a new question about this device
Download the instructions for your Car stereo in PDF format for free! Find your manual Crossover CXQ 3 - CALIBER and take your electronic device back in hand. On this page are published all the documents necessary for the use of your device. Crossover CXQ 3 by CALIBER.
USER MANUAL Crossover CXQ 3 CALIBER
Thank you for choosing a Caliber product. In doing so you've demonstrated a desire to own the finest in Car Audio Technology. Caliber strives to provide you with the finest products possible, and is always looking for ways to please our customers even more.
Properly installed, your Caliber amplifier will provide years of high quality sonic reproduction. Before installing this electronic bassdriver in your vehicle, please read this entire manual carefully, in order to protect your vehicle, and get the maximum performance of your mobile sound system.
Caliber Warranty
Due to the complexity of our products, we strongly recommend that this bassdriver is installed and connected by your authorized Caliber dealer. If properly installed and connected by your dealer, we provide a warranty for 12 month from the date of purchase.
If you install and connect this bassdriver yourself, we wish you lots of fun and success in doing so. If you follow our guidelines, you'll get the best result. Our warranty, however, will be limited to, and not exceed 30 days from the date of purchase.
Caliber Accessories
To realize the exceptional performance of which this bassdriver is capable, it is necessary that power sources, signal sources, speakers and interconnects are of the highest quality. Remember that Caliber is not just an equalizer manufacturer. We also manufacture everything needed for the 'optimal' Car Audio System (except the car). So be sure to 'Get Connected' with Caliber and ask your local Caliber dealer for our accessories.
Contents
Before you start your installation .This page
Features 2
Remote Control 3
Mounting 4
Installing and adjusting 4
Due to our effort to innovate and improve our products, this modern high performance electronic bassdriver offers you the following features:
Delay remote output.
Input Level Control (0dB - 24dB)
Low-pass reversible phase (0^ - 90^ - 180^)
Variable input sensitivity 250mV to 7V.
Low-pass stereo / mono mode
Output Level 15V/RMS
Channel Separation 65dB
Signal to Noise Ratio 96dB
Thermal, Overload and Short-circuit protection.
Excellent muting circuitry assures no turn on/off 'pops'.
Remote control with triple function.
Center Frequency tuning from 30Hz - 400Hz.
Adjustable band-width (Q2 - Q20).
Variable Output Level Control.
Fuse rating:1A.
Dimensions: 180 × 160 × 33mm
European design and engineering.
Superb Sonic performance for your 'Dream Machine' on wheels.
Years and years of acoustic pleasure.
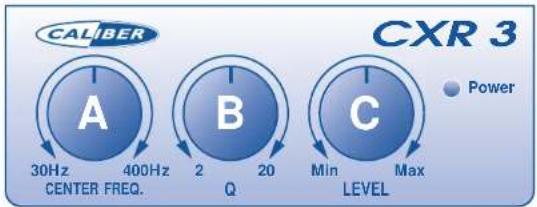
The remote control shows you 3 knobs to play with.
A. Center Frequency (30Hz - 400Hz).
B. Q (band-width between Q2 - Q20).
C. Level (min.-max.)
CALIBER
A. Center Frequency
This knob is to be used to locate the correct resonance-frequency of the subwoofer-enclosure you use. This is the frequency on which your subwoofer will play the loudest. The center Frequency can be adjusted between 30Hz and 400Hz, so the correct resonance for all types of subwooferenclosures is within reach.
The Center Frequency knob can also be used to locate the frequencies that sound a bit weaker or come on to strong. By changing the band-width (B) of these frequencies, and adjusting the (output-)Level (C) you can adjust the sound to your likings.This can be done directly for every new song, because the remote control-unit must be mounted in-dash,so it can be adjusted from the driverseat.
B. “Q”-adjustment
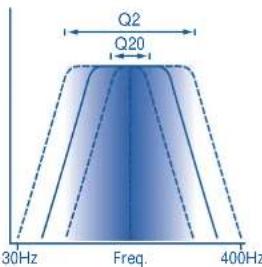
This Q-knob allows you to narrow or widen the band-width of the frequency you found with your Center Frequency knob. The band-width runs between Q2 (very broad) to Q20 (very small). The band-width Q2 is very broad. This means that at both sides of the set Center Frequency a greater area of frequencies will be amplified or weakened. A band-with of Q20 is very small, so only the set Center Frequency will be amplified or weakened (see drawing).
This gives you complete control over the set frequency-area,without interfering with the other (low-pass-)frequencies.
C. Level Control
No doubt that this will be the most used knob of your remote control. By adjusting the Level between min.and max, you can amplify or weaken the set frequency and band-width, and thus the volume.
A warning has to be made: Take care in using the level control. It can, in it's max. position, amplify up to 24dB, which is a lot. Not every amplifier or woofer will have the capability to handle such a lot of power. But if the Center Frequency and band-width are well adjusted, a woofer can handle quiet a lot of power, especially if the Center Frequency matches the resonance-frequency of you sub-wooferenclosure.

Mounting your Caliber CXQ 3 BassDriver
Before mounting your Caliber CXQ 3 you must carefully choose the place where it can be installed. Be sure that the power and signal cables can enter and leave the CXQ 3 in a straight line, to avoid the risk of malfunction.
The CXQ 3 should be protected from exposure to moisture and direct sunlight.
If you've decided where to place your Caliber CXQ 3, and you've convinced yourself there is enough protection from unusual hazards, mark the mounting surface using the CXQ 3 as a template (Placing masking tape on these surfaces first will make your markings more visible).
Drill 2.5 mm (1/8") diameter holes at the marked locations and mount the amplifier using the supplied self-tapping screws.
Note: Do not drill any holes while using the CXQ 3 as a template. You can easily damage the CXQ 3's coating in this manner.
Installing and adjusting the CXQ 3
There are 10 points of attention that need explaining on the CXQ 3. Once you have read this, you will find this BassDriver very easy to operate, and lots of fun to play with.

1 Stereo / mono selector switch.
2 Phase reversal switch.
3 Input Level Control 0dB-24dB
4 Power on LED.
5 Clipping LED.
6 Power and remote terminals.
7 Equalizer on/off switch.
8 Telephone jack for remote control.
9 RCA's Signal in
10RCA's Signal out

1 With the stereo / mono selector switch, you can choose whether the output signal will be in stereo or in mono. We advice you to put this switch in the mono-position, especially if you have mounted more than one woofer in an enclosure. Even if the amplifiers are used in a stereo mode, the mono position of the CXQ 3 is advised. In this way you will be sure that both channels will get the exact same signal and that the woofer perform in an optimal way. Also by the use of only one woofer the mono-position is advised, although it wouldn't make much difference if the stereo-position is used. The only situation in which the stereo-position is advised and required is when you use the CXQ 3 to drive a couple of mid-bass woofer. In that case there is a need for the stereo sound, because frequencies above the 200Hz are very well hearable in stereo.
2 With the phase reversal switch it is possible to alter the phase of the signal by 0^, 90^ or even 180^ . This can give a great advantage, especially if the woofers are located on a great distance from the full-range speakers. This can give the impression that the bass is a bit too late, compared to the full-range sound. This is logical because often the distance the bass-sound has to travel from the back of the car, is twice the distance the full-range has to go in the front. By shifting the phase with 90^ or 180^ this problem can be solved, however this will not always be the case.
3 With the input level control you can amplify the input signal up to 24dB. This can cause the output signal to become very powerful, up to 15V. Therefore caution must be taken by adjusting this inputlevel.It has a direct relation to the Level Control on your remote control.The best way to get a correct adjustment for your input level is to take it slowly step by step.First put all the leveladjustments in your system (also the amplifiers input) to a minimum.Then turn the volume of your head-unit to 80% of the maximum.Now slowly start increasing the input level on your CXQ 3. Keep turning up the input level until the clipping LED (5) starts to flicker. Now the signal is adjusted correctly, and in most cases, you won't even have to adjust the signal on your amplifier anymore.
4 The power LED illuminates when the CXQ 3 is turned on. When this LED is not burning, there will be no power on the remote-signal, the +12V or ground cable. Also check if the fuse is still intact.
5 The clipping LED illuminates constantly when the output signal is clipping. This can seriously damage your audio system. The clipping is caused by a too strongly adjusted input level, and this input level should be turned down immediately. When the clipping LED is flickering, it indicates that the output signal is around 7V, which is a safe value for most amplifiers and woofers. When you have just installed your CXQ 3.it is advised to monitor this clipping LED regularly, in order to get a good adjustment for all your types of music.

6 Powerterminal
REMEMBER TO ALWAYS DISCONNECT BATTERY GROUND BEFORE WORKING ON A VEHICLE'S ELECTRICAL SYSTEM
The powerterminal shows you 4 positions which have to be connected. On the "+" position a +12V cable has to be connected. Use a 1.5mm^2 cable of good quality. (for instance a Caliber

CP 1) The "--" positions has to be connected to the ground of the vehicle. Use the same gauge cable as the positive cable (the same amount of power has to run through it) (Caliber CN 1). Ensure that all paint, undercoating or any other insulation is removed from the area where you want to make your ground connection to. The third cable to connect is your remote turn-on, on the "R" position. Many radio-cassette and CD-players have an output terminal for connection of the Remote turn on to an amplifier/equalizer. If you don't have such an output, a separate switch must be installed to control your CXQ 3's on/off function. The last position on the powderterminal is the "D/R" position. This is the Delay Remote output of the CXQ 3 and is used to control the on/off function of the amplifier(s) or equalizers that follow the CXQ 3 in your system. By using the Delay Remote output of the CXQ 3 you are assured that that you won't hear any disturbing on-/off-plops from your system.
7 The Equalizer on/off switch can be used to activate or shut down the equalizer part of the CXQ 3. In the on position the CXQ 3 has all its functions at your disposal, while in the off-position the only function of the CXQ 3 that remains is the output level control of the remote control.
8 The remote control-jack is already pre-mounted to the 5m cable of the remote control. This connection should not give you any trouble just plug it in and play
9 This are the RCA-terminals to which you connect the input signal that comes from your head-unit or CD-player.
10These RCA-terminals provide the output signal from the CXQ 3. Connect them with a good quality signal cable (f.i. a cable from the Caliber CL 800-series) to the amplifier you use for your sub-woofer(s).
Once you have installed and adjusted the CXQ 3, and intergrated it with the rest of your system, it is time to start enjoying yourself.
Start your engine, turn on your audio, crank up the volume, pay attention (to the road), sit back, relax and enjoy the bass of your new Caliber sound system.
