
MCD 261M - Car stereo CALIBER - Free user manual and instructions
Find the device manual for free MCD 261M CALIBER in PDF.

| Product type | Car radio |
| Brand | Caliber |
| Model | MCD 261M |
| Power supply | 12 V DC, negative ground |
| Output power | 4 x 55 W |
| Speaker impedance | 4-8 ohms |
| Disc player | CD, MP3, WMA |
| Radio bands | FM 87.5-108 MHz, MW 522-1620 kHz |
| RDS functions | AF, CT, EON, PI, PS, PTY, REG, TA, TP |
| Display | Digital display |
| Front panel | Motorized detachable |
| Audio settings | Volume, Bass, Treble, Balance, Fader, Loudness |
| Sound effects (DSP) | OFF, FLAT, CLASSIC, POP, ROCK |
| Anti-shock protection (ESP) | 12 seconds or 45 seconds |
| Station memory | 18 FM (3 x 6) + 12 MW (2 x 6) |
| Automatic search | Yes |
| Clock | Display and setting |
| Dimensions (approx.) | 1-DIN standard (178 x 50 x 160 mm) |
| Weight (approx.) | 1.5 kg |
| Safety | Auto shut-off, fuse, anti-theft detachable panel |
| Cleaning | Soft cloth, avoid solvents |
| Repairability | Professional service recommended |
Frequently Asked Questions - MCD 261M CALIBER
User questions about MCD 261M CALIBER
0 question about this device. Answer the ones you know or ask your own.
Ask a new question about this device
Download the instructions for your Car stereo in PDF format for free! Find your manual MCD 261M - CALIBER and take your electronic device back in hand. On this page are published all the documents necessary for the use of your device. MCD 261M by CALIBER.
USER MANUAL MCD 261M CALIBER
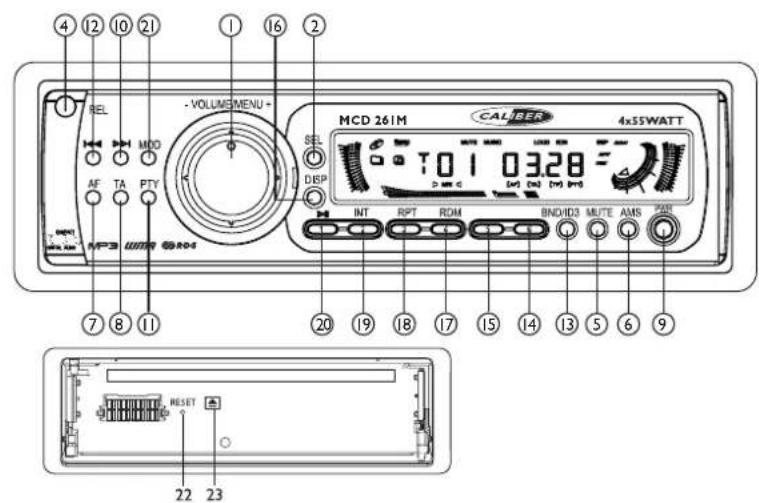
I. VOLUME UP/DOWN KNOB
2. SEL BUTTON (VOLUME/BASS/TREBLE/BALANCE/FADER)
4.PANEL RELEASE BUTTON
5.MUTE BUTTON
6.AMS (MP3) BUTTON
7.AF BUTTON
8.TA BUTTON
9. POWER BUTTON
10.TUNE/SEEK/TRACKFORWARDBUTTON
II.PTY BUTTON
12.TUNE/SEEK/TRACK REVERSE BUTTON
13.BAND/ID3 BUTTON
14/15/17/18/19/20. PRESET STATIONS BUTTONS (M1~M6)
16.DISPLAY BUTTON
17. RANDOM BUTTON
18.REPEAT BUTTON
19. INT BUTTON
20.PAUSE BUTTON
21.MODE BUTTON
22. RESET BUTTON
23.DISCEJECT
SPECIFICATIONS
GENERAL
Power Supply DC 12V
Polarity Negative Ground
Speaker impedance 4-8 ohms
Power Output 4 x 55W
CD PLAYER
System Compact disc audio system
Usable disc Compact disc
Sampling frequency 44.1KHz
No of quantization bits 16bit
Frequency 20-20,000Hz
Number of channels 2 stereo
S/N Ratio >60dB
RADIO SECTION
FM
Frequency Range 87.5-108 Mhz
Usable Sensitivity Better than 12dB at S/N 30 dB
Stereo Separation 30 dB at 1KHz
S/N Ratio 45 dB
MW
Frequency Range 522-1620 Khz
Intermediate Frequency 450KHz
Usable Sensitivity Better than 38dB at S/N 20dB
S/N Ratio 35 dB
REMARK :
Specifications subject to change without notice.
DISC PLAY
PRECAUTIONS
- Use only in a 12-volt DC negative-ground electrical system.
- Disconnect the vehicle's negative battery terminal while mounting and connecting the unit.
- When replacing the fuse, be sure to use one with an identical amperage rating.
- U sing a fuse with a higher amperage rating may cause serious damage to the unit.
DO NOT attempt to disassemble the unit. Laser beams from the optical pickup are dangerous to the eyes. - Make sure that pins or other objects do not get inside the unit; they may cause malfunctions, or create safely hazards such as electrical shock or laser beam exposure.
- If you have parked the car for a long time in hot or cold weather, wait until the temperature in the car become normal before operating the unit.
- Keep the volume at a level at which you can hear outside warning sounds (horns sirens, etc.).
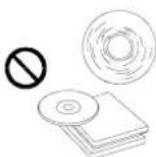
CD NOTES
- P laying a defective or dusty CD can cause dropouts in sound.
Hold CDs as illustrated.
DO NOT touch the unlabeled side.
DO NOT attach any seal, label or data protection sheet to either side of a disc.
DO NOT expose a CD to direct sunlight or excessive heat.
Wipe a dirty CD from the center outward with a cleaning cloth. - Never use solvents such as benzine or alcohol.
This unit cannot play 3-inch (8cm) CDs. - NEVER insert a 3-inch CD contained in the adapter or an irregularly shaped CD.
- The unit may not be able to eject it, resulting in a malfunction.
BEFORE OPERATION
- DO NOT raise the volume level too much, as this will block outside sounds, making driving dangerous.
- Stop the car before performing any comp
CAUTION
DO NOT open covers and do not repair by yourself. Consult the dealer or an experienced technician for help.
Installation procedures
First complete the electrical connections, and then check them for correctness.

Anti-Theft System
This unit is equipped with a detachable
Removing this panel makes the radio totally inoperable.
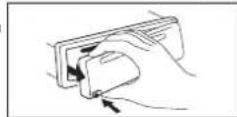
Removing the panel
I Switch off the power of the unit.
2. Remove the detachable panel.
3. Gently press the button of the case and open the cover. Place the panel into the case and take it with you when you leave the car.
Install detachable panel
- Fix right part of face plate in the right part of panel slot of the unit.
- Press down the left side of the face plate until it clicks into the panel slot of the unit.
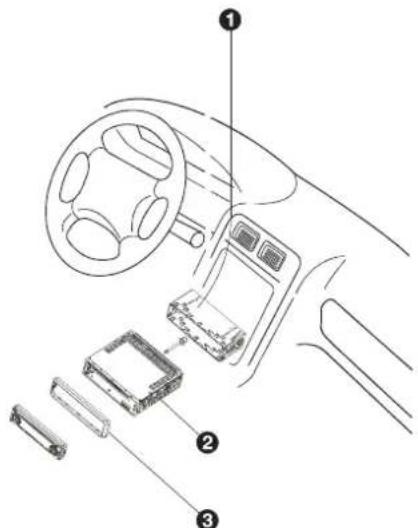
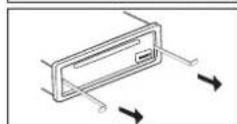
Remove the unit
Switch of the power of the unit.
1. Remove the panel and the trim plate.
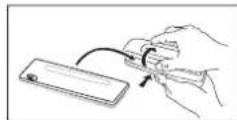
2. Insert both T-Keys into hole in front of the set until they lock.
3. Pull out the unit.

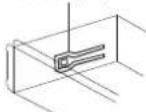
lock lever ( )
- Insert mounting bracket into the dashboard, and bend the mounting tabs out with a screwdriver. (Make sure that lock lever is flush with the mounting bracket. Not projecting outward)
- Secure the rear of the unit After fixing mounting bolt and power connector, fix the rear of the unit to the car body by rubber cushion
- Insert trimplate
5. BASIC OPERATIONS
4) PANEL RELEASE BUTTON
Press this button to remove the control panel.
Press POWER button or any other button on the front of the radio (except Open/Eject) to turn the unit on. Press POWER button again to turn the unit off.
Press MODE button to select a different mode of operation as indicated on the display panel. Available modes include Tuner and CD (MP3) mode.
5) MUTE BUTTON (MUTE)
Press the mute button momentarily to mute the audio volume, and "Mute on" will be displayed. Press the mute button again to restore volume to the previous setting.
1) VOLUME KNOB
To increase the volume rotate the volume knob clockwise, to decrease the volume rotate the volume knob counterclockwise.
2) SEL BUTTON (SEL)
Press the SEL button, the display will be displayed first option is Volume, followed by Bass,Treble, Balance, Fader and back to Volume.
When adjusting audio functions, the unit will automatically exit audio control mode after 5 seconds of inactivity. Use the volume button to adjust the settings.
Press the SEL button for more than 3 seconds, the display will be displayed as cyclical mode of following functions: TA SEEK or ALARM, MASK DPI or ALL, RETUNE L or S, DSP, LOUD OFF/ON,ESP 12/45, MULTI ON/OFF,BEEP ON/OFF,SEEK 1/2,STEREO/MONO,DX/LOCAL.
TA SEEK or ALARM
Use the volume knob to choose TA ALARM or TA SEEK mode, When TA is turned on and no traffic program identification code has been received during the specified time, no TA/TP is displayed and according to the MENU SELECT, alarm is set off, or TA SEEK is activated.
TAALARM mode: NO TA/TP is displayed and alarm is set off.
TASEEK mode: TA SEEK is activated.
MASK DPI or ALL
Use the volume knob to choose MASK DPI or MASK ALL mode.
MASK DPI mode: Only the AF which has different program identification is masked.
MASK ALL mode:The AF which has different program identification and NO RDS signal with high field strength is masked.
RETUNE L or S
The initial time of automatic TA search or PI search mode is selected. When PI information is not caught for retune time, the radio start to retune to the next same PI station. When the same PI station does not catch | cyclic search, the radio start to retune to the next same PI station.
RETUNE L mode: Selected as 90 seconds
RETUNE S mode: Selected as 30 seconds
DSP MODE
Use the volume knob to choose DSP sound effect:
Reinforce the bass output.
Use the volume knob to switch between LOUD ON and LOUD OFF. ESP 12/45 (Electronic Shock Protection)
Use the volume knob to switch between ESP 12 and ESP 45.
ESP 12: buffer memory from 12 seconds / ESP 45: buffer memory from 45 seconds MULTI SESSION
Use the volume knob to switch between MULTI ON and MULTI OFF.
MULTI OFF: support mixed CD, one session CD
MULTI ON: support mixed, extra, multi session CD
BEEP ON/OFF
Use the volume knob to switch between BEEP ON and BEEP OFF. SEEK 1/2
Use the volume knob to switch between SEEK I and SEEK 2. STEREO/MONO
Use the volume knob to switch between STEREO and MONO.
DX/LOCAL
Use the volume knob to switch between DX and LOCAL.
9) DISPLAY (DISP)
Pressing the "DISP" key will display the following modes;
In case of receiving a RDS station:
Tuner mode PS-FREQ-CLOCK-PTY
CD/MP3 player mode CDP - CT - PS - FREQ - PTY
In case of receiving NON RDS station
Tuner mode FREQ - NO CLOCK - NO PTY
CD/MP3 player mode CDP-FREQ-CT-NO PTY
CLOCK SETTINGS
Press the DISP button for more than 1 second, clock mode switches to clock adjusting mode and the clock display begins to flash. With the volume knob you can change the time clock.
6. TUNER OPERATION
13) BAND BUTTON (BAND)
Press BAND to change between FM 1, FM 2, FM 3, MW I and MW 2.
10-12) TUNING UP/DOWN BUTTON
Manual Tuning
Press the Up Tuning or Down Tuning button for more than 3 seconds to move the radio frequency number up or down one step.
Auto Seek Tuning
Press the Up Tuning or Down Tuning button for less than 3 seconds to move to next station automatically.
14-15-17-18-19-20) PRESET STATIONS BUTTONS
Six numbered preset buttons store and recall stations for each band (3FM/2MW bands).
Store a Station
Select a band (if needed), then select a station. Hold a preset button for 3 seconds. The preset number will appear in the display.
Recall a Station
Select a band (if needed). Press a preset button to select the corresponding stored station.
4) AUTOMATICALLY STORE / PRESET SCAN (AMS)
Automatically Store
Automatically select 6 strong stations and store them in the current band. Select a band (if needed). Press AMS button for more than three seconds. The new stations replace stations already stored in that band.
Preset Scan
Scan stations stored in the current band. Select a band (if needed). Press AMS button for less than 3 seconds. The unit will pause for ten seconds at each preset station. Press AMS button again to stop scanning when the desired station is reached.
Stereo
The unit will automatically pick up a stereo signal, if stereo signal is available.
Insert a CD label-side up with the unit turned on, and the disc will begin to play. Press the Eject button to stop CD play and eject the CD. The unit does not have to be turned on to eject the CD.
Press the pause button to suspend disc play. Press the pause button again to resume disc Play.

10-12) TRACK SELECT
Press the TUNE/SEEK/TRACK/FORWARD or TUNE/SEEK/TRACK/REVERSE button for less than one second to advance
to the next track on the CD, The selected track number will appear on the display. Press and hold the TUNE/SEEK/TRACK/ FORWARD or TUNE/SEEK/TRACK/ REVERSE button for more than one second to fast
forward or fast reverse through the disc.
18) REPEAT BUTTON (RPT)
Press REPEAT BUTTON (RPT) during disc play to continuously repeat the track. Press REPEAT BUTTON (RPT) again to stop Repeating.
Press RANDOM BUTTON (RDM) during disc play to play all tracks on a CD in random order. Press RANDOM BUTTON (RDM) again to stop random play.
19) INTRO SCAN BUTTON (INT)
During disc play, press INTRO SCAN BUTTON (INT) to play the first 10 seconds to each track on the disc. When the desired track is reached, press INTRO SCAN BUTTON (INT) again to end the scan and play the selected track.
CD TEXT
The unit can display the first 8 letters of Album Title,Artist Title. If the recorded information is longer than 8 characters. The rest of text will scroll from right to left on the display.
RDS FUNCTIONS
The unit is equipped with the following RDS function:
- AF Alternative Frequencies
-CTClockTime
EON Enchanced other Network
-PI Program identifications
- PS Program service name
- PTY Program Type
- REG Regional Change
- TA Traffic Announcement
-TP Traffic program
8. RDS OPERATION
1.AF FUNCTION
By pressing AF button (7) < 3 seconds to select AF ON/OFF. Under AF "On" mode, if the tuned in station signal is getting weak, the unit will automatically switches to a different frequency on the same network with stronger signal.
By pressing AF button >3 seconds to select REGIONAL MODE ON/OFF.
Regional mode on (REG ON): AF switching or PI SEEK is implemented to the station which have all the PI codes the same as the current station. REG of individual segment is turned on also together with displaying "REG ON" on numeric display for a few seconds.
Regional mode off (REG OFF): The regional code in the format of PI code is ignored when AF switching or PI SEEK is implemented. REG of individual segment is turned off together with displaying "REG OFF" on numeric display for a few seconds. When regional mode is off, the radio may switch from a national program station to a local variant of that program, or from a local station in an area to a local station to a local station in an other area. If you don't want to switch to an local station, turn regional mode on. The radio will only switch to an AF that broadcast exactly the same program.
2. TA FUNCTION
Press TA button (8) to turn on/off TA. When TA mode is on and TA indicator on LCD is displayed. When a traffic announcement broadcast starts, the traffic announcement broadcast will be received as top priority regardless of the function mode.
The unit will go back to the previous mode and TA goes into stand by mode again.
The TA volume will automatically begin at 20. If the volume level was below 20, it will be raised to 20. The volume returns to its previous mode and volume level when the traffic announcement is over.
3. PTY FUNCTION
Pressing PTY button (11) < 3 seconds to goes into PTY select mode. "PTY" icon will light up on the LCD. The user now has 5 seconds to select the desired PTY item by using the preset buttons (14/15/17/18/19/20). The unit will automatically search. If no station with the selected PTY broadcast can be received, the LCD will display "No Match PTY" and blinks for 5 seconds then returns to the previous mode.
The 2 program types are speech and music. (nieuwe vertaling)
By pressing PTY once, MUSIC is entered. When PTY is pressed the second time, SPEECH is entered. I~6 buttons can be used to select the desired program type.
2 EASY, LIGHT SPORT, EDUCATE, DRAMA
3 JAZZ, COUNTRY WEATHER, FINANCE, CHILDREN
4 CLASSICS CULTURE,SCIENCE,VARIED
5 N A TION, OLDIES SOCIAL, RELIGION, PHONE IN
6 FOLK TRAVEL, LEISURE, DOCUMENT
Note: Factory default stored for PTY preset memory.
M1/News, M2/Information, M3/Pop Music, M4/Sports, M5/Classics, M6/Finance.
9. MP3 FUNCTION
How to select MP3 files
I. Searching track (nieuwe vertaling)
- Press "AMS" once then searching is activated
- With the SEL button (2) you can select the digits
- With the volume knob (1) you can select the tracknumber, only track 1-999
- Press SEL button >0,5 sec and the song that you have selected will start playing
2. Searching file name
- Press "AMS" twice, now file search is activated
- Press the "SEL" button (2) then the first directory "A" is displayed.
- With the volume knob (I) you can select the directory you want
- Press "SEL" again, now the directory is fixed and the first file name will appear
- With the volume knob (1) you can select the file you want
- Press "SEL" >0,5 sec and the song you have selected will be played
3. Searching trackname
- Press "AMS" one time, now the trackname search is activated
- Press "SEL" button, Character "A" display in the 1st digit
- With the volume knob (I) select the character you want
- Press "SEL" button, Character "A" display in the 2nd digit
- With the volume knob (I) select the character you want
- Press "SEL" button > 0,5 sec and the song you have selected will be played
Selected song
During MP3 operation, press 5 button to move back 10 songs, press 6 button to move forward 10 songs.
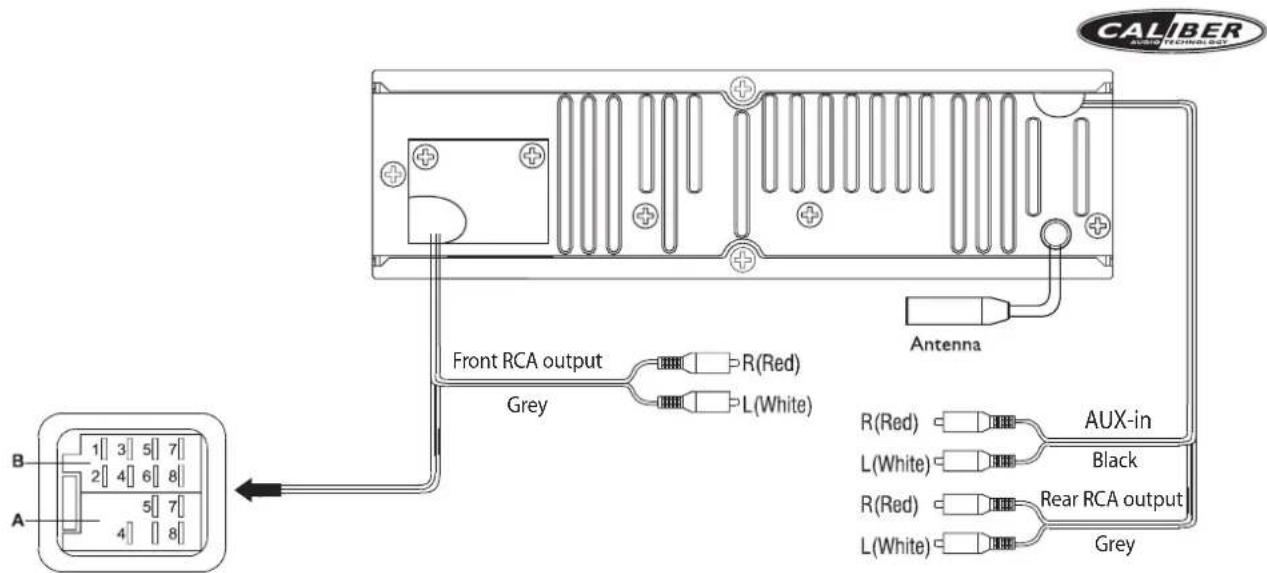
| Location Function | ||
| A | B | |
| 1 Rear | right (+) - Purple | |
| 2 Rear | right (-) - Purple / Black stripe | |
| 3 | F | |
| 4 Acc | 12V(+) Front right (-) - Gray / Black stripe | |
| 5 Auto | Antenna Front Left (+) - White | |
| 6 | F | |
| 7 | A | CC+ Rear left (+) - Green |
| 8 | G | round Rear Left (-) - Green / Black Stripe |
TROUBLESHOOTING
Before going through the check list, check wiring connection. If any of the problems persist after check list has been made, consult your nearest service dealer.
| Problem | Cause | Solution |
| No power | The car ignition switch is not on | If the power supply is properly connected to the car accessory terminal,switch the ignition key to "ACC" |
| The fuse is blown | Replace the fuse | |
| Disc cannot be loaded or ejected | Presence of disc inside the player | Remove the disc in the player, then insert a new one |
| Inserting the disc in reverse direction | Insert the compact disc with the label facing upward | |
| The disc is extremely dirty or defective | Clean the disc or try to play a new one | |
| Temperature inside the car is too high | Cool off or until the ambient temperature returns to normal | |
| Condensation | Leave the player off for an hour, then try again | |
| No sound | Volume is in minimum | Adjust volume to a desired level |
| Wiring is not properly connected | Check wiring connection | |
| Sound skips | The installation angle is more than 30 degrees | Adjust the installation angle less than 30 degrees |
| The disc is extremely dirty or defective | Clean the compact disc, then try to play a new one | |
| The operation keys do not work | The built-in microcomputer is not operating properly due to noise | Front panel is not properly fixed into its place Press the RESET button. |
| The radio does not work | The antenna cable is not connected | Insert the antenna cable firmly |
| The signals are too weak | Select a station manually |

I. TOUCHE DE REGLAGE DE VOLUME HAUT/BAS
2. BOTON SEL (Volumen/Graves/Agudos/Balance/Atenuador)
4. TOUCHE DEBLOCAGE PANNEAU
5. TOUCHESOURDINE (MUTE)
6. TOUCHE AMS (MP3)
7. TOUCHE AUDIOFREQUENCY (AF)
8. TOUCHETA
9. TOUCHE ALIMENTATION (POWER)
10. BOTON TUNE/SEEK/TRACK FORWARD
II. TOUCHE PTY
12. BOTON TUNE/SEEK/TRACK REVERSE
13. GAMME (BAND/ID3)
14/15/17/18/19/20.TOUCHES STATIONS PREREGLEES (1-6)
16. TOUCHE ECRAN D'AFFICHAGE
17. BOTON RANDOM
18. TOUCHER RPT
19. TOUCHE INT
20. BOTON PAUSE
21. TOUCHE MODE
22. TOUCHE DE REINITIALISATION
23. DISC EJECT
CARACTERISTIQUES
GENERALITES
Alimentation electrique DC 12V