
MCD 300M - Car stereo CALIBER - Free user manual and instructions
Find the device manual for free MCD 300M CALIBER in PDF.

| Product Type | Car radio with CD/MP3 player, FM/RDS radio, Bluetooth |
| Brand | Caliber |
| Model | MCD 300M |
| Power Supply | 12 V DC, negative ground |
| Output Power | 4 x 55 W (max) |
| Speaker Impedance | 4 ohms |
| FM Frequency Range | 87.5 - 108 MHz |
| FM Sensitivity | >15 dB (S/N 30 dB) |
| Stereo Separation | >30 dB |
| Signal-to-Noise Ratio (FM) | >60 dB |
| Compatible Audio Formats | Audio CD, MP3 |
| Frequency Response (CD) | 20 - 20,000 Hz |
| Signal-to-Noise Ratio (CD) | 60 dB |
| Bluetooth | Version 1.2, hands-free, pairing up to 3 phones |
| RDS Functions | AF, CT, EON, PI, PS, PTY, REG, TA, TP |
| Equalizer | DSP presets: OFF, FLAT, CLASSIC, POP, ROCK |
| Front Panel | Detachable motorized slide, anti-theft |
| Inputs/Outputs | Auto antenna output, preparation for steering wheel controls (not specified) |
| Fuse | Replace with a fuse of the same rating |
| Dimensions (approx.) | 1 DIN standard (approx. 180 x 50 x 160 mm) |
| Weight (approx.) | Approx. 0.8 kg |
| Operating Temperature | 0°C to 40°C (avoid extreme heat/cold) |
| Maintenance | Clean CDs from center to edge with a soft cloth; do not use solvents |
| Safety | Do not disassemble (laser beam), disconnect battery before installation |
Frequently Asked Questions - MCD 300M CALIBER
User questions about MCD 300M CALIBER
0 question about this device. Answer the ones you know or ask your own.
Ask a new question about this device
Download the instructions for your Car stereo in PDF format for free! Find your manual MCD 300M - CALIBER and take your electronic device back in hand. On this page are published all the documents necessary for the use of your device. MCD 300M by CALIBER.
USER MANUAL MCD 300M CALIBER
Polarity Negative Ground
Speaker impedance 4 ohms
Power Output 4 x 55W
CD PLAYER
System Compact disc audio system
Usable disc Compact disc
Sampling frequency 44.1KHz
No of quantization bits Ibit
Frequency 20-20,000Hz
Number of channels 2 stereo
S/N Ratio >60dB
RADIO SECTION
FM
Frequency Range 87.5-108 Mhz
Intermediate Frequency 10.7 MHz
Usable Sensitivity Better than 15dB at S/N 30dB
Stereo Separation >30dB
S/N Ratio >60dB
REMARK:
Specifications subject to change without notice.
DISC PLAY
PRECAUTIONS
- Use only in a 12-volt DC negative-ground electrical system.
- Disconnect the vehicle's negative battery terminal while mounting and connecting the unit.
- When replacing the fuse, be sure to use one with an identical amperage rating.
- U sing a fuse with a higher amperage rating may cause serious damage to the unit.
- DO NOT attempt to disassemble the unit. Laser beams from the optical pickup are dangerous to the eyes.
- Make sure that pins or other objects do not get inside the unit; they may cause malfunctions, or create safely hazards such as electrical shock or laser beam exposure.
- If you have parked the car for a long time in hot or cold weather, wait until the temperature in the car become normal before operating the unit.
- Keep the volume at a level at which you can hear outside warning sounds (horns, sirens, etc.).
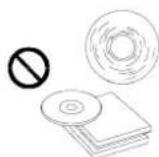
CD NOTES
- P laying a defective or dusty CD can cause dropouts in sound.
Hold CDs as illustrated.
DO NOT touch the unlabeled side.
DO NOT attach any seal, label or data protection sheet to either side of a disc.
DO NOT expose a CD to direct sunlight or excessive heat.
Wipe a dirty CD from the center outward with a clearing cloth. - Never use solvents such as benzine or alcohol.
This unit cannot play 3-inch (8cm) CDs. - NELVR insert a 3-inch CD contained in the adapter or an irregularly shaped CD.
- The unit may not be able to eject it, resulting in a malfunction.
BEFORE OPERATION
- DO NOT raise the volume level too much, as this will block outside sounds, making driving dangerous.
- Stop the car before performing any comp operation.
CAUTION
DO NOT open covers and do not repair by yourself. Consult the dealer or an experienced technician for help.
Installation procedures
First complete the electrical connections, and then check them for correctness.


Anti-Theft System
This unit is equipped with a detachable
Removing this panel makes the radio totally inoperable.
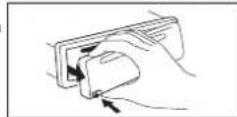
Removing the panel
I Switch off the power of the unit.
2. Remove the detachable panel.
3. Gently press the button of the case and open the cover. Place the panel into the case and take it with you when you leave the car.
Install detachable panel
- Fix right part of face plate in the right part of panel slot of the unit.
- Press down the left side of the face plate until it clicks into the panel slot of the unit.
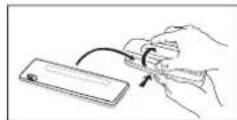
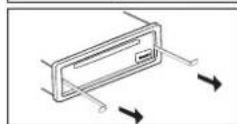
Remove the unit
Switch of the power of the unit.
1. Remove the panel and the trim plate.
2. Insert both T-Keys into hole in front of the set until they lock.
3. Pull out the unit.

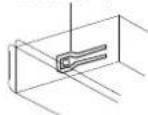
lockleve()
- Insert mounting bracket into the dashboard, and bend the mounting tabs out with a screwdriver. (Make sure that lock lever is flush with the mounting bracket. Not projecting outward)
- Secure the rear of the unit After fixing mounting bolt and power connector, fix the rear of the unit to the car body by rubber cushion
- Insert trimplate
5. BASIC OPERATIONS
Press this button to remove the control panel.
1) POWER ON/OFF BUTTON
Press PWR button or any other button on the front of the radio (except Open/Eject) to turn the unit on. Press PWR button again to turn the unit off.
2) MODE BUTTON (MODE)
Press MODE button to select a different mode of operation as indicated on the display panel. Available modes include Tuner, CD, CARD, USB mode.
3) PWR BUTTON (MUTE)
Press the PWR button momentarily to mute the audio volume, and "Mute" will flash in the display. Press the PWR button again to restore volume to the previous setting.
4) VOLUME KNOB
To increase the volume rotate the volume knob clockwise, to decrease the volume rotate the volume knob anticlockwise.
Press the VOLUME knob, the display will be displayed first option is Volume, Bass, Treble, Balance, Fader and back to Volume. >>
When adjusting audio functions, the unit will automatically exit audio control mode after 5 seconds of inactivity. Use the volume knob to adjust the settings.
8) DISPLAY (DSP)
Selects the radio frequency, clock display and PTY NONE.
To set the clock:
-
With clock display selected, hold down the "DISP" button until clock display starts flashing.
-
Rotate the volume knob to change minutes and hours.
-
Press "DISP" button to start the clock
Pressing the "DISP" key will display the following modes;
In case of receiving a RDS station:
Tuner mode PS-PTY-FREQ-CT
CD/MP3 player mode CDP - PS - PTY - FREQ - CT
In case of receiving NON RDS station
Tuner mode CLOCK-FREQ-NO PTY
CD/MP3 player mode CDP-FREQ-CT-NO PTY
CT = clocktime
6. TUNER OPERATION
II) TUNING UP/DOWN BUTTON
Manual Tuning
Press the Up Tuning or Down Tuning button for more than 3 seconds to move the radio
frequency number up or down one step.
Auto Seek Tuning
Press the Up Tuning or Down Tuning button for less than 3 seconds to move to next station automatically.
12) PRESET STATIONS BUTTONS
Six numbered preset buttons store and recall stations for each band (3 FM bands).
Store a Station
Select a band (if needed), then select a station. Hold a preset button for 3 seconds. The preset number will appear in the display.
Recall a Station
Select a band (if needed). Press a preset button to select the corresponding stored station.
13) AUTOMATICALLY STORE / PRESET SCAN (A/PS)
Automatically Store
Automatically select 6 strong stations and store them in the current band. Select a band (if needed). Press A/PS button for more than three seconds. The new stations replace stations already stored in that band.
Preset Scan
Scan stations stored in the current band. Select a band (if needed). Press A/PS button for less than 3 seconds. The unit will pause for ten seconds at each preset station. Press A/PS button again to stop scanning when the desired station is reached.
Stereo
The unit will automatically pick up a stereo signal, if stereo signal is available. When in stereo mode, the ST icon will appear on the display.
Insert a CD label-side up with the unit turned on, and the disc will begin to play. Press the Eject button to stop CD play and eject the CD. The unit does not have to be turned on to eject the CD.
PAUSE BUTTON (PAU)
Press the pause button to suspend disc play. Press the pause button again to resume disc play.
TRACK SELECT
Press the Up Tuning or Down Tuning button for less than one second to advance to the next track on the CD, The selected track number will appear on the display. Press and hold the Up Tuning or Down Tuning button for more than one second to fast forward or fast reverse through the disc.
REPEAT BUTTON (RPT)
Press REPEAT BUTTON (RPT) during disc play to continuously repeat the track. Press REPEAT BUTTON (RPT) again to stop Repeating.
RANDOM BUTTON (RDM)
Press RANDOM BUTTON (RDM) during disc play to play all tracks on a CD in random order. Press RANDOM BUTTON (RDM) again to stop random play. INTRO SCAN BUTTON (INT)
During disc play, press INTRO SCAN BUTTON (INT) to play the first 10 seconds to each track on the disc. When the desired track is reached, press INTRO SCAN BUTTON (INT) again to end the scan and play the selected track.
CD TEXT
The unit can display the first 11 letters of Album Title,Artist Title. If the recorded information is longer than 11 characters.The rest of text will scroll from right to left on the display.
RDS FUNCTIONS
The unit is equipped with the following RDS function:
- AF Alternative Frequencies
-CTClockTime
EON Enchanced other Network
-PI Program identifications
- PS Program service name
- PTY Program Type
- REG Regional Change
-TA Traffic Announcement
-TP Traffic program
- DSP OFF - FLAT - CLASSIC - POP - ROCK
By pressing AF button < 3 seconds to select AF ON/OFF. "AF ON" or "AF OFF" will show & remain on the LCD segment for 5 seconds.. Under AF "On" mode, if the tuned in station signal is getting weak, the unit will automatically switches to a different frequency on the same network with stronger signal.

2.TA FUNCTION
By pressing TA button < 3 seconds, turn switch on TA standby mode. "TA ON" will show & remain on the LCD segment for 5 seconds & the TA icon will light up on the LCD. In the stand by mode, when a traffic announcement broadcast starts, the traffic announcement broadcast will be received as top priority regardless of the function mode.When a traffic announcement starts, "TRAFFIC INFO" will show on the LCD, press the TA button can cancelled the broadcast reception while a traffic announcement broadcast is being received.
The unit will go back to the previous mode and TA goes into stand by mode again. When the TP icon is not light up for 60 seconds, A beep Alarm tone is heard and the LCD will show "Lost TP,TA".TA seek will automatic activate and searches to another TA station.
3.PTY FUNCTION
Pressing PTY button < 3 seconds to goes into PTY select mode. "PTY" icon will light up on the LCD. The LED around encoder volume will starts blinking. The user now has 5 seconds to select the desired PTY item by using volume up/down button. Once selected the PTY item, user have 5 seconds to press "SELECT" or "TUNE UP or TUNE DOWN" buttons < 3 seconds to seek for the selected PTY item. The LCD will display "PTY SEEK". If no station with the selected PTY broadcast can be received, the LCD will display "No Match PTY" and blinks for 5 seconds then returns to the previous mode.
User can store his favor PTY into the preset memory MI to M6. After selected a PTY item, long press any one of the preset memory button can store the selected PTY.To recall the stored PTY item by switching on PTY mode then press preset memory < 3 seconds, the unit will automatically search the stored PTY station in the preset memory
EASY, LIGHT SPORT, EDUCATE, JAZZ, COUNTRY WEATHER, FINANCE, CHILDREN CLASSICS CULTURE, SCIENCE,VARIED NATION, OLDIES SOCIAL RELIGION, PHONE FOLK TRAVEL, LEISURE, NOTE: Factory default stored for PTY preset memory. M1/News, M2/Information, M3/Pop Music, M4/Sports, M5/Classics, M6/Finance.
4.RDS (RADIO DATA SYSTEM) MENU
To access the RDS-MENU press the SELECT button >3 seconds. The following list of features can be selected
- Auto Seek All / RDS
- TA Seek On / Off
- TA Volume 0-40 (default 18)
Regional On/Off - DSP (Off - flat - classic - pop - rock)
Steps to access Menu items:
1) To access the RDS MENU press the SELECT button >3 seconds.
2) "RDS-MENU" will be displayed on display for 2 seconds, and then "Auto Seek" appears on display.
3) To navigate through the MENU use the >> or << buttons to navigate down or up through the menu items. Or Press SELECT BUTTON repeatedly to view the menu item sequential
4) Use the Volume up/down button to adjust the selected menu item.
5) After the selected menu item(s) has been changed and no other operation have been made, a 5 second time-out will resume the head unit to the previous mode.
Features description of RDS-Menu Items:
- Auto seek RDS/All
Auto Seek "RDS" will be displayed by default. The user now has 5 seconds to adjust by using volume up/down from "RDS" to "ALL". If "ALL" is selected, during the Auto Seek tuning mode, the unit will stop at all radio station including Non RDS station regardless of AF and TA is switched on. If "RDS" was selected and the AF is on, during the Auto Seek tuning mode, The unit will stop at only RDS station.
- TA seek On/Off
TAsee "On" will be displayed by default. The user now has 5 seconds to adjust by using volume up / down from "On" to "Off". If selected "On" mode, when a received station does not have TP information for 60 seconds, the unit automatic search to next station which does not have the same station (PI), but has the TP information. When a TP information get lost at the current station over the default retune time (60 seconds), the unit start to search to next same PI station. When the same PI station does not catch in I cyclic search, the unit retunes to next station with TP information.
If "Off" is selected, when a received station dose not have TP information for 60 seconds, a Double Beep Sound (Alarm) is output and the LCD will be displayed "Lost TP TA" but the retune mode is not activated.
Note: This function only activate when "TA" switches on mode.
-TA Volume
TAVolume "18" will be displayed by default. The user now has 5 seconds to adjust by using volume up/down button from "0-40". When TA function is activated, if a TA program is tuned in at the volume level set regardless of the volume of the other source at the time.
Note: When the unit tuned into a TA program. The volume level can only be increased but cannot be decreased.
Regional On/Off
REGIONAL "OFF" will be displayed by default. The user now has 5 seconds to adjust by using volume up/down button from "off" to "On". If "on" is selected when the AF search or PI seek, it will implemente to station which have all the PI codes which are the same as current station. If "off" is selected, when AF search or PI seek the regional code in the format PI code will be ignored. A regional station is possible to be received. Note: The Regional function On/Off Setting is valid when the "AF" function is "on"
MP3 FUNCTION
How to select MP3 files
I. Searching track
- Press "AS/PS" once then searching is activated
- Press "SEL"
- With the volume up/down knob select the first digit
- Press "SEL" then the first digit is fixed and the second digit is blinking
- With volume up/down knob select the 2nd (and/or 3rd number)
- The song that you have selected will automatically start playing
2. Searching file name
- Press "AS/PS" twice, now file search is activated.
- Press "SEL" then the first directory is displayed.
- With the volume up/down knob you can select the directory you want
- Press "SEL" again, now the directory is fixed and the first file name will appear
- With the volume up/down knob you can select the file you want
- Press "SEL" and the song you have selected will be played
3. Searching character
- Press "AS/PS" three times, now the character search is activated
- Press "SEL" button, now the "A" is displayed
- With the volume up/down knob select the letter you want.
- Press the "enter" key longer than 2 seconds
- Now all songs starting with this letter will be displayed
- With the volume up/down knob you can select the song you want
- Press "SEL" and the song that you have selected will be played
BLUETOOTH FUNCTION
I. Bluetooth Multi-function key
- Pairing
Pick up call
- Ending call
-Redial
Voice dialing
- Speaker mute
3. Bluetooth status LED indication
4. Microphone
5. Volume control
The MCD 300M bluetooth car CD/MP3 player not only provides the audio function but also hands-free communication using cell-phones. Please read this part of the user-guide to establish a connection with your mobile phone. Please note: you need to have a phone with Bluetooth capability. The phone can be in your pocket or your bag while handling in- and outgoing calls. This device utilizes Bluetooth wireless technology version V1.2 that supports Bluetooth headset and/or Handsfree profile.
PAIRING
The MCD 300M can store pairing info for 3 phones, please make sure the current paired phone is not connected to the device when pairing the new mobile phone.
Step I
Check your mobile phone's user guide and find out how to turn on the Bluetooth function.
Step 2
Press and hold the Bluetooth button ( ) , now the flyer will show “Phone ” and you will hear a “ do do ” melody and the blue light will flash quickly .
Step 3
Perform a 'Bluetooth device discovery' on your mobile phone. It takes a few seconds to search for and find Bluetooth devices.

Step 4
"HSD-01" will appear in the display and will ask for your confirmation to pair it. Confirm this, and enter Passkey "1234" (default). The phone will now start pairing with the unit and the phone will confirm that pairing was successful. Now the blue LED will flash one time per second.
If the pairing failed the blue LED will keep on flashing rapidly for 2 minutes. During this period you can repeat steps 3 and 4 to retry pairing.
If you want to stop this process push the Bluetooth button () for 2 seconds.A "dn dm dn" melody will be played and the player will go back to its normal status.
Answer a call
When the player is on and a call is coming in, the player will stop. The display will show "phone" and in the meanwhile the "do lu do lu" melody will be played.
Auto-answer: If the mobile phone is set to auto answer under hands-free or headset mode, the call will automatically be answered after a few rings.
Ending a call
Simply push the Bluetooth button ( ) once to end a call, after a few seconds the unit will automatically go back to its normal status.
Last number redial
While the MCD 300M is in standby mode (not in conversation mode) press and hold the Bluetooth button for 3 seconds and your phone will radial the last called number.
Voice dialing
First turn on the voice dialing function of your phone (if available) and voice tags have to be available. When the unit is in standby mode push the Bluetooth button once and the display will show "phone". Now push it again and a "do" sound will be played. Now speak the voice tag that was earlier stored in your phone's voice dial phone book. The number will be dialed now.
TROUBLESHOOTING
Before going through the check list, check wiring connection. If any of the problems persist after check list has been made, consult your nearest service dealer.
| Problem | Cause | Solution |
| No power | The car ignition switch is not on | If the power supply is properly connected to the car accessory terminal, switch the ignition key to "ACC" |
| The fuse is blown | Replace the fuse | |
| Disc cannot be loaded or ejected | Presence of disc inside the player | Remove the disc in the player, then insert a new one |
| Inserting the disc in reverse direction | Insert the compact disc with the label facing upward | |
| The disc is extremely dirty or defective | Clean the disc or try to play a new one | |
| Temperature inside the car is too high | Cool off or until the ambient temperature returns to normal | |
| Condensation | Leave the player off for an hour, then try again | |
| No sound | Volume is in minimum | Adjust volume to a desired level |
| Wiring is not properly connected | Check wiring connection | |
| Sound skips | The installation angle is more than 30 degrees | Adjust the installation angle less than 30 degrees |
| The disc is extremely dirty or defective | Clean the compact disc, then try to play a new one | |
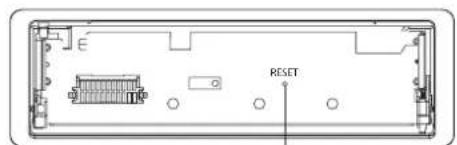
| The operation keys do not work | The built-in microcomputer is not operating properly due to noise | Front panel is not properly fixed into its place Press the RESET button. |
| The radio does not work | The antenna cable is not connected | Insert the antenna cable firmly |
| The signals are too weak | Select a station manually |

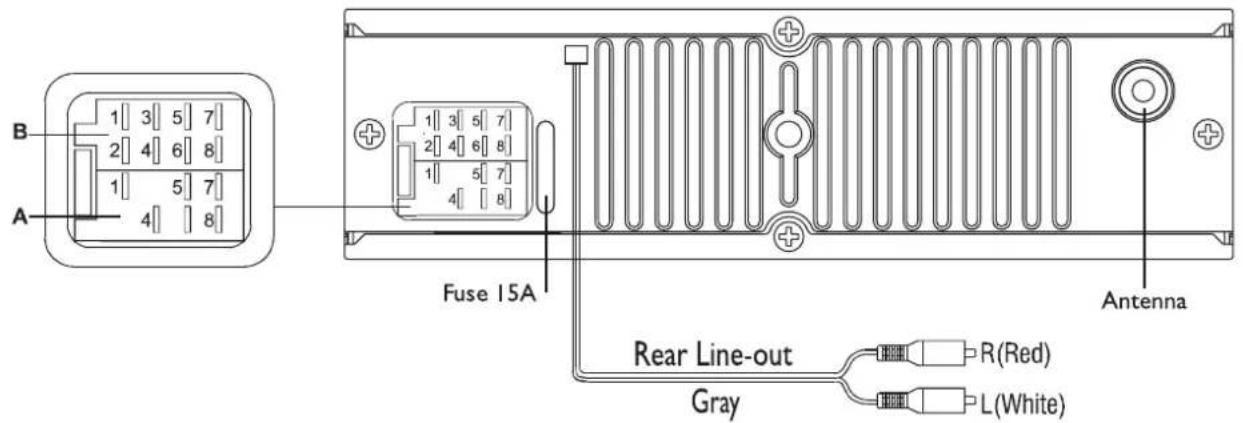
| Location | Function | |
| A | B | |
| 1 Rear | right speaker (+) | |
| 2 Rear | right | speaker (-) |
| 3 | F | |
| 4 Accu | 12V(+) Front right speaker | (-) |
| 5 Auto | Antenna Front left speaker | (+) |
| 6 | F | |
| 7 | A | CC+ Rear left speaker (+) |
| 8 | G | round Rear left speaker (-) |
r
ont
r
(
19
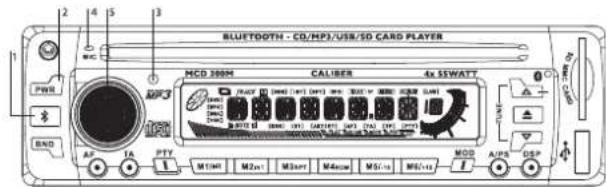
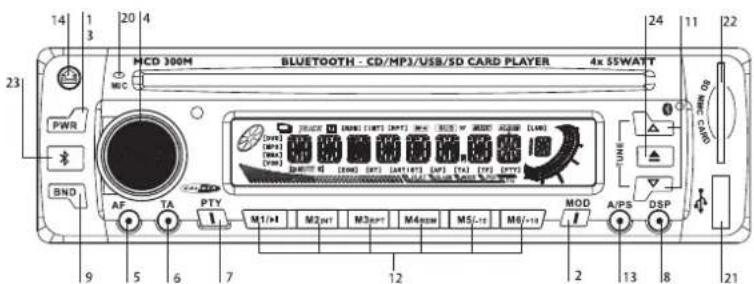
I. TOUCHE ALIMENTATION (POWER)
2. TOUCHE MODE
3. TOUCHESOURDINE (MUTE)
4. TOUCHE DE SELECTION DE FONCTION /VOLUME HAUT /VOLUME BAS
5. TOUCHE AUDIOFREQUENCY (AF)
6. TOUCHETA
7. TOUCHE PTY
8. TOUCHE ECRAN D'AFFICHAGE
9. TOUCHE GAMME (BAND)
II. TOUCHES ACCORD HAUT/BAS, PLAGE SUIVANTE/PRECEDENTE
12. TOUCHES STATIONS PREREGLEES (M1~M6)
13. TOUCHE MEMORISATION AUTOMATIQUE / BALAYAGE STATIONS PREREGLES (AS/PS)
14. TOUCHE DEBLOCAGE PANNEAU
15. TOUCHE OUVERTURE PANNEAU
19. TOUCHE DE REINITIALISATION
20. MICROPHONE
21. PRISE USB
22. PRISE CARTE SD/MMC
23. FONCTION BLUETOOTH
24. TOUCHE D'EACTION DE CD
CARACTERISTIQUES
GENERALITES
Alimentation electrique DC 12V