
BP8960E - Oven GORENJE - Free user manual and instructions
Find the device manual for free BP8960E GORENJE in PDF.
| Product type | Built-in oven |
| Brand | Gorenje |
| Model | BP8960E |
| Dimensions (W x D x H) | 440 x 390 x 340 mm |
| Volume | 59 liters |
| Power supply | 230 V ~ 50 Hz, phase + neutral |
| Maximum power consumption | 3,1 kW |
| Lower heating element | 1,3 kW |
| Upper heating element | 0,9 kW |
| Grill element | 1,6 kW |
| Fan element (inner front part) | 2,3 kW |
| Cooking functions | Conventional cooking, Grill, Semi-forced air convection, Defrosting, Lower heat only, Pyrolytic self-cleaning |
| Timer | Electronic with 24h clock, timer, automatic and semi-automatic cooking |
| Maximum temperature | 475 °C (pyrolysis) |
| Temperature range (cooking) | 50 °C to 250 °C |
| Included accessories | Rack, drip tray, rotisserie kit, side runners |
| Self-cleaning | Pyrolytic (90 min, extendable to 180 min) |
| Safety | Automatic door lock above 300 °C, earthing mandatory |
| Cleaning | Enamel surface: damp cloth and mild detergent; removable door |
| Lighting | Replaceable interior lamp |
| Weight | Not specified in the manual |
| Installation | Built-in in 600 mm cabinet, must be carried out by a professional |
Frequently Asked Questions - BP8960E GORENJE
User questions about BP8960E GORENJE
0 question about this device. Answer the ones you know or ask your own.
Ask a new question about this device
Download the instructions for your Oven in PDF format for free! Find your manual BP8960E - GORENJE and take your electronic device back in hand. On this page are published all the documents necessary for the use of your device. BP8960E by GORENJE.
USER MANUAL BP8960E GORENJE
natural_image
Exterior view of a stainless steel oven with control knobs and a 'goverage' label (no other text or symbols)BP2460 E / S / W

natural_image
Exterior view of a stainless steel oven with control knobs and a water bath (no visible text or symbols)BP7470 E / S / W

natural_image
Exterior view of a stainless steel oven appliance (no visible text or symbols)BP8960 E / S / W
NAVODILA ZA UPORABO ZA PIROLITIČNO VGRADNO PEČICO MODEL BP2460 / BP7470 / BP8960
INSTRUCTION FOR USE FOR BUILT IN PYROLITIC OVEN MODEL BP2460 / BP7470 / BP8960
The symbol on the product or on its packaging indicates that this product may not be treated as household waste. Instead it shall be handed over to the applicable collection point for the recycling of electrical and electronic equipment. By ensuring this product is disposed of correctly, you will help prevent potential negative consequences for the environment and human health, which could otherwise be caused by inappropriate waste handling of this product. For more detailed information recycling of this product, please contact your local city office, your household waste disposal service or where you purchased the product.
DE
natural_image
Technical line drawing of a mechanical component with labeled parts (A, C, D) and no readable text or symbols beyond labelsOdstranjevanje vrat pečice (Slika 4)
natural_image
Technical line drawing of a mechanical device with internal components and a tool (no text or symbols)Slika 5
| Razpredelnica za peko v pečici | ||||
| Vrsta hrane | Temperatura °C | Položaj police (*) | Čas peke (minute) | Način delovanja |
| Testo | ||||
| Štručke | 180 | 2 | 55-65 |  |
| Sadni kolač | 200 | 1 | 30-40 | |
| Skutina torta | 180 | 2 | 35-40 | |
| Vzhajano testo v modelu | 200 | 1 | 25-35 |  |
| Rahlo testo z jajci | 190 | 2 | 20-30 | |
| Rahlo testo brez jajc | 200 | 2 | 15-25 | |
| Biskvitno testo | 190 | 3 | 15-20 | |
| Lazanje | 225 | 2 | 40-50 |  |
| Meso | ||||
| File govedine | 225 | 2-3 | 50-80 |  |
| Goveja pečenka | 225 | 2-3 | 50-80 | |
| Telečja pečenka | 225 | 2-3 | 60-80 | |
| Svinjska pečenka | 170-180 | 2 | 45-60 | |
| Pečeno ovčje meso | 225 | 2 | 45-55 |  |
| Pečena govedina | 225 | 2-3 | 50-60 | |
| Pečen zajec | 200 | 2 | 60-90 | |
| Pečen puran | 180 | 2 | pribl. 240 |  |
| Pečena gos | 200 | 2 | 150-210 | |
| Pečena raca | 200 | 2 | 120-180 | |
| Pečen piščanec | 200 | 2 | 60-90 | |
| Srnino stegno | 200 | 2-3 | 90-150 | |
| Jelenovo stegno | 180 | 2-3 | 90-180 | |
| Ribe | 180 | 2-3 | 10-40 |  |
| Zelenjava |  | |||
| Dušena zelenjava | 170-190 | 2-3 | 40-50 | |
| Pizza | 240 | 1 | 15-25 |  |
| Peka pod žarom | ||||
| Zrezki (kotleti) | 4 | 8-12 |  | |
| Svinjska klobasa | 4 | 10-13 | ||
| Piščanec na žaru | 3 | 25-35 |  | |
| Piščanec na nabodalu | 50-65 | |||
| Teletina na nabodalu | 50-65 | |||
Opomba:
Installation Instruction
Warning and safety instructions Before using the oven for the first time, read these operating instructions carefully for full information on the safe installation, use and care of your new appliance.
This unit must be correctly installed in accordance with the menu-facturer's instructions by a suitably qualified person.
The manufacturers decline responsibility for damage to persons or items due to poor or incorrect installation of this appliance.
Make sure that the voltage and frequency of the mains supply correspond to the details on the rating plate which can be found on the lower part of the front of the oven.
Warning: this appliance must be earthed.
Our company declines any liability for failures in the earth connection or for earth connection that is not in compliance with the regulations in force.
Maintenance and servicing work must only be carried out after the power supply has been disconnected by switching off at the wall socket or removing the mains fuse.
Due to our policy of continuous innovation, we reserve the right to adjust or modify our product without prior notification.
Do not let children near the oven during use as external surfaces including glass will become hot so, to avoid the danger of burns or injury, and this appliance is not intended for use by young children or inform persons without supervision. Young children should be supervised to ensure that they do not play with the appliance
Supervise the use of the oven by the elderly or infirm.
Where an oven is built-under with a drawer beneath, this must be made non functioning with a ‘dummy’ front.
On no account should flammable materials be stored in a drawer beneath a built-under oven as there is a risk of fire.
Do not place heavy objects on the open door or sit on it as this could cause damage to the hinging.
When cooking with oil or fat, do not leave the oven unattended as there is a risk of fire.
To avoid damage to the interior enamel, do not place the oven pan or baking trays on the bottom of the oven and do not line the base of the oven with aluminium cooking foil.
During cooking, food natural produces steam which is vented away to prevent an excessive build-up within the oven. As this steam can condense to water droplets on the cool outer trim of the oven, it may be necessary during cooking to wipe away any moisture with a soft cloth. This will also help to prevent soiling and discoloration of the oven exterior by cooking vapours.
Before using for the first time
Switch off the oven at the wall socket or remove the mains fuse before cleaning. Remove any packaging and the oven accessories from the oven. Wipe the oven interior using hot water and a mild detergent.
Rinse carefully using a damp cloth. Wash the oven shelves and accessories in a dishwasher or using hot water and a mild detergent, and dry thoroughly.
Technical details
This appliance conforms to the standard 73/23 CEE and 93/68 CEE EMC 89/336 CEE.
Voltage regulations
≈ 230 V phase + neutral.
Built-in oven dimension:
Length : 440
Depth : 390
Height : 340
Volume : 59 Lt
Wattage of heating elements
Lower heating element : 1,3 kW
Top oven heating element : 0,9 kW
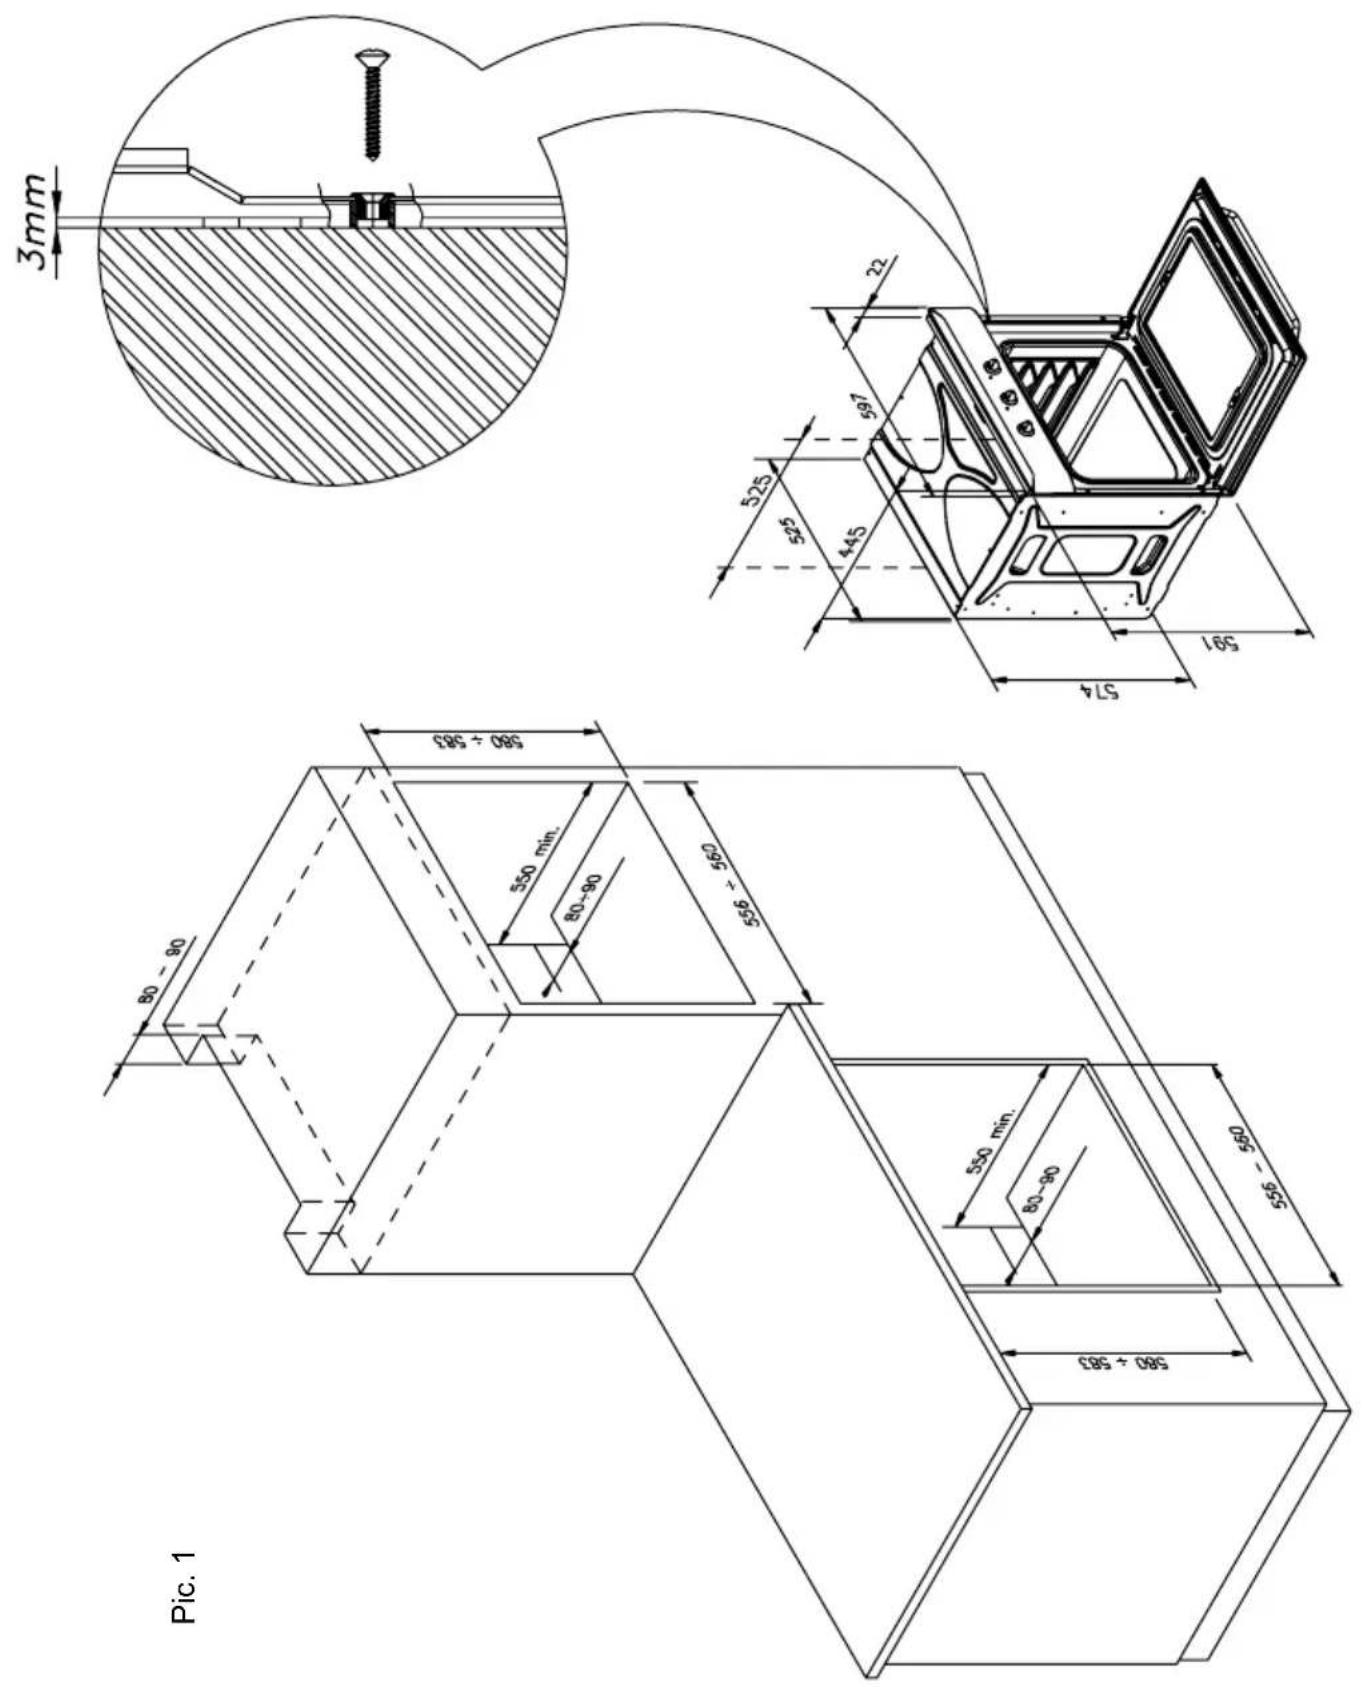
Built-in installation
IMPORTANT: The unit must be correctly installed in accordance with Manufacturers instructions and by qualified person. Maintenance and service must be carried out after the power supply has been disconnected.
ELECTRICAL CONNECTION: Before connecting the appliance to the mains, ensure that:
- The voltage corresponds to the voltage specified on the rating plate at the bottom of the surround.
- The overload cut-off device and the domestic system can withstand the load of the appliance (see rating plate).
- The power supply system is provided with an efficient earth connection and that the socket or omnipolar switch, with minimum contact opening of 3mm, is easily accessible once the appliance has been installed.
- If the plug is not easily accessible, the installation personnel must provide an omnipolar switch with contact opening distance equal to or greater than 3mm.
If further mains cable is needed, it must be with minimum section are of 1,5 mm type H05RR-F.
Sufficient cable must be left for easy maintenance of the appliance.
Warning: this appliance must be earthen.
Proper earthling is mandatory for the appliance.
Our company declines any liability for failures in the earth connection that is not in compliance with the regulation in force.
This appliance is designed for building-in to a standard 600mm wide oven housing.
The housing, adjacent furniture and all materials used in installation must be able to withstand a minimum temperature of 85^ C plus ambient temperature during periods of operation. In addition, adjacent furniture cabinet doors must be at least 4mm from the appliance at all points. Certain types of vinyl or laminate kitchen furniture cabinetry
are particularly prone to heat damage and discoloration, any delimitation or discoloration of materials which occurs below 85^ C plus ambient temperature or where materials are less than 4mm from the appliance will be the liability of the owner.
For building-under a worktop, the installation dimensions are as follows.
Attention: when the qualified person install the oven near other electrical appliances, the power cable mustn't be near or contact with side heat oven.
Oven operation

text_image
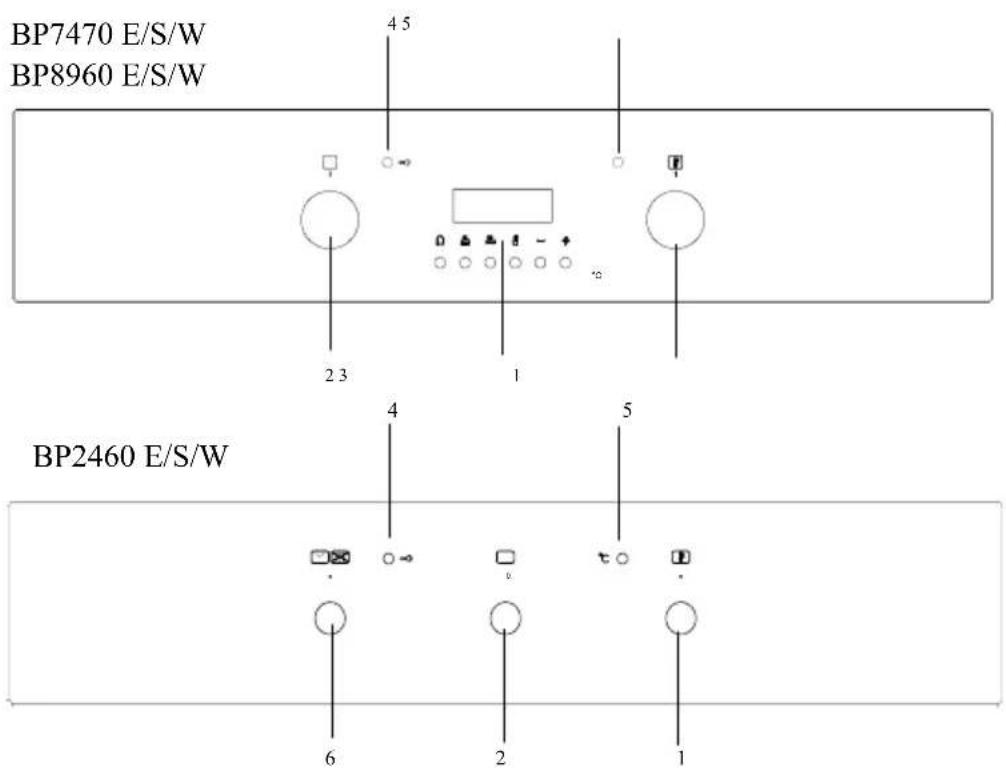
BP7470 E/S/W BP8960 E/S/W 4 5 2 3 1 4 5 BP2460 E/S/W 6 2 11 - Thermostat
2 - Selector
3 - Electronic programmer
4 - Red light
5 - Yellow light
6 - End of cooking timer
Your new oven incorporates a multifunction cooking system, enabling you to select the most appropriate heating method for the type of food you are preparing.
The function required is selected by turning the oven function selector knob in a clockwise direction to the appropriate symbol. The oven interior light will illuminate and the 'On' indicator light will glow. The oven functions and their symbols are:
Oven operation

Light only (BP2460 - BP7470 - BP8960)
The oven interior light comes on.

Conventional heating (BP2460 - BP7470 - BP8960)
The elements in the roof and floor operate to give a conventional static oven heating system. The oven should be preheated before use until the temperature indicator light goes out.
It is recommended that food is only placed on one shelf position when cooking with the conventional heating function. Do not use the lowest or highest shelf positions or the food may overcook.
Lower/upper resistance + ventilation (BP7470 - BP8960)
Semi forced air convection (with the door closed). The thermostat has to be set to desired temperature between 50^ C to 250^ C.
Recommended use : for food which needs to be cooked on the outside as an the inside (confectionery, roasted meat).

Full grill (BP2460 - BP7470 - BP8960)
The element under, the floor of the oven operates on its own. The oven, should be preheated for 15 minutes before use.
This function is ideal for 'blind baking' pastry cases for quiches and tarts.
In this case, the food should be cooked with the oven shelf on the lowest shelf position.

Semi forced air convection (BP7470 - BP8960)
The fan operates with the infra-red grill element in the roof of the oven. The oven should be pre-heated for 5-10 minutes before use.
When roasting meats, this function will crisp the outside of the food whilst the circulating hot air ensures even cooking.
Semi forced air convection can also be used for grilling, so that food does not need to be turned so often.
Grilling must always take place with the oven door closed.
Do not use aluminium foil to cover the grill pan or heat items wrapped in aluminium foil under the grill – the high reflectivity of the foil can damage the grill element.
Keep the oven door closed when using the GRILL.

Forced air convection (BP7470 - BP8960)
The fan and an element behind the rear wall of the oven circulate hot air to give an even temperature throughout the oven.
The oven should be pre-heated before use until the temperature indicator light goes out. Food can be cooked on several shelf positions at once, saving both time and energy.
The oven temperature should be reduced by approximately 10% compared to conventional oven heating systems.

Defrosting (BP7470 - BP8960)
The fan operates but without its element, so the oven is not directly heated. The oven door must remain closed.
Frozen food can be quickly defrosted by placing in the oven pan and sliding onto the lowest shelf position. Defrosting time will be reduced by up to one third using this system.

Lower heating element only (BP2460 - BP7470 - BP8960)
The element under, the floor of the oven operates on its own. The oven, should be preheated for 15-20 minutes before use.
This function is ideal for 'blind baking' pastry cases for quiches and tarts. In this case, the food should be cooked with the oven shelf on the lowest shelf position.

Oven self-clean mode (BP2460 - BP7470 - BP8960)
Turn the selector knob to this function which can only be set via the timer, the cleaning cycle is 1,5 hours.
All internal oven accessories must be removed before using the pyrolitic function. During the pyrolitic function the oven light is disabled.
Helpful hints
- Before cooking, check that any unused accessories are removed from the oven.
- Preheat the oven at cooking temperature before use.
- Place cooking trays in the centre of the oven and allow gaps when using more than one tray for air to circulate.
- Try to open the door as little as possible to view food (the oven light remains on during cooking
- Be careful when opening the door to avoid contact with hot parts and steam.
End of Cooking
The function of the programming timer is to make the oven turn on for a pre-determined amount of time.
1. To operate.
After having set the oven switch knob to the desired temperature, turn the timer knob in a clockwise direction to the desired cooking time (maximum 110minutes). After the set time runs out, the timer will have returned to position "O" and the oven will automatically turn off.
2.Manual position.
If the cooking time is longer than the hours programme, or if you wish to use the oven manually, to turn it off when you desire, turn the knob to position
3. Automatic pyrolitic cleaning.
The self-cleaning function

after having set the oven switch knob to turn the timer knob in a clockwise direction to 90 minutes cooking time (it's possible turn the timer knob to 110 minutes if the oven is very dirty).
During the pyrolitic function the oven light is disabled.

text_image
STOP 110 5 105 15 90 45 75 60ELECTRONIC PROGRAMMER (pic. 3)
The electronic programmerisa
device which groups together the following functions:
- 24 hours clock with illuminated display
- Timer (up to 23 hours and 59 min.)
- Program for automatic beginning and end of cooking
- Program for semi-automatic cooking (either start or finish only).
- Displaying the required temperature

text_image
24·00A(pic. 3)
Description of buttons

"TIMER"

"COOKING TIME "

"END OF COOKING TIME "

"MANUAL POSITION "

" ADVANCEMENT OF THE NUMBERS OF ALL PROGRAMS - CHECK THE INSERTED TEMPERATURE"

" TURNING BACK OF THE NUMBERS OF ALL PROGRAMS - CHECK THE INSERTED TEMPERATURE"
Description of lighted symbols
« AUTO » - (flashing) - Programmer in automatic position but not programmed.
« AUTO » - (always lighted) - Programmer in automatic position with inserted program.

Manual cooking taking place

+ A Automatic cooking taking place

+ Timer in operation
NOTE: After having selected the operation, a period of time will pass (about 3-4 seconds) before confirmation, during which the data may be modifies.
Digital clock
Clock numbers show hours (0-24) and minutes.
Upon immediate hooking up of the oven or after a blackout, three zeros will flash on the programmer panel.
To set the hour it is necessary to push simultaneously the and buttons or ↓ button and AT THE SAME TIME to push the
“+” button or “-” until you have set the exact hour. When the actual time is inserted, release the buttons in order to make function the clock.
Manual cooking without using the programmer
To use manually the oven, that is, without the auxiliary
programmer, it is necessary to cancel the flashing «A» by pushing the 🎨 button.
If the «A» message is displayed in permanent mode, indicating that the oven is programmed, it is impossible to set the timer to manual function and therefore the oven cannot be switched on. In this case the program must be firstly cancelled by pressing ☐, then the manual function can be set.
Timer
The timer can be used to measure a time period between 1 minute and 23 hours & 59 minutes.
1) Automatic cooking (start and end)
■ Set the length of cooking time by pushing the 12 button.
■ Set the end of cooking time by pushing the button.
- Set temperature and cooking program by using the thermostat knob and the selector knob.
After this setting the symbol «A» will light.
An example: cooking lasts 45 minutes and is expected to stop at 14.00.
Push until having set 0.45.
Push 📄 until having set 14.00.
After having finished the setting, the clock hour will appear on the panel and «A» symbol will light. This means the cooking program has been memorized.
At 13.15 h. (14.00 h. minus 45 minutes) the oven turns on automatically.
At 14.00 h. the oven turns off automatically, a buzzer goes on until it is stopped by pushing the 🔒 button.
The symbol «A» will flash.
2) Semi-automatic cooking
A. Set the length of cooking time
B. Set the end of cooking time
A) Set the length of cooking time by pushing the 📄 button.
The oven will turn on immediately, the symbol «A» will light.
When the set cooking time has elapsed, the oven will turn off, a buzzer will ring until it is stopped as above described.
The symbol «A» will flash.
B) Set the end of cooking time by pushing the 📄 button.
The oven will turn on immediately, the symbol «A» will light.
At the set time, the oven will turn off and a buzzer will ring until it is stopped as above described.
The cooking program may be cancelled at any moment by
pushing the 🏠 the oven can work manually.
NOTE: 1) and 2) functions or 1)+ 2) functions are active only if a cooking function has been selected.
Timer = buzzer
The timer program consists only of a buzzer which may be set for a maximum period of 23 hours and 59 min.
To set the timer, push the 🔒 button and, at the same time, + or - until you read the desired time on the display.
After the setting, the clock hour and the 🔒 symbol will appear.
The countdown will start immediately and may be seen at any moment on the display by simply pressing the 🔊 button.
At the end of the set time, the 🔒 symbol will turn off and the buzzer will ring until it is stopped by pressing the 🔒 button.
It is possible to change the sound (3 levels: low - medium - high): when it sounds, push “-” button.
NOTE: At end of cooking time, the sound beeps every second for a maximum of 7 minutes.
Cancelling an automatic cooking program
An automatic cooking program can be cancelled whenever by pushing at the same time the button 🎨 and 🎨 or the button 🎨. Now the oven can work manually.
Pyrolitic cleaning
Select the self-cleaning function When selected, this will automatically set a cleaning duration of 90 minutes (it's possible to change 180 minutes if the oven is very dirty).
This function cleans by raising the oven temperature to 475^ C. The resultant ash deposits can be wiped away with a moist cloth when the oven has cooled down but is still slightly warm.
If an increased cleaning duration is required, it can be increased in the following manner. Select the self-cleaning function as above.
Press the manual button 📋 on the electronic timer 1:30 will appear in the display.
For safety reasons the oven door automatically locks at temperatures above 300°C. When this occurs, the oven emits an acoustic signal and the 'lock' indicator on the fascia panel becomes illuminated.
During the pyrolitic function the oven light is disabled.
WARNING
- All internal oven accessories must be removed before using the pyrolitic function.
- It is strongly recommended that the oven be only used in pyrolitic mode with persons in attendance.
- All big food, that remaining into the oven, must be removed before using the pyrolitic function.
Replacing the oven light
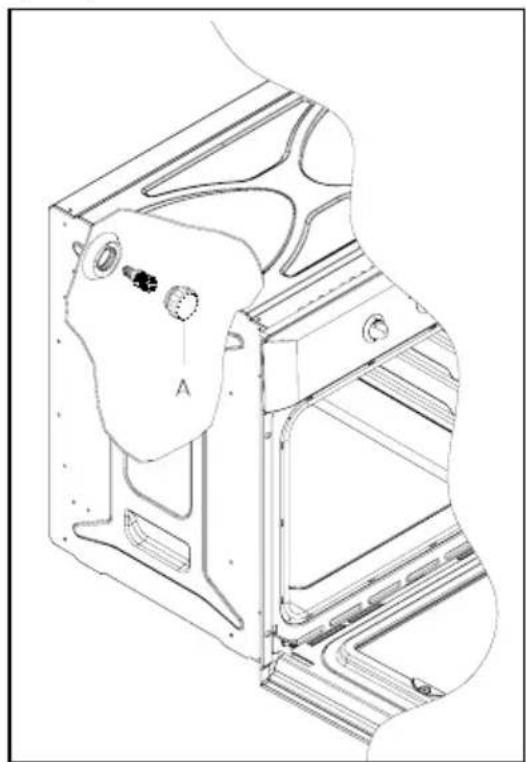
ATTENTION : disconnect the appliance from the power supply.
If the oven light needs to be replaced, the protective cover "A" must be removed by turning it anticlockwise. After the light has been replaced, refit the protective cover "A".
(Pic.4)
natural_image
Technical line drawing of a mechanical assembly with no visible text or symbolsRemoving the oven door (Pict.5)
To aid cleaning and make access to the oven interior easier, both oven doors can be simply removed (see diagram).
To facility cleaning of the oven, the door can Be removed via the hinges as follows:
hinges with movable bolts
The hinges A are provided with two movable bolts B.
When bolt B is raised, the hinge is released from its housing. Having done this, the door must be lifted upwards and removed, sliding it towards the outside;
grip the sides of the door near the hinges when performing these operations.
To refit the door, firstly slide the hinges into their slots.
Before closing the door, remember to rotate the two movable bolts B used to hook the two
hinges.
Do not immerse the door in water
Clean the enamelled interior surface and the glass using a damp cloth and a proprietary mild cream cleaner, rinse, then dry carefully using a soft cloth.
If necessary, the inner door glass can be removed by unscrewing the two lateral fixing screws. Make sure that the glass is dried thoroughly before re-fitting. Take care not to over tighten the fixing screws when re-fitting.
Oven accessories
The oven shelves, oven pans and trivets should be washed in hot water with a mild detergent then dried carefully, or they can be washed in a dishwasher.

text_image
A B Pict. 5How to use the turningspit (Pict.6)
In same ovens it is possible to use the turningspit and the grill together. Meat has to be inserted onto the skewers and blocked by the two clamps.
Proceed now as follows:
A. Place oven tray on the lowest position of the oven.
B. Place one of the forks support along the stainless steel rod and secure. Insert the meat onto the skewer and then put the other fork support on, securing it firmly into the meat.
C. The spit handle made of isolating material must be used for extracting the stainless steel rod from the oven and must be taken off when cooking.
For example the chicken weighing about 1,3Kg will take approximately 85-90minutes to cook.

natural_image
Line drawing of a mechanical device with a handle and internal components, labeled 'Pict. 6' (no text or symbols on the diagram itself)Oven cooking chart
| Food | Temp. °C | Shelf Position (*) | Cooking time (mins). | Cooking Function |
| Cake | ||||
| Bun 180 2 55-65 |  | |||
| Fruit Cake 200 1 30-40 | ||||
| Buttermilk curd cake 180 2 35-40 | ||||
| Mould leaven cake 200 1 25-35 |  | |||
| Choux pastry 190 2 20-30 | ||||
| Puff or flaky pastry 200 2 15-25 | ||||
| Biscuits 190 3 15-20 | ||||
| Lasagna | 225 2 40-50 | [GHYS] | ||
| Meat | ||||
| Fillet beef 225 2-3 50-80 |  | |||
| Roast beef | 225 2-3 | 50-80 | ||
| Roast veal | 225 2-3 | 60-80 | ||
| Roast pork | 170-180 | 2 45-60 | ||
| Roast lamp | 225 2 45-55 | |||
| Roast.beef | 225 2-3 | 50-60 |  | |
| Roast hare | 200 2 60-90 | |||
| Roast turkey | 180 2 240ca. |  | ||
| Roast goose | 200 2 | 150-210 | ||
| Roast duck | 200 2 | 120-180 | ||
| Roast chicken | 200 2 60-90 | |||
| Thigh roe deer | 200 2-3 | 90-150 | ||
| Thigh stag | 180 2-3 | 90-180 | ||
 | ||||
| Fish | 180 2-3 | 10-40 | ||
| Vegetable | [6DSX] | |||
| Stewing vegetable | 170-190 | 2-3 | 40-50 | |
| Pizza | 240 1 15-25 |  | ||
| Grill cooking | ||||
| Chop | 4 | 8-12 |  | |
| Pork sausage | 4 10-13 | |||
| Grill ckichen | 3 25-35 | |||
| Spit chicken | 50-65 |  | ||
| Spit roast veal | 50-65 | |||
Note: (*)= The start shelf position number is button oventhe oven should be preheated before use. This functions should cook with delicated food and/or preheated dish. This functions should cook with delicated food and/or preheated dish. It's possible cook same dish in different shelf position (the cooking time is the same). It's possible cook same dish in different shelf position (the cooking time is the same). | ||||
natural_image
Technical line drawing of a mechanical housing or enclosure component (no text or symbols)Abb. 4
Convection air forcée (BP7470 - BP8960)
natural_image
Technical line drawing of a mechanical housing or enclosure with mounting holes and internal components (no text or symbols)natural_image
Technical line drawing of a mechanical device with a component inserted into a housing, labeled Fig. 6 (no text or symbols on the diagram itself)natural_image
Technical line drawing of a mechanical device with a handle and internal components (no text or symbols)Oversigt over tilberedning i ovn
| Madvarer Temp. | °C Position plade(*) | Tilberedningstid(min) | Tilberedningssymbol |
| Kager | |||
| Kringler 180 2 55-65 |  | ||
| Frugttærter 200 1 | 30-40 | ||
| Kager med mælk og smør | 180 | 2 | 35-40 |
| Kager med gær 200 1 25-35 | |||
| Vandbakkelser 190 2 20-30 | |||
| Butterdej 200 2 15-25 | |||
| Småkager 190 3 15-20 | |||
| Lasagne 225 2 40-50 |  | ||
| Kød | |||
| Oksefilet 225 2-3 | 50-80 |  | |
| Roastbeef | 225 2-3 | 50-80 | |
| Kalvesteg | 225 2-3 | 60-80 | |
| Flæskesteg | 170-180 | 2 45-60 | |
| Lammesteg | 225 2 54-55 | ||
| Oksesteg | 225 2-3 | 50-60 | |
| Stegt hare | 200 2 60-90 | ||
| Stegt kalkun | 180 2 240 | ||
| Stegt gås | 200 2 150-210 | ||
| Stegt and | 200 2 120-180 | ||
| Stegt kylling 200 2 | 60-90 | ||
| Rådyrskølle | 200 2-3 | 90-150 | |
| Hjortekølle | 180 2-3 | 90-180 | |
| Fisk | 180 | 2-3 | 10-40 |
| Grøntsager | |||
| Stuvede grøntsager | 170-190 | 2-3 | 40-50 |
| Pizza | 240 1 15-25 | ||
| Grillstegning | |||
| Koteletter | 4 8-12 | ||
| Pølse af svinekød | 4 10-13 | ||
| Grillkylling | 3 25-35 | ||
| Kylling på grillspyd | 50-65 | ||
| Stegt kalv på spyd | 50-65 |
Bemærk:
natural_image
Technical line drawing of a mechanical assembly with no visible text or symbolsAsennusohjeet
natural_image
Technical line drawing of a Kuvia 2 device with a mounted sensor and internal components (no text or symbols)natural_image
Technical line drawing of a mechanical component labeled 'Kuva 5', showing internal structure and mounting points (no readable text or symbols beyond label)B
A

text_image
Kuva 6Upute za postavljanje
natural_image
Technical line drawing of a mechanical component with labeled section A, no readable text or symbols beyond labelSkidanje vrata pećnice (Slika 5)
Za lakše čišćenje i dostup do unutrašnjosti pećnice, možete vrata pećnice jednostavno skinuti (vidi sliku). Za lak še ičešje vrata na sto eri ž ma možete skinuti po slijedećem postupku:
natural_image
Technical line drawing of a laboratory apparatus with a labeled component 'Slika 6' (no other text or symbols)| Tabela za pečenje u pećnici | ||||
| Vrsta hrane | Temperatura °C | Položaj police (*) | Vrijeme pečenja (minute) | Nađn djelovanja |
| Tijesto | ||||
| Pecivo | 180 | 2 | 55-65 |  |
| Voći kola č | 200 | 1 | 30-40 | |
| Torta od sira | 180 | 2 | 35-40 | |
| Dizano tijesto u modelu | 200 | 1 | 25-35 |  |
| Krhko tijesto s jajima | 190 | 2 | 20-30 | |
| Krhko tijesto bez jaja | 200 | 2 | 15-25 | |
| Biskvitno tijesto | 190 | 3 | 15-20 | |
| Lazanje | 225 | 2 | 40-50 |  |
| Meso | ||||
| File govedine | 225 | 2-3 | 50-80 |  |
| Goveđe p eč en j e | 225 | 2-3 | 50-80 | |
| Teleće p eč en j e | 225 | 2-3 | 60-80 | |
| Svinjsko pečenje | 170-180 | 2 | 45-60 | |
| Pečeno ov je meso | 225 | 2 | 45-55 |  |
| Pečena govedina | 225 | 2-3 | 50-60 | |
| Pečen zec | 200 | 2 | 60-90 | |
| Pečen puran | 180 | 2 | pribl. 240 |  |
| Pečena guska | 200 | 2 | 150-210 | |
| Pečena patka | 200 | 2 | 120-180 | |
| Pečeno pile | 200 | 2 | 60-90 | |
| Srneđ b u t | 200 | 2-3 | 90-150 | |
| Jelenji but | 180 | 2-3 | 90-180 | |
| Ribe | 180 | 2-3 | 10-40 |  |
| Povrće | ||||
| Pirjano povrće | 170-190 | 2-3 | 40-50 |  |
| Pizza | 240 | 1 | 15-25 | |
| Pečenje na roštilju | ||||
| Odresci (kotleti) | 4 | 8-12 |  | |
| Svinjska kobasica | 4 | 10-13 | ||
| Pile na āru | 3 | 25-35 |  | |
| Pile na ražnju | 50-65 | |||
| Teletina na ražnju | 50-65 | |||
natural_image
Technical line drawing of a mechanical component with mounting holes and internal channels (no text or symbols)Odobratie dvierok rúry (Obr. 5)
natural_image
Technical line drawing of a mechanical device with a handle and internal components, labeled 'Obr. 6' (no text or symbols on the diagram itself)Kuchárska tabul'ka
natural_image
Technical line drawing of a mechanical housing or enclosure component (no text or symbols)natural_image
Technical line drawing of a mechanical device with a handle and internal components, labeled 'Obr. 6' (no text or symbols on the diagram itself)natural_image
Technical line drawing of a mechanical housing or enclosure with internal components and mounting holes (no text or symbols)Ta bort ugnsluckan (Fig. 5)
natural_image
Technical line drawing of a mechanical device with a handle and internal components (no text or symbols)Fig. 6
SCHEMA FÖR TILLAGNING I UGN
natural_image
Technical line drawing of a mechanical component with no visible text or symbolsTa ut ovnsdøren (fig. 5)
natural_image
Technical line drawing of a mechanical device with a handle and internal components (no text or symbols)Fig. 6
Tilberedningstabell
| Matrett | Temp. °C | Innsettingsrille (*) | Tilberedningstid (min.) | Symbol |
| Kaker | ||||
| Boller | 180 | 2 | 55-65 |  |
| Fruktkake | 200 | 1 | 30-40 | |
| Kaker med melk og smør | 180 | 2 | 35-40 |  |
| Formkake | 200 | 1 | 25-35 | |
| Vannbakkels | 190 | 2 | 20-30 | |
| Butterdeigbakst | 200 | 2 | 15-25 | |
| Kjeks | 190 | 3 | 15-20 | |
| Lasagne | 225 | 2 | 40-50 |  |
| Kjøtt | ||||
| Oksefilet | 225 | 2-3 | 50-80 |  |
| Roastbiff | 225 | 2-3 | 50-80 | |
| Kalvestek | 225 | 2-3 | 60-80 | |
| Svinestek | 170-180 2 | 45-60 | ||
| Lammestek | 225 | 2 | 45-55 | |
| Oksestek | 225 | 2-3 | 50-60 |  |
| Harestek | 200 | 2 | 60-90 | |
| Kalkunstek | 180 | 2 | 240ca. |  |
| Gåsestek | 200 | 2 150-210 | ||
| Andestek | 200 | 2 120-180 | ||
| Kyllingstek | 200 | 2 | 60-90 | |
| Rådyrlår | 200 | 2-3 | 90-150 | |
| Hjortelår | 180 | 2-3 | 90-180 | |
| Fisk | 180 | 2-3 | 10-40 |  |
| Grønnsaker | ||||
| Dampkokte grønnsaker | 170-190 | 2-3 | 40-50 | [SZ3X] |
| Pizza | 240 | 1 | 15-25 |  |
| Grilling | ||||
| Koteletter | 4 | 8-12 |  | |
| Svinepølse | 4 | 10-13 | ||
| Grillet kyllind | 3 | 25-35 | ||
| Kyllingkjøtt på spyd | 50-65 |  | ||
| Spit roast veal Kalvekjøtt på spyd | 50-65 | |||
Merk :
(*)= Tallet for innsettingsrillen tilsvarer ovnsknappen.
Ovnen skal forvarmes før bruk


text_image
Technical drawing of a microwave oven with dimensional annotations and cross-sectional viewРис. 1
Панель управления
text_image
BP7470 E/S/W BP8960 E/S/W 4 5 2 3 1 BP2460 E/S/W 4 5 6 2 1text_image
Image showing a row of simple icons: door, umbrella, mouse, hand, minus sign, plus circle, each paired with an empty circle.natural_image
Technical line drawing of a mechanical housing or enclosure with internal components and mounting holes (no text or symbols)Рис. 4
natural_image
Technical line drawing of a mechanical device with a handle and internal components (no text or symbols)Рис. 4
"DE CIJFERS VAN ALLE PROGRAMMA'S LOPEN ACHTERUIT "