
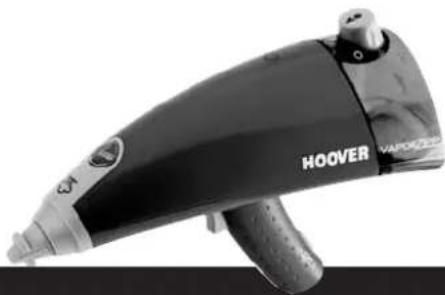
Vaporzipp VPA0301 - Steam cleaner HOOVER - Free user manual and instructions
Find the device manual for free Vaporzipp VPA0301 HOOVER in PDF.

| Product Type | Steam Cleaner |
| Brand | Hoover |
| Model | Vaporzipp VPA0301 |
| Power Supply | 230 V ~ 50 Hz, 13 A fuse (UK) |
| Heat-up Time | 20 seconds |
| Steam Control | Electronic slide control (variable flow) |
| Tank Capacity | Not specified (refill without stopping possible) |
| Water Type | Tap water or demineralized water |
| Included Accessories | Window squeegee, cloth holder, steam brush attachment, accessory holder, steam jet nozzle, angled steam nozzle, round brush, small cloth |
| Usage | Cleaning floors, windows, fabrics, joints, cooktops, etc. |
| Surfaces Treated | Tile, glass, wood (with caution), fabrics, leather (with caution) |
| Safety | Grounding, stop and unplug before maintenance, do not direct at people or animals |
| Maintenance | Clean the exterior with a damp cloth; let brush bristles cool flat |
| Spare Parts | Available from Hoover: brush sets, nozzles, squeegee, microfiber cloths |
| Warranty | According to local representative conditions, upon presentation of invoice |
| Standards | European directives 89/336 (EMC) and 73/23 (low voltage) |
| Recycling | Compliant with WEEE (2002/96/EC) – do not dispose of with household waste |
| Intended Use | Household use only |
Frequently Asked Questions - Vaporzipp VPA0301 HOOVER
User questions about Vaporzipp VPA0301 HOOVER
0 question about this device. Answer the ones you know or ask your own.
Ask a new question about this device
Download the instructions for your Steam cleaner in PDF format for free! Find your manual Vaporzipp VPA0301 - HOOVER and take your electronic device back in hand. On this page are published all the documents necessary for the use of your device. Vaporzipp VPA0301 by HOOVER.
USER MANUAL Vaporzipp VPA0301 HOOVER
Wapamia_2008, 11:15:2008. 13:29 [type 1]

GENERATION FUTURE
HOOVER
VAPORZIPP
User Instructions
| ENGLISH | GB |
| ITALIANO | IT |
| FRANÇAIS | FR |
| ESPAROLE8 | |
| PORTUGUES PT | |
| DEUTSCH | DE |
| EARNIKA | GR |
| DANSK | DK |
natural_image
Black and white photo of a HOVER VASORZER electric shaver tool (no visible text or symbols on body)
GENERATION FUTURE
Diagram A
natural_image
Simple line drawing of a mechanical device with an arrow indicating direction (no text or symbols)Diagram B
natural_image
Illustration of a hand holding a small object with an arrow indicating direction (no text or symbols)Diagram C
natural_image
Simple line drawing of a beaker with a circular object inside, no text or symbols presentDiagram D
natural_image
Simple line drawing of a stylized object resembling a rocket or aircraft (no text or symbols)Product and Accessories
GB
USER INSTRUCTIONS
Please read this manual carefully before use.
Contents:
Important safety reminders 2
Getting to know your product Precautions during use
How to start 2
Using your product 2
lempenbant information 3
Product maintenance. 3
Guaranteed statement 3 WEEE statement 3
IMPORTANT SAFETY REMINDERS
This product should only be used for domestic cleaning as described in this user manual. Please ensure that this guide is fully
understood before operating this appliance.
WARNING: Remember electricity can be dangerous, this appliance must be earthed. This plug is fitted with a 13-amp fuse (UK only)
IMPORTANT: The wires in the mains lead are coloured in accordance with the following code:
BLUE - Neutral BROWN - Live GREEN/YELLOW - Earth
REMEMBER: After use, switch the product off and remove the plug from the electricity supply. Always switch off and remove the plug before cleaning the appliance or attempting any maintenance.
GETTING TO KNOW YOUR PRODUCT
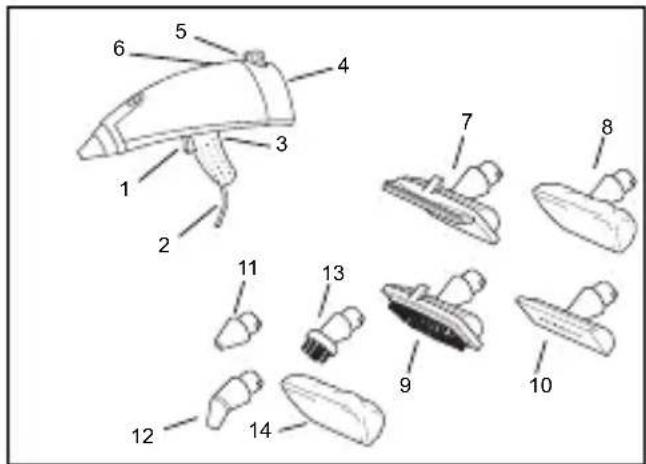
The following features and accessories are mentioned within this user manual and are shown in the 'Product and Accessories' diagram on Page 1.
PRODUCT
-
Steam release button
-
Power cord
-
Slider
-
Water tank
-
Water tank cap
-
Power light
ACCESSORIES
-
Window scueages
-
Cloth mounting
-
Steam brush nozzle
-
Accessories support
-
Steam jet nozzle
-
Angled hozzi
-
Round brush
This unit conforms with EC-directives 69/336 as amended by 93/88 (EMC) and 73/23 as amended by 93/68 (low voltage).
PRECAUTIONS DURING USE
- Read these instructions for use carefully before using the product
- Before connecting the product, make sure that the mains voltage is the same as the voltage indicated on the data label and that
•Do not put any detergent or chemical substance in the tank
- Never touch the product with wet hands or feet with the cable plugged into the mains
- Never dip the product in water or other liquids
- Never leave the product unattended with the cable plugged into the mains.
• Advis: All Council of People who are not formal with how the principal Medical data will be used in the product is involved, plus a replacement it from the origin.
• In the product is left unused, always disconnect it from the mains. • In case of breakdown or malfunction switch off the product as
service centre
• The wiring system to which the product is connected must always comply with the laws in force.
• To ensure the safety of the product, use only original spare parts and accessories, approved by the manufacturer.
- Do not use the product if the power cable or other important parts are damaged.
- Use of the product in places where there is a danger of explosions is prohibited.
•Do not direct the jet of steam in electrical components of devices. •Do not know the practical approach to wind or heat.
- Be not have the product applied to terms of time.
- Do not try the hot product on surfaces sensitive to heat. - Do not use electric expansion leads that are not auth
- If the product is accidentally dropped it must be checked by an authorised service centre because the internal mechanism may have been damaged thus compromising the safety of the product.

HOW TO START
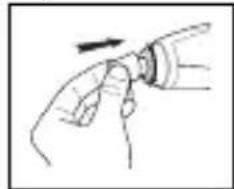
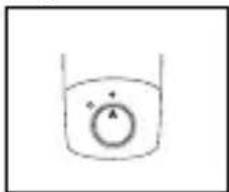
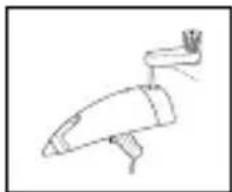
• Fill the water tank (4) with normal tap water or demineralised water (Diagram D).
• Fit the water tank cap (5) into the water tank (4) and turn it clockwise to lock it (Diagram C).
- Plug in, press the trigger and within 20 seconds the steam is ready.
USING YOUR PRODUCT
- Attach the accessory most suited for the kind of surface to be cleaned.
• Plug the mains cable (2) into a suitable earthed mains power outlet. The power light will come on (6).
• To deliver steam, press the steam release trigger (1).
ELECTRONIC STEAM REGULATION
The steam pressure can be adjusted by moving the slide control (3) from lower to higher flow, depending on the cleaning application.
WARNING: Before pulling the product away, empty the water tank.
WARNING: Even when unplugged, the product may release steam. Therefore handle it carefully, and store out of reach of anyone who does not know how to use it.
PRECAUTIONS:
- For cleaning leather, wood or delicate fabrics especially draper, velvet and other pile surfaces, consult the manufacturers instructions. Clean only by using the product at a safe distance together with a soft cloth and always do a test on a non-visible part of the item first or on a sample. Allow the test area to dry completely before observing results and effects on surfaces or colour before proceeding to clean further areas, ensuring that exactly the same distances and technique are applied as for the test area. If in doubt, and on sensitive surfaces like fabrics, leather and wood it is always better to ask for advice from your Steam Cleaner Dealer.
- For cleaning wood surfaces (furniture, doors, etc.) take great cars as too long an application of steam could alter the waxed appearance, the shine or the colour of the surface cleaned. We therefore recommend you apply steam on such surfaces only for brief periods or to clean these surfaces using a cloth first head in the steam.
- Please pay particular attention while cleaning brick floors. too long an application of steam could damage wax, brightness or colour of these surfaces.
- For delicate surfaces (e.g. synthetic materials, lacquered surfaces etc...), we recommend that the small brush should always be covered with at least two cloths to reduce the intensity of the steam.
- If cleaning glass surfaces in particularly low temperatures pre-heat the glass using the product from about 50 centimetres distance from the surface to be cleaned.
- For care of your plants vaporise at a minimum distance of 50 centimetres.
- The product may be used on its own, without attaching the brushes, for specific cleaning tasks requiring steam to be applied from a short distance, which will vary according to the kind of material and the type of soiling to be removed.
The more difficult the soil is to remove, the closer you must hold the product to it, because the temperature and pressure are higher closer to the steam outlet.
In all cases, after applying steam, wipe the surface with a dry cloth or with a scouring cloth if the soil is more difficult to remove.
REFILLING THE EMPTY TANK
Whenever the water finishes, you can refill the tank while working, without unplugging the power cable. This feature ensures unlimited freedom of operation and steam. Just remove the can as shown and fill up with water.
Then proceed with steaming.
ACCESSORIES
Various kinds of accessories may be connected to the product, depending on the cleaning task to be performed.
• Window squeegee (7) - to clean mirrors, windows, tiles and smooth surfaces
• Cloth mounting (8) - to clean delicate surfaces
- Steam brush nozzle (9) - to clean upholstery and sofas
- Accessories support (10) - to fill windows squeegee and steam brush nozzle. It can be used for direct steam emission on various surfaces
- Steam jet nozzle (11) - to clean corners, grout between tiles, and to steam houseplants
- Angled nozzle (12) - to clean narrow and difficult to reach areas such as toilets, washbasins and laps
• Round brush (13) - Ic clean stubborn dirt from small surfaces such as hobs, shutters, grout between tiles, etc.
• Small cloth (14) - to be filled to the accessories support, protects from direct hot steam.
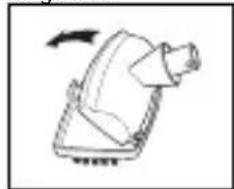
The correct method of attaching accessories is as follows:
- Insert the studs on the base of the accessories into the special slots in the edge of the product
• Turn them anticlockwise until they fully lock onto the appliance (Diagram B).
WARNING: Since the accessories become very hot during use, you must be very careful when removing them or replacing them. Either use an oven glove to handle them or wait until they have cooled down. Make sure that the product is disconnected from the mains power before changing the accessories.
Consumables
- ROUND BRUSHES SET P14 35600272
- MULTI FUNCTION NOZZLE G78 35600274
- SQUEEGEE INSERT AC17 35600275
- BRISTLE INSERT AC18 35600276
- MICROFIBRE CLOTH AC19 35600277
These items can be purchased separately from Hoover.
IMPORTANT INFORMATION
GENUINE HOOVER SPARES AND CONSUMABLES
Always replace parts with genuine Hoover spares. These are available from your local Hoover dealer or direct from Hoover. When ordering parts, please always quote your model number.
HOOVER SERVICE
Should you require service at any time please call your local Hoover service office.
PRODUCT MAINTENANCE
Before carrying out any type of maintenance make sure that the power cable has been disconnected from the mains. When you finish using the round brush, allow the bristles to cool in their natural position to prevent them from drying out of shape. To clean the outside of the product use a damp cloth.
GUARANTEE STATEMENT
The guarantee conditions for this appliance are as defined by our representative in the country in which it is sold. Details regarding these conditions can be obtained from the dealer from whom the appliance was purchased. The bill of sale or receipt must be produced when making and claim under the terms of the guarantee. Subject to change without notice.
Quality: Our factories meet the strict standards that ensures that European safety standards are met and maintained throughout the production life of an appliance.
Safety: We gain independent approval to demonstrate that our domestic electrical appliances are safe.
Hoover Help Line 0875 400 600
Hoover Spares 01204 556111
WEEE STATEMENT
Hoover has made a long-term commitment, in all its activities, to safeguarding the environment. Our environmental policy states: "To adopt the best practicable environmental methods in design, production, packaging, use and disposal of products, whilst continuing to improve benefits to the consumer".
This appliance is marked according to the European directive 2002/96/EC on Waste Electrical and Electronic Equipment (WEEE). By ensuring this product is disposed of correctly, you will help prevent potential negative consequences for the environment and human health, which could otherwise be caused by inappropriate waste handling of this product. The symbol on the product indicates that this product may not be treated as household waste. Instead it shall be handed over to the applicable collection point for the recycling of electrical and electronic equipment. Disposal must be carried out in accordance with local environmental regulations for waste disposal. For more detailed information about treatment, recovery and recycling of this product, please contact your local city office, your household waste disposal service or the shop where you purchased the product.

Hoover Limited
Pentrebach
Merthyr Tydfil.
Mid Glamorgan
CF48 4TU
Part No: 0565 - 5186
GB

IT
ISTRUZIONI PER L'USO
MANUAL DE INSTRUÇÕES
INTRODUKTION TIL PRODUKTET
EFTERFYLDNING AF DEN TOMME TANK


- HOOVER
- VAPORZIPP
- GB
- USER INSTRUCTIONS
- IMPORTANT SAFETY REMINDERS
- GETTING TO KNOW YOUR PRODUCT
- PRECAUTIONS DURING USE
- HOW TO START
- USING YOUR PRODUCT
- REFILLING THE EMPTY TANK
- ACCESSORIES
- Consumables
- IMPORTANT INFORMATION
- GENUINE HOOVER SPARES AND CONSUMABLES
- HOOVER SERVICE
- PRODUCT MAINTENANCE
- GUARANTEE STATEMENT
- WEEE STATEMENT
- IT
- ISTRUZIONI PER L'USO
- MANUAL DE INSTRUÇÕES
- INTRODUKTION TIL PRODUKTET
- EFTERFYLDNING AF DEN TOMME TANK
Brand : HOOVER
Model : Vaporzipp VPA0301
Category : Steam cleaner