
HSQ2010 - Voice recorder dnt - Free user manual and instructions
Find the device manual for free HSQ2010 dnt in PDF.

User questions about HSQ2010 dnt
0 question about this device. Answer the ones you know or ask your own.
Ask a new question about this device
Download the instructions for your Voice recorder in PDF format for free! Find your manual HSQ2010 - dnt and take your electronic device back in hand. On this page are published all the documents necessary for the use of your device. HSQ2010 by dnt.
USER MANUAL HSQ2010 dnt
Safety Instructions 35
Product highlights 36
What's in the box 38
Voice Recorder 39
Getting started 40
Insert the batteries. 40
Power on/off 40
Hold function. 41
Set date and time 41
Display information 41
Use the Recorder with a computer 42
Record 42
Overlap recording 44
Add index marks 44
Hidden Recording. 45
Additional Feature 47
Hearing Aid Feature 47
Using the WMP plugin with SLP 47
Rules of Voice File Name. 48
Lock and Unlock Voice File 49
Playback 50
Playback functions 51
Slow, fast, normal playback 51
Search 51
Rewind and forward 51
Play features 51
Repeat 51
Delete 52
Undelete functions 53
Radio 54
Record from FM radio 56
Customize settings 56
Update the firmware 60
Troubleshooting 61
Technical data 62
Service information 64
Disposal of electrical equipment 64
Declaration of conformity 64
Warranty regulations 65

Please read this information carefully before you use the product
General instructions
- Don't place the unit on unstable location, if it falls down, people may be injured.
The unit is not a toy, please beware of small children. - If you connect the unit to other electronic devices, please study also the security instruction of this device.
- If you have any question regarding the unit, how it works, the safety or the correct connection please contact our technical support or ask any specialist.
- The seller will not be liable for any damages caused by misuse of the product and any claim from third parties.
Environmental conditions
- Don't drop or shake the unit, it might be damaged.
- Avoid too high pressure to the LC-display, it might be damaged.
- Don't leave the unit where the temperature is higher than 60^ , e.g. in cars with closed windows in the summertime, near heaters or any other type of heat source.
- Don't use the unit in rooms with high humidity e.g. bathrooms. Parts of the apparatus, tube and mini camera, are water proofed. See technical specifications for details
- Don't use the unit at dusty places.
- Some parts of the chousing or the accessories contains so-called softeners, which may damage sensitive furniture and plastic surfaces. Avoid direct contact with sensitive surfaces.
Batteries
- Never leave empty batteries in the unit.
- Do not try to charge batteries or reactive them by other means, or take them apart, throw them into fireres or short-circuit them.
- Batteries can be extremely dangerous if accidentally swallowed. Keep batteries and the appliance out of the reach of small children. If a battery is accidentally swallowed, obtain medical assistance without delay.
Safety instructions
- Batteries must be disposed of correctly. Battery retailers have containers for used batteries. There are also special local authority collection points for used batteries.
Technical problems
- In case any foreign material or liquid gets into the product, please immediately remove the power cord.
Before you use it again, ask your authorised dealer to check the product carefully. - Please do not hesitate to contact our service center.
Packaging material
- Please don't keep any packaging material within reach of small children. It can become a dangerous toy.
Maintenance
- Store the product at a clean and dry place.
- For cleaning use dry and soft cloth.
Manufacturer
- Records in popular MP3 format with Voice Guidance Messages.
- Choose between six recording modes. Uncompressed PCM stereo recording* for audio CD-like quality, two stereo modes including SHQ and HQ, or three monaural modes including SP, LP and SLP for extended recording times.
- An adjustable recording sensitivity avoids background noises and adjusts to the recording environment.
-
Ample internal memor y offers a large recording capacity and allows the recording and storage of long recordings.
-
The voice-activat ed recording mode provides hands-free recording without having to worry about remembering to push the record button.
- The auto divide feature automatically divides long recordings into separate fi les. This makes it much easier to find, edit and archive long recordings such as meetings or lectures.
- Record while powered through USB without draining the battery.*
- Records from external audio sources via line-in.*
- The large signal-t o-noise (S/N) ratio of the microphone picks up every detail of the human voice to give superb sound reproduction.
- Hidden recording/ playback and recovers files accidentally deleted.
- Locking a fi le keeps import ant data from being accidentally erased.
Playback
- Adjustable playback speed to play recordings in fast and slow playback modes.
- Set a complete or a portion of an audio file to play repeatedly with the repeat playback option.
- Enjoy MP3 and WMA m usic plus FM radio *.
- Alarm clock with voice playback and timer recording.
- Voice guidance message gives audio announcements of recorder operating conditions.
Convenience
Large backlit screen for comfortable viewing.
- Enjoy up to 55 hours of continuous operation.
- Quickly transfer recordings, music and data via high-speed USB 2.0.
- Index mark and temp mark features allow you to quickly find desired locations in a recording.
Supports up to 400 recordings in each of four available folders and a hidden folder to organize your files in a fast and easy way.
- As a USB mass storage device, the HSQ2010 offers a convenient way to save, back up and move files without special software or driver installations.
Delivery content
Delivery content
us6u3
voice recorder

batteries
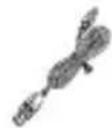
USB
cable
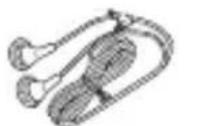
stereo earphones user manual
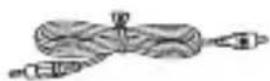
audio cable

user manual

lapel stereo microphone

ear microphone stand holder
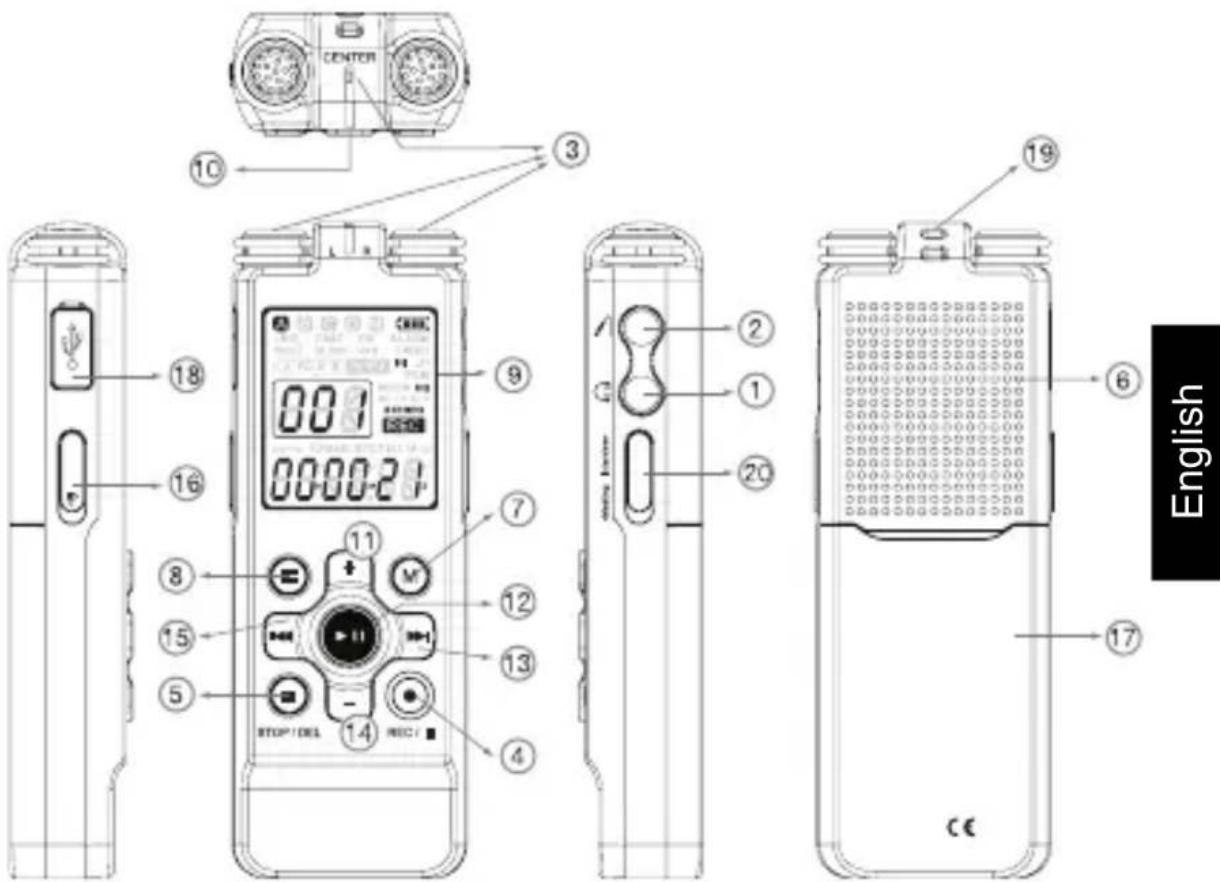
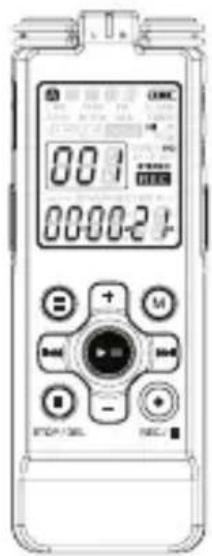
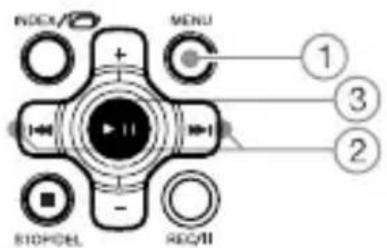
① Headphone socket
2 Microphone socket, line-in socket
③ Built-in microphone (LEFT/RIGHT/CENTER)
④ Record / Pause / Power on
Stop/Display/Delete
6 Speaker
7 Menu / FM radio
8 Index / Folder
9 Display
10 Record / Play indicator
11 Volume up
12 Power on/off, Play/Pause, Play speed
(13) Fast forward / File selection / Menu selection
(14) Volume down
15 Fast rewind / File selection / Menu selection
16 Hold switch
17 Battery compartment
18 USB socket
19 Strap hole
20 Select Mic.(L/R/C)
Getting started
Insert the batteries
- Slide open the battery cover.
- Place the batteries in the correct polarity as indicated and close you may have to reset the time, the cover.
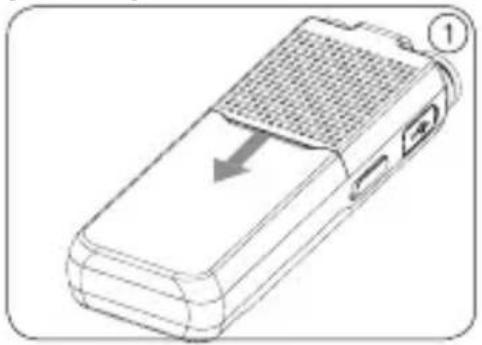


- Remove the batteries if you will not be using the HSQ2010 Recorder for an extended period. Leaking batteries may damage the HSQ2010 Recorder
- If the HSQ2010 Recorder malfunctions, remove the batteries and reinsert them.
- Stop the recorder before replacing the batteries. Removing the batteries while the recorder is in use may corrupt the file.
- When the batteries are nearly empty, the battery indicator blinks.
- If it takes longer than 2 minutes to replace the battery, you may have to reset the time.
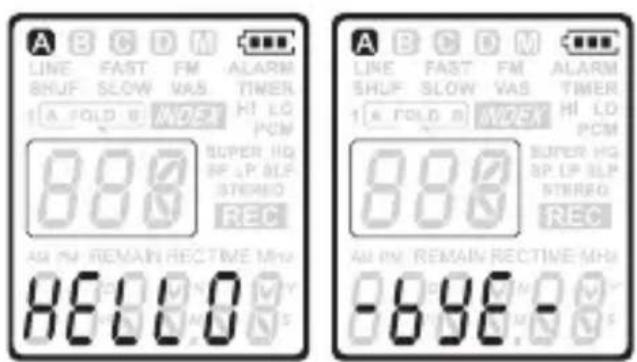
Power on/off
- To power on, press the button until the display shows HELLO.
- To power off, press the button while the recorder is stopped until the display shows BYE.
Hold function
When the HOLD switch is in the Hold position, all buttons on the device are inactive. On Hold will be shown briefly on the display, and the display will turn off. Unlock the HSQ2010 Recorder by moving the HOLD switch to the Off position.
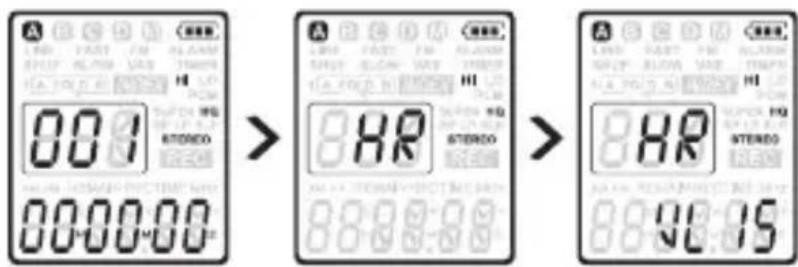
Set date and time
When the batteries are installed for the first time, you will be prompted to set the date and time.
- CLOCK will be shown on the display. Press the button. The year indicator flashes.
- Press the button to set the year.
- Press the button to advance to the settings for the month.
- Repeat the steps to continue to set the month, day, 12/24-hour system and the time in the same way.
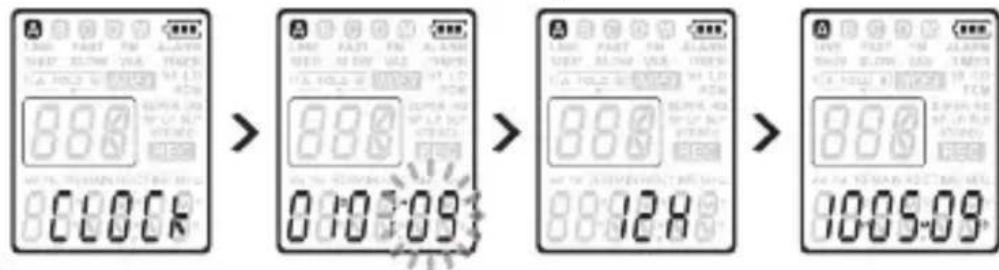

The date and time can be changed at any time using the menu. See Customize settings on page 56 for more information.
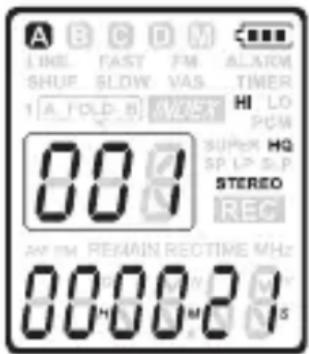
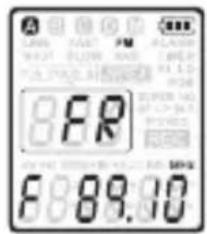
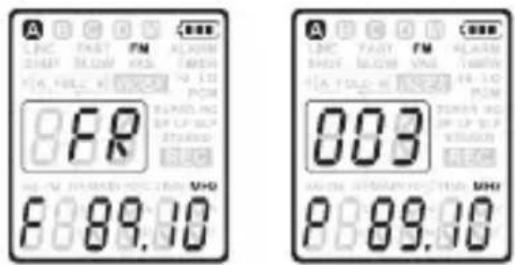
Display information
- Press the STOP/DEL button while the recorder is stopped to rotate the, information on the display: total playback time of the current fi le > time > date > remaining recording time > recording time of the current fi le > recording date of the current fi le.
- Press and hold during recording to display the remaining recording time.
Record
Use the HSQ2010 Recorder with a computer
As a USB mass storage device, the HSQ2010 Recorder offers a convenient way to save, back up and move fi les. The HSQ2010 Recorder connects to a computer using a USB connection and does not require special software to be installed. The HSQ2010 Recorder is automatically displayed as a removable drive, allowing you to simply drag and drop fi les to and from the unit.
usll6u3

Do not disconnect the HSQ2010 Recorder while fi les are transferred from or to the device. Data is still being transferred while the record/play indicator light is blinking in orange.
Do not format the drive of the HSQ2010 Recorder on a computer.
Record
Record with the built-in microphone
- Press the button while the recorder is stopped to select the desired folder.
- Press the button to start recording. The record/play indicator light will be red. Point the built-in microphone toward the sound source.
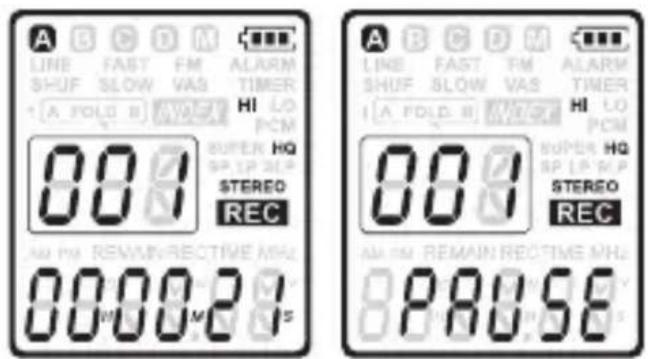
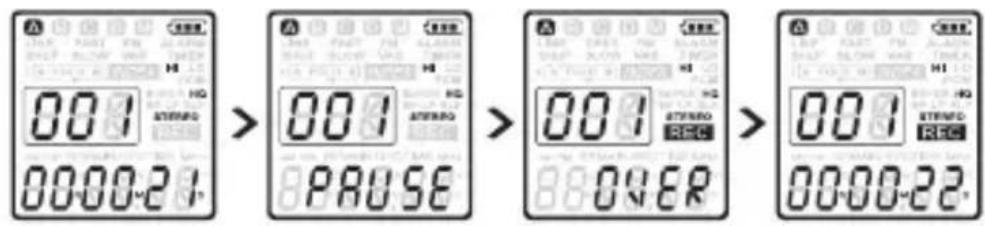
- To pause recording, press the button. The record/play indicator will blink, and PAUSE will flash on the display
- Press the , button again to resume recording.
- To stop recording, press the STOP/DEL button.

- Set the desired voice activation function and recording mode before starting recording (see Customize settings on page 56 for details).
Make a test recording to make sure that the HSQ2010
Recorder settings are correct.
Press and hold during recording to display the remaining recording time.
Press during recording to create a new file.
The maximum number of files in each folder is 400, for a total capacity of 2,000 files (400 files x 4 folders, 400 files x 1 hidden folder).
If the recording time exceeds the available capacity or the number of fi les reaches 2,000, recording stops and FULL will be displayed.
Delete a few recordings or move them to a computer.
Do not remove the batteries during recording. This may cause the recorder to malfunction.
If recording for a prolonged period of time, replace the batteries before beginning.
The HSQ2010 Recorder can record while powered through a USB cable without draining the battery. Connect the recorder to a computer using the USB cable and press the button for 1 second or longer to start recording (HSQ2010 only).
Record with an external microphone
To record with an external microphone, connect the microphone to the microphone jack and follow the same procedure as for the built-in microphone.
Record
Overlap recording
Follow these steps to make additions to a recording and overlap parts of a recording.
- Press the button while the recorder is stopped to select the desired folder.
- Press the or button to select the file to which the addition should be made.
- Play or forward to the position where the addition should be made and press the button to pause playback.
- Press the button to start overlap recording. The record/play indicator will blink and OVER will be shown on the display The existing recording will be overwritten.
- Press the STOP/DEL button to stop recording.

The recording mode of the original fi le is in effect when overlapping a recording.
Overlap recording is not available in the M (music) folder and SLP Mode.
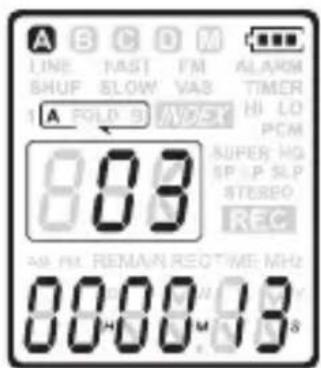
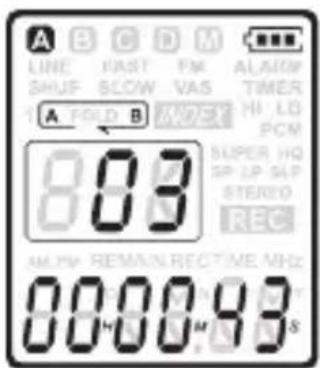
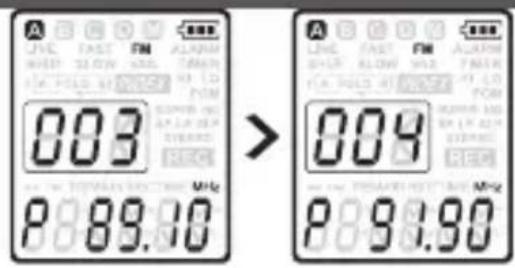
Add index marks
Index marks can be used to mark certain points in a recording as points of reference.
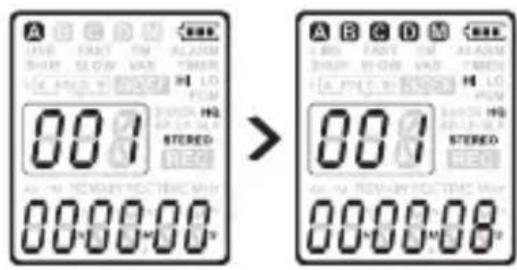
- Press the button during recording to add an index mark. The index number is displayed for one second.

The INDEX icon indicates that the recording contains index marks. Up to 32 index marks can be set per fi le.
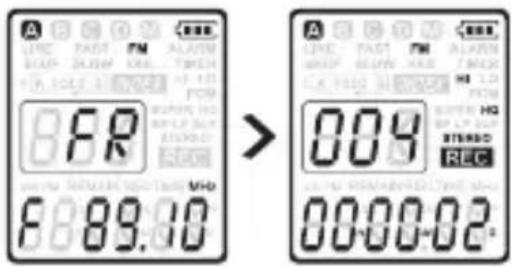
Hidden Recording
- Press the button while the recorder is stopped to select the desired folder.
- When it is in Hidden Recording mode, the red record/play indicator light will not be activated while recording. Point the Built-in microphone toward the sound source.
- To pause recording, press the button. The record/play indicator will not blink and PAUSE will flash on the display.
- Press the , button again to resume recording.
- To stop recording, press the STOP/DEL button.


The recording file will be saved on H folder of VOICE directory and it is set to read-only automatically which means it locks the current voice file to prevent it from being erased.
Locking a fi le keeps important data from being accidentally erased when you choose to erase all fi les from a folder. Please select Off to unlock the fi le and allows it to be erased.
When it is in Hidden Recording mode, the current settings will be ignored such as LED blinking, LCD screen, beep sound and so on due to private recording.
dnt does not take any legal responsibility for this feature.
Record
Playback of Hidden Recorded File
- Press the button and button simultaneously while the recorder is stopped to select the desired folder
- When it is in the Hidden Playback mode, the recorder browsesthe voice recording file of H folder of VOICE directory automatically.
- To pause playback, press the button. The record/play indicator will blink in orange, Press the button again to resume playback.
- To stop playback, press the STOP/DEL button. If you want to disable this feature on the fly, press button once that can be changed to normal mode and to desired folder.

When headphones are connected to the EAR jack, the recorder speaker will be switched off.
The recorder is in Hidden Playback mode, the folder indicator icon will be displayed all A/B/C/D and M.
dnt does not take any legal responsibility for this feature.
The INDEX icon indicates that the voice fi le contains index marks.
Up to 32 index marks can be set per file.
Additional Features
Hearing Aid Feature
You can listen to voices using the microphone with earphones without using the recording function.
- Press and hold the button on while the recorder is stopped to select the desired folder.
- To stop Hearing Aid Feature, press the STOP/DEL button
Using the Windows Media Player plugin with SLP mode
To play Windows media in SLP mode, SLP needs the Windows Media Player browser plugin installed. To install CNM Codec plugin, follow these steps:
- Visit the following dnt-web site: http://www.dnt.de
- Download CNM Codec plugin at the web site.
Playback SLP mode using the Windows Media Player
- When CNM Codec is installed after following above step, double click voic e recorded fi le which is SLP mode such as IC_090701_A0001.CNM on a folder of VOICE directory.
- Windows Media Player is executed and click OK right after pop-up window for .CNM extension
- Playback SLP mode through Windows Media Player.
Checking if the plugin is instaled
To see if you already have the plugin install: Click Start, and then click Run.
- In the Open box, type appwiz.cpl, and then click OK. It may take several seconds for your computer to compile a list of programs.
- Scroll down through the list and look for CNM Codec.
- The plugin is installed if yes, otherwise, you need to install Windows Media plugin for SLP mode on dnt support page or HSQ2010 root directory.
Additional Features
The simplest way to uninstall CNM plugin is to use Add or Remove Programs.
Uninstall CNM plugin
Click Start, and then click Run.
- In the Open box, type appwiz.cpl, and then click OK. It may take several seconds for your computer to compile a list of programs.
- Scroll down through the list and click CNM Codec, and then click Remove.
Rules for Voice File Names
File names will be automatically created for fi les recorded by this HSQ2010 Locking a fi le keeps important data from being accidentally erased.
IC_090701_A0001.MP3
Extension: Files recorded by this, device are saved in MP3 or linear PCM format with the fi le extensions .WAV. Also, it is saved with .CNM extension using high compressed voice algorithm for SLP
File number :A serial number automatically assigned by a HSQ2010 Recorder
- Folder name: indicates the folder A, B, C and D.
- TOD (date): Created date on Voice Recorders. Withing in the Clock menu
ID: The name that has been set on the HSQ2010 Recorder. The default name on the HSQ2010 is IC_

Sequential file numbers are reassigned automatically.
A fi le attribute of created date is set to current time and date based on HSQ2010 Recorder.
Lock and Unlock Voice File
When you choose to erase all files from a folder, Please select Off to unlock the file and allows it to be erased.
- Press and hold STOP/DEL button while the recorder is stopped to select the desired folder.
- Press the or button to select the menu until protected is displayed ProTec.
- Press the button to enter lock file menu and OFF is displayed.
- Press the or button to select the ON for locking voice file and OFF for unlocking.
- Press the>> button to confirm

File Protect is set to ON and Locks the file and prevents it from beeing erased.
Unlock File is set to OFF and Unlocks the file and allows it to be erased
Each fi le should be set to OFF if you want to erase a folder or all folders. The protected fi le won't be erased before setting OFF due to locking fi le
Format the HSQ2010 voice recorder, it erases all fi les on HSQ2010 voice recorder even though fi les are locked. Before formatting, please save the voice fi les on each folders in your PC using USB.
Playback
- Press the button while the recorder is stopped to select the desired folder.
- Press the button to select the file to play back.
- Press the button. The playback time will be shown on the display, and the green LED will light.
- Adjust the volume using the and + / - buttons.
- To stop playback, press the STOP/DEL button. The total playback time of the current file will be shown on the display.
- Press the button again to continue playback from the previ
ous position.

When headphones are connected to the EAR jack, the recorder speaker will be switched off.

Notes on using the Recorder as a music player
The recorder supports music files in .wma and .mp3 formats that can be transferred from the computer to the music folder of the recorder. Files with copy protection (digital rights management) are not supported.
The HSQ2010 Recorder supports up to two folder levels within the music folder. Each folder can hold up to 999 entries (fi les and folders).
Press > button to open a selected folder/fi le. Press the button to return to the folder one level higher.
Press bttion during music playback to change the equalizer mode (Normal > Classic > Jazz > Rock > Pop > Normal).

Note on using the HSQ2010 Recorder as a HSQ2010 Recorder
Press the button during voice playback to change the
noise cancel mode (Normal > LCF (Low Cut Filter) > VOC (Voice Filter) > Normal).

The INDEX n indicates, that the voice fi le contains index marks.
Up to 32 index marks can be set per file.
Playback functions
Slow and fast, normal playback
Press and hold the button for 1 second or longer to switch between normal, slow and fast playback.
Search
Press and hold the or button during playback to scan backward or forward in the current file at a fast speed. Release the button to resume playback at the selected speed.
Rewind and forward
Press the or button during playback to rewind to the beginning of the fi le being played or forward to the next fi le, respectively. If the fi le contains index marks, playback begins at that point.
Play features
You can set the Voice Recorder to play fi les repeatedly or randomly.
Repeat a sequence
- To repeat or loop a sequence in a song, press the button at the chosen starting point. [A - B] fl ashes on the screen.
- Press the button again at the chosen end point. The repeat sequence begins
- Press the STOP/DEL button to stop playback or press the button to return to normal playback.
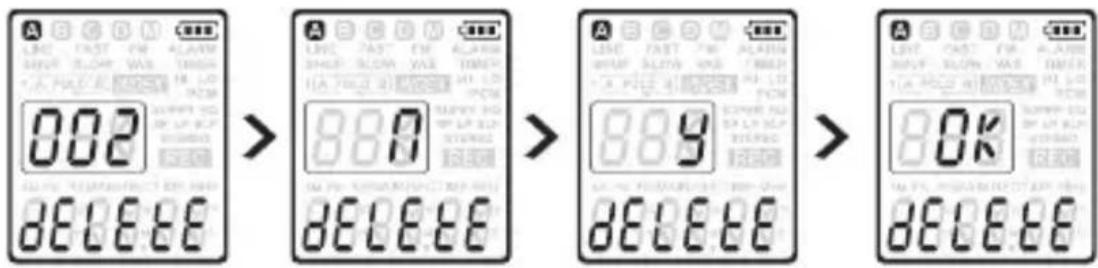
Delete
Repeat a fi le or folder / shuffle mode
Press and hold the button for 1 second or longer during playback to switch between play modes (repeat fi le, repeat folder, shuffle folder or normal playback).
Icon Meaning

Play one fi le repeatedly

Play all files within folder repeatedly.

Play all music fi les within folder randomly

Shuffle mode is available only in the M (music) folder.
Delete
- Press the button while the recorder is stopped to select the desired folder.
- Press and hold the STOP/DEL button for 1 second or longer. DELETE appears on the screen.
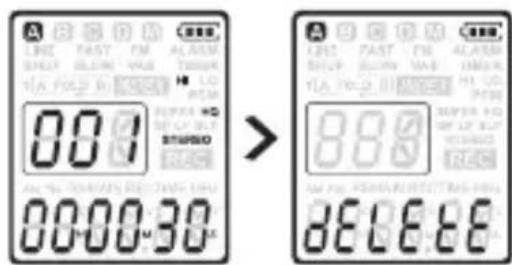
- Press to select a delete option:

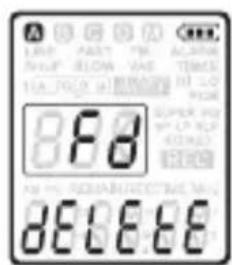
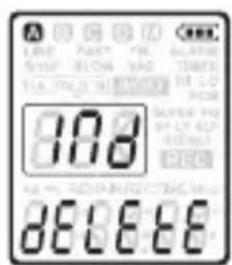
Icon Meaning
FILE Delete a single file
FOLD Delete all fi les in a folder

Delete all index marks in a file.
- Press the button.
- Press the or button to select the file, the folder or the file containing the index marks to be deleted
- Press the button again. N (No) is displayed.
- Press the or button to select Y(Yes)
- Press the button to confirm.
usu

Sequential file numbers are reassigned automatically
Undelete functions
To recover a fi le that was accidentally erased. If fi les were recorded after deleting a recorded fi le, recovery is not available.
- Press the button while the recorder is stopped to select the desired folder.
- Press and hold the STOP/DEL button for 1 second or longer. DELETE appears on the screen.
- Press the button to select the menu until Undelete is displayed Undele.
- Press the button to enter Undelete Menu and NO is displayed.
- Press the b on to select the YES for undelete.
- Press the button to confirm.

It is only be available right after the fi le is erased on HSQ2010 voice recorder.
If you update a fi le on HSQ2010 voice recorder using PC or recording function was activated just after fi le was removed, HSQ2010 voice recorder will not be able to restore erased data.
When HSQ2010 voice recorder is out of space, please back it up for future use.
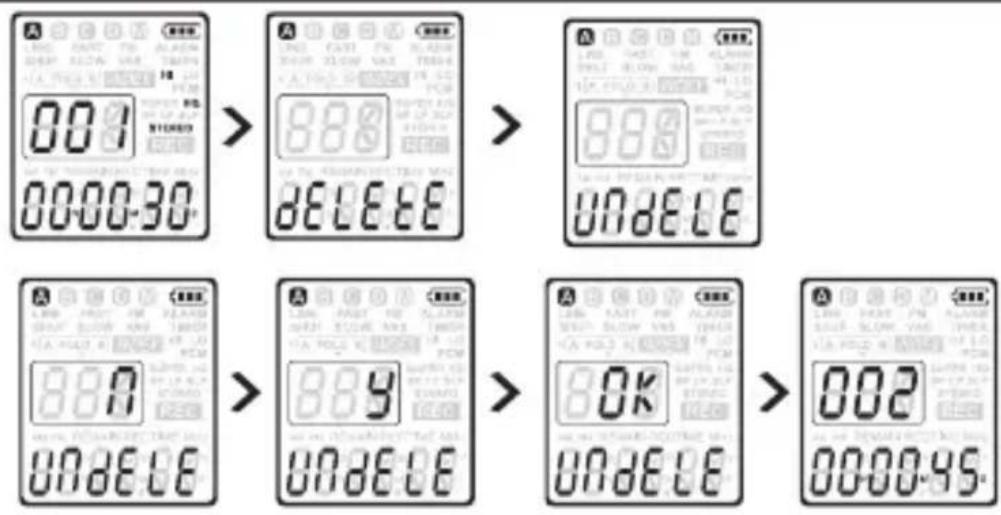
Error ER will be displayed, if it could not recover the erased
voice fi le.
Radio mode
- Connect the headphones. The supplied headphones serve as a radio antenna
- Press and hold the MENU button for 1 second or longer to enter radio mode.
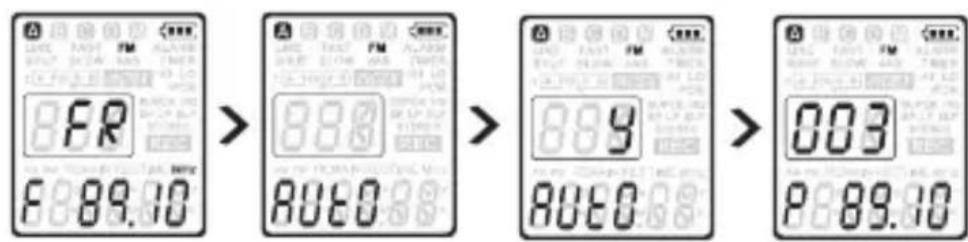
Auto tune radio stations
- Press the MENU button while the recorder is in radio mode to open the menu.
- Press the or button to select AUTO.
- Press the button again. N (No) is displayed.
- Press the arrow button to select Y(Yes).
- Press the button to confirm. The radio automatically tunes radio stations and saves the frequencies as presets. The radio store up to 20 radio stations as presets.
Manually tune to a radio station
- To fi ne-tune frequency, quickly press the button.
-
To search for the next stronger signal, press and hold button.
-
Press the button to save the frequency as a preset.
- Adjust the volume using the + and - buttons.
- To exit radio mode, press and hold the MENU button for 1 second or longer.

Press the STOP/DEL button while the recorder is in radio mode to switch between stereo and mono reception.
Play a preset radio station
- Press the button while the recorder is in radio mode to switch between frequency and preset mode.
- In preset mode, press the or button to change to another preset radio station.
- Adjust the volume using the + and - buttons.
- To exit radio mode, press and hold the MENU button for 1 second or longer.
Delete a preset radio station
- Press the button while the recorder is in radio mode to switch between frequency and preset mode.
- In preset mode, press the or button to select the preset radio station to be deleted.
- Press and hold the STOP/DEL button for 1 second or longer to delete the preset radio station.
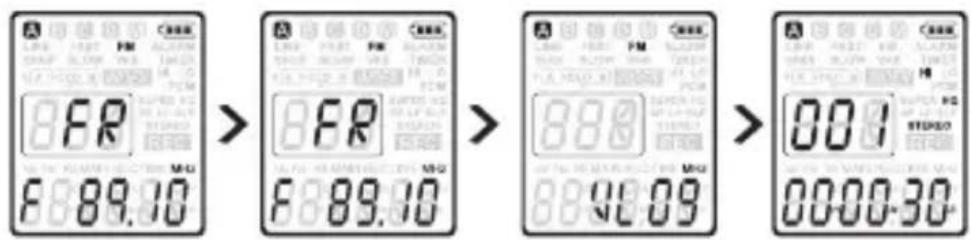
Record from FM radio

- Manually tune to a radio station or play a preset radio station.
- Press the button to start recording.
- To stop recording, press the STOP/DEL button.
Customize settings
The menu is available while the recorder is stopped and during radio reception. The available menu items differ depending on whether you are in a voice folder, a music folder or in radio mode.
- Press the MENU button while the recorder is stopped or during radio reception to open the menu.
- Press the but to select a menu item.
- Press the>按钮 to enter a sub-menu.
- Press the | ▶r ▷to change a setting.
- Press the button to confirm your selection

| Menu | Setting | Description |
| SPLIT* Yes | No | Split a large fi le into two separate fi les so that they can be easily archived or trans-ferred via e-mail, or so that part of a fi le can be deleted. To split a fi le, play and stop at the position where the splitting should be made, then open the SPLIT menu. |
| REC* PCM | SHQ | Choose among several recording modes, from un compressed PCM stereo record-ing for audio CD-like quality, two stereo modes including SHQ and HQ, or three monaural modes including SP, LP and SLP |
| HQ | ||
| SP | ||
| LP | ||
| SLP | for extended recording times. See Technical data on page 62 for details about available recording modes and recording times. | |
| DIVIDE* | Off | The auto divide feature automatically records into a new fi le every 30 or 60 minutes. This makes it much easier to fi nd, edit and archive long recordings such as meetings or lectures. |
| 30Min. | ||
| 60Min. | ||
| INPUT | V | Use the L (line-in) setting when recording from external audio sources via the line-in jack of the recorder. |
| (Voice), | ||
| Sprache L | ||
| (LineIn) | ||
| SENSE* | HI | Adjust the recording sensitivity to avoid-recording background noises and to adjust to the recording environment. |
| LO | ||
| BEEP | B | The recorder gives sound feedback about button enable voice guidance message or operations or errors. |
| V | ||
| Off | ||
| Light | On | The display will remain lit for a few seconds when a button is pressed. |
| Off | ||
| Settings | ||
| VA* | On Off | Voice-activated recording is a convenient feature for hands-free recording. When voice-activated recording is enabled, recording will start when you begin speaking. When you stop speaking, the recorder will automatically pause recording after three seconds of silence, and resume only when you begin speaking again |
| CLOCK | DD:MM:YY12/24HH:MM:SS | If the date and time are set, information about when the fi le is recorded is automatically stored with each fi le. |
| TIMER OFF | VCH | Schedule automatic recording to begin with the Schedule automatic recording to begin with the microphone (select V) or of a radio channel CH (select CH). Specify the start time, the duration of the recording (30/60/120 minutes/All), a folder and the radio channel to be recorded. |
| ALARM Off | bF | Use the HSQ2010 as a mobile alarm clock. Choose the alarm mode (b = beep, F = fi le playback) and specify the start time and the fi le to be played. |
| FORMAT | YesNo | Delete all fi les on the recorder including No programmed radio stations. Transfer any important fi les to a computer before formatting the recorder. |
| VER Display the fi rmware version and the release date. | ||
| NTRO Yes | No | Play music or voice 10 seconds at the beginning on current folder. |
AUTO**Yes Auto-tune a radio station and store up to 20 No stations as presets.
OUTPUT EP Switch between earphone (EP) and speaker SP (SP) output in radio mode.
REG ON KOR The FM Region mode enables you to select ** USA between Korea/USA/China/Europe/Japan/ Others
DEFAULT Yes You can reset all the items on the VOICE No and FM menu to their default setting.
UNDE- YES Recovers fi les accidentally erased. LETE*** No
PRO- YES Locking a fi le keeps important data from TECT No being accidentally erased. Locked fi les are not erased.
Firmware
Update the firmware
Your HSQ2010 Recorder is controlled by an internal program called fi rmware. Regularly check www.dnt.de for new fi rmware updates.
- Download the fi rmware update for your HSQ2010 model from www.dnt.de > Service > Download-Center > Voice-Recorder herunterand save the fi le in the root directory of the HSQ2010 Recorders.
- Press the MENU button while the recorder is stopped to open the menu.
- Press the or button to select UPDATE.
- Press the button ③ N (No) is displayed.
- Press the b to select Y (Yes)..
- Press the button again to install the new firmware.

Troubleshooting
My recorder cannot power on
- The batteries may be out of power or not inserted correctly. Replace the batteries with new ones and verify that the batteries are inserted correctly.
My recorder does not record anything
- The recorder may be in HOLD mode. Slide the HOLD switch to the Off position.
- The maximum number of recordings may be reached or the recording capacity is full.
- Delete some recordings or move recordings to an external device.
I cannot hear anything from the speaker
- The headphones may be plugged in. Remove the headphones..
- The volume is at the lowest setting. Adjust the volume.
My recorder cannot play recordings
- The recorder may be in HOLD mode. Slide the HOLD switch to the off position.
- The batteries may be out of power or not inserted correctly. Replace the batteries with new ones and verify that the batteries are inserted correctly.
- Nothing has been recorded yet. Check the number of recordings.
My recorder cannot stop, pause, play or record
- The recorder may be in HOLD mode. Slide the HOLD switch to the Off position.
I cannot hear anything through the headphones
- The headphones may not be plugged in properly. Plug in the headphones properly.
- The volume is at the lowest setting. Adjust the volume.
Technical data
Connectivity
- USB High-speed 2.0 mini-USB
Center mic 6,0mm impedance 2,0 kΩ
left/right mic 5,8 mm, impedance 1,6 kΩ - Headphone 3.5 mm, impedance 16 Ω or more
Display
Recording media Built-in fl ash memory
Microphone Built-in: Stereo
External Stereo
Recording time 4GB
PCM mode (.wav/Stereo) 6,3 hours
SHQ mode (.mp3/Stereo) 28.4 hours
HQ mode (.mp3/Stereo) 47,44 hours
SP mode (mp3/Mono) 71.36 hours
LP mode (.mp3/Mono) 143 hours
SLP mode (.mp3/Mono) 2291 hours
Compression rate / sampling frequency
PCM mode 1411 kBit/S, 44,1 kHz
SHQ mode 320 kBit/s, 44,1 kHz
HQ mode 192 kBit/s, 44.1 kHz
SP mode 128 kBit/s, 44.1 kHz
LP mode 64 kBit/S, 22.05 kHz
SLP mode 4 kBit/s, 8 kHz
Music playback
Kompressionsformat .mp3, .wma
Built-in 30 mm round dynamic speaker
- Output power 300 mW
Operating conditions
- Temperature 5 - 45 °C/41 - 113 °F
- Humidity 10% -90%
Power
- Battery type 2 AAA Alkali-Mangan-Batteries (LR03 oder R03)
- Battery life (SLP-Modus) 55
- Battery life (SLP mode): 55 hours
Dimensions
- Product dimensions 34,8 x 17,4 x 98 mm (WxDxH)
Weight 46 g/1.6 oz. incl. batteries
System requirements
Mac OS X, Linux Free USB-Port
Servicea information/Disposal
Service information
In case of complaints your device shows a defect, please consult your dealer or contact the service department of dnt to agree a servicing.
Service time: Monday until Thursday from 8.00-17.00h
Friday from 8.00-16.00h Hotline/service: +49 6074 3714 31 E-mail: support@dnt.de
Please do not send your device to our address without request by our service team. The expense and the risk of loss are for debits of the sender. We reserve to refuse the unrequested shipment or return corresponding goods to the sender at buyer's risk and expense.
Disposal of electrical and electronic equipment

This symbol on the product or in the instructions means that your electrical and electronic equipment should be disposed at the end of its life separately from your household waste. There are separate collection systems for recycling in the EU.
For more information, please contact the local authority or your retailer where you purchased the product.
Batteries do not belong into the domestic refuse. Empty batteries must be delivered to the specially arranged collecting points.
Declaration of conformity
Hereby, dnt GmbH, declares that this Findoo Profi line is in compliance with the essential requirements and other relevant provisions of Directive 1999/5/EC. The declaration of conformity for this product can be downloaded
from:
http://www.dnt.de/conformity
Warranty regulations
-
In general the European warranty regulations are valid. Warranty starts with receipt of unit. In a warranty case, please submit the unit together with invoice, unit pass and error description. Without these documentary evidence we are not obliged to a warranty performance.
-
During warranty period we repair all constructional or material defects which are caused by a manufacturing fault. It is in the decision of the manufacturer to change or replace defective parts/units. Further claims are excluded. Changed parts will automatically go over into our property. We will not be held responsible for future damages.
-
Manipulation on the unit through non-authorized companies/persons automatically leads to an end of warranty period.
- Excluded of warranty claims are damages due to improper treatment, not following the manual, oxidation of batteries, permanent usage.
- The initial warranty period is not extended because of repair or replacement of parts.
- These warranty regulations are valid in the Federal Republik of Germany.
Contenu
Bouton Delete (supprimer)
.CNM (Compressed Voice
Format)
Declaration of Conformity
Stamp and signature of the dealer