KR120 DAB 10029988 - Radio OneConcept - Free user manual and instructions
Find the device manual for free KR120 DAB 10029988 OneConcept in PDF.
User questions about KR120 DAB 10029988 OneConcept
0 question about this device. Answer the ones you know or ask your own.
Ask a new question about this device
Download the instructions for your Radio in PDF format for free! Find your manual KR120 DAB 10029988 - OneConcept and take your electronic device back in hand. On this page are published all the documents necessary for the use of your device. KR120 DAB 10029988 by OneConcept.
USER MANUAL KR120 DAB 10029988 OneConcept
Congratulations on purchasing this product. Please read and follow these instructions, in order to avoid damaging the item. We do not cover any damages that may arise from improper use of the item or the disregard of the safety instructions.
Important Safety Advice
- Read all instructions before using.
- To protect against a fire, electric shock or personal injury, do not immerse cord, electric plugs or device in water or other liquids.
- Do not expose the appliance to extreme temperatures. The appliance shall be used in moderate climates.
- The use of attachments that are not recommended by the appliance manufacturer may result in fire, electric shock or personal injury.
- Do not open the unit by removing any cover parts. Do not attempt to repair the unit. Any repairs or servicing should be done by qualified personell only.
- Only qualified persons may perform technical work on the product. The product may not be opened or changed. The components cannot be serviced by the user. The manufacturer is not responsible for any radio or TV interference caused by unauthorized modifications.
- The appliance is not a toy. Do not let children play with it. Never let children insert foreign objects into the appliance.
- Never clean the surface of the device with solvents, paint thinners, cleansers or other chemical products. Instead, use a soft, dry cloth or soft brush.
- We strongly suggest you power off projector when play it for 6 hours constantly one time.
- To protect your eye , do not watch directly at the lens when projector working .
- Save these instructions.
Small objects
Keep small objects (i.e. screws, mounting material, memory cards etc.) and packaging out of the range of children. Do not let Children play with foil. Choking hazard!
Transporting the device
Please keep the original packaging. To gain sufficient protection of the device while shipment or transportation, make sure to put it back in its original packaging.
Cleaning the surface
Do not use any volatile liquids, detergents or the like. Use a clean dry cloth.
Technical Data
Item # 10029987, 10029988
Power supply AC 230V 50Hz
Frequency ranges | DAB: 174 - 240MHz
Scope of delivery Device, instruction manual
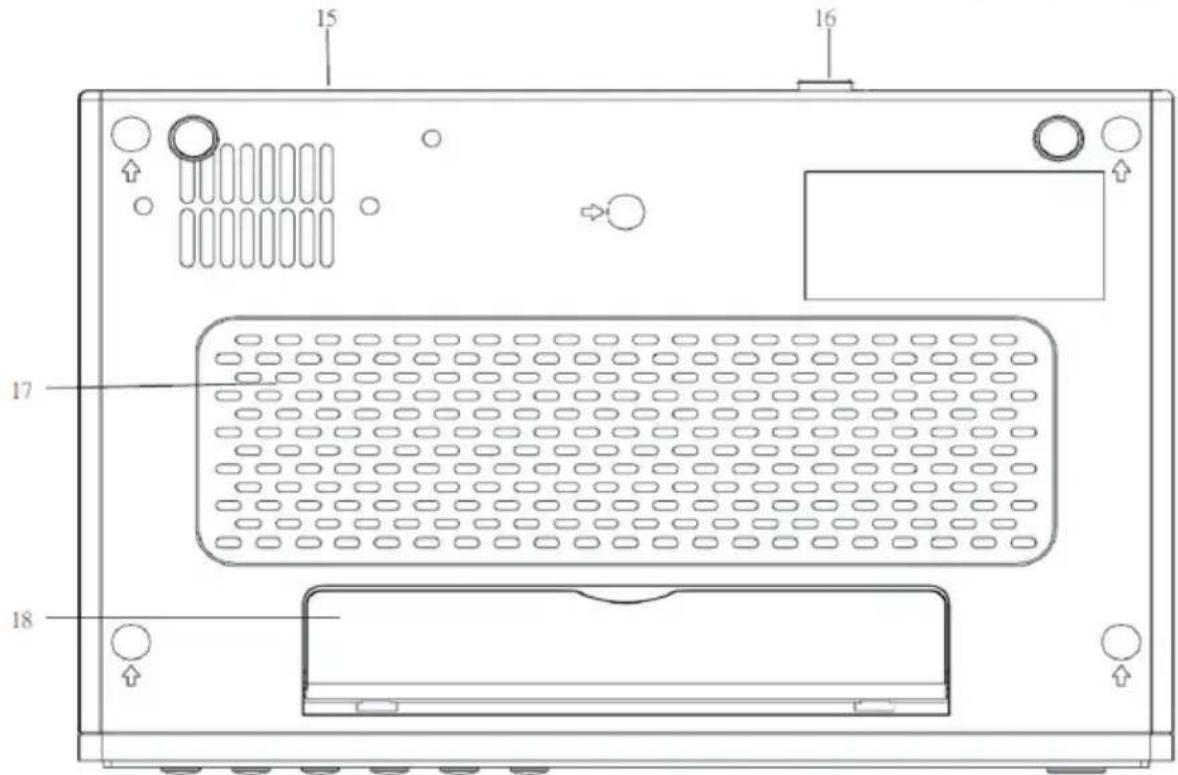
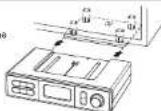
Overview & Mounting
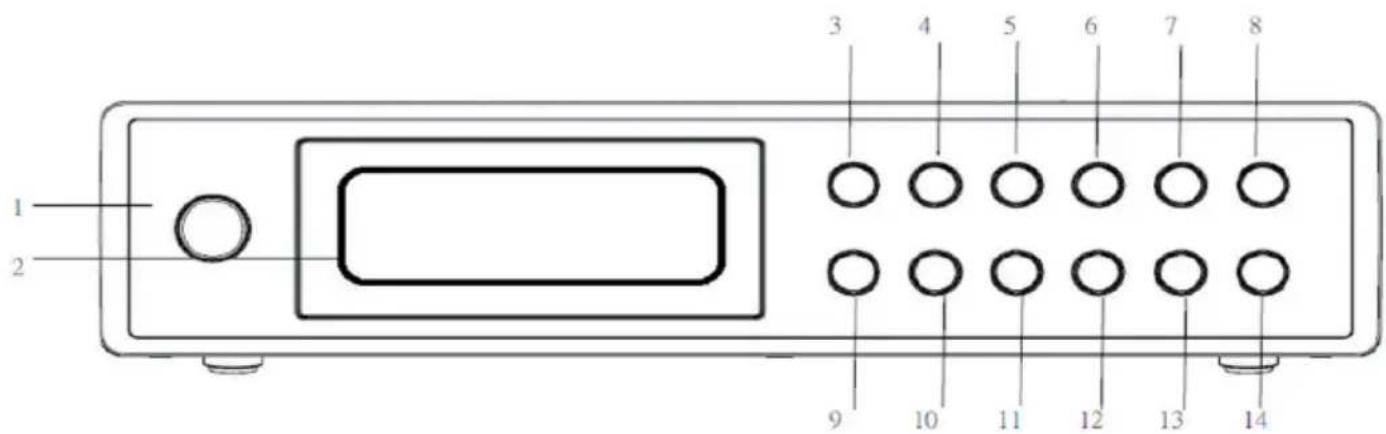
| Power / Standby | 1 11 | INFO | |
| Display | 2 12 | ENTER | |
| UP | 3 13 | TIMER 2 | |
| MODE (FM/DAB) | 4 14 | VOLUME - | |
| MENU | 5 15 | Mains cable | |
| PRESENT | 6 16 | Antenna jack | |
| TIMER 1 | 7 17 | Speaker | |
| VOLUME + | 8 18 | Plastic stand | |
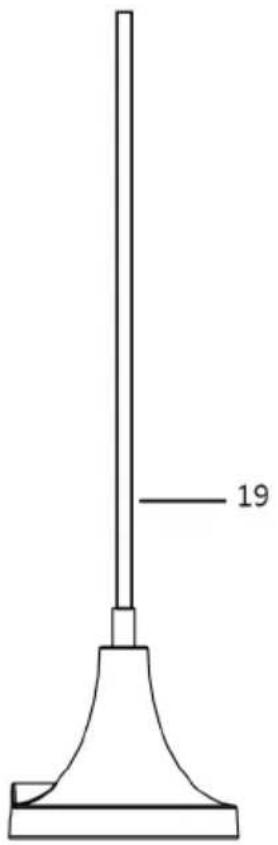
| DOWN | 9 19 | Antenna with magnetic stand | |
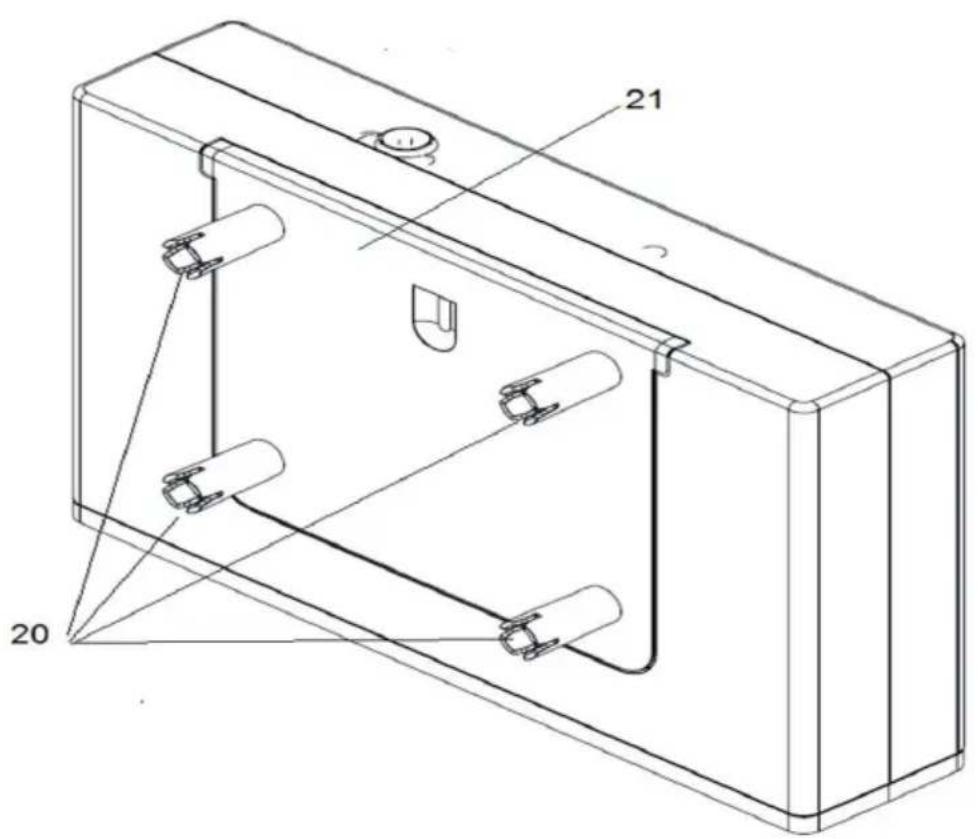
| AUTO SCAN | 10 20 | Mounting plate (for under-cabinet- mounting) |
Operation
Startup
Plug the AC Power Cord into AC wall outlet. Before switching on the unit, make sure that the voltage of your electricity supply is the same as that indicated on the rating plate.
Put the antenna to a suitable place and connect to the antenna jack on the rear of the device.
Time Setting
This unit will automatically sync the time from radio station once it is connected to the AC. It may take several minutes for the first sync.
Setting the Timer
- Press the TIMER 1 or TIMER 2 and press DOWN/UP button to turn on the alarm.
- Press the ENTER button to confirm. The display will show "00:00" (HOUR: MINUTE).
- Press UP/DOWN to select the desired hour and press the ENTER button to confirm.
- Press UP/DOWN to select the desired minute and press the ENTER button to confirm.
- Press UP/DOWN to select the desired alarm volume and press the ENTER to confirm.
- The timer will start and increase gradually to the desired volume setting. (The default setting is Volume 9.)
- To switch off the timer, Press the TIMER 1 or TIMER 2 button correspondingly.
NOTE: Timer 1 and Timer 2 have two different alarm sound. Both alarms will stop automatically after 5 minutes.
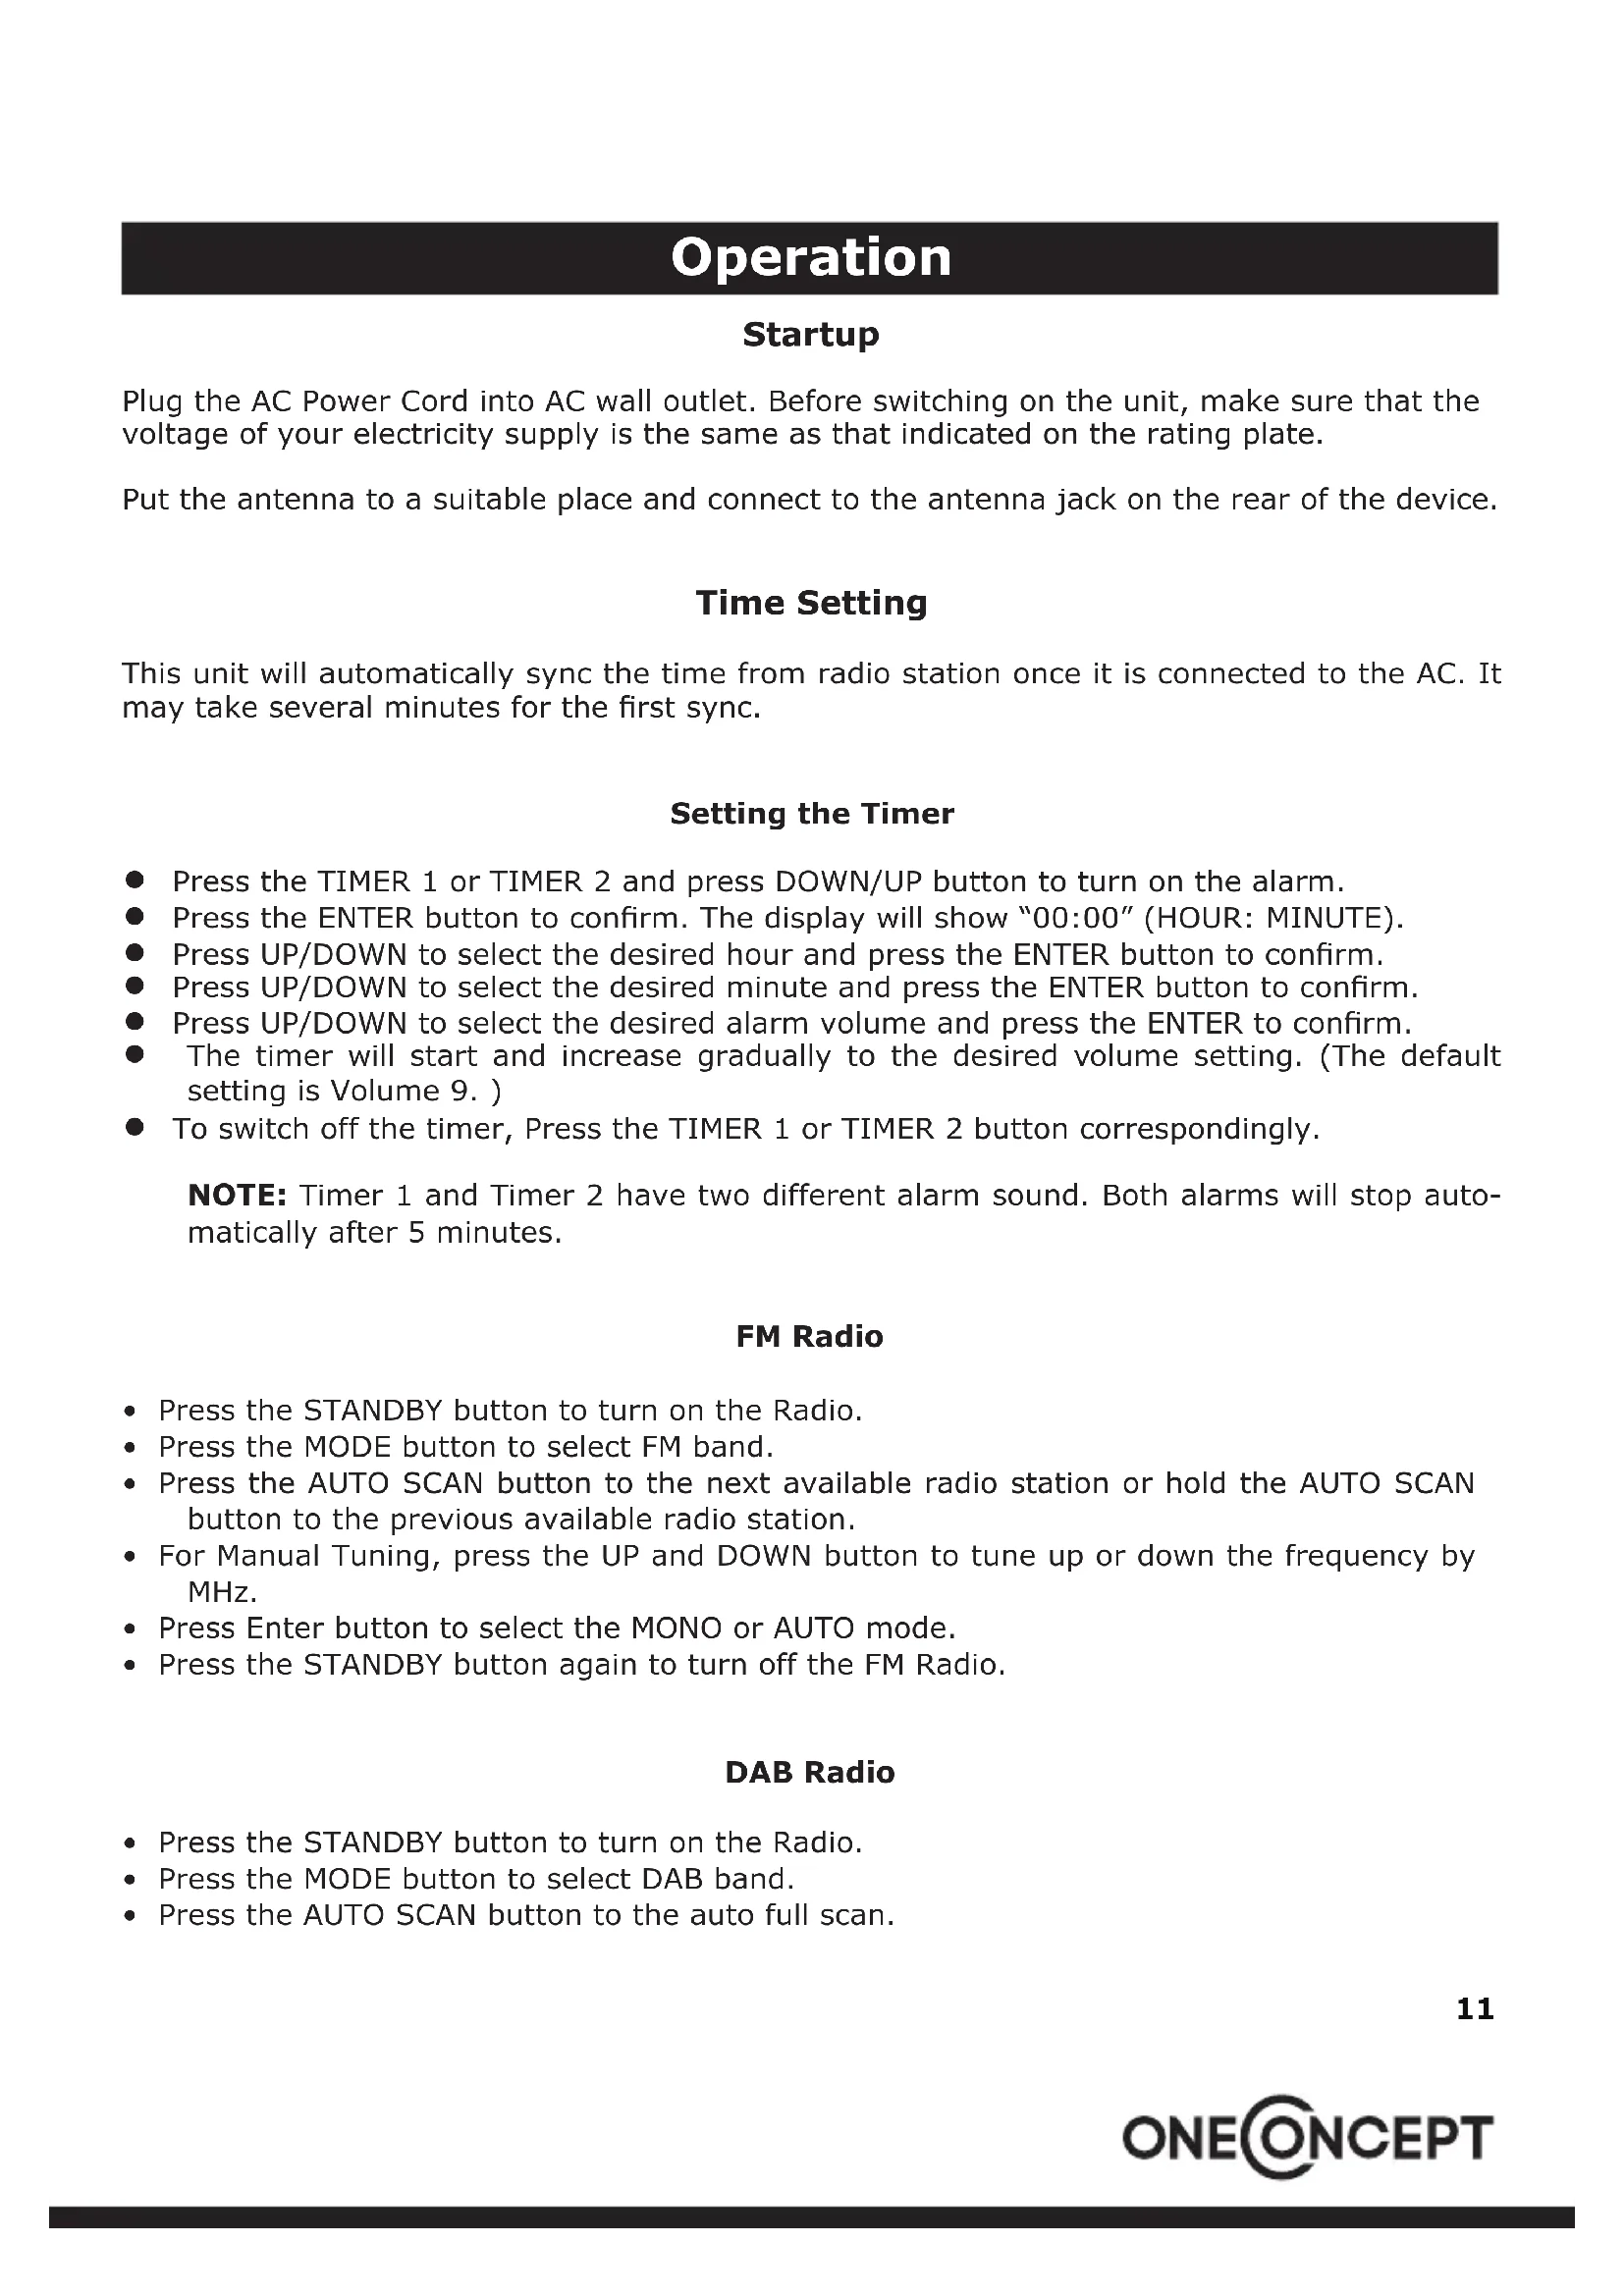
FM Radio
- Press the STANDBY button to turn on the Radio.
- Press the MODE button to select FM band.
- Press the AUTO SCAN button to the next available radio station or hold the AUTO SCAN button to the previous available radio station.
- For Manual Tuning, press the UP and DOWN button to tune up or down the frequency by MHz.
- Press Enter button to select the MONO or AUTO mode.
- Press the STANDBY button again to turn off the FM Radio.
DAB Radio
- Press the STANDBY button to turn on the Radio.
- Press the MODE button to select DAB band.
- Press the AUTO SCAN button to the auto full scan.
Note: When first used, the unit scanned the DAB band for available stations. The station services found were then stored in its memory. You can rescan the band at anytime if you move to a different area or just refresh the stored list of available stations.
The scanning process will take a few minutes. The number of services found during the scan will be shown at the right side of the display.
After the scan, the radio will re-tune to the last station playing if it is available. Alternatively, you can continue to browse for another station.
- Press UP/DOWN to select the desired DAB radio Station.
- Press the RADIO ON/OFF button again to turn off the DAB Radio.
Performing a Manual Tuning:
- Press and hold the ENTER button until "Manual Tune" appears.
- Using the UP and DOWN buttons, toggle through the frequencies to tune a station.
- Press the Enter button twice to confirm the frequency and exit from "Manual Tuning".
Note: The multiplex channel number and frequency is displayed. If a station multiplex exists on this frequency, the multiplex name will also be displayed and the first station in the multiplex will play.
ANCILLARY FUNCTIONS
- Preset function
The unit can store up to 10 DAB and 10 FM stations as presets for instant access to your favorite stations.
Storing a station preset:
- Tune your desired radio station you wish to store as a preset.
- Press and hold the PRESET button until "Preset Empty 1" appears with the number flashing.
- Using the UP and DOWN buttons, select the preset number you wish to use and press ENTER button to store that station into the radio memory.
Note: When you store a preset, the preset number and "Stored" will be displayed to confirm the number you selected. You can choose a preset number that is already in use. The new station details will over-write the stored station.
Recalling a preset station:
- Press the PRESET button until the first preset appears.
- Using the UP and DOWN buttons, scroll through the station presets.
- Press the ENTER button to select the station you wish to listen to.
- System Reset
If a factory reset is required, follow these steps:
- In FM mode, press and hold the MENU button
- USE UP/DOWN button to select the System Reset.
- Press ENTER when prompted to perform the system reset. The radio will return to DAB mode and perform an initial DAB+ scan on start-up.
Note: Any presets or setting stored will be permanently deleted.
- Browse station Information
Press the INFO button repeatedly to view information transmitted by the station in DAB / FM modes.
DAB: Multiplexer name - signal strength - time & date - DLS information - program type* - frequency - bit rate
FM: RDS*** information - program type - signal strength - time&date - audio mode
*DSL (Dynamic Label Segment): This is a scrolling message giving real-time information - song titles, news headlines, or detail of the program and is provided by the broadcaster.
**Program Type: This describes the style of the program being broadcast
***RDS (Radio Data System): Small amounts of digital data supplied by the broadcaster that may provide song/station details, results, etc.
- Prune
You may remove all unavailable DAB stations from the list.
- In DAB mode, press and hold the MENU button.
- USE UP/DOWN button to select the PRUNE.
- Press ENTER to confirm.
The radio will return to DAB mode and perform an initial DAB+ scan on start-up.
Note: Any presets or setting stored will be permanently deleted.
Environment Concerns

According to the European waste regulation 2002/96/EG this symbol on the product or on its packaging indicates that this product may not be treated as household waste. Instead it should be taken to the appropriate collection point for the recycling of electrical and electronic equipment. By ensuring this product is disposed of correctly, you will hep prevent potential negative consequences for the environment and human health, which could otherwise be caused by inappropriate waste handling of this product. For more detailed information about recycling of this product, please contact your local council or your household waste disposal service.
Declaration of Conformity
Manufacturer: CHAL-TEC GmbH, Wallstraße 16, 10179 Berlin, Germany.
This product is conform to the following European directives:
2004/108/EC (EMV)
2011/65/EU (RoHS)

Chere cliente, cher client,
*DSL (Dynamic Label Segment): This is a scrolling message giving real-time information - song titles, news headlines, or detail of the program and is provided by the broadcaster.
**Program Type: This describes the style of the program being broadcast
***RDS (Radio Data System): Small amounts of digital data supplied by the broadcaster that may provide song/station details, results, etc.
Size: W148.5 x H176 mm
Scale 1:1
TEMPLATE BORDER
CAUTION
Do not install the appliance over a heat source.
Test the radio reception before installation.
Install the appliance far from the noise sources.

Mounting Material - Using Spacers
45ppm
1
1
1111
Mounting Material - Not Using Spacers
1111457x103x6m
4

STEP1
Align the template border marked "FRONT" along the front edge of your cabinet.
Fi the template to the cabinet with adhesie tape
Make a notch to the bottom of the cabinet as marked 品 on the template.
Remove the template after you finish marking.
STEP2-Using Spocrs
Tae out the top plate from the
int
Faslen the screw through the hoes of the top piece with the
eepers in hortrees to the bottom
of the celalal as ilustrated.

STEP2-NotUsingSpacers
Take out the tap plate from the
Pase the srow through this
pattern of the cabinet as
illustrated
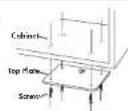

STEP3
Slide the unit to fit in the top plate mounted in the
cabire

FRONT
Size: W148.5 x H176 mm
Scale 1:1
TEMPLATE BORDER
Achtung