BC400D - Baby monitors HAMA - Free user manual and instructions
Find the device manual for free BC400D HAMA in PDF.

| Product type | Baby audio monitor |
| Brand | Hama |
| Model | BC400D |
| Power supply (parent unit) | 3 AAA batteries (alkaline or rechargeable) + AC adapter 120-230V, DC 7.5V |
| Power supply (baby unit) | 3 AAA batteries (alkaline or rechargeable) + AC adapter 120-230V, DC 7.5V |
| Operating frequency | 2.401 - 2.482 GHz |
| Maximum range | Up to 300 meters in open field |
| Microphone sensitivity | Adjustable: Lo (1-2 m) / Hi (2-6 m) |
| Main functions | Two-way communication, baby monitor, built-in music (6 lullabies), out-of-range alert, low battery alert, key lock, 65000 identification codes |
| Display | LCD or LED version (depending on model) |
| Built-in music | 6 different melodies + random play (AL) |
| Charging time | Approximately 8 hours for empty batteries |
| Safety | Does not replace adult supervision. Keep out of reach of children. Do not expose to water. |
| Maintenance | Clean with a damp cloth. Do not use liquids or aerosols. |
| Repairability | Do not disassemble. Contact a qualified technician for repairs. |
| Box contents | 1 parent unit, 1 baby unit, 2 AC adapters, rechargeable batteries included |
| Certifications | CE (compliant with R&TTE directives) |
Frequently Asked Questions - BC400D HAMA
User questions about BC400D HAMA
0 question about this device. Answer the ones you know or ask your own.
Ask a new question about this device
Download the instructions for your Baby monitors in PDF format for free! Find your manual BC400D - HAMA and take your electronic device back in hand. On this page are published all the documents necessary for the use of your device. BC400D by HAMA.
USER MANUAL BC400D HAMA
natural_image
Two identical white and gray baby phone devices with digital displays, no visible text or symbols on the device surfaces.All listed brands are trademarks of the corresponding companies. Errors and omissions excepted, and subject to technical changes. Our general terms of delivery and payment are applied.
00092661
00092661/08.10

natural_image
Simple line drawing of a smiling cartoon character inside a teapot (no text or symbols)natural_image
Simple line drawing of a teardrop-shaped object with internal circular elements and two horizontal lines (no text or symbols)text_image
Labeled diagram of a mechanical or electronic component with numbered parts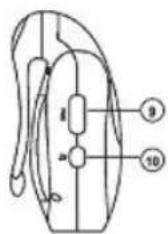
text_image
Diagram of a mechanical or electrical component with labeled parts and numbered annotations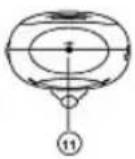
LED Anzeigeversion:

text_image
1b 2 3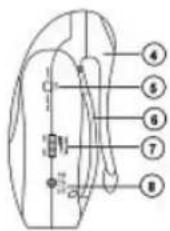
text_image
Anatomical diagram of a kidney with numbered labels pointing to specific structures.
natural_image
Simple line drawing of a smiling credit card with no text or symbolstext_image
Two cartoon face expressions with speech bubbles and connecting lines, likely illustrating visual or cognitive concepts.text_image
Diagram of a mechanical lifting device with labeled components and directional arrows indicating motionBatterietipps:
GB Operating Instruction
You have just purchased a quality baby monitor. Please read the instructions thorough before using the monitor system and keep it for future reference.
Safety Precautions
When using this unit, basic Safety Precautions should always be followed to reduce the risk of fire, electric shock, or personal injury.
- Read and understand all instructions.
- Follow all warnings and instructions marked on this unit or mentioned in this operation instruction.
- Do not use liquid or aerosol cleaners. Use a damp cloth for cleaning.
- Do not use this unit near water such as bathtub, shower or pool. Immersion of this unit in water could cause an electrical shock.
- Place the unit securely on a stable surface. Serious damage and/or injury may result if the unit falls.
- Do not cover slots and openings on the unit. They are provided for ventilation and protection against overheating.
- Install the unit where no one can step or trip on the cord.
- Never push any objects through slots in this unit. This may result in the risk of fire or electric shock. Never spill any liquid on the unit.
- To reduce the risk of electric shock, do not disassemble this unit. Take the unit to authorized service center or qualified technician when service or repair work is required. Opening or removing covers may expose you to dangerous voltages or other risks. Incorrect reassembly can cause electric shock when the unit is subsequently used.
- Do not expose the unit to extreme temperatures such as areas near a hot radiator or stove or in a hot car.
- Do not place lighted objects such as candles, cigarettes on the unit.
Caution:
This product cannot replace responsible adult supervision.
- This Baby Monitor is intended as an aid. Do not use it as a medical monitor or a substitute for responsible and proper adult supervision.
- Make sure the Parents unit and adaptor cable are always out of child's reach. Do not place the Baby Unit inside the baby's crib or playpen!
WARNING:
To prevent the risk of fire or electrical shock, do not expose this unit to rain or any type of moisture.
Content and Features
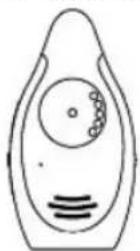
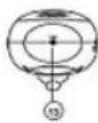
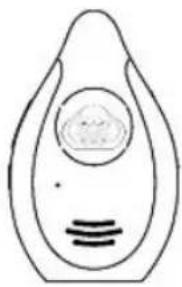
LCD version:
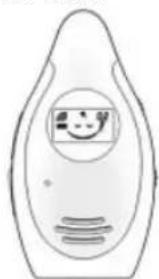
natural_image
Simple line drawing of a smiling fish-shaped object with a circular inset showing a smiling face (no text or symbols)Parents unit Baby unit
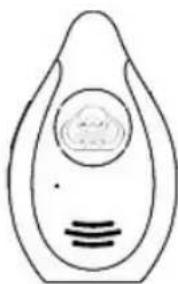
natural_image
Simple line drawing of a stylized object resembling a droplet or container with internal circular elements (no text or symbols)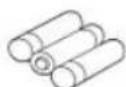
supplied
rechargeable batteries
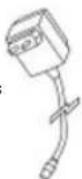
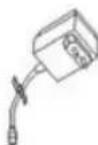
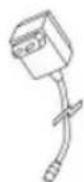
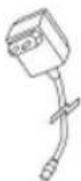
AC Adapter (for parents unit)
AC Adapter (for baby unit)
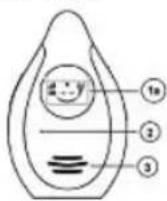
LED Indicator version
Parent unit
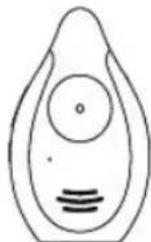
Baby unit
Baby unit
LCD version


LED Indicator version
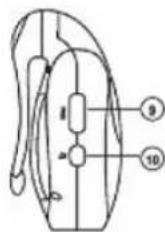
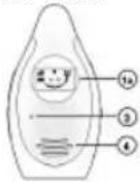
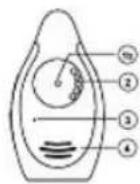
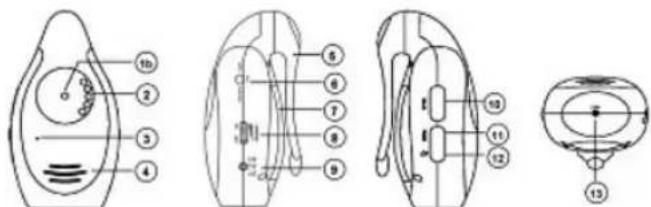
1a. LCD Display (for LCD version)
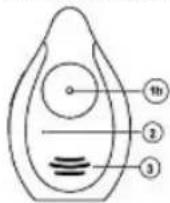
1b. Power Indicator : Red, Green and Orange (for LED Indicator version)
2. Microphone
3. Speaker
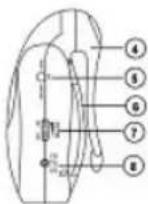
4. Belt Clip
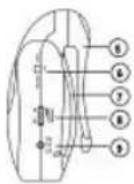
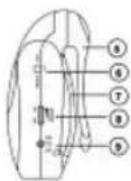
5. Lock / Unlock key
6. Battery Compartment
7. Power and Volume Control
8. AC / DC Power Supply Sock
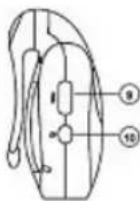
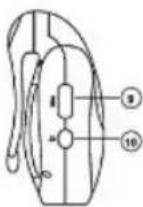
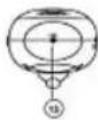
9. PAGE key
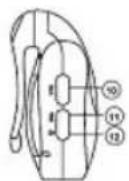
10. Music Play and Control (optional)
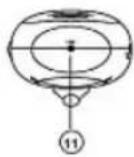
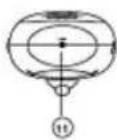
11. LINK key
Parents unit :
LCD version:
LED Indicator version
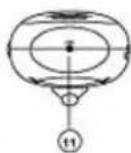
1a. LCD display (for LCD version)
1b. Power Indicator : Red, Green and Orange (for LED Indicator version)
2. Sound Lights (only for LED Indicator version)
- One or two LEDs lighted up means shallow sound received.
- Three to five LEDs lighted up means louder sound received.
3. Microphone
4. Speaker
5. Belt Clip
6. Lock / Unlock key
7. Battery Compartment
8. Power and Volume Control
9. AC / DC Power Supply Sock
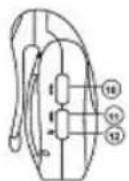
10. TALK key
11. PAGE key
12. Music Play and Control (optional)
13. LINK Key Indication
Indication
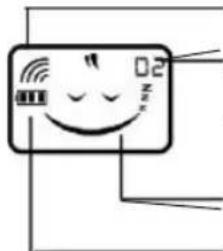
LCD version : Main LCD Screen
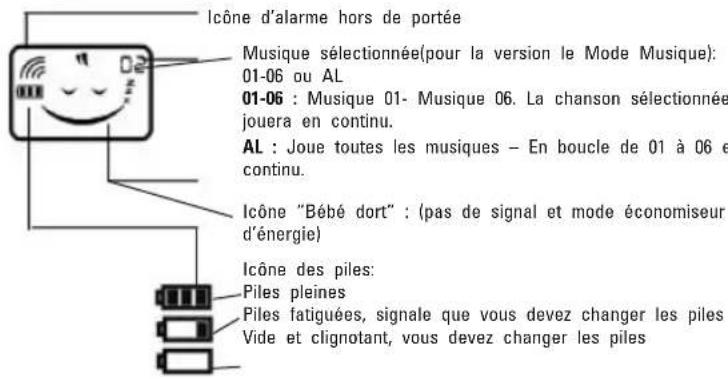
Out of range alarm icon
natural_image
Simple line drawing of a smiling face inside a credit card (no text or symbols)Selected Music (for Music function version): 01-06 or AL 01-06 : Music 01- Music 06 . The selected song will be playing repeatedly.
AL : Play All music - Music is looped from 01 to 06 repeatedly.
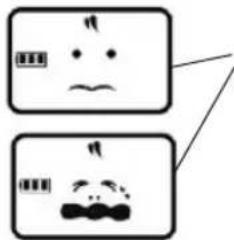
"Baby sleeping" icon : (no signal and energy saving mode)
Battery icon:
Full battery level
Low battery level, reminds you to change the batteries.
Empty and flashing, batteries change is a must.
text_image
Two cartoon face expressions with expressive faces and speech bubbles, possibly depicting emotional or satirical reactions."Baby calling" icon : constantly changing display
LED Indicator version : Color Index of Power Indicator
| Indicator Indication Indication | ||
| Parent unit Baby unit | ||
| flashing green light Power | is good and standby | → |
| flashing red light Battery | charging Low power; | Battery charging |
| Flashing red light with alert in every 3 seconds | Low power N/A | |
| Flashing red light with alert in every second | Out of range N/A | |
| Red light Fully charged when the unit is turned off. | → | |
| Green light Power is good and receiving signal | Power is good and transmitting signal | |
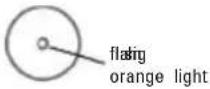
| Flashing orange light Scanning the corresponding code for both units | → | |
| Red Light Scanned the corresponding code successfully | → | |
AC Adaptor:
The AC Adaptors are low voltage power source that allow you to use your household electricity to run the Baby Monitor. Connect the AC Adaptors to the AC Adaptor Jack in the Unit. Both plug into any standard volt electrical outlet in your home.
It is recommended to turn off the units before plug in or unplug the adaptors.
CAUTION: These adaptors were made with a specific design for this product. They cannot be used with any other appliance. Never use a different type of adaptor with Baby Monitor.
Privacy Protection
Always remember that you are using public airwaves when you use the Wireless 2.4 Digital Baby Monitor. Sound may be broadcasted to other receiving devices. Conversations, even from rooms near the Baby unit, may be broadcast as well.
CAUTION: To protect your privacy, always turn the system off when not in use. It is possible that the Parents unit may be interfered from other devices in the 2.4GHz frequen range. To minimize this potential problem, more than 65000 ID code have been provided for your use. If you experience interference while using one ID code setting, simply select to another ID code.
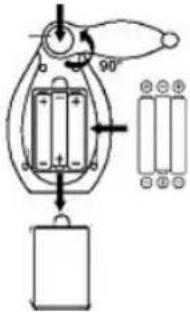
Battery Installation
Please charge the rechargeable batteries before first time usage.
- Ensure the unit is off. Press the button on the belt clip and rotate it clockwise or counterclockwise for 90°.
- Open the battery compartment door.
- Insert 3 AAA batteries into the Baby unit and Parents unit according to the +/- signs shown in the battery compartment, respectively.
- Replace battery compartment door. Press and rotate the belt clip to its normal position.
Battery Tips:
- If the product is not in use for a long time, disconnect both units from the household electrical outlet. And remove the batteries or the exhausted batteries from the units, otherwise battery leakage and corrosion can damage them.
- Non-rechargeable battery is not to be recharged.
- Rechargeable batteries are only to be charged under adult supervision.
- Danger of explosion if battery is incorrectly replaced. Replace only with the batteries of the same and equivalent type.
text_image
Diagram of a mechanical lifting device with labeled components and directional arrows, including a 90° angle indicator.Battery Charging
If the battery level becomes almost empty, the units will display the below :
| Model Baby Unit Parent Unit | ||
| LED Indicator version Power indicator flashesRed light. | ||
| No Alert sound Emits a alert tone in every 3 seconds. | ||
| LCD Display version | flatin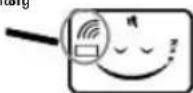 | |
| No Alert sound and empty battery | Emits a alert tone in every 3 seconds | |
In this case, user needs to recharge the supplied rechargeable batteries or change for new alkaline AAA batteries.
Charging the batteries
The rechargeable batteries to the Baby unit and Parents unit must not be taken out of the units for charging.
- Use only the AC adaptors which are included in the package, plug into any nearby standard household electrical outlet.
- Once connect them with the units, charging automatically begins.
- The charging time for completely charging empty battery takes 8 hours when the unit is turned off.
Charging and Fully charged Indication:
| LED Indicator version LCD | version | |
| In charging(Unit is turned on) | Flashing red light fast | 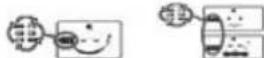 The battery icon loops. The battery icon loops. |
| In charging(Unit is turned off) | Flashing red light slow |  The battery icon loops. The battery icon loops. |
| Fully charged(Unit is turned on) | Green light / Flashing green light | 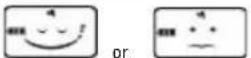 The battery icon stops looping. The battery icon stops looping. |
| Fully charged(Unit is turned off) | Red light |  The battery icon stops looping. The battery icon stops looping. |
Note:
- User can also install 3 alkaline AAA batteries instead of the supplied re-chargeable batteries.
- Or directly operated by the supplied adaptors.
Testing Before First Time Usage
A. Test the Baby unit transmission and the Parents unit reception.
- Place Baby unit and Parents unit in room where you intend to use it.
- Set both Baby unit and Parents unit to the corresponding code by pressing the LINK key at the bottom of the units for different ID code to ensure privacy. There are more than 65000 ID codes user selection.
3. Then:
- The LCD displays standby status. (LCD version)
- The power indicator lights and the power is on. (LED Indicator version)
NOTE:
For the first time usage, turn on both units, they can automatically scan the corresponding code at once without press any key. If reset the corresponding code for both units, user has to press the LINK key.
B. Baby unit emission:
- Place Baby unit in room where you intend to use it.
- Push the SENSITIVITY switch to a desired position to turn on the Baby unit transmission.
- As soon as the Baby unit transmits a signal, then:
| LCD Version LED Indicator version | |
 Constantly changing display-readouts Constantly changing display-readouts | 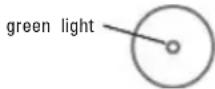 |
- The transmitter is standby status when no signal is transmitted.
| LCD Version LED Indicator version | |
 | flashing green light  |
C. Parents unit reception
- Place Parents unit in room where you intend to use it.
- Slide the VOLUME switch to a desired position and the unit is ready for reception.
- If the unit receives a signal,
| LCD Version LED Indicator version | |
 Constantly changing display-readouts Constantly changing display-readouts | green light 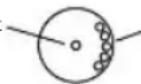 green light green light |
- The receiver is standby status when no signal is received.
| LCD Version LED Indicator version | |
 | flashing green light 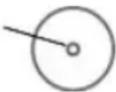 |
When you experience interference (buzzing or static, etc.), reset both units to another corresponding code. (details please refer to P.11 - scan the corresponding code for the units)
IMPORTANT! Test sound reception before use and whenever location of Baby unit is changed. (Refer to Testing Before First Time Usage)
Note:
- Position the Baby unit at least 1 meter away from the baby so that the microphone can pick up the child's sound.
- Unwrap and fully extend power cord for best transmission if adaptor is used. Plug the adaptor into the nearest standard household electrical outlet.
Operations Procedures
A. Power On / Off
- Connect the Parents unit with the AC adaptor. Plug it into the nearby standard electrical outlet or insert 3 AAA alkaline batteries.
- Turn on at the right side upward of the unit, a click sound be heard indicates the unit is turned on.
- Turn downward, a click sound indicates the unit is off.

B. Volume Adjustment
Rotate for adjusting the desired volume level.
-
Turning it upward for increasing volume level.
-
Turning it downward for decreasing volume level.

C. Talk to Baby unit (Only for Parents unit)
TALK key is located at the left side of the Parents unit.
-
Press and hold TALK key to talk to the Baby unit.
-
Release TALK key and return to the receiving status.
Remark: When the Parents unit is talking to the Baby unit, the call ring tone can also be heard if press PAGE key of Baby unit.
D. Music Playing & Select Music (optional)
Music play key is located at the left side of the unit. User can activate the music play and/or select a desired music to lull the baby to sleep. There are six music for selecting.
-
Press Play-key for about 3 seconds to activate the Music Playing function, and Music 01 will be played automatically.
-
Press Play-key to change music (01-06 or AL), you can hear the demonstration of different music. When you have selected the desired music, do not press key again.
Note: Selected music will be shown on the top right corner of the LCD screen for LCD version.
- Press Play-key for about 3 seconds again to turn off the music playing function.
Remarks:
- Baby unit can play music solely when the Parents unit is turned off. But Music play function of Parents unit is not available for use when Baby unit is turned off.
- When pressing the TALK key of Parents unit to talk to Baby unit, the music will be stopped playing.
• Music playing is not interrupted by call ring tone.
- Music playing could be interrupted by out of range alert.
E. Sensitivity Level Adjustment (Only for Baby unit)
SENSITIVITY slide switch is located in the battery compartment. Adjust different detecting sound level sensitivity by switching the SENSITIVITY switch to either Lo (normal sensitivity : 1-2 meters) or Hi ( high sensitivity : 2-6 meters) position.
Remarks : The default setting of sensitivity level is Hi.
F. Call Function
Both units can make a call ring tone to call one another.
-
Press PAGE key at the left side of the Parents unit or Baby unit one time to call another unit.
-
Three "BiBi" sound will be heard from Baby unit or Parents unit.
-
Each press PAGE key once, you will hear three "Bi Bi" sound. If no press PAGE k again, the call ring tone will end.
Remarks:
- When Baby unit call Parents unit, only the Parents unit can be heard three "Bi BI" sound (with power LED of Parents unit flashes RED light for LED indicator version.)
- When Parents unit call Baby unit, only the Baby unit can be heard three "Bi BI" sc (with power LED of Baby unit flashes Red light for LED indicator version.)
G. Low Battery Alert
When the unit is in low power, the details please refer to page 6 "Battery Charging".
Remarks:
- No low battery alert for Baby unit.
- No transmission and receipt while the unit is in low battery.
H. Out of Range Alert (Only for Parents unit)
When the connection between Parents unit and Baby unit is broken, e.g.
- one of the units is turned off during connection;
• the Baby unit is in low battery;
- the units are detected out of communication range.
The units will display the below :
| LCD Version LED Indicator | version | |
| Parents Unit | flating 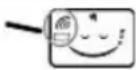 | 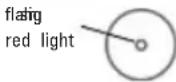 |
| with alert sound will be heard in every 1 second | with alert sound will be heard in every 1 second | |
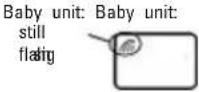
| Baby Unit | flatig  | flatig red light  |
For Blue Angel version, when only turn on the Parents unit, out of range alert sound should be heard within 30 second.
Note: Under out of range alert mode, the TALK, PAGE and music play key is not available for use.
I. Key Lock / Unlock
- Turn the right-hand key lock side switch to LOCK position of unit to lock key. The TALK key, PAGE key and MUSIO LOCK key are not available for use.
- Turn the same switch to UNLOCK position to unlock all the keys.
J. Belt Clip
The Baby unit and Parents unit can both be carried around using the belt clip provided on the rear of each unit.
How to operate 2 way communication between Parents unit and Baby unit
The Baby Phone yields high privacy and almost zero-interference to end users. There are more than 65000 ID code for user selection with the LINK key positioned at the bottom of the units.
NOTE:
Only scan the corresponding code for both units, they are able to connect to one another.
Operating and Setup
A. Scan the Corresponding Code
- Turn on both units. The Baby unit will emit a random ID code to Parents unit automatically without pressing any key.
- Once scanned the corresponding code, the units are ready for use. The code is recorded even thought you turn off the units or recharge the batteries. Or else the unit is not for use.
B. LINK key
LINK key is located at the bottom of the Parents unit and Baby unit. It is used for eliminating the corresponding code recorded in the unit and reset a new corresponding code for the Parents unit and Baby unit. The Parents unit / Baby unit can connect with another Baby unit / Parents unit with the LINK key to scan a new corresponding code for them.
- Ensure both units are turned ON. Press the LINK key of the units with a spiky and thin object (such as toothpick).
- Both units begin to scan corresponding code.
| LCD Version LED Indicator version | ||
| Scanning the corresponding code automatically | Parent unit: Parent unit:flating | 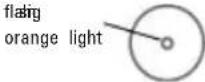 |
Baby unit: Baby unit:flating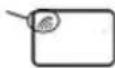 |  | |
| Scanned the corresponding code successfully | Baby unit and parent unit: normal status normal status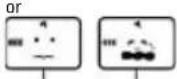 constantly changing display-readoutswith a “Di” sound constantly changing display-readoutswith a “Di” sound | Baby unit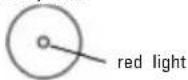 Parent unit Parent unit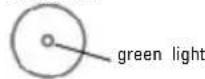 with a “Di” sound with a “Di” sound |
| Scanned the corresponding code unsuccessfully | Parent unit: Parent unit: stillflating  | 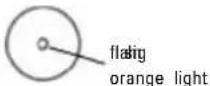 |
 |  | |
normal status
Parent unit
with a "Di" sound
Remarks: If operated by the supplied adaptor, please first plug in the adaptor, then power on the unit. And then scan the corresponding code with the LINK key if need.
C. 2-Way Communication
Usually, the detected sound is transmitted from the Baby unit to Parents unit. But Parents unit can talk to Baby unit with its TALK key.
- Press and hold TALK key of Parents unit and talk to the Baby unit.
- Release the TALK key, the Parents unit is in receiving status and wait for signal from Baby unit.
Remarks:
When pressing TALK key, the Parents unit does not receive any sound from Baby unit.
D. Music Control (optional)
After activating Music Play function of both units, as long as one of them adjusts music play or changes music(01-06 or AL), the setting for this function of the other unit will change accordingly.
Trouble shooting
| Problems Solutions | |
| 1. No power - Unit is turned off.- Check if the batteries are installed properly.- Make sure the adaptor is connected to the Unit properly if using the adaptor instead of batteries.- The Unit may be in low battery status, change new batteries. | |
| 2. Message not transmitted | - Sound sensitivity level of Baby unit is too low, turn the sound sensitivity switch to “HI” position.- Units are out of range or lost connection. Ensure the distance between the units within communication rangeNote: Communication range varies depending on surrounding conditions such as physical obstructions, interference.- Make sure the TALK key of Parents unit is not pressed- Make sure the unit is unlocked.- Ensure both units have already scanned the corresponding code. |
| 3. No sound signal - Volume level on Parents unit is set too low. Adjust it to higher volume.- Sound sensitivity level of Baby unit is too low, Turn the Sound Sensitivity switch to “HI” positions.- Units are out of range. Ensure the distance between the units within communication range.- Make sure the TALK key of Parents unit is not pressed- Make sure the unit is not locked key.- Ensure both units have already scanned the correspond code. | |
| 4. Received conversation or sound from neighbors. | - Signal interference due to other nursery monitor on the same ID Code or cordless phone used.- Change both units to another ID code by pressing LINK |
| 5. Hearing static or rustle from Parent unit. | - The both units are positioned too close to each other. away two units at about 1m.- The volume is set too high. Lower the volume at the Parent unit.- Reposition or replace batteries. | Keep |
| 6. Power LED rapidly flashes green light and can not receive or transmit | The power is too low. Change new batteries or operated by the supplied adaptor. |
Technical Specifications
Power Supply Voltage:
Parents unit : 3 AAA batteries or rechargeable batteries &
Adaptor: AC230V, DC 7.5V (Europe version)
Adaptor: AC120V, DC 7.5V (US version)
Baby unit: 3 AAA batteries or rechargeable batteries &
Adaptor: AC230V, DC 7.5V (Europe version)
Adaptor: AC120V, DC 7.5V (US version)
Operation Frequency: 2.401\~2.482GHz
Operating Range: up to 300m in ideal conditions
up to 100m in ideal conditions (for Blue Angel version)
Mic Sensitivity: 1 to 2 meter
Registration and Safety Certification/General Information
This device bears the CE symbol as specified by the provisions of Directive
R & TTE (1999/5/EC).
Hama GmbH & Co. KG hereby declares that this device is in compliance with the basic requirements and other relevant guidelines and regulations of the 1999/5/EC guideline.
You will find the declaration of compliance and declaration of conformity in the Internet at
http://www.hama.com
F Mode d'emploi
natural_image
Simple line drawing of a smiling cartoon character inside a teapot (no text or symbols)natural_image
Simple line drawing of a stylized biological or anatomical structure with no text or symbols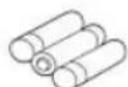
Piles rechargeables
fournies
text_image
Technical diagram of a device with numbered parts and labeled parts, likely for assembly or labeling purposes.text_image
Technical diagram of a device with numbered parts and labeled parts, likely for assembly or labeling purposes.Indications
Version LCD : Ecran principal LCD
text_image
Diagram of a mechanical device with labeled components and directional arrows, including a hanging weight and two stacked plates.text_image
Technical diagram of a device with numbered parts, likely illustrating a mechanical or electrical component layout.text_image
Technical diagram of a device with numbered components and labeled parts in Chinesetext_image
Technical diagram of a device with numbered components and labeled parts in Chinesetext_image
Hand-drawn illustration of a smiling digital device with Wi-Fi signal and '0.2' label, likely representing a smart device or app interface.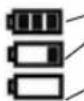
AL : Play All music - Music is looped from 01 to 06 repeatedly
natural_image
Simple line drawing of a smiling cartoon character inside a teardrop-shaped container (no text or symbols)Ouderunit Baby-unit
natural_image
Simple line drawing of a stylized object resembling a droplet or container with internal circles and three horizontal lines (no text or symbols)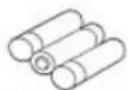
Oplaadbare
batterijen inbegrepen
text_image
Technical diagram of a device with numbered parts and labeled internal structuresLED-indicatoren:
text_image
Technical diagram of a mechanical component with numbered parts for identificationnatural_image
Two identical stylized illustrations of a smiling face inside a teardrop-shaped container, with no text or symbols present.natural_image
Two identical line drawings of a stylized object with internal circular elements, no text or symbols present.text_image
Technical diagram of a device with numbered parts and labeled parts, likely for assembly or labeling purposes.text_image
Technical diagram of a device with numbered parts, likely illustrating a mechanical or electrical component layout.text_image
Two cartoon face expressions with speech bubbles and symbols, likely depicting emotional or satirical reactions.text_image
Diagram of a mechanical lifting device with labeled components and angle indicationA. Interruptor ON/OFF
natural_image
Two identical line drawings of a stylized device with a smiling face and decorative patterns (no text or symbols)natural_image
Two identical line drawings of a stylized object with internal circular elements and horizontal lines, resembling a battery or device (no text or symbols)text_image
Technical diagram of a device with numbered parts, likely illustrating a mechanical or electrical component layout.text_image
Technical diagram of a device with labeled parts, including top, front, side, and side views with numbered annotations.text_image
Technical diagram of a device with numbered parts for identification and assembly reference.text_image
Technical diagram of a device with numbered parts and labeled internal componentstext_image
Diagram showing a smiling credit card connected to batteries, with signal icons and battery symbolstext_image
Two cartoon face expressions with Chinese labels, showing different expressions and visual cues.natural_image
Simple line drawing of a smiling cartoon character inside a teapot (no text or symbols)родительский блок
natural_image
Simple line drawing of a stylized object resembling a teardrop or container with internal circles and three horizontal lines (no text or symbols)детский блок
natural_image
Simple line drawing of a smiling cartoon character inside a teapot (no text or symbols)родительский блок
natural_image
Simple line drawing of a stylized object resembling a teardrop or container with internal symbols (no text or labels)детский блок
Детский блок:
text_image
Labeled diagram of a medical device with numbered parts for identification