Modesto Hotfill - Boiler INVENTUM - Free user manual and instructions
Find the device manual for free Modesto Hotfill INVENTUM in PDF.

| Product type | Electric storage water heater |
| Brand | Inventum |
| Model | Modesto Hotfill |
| Capacity | 10 liters |
| Maximum working pressure | 5 bar (500 kPa) |
| Weight empty | 6.8 kg |
| Weight full | 16.8 kg |
| Standby heat loss | 21 W |
| Electrical supply | 230 V ~ 50 Hz (estimated) |
| Power | 2,000 W (estimated) |
| Water connection | Flexible hose 1 m, G1/2" |
| Main functions | Storage and heating of drinking water, pressurized / non-pressurized / Hotfill systems |
| Temperature range | 10 °C (antifreeze) to 75 °C |
| Child safety | Temperature button lock with screwdriver |
| Safety group | Built-in discharge valve |
| Maintenance and cleaning | Annual descaling if hard water; exterior cleaning with a soft cloth |
| Warranty | 5 years on copper tank, 2 years on other parts |
| Standards | CE, ISO 9001 |
| Installation | Vertical or horizontal, behind a baseboard or in a kitchen cabinet |
Frequently Asked Questions - Modesto Hotfill INVENTUM
User questions about Modesto Hotfill INVENTUM
0 question about this device. Answer the ones you know or ask your own.
Ask a new question about this device
Download the instructions for your Boiler in PDF format for free! Find your manual Modesto Hotfill - INVENTUM and take your electronic device back in hand. On this page are published all the documents necessary for the use of your device. Modesto Hotfill by INVENTUM.
USER MANUAL Modesto Hotfill INVENTUM
Slide-in boiler/Slide-in waterheater/
Chauffe-eau Slide-in /Slide-in Speicher/
Slide-in Kazan
Instructions for installer and user
In purchasing this waterheater, you have acquired a safe and reliable quality product. The Inventum waterheater provides hot water from stock, without waiting, directly into the kitchen or the wash-basin. A high tap speed without unpleasant temperature differences offers you a high level of hot water convenience.
All Inventum waterheaters meet the highest quality requirements, also those regarding energy consumption. For example, we use high-grade CFC-free material for the isolation of the water-heaters. This way loss of energy is minimised.
Declaration of compliance
Inventum is a certified company according to ISO 9001. Inventum declares that the waterheater referred to on the front complies with:
Low-voltage Directive 73/23/EEG EMC Directive 89/336/EEG
Harmonised standards: EN 60335-1 EN 60335221 EN 50082-1 EN 55014 EN 61000-3.3 EN 610004-5

Chauffe-eau Inventum
Fig. 1 Main components
A Casing/Insulation
B Temperature switch
C Child-proofing
D Thermostat axe
E Hot-water connection
F Cold-water connection
G Connecting cable
H Type plate
J Reset knob
2.3 Quality marks en-3
2.4 Basic operation en-3
3 Operation and use en-3
3.1 Operation en-3
3.2 Putting into operation and terminating the system
3.3 Checking the system's operation
3.4 Activities regarding water main
3.5 Water and energy saving en-3
4 Maintenance en-4
4.1 Cleaning en-4
4.2 Inlet combination en-4
5 Malfunction en-4
6 Legionella prevention en-4
7 End of useful life en - 4
Abridged user instructions for child-proofing en-5
INSTALLATION MANUAL
7 Storage and transport en - 6
7.1 Contents of the packaging en - 6
7.2 Packaging and the environment en-6
8 Technical specifications en - 6
9 Preparations for installation en - 6
9.1 Local installation instructions en-6
9.2 Installation conditions en-6
9.3 Connecting conditions en-6
9.4 Accessories en-6
10 Installation en - 6
10.1 Installation of the water heater en-6
10.2 Connections water main en - 6
10.3 Connection drain pipe (with pressurised system) en - 6
10.4 Filling the water heater en - 6
10.5 Connections electricity en-6
11 Putting into operation and terminating the system en-7
11.1 Putting into operation en-7
11.2 Checking proper installation en-7
11.3 Terminating the system's operation en-7
11.4 Emptying the water heater en - 7
1 Use of the manual
This manual serves as a reference work for users and fitters. This manual describes how to safely install, use and maintain the waterheater referred to on the front. Keep the manual near the waterheater. The first part is written for both users and fitters. The second part is exclusively written for fitters. Closely read the part of the manual that is written for you. We strongly advise users to ask the fitter how to safely use the waterheater.
The manual uses the following pictograms and symbols:

Attention!

Fitter
Operations
Great care has been taken by Inventum in writing this manual. However, no rights can be derived from it. In relation to continuing product innovation, Inventum reserves the right to alter the specifications without prior notification at all times.
1.1 Application
The Modesto waterheater is suitable for storing and heating drinking water under pressure. It is to be connected to a water supply system with a maximum water pressure of 500 kPa (5 bars). All other or additional use is not in accordance with the purpose. Only install and use the waterheater when it is in a technically perfect condition. The Modesto waterheater is intended for placing behind the baseboard of the kitchen. It's also possible to place the Modesto in or behind the kitchen. The Modesto waterheater can be applied both horizontally and vertically. The Modesto can also be applied in other places near a tapping point.
1.2 Guarantee
This waterheater is manufactured with great care and is therefore guaranteed by Inventum for any failure due to bad quality of materials and/or manufacturing.
Submitting Guarantee
The responsibility for submitting the guarantee lies initially with the installer or supplier where the water heater was purchased. Therefore allways contact your installer or supplier first.
Guarantee period
-
5 years for the inner container (without accessories)
-
1 year for all other components
valid from the date on the invoice of purchase.
Terms of Guarantee
- Any claim for repair or replacement should be substantiated by submittal of the type- and serial number and the invoice of purchase. (You will find this information at the back of this manual);
The guarantee applies only if:
- there is any failure due to bad quality of materials and/or manufacturing (to be judged by manufacturer);
- the water heater is installed, used and maintained according to this manual;
- no constructional changes and/or modifications are made to the water heater;
- the failure is not caused by heating without water inside the tank, too hard or too aggressive drinking water or other liquids, vapours or gases and in- or outside corrosion or scale.
- the failure is not caused by own fault, negligence or injudicious handling.
Guarantee exclusions
- Call-out charge
- Charge for labour
- Shipping costs
- Transportation damage
- Administrative costs
- Secondary damage like fire damage, water damage, industrial damage and physical injury.
Service
In case of any problems with installing and/or operating the waterheater, always contact your local fitter or point of sale, also for reordering components.
N.B.
A defect of one or more components does not justify in any way replacing or returning the complete waterheater. All relevant waterheater components are available within a short time frame.
1.3 Liability
Inventum and/or the supplier and your fitter do not accept any liability for damages or physical damage of any kind resulting from:
not complying with the instructions of this manual;
- carelessness while installing, using, maintaining or repairing this waterheater;
- use which is not in accordance with the purpose;
- applying components that have not been provided by the manufacturer;
- consequential damage through leakage.
2 Description
This waterheater designed for storing and heating drinking water. The waterheater contains an isolated innertank suitable for 10 litres of water. The in-built electrical heating element heats up the water. The waterheater can be incorporated into a water supply system by means of the hot-water and cold-water connection.
2.1 Main components
The main components are shown in figure 1 on page 1.
2.2 Product identification
The type plate contains the following data:
- product name;
-type number; - serial number;
capacity [L]; - quality marks;
- working pressure [kPa or bars];
- power [W];
- electrical connecting value [V];
- CE marking;
-damp resistance.
2.3 Quality marks
You will find the applicable quality marks on the type plate.
2.4 Basic operation
Modesto
System under pressure (figure 2.1)
Cold tap water enters the waterheater via the inlet combination. The thermostat and the electrical heating element heat up the water to the pre-set temperature. When the water is heated, it expands, increasing the pressure in the water-heater. This overpressure is limited by the relief valve of the inlet combination.
Unpressurised system (figure 2.2)
This application does not make use of an inlet combination. The special unpressurised mixing tap drains away the expansion water. During the heating of the water, the tap drips until the pre-set temperature has been reached. There should never be any obstruction for the expansion water to drip from the tap.
Modesto Hotfill
System under pressure (figure 2.3)
The waterheater is included in the main hot water system. During use, the waterheater is filled directly with hot water from the main hot water provision, ensuring that it is always possible to draw hot water. The thermostat and the electrical heating element heat up the water to the pre-set temperature. When the water is heated, it expands, increasing the pressure in the waterheater. This overpressure is limited by the relief valve of the inlet combination.
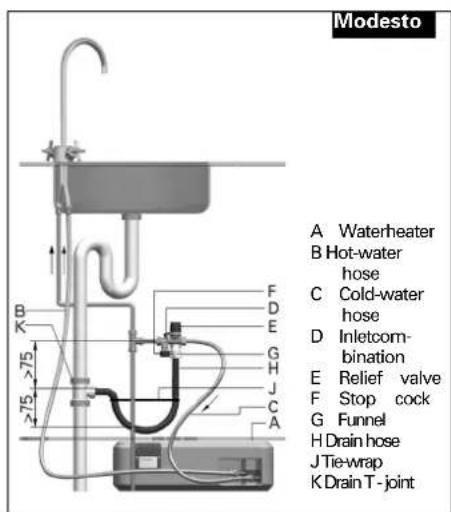
Figure 2.1 Basic operation of a pressurised system
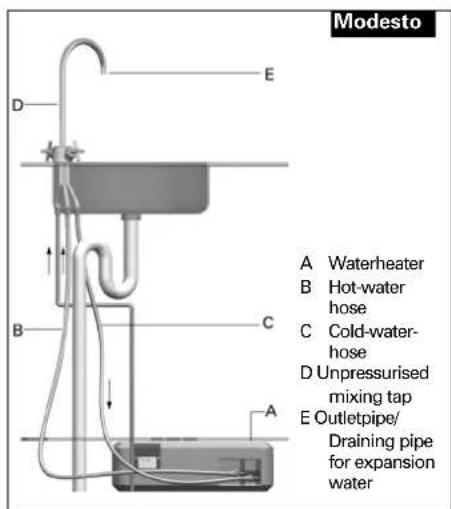
Figure 2.2 Basic operation of a unpressurised system
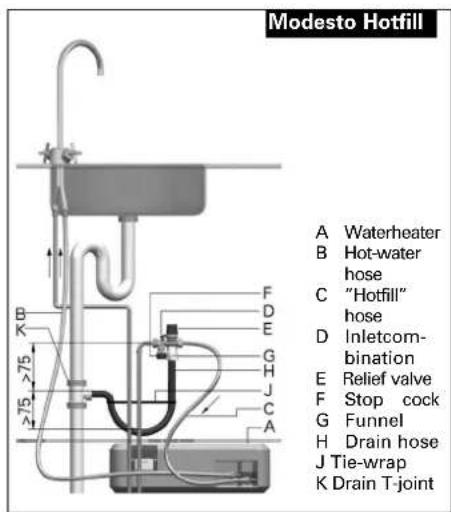
Figure 2.1 Basic operation of a pressurised system, "Hotfill"
3 Operation and use
3.1 Operation
The temperature switch can be adjusted to continuously variable.
- Minimum:
Frostproof position () .The water temperature is approx. 10^;
-45°C:
Energy saving position. This position can be used for washing hands and rinsing, for instance. This position reduces calcification in the waterheater;
-60°C:
This is a common temperature for washing-up water;
-75℃:
Maximum position. For hot water or much warm water. The water heater supplies app. 20 litres of 40^
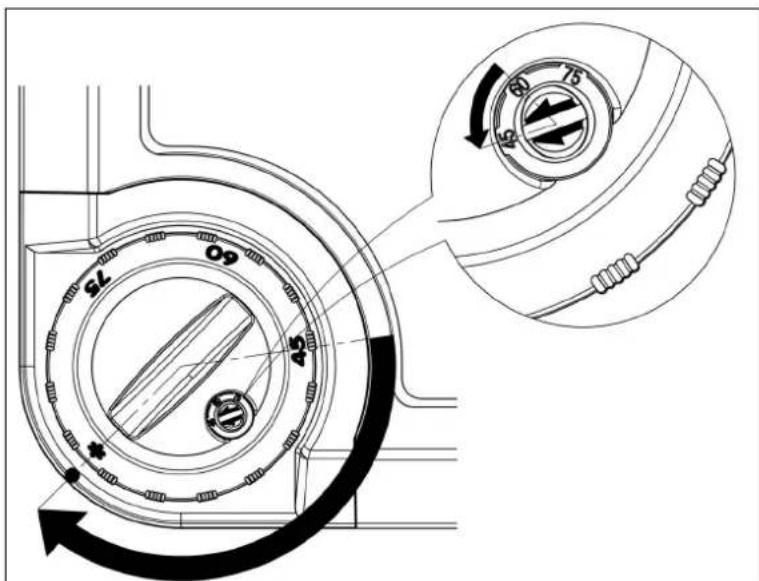
Child-proofing
If required, the setting of the temperature switch can be blocked by means of a childproof lock. (fig. 3).
- Turn the temperature adjusting knob to the position with the star;
- Twist the red childproofing with a screwdriver to the desired blocking position;
The knob cannot be turned any further than the set value.
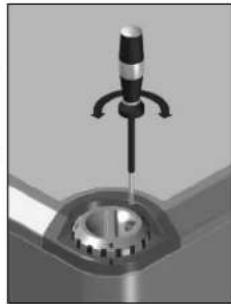
Fig. 3 Temperature adjusting knob with child-proofing

See also page 5 of this manual!
3.2 Putting into operation and terminating the system

Check if the waterheater is filled with water!
The waterheater is connected to the electricity grid by means of a wall socket.
- Connect the power plug to the wall socket to put the waterheater into operation;
- Disconnect the power plug from the wall socket to put the waterheater out of operation or turn the temperature adjusting knob to 串 ^ 串 (frost proof position).
3.3 Checking the operation
Systeem under pressure
The waterheater heats up the water if the expansion water trickles from the relief valve.
Unpressurised system
The waterheater heats up the water if the expansion water trickles from the outlet pipe of the tap.
3.4 Activities regarding water main
If the water pressure should be cut off, for example due to activities regarding the main, flush - as soon as the water pressure is back - through a cold-water tap until the water remains clear.
3.5 Water and energy saving
By using (hot) water with care, you protect the environment and decrease your water and energy bill.
4 Maintenance

Make sure that your waterheater is descaled once a year when you live in an area with hard water exceeding 12^ (German standard of hardness)
4.1 Cleaning
Use a soft cloth with a non-aggressive cleaning product to clean the outside of the waterheater.
4.2 Inlet combination
Regularly check whether the relief valve (Figure 2.1) is not obstructed in draining the expansion water from the waterheater.

The outlet of the relief valve on the inlet combination must be kept open to the atmosphere.

The relief valve on the inlet combination must be regularly operated, to remove calcium deposits and to verify that it is not blocked.
5 Malfunctions
This Inventum waterheater is extremely reliable. However, if any malfunctions should occur, follow the table of malfunctions (Table 1).

Contact your fitter if malfunctions cannot be resolved by means of the actions prescribed!
Please have the following information ready:
product name;
type number;
- serial number.

Do under no circumstance try to repair the waterheater yourself. A hazardous situation may occur, and besides your guarantee will lapse.

The power supply cable may only be replaced by the Inventum Technical Service if it should be damaged, this to prevent dangerous situations.
6 Legionella prevention!

The kitchen water heater is intended for use near to the kitchen tap which provide hot water for daily use.
If the water temperature is higher than 45^ for any length of time and the water is used daily there is only a very limited risk of legionella. To avoid any risk after a long period of inactivity, it is recommended that the water should be heated once to a temperature higher than 60^ and then allowed to flow through the tap for one minute.
If the kitchen water heater is used for showers (for example in a caravan), or if hot water is not used for a long period regularly, it is recommended that the temperature be set higher than 60^ .
| Storage temperature | Legionella growth water use | Daily hot | Advice |
| < 25 °C | No growth | not necessary | Setting only for frost protection |
| 25 - 40 °C | Growth is possible | required | Setting not advised |
| 45 - 60 °C | Growth not possible | required | Only for kitchen use |
| > 60 °C | Legionella dies | not necessary | Always safe |
Legionella risk at set water heater temperatures
WARNING!

For waterheaters set at high temperature there is a burning hazard (more specifically for children).
7 End of useful live
All materials used by Inventum are free of hazardous materials which could harm the environment when these are dismantled and/or destroyed.
Table1: Table of malfunctions
| MALFUNCTION | EXPLANATION | ACTION |
| (Too) cold water. - Thermostat is set too low. • Adjust | thermostat switch. | |
| - Child-proofing is set too low. • Set child-proofing higher (See 3.1). | ||
| - Hot-water tap is (too) long or is • Isolate the hot-water not isolated. | ||
| - Waterheater operated without water. • Reset thermal | cut-out. Remove thermostat knob. | |
| Too hot water. - Thermostat is set too high. • Adjust the thermostat switch. | thermostat switch. | |
| Too little water. - Water pressure is too low. • Check | whether the cold- water taps have the | same problem. • Contact the waterworks. |
| - Stop valve is not sufficiently open. • Open stop valve. | ||
| Too little water in vertical position. | - Waterheater not placed correctly vertical. | • Place the waterheater correctly, see figure 11. |
| Relief valve keeps leaking. - Water supply pressure is too high. • Place a pressure reducing valve before | the inlet combination. | |
| - Relief valve does not close properly. | • Operate relief valve a number of times. | |
| Waterheater is leaking. | - Water mains have not been properly connected to waterheater • Close the stop clock. - Inner tank is leaking | • Switch off the electricity of the waterheater. • Open a hot-water tap to release the pressure in the waterheater. • Collect the leaking water. • Contact your fitter. |
| The waterheater makes boiling noises. | - Calcification in the waterheater. | • Contact your fitter. |
Modesto Slide-in waterheater Abridged user instructions for child-proofing
The child-proofing is able to limit the maximum adjustable temperature.
Prevents burning
- Saves energy
Safer for children
Prevents excessive scaling
- Turn the temperature knob to the frostproof position ()

- Turn the red child-proofing to the desired maximum temperature using a suitable screw-driver.
The maximum adjustable temperature can be limited to:
45 ^ C - energy-saving setting (recommended in areas with extremely hard water >16^ )
60^ - normal use (factory setting)
75^ - maximum hot water (only recommended in areas with soft water < 12^
- The temperature knob cannot now be turned any further than the adjusted setting.
INSTALLATION MANUAL
7 Storage and transport
The device must always be stored in the manufacturer's original packaging. All the instructions stated on the outside of the packaging must be followed. The storage space must be dry and arranged in such a way as to prevent the packaging from being damaged. During transportation the original packaging must remain undamaged in order to protect the device. When placing the box into the vehicle, do this in such a way that the box cannot shift. Keep the device contained in the packaging, as long as possible until you have reached the location where the installation is to take place.
7.1 Contents of the packaging
The packaging contains the following items:
Waterheater
- Manual
Quick installation guide
- Connecting set
7.2 Packaging and the environment
In order to save the environment, you must:
- Dispose of the cardboard elements at a local assembly point for recycling.
- Dispose of the remainder of the packaging through the regular disposal channels.
Or give the box a second life by transforming it into a storage box.
8 Technical specifications
For technical specifications of the waterheater we refer you to:
the type plate (fig. 1)
the dimensional sketch (fig. 4)
9 Preparations for installation
9.1 Local installation instructions
When installing the waterheater, you must follow the locally applicable installation instructions regarding, for example, the electricity company and waterworks.
9.2 Installation conditions
Determine the place where the waterheater is to be installed on the basis of the examples on p. 6
(fig. 6, 7, 8 and 9) and the situation in your kitchen.
Take into account the following points: - Waterheater, inlet combination, water conduits and drain pipes are located in a frostproof space:
- The ground is level and can support the waterheater with contents;
- Make sure the waterheater stays reachable for service and maintenance.
9.3 Connecting conditions
- Electricity connections are present or can be installed;
- An earth-connected wall socket is used for the input;
- Water conduits are present or can be installed;
- A cut-off valve is never placed between the inlet combination and the waterheater;
- The expansion water from the relief valve of the inlet combination is carried off via the drain pipe to the sewer;
- The supplied inlet combination has an opening pressure of 6 bar (and is equal to the operating pressure of the waterheater);
- The 1 meter long flexible connection-hoses are already mounted in the factory and tested for leakage. It is not recommended to loosen them.
9.4 Possible accessories
System under pressure
- A pressure reducing valve* is necessary if the water supply pressure is higher than 5 bar;
Unpressurised system
- A unpressurised single hole mixing tap.*
* Not supplied!
10 Installation
10.1 Installation of the waterheater
- Place the device on a flat surface with nothing in between.
10.2 Connections water main

When installing swivels and compression couplings, always use 2 open-end spanners in order to prevent bending and torsion on the pipes and accessories.

The new flexible connection hoses that are supplied with the Modesto should be used to install the new water heater. Old connecting hoses must not be reused.
Pressurised system (Fig. 2.1 and 2.3)
- First carefully flush out all the pipes connecting with the waterheater (especially important in case of newly-built houses);
- Close off the main cock of the water main;
- Connect the cold water connection of the waterheater (G1/2" swivel) with the inlet combination:
- Install a pressure reducing valve upstream of the inlet combination if the water main pressure is higher than the closing pressure of the inlet combination;
-
Install the inlet combination on the coldwater supply or -with the Modesto Hotfill - on the hot water pipe (Hotfill pipe) of the main hot water provision;
-
Connect the cold water connection of the tap with the cold water supply;
- Connect the hot water connection of the waterheater (10 mm compression coupling) with the hot water connection of the tap.
Unpressurised system (Fig. 2.2)
- First carefully flush out all the pipes connecting with the waterheater (especially important in case of newly-built houses);
- Close off the main cock of the water main;
- Connect the cold water connection of the waterheater (G 1/2" swivel) with the cold water pipe of the tap;
- Connect the cold water connection of the tap with the cold water supply;
- Connect the hot water connection of the waterheater (10 mm compression coupling) with the hot water connection of the tap.
10.3 Connection drain pipe (with pressurised syst
- Connect the drain T-joint in the drainage pipe and attach the flexible drain pipe according to the diagram (fig. 2.1 and 2.3). Do not forget to place the Tie-wrap to guarantee stench seal.

The (main-) drainpipe on which the outlet of the relief valve on the inlet combination is connected, must be placed in a continuous downward direction in a frost-free environment.
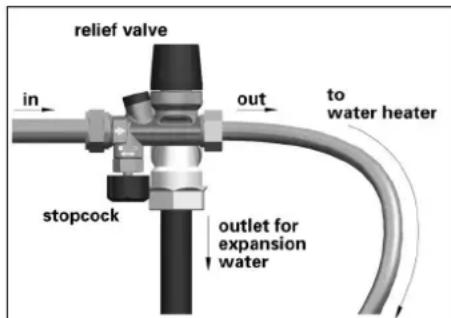
Fig. 4a Detailed diagram of inlet combination
10.4 Filling the waterheater
- Open the hot-water tap:
- Open the stop cock of the inlet combination (with a system under pressure);
- Open the main cock of the water main;
- Have the waterheater properly flushed through;
- Check the installation for leakage.
10.5 Connections electricity

The waterheater must be completely filled with water and the installation must be free from leaks before a connection with the electricity grid can take place.
The device has a 1,5 metre long cord for a connection with an earth-connected wall socket.
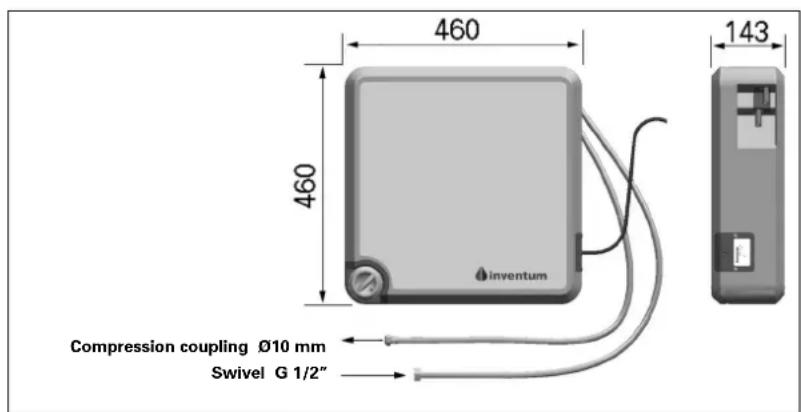
| Contents | 10 L | |
| No-load losses | 21 W | |
| Weight empty 6,8 kg | ||
| Weight filled | 16,8 kg | |
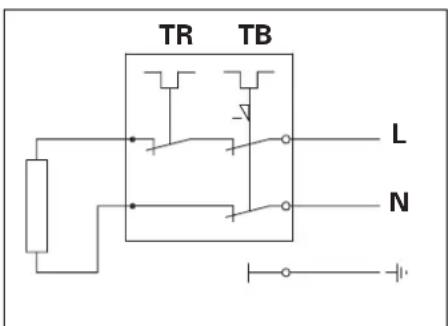
Fig. 4 Dimensional sketch
Fig.6 Connecting diagram
TR= Temperature regulator
TB= Temperature limiter
N = Zero connection
L = Phase connection
11 Putting into operation and terminating the system's operation
11.1 Putting into operation
- Check whether the waterheater is completely filled with water and the installation is free from leaks;
- Switch on the electricity to the device.

After being installed and filled with the water, the water heater must be put into operation within three months in order to guarantee proper functioning.
11.2 Checking proper operation
After the device has been put into operation, you must check the following points:
- Expansion water trickling from the relief valve or pressureless mixing tap. This is necessary in order to prevent the pressure from getting too high in the waterheater during the heating process;
- The entire system for leakage, also 30 minutes after having been put into operation.
11.3 Terminating the system's operation
- Switch off the electricity to the device. The main cock of the water main can remain open.
11.4 Emptying the waterheater
- Disconnect the power plug from the wall socket;
- Close off the main cock of the water main;
- Close off the stop cock of the inlet combination;
- Open a hot water tap;
- Collect any leak water.
- Disconnect the water connections to the waterheater at the inlet combination and at the hot-water tap;
- Place the waterheater horizontal, with the cold-water hose in the sink and the hot-water hose facing upward. The waterheater siphons itself automatically empty.
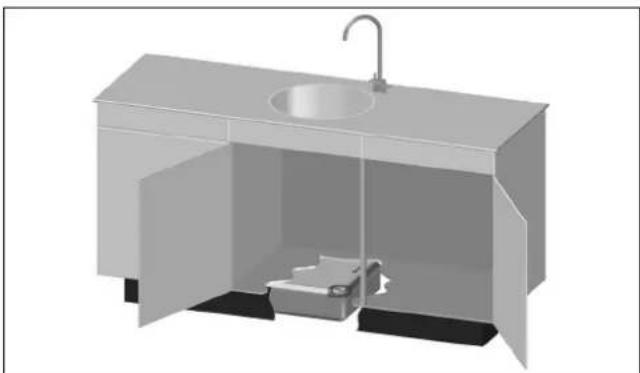
Fig. 6 Placing Slide-In waterheater behind the baseboard
Attention: Follow the directives for correct placing of the adjustable legs of the kitchen cabinet. Set the thermostat with care before replacing the baseboard.

The power supply cable must always be fed through a recess in the bottom of the cupboard. When starting up ensure that the power plug is in an easy to reach wall socket.
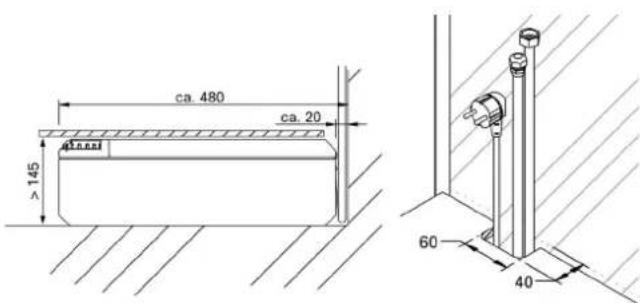
Fig.10 Course of pipes
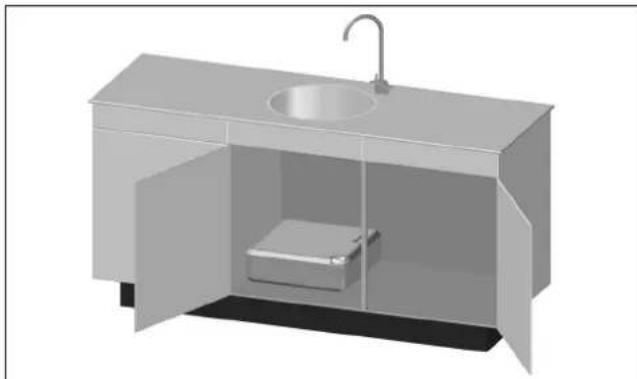
Fig. 7 Placing Slide-In waterheater flat in the kitchen cabinet It is advisable to place a shelf on top of the waterheater for instance to put things on top of it. The temperature knob stays reachable.
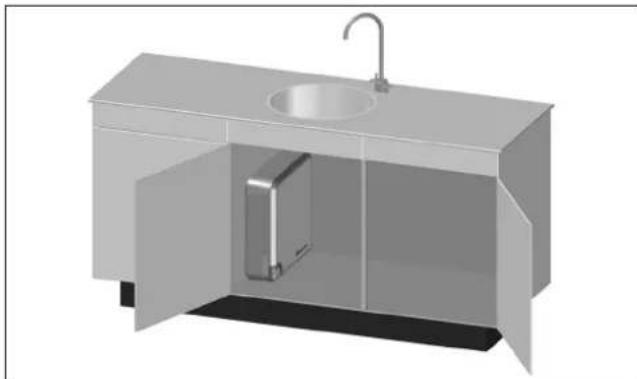
Fig. 8 Placing the slide-in waterheater vertically on the left or right side of the kitchen cabinet this being dependent on the position of the siphon.
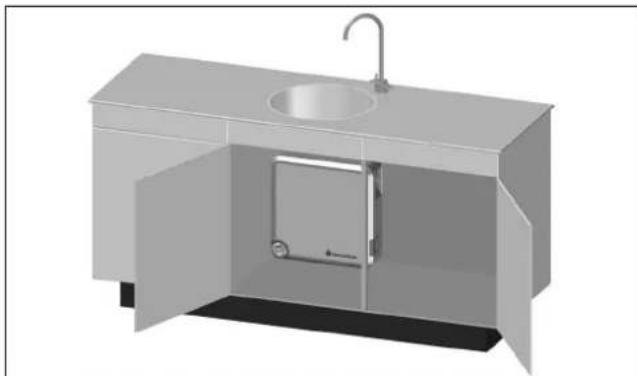
Fig. 9 Placing the slide-in waterheater against the back of the kitchen cabinet.
You could consider placing the slide-in waterheater behind the kitchen (in the installation space)
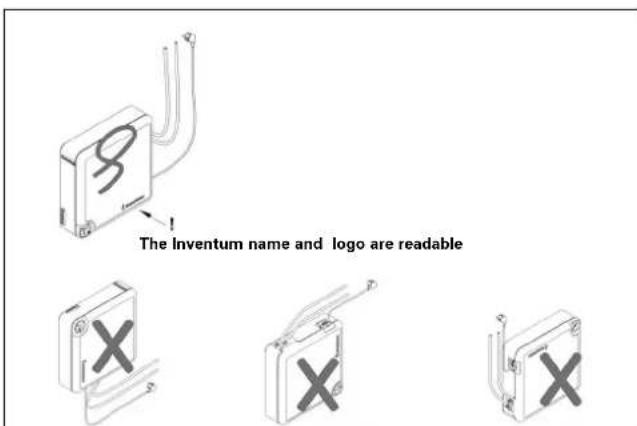
Fig.11 Correct vertical placing
Table de matière
MANUEL UTILISATEUR
MANUEL D'INSTALLATION
7 Entreposage et transport fr-6
8 Spécifications techniques fr-6
10 Installation fr-6
MANUEL D'INSTALLATION
9.3 Conditions relatives aux raccordements
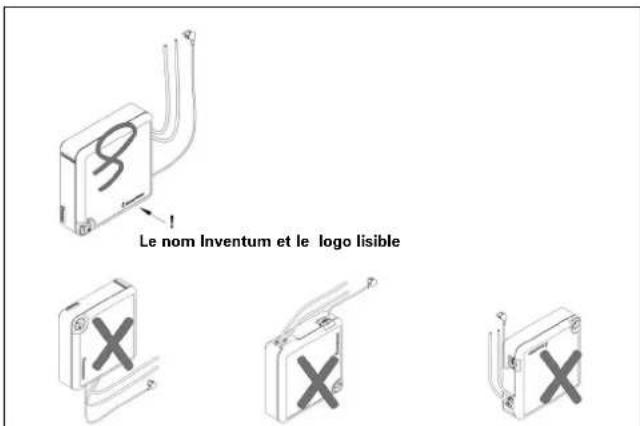
Fig.11 Placement correct vertical
Inhaltsverzeichnis
BENUTZERANLEITUNG
- Glue the Type plate here.