KM4400 - Food Processor AEG - Free user manual and instructions
Find the device manual for free KM4400 AEG in PDF.
| Brand | AEG |
| Model | KM4400 |
| Product type | Stand mixer |
| Main functions | Whipping, beating, kneading |
| Included accessories | Metal whisk, flat beater, dough hook, stainless steel bowl |
| Bowl material | Stainless steel |
| Number of speeds | 10 (positions 1 to 10) |
| Speed selector | Rotary with blue LED backlight |
| Operation indicator | LED under the motor arm; turns off automatically 3 minutes after stopping |
| Accessory adapter | Integrated multi-purpose |
| Non-slip feet | Yes |
| Maximum liquid temperature | 90 °C |
| Max kneading capacity (recipe) | Up to 16 dl flour, 4 dl water (pizza dough) |
| Height adjustment of the shaft | Possible (see manual) |
| Cleaning of accessories | Dishwasher safe (except metal whisk) |
| Cleaning of motor body | With a damp cloth; never immerse |
| Usage | Household use only |
| Important safety instructions | Not to be used by children; keep out of reach; unplug before cleaning |
| Warning | Never immerse the motor in water |
Frequently Asked Questions - KM4400 AEG
User questions about KM4400 AEG
0 question about this device. Answer the ones you know or ask your own.
Ask a new question about this device
Download the instructions for your Food Processor in PDF format for free! Find your manual KM4400 - AEG and take your electronic device back in hand. On this page are published all the documents necessary for the use of your device. KM4400 by AEG.
USER MANUAL KM4400 AEG
natural_image
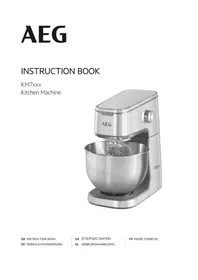
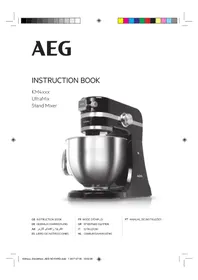
Black and white photo of a modern ultramix AEG stand mixer with no visible text or symbols on the device itself.UltraMix Stand Mixer KM4xxx
GB Instruction book....21–27
Before using the appliance for the first time, please read the safety advice on page 22 carefully.
D
Teile
A. Motorkopf (kippbar)
J. Anti-slip pootjes
K. Stroomkabel
L. Garde
M. Gecoate platte klopper
N. Gecoate deeghaak
Éléments
natural_image
Illustration of a shoe with a bandage and a magnifying glass highlighting a speaker symbol (no text or labels)natural_image
Close-up of a Kiosk with a hand operating the button, showing internal mechanism and directional arrows (no text or symbols)natural_image
Illustration of a kitchen mixer with a circular inset showing the mixing bowl (no text or symbols)natural_image
Illustration of a robotic mixer blending liquid into a bowl with a whisk (no text or symbols)-
Befestigen von Zubehörteilen an der Rührerwelle: Richten Sie die Kerbe oben auf dem Zubehörteil am Stift der Rührerwelle aus. Drücken Sie das Zubehörteil nach oben und drehen Sie es gegen den Uhrzeigersinn, bis der Stift einrastet. Zum Entfernen des Zubehörteils drehen Sie dieses im Uhrzeigersinn und ziehen es von der Welle ab.
-
Τοποθετήστε ένα εξάρτημα στον άξονα εξαρτημάτων: Ευθυγραμμίστε την υποδοχή στο πάνω μέρος του εξαρτήματος με τον πείρο στον άξονα εξαρτημάτων. Σπρώξτε το εξάρτημα προς τα επάνω και στρέψτε το αριστερόστροφα έως ότου ο πείρος ασφαλίσει στη θέση του. Για να αφαιρέσετε το εξάρτημα, γυρίστε το δεξιόστροφα και τραβήξτε.
-
Zet een opzetstuk op de schacht: Zorg ervoor dat de opening aan de bovenkant van het opzetstuk over het pinnetje valt op de schacht. Druk het opzetstuk omhoog en draai het linksom tot het pennetje vastklikt. Draai het opzetstuk rechtsom om het te verwijderen en trek het omlaag.
-
Placer un accessoire sur tige à accessoires à accessoires : Positionner l'accessoire en respectant le sens d'introduction de celui-ci, enclencher-le en exerçant une pression puis tourner d'un quart sur la droite pour le verrouiller. Pour le retrait appuyer sur l'accessoire et le tourner d'un quart sur la gauche.
natural_image
Illustration of a kitchen mixer blending liquid into a bowl, with an inset showing the mixing process (no text or symbols)natural_image
Illustration of a kitchen mixer with a magnified inset showing the rotating knob (no text or symbols)6. Drehen Sie den
natural_image
Illustration of a kitchen mixer with a circular head and side blades (no text or symbols)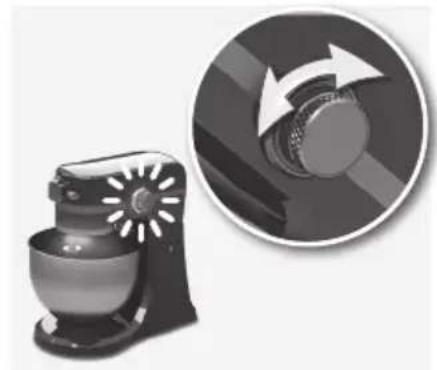
natural_image
Illustration of a kitchen mixer and a circular button with directional arrows (no text or symbols)D
natural_image
Close-up of a mechanical component with metallic parts and a cylindrical shaft (no visible text or symbols)natural_image
Illustration of a kitchen mixer with a circular dial and handle (no text or symbols)natural_image
Close-up of a microscope with a screwdriver inserted, showing mechanical components and a curved tool interacting with it (no text or symbols visible)- Stellen Sie den Geschwindigkeitsregler auf „OFF“ und ziehen Sie den Stecker des Geräts aus der Steckdose. Kippen Sie den Motorkopf zurück. Passen Sie die Schraube mit Hilfe eines Schlitzschraubendrehers an. Drehen Sie gegen den Uhrzeigersinn, um die Rührerwelle anzuheben bzw. im Uhrzeigersinn, um sie abzusenken.
- Στρέψτε τον επιλογέα ταχύτητας στη θέση «OFF» και αποσυνδέστε τη συσκευή από την πρίζα. Μετακινήστε την κεφαλή μοτέρ προς τα πίσω. Χρησιμοποιήστε ένα επίπεδο κατσαβίδι για να ρυθμίσετε τη βίδα. Στρέψτε αριστερόστροφα για να σηκώσετε τον άξονα εξαρτημάτων, στρέψτε δεξιόστροφα για να τον κατεβάσετε.
- Zet de snelheidsknop op "OFF" en haal de stekker uit het stopcontact. Kantel de motorkop naar achteren. Gebruik een schroevendraaier om de schroef af te stellen. Draai linksom om de bevestigingsschacht hoger af te stellen en rechtsom om deze lager af te stellen.
- Positionner le sélecteur de vitesse sur "OFF" et débrancher l'appareil. Incliner le bras moteur du moteur vers l'arrière. Utiliser un tournevis plat pour régler la vis. Tourner dans le sens inverse des aiguilles d'une montre pour faire remonter la tige de fixation des accessoires ; tourner la vis dans le sens des aiguilles d'une montre pour l'abaisser.
Reinigung und Pflege / Καθαρισμός και φροντίδα Reiniging en onderhoud / Nettoyage et entretien

natural_image
Black-and-white photo showing a pair of handbags and decorative items on a diagonal line (no text or symbols)D
natural_image
Simple illustration of a rectangular block with a black X symbol crossed out (no text or symbols present)-
Verwenden Sie zum Reinigen des Geräts keine Scheuermittel oder Metallschwämme.
-
Μη χρησιμοποιείτε λειαντικά καθαριστικά ή συρμάτινα σφουγγαράκια όταν καθαρίζετε την συσκευή.
-
Gebruik geen agressieve reinigingsmiddelen of schuursponsjes om het apparaat schoon te maken.
-
N'utiliser ni produits nettoyants abrasifs ni grattoirs pour le nettoyage de l'appareil.
GB
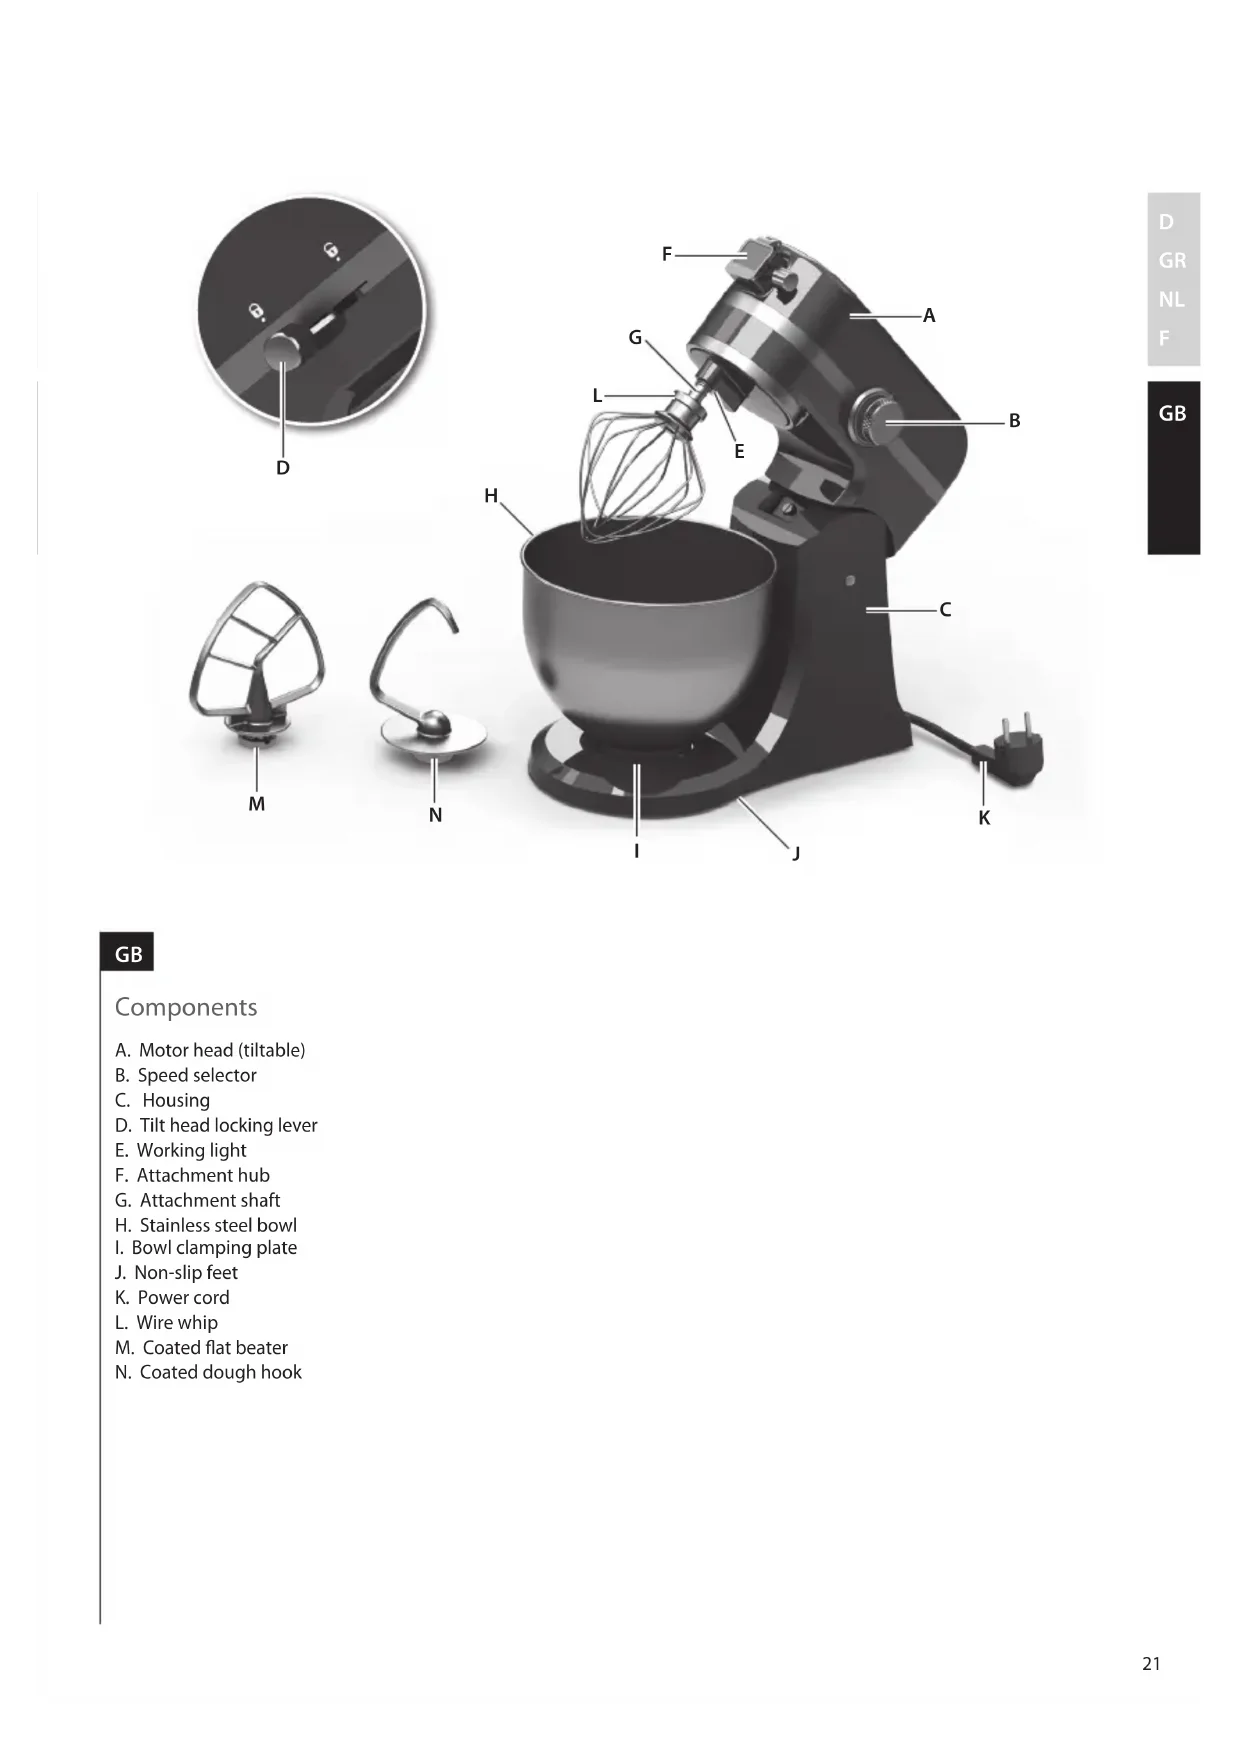
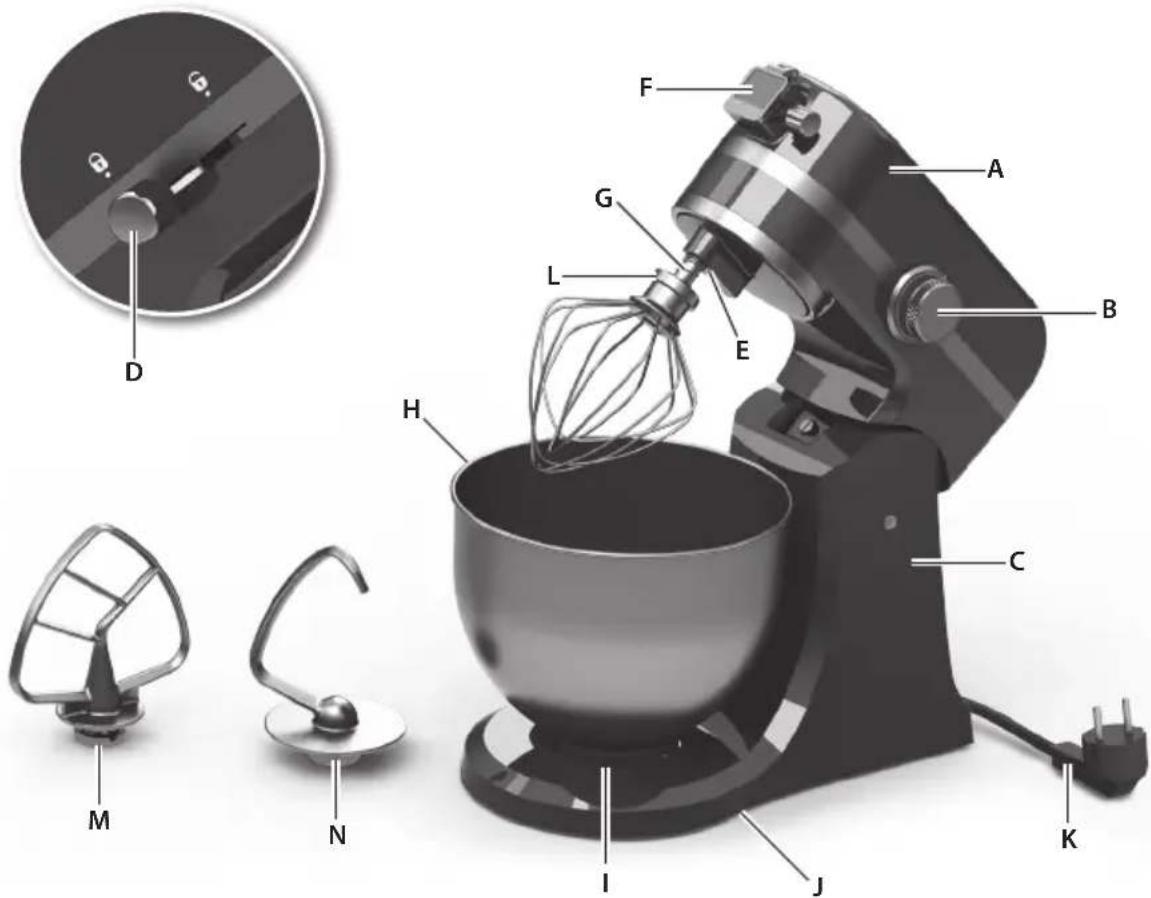
Components
A. Motor head (tiltable)
B. Speed selector
C. Housing
D. Tilt head locking lever
E. Working light
F. Attachment hub
G. Attachment shaft
H. Stainless steel bowl
I. Bowl clamping plate
J. Non-slip feet
K. Power cord
L. Wire whip
M. Coated flat beater
N. Coated dough hook
Read the following instruction carefully before using the appliance for the first time.
- This appliance shall not be used by children. Keep the appliance and its cord out of reach of children.
- Care shall be taken when handling the sharp cutting blades, emptying the bowl and during cleaning.
- Appliances can be used by persons with reduced physical, sensory or mental capabilities or lack of experience and knowledge if they have been given supervision or instruction concerning use of the appliance in a safe way and if they understand the hazards involved.
• Children shall not play with the appliance. - The appliance may only be connected to a power supply whose voltage and frequency comply with the specifications on the rating plate!
- Never use or pick up the appliance if – the supply cord is damaged, – the housing is damaged.
- If the appliance or the supply cord is damaged, it must be replaced by the manufacturer, its service agent or similarly qualified person, in order to avoid hazard.
• Always place the appliance on a flat, level surface. - Always disconnect the appliance from the supply if it is left unattended and before assembling, disassembling or cleaning.
- Appliance is for indoor use only.
- Do not immerse the appliance, cord or plug in water or any other liquid.
- Do not let cord hang over edge of table or counter, do not let cord contact hot surface, including the stove.
- Never use accessories or parts made by other manufactures not recommended or sold; may cause a risk of injury to persons.
- Make sure the motor has completely stopped before disassembling and cleaning.
- Avoid contact with moving parts. Contact could result in injury! Do not use other tools or utensils during the appliance usage.
- Do not leave this product out of your sight when it is running.
- Ensure all loose matters and your clothes/accessories are kept away while using this product.
- Never process boiling liquids (max 90^ ).
- Do not use this appliance to stir paint. Danger, could result in an explosion!
- Never operate appliance with the attachments wire whip, flat beater or dough hook unless the bowl is in place.
- This appliance is intended for domestic use only. The manufacturer cannot accept any liability for possible damage caused by improper or incorrect use.
Getting started
natural_image
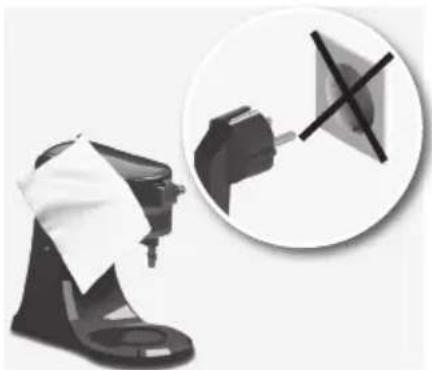
Illustration of a bandaged shoe and a speaker symbol (no text or labels)- Before using the appliance for the first time: Unplug the appliance. Wash all the accessories by hand in warm soapy water or in the dishwasher.
(The accessories are dishwasher-proof, except for the Wire whip.) Clean the motor unit with a damp cloth.
Caution: Never immerse the motor unit in water!
Let all parts dry thoroughly.
natural_image
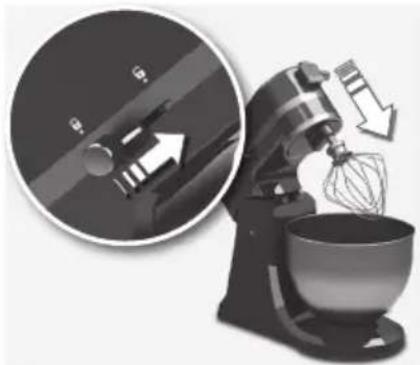
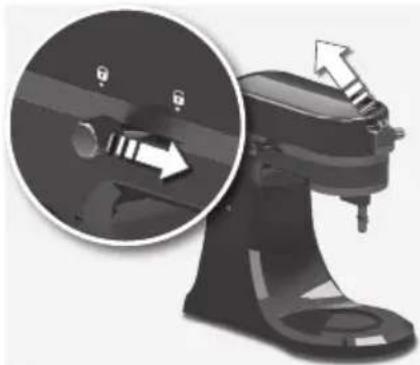
Close-up of a kitchen mixer with a magnified inset showing internal components (no text or symbols visible)- Place the appliance on a flat surface. Tilting the Motor head up: Move the Tilt head locking lever to "Unlocked" with one hand, tilt the Motor head up with the other hand. Once in up position it locks. Warning: Keep fingers and hands away from areas with movable parts.
natural_image
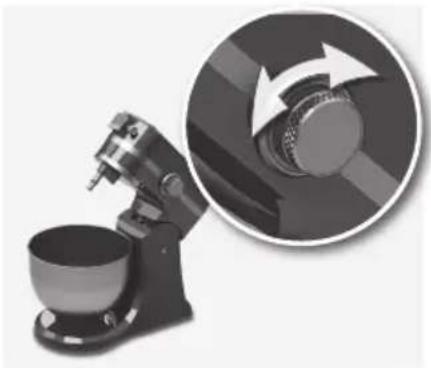
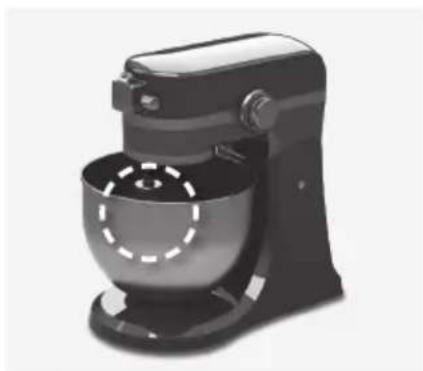
Illustration of a coffee maker with a magnified inset showing the mechanical component (no text or symbols)- Move Speed selector to "OFF". Place the Stainless steel bowl on the bowl clamping plate. Move the bowl clockwise to lock into position.
Warning: Never operate the appliance with the attachments wire whip, flat beater or dough hook unless the bowl is in place.
natural_image
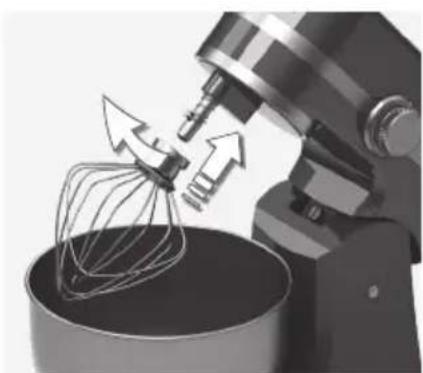
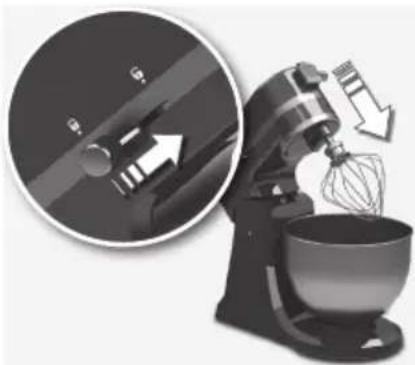
Illustration of a kitchen mixer blending into a bowl with an electric stirrer (no text or symbols)- Place an attachment on the Attachment shaft: Align the slot at the top of the attachment with the pin on the Attachment shaft. Push attachment up and turn it counterclockwise until the pin is locked into position. To remove attachment, move it clockwise and pull off.
natural_image
Illustration of a kitchen mixer blending liquid into a bowl, with an inset showing the mixing process (no text or symbols)- Tilting the Motor head down: Move the Tilt head locking lever to "Unlocked" with one hand, tilt the Motor head down with the other hand. Insert the plug in the main socket.
natural_image
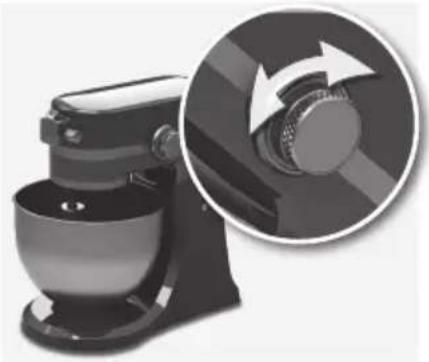
Illustration of a kitchen mixer with a magnified inset showing the rotating knob (no text or symbols)- Move the Speed selector from "OFF" to desired speed (1-10). Once mixing is complete, turn the Speed selector to "OFF" and unplug the appliance.
Getting started
natural_image
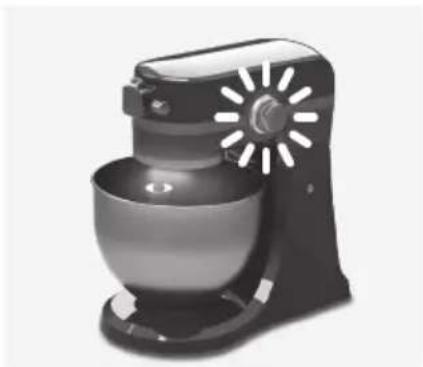
Illustration of a kitchen mixer with a bowl and fan (no text or symbols)- Work light and Power indicator light: If the appliance is plugged in and a speed is selected, a blue LED lights up around the Speed selector. A work light will also light up over the working area. If the Speed selector is moved to "OFF", the working light will automatically shut off after 3 min.
natural_image
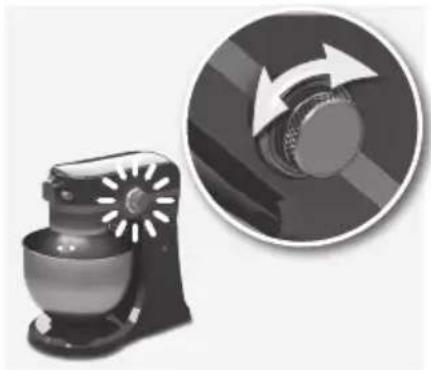
Illustration of a kitchen mixer next to a circular arrow symbol (no text or labels)- Note: If the Speed selector is already turned on before the appliance is plugged in, both the blue Speed selector LED light and the Work light will flash OFF and ON to let you know the Speed selector has been left on. Turn the Speed selector to OFF and the lights will stop flashing. Then resume operating normally.
Other functions
natural_image
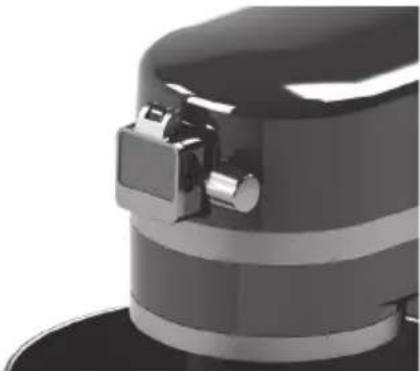
Close-up of a mechanical component with layered structure and mounting bracket (no visible text or symbols)- Attachment hub: The appliance comes with a built in multipurpose Attachment hub. Read and carefully follow the instructions that comes with each attachment for correct and safe use.
natural_image
Illustration of a kitchen mixer with a circular dial and handle (no text or symbols)- Adjusting the Attachment shaft: The appliance is adjusted at the factory so that the Flat Beater clears the bottom of the Bowl. If the Flat Beater hits the bottom of the Bowl or is too far away from the sides, you can adjust it correctly. See 3 for further instructions.
natural_image
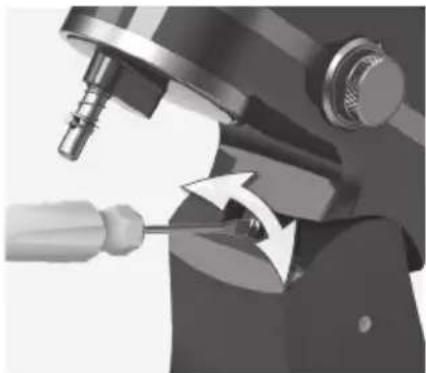
Close-up of a mechanical tool interacting with a screwdriver (no visible text or symbols)- Turn the Speed selector to "OFF" and unplug the appliance. Tilt the Motor head back. Use a slotted point Head screwdriver to adjust the screw. Turn counter clockwise to raise the Attachment shaft, turn clockwise to lower it.
Cleaning and care

natural_image
Black and white photo showing kitchen utensils and a stand mixer (no text or symbols visible)- Unplug the appliance. Wash all the accessories by hand in warm soapy water or in the dishwasher.
(The accessories are dishwasher-proof, except for the Wire whip.) Clean the motor unit with a damp cloth.
Caution: Never immerse the motor unit in water!
Let all parts dry thoroughly.
natural_image
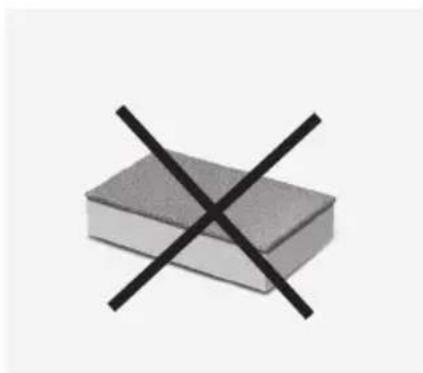
Simple illustration of a rectangular block with a black X symbol crossed out (no text or symbols present)- Do not use abrasive cleaners or scouring pads when cleaning the appliance.
GB
| Troubleshooting | ||
| Problem Possible cause Solution | ||
| The motor slows down during operation. | Amount of dough may exceed maximum capacity. | Remove half and process in two batches. |
| Dough may be too wet, it sticks onto the side of the bowl. | Add more flour, 1 tablespoon at a time until the motor speeds up. Process until dough cleans the side of the bowl. | |
| The motor does not work. The appliance is not connected to the mains. Make sure to plug in the appliance before operation. | ||
| The appliance vibrates/ moves during operation. | The rubber feet are wet. Make sure the rubber feet at the bottom of the unit are clean and dry. | |
| It is normal for heavy loads (e.g heavy dough, cheese). | Remove half and process in two batches. | |
| The attachment scrapes the Stainless steel bowl during operation. | The height of the attachment shaft is incorrect. | Adjust the height of the attachment shaft. |
| The Work light and Power indicator light flashes on and off. | The Speed selector has been left turned on. Turn the Speed selector to “OFF”. | |
Disposal
Recycle the materials with the symbol

. Put the packaging in applicable containers to recycle it.
Help protect the environment and human health and to recycle waste of electrical and electronic appliances.
Do not dispose appliances marked with

the symbol ■ with the household waste. Return the product to your local recycling facility or contact your municipal office.
Recipes
| Whisking function quantities and Processing Times | ||||
| Ingredients | Quantity | Unit | Time | Speed |
| Cream | 2.1~6.1 | dL | 60~80s | 8~10 |
| Egg-white | 1.2~2.4 | dL | At least 100s | 8~10 |
| Beating function quantities and Processing Times (mixing light dough (e.g: cake dough)) | |||||
| Recipe Ingredients | Quantity Unit Time Speed | ||||
| Cake sponge | Flour 6,0 dL | 200~230s | Medium setting(5~6setting) | ||
| Margarine 1,5 dL | |||||
| Sugar 1,7 dL | |||||
| Baking powder 1,0 tsp | |||||
| Chocolate cake | Flour 8,0 dL | 300~360s | Medium setting(4~6setting) | ||
| Egg 4,0 pcs | |||||
| Butter 2,0 dL | |||||
| Sugar 1,7 dL | |||||
| Vanilla Sugar 2,0 tsp | |||||
| Sour cream | 1,0 dL | ||||
| Nougat raw mixture | 100 | g | |||
| Baking soda | 3,0 tsp | ||||
| Method | |||||
| The butter should be soft not hard. Stir the soft butter with sugar until creamy. Add the eggs one after another.While stirring, add the sour cream and vanilla sugar. Finally stir in the flour together with baking soda. | |||||
| Butter Cake | Flour 3,0 dL | 200~230s | Medium setting(4~6setting) | ||
| Margarine 1,5 dL | |||||
| Sugar 1,7 | dL | ||||
| Fresh egg | 3 | pcs | |||
| Baking powder 1,0 | tsp | ||||
| Method | |||||
| Place all ingredients in the bowl, and mix them, till it is ready. | |||||
| Hooks function quantities and Processing Times | |||||
| Recipe Ingredients | Quantity Unit Time Speed | ||||
| Yeast dough* (bread)min. Quantities | flour | 6,0 dL | 350~380s | Low setting (1~2 setting) | |
| water | 2,0 dL | ||||
| Sugar 2,4 dL | |||||
| Margarline | 1,0 tbs | ||||
| Salt | 1,0 tsp | ||||
| Method | |||||
| Place all the ingredients into the bowl and knead until satisfactory. | |||||
| Yeast dough* (Pizza dough) max quantities | Wheat flour | 16,0 | dL | At least 480s | Low setting (1~2 setting) |
| Water 4,0 dL | |||||
| Oil | 1,0 dL | ||||
| Fresh egg | 2,0 pcs | ||||
| Salt | 3,0 tsp | ||||
| Sugar 2,0 tsp | |||||
| Dry Yeast | 1,0 tbs | ||||
| Method | |||||
| 1. In a container mix the half of yeast with the salt and the sugar and set aside;2. In the bowl of stand mixer put the remaining yeast, the water and the oil;3.This dough should be mixed with common beaters, at minimum speed until obtain a smooth mixture;4. After, add the egg and the yeast mixed with salt and sugar;5. The speed should be increased to medium and the flour should be added gradually;6. After realizing that the mass tends to rise by the beaters, they must be changed by the beaters for heavy mass;7. Put all the flour and mix until obtain a homogenous mixture;8. At this point you will need to monitor the input power of stand mixer, so that it not exceed the maximum value determined by the manufacturer;9. The mass reaches the point when no more paste in the hand. | |||||
*Do not exceed Speed 2 when preparing yeast dough. This may damage the mixer.