6720 - Barbecue Cloer - Free user manual and instructions
Find the device manual for free 6720 Cloer in PDF.
| Product type | Electric barbecue (grill) |
| Brand | Cloer |
| Model | 6720 |
| Rated voltage | 230 V |
| Frequency | 50 Hz |
| Power | 2200 W |
| Plug type | Type 672 (supplied) |
| Plate material | Cast iron with non-stick coating |
| Number of heat levels | 5 (1 to 5 + warm keeping) |
| Control type | Continuously adjustable thermostat |
| Lid | Yes, glass with handle and lock |
| Grease collector tank | Yes, integrated |
| Stand/legs included | Yes (tray, legs, crossbar, basket) |
| Outdoor use | Suitable |
| Child safety | Use under supervision from age 8 |
| Electrical protection | Residual current circuit breaker recommended (≤30 mA) |
| Cleaning of the plate | Washable under water after removing the plug |
| Cleaning of the plug | Do not immerse, damp paper towel |
| Manufacturer warranty | Subject to registration within 6 months |
| After-sales service | service-fr@cloer.com |
Frequently Asked Questions - 6720 Cloer
User questions about 6720 Cloer
0 question about this device. Answer the ones you know or ask your own.
Ask a new question about this device
Download the instructions for your Barbecue in PDF format for free! Find your manual 6720 - Cloer and take your electronic device back in hand. On this page are published all the documents necessary for the use of your device. 6720 by Cloer.
USER MANUAL 6720 Cloer
natural_image
Black-and-white photo of a modern outdoor grater with open lid and basket, no visible text or symbols on the main subject.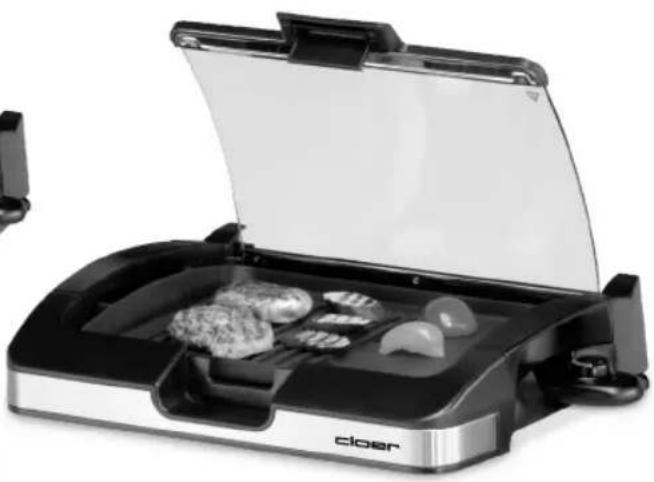
natural_image
Exterior view of a modern open-frozen grater with food items on the grates (no text or symbols visible)Art-6725
natural_image
Circular black-and-white photo of a plated dish featuring various meat and vegetables (no visible text or labels)SPRACHEN - LANGUAGES - LANGUES - TALEN - LINGUE
text_image
Exploded view diagram of a refrigerator with numbered parts for identificationtext_image
Technical diagram of a folding table setup with labeled componentsnatural_image
Diagram of three vertical rods mounted on a grid base with curved arrows indicating motion or force direction (no text or symbols)natural_image
Illustration of a grater with open lid and internal compartments, showing heat transfer or cooling process (no text or symbols)Bedienungshinweise
natural_image
Exterior view of a modern office building with large windows and a road (no visible signage or text)
Cloer Online-Shop
https://cloer.de
Gewährleistung
https://service.cloer.com/register/
Basic safety instructions
- The appliance is intended to be used in household only and using in:
- staff kitchen areas in shops, offices and other working environments,
- in farm houses,
- by clients in hotels, motels and other residential type environments,
- on bed and breakfast type environments.
- Have repairs of Cloer electronic appliances carried out only by authorized Cloer specialist dealers or by the Cloer customer service. Improper repairs can involve substantial dangers for the user. Furthermore, this will void your warranty claims.
- Only operate the appliance at household-usual power sockets. Check if the mains voltage stated on the type plate is up to that of your power supply network.
- The device must be connected to a power outlet with protective ground.
- If the supply cord is damaged, it must be replaced by Cloer, its service agent or similarly qualified persons in order to avoid a hazard.
- Pull power plug of the power socket
- in case of a defect,
- if the appliance is not used for a longer time,
- before any cleaning.
- Only pull at the plug, never at the feed cable.
- Do not stretch the feed cable over sharp edges and do not tighten it too tight.
- Do not use it for carrying and protect it from heat (hotplate, for example).
- Do not tighten the feed cable too tight as otherwise the appliance is likely to tip over.
- This appliance can be used by children aged from 8 years and above and persons with reduced physical, sensory or mental capabilities or lack of experience and knowledge if they have been given supervision or instruction concerning use of the appliance in a safe way and understand the hazards involved.
- Do not leave children unattended to ensure they do not play with the appliance.
- Keep the appliance and its cord out of reach of children less than 8 years.
- Cleaning and user maintenance shall not be made by children unless they are older than 8 and supervised.
- Do not immerse the appliance in water.
- Protect your appliance from humidity (splash water / rain).
- Let the appliance cool off before cleaning or stowing away.
- The device is suitable for outdoor use.
- This appliance should not be operated due to an external timer or separate remote control system.
- The device should be operated via a residual current device (RCD) with a trigger current not exceeding 30 mA.
- The mains connection line should be regularly inspected for signs of damage. The device must not be used if the connection line is damaged.
- Warning: Lignite or similar fuels must not be used in this device.
- Use Barbecue Grill exclusively with the delivered connector plugs: Type 672 for Barbecue Grill 6720/6725.
Technische Daten
| type volt hz watt | |||
| 672 230 | 50 2200 | ||
Before the first use

Read these operating instructions carefully before using the appliance for the first time.
- Remove all packing parts and possibly stickers, but not the type plate nor the serial number.
- Place the Barbecue-Grill on a dry, slip-resistant and level surface.
CE Label / Safety information

The appliance meets the requirements of the applicable CE directives.

ATTENTION! Grilling surface gets extremely hot in operation. There is the danger of burns and fire! Only touch the grill or the grill plate at the heat-isolated handles.
- Never cover the grilling surface with aluminium foil. Do not put saucepans, pans or aluminium bowls on it, as the heat development can cause deterioration of the non-stick coating.
- Never put baking paper and inflammable materials on the grilling surface. The immense heat can cause fire.
- Never let the Barbecue Grill unattended while in operation.
- You can clean the grill plate under running water; however, thereby it is absolutely necessary to pay attention to the following:
- The detachable device plug must be taken off. It must not have any contact with water.
- The plug socket on der grill plate must be completely dry before putting the grill again in operation.
You can find other cleaning instructions on the following pages.

ATTENTION! Even at the lowest setting of the thermostat (level 1 or lower) the appliance is already in operation. Unplug the power plug to switch off the appliance completely.
Set up
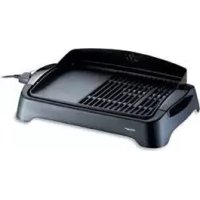
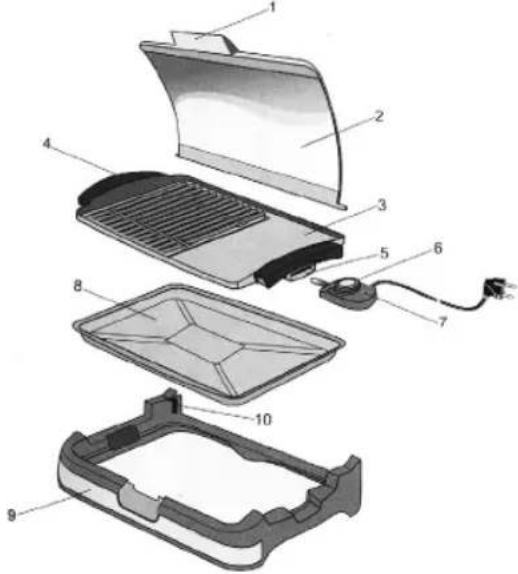
Parts of the Barbecue Grill 6720 / 6725:
- Lid handle
- Glass lid
- Cooking plate
- Handle
- Temperature control socket
- Temperature control probe
- Thermostat lamp
- Drip tray
- Base
- Hinges
text_image
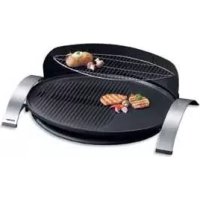
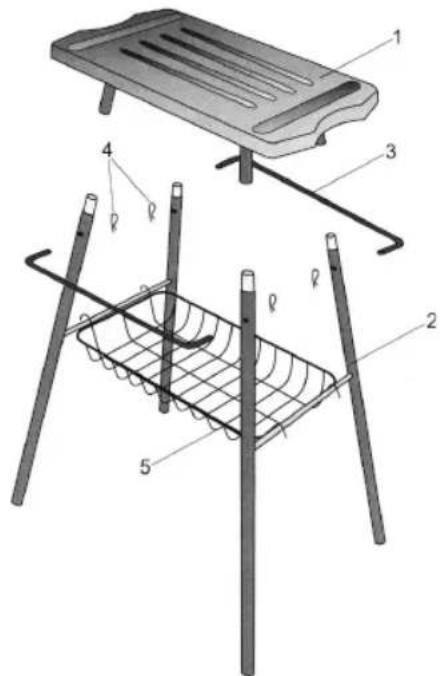
Exploded view diagram of a refrigerator with numbered parts for identificationParts of the stand 6725:
- Stand platform
- Legs
- Cross bar
- Cross bar clip
- Basket
text_image
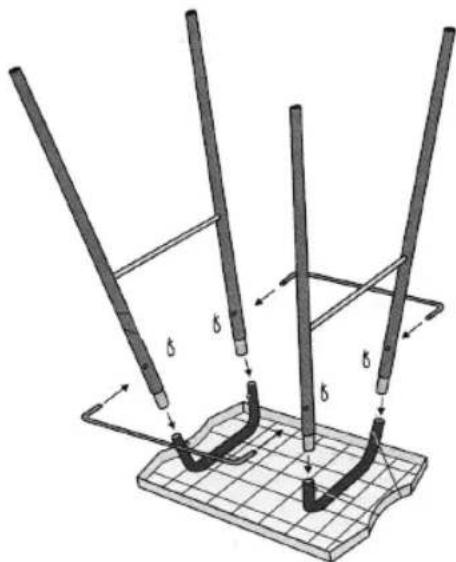
Technical diagram of a folding table setup with labeled componentsAssemble the stand
Turn the stand platform up-side-down to assemble the stand as shown below. Turn over the stand and hang the basket onto the side bars of the legs. When using the grill with the stand, ensure that the feet of the grill sit fully into the recess of the stand platform and ensure that the grill stands even.
natural_image
Diagram of three vertical rods mounted on a grid base with curved black lines, no text or symbols presentAssemble the grill 6720 /6725
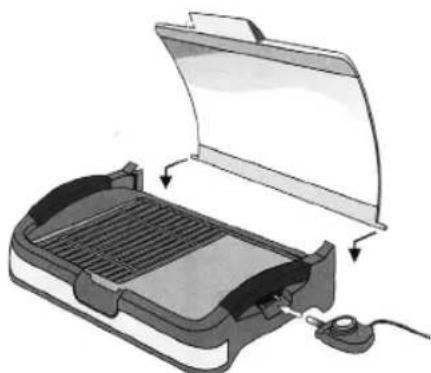
Place the drip tray into the base. Position the cooking plate over the base and drip tray. Never use the grill without the drip tray! Slide the glass lid into the hinges of the base, from back to front.
natural_image
Illustration of a portable grater with open lid and internal compartments, showing heat transfer process (no text or symbols)Operating instructions
- The lid handle will lock into the base when it is closed.
• To open the glass lid, simply squeeze the lid handles release lock that are located underneath the lid handle. - The grill can be used in closed or opened lid position.
- At opened position, the glass lid also act as a wind shield for outdoor cooking.
- Your grill has an integrated heating integrated in the die-cast plate of the grilling surface.
- It provides for a constant and good heat distribution and healthy preparation of your grilling goods.
-
Due to the inside heating there is no offensive smell and smoke because of dripping down and burning fat.
-
Your Barbecue Grill is provided with a non-stick coating, avoiding sticking of grilling goods and facilitating cleaning.
- The infinitely variable thermostat at the connector plug serves for adapting the grilling temperature to the respective grilling goods or for keeping meals warm.
- Fat and juices developing during cooking are collected in the removable fat collecting pan.
Start-up
- Put the Barbecue Grill on a dry, non-slip and even surface or on the stand provided.
- Insert the temperature control probe fully into the socket of cooking plate and plug into a wall outlet.
- Set the temperatur control to the desired cooking temperature.
- The grill is ready to use when the thermostat lamp switches OFF.
- Now place the desired grillables to the grill.
- Please note: The thermostat lamp on the temperature control probe indicates the grill is heating up. The lamp will remain ON until the set temperature has reached, and then cycle ON and OFF throughout cooking to maintain the temperature.
- Do not use the grilling goods by means of tongs or forks of metal as this will damage the non-stick coating.
- Please exclusively use grill cutlery of wood or heat-resistant plastics!
- Do not use aluminium grill pan at the grilling surface as this will cause a dangerous development of heat.
Cleaning
• To clean the appliance, you should exclusively use soft, humid clothes. Do not clean the appliance and all of its parts by hard pot sponges.
- Before cleaning please always unplug power plug. Always let appliance completely cool down before cleaning.
- The removable connector plug must not get in contact with water. Just clean the plug by means of a humid cloth.
Environmentally friendly disposal
We use environmentally friendly packaging for the transport of our appliances. Please recycle cardboard/ paper and plastic packaging appropriately.
ATTENTION!
Electrical appliances should not be disposed of with the household trash.
Electrical appliances contain valuable raw materials. When an appliance is worn-out, please take it to a recognised recycling facility. Consult the local authorities for information on recycling appliances.
Warranty
Cloer electrical appliances are in conformity with the currently required EC-guidelines and safety regulations. If your Cloer electrical appliance has a defect or it does not work properly, contact your specialist dealer.
Registered clients have at their disposal our technical customer service.
cloer Technical customer service
Mail: service-gb@cloer.com
https://service.cloer.com
Manufacturer warranty
Please register your appliances in the period of 6 months since the purchase in order to benefit from our manufacturer warranty. The published conditions of warranty in the moment of the registration are valid. You will find conditions of warranty and product registration here:

Manufacturer warranty
https://cloer.eu/gb/guarantee/
- in bed-and-breakfasts.
text_image
Exploded view diagram of a refrigerator with numbered parts for identificationtext_image
Technical diagram of a portable table with labeled parts including a tray, basket, and standnatural_image
Diagram of three vertical rods mounted on a grid base with curved arrows indicating motion or force direction (no text or symbols)natural_image
Illustration of a portable grater with open lid and internal compartments, showing heat transfer arrows (no text or symbols)Bediening
text_image
Exploded view diagram of a refrigerator with numbered parts for identificationtext_image
Technical diagram of a portable table with labeled parts including a tray, basket, and standMontage du support
natural_image
Diagram of three vertical rods mounted on a grid base with curved arrows indicating force or movement (no text or symbols present)Montage du gril
natural_image
Illustration of a portable grater with open lid and internal grating, showing heat transfer process (no text or symbols)text_image
Exploded view diagram of a refrigerator with numbered parts for identificationtext_image
Technical diagram of a portable table setup with labeled componentsnatural_image
Diagram of three vertical rods mounted on a grid base with curved arrows indicating motion or force (no text or symbols)natural_image
Diagram of a portable electric cooker with open lid and internal grating, showing internal components and wiring (no text or symbols)https://cloer.eu/it/guarantee