USER MANUAL A 2254 ME Kärcher
register and win!
www.kaercher.com
A 2204
A 2254 Me

natural_image
Two yellow and black vacuum cleaner units labeled A 2204 and A 2254 Me, shown without any text or symbols on the devices themselves.
Deutsch 3
English 6
Français 9
Italiano 13
Nederlands 16
Español 19
Português 22
Dansk 25
Norsk 28
Svenska 31
Suomi 34
Ελληνικά 37
Türkçe 41
Русский 44
Magyar 48
Čeština 51
Slovenščina 54
Polski 57
Românește 61
Slovenčina 64
Hrvatski 67
Srpski 70
Български 73
Eesti 77
Latviešu 80
Lietuviškai 83
Українська 86
العربية 93

natural_image
Technical line drawing of a mechanical assembly with no visible text or symbols
natural_image
Technical illustration of mechanical components on a grid background, showing bracket and pin assembly (no text or symbols)
natural_image
Diagram of a medical device with a gloved hand inserting a cable into a device (no text or symbols visible)
natural_image
Diagram of a car interior showing a hand holding a directional arrow and a circular diagram with arrows, no text or symbols present.

natural_image
Line drawing of a vacuum cleaner with coiled tubing and internal components (no text or symbols)
Please read and comply with these original operating instruc-
tions prior to the initial operation of your appli-
ance and store them for later use or
subsequent owners.
Proper use
The appliance is intended for use as a wet and dry vacuum cleaner corresponding to the descriptions given in these operating instructions and the safety notes.
- Protect the unit from rain. Do not store outside.
- This device may not be used to suck in ash and soot.
Use the wet/dry vacuum cleaner only with:
- Original filter bag.
- Original spare parts, accessories and special accessories.
The manufacturer is not responsible for any damages that may occur on account of improper use or wrong operations.
Environmental protection

The packaging material can be recycled. Please do not place the packaging into the ordinary refuse for disposal, but arrange for the proper recycling.

Old appliances contain valuable materials that can be recycled. Please arrange for the proper recycling of old appliances. Please dispose your old appliances using appropriate collection systems.
Disposing the filters and filter bags
Filters and filter bags are made from environment-friendly materials.
They can therefore be disposed off through the normal household garbage provided you have not sucked in substances that are not permitted to be thrown into household garbage.
Safety instructions
- This device is not intended for use by persons (including children) with reduced physical, sensory or mental abilities or lacking experience and/or knowledge, unless they are supervised by a person responsible for their safety or are instructed by these persons on the use of the device.
Children should be supervised, to ensure that they do not play with the device.
- Switch the appliance off after every use and prior to every cleaning/maintenance procedure.
- Risk of fire. Do not vacuum up any burning or glowing objects.
- The appliance may not be used in areas where a risk of explosion is present.
Electrical connection
The appliance may only be connected to alternating current. The voltage must correspond with the type plate on the appliance.
⚠️ Risk of electric shock
Never touch the mains plug and the socket with wet hands.
Do not pull the plug from the socket by pulling on the connecting cable.
Check the power cord with mains plug for damage before every use. If the power cord is damaged, please arrange immediately for the exchange by an authorized customer service or a skilled electrician.
To avoid accidents due to electrical faults we recommend the use of sockets with a line-side current-limiting circuit breaker (max.
30 mA nominal tripping current).
Caution
Certain materials may produce explosive vapours or mixtures when agitated by the suction air!
Never vacuum up the following materials:
- Explosive or combustible gases, liquids and dust particles (reactive dust particles)
- Reactive metal dust particles (such as aluminium, magnesium, zinc) in combination with highly alkaline or acidic detergents
– Undiluted, strong acids and alkalies
- Organic solvents (such as petrol, paint thinners, acetone, heating oil).
In addition, these substances may cause the appliance materials to corrode.
Start up
Description of the Appliance
■ These operating instructions describe the basic models of the wet/dry vacuum cleaner shown on the front cover.
■ When unpacking the product, make sure that no accessories are missing and that none of the package contents have been damaged. If you detect any transport damages please contact your dealer.
■ You will find the accessories and the swivel casters in the container. The swivel casters must be mounted on the appliance.
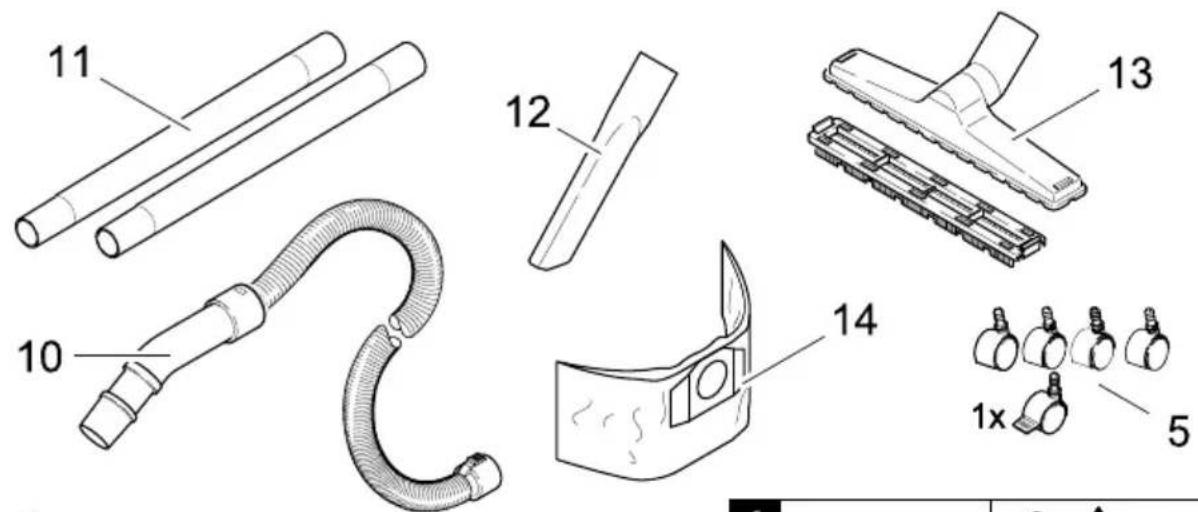
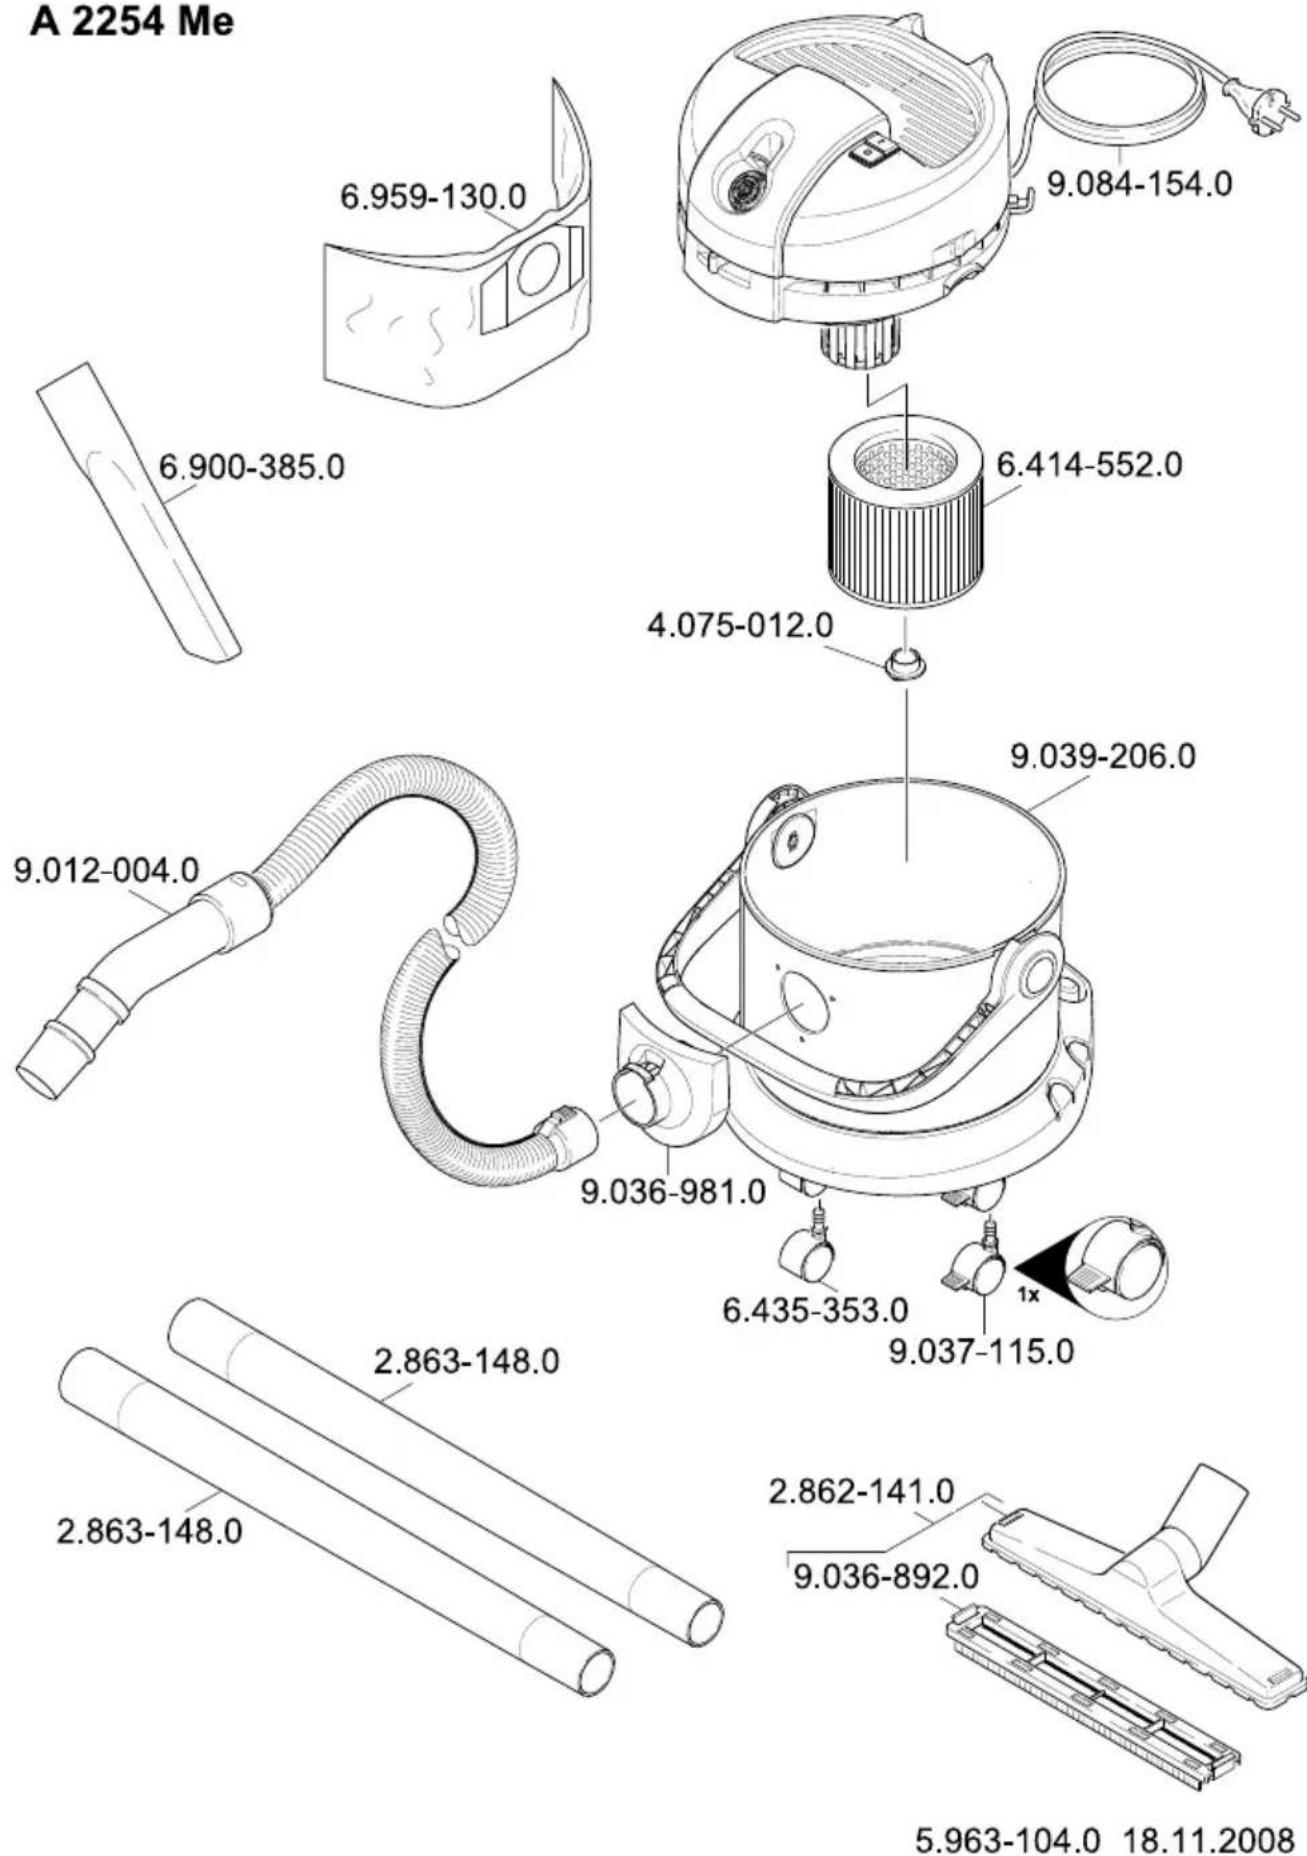
Illustrations on Page 2
1 Carrying handle
2 Blowing connection
3 Air regulation of the blowing function
4 Suction hose connection
5 Swivel casters
6 Accessory mount
7 Power cord with plug
8 Storage, power cord
9 ON/OFF switch for appliance
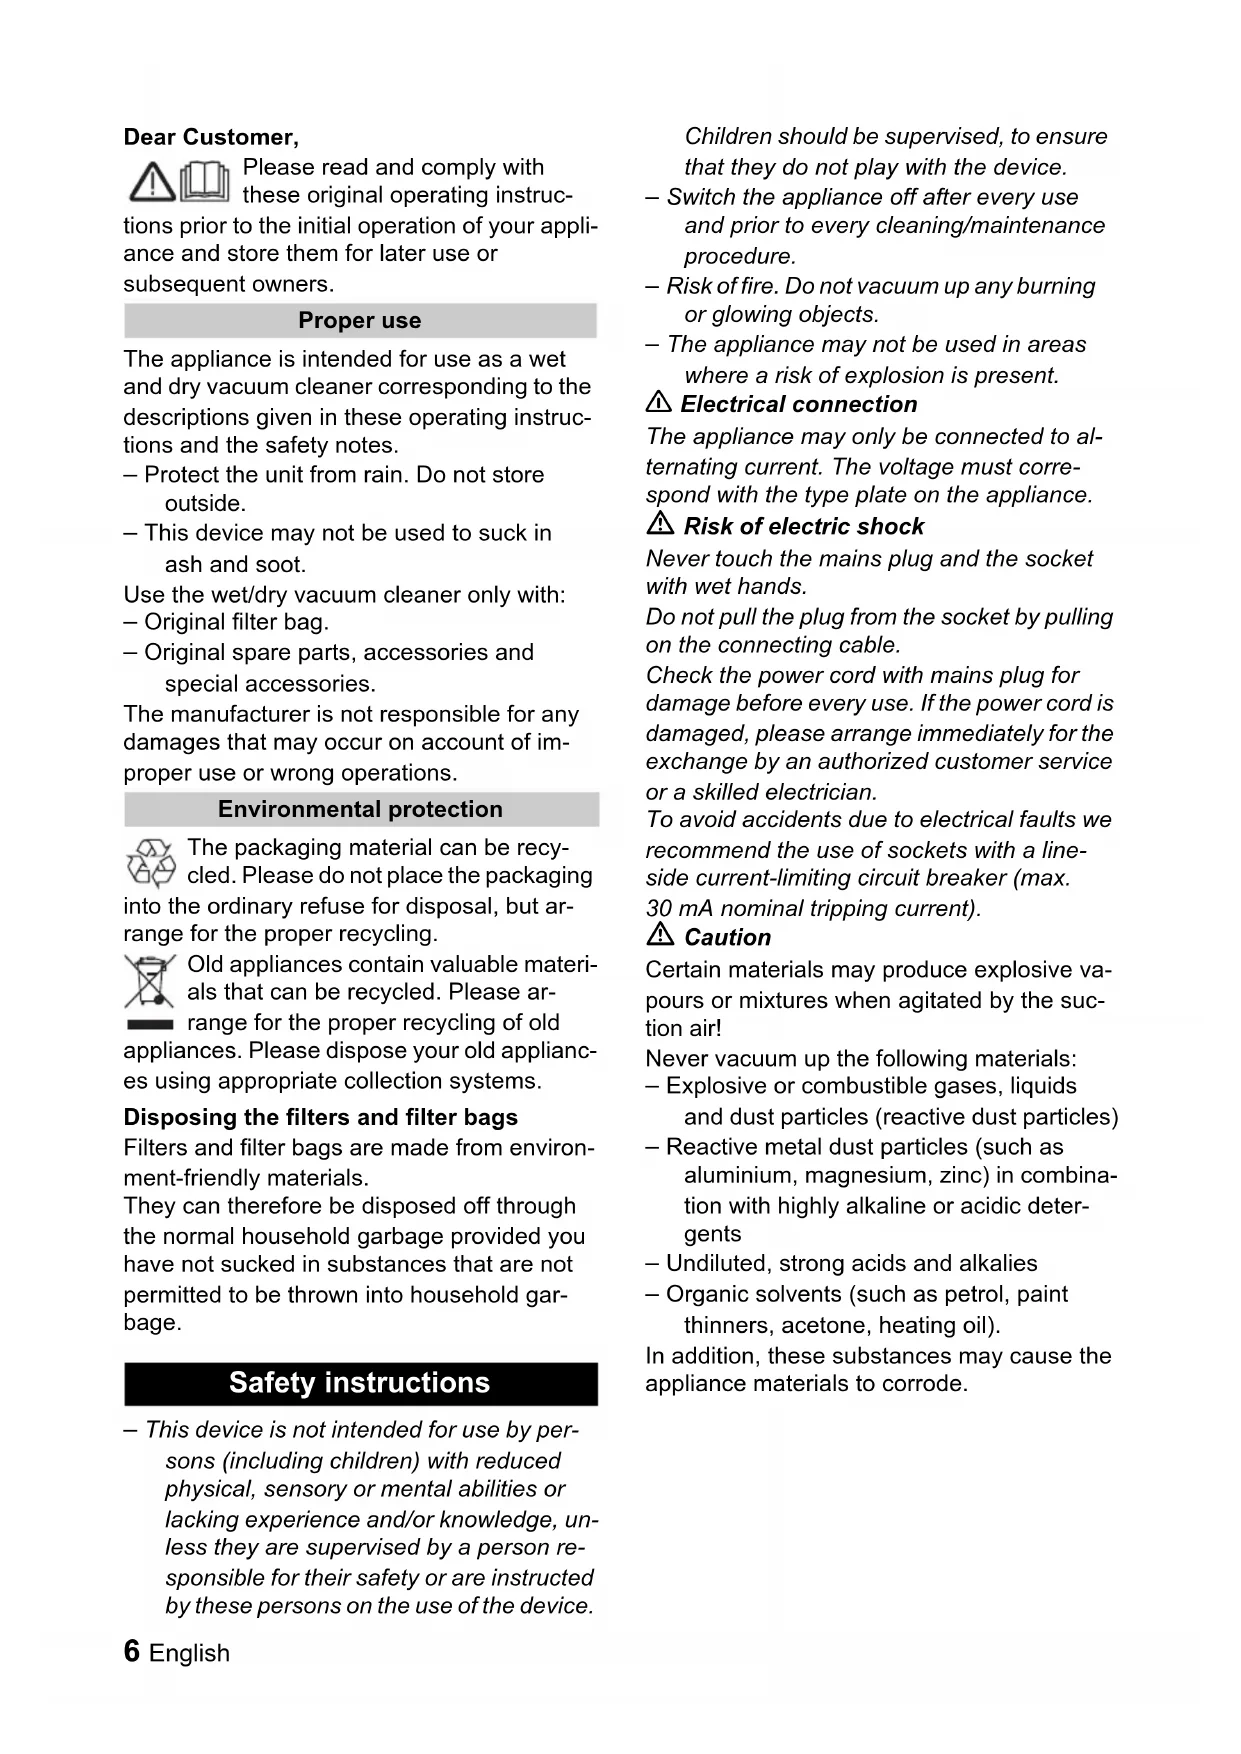
10 Suction hose
11 Suction tubes 2 x 0.5 m
12 Crevice nozzle
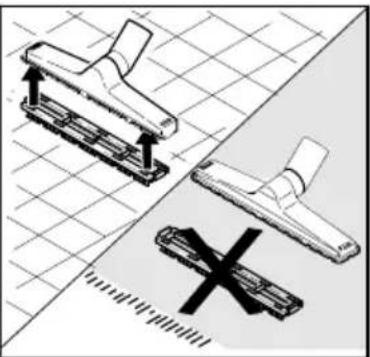
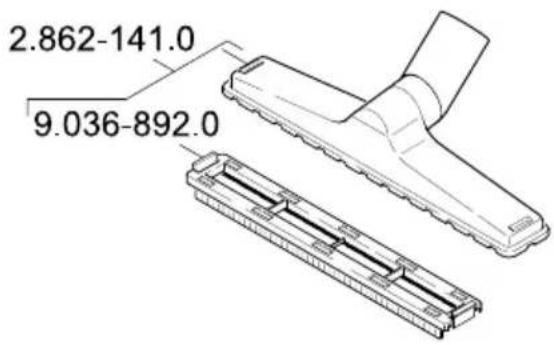
13 Floor nozzle with hard surface insert
14 Filter bag
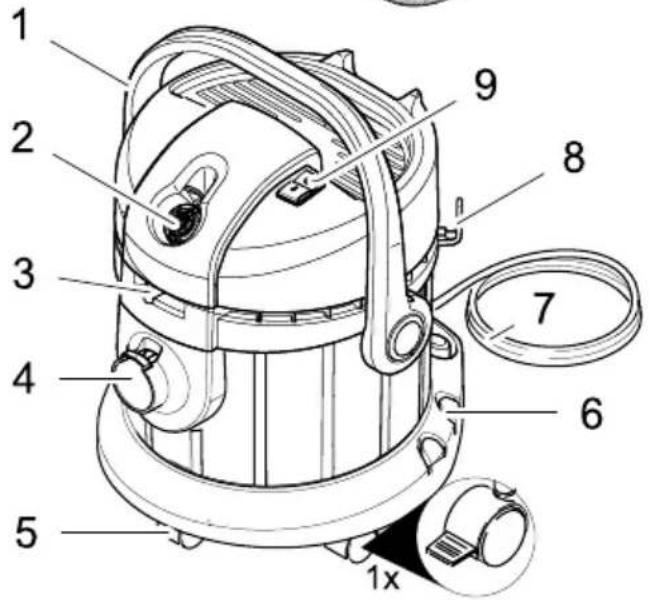
Attaching the Accessories
Illustration 1
→ Remove the motor casing, take the attachments and the swivel casters out of the container.
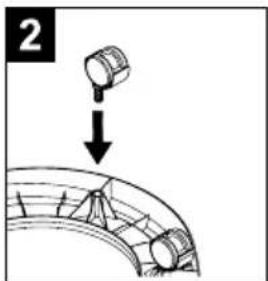
Illustration 2
→ Turn the container, press in the swivel casters in the openings at the base of the container till the end-point.
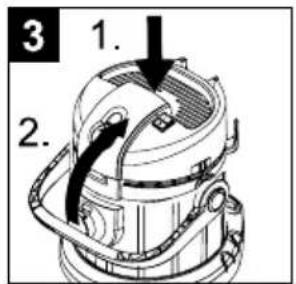
Illustration 3
→ Place motor casing on the container and lock it.
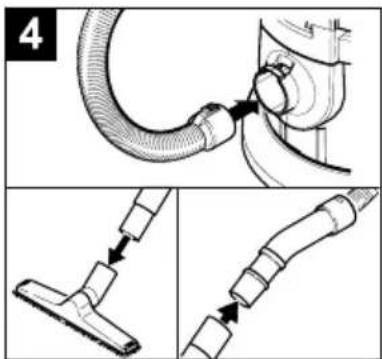
Illustration 4
→ Connect accessories.
Operations
Turning on the Appliance
Illustration 5
→ Plug in the main plug.
→ Turn the appliance on and put it into operation.
→ Switch off the appliance when finished.
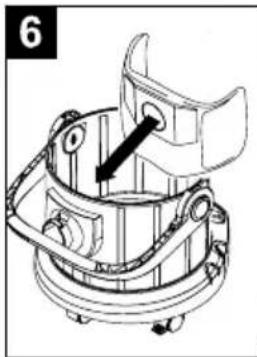
Dry vacuum cleaning
Illustration 6
For a dust-free disposal of the vacuuming material we recommend to insert the paper filter bag as well. This provides the additional advantage that the cartridge filter will not become contaminated that quickly.
⚠️ Work only with a dry cartridge filter!
→ Therefore: Always let the cartridge filter dry thoroughly before using it!
⚠ Added filter bags can burst!
→ Therefore: Change the filter bag at the appropriate time!
⚠️ Always use a filter bag while sucking in fine dust!
Wet vacuum cleaning
Caution:
Do not use a filter bag!
Immediately switch the appliance off if foam forms or liquids escape!
Note: If the container is full a float closes the suction opening and the appliance works at a higher speed. Switch off the appliance immediately and empty the container.
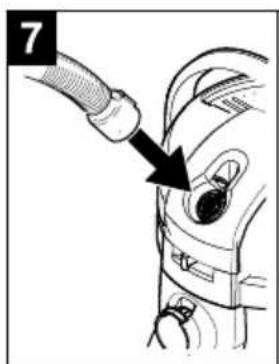
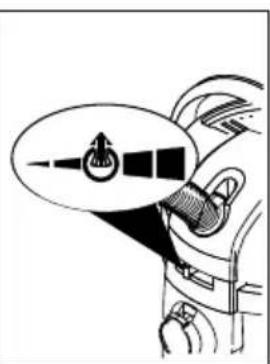
Blowing function
Use this function, for example, to blow out leaves or dust from the garage, hobby room, work shop, courtyard or garden.
Illustration 7
→ Connect connection hose. Open the slide of the air regulation, and select the desired blowing performance.
Finish operation
Illustration 8
Empty the container
→ Turn off the appliance and disconnect the mains plug.
→ Remove the motor casing and empty the container.
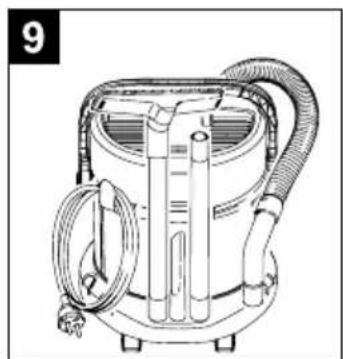
Illustration 9
Storing the Appliance
→ Place the accessories in the appropriate compartments at the appliance and store the appliance in a dry room.
Transporting the device
→ The device is to be fastened properly before transporting the device in the car.
Maintenance and Care
⚠️ Risk of injury
Always switch off the appliance and pull out the mains plug before care and maintenance work.
Cleaning the appliance and accessories
Caution
Do not use abrasives, glass or universal cleaners! Never immerse the appliance in water.
→ Clean the appliance and accessory parts made of plastic with a commercial plastic cleaner.
→ If required, rinse the container and accessories with water properly and dry them before reuse.
General notes
Warranty
The terms of the guarantee applicable in each country have been published by our respective national distributors. We will repair possible faults on your unit free of charge within the warranty period, insofar as the faults are caused by material defects or defective workmanship. Guarantee claims should be addressed to your dealer or the nearest authorized customer service centre, and supported by documentary evidence of purchase. (See address on the reverse)
Customer Service
Our KÄRCHER branch will be pleased to help you further in the case of questions or faults. (See address on the reverse)
Ordering spare parts and special attachments
At the end of the operating instructions you will find a selected list of spare parts that are often required.
You can procure the spare parts and the attachments from your dealer or your KÄRCH-ER branch office.
(See address on the reverse)
Troubleshooting
Suction power decreases
Attachment, suction hose or suction pipe are blocked
→ Remove the blockage with the help of a stick.
Filter bag is full
→ Insert new filter bag.
Cartridge filter is dirty
→ Take out the filter and shake it. If the dirt does not come off, then clean it under flowing water and let it dry thoroughly before fitting it back. Replace it if the dirt is stubborn or if the filter itself is damaged.
Appliance does not suck in water
Container is full
→ Switch off the appliance and empty the container.
Specifications
Mains voltage 220 - 240V
1\~50/60 Hz
Mains fuse (slow-blow) 10 A
Container capacity 18 l
Water intake, max. 8 l
Output P_nom 1200 W
Output P_max 1400 W
Mains cable: Type: H05-VV-F2x0,75
Sound pressure level (EN 75 dB(A))
60704-2-1)
Subject to technical modifications!
Cher client,

→ Sett inn ny filterpose.
Patronfilter er tilsmusset
Äänen painetaso (stan- 75 dB(A)
dardi EN 60704-2-1)
Mult stimate client,
Lisavarustuse monteerimine
Joonis 1
Padrunifilter on must
7Market should be an interview between the market and the market.
8Group حفظ antibالرئي
9 capitalический والقابض
5.963-104.0 18.11.2008
A 2254 Me
A
Alfred Kärcher Ges.m.b.H.
Lichtblaustraße 7
1220 Wien
(01) 25 06 00
AUS
Kärcher Pty. Ltd.
40 Koornang Road
Scoresby VIC 3179
(03) 9765 - 2300
B / LUX
Kärcher N.V.
Industrieweg 12
2320 Hoogstraten
0900 10 027
BR
Kärcher Cleaning Systems A.E.
31-33, Nikitara & Konstantinoupoleos str.
13671 Acharnes
210 - 23 16 153
GB
Kärcher (UK) Limited
Kärcher House
Beaumont Road
Banbury
Oxon, OX16 1TB
01295 752200
H
Kärcher Hungária Kft
Tormásrét ut 2.
2051 Biatorbágy
(023) 530-640
HK
Kärcher Limited
Unit 10, 17/F.
APEC Plaza
49 Hoi Yuen Road
Kwun Tong, Kowloon
(02) 357-5863
|
Kärcher S.p.A.
Via A. Vespucci 19
21013 Gallarate (VA)
848 - 99 88 77
IRL
Kärcher Limited
12 Willow Business Park
Nangor Road
Clondalkin
Dublin 12
01 409 7777
KOR
Karcher Co. Ltd. (South Korea)
Youngjae B/D, 50-1, 51-1
Sansoo-dong, Mapo-ku
Seoul 121-060
032-465-8000
MAL
Karcher Cleaning Systems Sdn. Bhd.
No. 8, Jalan Serindit 2
Bandar Puchong Jaya
47100 Puchong, Selangor
(03) 5882 1148
N
Kärcher AS
Stanseveien 31
0976 Oslo
24 17 77 00
NL
Kärcher BV
Postbus 474
4870 AL Etten-Leur
0900 33 444 33
NZ
Karcher Limited
12 Ron Driver Place
East Tamaki, Auckland
(09) 274-4603
PRC
Kärcher Cleaning Systems Co., Ltd.
Part B, Building 30,
No. 390 Ai Du Road
Shanghai Waigaoquiao 200131
(021) 5046-3579
P
Neoparts Com. e Ind. Automóvel, Lda.
5 Toh Guan Road East
01-00 Freight Links Express Distripark
Singapore 608831
6897-1811
TR
Kärcher Servis Ticaret A.S.
9 Eylül Mahallesi
307 Sokak No. 6
Gaziemir / Izmir
(0232) 252-0708
TWN
Karcher Limited
5F/6. No.7
Wu-Chuan 1st Rd
Wu-Ku Industrial Zone
Taipei County
(02) 2299-9626
UA
Kärcher Ukraine
Kilzeva doroga, 9
03191, Kyiv
(044) 5947575
UAE
Karcher FZE
Jebel Ali Free Zone
RA 8, XB 1, Jebel Ali, Dubai
(04) 8836-776
ZA
Kärcher (Pty.) Limited
144 Kuschke Street
Meadowdale
Edenvale 1614
(011) 574-5360
05/2008

KARCHER®
www.kaercher.com