Burr Grinder BG88PR - Coffee grinder Nesco - Free user manual and instructions
Find the device manual for free Burr Grinder BG88PR Nesco in PDF.
User questions about Burr Grinder BG88PR Nesco
0 question about this device. Answer the ones you know or ask your own.
Ask a new question about this device
Download the instructions for your Coffee grinder in PDF format for free! Find your manual Burr Grinder BG88PR - Nesco and take your electronic device back in hand. On this page are published all the documents necessary for the use of your device. Burr Grinder BG88PR by Nesco.
USER MANUAL Burr Grinder BG88PR Nesco
natural_image
Black-and-white photo of a NESCO PROFESSIONAL coffee maker with coffee beans and a spoon, no visible text or symbols on the main subject.NESCO®
PROFESSIONAL
BURR GRINDER BG-88PR
Table of Contents
Important Safeguards .... 1
Parts and Accessories 2
How to Use your Burr coffee grinder 2
Caution 3
Care and Cleaning 3
One Year Limited Warranty 4
NESCO® is a registered trademark of The Metal Ware Corporation.
The Metal Ware Corporation
1700 Monroe St., P.O. Box 237
Two Rivers, WI 54241-0237, USA
Phone: (800) 288-4545
For accessories and additional products, go to
www.nesco.com
IMPORTANT SAFEGUARDS
- This product is designed for household use only -
When using electrical appliances, basic safety precautions should always be followed, including the following:
- READ ALL INSTRUCTIONS BEFORE USING THIS APPLIANCE.
- To protect against electric shock, do not immerse the Motor Body, Cord or Electrical plug in water or other liquid. See Cleaning Instructions.
- The appliance is designed for household use only. It is not intended for commercial use.
- This appliance should not be used by children. To avoid accidental injury, close supervision is necessary when any appliance is used by or near children.
- Unplug appliance from power outlet when not in use, before putting on or taking off parts, and before cleaning.
- Do not operate any appliance with damaged cord or plug, or after appliance malfunctions, or has been damaged in any manner. Return the appliance to NESC® Factory Service Department for examination, repair or adjustment.
- Do not use water to clean the grinder, please use a brush to remove obstructions only when the grinder is not working properly.
- The use of accessory attachments not recommended by the appliance manufacturer may cause injuries.
- Do not use outdoors.
- Do not let the cord hang over the edge of a table or touch hot surfaces.
- Do not use the appliance for other than intended use.
- Do not place on or near a hot gas or electric burner, or in a heated oven.
- Avoid contacting moving parts. Make sure the appliance is OFF, the motor has stopped completely, and the appliance is unplugged from outlet before putting on or taking off attachments and before cleaning.
SAVE THESE INSTRUCTIONS
Polarized Plug: This appliance has a polarized plug (one blade is wider than the other). To reduce risk of electric shock, plug is intended to fit into polarized outlet only one way. If the plug does not fit fully into the outlet, reverse the plug. If it still does not fit, contact a qualified electrician. Do not try to modify the plug in any way. Short Cord Instructions: A short power supply cord is provided to reduce the risk resulting from becoming entangled in or tripping over a longer cord. Extension cords may be used if care is exercised in their use. If an extension cord is used, the marked electrical rating of the cord should be at least as great as the electrical rating of the appliance. The longer cord should be arranged so that it will not drape over the tabletop where it can be pulled on by children or tripped over unintentionally.
Parts and Accessories
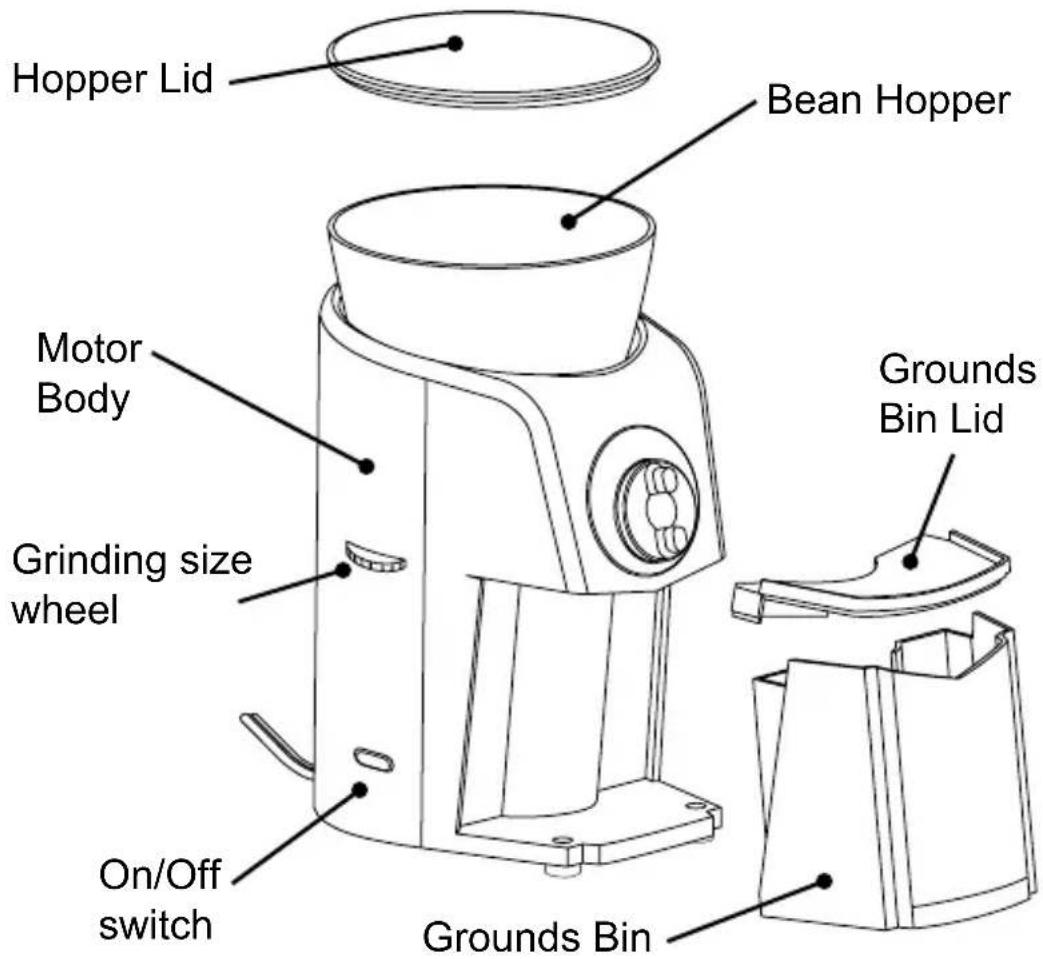
text_image
Hopper Lid Bean Hopper Motor Body Grinding size wheel On/Off switch Grounds Bin Grounds Bin LidHow to use your Burr Grinder
- Remove all packaging materials before using the first time.
- Put the lid on the grounds bin and slide into the coffee grinder, pushing it back until it clicks into place.
- Remove the hopper lid from the bean hopper.
- Put the required amount of coffee beans in to the bean hopper, the amount will vary with the type of coffee and your own taste. We suggest a tablespoon of ground coffee to one 6 oz. cup of coffee.
- Replace the hopper lid on the bean hopper.
- Move the grinding size wheel to the desired setting. The wheel is marked as 1 (fine) to 9 (course) with settings midway between each number. As a guide, we suggest 1-3 for Espressos, 4-6 for filtered coffeemakers and 7-9 for Percolators, etc.
-
Set the timer to the number of cups to be ground 0 - 12. This is only a guide as Fine grinding will take longer than Course grinding.
-
Plug cord into 120 volt electrical outlet. If it does not fit, rotate plug 180^ , if it still does not fit contact a certified electrician.
- Press and release the On/Off switch. The coffee grinder will start, the beans will begin to fall between the grinding wheels and the ground coffee will be ejected into the grounds bin.
- When the coffee grinder stops, press the On/Off switch and remove plug from electrical outlet.
- If you need to grind more coffee, please wait one minute before reusing.
- Clean the grinder after each use. Coffee left over can become stale and get mixed in with the next batch.
Caution
- After one minute of use (12 Cups), let the grinder cool for one minute before reusing.
- Do not operate more than 2 minutes at one time.
- Before cleaning, turn the timer to "0" (off) and press the On/Off switch then remove plug from electrical outlet. It is now ready to be cleaned.
- The grinding wheels are fixed and cannot be removed.
- Other than cleaning, no additional maintenance or servicing of this appliance is required. Repairs, if needed, should be sent to authorized service center.
Care and Cleaning
- Clean the inside of the bean hopper and grounds chute with a soft brush, such as pastry brush.
- The hopper lid and grounds coffee bin may be washed in soapy water. Rinse and dry before use. NOTE: Do not put items in dishwasher.
- Clean the outer surfaces of the coffee grinder with a soft damp cloth.
- Never immerse or rinse the body of the coffee grinder in water or other liquid.
- Do not use harsh or abrasive cleaners or solvents to clean appliance.
ONE YEAR LIMITED WARRANTY
This appliance is warranted for one year from date of original purchase against defects in material and workmanship. This warranty does not cover transportation damage, misuse, accident or similar incident. This warranty gives you specific legal rights and you may have other rights, which vary from state to state. This product is intended for household use only, not for commercial use. Warranty does not cover commercial use.
Your new NESCO® appliance comes equipped with numerous safety features. Any attempt to interfere with the operation of these safety features makes this warranty null and void. In the event we receive an appliance for service that has been tampered with, we reserve the right to restore it to its original state and charge for the repair.
For service in warranty - Defective products may be returned, postage prepaid, with a description of the defect to: The Metal Ware Corporation, 1700 Monroe Street, Two Rivers, Wisconsin 54241, for no-charge repair or replacement at our option. Must include proof of purchase or copy of original bill of sale when returning product for warranty service.
Please call Customer Satisfaction at 1-800-288-4545 to obtain a Return Authorization before shipping.
- For service in warranty, follow instructions set forth in warranty. When ordering new parts, make sure that you always mention the model number of the product.
- Call us on our toll free number, 1-800-288-4545 and tell us about your problem.
- If we instruct you to send all or part of your appliance to us for repair or replacement, our Customer Satisfaction representative will provide a Return Authorization number (this number notifies our receiving department to expedite your repair). Pack your unit carefully in a sturdy carton with sufficient padding to prevent damage because any damage caused in shipping is not covered by the warranty.
- Print your name, address and Return Authorization number on the carton.
- Write a letter explaining the problem. Include the following: your name, address and telephone number and a copy of the original bill of sale.
- Attach the sealed envelope containing the letter inside the carton. Insure the package for the value of the appliance and ship prepaid to:
Attn: Factory Service Dept.
The Metal Ware Corporation
1700 Monroe Street
Two Rivers, WI 54241
NESCO®
PROFESSIONAL
BURR GRINDER BG-88PR
text_image
Customer Satisfaction™1-800-288-4545

For accessories and additional products, go to
www.nesco.com