
AT 2540 - Toaster SEVERIN - Free user manual and instructions
Find the device manual for free AT 2540 SEVERIN in PDF.
| Brand | Severin |
| Model | AT 2540 |
| Product type | Automatic toaster |
| Dimensions (approx.) | 30 x 18 x 20 cm |
| Weight (approx.) | 1.2 kg |
| Power supply | 220-240 V ~ 50/60 Hz, 900 W |
| Capacity | 2 slices |
| Maximum bread thickness | 14 mm |
| Main functions | Toasting, defrost, reheat, emergency stop |
| Browning control | Continuous adjustment (light to dark) |
| Defrost function | Yes, with indicator light |
| Reheat function | Yes, with indicator light |
| Emergency stop | Dedicated stop button |
| Extra lift | Yes, for easy removal of small slices |
| Crumb tray | Removable, easy to empty |
| Cord storage | Under-unit cord winder |
| Safety | Auto shut-off, overheating protection |
| Housing material | Heat-resistant plastic |
| Care and cleaning | Clean with a dry cloth; removable crumb tray |
| Warranty | 2 years |
Frequently Asked Questions - AT 2540 SEVERIN
User questions about AT 2540 SEVERIN
0 question about this device. Answer the ones you know or ask your own.
Ask a new question about this device
Download the instructions for your Toaster in PDF format for free! Find your manual AT 2540 - SEVERIN and take your electronic device back in hand. On this page are published all the documents necessary for the use of your device. AT 2540 by SEVERIN.
USER MANUAL AT 2540 SEVERIN
Before using the appliance, the user should read the following instructions carefully.
Connection to the mains supply
The appliance should only be connected to an earthed socket installed in accordance with the regulations.
Make sure that the supply voltage corresponds to the voltage marked on the rating label.
This product complies with all binding CE labelling directives.
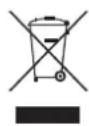
Familiarisation
- Operating lever for warming top
- Crumb tray
- Housing
- Rating label (on underside of appliance)
- Power cord storage (on underside of appliance)
- Toast slot
- Integral warming top
- Operating lever
- Power cord with plug
- Indicator lamp
- Defrost function with indicator lamp
- Warm-up function with indicator lamp
- Eject button
- Continuously adjustable browning control knob
Connection to the mains supply
The appliance should only be connected to an earthed socket installed in accordance with the regulations.
Make sure that the supply voltage corresponds to the voltage marked on the rating label.
This product complies with all binding CE labelling directives.
Important safety instructions
- There is always a danger that bread may catch fire, e.g. if it is toasted more than once or comes into contact with the heating elements. Therefore ensure that the appliance is not positioned or operated in close proximity to curtains or any such inflammable materials. Do not leave the appliance unattended during use.
- In order to prevent damage to the housing, do not position the appliance on or near hot surfaces or open flames such as hot-plates or gas flames.
- Caution: the accessible housing surfaces become very hot during operation. Burns can occur from touching the hot parts.
- Always position the appliance on a level heat-resistant surface.
- Before the appliance is used, the main body as well as any attachment fitted should be checked thoroughly for any defects. Should the appliance, for instance, have been dropped onto a hard surface, it must not be used any longer: even invisible damage may have adverse effects on the operational safety of the appliance.
- Do not cover the toast slot during operation.
- Do not try to remove bread from the toaster with your fingers or insert any other objects (eg knives, forks) into the toast slot as the heating elements carry a live current.
- The power cord should be regularly examined for any signs of damage. In the event of such damage being found, the appliance must no longer be used.
- Do not allow the power cord to touch hot surfaces.
- Do not let the power cord hang free.
-
Always remove the plug from the wall socket after use, and also
-
in case of any malfunction,
- when fitting or removing the warming top,
-
when cleaning the appliance.
-
When removing the plug from the wall socket, never pull on the power cord; always grip the plug itself.
The appliance is not intended to be operated by means of an external timer or separate remote-control system. - This appliance is not intended for use by any person (including children) with reduced physical, sensory or mental capabilities, or lacking experience and knowledge, unless they have been given supervision or instruction concerning the use of the appliance by a person responsible for their safety.
Children should be supervised to ensure that they do not play with the appliance. - No responsibility will be accepted if damage results from improper use, or if these instructions are not complied with.
- This appliance is intended for domestic use only and not for commercial applications.
- In order to comply with safety regulations and to avoid hazards, repairs of electrical appliances must be carried out by qualified personnel, including the replacement of the power cord. If repairs are needed, please send the appliance to one of our customer service departments. The address can be found in the appendix to this manual.
Operation
General information
Day-old, dry bread darkens faster than fresh bread. For brown bread, adjust the browning control to a higher setting than for toasting white bread.
- Do not use slices which are too thick or too big, as they may become stuck in the toaster. The thickness of the slices to be toasted should not exceed 14mm .
- In case of problems or malfunctions during use, and before cleaning, always remove the plug from the wall socket.
- To remove a slice stuck in the toast slot, use a blunt wooden implement (eg a brush handle). Never touch the metal
heating elements.
- Variations in bread type, humidity content and thickness of the slices result in different degrees of browning. The bread should therefore be kept in a sealed wrapping.
Before using for the first time
- Clean the toaster thoroughly (see General care and cleaning).
- Switch on the toaster without any bread inserted and go through at least five toasting cycles at the maximum temperature setting.
- Allow the toaster to cool down between cycles.
- Note: the operating lever locks down only when the plug is inserted.
- When switching on the appliance for the first time, the toaster may emit a slight smell and a little smoke, but this will disappear after a short while. Ensure sufficient ventilation.
Adjusting the degree of browning
The desired degree of browning can be varied by turning the adjustable browning control knob.
Light: turn the control knob anti-clockwise.
Dark: turn the control knob clockwise.
In the case of sliced bread specifically intended for toasting, we recommend a browning control setting of 3 to 4.
Operation
After adjusting the browning control, insert the bread into the toast slot and press the operating lever down. The indicator lamp will go on.
- Once the desired degree of browning is reached, the toaster switches off automatically; the slices are ejected, and can be removed once the indicator lamp goes off.
- Easy lift-out: to facilitate lifting the bread slices out, push the operating lever up.
- To achieve regular browning when toasting several slices in succession, allow
the toaster to cool down for 60 - 90 seconds after each cycle.
The toasting time may be shortened as a result of fluctuations in the power supply.
- Do not cover the toast slot during operation.
Defrost function
The defrost function may be used in addition to the normal action when toasting deep-frozen bread. This will extend the toasting process. This function is shown by the indicator lamp.
Warm-up function
The warm-up function is suitable for reheating bread which has already been toasted. Caution: do not warm up buttered bread. After activating the toasting function, the warm-up function can be used in addition. This function is shown by the indicator lamp.
Interrupting the toasting cycle
If you want to interrupt the toasting cycle, press the eject button. The toaster will switch off and the slices are ejected.
Warming up rolls, buns etc.
- To warm up buns, rolls or other bakery items, push the slide control operating lever for the warming top down to raise the bread roll holder.
- Place the items to be warmed up on the top, adjust the browning control to a medium setting and then push down the operating lever to switch on the toaster.
- Once the browning cycle is complete and the appliance has automatically switched off, turn the roll or bread over and repeat the cycle.
- After use, return the bread roll holder to its rest position by pushing the slide control back up.
- Do not place the items directly on the toast slot.
General care and cleaning
- Before cleaning the appliance, ensure it is disconnected from the power supply and has cooled down completely.
- To avoid the risk of electric shock, do not clean the toaster with water and do not immerse it in water.
- Do not use abrasives or harsh cleaning solutions.
- The exterior may be wiped with a dry or slightly damp lint-free cloth.
Crumb tray
During use, any bread crumbs falling down are collected in the crumb tray. To empty the tray, pull it out sideways.
Power cord storage
Unwind the power cord completely before operation and make sure it is kept well away from the appliance.
Allow for a sufficient cooling-down period before winding up the power cord after use.
Disposal
Do not dispose of old or defective appliances in domestic garbage; this should only be done through public collection points.
Guarantee
This product is guaranteed against defects in materials and workmanship for a period of two years from the date of purchase. Under this guarantee the manufacturer undertakes to repair or replace any parts found to be defective, providing the product is returned to one of our authorised service centres. This guarantee is only valid if the appliance has been used in accordance with the instructions, and provided that it has not been modified, repaired or interfered with by any unauthorised person, or damaged through misuse.
This guarantee naturally does not cover wear and tear, nor breakables such as glass and ceramic items, bulbs etc. This guarantee does not affect your statutory rights, nor any
legal rights you may have as a consumer under applicable national legislation governing the purchase of goods. If the product fails to operate and needs to be returned, pack it carefully, enclosing your name and address and the reason for return. If within the guarantee period, please also provide the guarantee card and proof of purchase.

Iooos aayantrous maes nai 10a008,
Piiv n xonn tno oovxueo, o xonotno ngenei va diaabeoi npoeextia tio axolov0e oynieo.
CJIeIHTe 3a TEM, YTO6bI HHyp IITaHnHe COIIpHKacJcH HaRpeBaIOIeIcI IOBepXHOCTbIO np6opa.
He IOnyckaIte CBO6OJHOro npOBncaHnIshHpyPiTaHnI.
Bcerda n3BJIeKaIte BNIky n3 po3eTKH IocJIe HcIOJIb3OBaHHn np6opap, a TaKKe:
- npn JIO60H HNOJAikke,
- npn ycTaHOBKe HJN cHATNN IOIOrpeBaTeJI 6yIoueK,
-
npn YHCTKe IINHOopa.
-
Ppi H3BJIeHn BNIJKN I3 cTeHHoI pO3eTKH NIKOrJa He TIAHHTe 3a IIHyp, a TOJIbKO 3a BNJKy.
-3KcIIyatau np6opa c HIOJIb3OBaHHeM BHeIHIrO TaHMepa HIN OTJeJIbHO r yCTpoIcTBA IINCTaHIOHO r yIpaBJIeHn He IOnYCKaETcI.
-3TOT np6op He npeHa3HaueH IINcIOJIb3OBaHHa 6e3 IIpncMOtpa JInuAMn (BkJIOUaJeTei) COrpaHHueHHbIMN H3NuYeCKHM, CEHCOPHBIM NJN yMCTBeHHbIMN cIOco6HOCTaMM, a TaKKe JINIaMn, He O6JaIaIOIIIMN IOCTaTOUHbIM ONITOM N yMeHNc, IOKa JINIO, OTBeauOuCe 3a INx 6e3OIAacHOCTb, He O6yHT INX 6oPaueHHIO C daHHbIM np6Opom.
He octabJIe Te 6e3 npncMoTpa, TTo6bO Hn He Haayan nIgpaTb c np6opom.
H3rTOBHTeJIb He Hecet HnKaKoI OTBcTCTBeHHOCTH 3a NOBpeXdEHNHe, BBi3BaHHoe HeIIpaBnJIbHOJ 3KcIIyataHneH JIn HApYIIeHNEm HActOaNX yka3AHN.
3To ycTpoIcTBo IpeHa3HaueHo NCKJIIOUHTeJIbHO IJIa DOMaIIHeRO IIpIMeHEnn H He IOJIXHO IcIOJIb3OBaTbcB B IyHKTaX 06IeCTBeHHO TITAHN.
BcoOTBeTCTBnnc Tpe6oBaHnMaHnIpaBNI TexHNKn 6e30NaChOCTN n I
HCKJIIOUeHHN BO3MOJHOTo TpaBMaTH3Ma peMOHT 3JIeKTPoIIpH6OpOB, BKIIIOuAЯ И 3aMeHy IIIHypa IIITaHHN, IOJIKeH II pO H 3B OД N T b C KBAJIINΦHIIINPOBaHHbIM IepcoHaJIOM. EcJH Heo6XoIIM peMOHT, HaIpaBbTe, IIOXaJIyIcTa, 3JIeKTPoIIpH6Op B OdHy H3 HaIIHX cepBnCHbIX cIyX6. AIpeca yKa3aHbI B IIpNIJOxKeHHN K JaHHOMy PYKOBOIDCTBy.
HcnoJb30BaHne
Osha HhOpMaHn
- YEpCTBbI OINHOINHEBbI XJIe6 BceTla IIOJXapNBaETc8 6bICTpee, Yem CBexKn. IJIa ceporo H YepHOrO XIE6a ycTaHaBJIbBaIte pyUky peYJInPOBaHNr CTeIeHN IIOJXapNBaHNr Ha 6OJIee BBICOKoe IIOJOKeHHe, Yem IIJI IOJXapNBaHNr 6eJIOrO XIE6a.
He nCIOJIb3yIte OueHb TOJIcTbIe HJIN 6OJIbIIIne JIOMTN. OHN MOYr 3aCTpIb BTOCTepe. ToJIuHa XJIe6a He JOJIxHa 6bITb 6OJIee 14 MM.
B cIyuae npo6Jem HJH Hecpa6aTbIBaHHn H IpeD YmCTKoH Bcerla BblHMaTe BHJKy H3 p03ETKn. - YTO6bI ydaJIHTb TOcT, 3aCTpRABIIIN B Inpope3n TocTepa, NOJb3yIITecb TYIbIMN IpePBHHbIMN IpeIMTaMn (Haip.,pyKoI IIETKN).HIKOrIa He IpnHKacaIITecb K MeTaJIINueCKM HaIpeBaTeJIbHBIM 3JIeMeHTam.
- Pa3JIuHbIe TnIIbI xJIe6a pa3HOB BJIaXHoCTN I TOJIINHbI Tpe6yIOT pa3JIuYHbIX IIOJIOKeHN pyUKN peRyJInpOBAHHa cTeNeHN IIOJxapNBaHHa. IocJe IIOJxapNBaHHa XJIe6 MOxHO xpaHHTb B repMeTnueckoYIaNKOBKe.
IpepiepBbIM HcHIOJIb3OBAHHem
TtataTeJIbHO OuHCTHTe TocTepe (cM. 06nnyXoN H nHctka).
- BkIIOUHTe TocTepe3 xJIe6a H npOrOHHTe eRo He MeHee PAn pa3 IIpn MaKcHMaJIbHO TeMIIepaType.
- IocJIe KaXIOrO IIporOHa TocTepy HUxHO DaTb OCTbITb.
-Пиимechан.БьчагЗИнраетсToJbKO nocJIe NODKJIIOUeHnBBIJKN K pO3eTKe.
-Прн BKЛIOUeHnTOcTepaВпepBbI pa3 MoXeT IOYBNTbcS cJa6bI 3aIIax (JIIN JIaKe JIeKNI IbIM), KOTOpbI BCKope HcYe3HeT. OBeCpeYbTe HeO6xOJIMyIO BeHTNJIAIIO.
PeryJnnpOBka cTeneHH noJXapHBaHm
CteIeHb IOJXapNBaHnM OXXHOpeYJInpoBaTb IIO JKeJIaHHIO NytE MIOBOPTa pyKn.
JIy yMeHbIeHHNIOBepHHTe IIpOTHB YacOBoi CTpeJIKN.
IyBeJIuHnI IOBepHnTe IIO YacOBoN CTpeJIke.
B cIyuae npImeHnnaCneuHaBHoro XJIe6a IJIa TOcTOB Mbl peKOMeHNyEm CTaBNbpyuKypeRyInpOBaHHa CTeiEnH NIOJXapHBaHH B IOJIOKeHHe 3 HIN 4.
EkciLiyaTaunna
- PocJIe peRyJIHpoBaHHa CTeIeHN 06KapNBaHHa, IIOJoxKe TcXJIe6 B OTBepCTHe IJIa XJIe6a H IpePeIBHHbTe pbUar 3aIpy3Kn BHN3. KOHTpOJIbHaJ JAmIIa 3acBETITcR.
-Пи IOCTINKHeHH 3aIaHHoI cTeIIeHIO6XkapINBaHHa,TOcTeP BbIKJIIOuAcTcA bTOMaTHUeCKN,XJIe6 BBtAJKNBaETCn I eRO MOxHO B3rTb IocJIe BbIKJIIOUeHH KOHTpOJIbHOJ JAmIOUKN. - JeTkn IOnbem: YTO6bl O6JIeYHTb IIOIbEM TOcTOB, IIOJaITe pbIur BKJIIOUcEHn BBepx.
-Дя IOCTNKeHЯ OINHaKOBOrO IODKapNBaHnI HeCKOJIbKHX TOCTOB IODPnIocTyXaIte TOCTeB TeUeHne 60-90ceKIOcJIe KaKJIO rIKJa. - H3-3a KOJIe6aHnI HAnpJxKeHnI B CeTH
IIHTaHnBpeMIOJXapNBaHHMOxET 6bITb COKpaueHO.
He HaKpbIbAaTe Ipope3b IIA TOCTOB BO BpeMa pa6OtBi IIpN6Opa.
Фуншпma pa3MopapKHBaHnA
Ipn HcIOJIb3OBaHHN TOCTepa MOxHO IOIOJIHHTeJIbHO HCIOJIb3OBaTb FOYHKIIIOpa3MOpajKBaHHN IJIAmOpOKeHHORo XJIe6a. 9To IpoJInr IpoIecc IIOJXapNBaHHN. Pn BKIOUeHHN 3TOI KOTyHKUHN 3aRopaETcKOHtPOJIbHaJAMIOUka.
Функшиюлогревa
XpaHeHHe IHHypa IHTaHHN
IpeepnepBbIM nCIOJb3OBaHnem IIOJIHOCTbIO pa3MOTaTe IIHHyp IITaHnIy6eIHTecb, YTO OH HaxOJNTcHa IOCTaTOUHOM ydaJIeHnn OT npu6opa. IpeepTcK cMOTaTB IIHHyp IITaHnIPOcJIe npImMeHHeHn IpH6opa, y6eIHTecb, YTO OH OCTbUI.
yIN3aHn
He BbI6paCbIBaIe cTapbIe HIN HeNCIIpaBHBie 3JIeKTpOPIpN6Opbl BMeCTe C 6bITOBbIM MycOpOM. OTHOCHTe Hx Ha NyHKtbl c6opa
CNEUHaJIbHOrO Mycopa.
TapaHTn
TapaHTnHbI cPOK Ha np6Opbl qnpMb1 "Severin" - 2 roHa co IINx IpOJaXn. B TeueHne 3TOrO BpeMeHH Mbl 6ecIIaTHo UcTpaHm BCE DepeKtbl, BO3HNKIIHe B pe3yJIbTaTe IIPOUN3BOJCTBeHHORo 6paka HIn IprImeHnna HeKaueCTBeHHbIX MaTePnaJIOB. TapaHTnH He pacIproCTpaHЯETcH Na DeΦeKtbl, BO3HNKIIHe N3-3a HecO6JIIOJeHnnyPOKOJCTBa IIO 3KcIIJIyaTAIIHH, rpy60r O6paIeHnna C np6Opom, a TaKke Ha 6bIOIIneC (CTeKJIaHHbIe IN KepaMHueckne) qactn. DaHHaRrapaHTnH He HApUIIaET BaIIHX 3aKOHHbIX IIpaB, a TaKke JIO6bIX IIpyHIX IIpaB IIOTpe6ntEJIy, YCTaHOBJeHHbIX HAIIHOHaJIbHbIM 3aKOHODaTEJIbCTBOM, peYJINpyIOIH M OTHOIIeHn, BO3HNKaIOIIHe MeJdy IOTpe6NTeJIaMn IN pOdaBuaAMN IIpOJaXe TOBapOB. TapaHTnA HHUInpyeTcH, ecJIN IIpN6Op peMOHTnpOBaICr He B yKa3aHHbIX HaMn IyHKtax cepBnCHOrO 6CbJyXnBaHn. Bbl MOKeTe IIOuTe OTpabNTb IIpN6Op c IIpeChEM HeHCIIpaBHOCTei H IIpNJIOXeHHbIM KACCOBbIM YcKOM Ha HAIIS 6JIIXaIIII IN IyHKT cepBnCHOrO 6CbJyXnBaHn. KaKne-JIN6O IOnOJIHNITeJIbHbIe rapaHTnH IIpoDAuHa 3aBOJOM-N3TOTOBHTeJIeM He IIpNHMaIOTcI.
Pikk 1B, tel: 45 55 978
Philippines Business Center
Agias Anastasias & Laertou, Pilea
Service Post of Thermi
570 01 Thessaloniki, Greece
Tel.: 0030-2310954020
Iran
IRAN-SEVERIN KISH CO.
LTD.
No.668,7th.Floor
Bahar Tower
Ave. South Bahar
TEHRAN-IRAN
Tel.:009821-77616767
Fax:009821-77616534
Info@iranseverin.com
www.iranseverin.com
Israel
Eatay Agencies
109 Herzel St.
Haifa
Phone: 050-5358648
Email: service@severin.co.il
Italia
via Dino Col 52r-54r-56r,
I-16149 Genova
Green Number: 800240279
Tel.: 010/6451102 - 010418609
Fax: 010/6425009
e-mail: videoelettronica@panet.it
Jordan
F.A. Kettanch
P.O.Box 485
Amman, 11118, Jordan
Tel: 00962-6-4398642
e-mail: app@kettaneh.com.jo
Korea
Jung Shin Electronics co., Ltd.
501, Megaventuretower 77-9
Moonrae-Dong 3ga,
Yongdeungpo-Gu
Seoul, Korea
Tel: +82-22-637 3245~7
Fax: +82-22-637 3244
Service Hotline: 080-001-0190
Latvia
SERVO Ltd.
Mr. Janis Pivovarenoks
Tel: +371 7279892
servo@apollo.lv
Lebanon
Khoury Home
7th Floor, Cité Dora 3 Building,
Dora
P.O.Box 70611
Antelias, Lebanon
Telephone 01 244200, Fax 01
253535
eMail: info@khouryhome.com
Internet: www.khouryhome.com
Luxembourg
Ser-Tec
Serbia and Montenegro
tel: + 381-21-524-638
tel: +381-21-553-594
fax: +381-21-522-096
Slowak Republic
PREMT.s.r.o.
Skladova 1
91701Trmava
Tel: 033/544 7177
Finland
Oy Harry Marcell Ab
Rälssitie 6, PL 63
01511 Vantaa
Puh 0207 599 860
Fax 0207599803
Svenska
Rakspecialisten HS
Mollevangsgatan 34
214 20 Malmö
Fax: 040/6 11 03 35
Slovenia
SEVTIS d.o.o.
Smartinska 130
1000 Ljubljana
Tel: 0038615421927
Fax:0038615421926
Stand: 07.2009


- Connection to the mains supply
- Familiarisation
- Important safety instructions
- Operation
- General information
- Before using for the first time
- Adjusting the degree of browning
- Defrost function
- Warm-up function
- Interrupting the toasting cycle
- Warming up rolls, buns etc.
- General care and cleaning
- Crumb tray
- Power cord storage
- Disposal
- Guarantee
- Iooos aayantrous maes nai 10a008,
- HcnoJb30BaHne
- Osha HhOpMaHn
- IpepiepBbIM HcHIOJIb3OBAHHem
- PeryJnnpOBka cTeneHH noJXapHBaHm
- EkciLiyaTaunna
- Фуншпma pa3MopapKHBaHnA
- Функшиюлогревa
- XpaHeHHe IHHypa IHTaHHN
- yIN3aHn
- TapaHTn
- Pikk 1B, tel: 45 55 978
- Philippines Business Center
- Agias Anastasias & Laertou, Pilea
- Service Post of Thermi
- 01 Thessaloniki, Greece
- Tel.: 0030-2310954020
- Iran
- IRAN-SEVERIN KISH CO.
- LTD.
- No.668,7th.Floor
- Bahar Tower
- Ave. South Bahar
- TEHRAN-IRAN
- Tel.:009821-77616767
- Fax:009821-77616534
- Info@iranseverin.com
- www.iranseverin.com
- Israel
- Eatay Agencies
- Herzel St.
- Haifa
- Phone: 050-5358648
- Email: service@severin.co.il
- Italia
- via Dino Col 52r-54r-56r,
- I-16149 Genova
- Green Number: 800240279
- Tel.: 010/6451102 - 010418609
- Fax: 010/6425009
- e-mail: videoelettronica@panet.it
- Jordan
- F.A. Kettanch
- P.O.Box 485
- Amman, 11118, Jordan
- Tel: 00962-6-4398642
- e-mail: app@kettaneh.com.jo
- Korea
- Latvia
- Lebanon
- Luxembourg
- Slowak Republic
- Finland
- Svenska
- Slovenia
Brand : SEVERIN
Model : AT 2540
Category : Toaster