Kult Pro Power - Juicer WMF - Free user manual and instructions
Find the device manual for free Kult Pro Power WMF in PDF.
| Product Type | Centrifugal Juicer |
| Brand | WMF |
| Model | Kult Pro Power |
| Power Supply | 220-240 V, 50/60 Hz |
| Power | 900 W |
| Protection Class | II |
| Speeds | 2 levels: level 1 for soft fruits and vegetables (melons, grapes, tomatoes, cucumbers, raspberries); level 2 for all fruits and vegetables |
| Max. Continuous Operation Time | 2 minutes at full speed, then complete motor cooling |
| Box Contents | Small pusher, large pusher, lid with feed opening, microfilter (rotating sieve), pulp container, anti-drip spout, juice outlet, motor base, cable holder |
| Materials | Plastic, stainless steel (microfilter) |
| Safety | Safety locks on the lid; the appliance only works if all parts are correctly assembled; protective circuit breaker |
| Care and Cleaning | Clean removable parts immediately after use with a brush and hot water; do not immerse the motor base; wipe with a damp cloth |
| Spare Parts and Repairability | Available parts: microfilter, pushers, lid, pulp container, anti-drip spout; power cable replacement by the manufacturer's customer service or a qualified professional |
| Important Instructions | Do not use if the microfilter or lid are damaged; do not insert fingers or objects into the opening during operation; do not process nuts, chocolate, or hard ingredients; do not use for professional use |
| Dimensions (approx.) | Height: 40 cm, Width: 20 cm, Depth: 30 cm |
| Weight (approx.) | 4.5 kg |
Frequently Asked Questions - Kult Pro Power WMF
User questions about Kult Pro Power WMF
0 question about this device. Answer the ones you know or ask your own.
Ask a new question about this device
Download the instructions for your Juicer in PDF format for free! Find your manual Kult Pro Power - WMF and take your electronic device back in hand. On this page are published all the documents necessary for the use of your device. Kult Pro Power by WMF.
USER MANUAL Kult Pro Power WMF
Important safety information
-
Appliances may be used by persons with limited physical, sensory or mental capabilities and persons lacking experience and/or knowledge if they are supervised or have received instructions on how to use the appliance safely and if they have understood the resulting hazards.
-
This appliance must not be used by children. The appliance and its connecting cable must be kept out of the reach of children.
Children must not play with the appliance.
-
The appliance must always be disconnected from the mains by means of pulling out the mains plug when there is no supervision present, if a fault occurs during operation and prior to any assembly, disassembly or cleaning work.
-
If the appliance's connection cable is damaged, it must be replaced by the manufacturer, his customer service representative or a similarly qualified person to avoid hazards.
-
You must not operate the appliance if the rotating sieve (micro filter) and/or the protective cover is/are damaged and/or if there are any visible cracks.
-
Attention! The cutting blades on the base of the sieve are sharp.
-
Clean all parts immediately after use and remove any food residue straight away.
-
The appliance must be switched off and disconnected from the mains before accessories or additional parts that move during operation are replaced.
-
Be careful of the sharp cutting blades when emptying the container and when cleaning the appliance.
-
This appliance is designed for use in households and similar environments such as:
-
in kitchens – for employees in shops, offices and other commercial areas;
on agricultural property; -
by customers in hotels, motels and other residential facilities;
- in bed-and-breakfast establishments. The appliance is not intended for purely commercial use.
Before use
The appliance may only be used for the intended purpose according to these operating instructions. Therefore, carefully read the instruction manual before operating the appliance. It contains instructions for using, cleaning and caring for the appliance. We accept no liability for any damages caused if this manual is not observed. Keep the operating manual in a safe place and pass it on to any subsequent user together with the appliance. Please also note the warranty information at the end. The appliance is not intended for commercial use, but only for the preparation of household quantities of food.
Observe the safety information when using the appliance.
Technical data
Rated voltage: 220 - 240V 50 - 60Hz
Power consumption: 900 W
Protection class: II
Safety instructions
- Only connect the appliance to earthed wall sockets that have been installed in accordance with the regulations. The cable and plug must be dry.
- Do not pull or clamp the connecting cable over sharp edges. Do not leave it dangling and protect it from heat and oil.
- Do not place the appliance on hot surfaces, such as on hotplates or similar areas, and do not operate near naked flames.
- Never pull the mains plug out of the socket by the cable or with wet hands.
- Do not reach into the appliance when it is in operation.
- Also keep long hair, for example, away from the filling opening.
- Do not insert any objects such as spoons into the filling opening when the appliance is in operation.
- Do not move the appliance during operation.
- The appliance is not suitable for finely chopping or grating nuts, chocolate or similar ingredients.
-
Stop using the appliance and/or pull out the mains plug immediately if: the appliance or mains cable is damaged.
-
you suspect that there is a defect after the appliance has fallen or suffered a similar incident.
-
In such cases, arrange for the appliance to be repaired.
-
We accept no liability for any damages caused as a result of misuse, incorrect operation or improper repairs. Claims under warranty are also excluded in such cases.
The appliance is not intended for commercial use.
- The appliance is only designed for household use indoors.
The maximum uninterrupted operating time at high speed is 2 minutes. - You must allow the motor to cool down completely between two subsequent operating cycles.
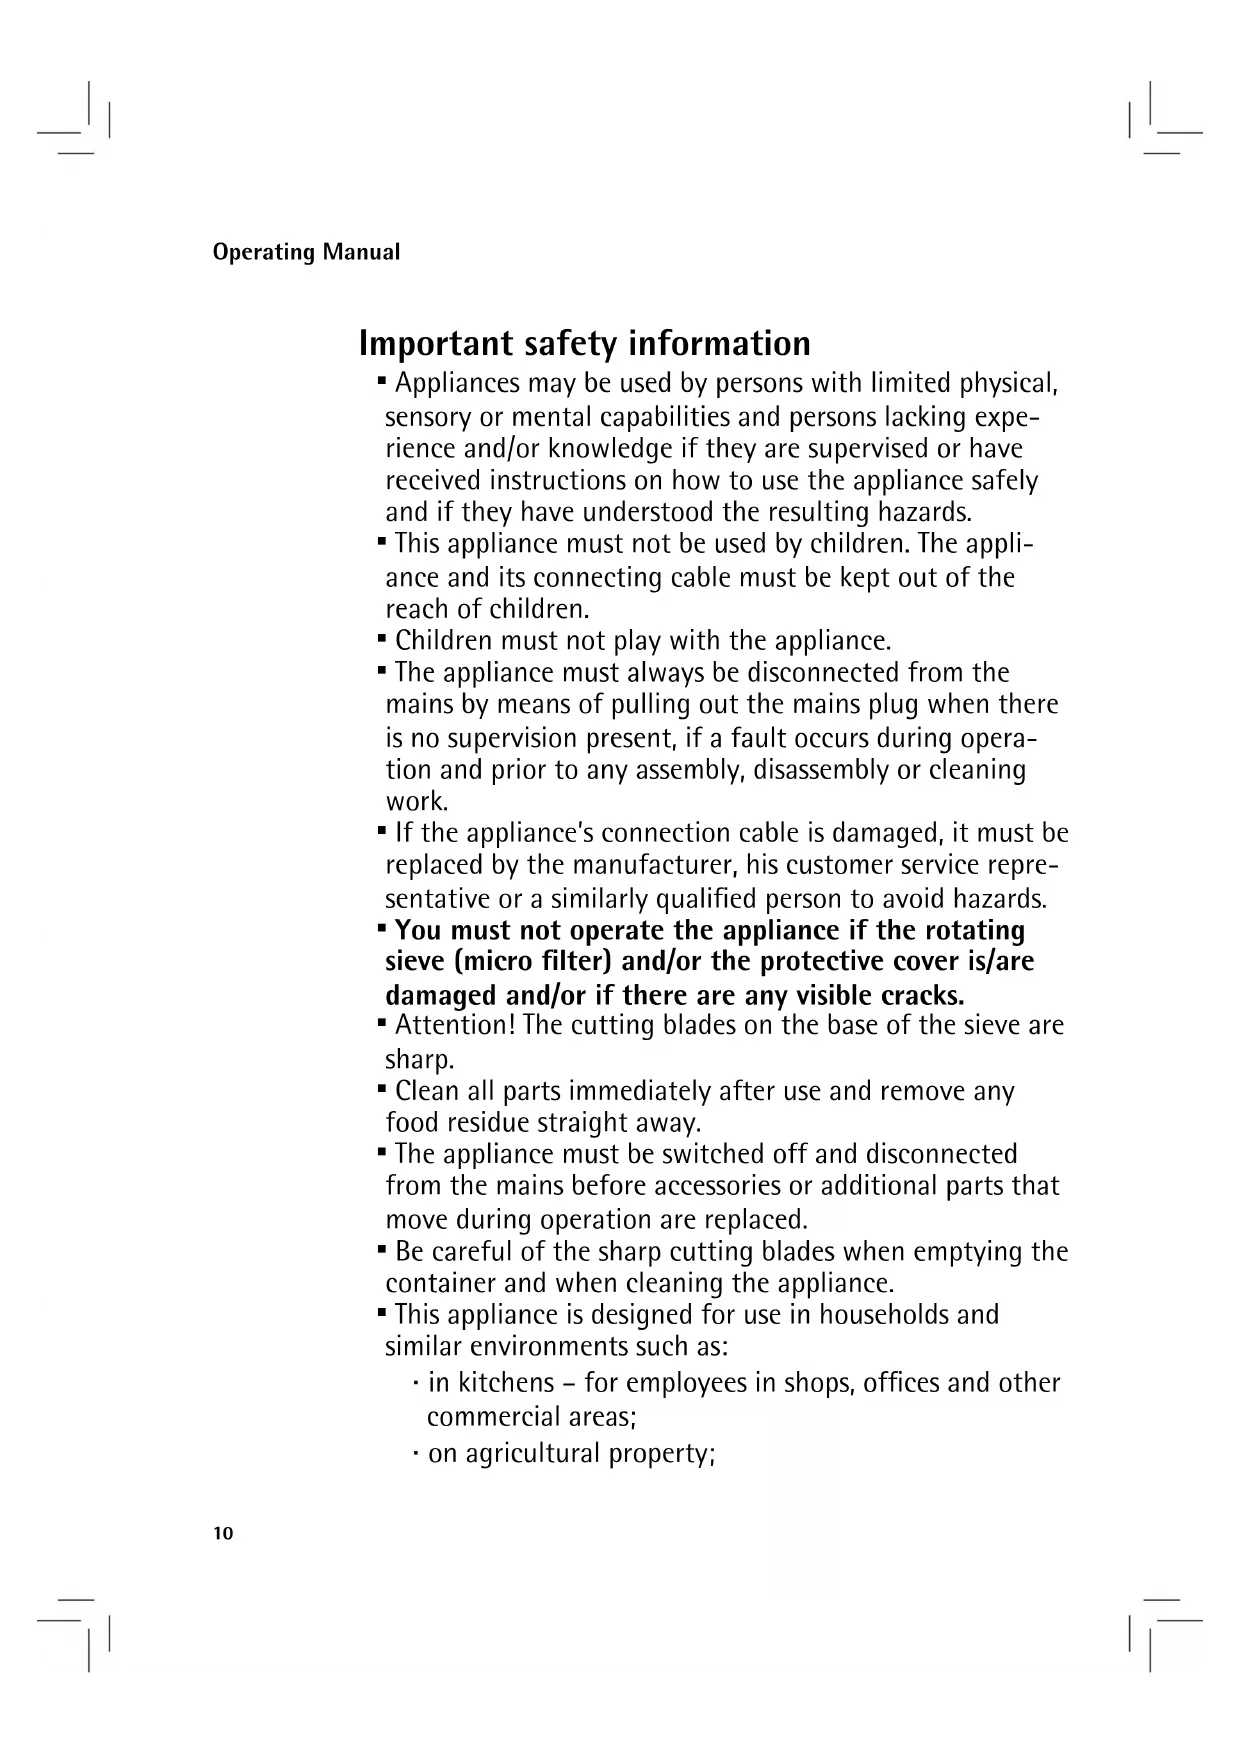
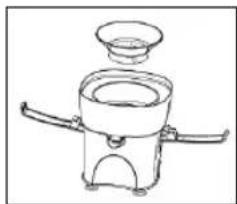
Appliance assembly
| 1 | Small stopper 8 Safety lock | ||
| 2 | Large stopper 9 Motor base | ||
| 3 | Lid with filling opening | 10 | Non-slip feet |
| 4 | Micro filter 11 Drive axle | ||
| 5 | Pulp container 12 On/off switch with 2 | speed | levels |
| 6 | Drip stop 13 Cable storage | ||
| 7 | Juice spout | ||
Starting up the appliance
Clean all the removable parts before using the appliance for the first time. Ensure that you do not injure yourself on the sharp blade.
- Switch the on/off button to 0 to switch the appliance off.
- Remove the required length of cable from the appliance cable storage.
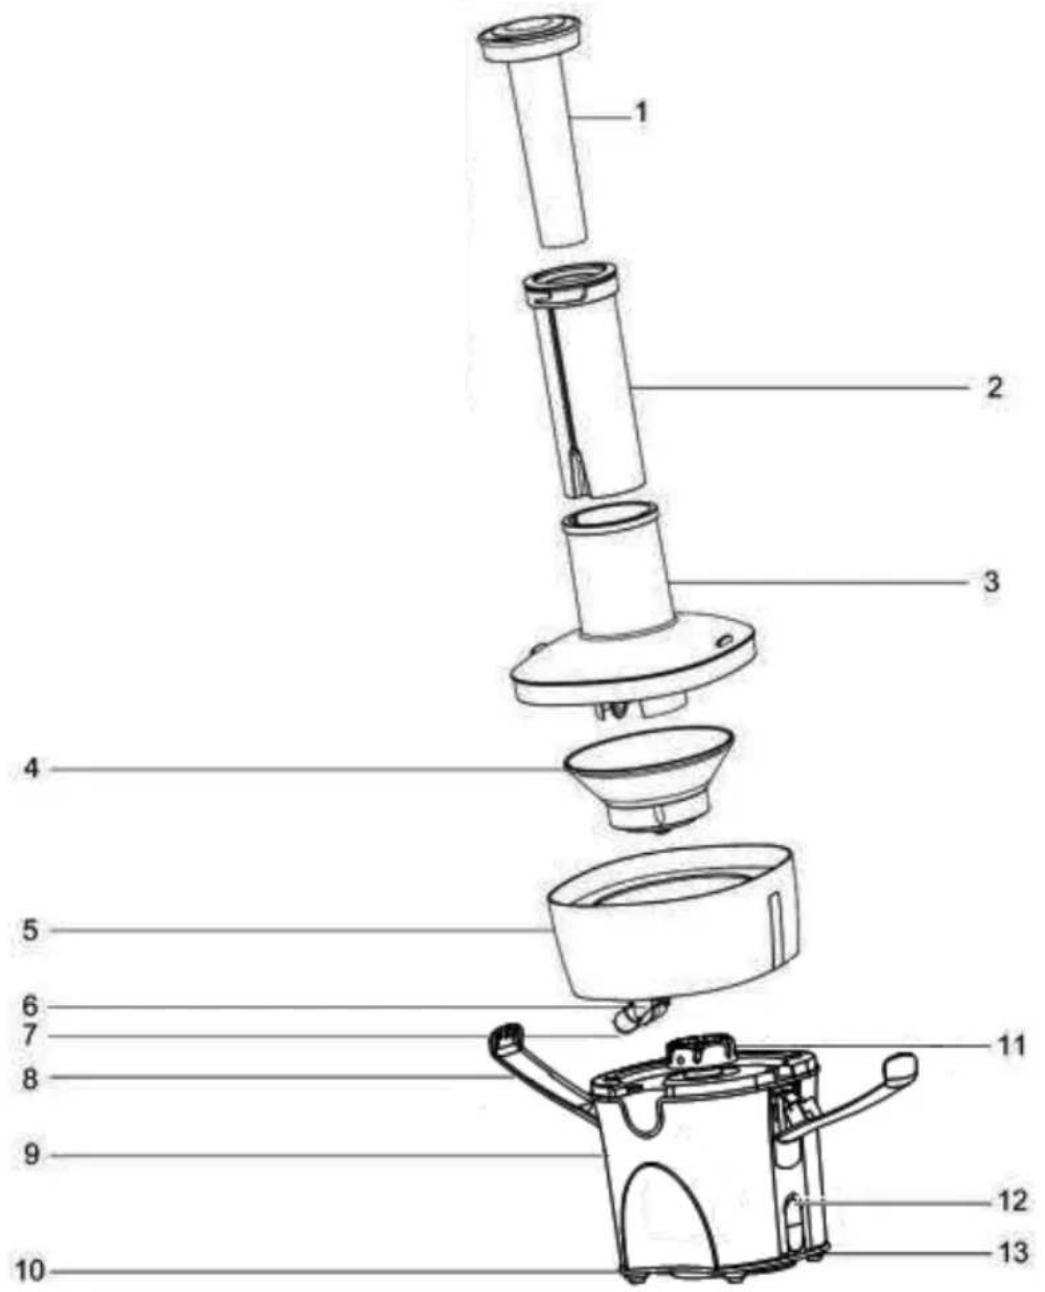
- Place the pulp container (5) on the motor base (9).
- Place the micro filter (4) on the drive axle (11); you can hear the micro filter (4) lock into place.
Each time before using the appliance, check if the micro filter (4) is damaged. If you notice any cracks or other damage you must not use the appliance until the micro filter (4) has been replaced.
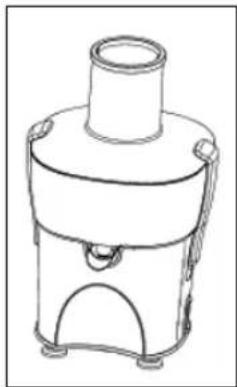
- Place the lid with the filling opening (3) on the appliance.

Then fasten both safety locks (8) on the lid (3) by pushing them upwards until you hear them lock into place.
-
Place a catch container below the juice spout (7).
-
Note: The appliance only functions when all the parts are completely and correctly assembled and when the safety lock (8) on the lid has locked correctly into place.
-
Wash the required fruit/vegetables and chop them into small pieces so that they fit in the filling opening (3) without getting stuck.
-
Fold the juice spout (7) downwards so that the drip stop (6) is not active.
-
Connect the mains plug to a mains socket and switch the on/off button to the required position.
-
Level 1: For soft fruit and vegetables such as watermelon, grapes, tomatoes, cucumbers and raspberries.
-
Level 2: For all types of fruit and vegetable.
-
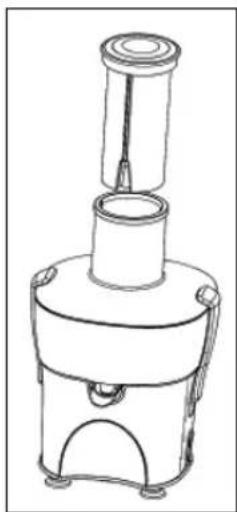
Insert the chopped pieces of fruit and vegetable into the filling opening (3).
Depending on the size of the food pieces use the small (1) or large (2) stopper.
- Press the stopper (1 or 2) downwards slowly and steadily in order to obtain as much juice as possible.
If you press too hard this can hamper the quality of the juice. It can also cause the micro filter (4) to stop and can damage it.
Attention: You must always keep your hands, spoons or other objects (e.g. hair, items of clothing, brushes and cloths) away from the filling opening (3) when the mains plug is in the mains socket.
- Once you have juiced all the pieces of fruit and vegetable and no more juice is running into the juice jug, switch the appliance off and pull out the mains plug. Wait until the micro filter (4) stops rotating.
- If the motor sticks, rotates slowly or stops during operation, switch the appliance off immediately and pull the mains plug out of the mains socket. Remove the micro filter and clean it immediately.
General information
- Pineapples, beetroot, celery, cucumbers, carrots, spinach, melons, tomatoes, pomegranates, oranges and grapes are all suitable for juicing.
- Very hard and/or fibrous fruit and vegetables such as sugar cane are not suitable for use in the juicer.
- Fruits with a thick consistency such as bananas, papayas, avocados, figs and mangos are not suitable for use in the juicer. To process these fruits, use a food processor or a blender.
- To obtain as much juice as possible, press the stopper (1 or 2) downwards slowly and with very little pressure.
- Make sure that the pulp container (5) and the catch container do not overfill, otherwise the appliance may not work properly.
Cleaning and care
After use turn the appliance off and pull out the mains plug. Wait until the micro filter stops rotating.
Under no circumstances should you immerse the motor base (9) in water. Simply wipe the outside with a damp cloth. Do not use any abrasive cleaning agents.
Remove the stopper (1 or 2) and then open the safety lock (8). Remove the lid with the filling opening (3) and carefully remove the micro filter (4). Now remove the pulp container (5).
Clean the lid (3), pulp container (5) and micro filter (4) with a brush in warm rinsing water. Then rinse the parts thoroughly under running water.
Make sure you do not touch the blade and always hold the micro filter by its edge.
For UK use only
-
This product is supplied with a 13 A plug conforming to BS 1363 fitted to the mains lead. If the plug is unsuitable for your socket outlets or needs to be replaced, please note the following. If the plug is a non-rewireable one, cut it from the mains lead and immediately dispose of it. Never insert it into a socket outlet as there is a very great risk of an electric shock.
-
The replacement of the plug at the mains lead has to be done according to the following instructions:
Important: The wires in this mains lead are coloured in accordance with the
following code:
blue
Neutral
brown
Live
As the colours of the wires in the mains lead of this
appliance may not correspond with the coloured markings
identifying the terminals in your plug, proceed as follows:
- the wire which is coloured blue must be connected to the terminal which is marked with the letter N or coloured black,
- the wire which is coloured brown must be connected to the terminal which is marked with the letter L or coloured red.
Do not connect any wire to the terminal which is marked
with the letter E or by the earth symbol ± , or coloured green or green and yellow.
- If a 13 A (BS 1363) plug is used it must be fitted with a 13 A fuse conforming to BS 1362 and be ASTA approved. If any other type of plug is used, the appliance must be protected by a 10 A fuse either in the plug or adapter or at the distribution board.
If in doubt - consult a qualified electrician.
- Never use the plug without closing the fuse cover.

The appliance complies with the European directives 2006/95/EC,2004/108/EC and 2009/125/EC.
This product may not be disposed of with the normal household waste at the end of its service life but must be delivered to a collecting point for recycling electrical and electronic appliances. The materials are reusable in accordance with their identification. You will make an important contribution to the protection of our environment by recycling used appliances.
Please ask about the responsible disposal point at your community offices.
Subject to change