USER MANUAL A3425FTRVS ETNA
When you have read these instructions for use, you will quickly be aware of all the facilities the appliance can offer you. You can read about safety and how you should look after the appliance. In addition you will find environmental tips and instructions that can help to save energy.
Keep the instructions for use and the installation instructions. Any later user of this appliance could benefit from them.
Enjoy your cooking!
Table of contents
■Appliance description 19
For your safety. 20
Things to watch for 20
Before use of the oven 20
Control 21-25
Use of the oven 21
Ovenfunctions 21-22
Timer clock. 23
Switching clock 23
Electronic programming clock. 24-25
Use 26-29
Baking tips 26
Baking table. 27
Roasting 28
Grilling. 29
Browning 29
■ Maintenance 30
Cleaning. 30
Assembly 31
Removing the oven door. 31
Cleaning the interior glass 32
Installation 33
Disposal of packaging and appliances 34
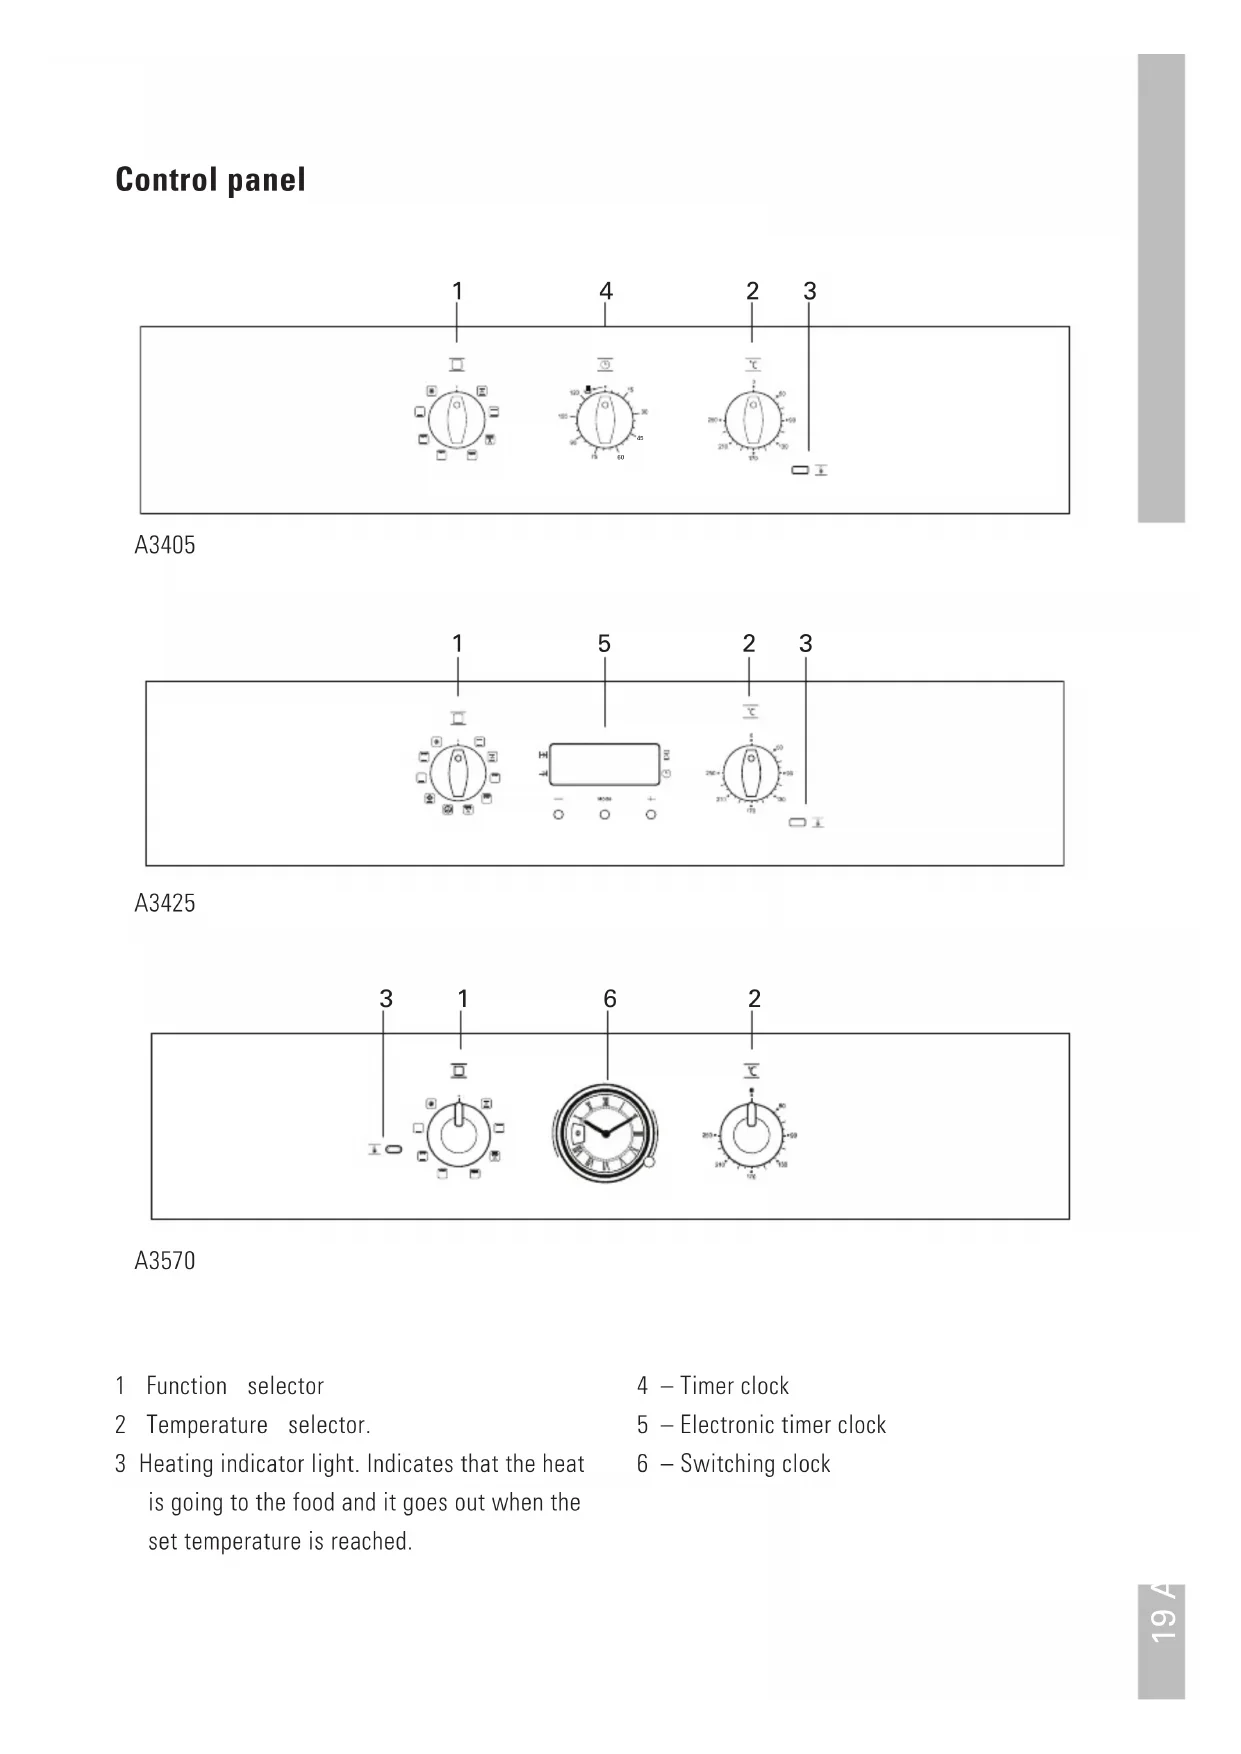
Control panel

A3405

A3425
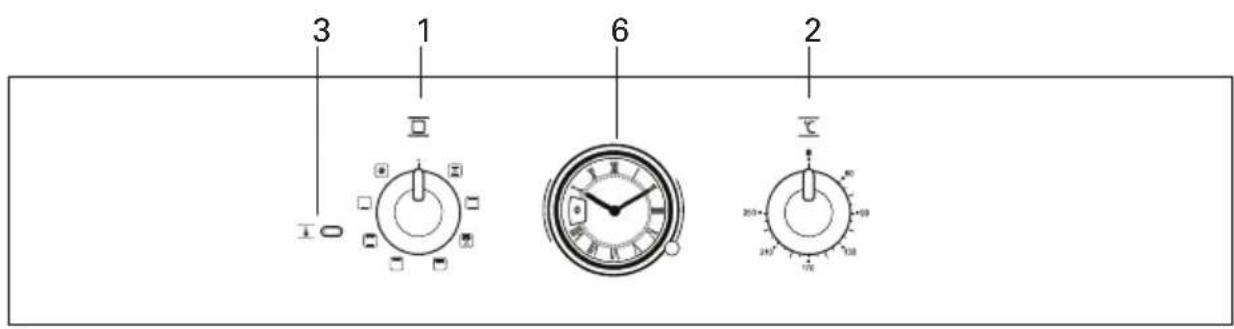
A3570
1 Function selector
2 Temperature selector.
3 Heating indicator light. Indicates that the heat is going to the food and it goes out when the set temperature is reached.
4 - Timer clock
5 - Electronic timer clock
6 - Switching clock
Things to watch for
The appliance should only be connected by a qualified fitter (see electrical connection).
- Disconnect the appliance before starting with cleaning or reparation. Preferably by taking the plug out of the socket or by turning off the mains switch.
The glass oven door can heat up when using the oven at maximum temperature for a long time (e.g. during grilling). Act with care if children are nearby.
Grease and oil are flammable when overheated. Stay near the cooker when preparing dishes.
Cords to electrical appliances - e.g. a mixer - can get caught between the door of the convector oven or may accidentally touch the cooking zones.
Always grill with a closed oven door.
Always cool the oven with a closed oven door.
Before use of the oven
Prepare for use
- Remove all accessories from the oven and clean them thoroughly using a dish-washing detergent. Switch on the closed, empty oven at the maximum temperature for about thirty minutes, after which the grilling element should be switched on for a period of fifteen minutes. Let the oven cool off and clean it with warm water.
Please note:
When the oven is heated to a high temperature for the first time, you will smell a "new appliance" odour. This is to be expected.
No aluminium foil on the oven base
- Never cover the base of the oven with aluminium foil and do not put baking tins on the base of the oven. The foil will block the heat, damaging the enamel, and the baking result will therefore not be satisfactory.
Spilled foods with sugar or fruit juices, such as prune juice or rhubarb, may affect the colour of the enamel. Spills of this type should be cleaned immediately.
Use of the oven
1 Select a temperature and a cooking function.
2 Set the selectors in position '0' to switch off the oven.
Ovenfunctions
A3405


A3425


A3570


Conventional
It is used for sponges and cakes where the heat received must be uniform to achieve a spongy texture.

Conventional with fan
Appropriate for roasts and cakes. The fan spreads the heat uniformly inside the oven. With this function you can also defrost food. To do this, set the temperature selector in position '0'.

Grill
For preparing dishes with superficial roasting. It allows the outer layer to be browned without affecting the inside of the food. Ideal for flatfood, such as steaks, ribs, fish and toast.

Maxi-grill
Allows greater surfaces to be prepared. Due to the higher power, the time required for browning the food is reduced.

Grill with fan
The ventilator distributes the heat radiated by the grill element throughout the oven. Allows uniform roasting at the same time as surface browning. Ideal for large volume pieces, such as poultry, game etc. It is recommended to put the item on a rack with a tray beneath to collect the stock and juices.
Caution
While using the Grill, Maxi-grill or Grill with fan, the door must be kept closed.

Hot air
The fan in the back of the oven blows hot air into the oven. This is used to heat the dishes. You can use several levels at the same time, thus saving energy. The hot air system is highly suitable for baking cakes, cookies and apple pie.

Pizza
Special for cooking pizzas, pasty and fruit cakes.

Lower element
Heats only from beneath. Suitable for heating dishes and raising pastry and similar.

Grill with lower element
Special for roasts. It can be used for any piece, whatever its size.

Defrosting
This cooking mode is suitable for gently defrosting food.
Note
The pilot light remains on in any cooking function.
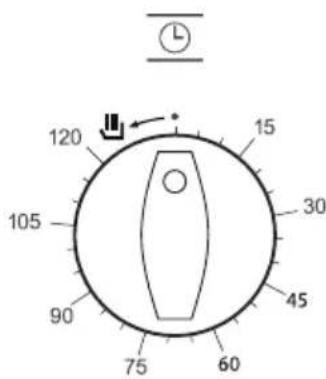
Timer clock
The timer clock can be used to switch off the oven after the set time has elapsed.
Manual operation
1 Turn the timing switch to the left to the position.
2 Select a temperature and a cooking function.
3 Set the selectors in position '0' to switch off the oven.
Using the timer switch
Allows cooking during a pre-established time. To do this:
1 Select a function and a cooking temperature.
2 Turn the timer control clockwise as far as the position '120 minutes' and then turn it backwards to the required cooking period.
3 When the time has finished, there will be an acoustic signal and the oven will stop heating.
4 Set the selectors in position '0' to switch off the oven.
Switching clock
The switching clock displays the current time. The switching clock can also be used to switch off the oven after the set time has elapsed.

Setting the time of day
Pull and turn the clock control (A) at the same time in counter - clockwise direction until the clock hands mark the correct time.
Manual operation
1 Turn the clock control (A) in counter - clockwise direction until you see 'I' in the display.
2 Select a temperature and a cooking function.
3 Set the selectors in position '0' to switch off the oven.
Programming Cooking Time
1 Turn the clock control (A) in counter - clockwise direction until the desired cooking time in minutes is reached.
2 Select a cooking function and temperature.
3 When the set time ends, the oven will turn off and an alarm will sound.
4 To turn off the alarm, turn the clock control in counter - clockwise direction until you see '0' in the display.
5 Set the selectors in position '0' to switch off the oven.
Electronic programming clock
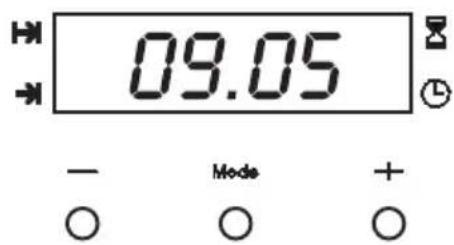
Setting the time on the clock
On connecting the oven, you will notice that '12:00' appears in the display and that a light begins to flash next to the symbol. By pressing the + and - buttons, the correct time can be set on the clock, which is subsequently stored and the flashing light goes out.
Manual use
After setting the correct time, the oven is ready for use. Select a temperature and a cooking function.
To switch off the oven, set the selectors to the position '0'.
Warning function
1 Press the MODE button until the signal next to the symbol z begins to flash.
2 Choose the time when you want the alarm to sound, pressing the "+" or "-" button.
3 Subsequently, the light will remain on, indicating that the alarm is programmed.
4 At the end of the programmed time, an alarm will sound and the light will begin to flash.
5 Press any button to turn off the alarm. The light goes out and the screen shows the current time again.
Programming the cooking time
1 Press the MODE button until the indicator next to the symbol begins to flash.
2 Select the length of the cooking time by pressing the +^ or - button.
3 Subsequently, the indicator that was flashing will light, indicating that the oven will switch itself off automatically.
4 The display will then show the current time.
5 Select a temperature and cooking function.
6 When the set time has elapsed, the oven will switch off, an alarm will sound and the indicator will begin to flash.
7 Press any button to switch off the alarm, the oven switches on again.
8 Set the selectors in the position '0' to switch off the oven.
Programming the end of cooking time
1 Press the MODE button until the indicator next to the symbol begins to flash.
2 Select the time that the cooking has to end by pressing the ^ 喜 + ^ 喜 or " button.
3 Subsequently, the indicator that was flashing is lit, indicating that the oven will switch itself off automatically.
4 The display will now show the current time.
5 Select a temperature and cooking function.
6 When the programmed time is reached, the oven will switch off, an alarm will sound and the indicator will begin to flash.
7 Press any button to switch off the alarm and the oven will switch on again.
8 Set the selectors in the position '0' to switch off the oven.
This function may be used even though you are already cooking in your oven. To do so, follow the instructions given except N^5 .
Programming the duration and automatic stop
1 Press the MODE button until the indicator next to the symbol begins to flash.
2 Select the length of the cooking time by pressing the "+" or "-" button.
3 Subsequently, the indicator that was flashing will remain lit.
4 Press the MODE button again until the indicator above the symbol begins to flash.
5 Select the time that the cooking has to end by pressing the "+" or "-" button.
6 Subsequently, the indicator that was flashing will remain lit.
7 Select a function and cooking temperature.
8 The oven will remain switched off. The indicators next to the and symbols lit. Your oven is programmed.
9 When the programmed time is reached, the oven will switch itself on and will continue cooking during the programmed time.
10 When the programmed finishing time is reached, the oven will switch off, an alarm will sound and the light next to the symbol will begin to flash.
11 Press any button to switch off the alarm and the oven will switch on again.
12 Set the selectors to the position '0' to switch off the oven.
Caution
Pressing the MODE button, the display on the screen will show any function programmed. It can be changed by pressing the +^ or - button. By selecting the desired function, the indicator next to the corresponding signal will light.
In the event of a power cut, all the programming of the electronic clock will be erased. If you connect the oven again, you will notice that '12:00' appears in the display. The correct time has to be set.
Switching off the time of day
To switch off the time of day, press two buttons at the same time and, after several seconds the screen of your clock will go out. To switch on the time of day, press any button and the current time will appear again.
This function can only be used when the clock shows the current time and there is no function programmed (no function symbol is lit). Press any button to switch on the time of day again.
Baking tips
Oven levels
Depending on the height of the pastry or cookies, place the baking sheet on the second or third level from the bottom. Tins should be placed on a rack on the first or second level from the bottom.
Tins are important
In particular in ovens with upper and lower heating elements, the material from which the tin is made is extremely important. The best tins are made from black tin or are lined with a special synthetic material: these tins absorb the heat the quickest and can shorten the baking time.
How to test whether or not a cake is cooked
Prick a skewer into the cake at its thickest point about 10 minutes before the end of the given baking time. If the skewer remains dry and no cake mixture sticks to it you can turn off the oven and use the residual heat to let the cake cook thoroughly.
The cake has not risen proper
Use less liquid next time, or set the oven to a temperature 10^ lower. You should adhere exactly to the mixing times given in your cookery book.
The cake has risen beautifully at the edges but sunk in the middle
Do not grease the sides of the cake tin. Loosen the cake carefully with a knife after baking.
The cake is too dark on the top
Put the cake on a lower ridge in the oven, set a lower temperature, bake the cake for a little longer and, perhaps, use black baking tins.
The cake is too dark on the bottom
Put the cake on a higher ridge in the oven and set a lower temperature.
The souffle is much too dark on top
Remove the crust. Grill the top for a moment to give a golden brown crust to the souffle. Do not use Parmesan cheese: this type of cheese browns too quickly and will taste bitter. Next time put the dish a little lower in the oven and set the temperature 10^ lower.
The biscuits stick to the baking sheet
Slide the baking sheet back into the oven for a moment and then remove the biscuits immediately.
The cake will not turn out of the tin
Carefully loosen the edge with a sharp knife. Turn the tin upside down again and cover with a cold, damp cloth a couple of times. Next time grease and flour the tin well.
Table for baking
| Dish temp ridge time in °C level min. in °C | in temp level min. | ridge time in | | | | |
| Cakes and Biscuits |
| Fruit cake 150 2 70 - 80 | 160 1 | 70 - 80 | | | | | |
| Walnut gateau 150 2 | 60 - 70 | 1 60 - 70 | | | | | |
| Fruit sponge | 150 | 2 | 35 - 40 | | 180 | 1,2 | 35 - 40 |
| Sponge flan | 150 | 2 | 25 - 30 | | 180 | 1 | 15 - 20 |
| Shortbread | 150 | 2 | 50 - 60 | | 160 | 1 | 50 - 60 |
| Biscuits | 150 | 1,2,3 | 15 - 25 | | 180 | 2 | 10 - 15 |
| Meringues | 120 | 1,2,4 | 40 - 50 | | 130 | 2 | 30 - 50 |
| Pastries |
| Flan pastry | 150 | 2 | 20 - 25 | | 180 | 1 | 15 - 20 |
| Shortcrust pastry | 150 | 2 | 20 - 25 | | 180 | 1 | 20 - 25 |
| Puff pastry | 170 | 1 | 20 - 25 | | 200 | 1,2 | 15 - 20 |
| Choux pastry | 160 | 1,3 | 25 - 30 | | 190 | 2 | 20 - 25 |
| Paté sucree | 160 | 2 | 25 - 30 | | 180 | 1 | 25 - 30 |
| Yeast baking |
| Bread | 160 | 2,3 | 40 - 50 | | 190 | 2,3 | 40 - 50 |
| Pizzas | 180 | 2,3 | 25 - 30 | | 190 | 2,3 | 20 - 25 |
| Fruitloaf | 160 2 | 80 - 95 170 | 2 80 - 95 | | | | |
| Croissants | 220 | 2,3 | 20 - 25 | | 230 | 2 | 20 - 25 |
| Chelsea buns | 180 | 2,3 | 25 - 30 | | 190 | 2,3 | 25 - 30 |
The figures in this table are guidelines.
The times will vary depending on the type and quantity of food being baked.

Roasting
If the meat is covered when roasted, e.g. in a casserole, it will retain its juices and little or no smoke will develop. When roasted in an open roasting tin it will brown and crisp more quickly. The oven's roasting tin is ideal for roasting large joints.
The table below applies only when you put the dishes into a cold oven. When using top and bottom heat the dishes should be put on to the second ridge.
Roasting table
| Meat weigh in kg temp in °C time in mins. | | |
|
| Pork | 1,0 | |
| Beef | 1,0 | |
| Veal | 1,0 | |
| Spring Chicken 1,0 180 - 200 60 | | |
| Chicken | 1,3 | 170 - 190 75 |
| Duck | 1,5 | 150 - 170 90 |
| Goose | 3,0 | 170 - 190 160 - 180 |
| Turkey | 2,0 | 160 - 180 110 - 130 |
| Turkey | 3,0 | 160 - 180 150 - 180 |
| Venison | 1,5 | 170 - 190 90 |
| Fish (whole) | 1,0 160 - 180 50 | |
The figures in this table are guidelines.

Grilling
Place the roasting sheet on the lowest level in the oven.
Place the grill sheet in the middle of the oven (see table).
- Close the door and turn the knob to the grill setting.
Dark meat such as beef, game and mutton, will brown more quickly than light meat, such as veal, pork and poultry. Light meat and fish filets will not be as brown on the outside, even when they are done to juicy perfection on the inside.
Smoke caused by burning grease will often develop when meat is grilled directly on the rack. The smoke development can be minimised by filling the roasting sheet with water and placing it underneath the grill rack. This will, of course, result in increased condensation.
Browning
To brown and crisp the outside of meat, switch the grill element on for a few moments. Wait until the top is golden brown; turn the food without pricking it.
Small pieces of meat
Grilled meat will retain its natural flavour if it is not coated with oil before grilling.
Large pieces of meat
These are best brushed with a thin coating of oil or butter to prevent the surfaces exposed to the heat from drying out.
Time table for surface grilling
| Grill meat ridge level time in mins. | | |
|
| Steak (4 pieces) 3 or 4 5 - 6 | | |
| Schnitzel (4 pieces) 3 or 4 6 - 8 | | |
| Liver (4 pieces) 3 or 4 4 - 5 | | |
| Meat ball (4 pieces) 3 or 4 7 - 9 | | |
| Sausage (4 pieces) 3 or 4 5 - 6 | | |
| Toast 3 or 4 2 - 3 | | |
The figures in this table are guidelines.
Cleaning
Enamelled parts
The inside of the oven door, the side panels, the base of the oven, the baking sheet and the roasting tin are all completely enamelled. These are best cleaned with hot, soapy water or a little liquid detergent; rinse well with clean water.
Chrome
Clean the ridges, the rack and the control panel with hot soapy water or a little liquid detergent, rinse with clean water.
Plastic/glass
Clean the handle and knobs with soapy water or Glassex.
Sealing rubber
Clean with hot soapy water and rinse with clean water.
A tip
Cleaning the oven regularly will prevent stubborn stains. If you want to thoroughly clean the oven, the ledges can be removed.
Removing and refitting the oven door
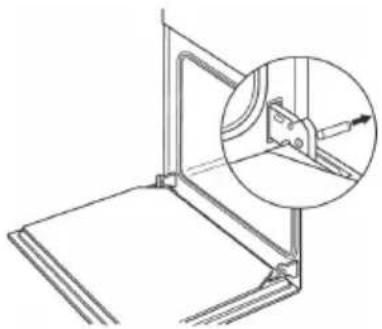
Removing the oven door
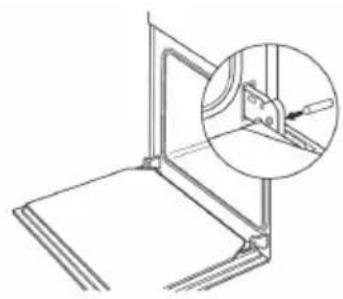
- Open the oven door as far as it will go.
- Insert the locking pins enclosed into the drilled holes of the door hinges.
- Grasp the oven door at both sides and lift it up until it is nearly closed.
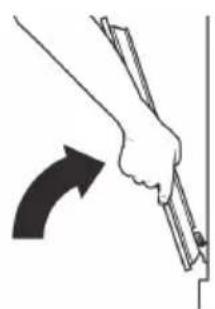
Gently lift the door and pull the hinges forward away from the door opening.
Important! Risk of injury!
Do not pull the locking pins out of the drilled holes! The hinge is under tension. It must also be under tension on installation. Once the pins have been removed it is no longer possible to tension and secure the hinge.
Refitting the oven door
- Grasp the oven door at both sides and slide the hinges into the openings on the oven. The hinge will click into place.
- Slowly open the oven door until it is fully open.
- Remove the locking pins from the drilled holes of the door hinges again.
Cleaning the large interior glass
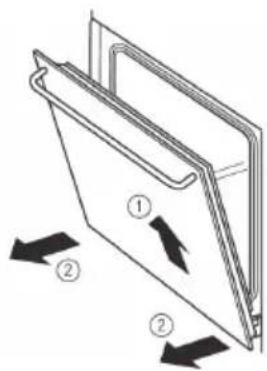
Dismantling the interior glass
- Open the oven door.
- Pull the glass upwards from the bottom (A).
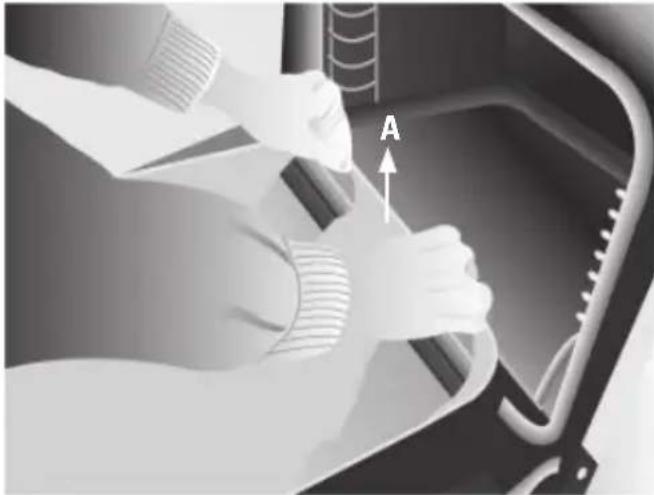
- The interior glass is now free. Remove it.
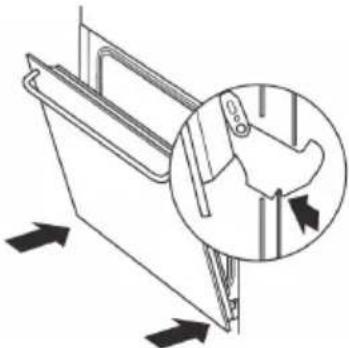
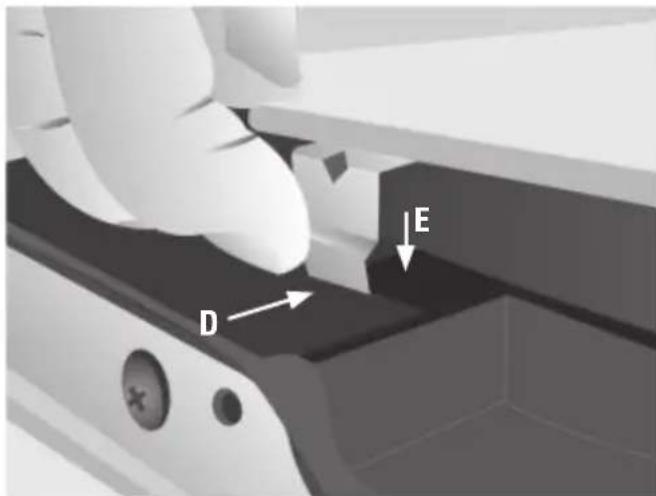
- Lower the glass into the door (C).
- The glass is fixed to the door by pressing the two lower supports (D) while pushing the glass into the door (E).
Warning:
Be careful: the oven door closes when the interior glass is removed.
- Clean the interior glass and the inside of the oven door.
Assembling the interior glass
- Insert the supports on the interior glass into the grooves (B) at the top of the door (with the oven door open).

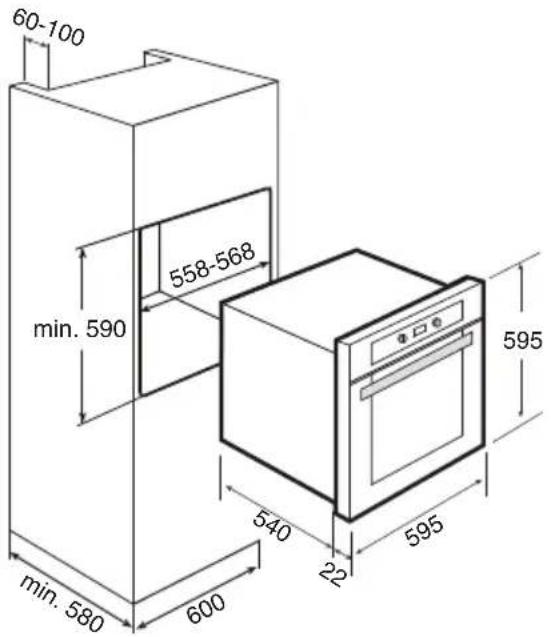
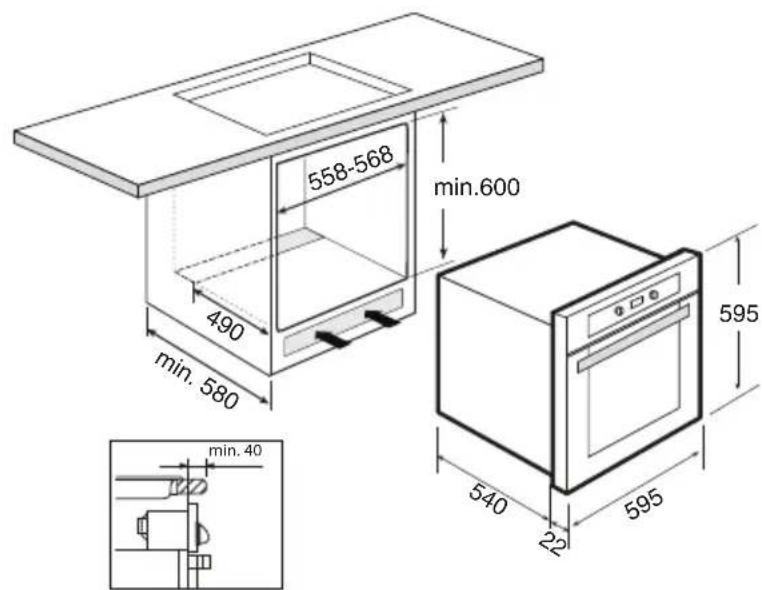
Installation of oven
Having connected the oven to the mains supply, carry out the following steps:
- Place the oven in the cabinet.
- Ensure that the mains cable is neither obstructed nor is resting on the top surface of the oven.
Fix the oven to the cabinet with the 4 screws supplied.
- Check that the oven casing is not in contact with the walls of the cabinet and that there is a gap between them of at least 2mm .
Disposal of packaging and appliances
In the manufacturing of this appliance durable materials were used. Make sure to dispose of this equipment responsibly at the end of its lifecycle. Ask the authorities for more information regarding this.
The appliance packaging is recyclable. The following may have been used:
- cardboard;
polythene film (PE);
CFC-free polystyrene (PS hard foam);
Dispose of these materials in a responsible manner and in accordance with government regulations.

As a reminder of the need to dispose of household appliances separately, the product is marked with the symbol of a crossed-out wheeled dustbin. This means that at the end of its working life, the product must not
be disposed of as urban waste. It must be taken to a special local authority differentiated waste collection centre or to a dealer providing this service.
Disposing of a household appliance separately avoids possible negative consequences for the environment and health deriving from inappropriate disposal and enables the constituent materials to be recovered to obtain significant savings in energy and resources.
This appliance complies the regulations concerning electromagnetic compatibility in directive 89/336/EEC.
Introduction