MVWB880BW Bravos XL - Washing machine MAYTAG - Free user manual and instructions
Find the device manual for free MVWB880BW Bravos XL MAYTAG in PDF.


User questions about MVWB880BW Bravos XL MAYTAG
0 question about this device. Answer the ones you know or ask your own.
Ask a new question about this device
Download the instructions for your Washing machine in PDF format for free! Find your manual MVWB880BW Bravos XL - MAYTAG and take your electronic device back in hand. On this page are published all the documents necessary for the use of your device. MVWB880BW Bravos XL by MAYTAG.
USER MANUAL MVWB880BW Bravos XL MAYTAG
ASSISTANCE OR SERVICE......Back Cover
Table des matières
SÉCURITÉ DE LA LAVEUSE ....19
QUOI DE NEUF SOUS LE COUVERCLE? ......20
TABLEAU DE COMMANDE
ET CARACTÉRISTIQUES ....21
Distributeurs 23
GUIDE DES PROGRAMMES ....24
UTILISATION DE LA LAVEUSE....27
ENTRETIEN DE LA LAVEUSE....30
DÉPANNAGE....32
ACCESSOIRES....38
GARANTIE....39
ASSISTANCE OU SERVICE .... Couverture arrière
Para una version en espanol, visite www.maytag.com

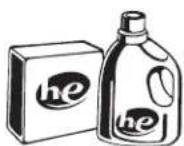
Designed to use only HE High Efficiency detergents.
Your safety and the safety of others are very important.
We have provided many important safety messages in this manual and on your appliance. Always read and obey all safety messages.

This is the safety alert symbol.
This symbol alerts you to potential hazards that can kill or hurt you and others.
All safety messages will follow the safety alert symbol and either the word "DANGER" or "WARNING." These words mean:
DANGER
You can be killed or seriously injured if you don't immediately follow instructions.
WARNING
You can be killed or seriously injured if you don't follow instructions.
All safety messages will tell you what the potential hazard is, tell you how to reduce the chance of injury, and tell you what can happen if the instructions are not followed.
IMPORTANT SAFETY INSTRUCTIONS
WARNING: To reduce the risk of fire, electric shock, or injury to persons when using the washer, follow basic precautions, including the following:
■ Read all instructions before using the washer.
■ Do not wash articles that have been previously cleaned in, washed in, soaked in, or spotted with gasoline, dry-cleaning solvents, other flammable, or explosive substances as they give off vapors that could ignite or explode.
■ Do not add gasoline, dry-cleaning solvents, or other flammable, or explosive substances to the wash water. These substances give off vapors that could ignite or explode.
■ Under certain conditions, hydrogen gas may be produced in a hot water system that has not been used for 2 weeks or more. HYDROGEN GAS IS EXPLOSIVE. If the hot water system has not been used for such a period, before using the washing machine, turn on all hot water faucets and let the water flow from each for several minutes. This will release any accumulated hydrogen gas. As the gas is flammable, do not smoke or use an open flame during this time.
■ Do not allow children to play on or in the washer. Close supervision of children is necessary when the washer is used near children.
■ Before the washer is removed from service or discarded, remove the door or lid.
■ Do not reach into the washer if the drum, tub or agitator is moving.
■ Do not install or store the washer where it will be exposed to the weather.
■ Do not tamper with controls.
■ Do not repair or replace any part of the washer or attempt any servicing unless specifically recommended in this manual or in published user-repair instructions that you understand and have the skills to carry out.
■ See "Electrical Requirements" located in the installation instructions for grounding instructions.
SAVE THESE INSTRUCTIONS
State of California Proposition 65 Warnings:
WARNING: This product contains one or more chemicals known to the State of California to cause cancer.
WARNING: This product contains one or more chemicals known to the State of California to cause birth defects or other reproductive harm.
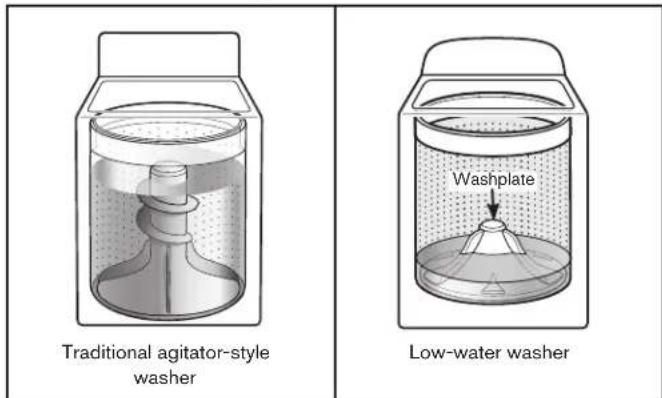
Cleaning with Less Water
text_image
Traditional agitator-style washer Washplate Low-water washerThe most striking difference in your new washer is the low-water washplate wash system. The washer automatically adjusts the water level to the load size—no water level selector is needed.
natural_image
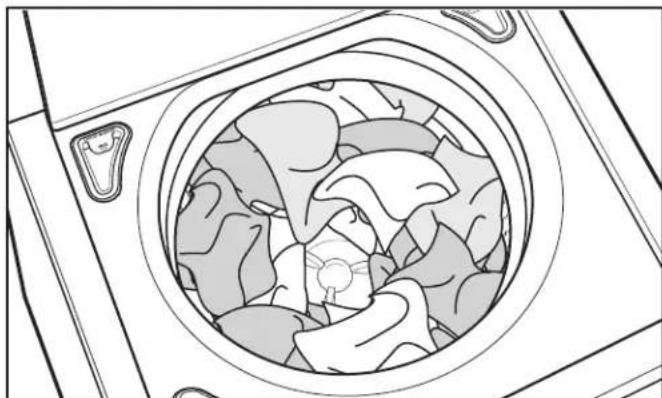
Top-down line drawing of a circular mechanical component with internal layered structure (no text or symbols)Load garments in loose heaps evenly around the washplate. Do not load garments directly over the center of the washplate; when loaded, the center of the washplate should be visible.
natural_image
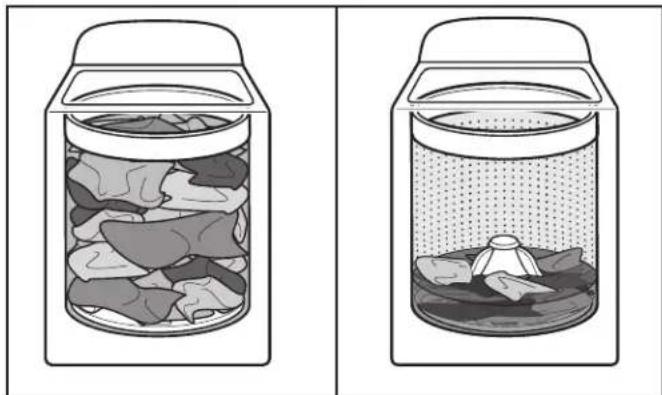
Two diagrams showing a container filled with various food items, one open and one filled with liquid (no text or symbols)As the washer dampens and moves the load, the level of the garments will settle in the basket. This is normal, and does not indicate that more garments should be added.
IMPORTANT: You will not see a washer basket full of water as with your past agitator-style washer. It is normal for some of the load to be above the water line.
INTELLIFILL™ Water Level Control
Once you start the cycle, the lid will lock, and the washer will begin the sensing process to determine the correct water level for the load. You will find a step-by-step description in the "Cycle Status Lights" section.
You will hear the motor turn the basket in short pulses to thoroughly wet the load. This low-water wash method uses less water and energy compared to a traditional agitator-style washer.
Auto Temperature Control
Auto Temperature Control (ATC) regulates incoming hot and cold water, blending the temperatures for optimal and consistent cleaning. The ATC is automatically turned on when a cycle is selected.
Choosing the Right Detergent
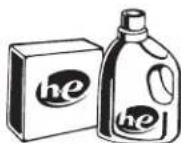
Use only High Efficiency detergents. The package will be marked "HE" or "High Efficiency." Low-water washing creates excessive sudsing with a regular non-HE detergent. Using regular detergent will likely result in longer cycle times and reduced rinsing performance. It may also result in component failures and noticeable mold or mildew. HE detergents are made to produce the right amount of suds for the best performance. Follow the manufacturer's instructions to determine the amount of detergent to use.
Use only High Efficiency (HE) detergent.
Concentrated Cleaning
Low-water cleaning means concentrated cleaning. Rather than diluting detergent as done in an agitator-style washer, this washer delivers the detergent directly to the soils.
Normal Sounds You Can Expect
At different stages of the wash cycle, you may hear sounds and noises that are different from those of your previous washer. For example, you may hear a clicking and hum at the beginning of the cycle, as the lid lock goes through a self-test. There will be different kinds of humming and whirring sounds as the washplate moves the load. And sometimes, you may hear nothing at all, as the washer determines the correct water level for your load or allows time for clothes to soak.
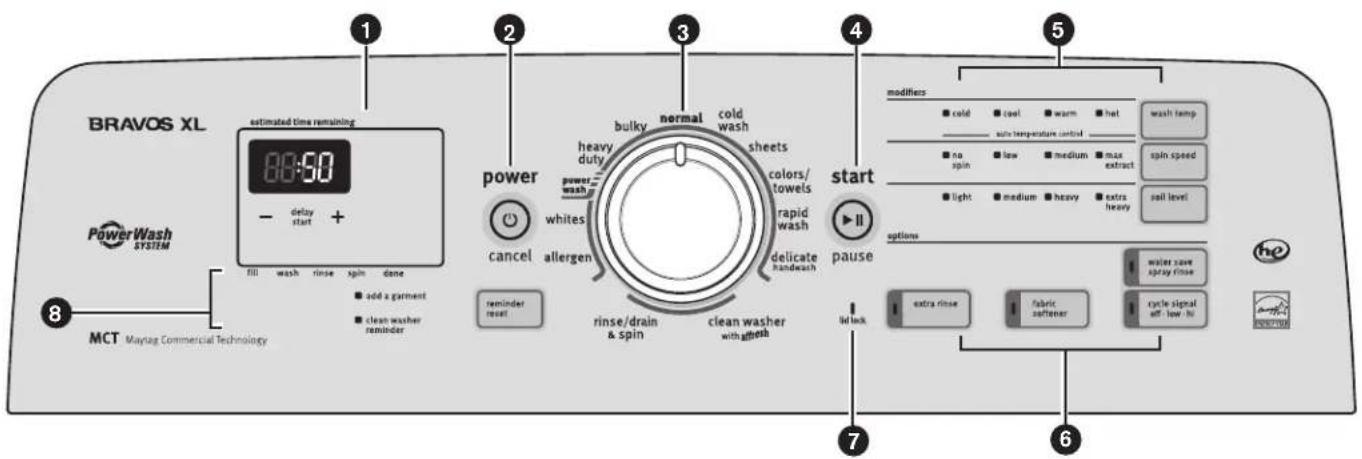
CONTROL PANEL AND FEATURES
text_image
BRAVOS XL PowerWash SYSTEM estimated time remaining 00:50 - delay start + fill wash rinse spin done ■ add x garment ■ clean washer reminder power cancel whites allergen rilinder reset power_wash/ rinsse/drain & spin clean washer with mesh normal heavy duty shells colors/towels rapid wash delicate handwash pause ① ② ③ ④ ⑤ ⑥ ⑦ ⑧ MCT Maytag Commercial Technology ⑦ ⑦ ⑦ ⑦ ⑦ ⑦ ⑦ ⑦ ⑦ ⑦ ⑦ ⑦ ⑦ ⑦ ⑦ ⑦ ⑦ ⑦ ⑦ ⑦ ⑦ ⑦ ⑦ ⑦ ⑦ ⑦ ⑦ ⑦ ⑦ ⑦ ⑦ ⑦Not all features and cycles are available on all models.
1 ESTIMATED TIME REMAINING DISPLAY
The Estimated Time Remaining display shows the time required for the cycle to complete. Factors such as load size and water pressure may affect the time shown in the display. Tightly packed or unbalanced loads, or excessive suds may cause the washer to adjust the cycle time, as well.
2 POWER/CANCEL BUTTON
Press to turn the washer ON or OFF.
3 WASH CYCLE KNOB
Use the Wash Cycle knob to select available cycles on your washer. Turn the knob to select a cycle for your laundry load. See "Cycle Guide" for detailed descriptions of cycles.
4 START/PAUSE BUTTON
Press to start the selected cycle. Be sure all desired Modifiers and Options have been selected. Press START/PAUSE once to unlock the lid and add a garment. Press START/PAUSE again to complete the cycle from where it was stopped. The lid must be closed for the washer to start.
5 CYCLE MODIFIERS
Modifiers allow you to further customize your cycles and save energy. Not all cycles, options, and modifiers are available on all models.
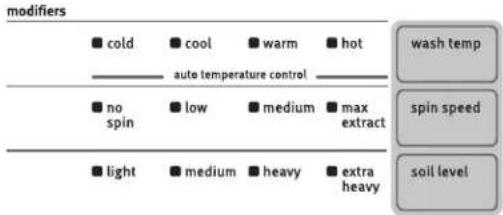
WASH TEMP
Select a water temperature based on the type of load you are washing. Use the warmest wash water suitable for fabrics. Follow garment label instructions.
All cycles use cold rinses. Cold rinses may help with wrinkling and save energy.
NOTE: In wash water temperatures colder than 60°F (15.6°C), detergents do not dissolve well. Soils may be difficult to remove.
SPIN SPEED
This washer automatically selects the spin speed based on the cycle selected. The preset speeds can be changed. Not all spin speeds are available with all cycles.
■ Faster spin speeds mean shorter dry times, but may increase wrinkling in your load.
■ Slower spin speeds mean less wrinkling, but will leave your load more damp.
SOIL LEVEL
Soil Level (wash time) is preset for each wash cycle. As you press Soil Level, the cycle time (minutes) will increase or decrease in the Estimated Time Remaining display and a different wash time will appear.
For most loads, use the Soil Level that is preset with the cycle you have chosen. For heavily soiled and sturdy fabrics, press SOIL LEVEL to select more wash time, if needed. For lightly soiled and delicate fabrics, press SOIL LEVEL to select less wash time, if needed. Lower Soil Level settings will help reduce tangling and wrinkling.
6 CYCLE OPTIONS
When you select a cycle, its default options will light up. Not all cycles, options, and modifiers are available on all models.
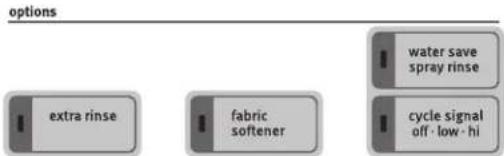
WATER SAVE SPRAY RINSE
Use this option to save water by using a spray rinse instead of a deep water rinse. This option is the default setting on some cycles, and selectable on other cycles. When using fabric softener, always select the FABRIC SOFTENER button, or select EXTRA RINSE; both of these options will dispense fabric softener in a deep rinse.
EXTRA RINSE
This option can be used to automatically add a second rinse to most cycles.
FABRIC SOFTENER
This option must be selected if using fabric softener during a cycle. It ensures that fabric softener is added at the correct time in the rinse for even distribution.
CYCLE SIGNAL
Use this option to adjust volume of the signal that sounds at end of cycle. You may select Hi, Low, or Off (no indicator lit). A louder signal is helpful in removing items as soon as cycle is complete.
You may also add or remove options for each cycle. Not all options can be used with all cycles, and some are preset to work with certain cycles.
To turn Button Sounds either Off or On:
Button Sounds can be turned off or on by holding down the Cycle Signal button for 5 seconds. The washer will make a single short beep/tone when complete. This function can be completed at any time during the washer's operation, but not in STANDBY.
When the Button Sounds function is set to Off:
- Invalid key selection tones (3 short beeps/tones) will still remain active, but will sound at the "SOFT" volume level.
All Valid key selection tones (1 short beep/tone) are disabled including Power/Cancel and End of Cycle signal, as well as the chime that is produced when turning the cycle knob past NORMAL.
NOTE: The chosen setting will remain in effect through a power loss.
7 LID LOCK INDICATOR
This light indicates that the lid is locked and cannot be opened. If you need to open the lid, press START/PAUSE. The lid will unlock once the washer movement has stopped. This may take several minutes if the load was spinning at high speed. Press START/PAUSE again to restart the cycle.

start

pause
8 CYCLE STATUS LIGHT INDICATORS
The Cycle Status Lights show the progress of a cycle. At each stage of the process, you may notice sounds or pauses that are different from traditional washers.
FILL
When the Start/Pause button is pressed, the washer will add a small amount of water to the load, then pause for a few seconds. The lid will then lock and the washer will continue to fill.
WASH
You will hear the motor and washplate moving the load. It is normal for some of the load to be above the water line. Low-water cleaning means concentrated cleaning. Rather than diluting detergent as done in an agitator-style washer, this washer delivers the detergent directly to the soils. The motor sounds may change at different stages in the cycle. The wash time is determined by the selected Soil Level.
RINSE
You will hear sounds similar to the wash cycle as the washer rinses and moves the load. You may hear the motor turning on briefly to move the basket while filling. Fabric softener will be added if the Fabric Softener option was selected. Some cycles use spray rinsing.
SPIN
The washer spins the load at increasing speeds for proper water removal, based on the selected cycle and spin speed.
DONE
Once the cycle is complete, this light will come on. Remove the load promptly for best results.
ADD A GARMENT
You may place additional clothing in the wash when the Add a Garment indicator is lit without sacrificing wash performance. Press START/PAUSE once. The Lid Lock light will turn off. Open the washer lid, add garments and close the lid. Press START/PAUSE to restart.
CLEAN WASHER REMINDER
The Clean Washer Reminder indicator lights after 30 wash cycles without a clean washer cycle. See the "Washer Care" section to run the clean washer cycle, or you can press REMINDER RESET button to manually reset clean washer cycle counter.
DISPENSERS
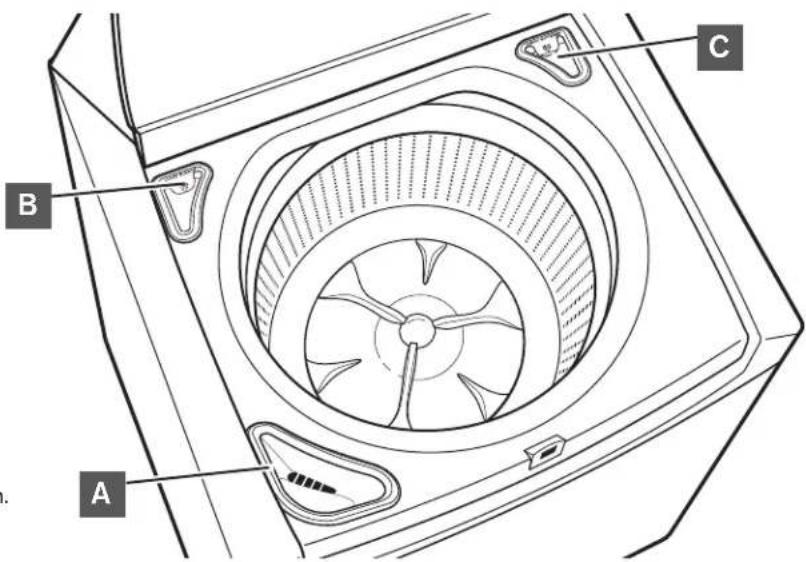
High Efficiency "HE" detergent dispenser
Add liquid or powdered HE detergent product to this dispenser for your main wash cycle.
Use only High Efficiency (HE) detergent.
B Liquid chlorine bleach dispenser
This dispenser holds up to 3/4 cup (180 mL) liquid chlorine bleach. The bleach will be automatically diluted and dispensed at the optimum time during the wash cycle. This dispenser cannot dilute powdered bleach. Use the liquid chlorine bleach dispenser for liquid chlorine bleach or color-safe bleach.
text_image
A B CLiquid fabric softener dispenser
Pour measured liquid fabric softener into the liquid fabric softener dispenser, if desired. It will dispense automatically at the optimum time when the Fabric Softener option is selected.
■ Use only liquid fabric softener in this dispenser.
■ Do not overfill. Do not dilute. The dispenser holds 3 oz (94 mL), or a capful of fabric softener.
■ Fabric softener is dispensed in a deep rinse when the Fabric Softener option is selected. If Extra Rinse is selected, the fabric softener will be dispensed during the final rinse.
■ Do not use fabric softener dispensing balls in this washer. Dispensing balls will not operate correctly with this washer.
■ Do not spill or drip any fabric softener onto the clothes.
At the end of the cycle, a small amount of water may be left in the dispenser. This is normal.
CYCLE GUIDE
Settings and options shown in bold are default settings for that cycle. For best fabric care, choose the cycle that best fits the load being washed. Not all cycles and options are available on all models.
| Items to wash: | Cycle: | Wash Temp: | Spin Speed: | Soil Level: | Available Options: | Cycle Details: |
| Cottons, linens, and mixed garment loads | Normal Hot | Warm Cool Cold | Max Extract Medium No Spin | Extra Heavy Heavy**Medium Light | Extra Rinse Water Save Spray Rinse Fabric Softener | Use this cycle for normally soiled cottons and mixed fabric loads. This cycle combines high-speed wash action and medium-speed spin. |
| Sturdy fabrics, dark colors that bleed or fade | Cold Wash | Cold Max | Extract Medium Low No Spin | Extra Heavy Heavy Medium Light | Extra Rinse Water Save Spray Rinse Fabric Softener | Use this cycle for sturdy garments with dark or bright colors that could bleed or fade in a warmer wash cycle. This cycle is a good choice for washing new garments that may shrink or fade in their first wash. |
| Normally soiled sheets, pillowcases, light blankets, or throws | Sheets Hot | Warm Cool Cold | Max Extract Medium Low No Spin | Extra Heavy Heavy Medium Light | Extra Rinse Water Save Spray Rinse Fabric Softener | The wash action of this cycle is designed to keep large items from tangling and balling up.IMPORTANT: For best performance, load garments in loose heaps evenly around the washplate. Do not load garments directly over the center of the washplate. |
| Towels and terrycloth items, lightly soiled, colored clothing | Colors/Towels | Hot Warm Cool Cold | Max Extract Medium Low No Spin | Extra Heavy Heavy Medium Light | Extra Rinse Water Save Spray Rinse Fabric Softener | This cycle is also a good choice for garments with a wrinkle-free finish. This cycle uses medium-speed wash action and medium-speed spin. |
| Lightly soiled garments | Rapid Wash | Hot Warm Cool Cold | Max Extract Medium Low No Spin | Extra Heavy Heavy Medium Light | Extra Rinse Water Save Spray Rinse Fabric Softener | Use this cycle to wash small, lightly soiled loads that are needed in a hurry. This short cycle combines high-speed wash action and high-speed spin for the optimal cleaning and shortened dry times. |
| Machine-wash silks, hand-wash fabrics, and wool | Delicate (Handwash) | Hot Warm Cool Cold | Medium Low No Spin | Extra Heavy Heavy Medium Light | Extra Rinse Water Save Spray Rinse Fabric Softener | This cycle combines low-speed wash and low-speed spin action to clean items labeled as “Machine Washable” on the garment care label. |
| Large items such as sleeping bags, blankets, small comforters, and jackets | Bulky Hot | Warm Cool Cold | Medium Low No Spin | Extra Heavy Heavy Medium Light | Extra Rinse Fabric Softener | This cycle starts with a soak to thoroughly saturate your large load. This is followed by medium wash action and medium spin speeds to maintain load balance.IMPORTANT: When washing waterproof/water-resistant items such as plastic lined mattress pads, shower curtains, tarps, jackets, or sleeping bags, select the lowest spin speed setting available for the cycle and washer model being used. |
| Sturdy fabrics, colorfast items | Heavy Duty | Hot Warm Cool Cold | Max Extract Medium Low No Spin | Extra Heavy*** Heavy Medium Light | Extra Rinse Water Save Spray Rinse Fabric Softener | Use this cycle for heavily soiled or sturdy cotton items. Cycle combines high-speed wash action and high-speed spin. |
| Heavily soiled fabrics | Power Wash | Hot Warm Cool Cold | Max Extract Medium Low No Spin | Extra Heavy*** Heavy Medium Light | Extra Rinse Water Save Spray Rinse Fabric Softener | Use this cycle for extremely soiled garments and household items that need additional cleaning power. This cycle combines high-speed wash action, medium-speed spin, and a deep rinse to flush excess dirt from the load. |
* Wash temperatures vary according to the chosen cycle setting. All cycle settings use a cold rinse temperature.
** Not all models default to the same Soil Level setting. Some models will default to Medium on this cycle.
*** Not all models default to the same Soil Level setting. Some models will default to Heavy on this cycle.
CYCLE GUIDE
Settings and options shown in bold are default settings for that cycle. For best fabric care, choose the cycle that best fits the load being washed. Not all cycles and options are available on all models.
| Items to wash: | Cycle: | Wash Temp: | Spin Speed: | Soil Level: | Available Options: | Cycle Details: |
| Heavily soiled white fabrics | Whites | Hot Warm Cool Cold | Max Extract Medium Low No Spin | Extra Heavy***Heavy Medium Light | Extra Rinse Water Save Spray Rinse Fabric Softener | This cycle introduces liquid chlorine bleach to the load at the proper time for improved whitening of your heavily soiled white fabrics. This cycle combines high-speed wash action and high-speed spin speed. For maximum soil and stain removal, use the liquid chlorine bleach dispenser for liquid chlorine bleach or color-safe bleach. This cycle can also be used for sturdy color fabrics, such as towels without liquid chlorine bleach. |
| Cottons and linens exposed to possible allergens | Allergen | Hot Max Extract Medium Low No Spin | Extra Heavy Heavy Medium Light | Extra Rinse Fabric Softener | This cycle uses more water to flush out allergens, such as dust mites or pet dander, from normally soiled garments. This cycle removes more than 95% of allergens. | |
| Swimsuits, items that need rinsing only | Rinse/Drain & Spin | Max Extract Medium Low No Spin | Extra Rinse | Use Rinse/Drain & Spin with the Extra Rinse option turned on to get a deep rinse followed by a high-speed spin. The time display will include an estimate of how long it will take to fill and drain the washer. | ||
| Wet load of clothes | Rinse/Drain & Spin | Max Extract Medium Low | Use Rinse/Drain & Spin to remove excess water from the load by choosing Rinse/Drain & Spin and turning off Extra Rinse. This cycle may help shorten drying times for some heavy fabrics or special-care items. Spin speed can be set to a lower setting.Rinse/Drain & Spin may also be used for draining the washer after canceling a cycle or completing a cycle after a power failure. | |||
| No clothes in washer | Clean Washer with affresh® | Use this cycle every 30 washes to keep the inside of your washer fresh and clean. This cycle uses a higher water level. Use with affresh® Washer Cleaner tablet or liquid chlorine bleach to thoroughly clean the inside of your washer. This cycle should not be interrupted. See “Washer Care.”IMPORTANT: Do not place garments or other items in the washer during the Clean Washer with affresh® cycle. Use this cycle with an empty wash tub. | ||||
* Wash temperatures vary according to the chosen cycle setting. All cycle settings use a cold rinse temperature.
*** Not all models default to the same Soil Level setting. Some models will default to Heavy on this cycle.
USING YOUR WASHER
WARNING
Fire Hazard
Never place items in the washer that are dampened with gasoline or other flammable fluids.
No washer can completely remove oil.
Do not dry anything that has ever had any type of oil on it (including cooking oils).
Doing so can result in death, explosion, or fire.
WARNING

Electrical Shock Hazard
Plug into a grounded 3 prong outlet.
Do not remove ground prong.
Do not use an adapter.
Do not use an extension cord.
Failure to follow these instructions can result in death, fire, or electrical shock.
1. Sort and prepare your laundry
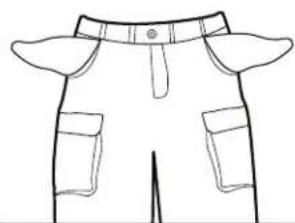
natural_image
Line drawing of a pair of shorts with buttons and pockets (no text or symbols)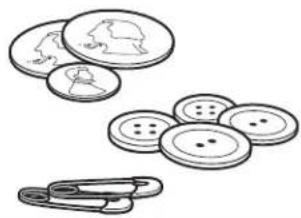
natural_image
Illustration of various household items including coins, a cat, and a pair of buttons (no text or symbols)- Empty pockets. Loose change, buttons, or any small object can pass under the washplate and become trapped, causing unexpected sounds.
- Sort garments by recommended cycle, water temperature, and colorfastness.
- Separate heavily soiled garments from lightly soiled.
- Separate delicate garments from sturdy fabrics.
- Do not dry garments if stains remain after washing; heat can set stains into fabric.
- Treat stains promptly.
- Close zippers, fasten hooks, tie strings and sashes. Remove non-washable trim and ornaments.
- Mend rips and tears to avoid further damage to garments during washing.
Helpful Tips:
- When washing water-proof or water-resistant items, load evenly. See "Cycle Guide" for tips and more information on using the Bulky cycle.
- Use mesh bags to help avoid tangling when washing delicate or small items.
- Turn knits inside out to avoid pilling. Separate lint-takers from lint-givers. Synthetics, knits, and corduroy fabrics will pick up lint from towels, rugs, and chenille fabrics.
NOTE: Always read and follow fabric care labels instructions to avoid damage to your garments.
2. Add laundry products
natural_image
Line drawing of a hand using a tool to clean or inspect the interior of a washing machine (no text or symbols)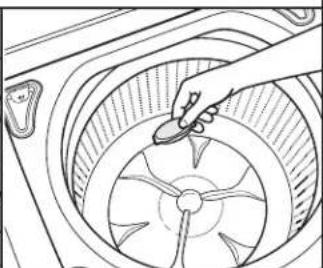
natural_image
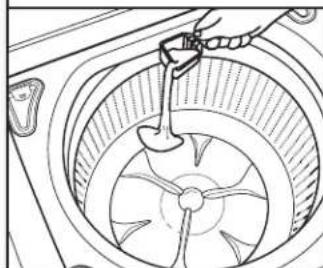
Line drawing of a hand holding a tool over a circular fan or vent (no text or symbols)Add a measured amount of detergent or single-dose laundry packet into the basket.
If using Oxi-type boosters, color-safe bleach, or fabric softener crystals, add to the bottom of the washer basket before adding clothes.
NOTE: Follow the manufacturer's instructions to determine the amount of laundry products to use.
3. Load laundry into washer
natural_image
Line drawing of a washing machine interior showing internal components (no text or symbols)
natural_image
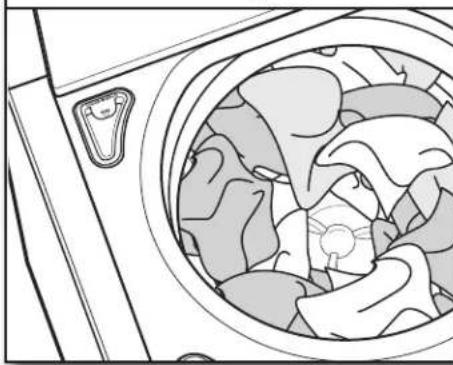
Abstract curved line pattern with no text or symbolsLoad garments in loose heaps evenly around the washplate. Do not load garments directly over the center of the washplate; when loaded, the center of the washplate should be visible. Try mixing different sized garments to reduce tangling.

natural_image
Line drawing of a jar filled with food items, no text or symbols presentIMPORTANT: Garments need to move freely for best cleaning and to reduce wrinkling and tangling.
NOTE: Do not add single-dose laundry packets, Oxi-type boosters, or fabric softener crystals to dispensers. They will not dispense correctly.
text_image
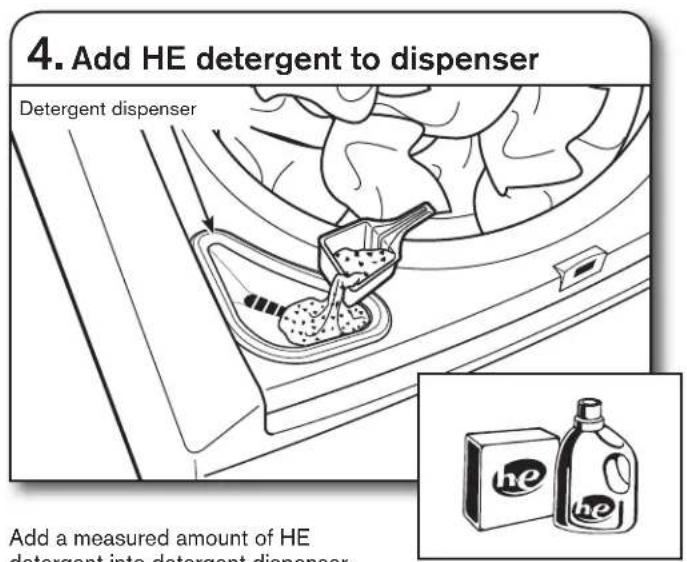
4. Add HE detergent to dispenser Detergent dispenser Add a measured amount of HE detergent into detergent dispenserAdd a measured amount of HE detergent into detergent dispenser.
IMPORTANT: Use only High Efficiency detergents. The package will be marked "HE" or "High Efficiency." Low-water washing creates excessive sudsing with a regular non-HE detergent. Using regular detergent will likely result in longer cycle times and reduced rinsing performance. It may also result in component failures and noticeable mold or mildew. HE detergents are made to produce the right amount of suds for the best performance. Follow the manufacturer's instructions to determine the amount of detergent to use.
HELPFUL TIP: See "Washer Maintenance" for information on recommended method of cleaning washer dispensers.
text_image
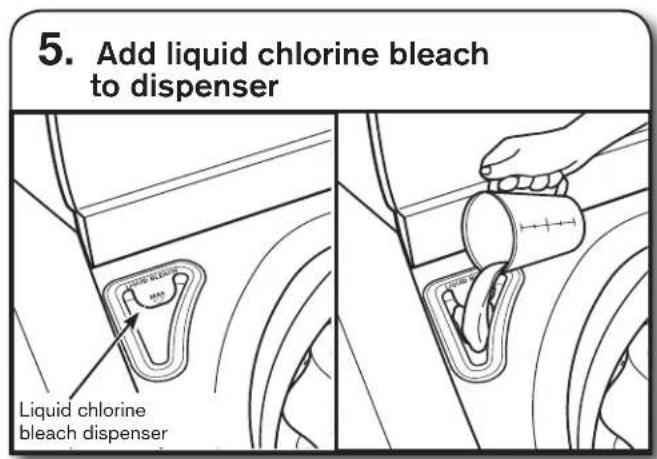
5. Add liquid chlorine bleach to dispenser Liquid chlorine bleach dispenserDo not overfill, dilute, or use more than 3/4 cup (180 mL). For maximum soil and stain removal, you may use the liquid chlorine bleach dispenser for liquid chlorine bleach or color-safe bleach.
text_image
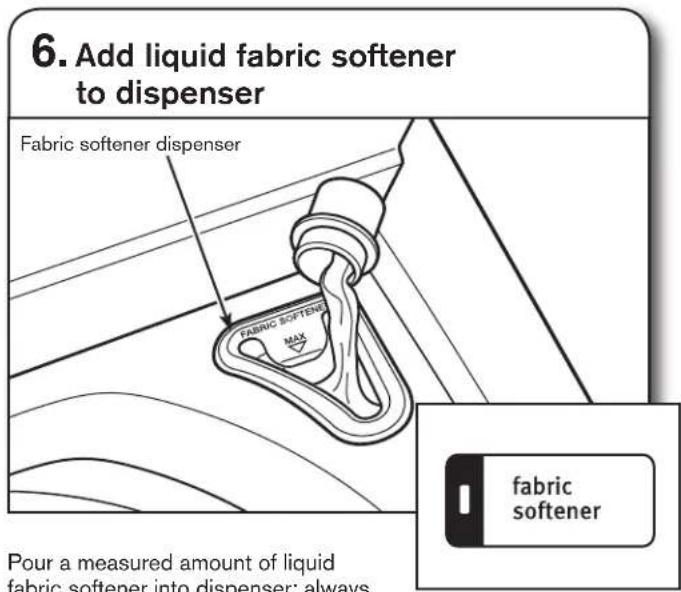
6. Add liquid fabric softener to dispenser Fabric softener dispenser FABRIC SOFTENER MAX fabric softener Pour a measured amount of liquid fabric softener into dispenser: alwaysPour a measured amount of liquid fabric softener into dispenser; always follow manufacturer's directions for correct amount of fabric softener based on your load size. Then select Fabric Softener option.
IMPORTANT: Fabric Softener option must be selected to ensure proper distribution at correct time in cycle. Do not overfill or dilute. Overfilling dispenser will cause fabric softener to immediately dispense into washer.
If Extra Rinse option is selected, fabric softener will be dispensed in the last rinse.
NOTE: Do not use liquid fabric softener dispenser balls in this washer. They will not dispense correctly.
text_image
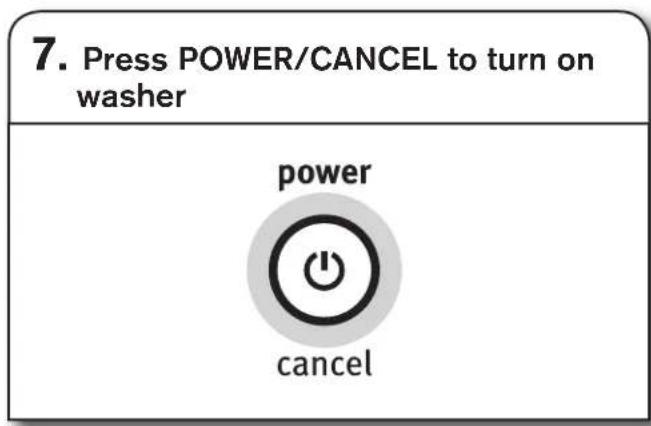
7. Press POWER/CANCEL to turn on washer power cancel- Select cycle
text_image
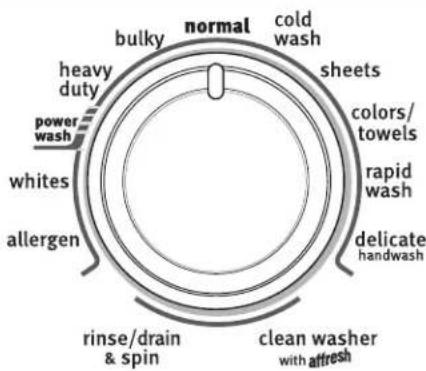
bulky normal cold wash heavy duty sheets power wash whites allergen colors/towels rapid wash delicate handwash rinse/drain & spin clean washer with refreshTurn cycle knob to choose your wash cycle. Estimated Time Remaining will light up with a cycle time. You may notice time adjusting during the cycle. This is normal.
text_image
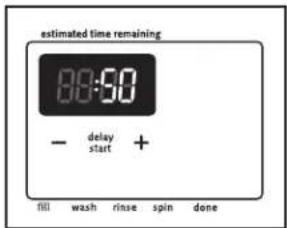
estimated time remaining 8:00:00 - delay start + fill wash rinse spin done- Select cycle modifiers
text_image
modifiers ■ cold ■ cool ■ warm ■ hot —— auto temperature control ——— ■ no spin ■ low ■ medium ■ max extract ■ light ■ medium ■ heavy ■ extra heavy wash temp spin speed soil levelOnce you select a cycle, the default settings for that cycle will be lit. Press the Modifier buttons to change the Wash Temp, Spin Speed, and Soil Level, if desired. Not all settings are available with all cycles.
NOTE: Always read and follow fabric care label instructions to avoid damage to your garments.
| Wash Temp Suggested Fabrics | |
| HotSome cold water is added to save energy. This may be cooler than your hot water heater setting. | Whites and pastelsDurable garmentsHeavy soils |
| WarmSome cold water will be added, so this may be cooler than what your previous washer provided. | Bright colorsModerate to light soils |
| CoolWarm water is added to assist in soil removal and to help dissolve detergents | Colors that bleed or fadeLight soils |
| ColdWarm water may be added to assist in soil removal and to help dissolve detergents | Dark colors that bleed or fadeLight soils |
- Select cycle options
flowchart
graph LR
    A["extra rinse"] --> B["fabric softener"]
    C["water save spray rinse"] --> D["cycle signal off - low - hi"]
Select any other cycle options you may wish to add, if not previously set. Some cycles will automatically add certain options such as Extra Rinse. These may be turned off, if desired.
NOTE: Not all options are available with all cycles.
- Press START/PAUSE to begin wash cycle

Press the START/PAUSE button to start the wash cycle. When the cycle has finished, the end of cycle signal will sound (if set). Promptly remove garments when cycle is done to avoid odor, reduce wrinkling, and rusting of metal hooks, zippers, and snaps. If lid is left open for more than 10 minutes, the water will pump out.
WASHER MAINTENANCE
WATER INLET HOSES
Replace inlet hoses after 5 years of use to reduce the risk of hose failure. Periodically inspect and replace inlet hoses if bulges, kinks, cuts, wear, or leaks are found.
When replacing your inlet hoses, mark the date of replacement on the label with a permanent marker.
NOTE: This washer does not include inlet hoses. See the Installation Instructions for more information.
WASHER CARE
Recommendations to Help Keep Your Washer Clean and Performing at its Best
- Always use High Efficiency (HE) detergents and follow the HE detergent manufacturer's instructions regarding the amount of HE detergent to use. Never use more than the recommended amount because that may increase the rate at which detergent and soil residue accumulate inside your washer, which in turn may result in undesirable odor.
- Use warm and hot wash water settings sometimes (not exclusively cold water washes), because they do a better job of controlling the rate at which soils and detergent accumulate.
- Always leave the washer lid open between uses to help dry out the washer and prevent the buildup of odor-causing residue.
Cleaning Your Top Loading Washer
Read these instructions completely before beginning the routine cleaning processes recommended below. This Washer Maintenance Procedure should be performed, at a minimum, once per month or every 30 wash cycles, whichever occurs sooner, to control the rate at which soils and detergent may otherwise accumulate in your washer.
Cleaning the Inside of the Washer
To keep your washer odor-free, follow the usage instructions provided above, and use this recommended monthly cleaning procedure:
Clean Washer Cycle
This washer has a special cycle that uses higher water volumes in combination with affresh® Washer Cleaner or liquid chlorine bleach to clean the inside of the washer.
Begin procedure
1. affresh® Washer Cleaner Cycle Procedure (Recommended for Best Performance):
a. Open the washer lid and remove any clothing or items.
b. Place an affresh ^® Washer Cleaner tablet in the bottom of the washer basket.
c. Do not place an affresh ^® Washer Cleaner tablet in the detergent dispenser.
d. Do not add any detergent or other chemical to the washer when following this procedure.
e. Close the washer lid.
f. Select the CLEAN WASHER cycle.
g. Press the START/PAUSE button to begin the cycle. The Clean Washer Cycle Operation is described below.
NOTE: For best results, do not interrupt cycle. If cycle must be interrupted, press POWER/CANCEL. (For models with no Power/Cancel button, press and hold START/PAUSE for three seconds). After the Clean Washer cycle has stopped, run a Rinse/Drain & Spin cycle to rinse cleaner from washer.
WASHER CARE (cont.)
2. Chlorine Bleach Procedure (Alternative):
a. Open the washer lid and remove any clothing or items.
b. Add 1 cup (236 mL) of liquid chlorine bleach to the bleach compartment.
NOTE: Use of more liquid chlorine bleach than is recommended above could cause washer damage over time.
c. Close the washer lid.
d. Do not add any detergent or other chemical to the washer when following this procedure.
e. Select the CLEAN WASHER cycle.
f. Press the START/PAUSE button to begin the cycle. The Clean Washer Cycle Operation is described below.
NOTE: For best results, do not interrupt cycle. If cycle must be interrupted, press POWER/CANCEL. (For models with no Power/Cancel button, press and hold START/PAUSE for three seconds). After the Clean Washer cycle has stopped, run a Rinse/Drain & Spin cycle to rinse cleaner from washer.
Description of Clean Washer Cycle Operation:
- This cycle will fill to a water level higher than in normal wash cycles to provide rinsing at a level above the water line for normal wash cycle.
- During this cycle, there will be some agitation and spinning to increase the removal of soils.
After this cycle is complete, leave the lid open to allow for better ventilation and drying of the washer interior.
Cleaning the Dispensers
After a period of using your washer, you may find some residue buildup in the washer's dispensers. To remove residue from the dispensers, wipe them with a damp cloth and towel dry. Do not attempt to remove the dispensers or trim for cleaning. The dispensers and trim are not removable. If your model has a dispenser drawer, however, remove the drawer and clean it before or after you run the Clean Washer cycle. Use an all-purpose surface cleaner, if needed.
Cleaning the Outside of the Washer
Use a soft, damp cloth or sponge to wipe away any spills. Use only mild soaps or cleaners when cleaning external washer surfaces.
IMPORTANT: To avoid damaging the washer's finish, do not use abrasive products.
NON-USE AND VACATION CARE
Operate your washer only when you are home. If moving, or not using your washer for a period of time, follow these steps:
- Unplug or disconnect power to washer.
- Turn off water supply to washer, to avoid flooding due to water pressure surge.
WINTER STORAGE CARE
IMPORTANT: To avoid damage, install and store washer where it will not freeze. Because some water may stay in hoses, freezing can damage washer. If storing or moving during freezing weather, winterize your washer.
To winterize washer:
- Shut off both water faucets; disconnect and drain water inlet hoses.
- Put 1 qt. (1 L) of R.V.-type antifreeze in basket and run washer on RINSE/DRAIN & SPIN cycle for about 30 seconds to mix antifreeze and remaining water.
- Unplug washer or disconnect power.
TRANSPORTING YOUR WASHER
- Shut off both water faucets. Disconnect and drain water inlet hoses.
- If washer will be moved during freezing weather, follow WINTER STORAGE CARE directions before moving.
- Disconnect drain from drain system.
- Unplug power cord.
- Place inlet hoses inside washer basket.
- Drape power cord and drain hose over the console and secure with masking tape.
- Place foam packing ring from original shipping materials back inside washer. If you do not have packing ring, place heavy blankets or towels into basket opening. Close lid and place tape over lid and down front of washer. Keep lid taped until washer is placed in new location.
WARNING

Electrical Shock Hazard
Plug into a grounded 3 prong outlet.
Do not remove ground prong.
Do not use an adapter.
Do not use an extension cord.
Failure to follow these instructions can result in death, fire, or electrical shock.
REINSTALLING/USING WASHER AGAIN
To reinstall washer after non-use, vacation, winter storage or moving:
- Refer to Installation Instructions to locate, level, and connect washer.
- Before using again, run washer through the following recommended procedure:
To use washer again:
- Flush water pipes and hoses. Reconnect water inlet hoses. Turn on both water faucets.
- Plug in washer or reconnect power.
- Run washer through BULKY cycle to clean washer and remove antifreeze, if used. Use only HE High Efficiency detergent. Use half the manufacturer's recommended amount for a medium-size load.
TROUBLESHOOTING
| First try the solutions suggested here or visit our website to possibly avoid the cost of a service call.In U.S.A. www.maytag.com/product_help - In Canada www.maytag.ca. | ||
| If you experience Possible Causes Solution | ||
| Vibration or Off-Balance | ||
| Vibration, rocking, or "walking" | Feet may not be in contact with the floor and locked. | Front and rear feet must be in firm contact with floor, and washer must be level to operate properly. Jam nuts must be tight against the bottom of the cabinet. |
| Washer may not be level. Check floor | For flexing or sagging. If flooring is uneven, a 3/4"(19 mm) piece of plywood under your washer will reduce sound. | |
| See "Level the Washer" in Installation Instructions. | ||
| Vibration during spinning or washer stopped with uL error code flashing | Load could be unbalanced. Load garments in loose heaps evenly around the washplate. Do not load garments directly over the center of the washplate. Adding wet items to washer or adding more water to basket could unbalance washer. | |
| Avoid washing single items. Balance a single item such as a rug or jacket with a few extra items. If the uL error code is flashing, redistribute the load, close the lid, and press START/PAUSE. | ||
| Do not tightly pack. Avoid washing single items. | ||
| Use Bulky cycle for oversized, non-absorbent items such as comforters or poly-filled jackets. Other items are not appropriate for Bulky cycle. See "Cycle Guide." | ||
| Item or load not suitable for selected cycle. See "Cycle Guide" and "Using Your Washer." | ||
| Noises - for normal operating sounds, go to www.maytag.com/help | ||
| Clicking or metallic noises Objects caught in washer drain system. | Empty pockets before washing. Loose items such as coins could fall between basket and tub or may block pump. It may be necessary to call for service to remove items. | |
| It is normal to hear metal items on clothing such as metal snaps, buckles, or zippers touch against the stainless steel basket. | ||
| Gurgling or humming Washer may be draining water. It is normal to hear the pump making a continuous humming sound with periodic gurgling or surging as final amounts of water are removed during the Drain & Spin cycles. | ||
| Water Leaks | ||
| Check the following for proper installation: | Washer not level. Water may splash off basket if washer is not level. | |
| Fill hoses not attached tightly. Tighten fill-hose connection. | ||
| Fill hose washers. Make sure all four fill hose flat washers are properly seated. | ||
| Drain hose connection. Pull drain hose from washer cabinet and properly secure it to drainpipe or laundry tub. | ||
| Do not place tape over drain opening. | ||
| Check household plumbing for leaks or clogged sink or drain. | Water can back up out of a clogged sink or drainpipe. Check all household plumbing for leaks (laundry tubs, drain pipe, water pipes, and faucets.) | |
| Washer not loaded as recommended. | An unbalanced load can cause basket to be out of alignment and cause water to splash off tub. See "Using Your Washer" for loading instructions. | |
| Washer not performing as expected | ||
| Not enough water in washer | Load not completely covered in water. | This is normal operation for an HE low-water washer. The load will not be completely under water. The washer senses load sizes and adds correct amount of water for optimal cleaning. See "What's New under the Lid."IMPORTANT: Do not add more water to washer. The added water lifts the load off the washplate, resulting in less cleaning. |
| Washer won't run or fill, washer stops working | Check for proper water supply. Both hoses must be attached and have water flowing to inlet valve. | |
| Both hot and cold water faucets must be turned on. | ||
| Check that inlet valve screens have not become clogged. | ||
| Check for any kinks in inlet hoses, which can restrict water flow. | ||
WARNING

Electrical Shock Hazard
Plug into a grounded 3 prong outlet.
Do not remove ground prong.
Do not use an adapter.
Do not use an extension cord.
Failure to follow these instructions can result in death, fire, or electrical shock.
TROUBLESHOOTING
| First try the solutions suggested here or visit our website to possibly avoid the cost of a service call. In U.S.A. www.maytag.com/product_help - In Canada www.maytag.ca. | ||
| If you experience Possible Causes Solution | ||
| Washer not performing as expected (cont.) | ||
| Washer won't run or fill, washer stops working (cont.) | Check proper electrical supply. Plug power cord into a grounded 3-prong outlet. | |
| Normal washer operation. Lid must be closed for washer to run. | ||
| Washer may be tightly packed. Remove several items, rearrange load evenly around the washplate. Do not load garments directly over the center of the wash plate. Close lid and press START/PAUSE. | ||
| Not using HE detergent or using too much HE detergent. | Only use HE detergent. Suds from regular detergents can slow or stop the washer. Always measure detergent and following detergent directions based on your load requirements. | |
| To remove suds, cancel cycle. Select RINSE/DRAIN & SPIN. Select your cycle. Press START/PAUSE. Do not add more detergent. | ||
| Washer not draining/ spinning, loads are still wet | Empty pockets and use garment bags for small items. | Small items may have been caught in pump or between basket and tub, which can slow draining. |
| Using cycles with a lower spin speed. | Cycles with lower spin speeds remove less water than cycles with high spin speeds. Use the recommended cycle/speed spin for your garment. | |
| Washer may be tightly packed or unbalanced. | Tightly packed loads may not allow the washer to spin correctly, leaving the load wetter than normal. Evenly arrange the wet load for balanced spinning. Select RINSE/DRAIN & SPIN to remove excess water. See "Using Your Washer" for loading recommendations. | |
| Check plumbing for correct drain hose installation. Drain hose extends into standpipe farther than 4.5" (114 mm). | Check drain hose for proper installation. Use drain hose form and securely attach to drainpipe or tub. Do not tape over drain opening. Lower drain hose if the end is higher than 96" (2.4 m) above the floor. Remove any clogs from drain hose. | |
TROUBLESHOOTING
| First try the solutions suggested here or visit our website to possibly avoid the cost of a service call.In U.S.A. www.maytag.com/product help – In Canada www.maytag.ca. | ||
| If you experience Possible Causes Solution | ||
| Washer not performing as expected (cont.) | ||
| Washer not draining/ spinning, loads are still wet (cont.) | Not using HE detergent or using too much HE detergent. | Suds from regular detergent or using too much detergent can slow or stop draining or spinning. Use only HE detergent. Always measure and follow detergent directions for your load. To remove extra suds, select RINSE/DRAIN & SPIN. Do not add detergent. |
| Incorrect or wrong wash or rinse temperatures | Check for proper water supply. Make sure | hot and cold inlet hoses are not reversed. |
| Both hoses must be attached to both washer and faucet, and have both hot and cold water flowing to inlet valve. | ||
| Check that inlet valve screens are not clogged. | ||
| Remove any kinks in hoses. | ||
| Energy-saving controlled wash temperatures. | ENERGY STAR® qualified washers use cooler wash and rinse water temperatures than traditional top-load washers. This includes cooler hot and warm washes. | |
| Load not rinsed Check for proper water supply. Make sure hot and cold inlet hoses are not reversed. | ||
TROUBLESHOOTING
| First try the solutions suggested here or visit our website to possibly avoid the cost of a service call. In U.S.A. www.maytag.com/product_help - In Canada www.maytag.ca. | ||
| If you experience Possible Causes Solution | ||
| Washer not performing as expected (cont.) | ||
| Not cleaning or removing stains (cont.) | Not using HE detergent or using too much HE detergent. (cont.) | Use only HE detergent. Be sure to measure correctly. |
| Always measure detergent and follow detergent directions based on load size and soil level. | ||
| Not using correct cycle for fabric type. Use | Use a higher soil level cycle option and warmer wash temperature to improve cleaning. | |
| If using Rapid Wash cycle, wash only a few items. | ||
| Use Power Wash, Whites, or Heavy Duty cycle for tough cleaning. | ||
| See the "Cycle Guide" to match your load with the best cycle. | ||
| Not using dispensers. Use dispensers to | avoid chlorine bleach and fabric softener staining. | |
| Load dispensers before starting a cycle. | ||
| Avoid overfilling. | ||
| Do not add products directly onto load. | ||
| Not washing like colors together. Wash I | ke colors together and remove promptly after the cycle is complete to avoid dye transfer. | |
| Odors Clean washer maintenance not done as recommended. | Run the Clean Washer with affresh®cycle after every 30 washes. See "Washer Care" in "Washer Maintenance." | |
| Unload washer as soon as cycle is complete. | ||
| Use only HE detergent. Be sure to measure correctly. | ||
| Always follow the detergent directions. | ||
| See "Washer Care" section. | ||
| Fabric Damage Sharp items were in pockets during wash cycle. | Empty pockets, zip zippers, and snap or hook fasteners before washing to avoid snags and tears. | |
| All strings and straps before starting wash load. | ||
| Mend rips and broken threads in seams before washing. | ||
| Load garments in loose heaps evenly around the washplate. Do not load garments directly over the center of the washplate. | ||
| Use cycle designed for the fabrics being washed. | ||
| Add only 1 or 2 additional garments after washer has started. | ||
| Always read and follow garment manufacturer's care label instructions. See the "Cycle Guide" to match your load with the best cycle. | ||
| Do not pour liquid chlorine bleach directly onto load. Wipe up bleach spills. | ||
| Undiluted bleach will damage fabrics. Do not use more than recommended by manufacturer. | ||
| Do not place load items on top of bleach dispenser when loading and unloading washer. | ||
| Incorrect dispenser operation | Clogged dispensers or laundry products dispensing too soon. | Do not overfill dispenser. Overfilling causes immediate dispensing. |
| Always select FABRIC SOFTENER option to ensure proper dispensing. | ||
| Load dispensers before starting a cycle. | ||
| It is normal for small amounts of water to be remain in dispenser at the end of the cycle. | ||
| Homes with low water pressure may result in residual powder in the dispenser. To avoid, select a warmer wash temperature if possible, depending on your load. | ||
TROUBLESHOOTING
| First try the solutions suggested here or visit our website to possibly avoid the cost of a service call.In U.S.A. www.maytag.com/product_help - In Canada www.maytag.ca. | ||
| If you experience Possible Causes Solution | ||
| Washer not performing as expected (cont.) | ||
| Incorrect dispenser operation (cont.) | Liquid chlorine bleach not used in dispenser. | Use liquid chlorine bleach only in the liquid chlorine bleach dispenser. |
| Single-dose laundry packet not dissolving | Adding laundry packet incorrectly Be sure | laundry packet is added to washer basket before adding clothes. Do not add packet to dispenser. Follow the manufacturer's instructions to avoid damage to your garments. |
| Error Code Appears in Display | ||
| oL (overloaded) appears in display | Load too large. If an overload is detected, the washer will drain any water and detergent in the washer. Remove several items and add HE detergent. Close lid and press START/PAUSE. | |
| uL (unbalanced load) appears in display | Load not balanced. The washer is running a load-balance correction routine. | Allow the washer to continue. If the dial is flashing and the washer has stopped, redistribute the load, close the lid, and press START/ PAUSE. |
| LF (too long to fill) appears in display | Washer taking too long to fill. Drain extends more than 4.5" (114 mm) into standpipe. | Check plumbing for correct drain hose installation. Use drain hose form and attach securely to drainpipe or tub. Do not tape over drain opening. See Installation Instructions. |
| Ld (too long to drain water) appears in display | Washer taking too long to drain water. Drain extends more than 4.5" (114 mm) into standpipe. | Check plumbing for correct drain hose installation. Use drain hose form and attach securely to drainpipe or tub. Do not tape over drain opening. See Installation Instructions. |
| Lower drain hose if the end is higher than 96" (2.4 m) above the floor. Remove any clogs from drain hose. See Installation Instructions. | ||
| HC (Hot and Cold hoses reversed) appears in display | Hot and cold inlet hoses have been installed incorrectly. | This code will appear at the end of the wash cycle to indicate that cold water hose is connected to the hot water inlet and hot water hose is connected to the cold water inlet. |
| Sd (Excess suds) appears in display | Excessive suds in washer. Washer is running a suds reduction routine. | Allow the washer to continue. Use only HE detergent. Always measure detergent, and base detergent quantity on load size. Follow detergent manufacturer's instructions. If the dial is flashing, reselect your desired cycle using a cold wash temperature, and press START/PAUSE. Do not add detergent. |
| dL (Lid cannot lock) appears in display | An item in the load may be keeping the lid from locking. | Check for items directly under the lid. |
| lid (Lid opened) appears in display | Washer lid left open. Close the lid to clear the display. If the lid is left open for more than 10 minutes, the cycle will reset and water in the washer will drain. | |
| dU (Lid cannot unlock) appears in display | Objects on washer lid prevent it from unlocking. | Remove objects, such as a basket of laundry, from the top of the washer. |
| F## code (F-type error code) appears in display | System error code. Press START/PAUSE once to clear the code. Then press START/PAUSE again to restart washer. If code appears again, call for service. | |
| Fd (Factory Default) Washer | sets back to factory default. To return all options and modifiers to Factory Default, press POWER/CANCEL, select RINSE/DRAIN & SPIN cycle, and then press EXTRA RINSE, FABRIC SOFTENER, EXTRA RINSE, FABRIC SOFTENER within 5 seconds. When done correctly, the display shows "Fd" for 3 seconds and then unit returns to Standby Mode. | |
ACCESSORIES
See Installation Instructions for installation accessories
| Part Number: | Accessory |
| 8212526 | Washer drip tray, fits under all |
| 31682 | All-purpose appliance cleaner |
| 1903WH | Laundry supply storage cart |
MAYTAG® LAUNDRY LIMITED WARRANTY
This Maytag Limited Warranty supersedes and replaces the limited warranty printed in the Use and Care Guide for products sold within the United States of America and Canada.
FIRST YEAR LIMITED WARRANTY (PARTS AND LABOR)
For one year from the date of purchase, when this major appliance is installed, operated, and maintained according to instructions attached to or furnished with the product, Maytag brand of Whirlpool Corporation or Whirlpool Canada LP (hereafter "Maytag") will pay for factory specified parts and repair labor to correct defects in materials or workmanship that existed when this major appliance was purchased.
SECOND THROUGH TENTH YEAR LIMITED WARRANTY (DRIVE MOTOR AND WASH BASKET ONLY - LABOR NOT INCLUDED)
In the second through tenth years from the date of original purchase, when this major appliance is installed, operated, and maintained according to instructions attached to or furnished with the product, Maytag will pay for the replacement of the wash basket drive motor and stainless steel wash basket (side walls only) to correct non-cosmetic defects in materials or workmanship in these parts that prevent function of the washer and that existed when this major appliance was purchased. This limited 10-year warranty on the wash basket drive motor and stainless steel wash basket (side walls only) does not include labor.
YOUR SOLE AND EXCLUSIVE REMEDY UNDER THIS LIMITED WARRANTY SHALL BE PRODUCT REPAIR AS PROVIDED HEREIN. Service must be provided by a Maytag designated service company. This limited warranty is valid only in the United States or Canada and applies only when the major appliance is used in the country in which it was purchased. This limited warranty is effective from the date of original consumer purchase. Proof of original purchase date is required to obtain service under this limited warranty.
ITEMS EXCLUDED FROM WARRANTY
This limited warranty does not cover:
- Replacement parts or repair labor if this major appliance is used for other than normal, single-family household use or when it is used in a manner that is inconsistent to published user or operator instructions and/or installation instructions.
- Service calls to correct the installation of your major appliance, to instruct you on how to use your major appliance, to replace or repair house fuses, or to correct house wiring or plumbing.
- Service calls to repair or replace appliance light bulbs, air filters or water filters. Consumable parts are excluded from warranty coverage.
- Damage resulting from accident, alteration, misuse, abuse, fire, flood, acts of God, improper installation, installation not in accordance with electrical or plumbing codes, or use of products not approved by Maytag.
- Cosmetic damage, including scratches, dents, chips or other damage to the finish of your major appliance, unless such damage results from defects in materials or workmanship and is reported to Maytag within 30 days from the date of purchase.
- Pick up and delivery. This major appliance is intended to be repaired in your home.
- Repairs to parts or systems resulting from unauthorized modifications made to the appliance.
- Expenses for travel and transportation for product service if your major appliance is located in a remote area where service by an authorized Maytag servicer is not available.
- The removal and reinstallation of your major appliance if it is installed in an inaccessible location or is not installed in accordance with Maytag's published installation instructions.
- Replacement parts or repair labor on major appliances with original model/serial numbers that have been removed, altered, or cannot be easily determined.
DISCLAIMER OF IMPLIED WARRANTIES
IMPLIED WARRANTIES, INCLUDING ANY IMPLIED WARRANTY OF MERCHANTABILITY OR IMPLIED WARRANTY OF FITNESS FOR A PARTICULAR PURPOSE, ARE LIMITED TO ONE YEAR OR THE SHORTEST PERIOD ALLOWED BY LAW. Some states and provinces do not allow limitations on the duration of implied warranties of merchantability or fitness, so this limitation may not apply to you. This warranty gives you specific legal rights, and you also may have other rights that vary from state to state or province to province.
LIMITATION OF REMEDIES; EXCLUSION OF INCIDENTAL AND CONSEQUENTIAL DAMAGES
YOUR SOLE AND EXCLUSIVE REMEDY UNDER THIS LIMITED WARRANTY SHALL BE PRODUCT REPAIR AS PROVIDED HEREIN. MAYTAG SHALL NOT BE LIABLE FOR INCIDENTAL OR CONSEQUENTIAL DAMAGES. Some states and provinces do not allow the exclusion or limitation of incidental or consequential damages, so these limitations and exclusions may not apply to you. This warranty gives you specific legal rights, and you also may have other rights that vary from state to state or province to province.
If outside the 50 United States and Canada, contact your authorized Maytag dealer to determine if another warranty applies.
If you think you need repair service, first see the "Troubleshooting" section of the Use & Care Guide. If you are unable to resolve the problem after checking "Troubleshooting," additional help can be found by checking the "Assistance or Service" section or by calling Maytag. In the U.S.A., call 1-800-688-9900. In Canada, call 10800-807-6777
natural_image
Diagram of a circular mechanical component with internal layered structure (no text or symbols)natural_image
Two diagrams showing a container filled with various food items, one with a lid and the other with a lid filled with liquid (no text or symbols)6 OPTIONS DE PROGRAMME
WATER SAVE SPRAY RINSE (Rinçage
natural_image
Line drawing of a pair of shorts with buttons and accessories (no text or symbols)natural_image
Line drawing showing two views of a washing machine with hand and spoon (no text or symbols)text_image
bulky normal cold wash heavy duty sheets power wash whites allergen colors/towels rapid wash delicate handwash rinse/drain & spin clean washer with affreshtext_image
estimated time remaining 8:00:50 - delay start + fill wash rinse spin doneASSISTANCE OR SERVICE
Before calling for assistance or service, please check "Troubleshooting" or visit www.maytag.com/help.
It may save you the cost of a service call. If you still need help, follow the instructions below.
When calling, please know the purchase date and the complete model and serial number of your appliance.
This information will help us to better respond to your request.
If you need replacement parts or to order accessories
We recommend that you use only Factory Specified Parts.
These parts will fit right and work right because they are made with the same precision
used to build every new MAYTAG® appliance.
To locate factory specified replacement parts, assistance in your area, or accessories:
Maytag Services, LLC
1-800-688-9900 www.maytag.com
1-800-901-2042 (Accessories)
www.maytag.com/accessories
Whirlpool Canada LP
Customer Assistance
1-800-807-6777
www.maytag.ca
or call your nearest designated service center or refer to your Yellow Pages telephone directory.
Our consultants provide assistance with
In the U.S.A.
■ Features and specifications on our full line of appliances. Installation information. ■
Specialized customer assistance (Spanish speaking, hearing ■ impaired, limited vision, etc.).
In the U.S.A. and Canada
■ Use and maintenance procedures.
Accessory and repair parts sales. ■
Referrals to local dealers, repair parts distributors, ■
and service companies. Maytag ^® designated service technicians are trained to fulfill the product warranty and provide after-warranty service, anywhere in the United States and Canada.
You can write with any questions or concerns at:
Maytag Services, LLC
ATTN: CAIR® Center
P.O. Box 2370
Cleveland, TN 37320-2370
Customer eXperience Centre
Whirlpool Canada LP
Unit 200 - 6750 Century Ave.
Mississauga, ON L5N 0B7
Please include a daytime phone number in your correspondence.
ASSISTANCE OU SERVICE
Customer eXperience Centre
Whirlpool Canada LP
Unit 200 - 6750 Century Ave.
Mississauga, ON L5N 0B7