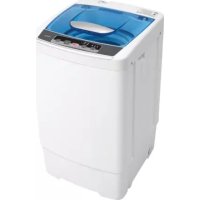
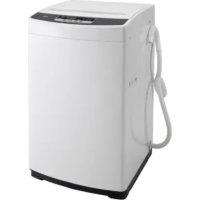
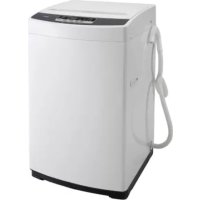
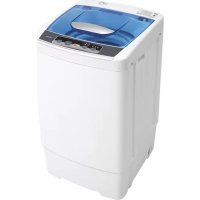
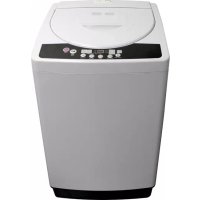
DTT100A1WDB - Washing machine DANBY - Free user manual and instructions
Find the device manual for free DTT100A1WDB DANBY in PDF.

| Product Type | Twin Tub Washer/Spin Dryer |
| Model | DTT100A1WDB |
| Brand | Danby |
| Washing Capacity | Up to 2.8 kg (max load) |
| Water Levels | Low (36 L), Medium (43 L), High (50 L) |
| Wash Time | 2 to 15 minutes depending on fabric type |
| Spin Time | 1 to 5 minutes depending on fabric |
| Wash Actions | Gentle, Normal, Heavy |
| Power Supply | 120 V, 60 Hz, grounding required |
| Power Cord | With grounded 3-prong plug |
| Water Connection | Quick connect for water inlet hose |
| Drainage | Drain hose with clamp, can be hung over sink |
| Safety Features | Auto shut-off if lid opened during spin, overflow prevention mechanism |
| Maintenance | Clean lint filter, overflow grid and drain grid after each use |
| Materials | Plastic tubs, painted steel panels |
| Warranty | 1 year functional parts, 30 days for plastic parts |
Frequently Asked Questions - DTT100A1WDB DANBY
User questions about DTT100A1WDB DANBY
0 question about this device. Answer the ones you know or ask your own.
Ask a new question about this device
Download the instructions for your Washing machine in PDF format for free! Find your manual DTT100A1WDB - DANBY and take your electronic device back in hand. On this page are published all the documents necessary for the use of your device. DTT100A1WDB by DANBY.
USER MANUAL DTT100A1WDB DANBY
TWIN TUB WASHING MACHINE
LAVEUSE-ESSOREUSE
LAVADORADEDOBLE TINA
MODE L·MODELE·MODELO
DTT100A1WDB
ENGLISH
TABLE OF CONTENTS 1
FRANÇAIS
TABLE DES MATIÈRES 13
ESPANOL
INDICE 25
TABLE OF CONTENTS
Safety instructions 2
Parts identification 4
Cautions regarding use 5
Grounding instructions 5
Installation Instructions 6
Washing procedure 7
Laundry method with intermediate spin 10
Cleaning after use 10
Before requesting service 11
Warranty 12
INTRODUCTION
Thank you for buying a Danby appliance. Before operating this unit please read and save these instructions.
Model Number: Serial Number:
Date of Purchase: Place of Purchase:
Dealer's Name and Address:
This information will be required if your unit requires servicing and/or for general inquiries. To contact a Customer Service Representative, call Danby TOLL FREE. 1-800-26 -DANBY
CAREFULLY READ AND SAVE THESE INSTRUCTIONS
These instructions for use are intended for the user. They describe the appliance and correct installation and operating procedures for safe use.
NOTE:
This appliance was carefully packed and thoroughly inspected before leaving our factory. Responsibility for its safe delivery was assumed by the carrier upon acceptance of the shipment. Claims for loss or damage sustained during transit must be made directly to the carrier.
SAFETY INSTRUCTIONS
Save these instructions
- Please read this instruction manual carefully before operating.
- Refer to the Grounding Instructions in the Installation manual for the proper grounding of the washer.
- Do not wash articles that have been previously cleaned in, washed in, soaked in or spotted with gasoline, dry-cleaning solvents, other flammable or explosive substances as they give off vapors that could ignite or explode.
- Do not allow children to play on or in the washer. Close supervision of children is necessary when the washer is used near children.
- Do not reach into the washer if the inner tub or agitator is revolving.
- Do not install or store the washer where it will be exposed to water and/or weather.
- Do not tamper with the controls.
- Do not repair or replace any part of the washer, or attempt any servicing unless specifically recommended in the user maintenance instructions trouble shooting guide that you understand and have the skills to carry out.
- Do not add gasoline, dry-cleaning solvents, or other flammable or explosive substances to the wash water. These substances give off vapors that could ignite or explode.
- Under certain conditions, hydrogen gas may be produced in a hot water system that has not been used for two weeks or more. HYDROGEN GAS IS EXPLOSIVE. If the hot water system has not been used for such a period, before using this washer, turn on all hot water faucets and let the water flow from each for several minutes. This will release any accumulated hydrogen gas. THE GAS IS FLAMMABLE, DO NOTSMOKE OR USE AN OPEN FLAME DURING THIS TIME.
-
Replace worn power cords and/or loose plugs.
-
To reduce the risk of an electric shock or fire, DONOTuse an extension cord or an adapter to connect the washer to the electrical power source.
- Use your washer only for its intended purpose, washing clothes.
- ALWAYS disconnect the washer from electrical supply before attempting any service. Disconnect the power cord by grasping the plug, not the cord.
- Install the washer according to the INSTALLATION INSTRUCTIONS. All connections for water, drain electrical power and grounding must comply with local codes and be made by licensed personnel when required. Do not do it yourself unless you know how!
- To reduce the risk of fire, clothes which have traces of any flammable substances such as vegetable oil, cooking oil, machine oil, flammable chemicals, thinner etc. or anything containing wax or chemicals such as in mops and cleaning cloths, must not be put into the washer. These flammable substance may cause the fabric to catch on fire by itself.
- Do not use fabric softeners or products to eliminate static unless recommended by the manufacturer of the fabric softener or product.
- Keep your washer in good condition. Bumping or dropping the washer can damage safety features. If this occurs, have your washer checked by a qualified serviceman.
- Be sure water connections have a shut-off valve and fill hose connections are tight. CLOSE the shut-off valves at the end of each wash day.
- The LID MUST BE CLOSED any time the washer is to spin. DO NOTby-pass the safety switch by permitting the washer to spin with the lid open. A brake will stop the inner tub within seconds if the lid is opened during spinning. If the inner tub does not stop when the lid is opened, remove the washer from use and call a serviceman.
SAFETY INSTRUCTIONS
- Always follow the fabric care instructions supplied by the garment manufacturer.
- Never operate the washer with any guards and/or panels removed.
- DO NOT operate the washer with broken or missing parts.
- DO NOTby-pass any safety devices.
- Failure to install, maintain, and/or operate this machine according to these instructions may result in conditions which can produce bodily injury and/or property damage.

IMPORTANT
The WARNING AND IMPORTANT SAFETY INSTRUCTIONS appearing in this manual are not meant to cover all possible conditions and situations that may occur. It must be understood that common sense, caution and carefulness are factors which CAN NOT be built into the washer. These factors MUST BE supplied by the person(s) installing, maintaining, or operating the washer.
Always contact your dealer, distributor, service agent or the manufacturer about any problems or conditions you do not understand.

WARNING
To reduce the risk of electric shock, disconnect this appliance from the power supply before attempting any user maintenance. Turning the controls to the OFF position does not disconnect this appliance from the power supply.
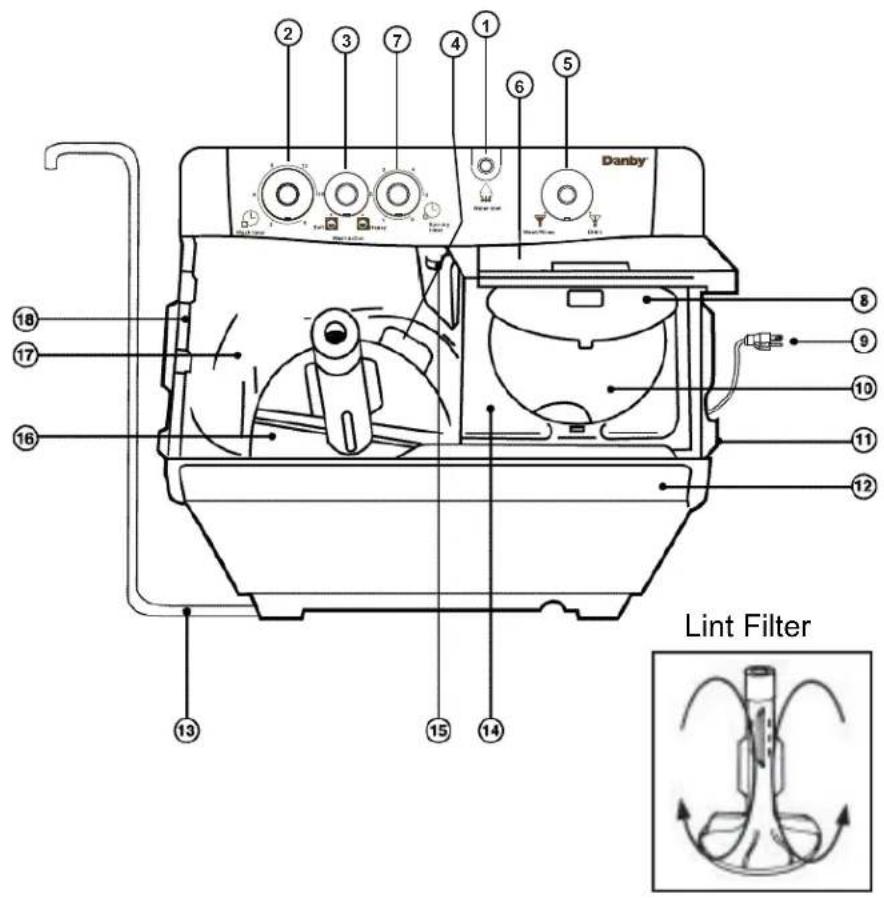
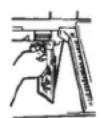
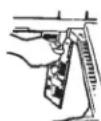
PARTS IDENTIFICATION
- Water Inlet
- Wash timer
- Wash action selector
- Drain strainer
- Drain selector
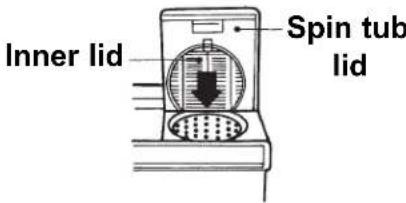
- Spin-tub lid
-
Spin timer
-
Spin-tub inner lid
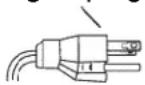
- Power cord
- Spin-tub
11.Hose-hook - Panel front
- Drain hose
-
Rub-wash section
-
Overflow strainer
- Pulsator (with lint filter)
- Wash-tub
- Wash-tub lid
CAUTIONS REGARDING USE
Heat
Many parts of this washing machine are made of plastic; never place hot or burning objects on or near the washing machine.
Using Hot Water
Use only water under 50C. If the hot water to be used is 50C or above, first partly fill the washing machine with cold water, and then add the hot water.
Articles that shouldn't be washed or
spun
Don't put shoes, utensils etc. into the tub to wash or spin. Doing so could cause trouble.
Putting in the clothes
- Do not overload the washing machine.
- Fold up bulky clothing before putting it into the tub
- Do not let the clothes cover the top of the agitator. Doing so could cause a decline in the washing efficiency.
Water tap
Control the water supply by adjusting the tap valve If the water pressure is too high, the water can be sprinkled on the floor

IMPORTANT
This appliance is equipped with a "Water Overflow" safety feature, designed to automatically activate the pump in the event of accidental water overflow. However, this feature is only operational while the appliance remains connected to an electrical source.
CAUTIONS REGARDING USE
This appliance must be grounded. In the event of an electrical short circuit, grounding reduces the risk of electric shock by providing an escape wire for the electric current. This appliance is equipped with a cord having a grounding wire with a grounding plug. This plug must be plugged into an outlet that is properly installed and grounded.

WARNING
Improper use of the grounding plug can result in a risk of electric shock. Consult a qualified electrician or service person if the grounding instructions are not completely understood, or if doubt exists as to whether the appliance is properly grounded. If it is necessary to use an extension cord, use only a three wire extension cord that has a three blade grounding plug, and a three slot receptacle that will accept the plug on the appliance. The marked rating of the extension cord should be equal to or greater than the electrical rating of the appliance.
USE A 3 PRONGED PLUG
3-pronged plug
Recepticle box cover
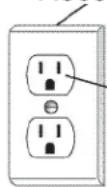
3-pronged recepticle
INSTALLATION INSTRUCTION
Place of installation
Choose a place on a horizontal solid floor. If the machine is installed on an unstable floor, heavy vibration will result during spin.
Keep the machine body more than 5cm apart from the wall surface. If it comes into contact vibration may occur.
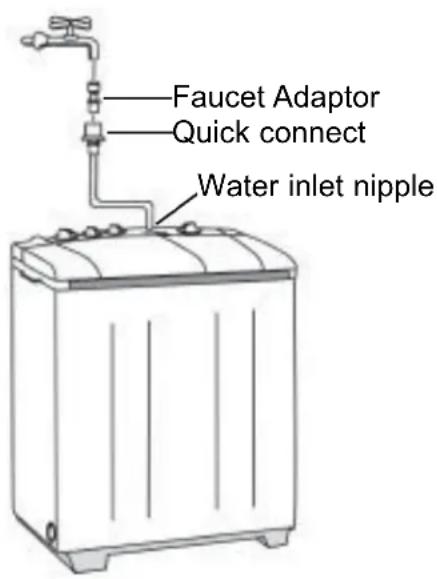
Hose Installation
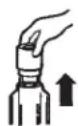
For your convenience, this washing machine is equipped with a "Quick Connect" hose kit. Please follow these instructions:
- Connect the "facet adapter" to your water supply
-
Pressure fit the open end of the hose assembly at least half way down the "water inlet" nipple. No clamps are required to secure this connection because it is not a pressurized line application.
-
Install the "quick connect" fitting to the faucet adapter by pulling down the white collar. Pull down on the white collar to disconnect.
- For portable applications, avoid disconnecting the water hose assembly from the "water inlet nipple" connection. Always disconnect the hose from the "quick connect" side. A "hanger hook" is provided on the "quick connect" which allows you to conveniently hang the hose on the side of the cabinet.
Installing the drain hose
Install the drain hose properly as shown below. Secure the drain hose to the drain outlet pipe, using the clamp provided.
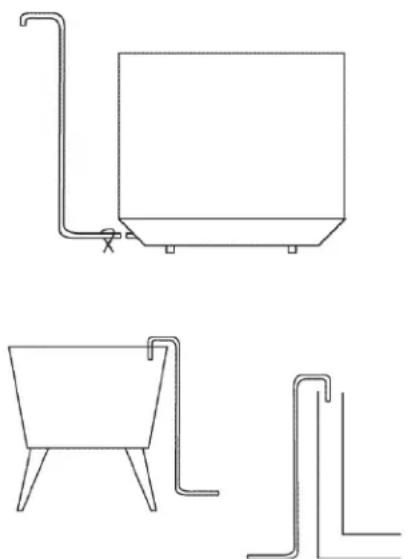
Hook drain hose over the edge of sink or directly into your drain pipe.
WASHING PROCEDURE
A) Laundry Guide
| Wash Load | Type of fabric | Wash Time | Wash Action | Water Level | Amount of Detergent |
| Up to 1.4 kg | Wool, Silk, Polyester Rayon, Thin Clothes | 2 min. Soft | LOW 36 L | Approx. 40 g | |
| Cotton, Linen T-shirts, underwear | 7 min. Normal | ||||
| Heavy soiled cotton Workclothes, Sheets | 10 min. | Normal | |||
| 1.4-2.8 kg | Wool, Silk, Polyester Rayon, Thin Clothes | 4 min. | Soft | MEDIUM 43 L | Approx. 47 g |
| Cotton, Linen T-shirts, underwear | 7 min. | Normal | |||
| Heavy soiled cotton Workclothes, Sheets | 10 min. | Normal | |||
| Above 2.8 kg | Wool, Silk, Polyester Rayon, Thin Clothes | 4 min. | Soft / Normal | HIGH 50 L | Approx. 55 g |
| Cotton, Linen T-shirts, underwear | 7-10 min | Normal | |||
| Heavy soiled cotton Workclothes, Sheets | 10-15 min | Heavy | |||
- The amount of laundry detergent will vary according to the type of detergent used; carefully read the instructions accompanying the detergent.
B) Preparation
- Connect the inlet hose to water tap
- Unhook the drain hose and set it properly
- Plug the power cord into an electric outlet.
.C) Wash
1. Water Level
Set the water level properly according to the size of the load to be washed.
2. Drain Valve selection switch
Set the drain valve selection switch on "Wash/Rinse" position
3. Detergent
Put in the laundry detergent (If the detergent does not dissolve easily, fill the washing machine with a small amount of water and mix the detergent with the water for a few minutes)
4. Clothes
Put in the clothes
(remove any matches, coins, pins, etc., that may be in the pockets of the clothes.)
5 Water supply
Open the water tap and fill the tub to a suitable water level for the wash load.
D) Rinse
1. Drain
Set the drain valve selector switch on DRAIN position It takes about two minutes for the water to drain thoroughly away.
2. Drain switch
Set the drain valve selector switch on WASH/RINSE position again, to stop the drain cycle
3. Water supply
Open the water tap and fill the tub to a suitable level for the laundry
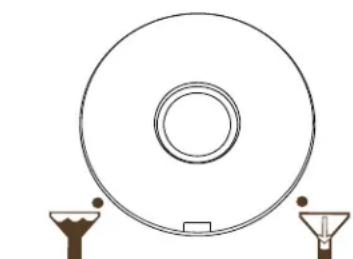
6. Wash action
Select a wash action according to the type of fabric to be washed: Gentle, Normal
7. Wash-tub lid
Close the wash tub lid
8. Wash timer
Turn the wash timer clockwise, until you reach the desired wash time position. The wash cycle starts immediately.
Wash/Rinse Drain
4. Rinse-wash timer
Turn the wash timer to clockwise
Set the time to 2-4 minute position
- Repeat processes 1 to 4 twice or three times according to the condition of the washed laundry.
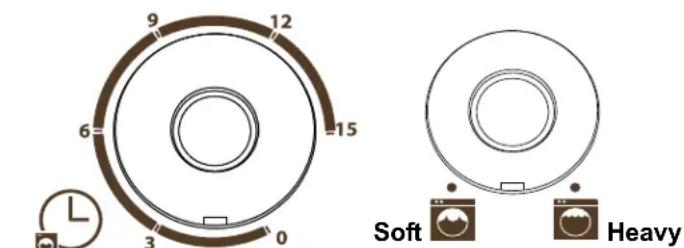
Wash timer
Wash action
WASHING PROCEDURE
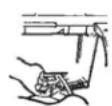
E) Spin
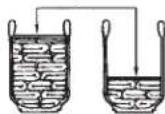
1. Putting in the clothes
Put the wet clothes into the spin-tub
Distribute the clothes in the tub being sure that they are well balanced. Put the safety cover properly on top of the clothes
2. Closing the lids
Close the spin-tub lid and inner lid The machine will not spin if the spin-tub lid is open
3. Spin timer
Turn the timer clockwise until you reach the desired spin time position
Safety Cover
Correct
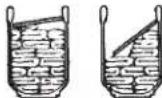
Incorrect
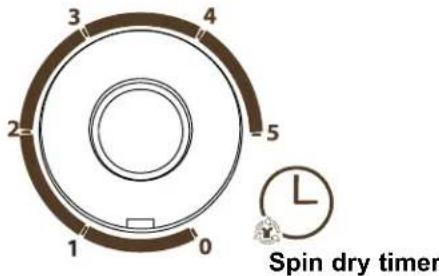
Spin Time
| Type of Fabric | Spin Time |
| Clothes that wrinkle easy (synthetics, fibers, delicate materials) | 1 - 3 min. |
| Clothes that do not wrinkle easy (workclothes, sheets, underwear) | 3 - 5 min. |
Unbalance
If there is any abnormal vibration during spinning, open the lids to stop the spin-tub and rearrange the clothes evenly.
Simultaneous Drain
If the drainage from the wash-tub and spin-tub occur simultaneously, the drainage from spin-tub will be obstructed and there may be a malfunction. Therefore, if you need to drain the wash-tub while spinning, be sure to drain the wash-tub after at least one minute's spinning.
LAUNDRY METHOD WITH INTERMEDIATE SPIN
You can improve the rinsing effect and save rinsing water by using an intermediate spin between wash and rinse process:
1. WASH
- Operate the wash process as described in wash procedure
2. Drain
- Drain the wash-tub by turning the drain valve selection switch to DRAIN position
3. Intermediate Spin
- Move the laundry to the spin-tub
- Operate the spin process for about three minutes as described in the spin procedure
4. Rinse
- Move the laundry to the wash-tub
- Operate the rinse process for about two to three minutes
5. Intermediate spin
- Move the laundry to the spin-tub
- Operate the spin process for about three minutes as described in the spin procedure
6. Overflow Rinse
- Move the laundry to the wash-tub
- Open the water tap
- Operate the rinse process for about two to three minutes continuing water supply
7. Final spin
- Move the laundry to the spin-tub
- Operate the spin process
CLEANING AFTER USE
Cleaning after use will extend the life of your washing machine. Before cleaning, shut off the power switch and disconnect the power cord from the electrical outlet, being sure to take hold of the plug.
Cleaning the body
- Wipe with a soft cloth
- If extremely dirty, wipe with a cloth soaked in a solution of water and dish detergent or soap.
- Do not spray the washing machine with water or use paint thinner, abrasive cleanser, benzene, alcohol, etc., to clean it.
Cleaning the overflow strainer
- Remove the strainer by pulling it forward to push in the strainer during overflow
Cleaning the lint filter Cleaning the drain strainer
- Remove the filter frame by pulling it upward
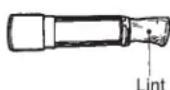
- Turn the filter inside out and wash the lint off with water
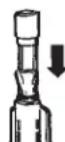
- Insert the filter frame into the center agitator as it was
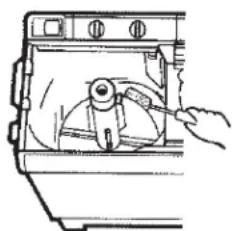
1) Remove the drain strainer from the bottom of the tub using a sharp tool such as a screw driver
2) Wash off the lint stuck in the strainer
3) Re-install the strainer
BEFORE REQUESTING SERVICE
When you suspect your washing machine requires maintenance before calling for service, please check the following points to save unnecessary cost. You may be pleasantly surprised that an apparent malfunction can be easily rectified by following the chart below.
| Problem | Location to be checked |
| The washing machine will not operate at all | ·Is there a power blackout? ·Is the power cord correctly connected to an electricla outlet? ·Is the electric fuse or breaker blown? ·Did you turn the “Wash Timer” knob or “Spin Timer” knob to begin operation? |
| The washing machine will not drain properly | ·Is the drain hose clogged with lint? ·Is the drain hose kinked? ·Is any part of the hose higher than 90 cm (35 inches)? ·Is extension hose longer than 3 m (9 feet)? ·Is a narrow hose being used? |
| There is an abnormal noise during washing | ·Is something touching the agitator as it rotates? |
| Water is not supplied | ·Is the inlet hose connected and the water shut off? ·Has the water supply been shut off due to a water shortage in your area? ·Is foreign matter clogging the water inlet? |
| The washing machine will not spin | ·Is the spin-tub lid open? ·Have any clothes dropped between the spin-tub and the wash-tub? |
| There is a bumping noise of the spin-tub against the wash-tub | ·Is the washing machine level? ·Have the clothes in the tub collected on one side? (Redistribute them evenly) |
Danby
LIMITED IN-HOME APPLIANCE WARRANTY
This quality product is warranted to be free from manufacturer's defects in material and workmanship, provided that the unit is used under the normal operating conditions intended by the manufacturer.
This warranty is available only to the person to whom the unit was originally sold by Danby Products Limited (Canada) or Danby Products Inc. (U.S.A.) (hereafter "Danby") or by an authorized distributor of Danby, and is non-transferable.
TERMS OF WARRANTY
Plastic parts, are warranted for thirty (30) days only from purchase date, with no extensions provided.
First Year During the first twelve (12) months, any functional parts of this product found to be defective, will be repaired or replaced, at warrantor's option, at no charge to the ORIGINAL purchaser.
To obtain Danby reserves the right to limit the boundaries of "In Home Service" to the proximity of an Authorized Service Depot. Any appliance requiring service outside the limited boundaries of "In Home Service", it will be the consumer's responsibility to transport the appliance (at their own expense) to the original retailer (point of purchase) or a service depot for repair. See "Boundaries of In Home Service" below. Contact your dealer from whom your unit was purchased, or contact your nearest authorized Danby service depot, where service must be performed by a qualified service technician.
If service is performed on the units by anyone other than an authorized service depot, or the unit is used for commercial application, all obligations of Danby under this warranty shall be void.
Boundaries of If the appliance is installed in a location that is 100 kilometers (62 miles) or more from the nearest service center your unit must be delivered to the nearest authorized Danby Service Depot, as service must only be performed by a technician qualified and certified for warranty service by Danby. Transportation charges to and from the service location are not protected by this warranty and are the responsibility of the purchaser.
Nothing within this warranty shall imply that Danby will be responsible or liable for any spoilage or damage to food or other contents of this appliance, whether due to any defect of the appliance, or its use, whether proper or improper.
EXCLUSIONS
Save as herein provided, Danby, there are no other warranties, conditions, representations or guarantees, express or implied, made or intended by Danby or its authorized distributors and all other warranties, conditions, representations or guarantees, including any warranties, conditions, representations or guarantees under any Sale of Goods Act or like legislation or statue is hereby expressly excluded. Save as herein provided, Danby shall not be responsible for any damages to persons or property, including the unit itself, howsoever caused or any consequential damages arising from the malfunction of the unit and by the purchase of the unit, the purchaser does hereby agree to indemnify and hold harmless Danby from any claim for damages to persons or property caused by the unit.
GENERAL PROVISIONS
No warranty or insurance herein contained or set out shall apply when damage or repair is caused by any of the following:
1) Power failure.
2) Damage in transit or when moving the appliance.
3) Improper power supply such as low voltage, defective house wiring or inadequate fuses.
4) Accident, alteration, abuse or misuse of the appliance such as inadequate air circulation in the room or abnormal operating conditions (extremely high or low room temperature).
5) Use for commercial or industrial purposes (ie. If the appliance is not installed in a domestic residence).
6) Fire, water damage, theft, war, riot, hostility, acts of God such as hurricanes, floods etc.
7) Service calls resulting in customer education.
8) Improper Installation (ie. Building-in of a free standing appliance or using an appliance outdoors that is not approved for outdoor application).
Proof of purchase date will be required for warranty claims; so, please retain bills of sale. In the event warranty service is required, present this document to our AUTHORIZED SERVICE DEPOT.
Warranty Service
In-home
Danby Products Limited
PO Box 1778, Guelph, Ontario, Canada N1H 6Z9
Telephone: (519) 837-0920 FAX: (519) 837-0449
1-800-263-2629
Danby Products Inc.
PO Box 669, Findlay, Ohio, U.S.A. 45840
Telephone: (419) 425-8627 FAX: (419) 425-8629
04/09
TABLE DES MATIERES
Danby Products Limited
PO Box 1778,Guelph, Ontario, Canada N1H 6Z9
Telephone: (519) 837-0920 FAX: (519) 837-0449
1-800-263-2629
Danby Products Inc.
PO Box 669, Findlay, Ohio, U.S.A. 45840
Telephone: (419) 425-8627 FAX: (419) 425-8629
04/09
INDICE
Danby Products Limited
PO Box 1778, Guelph, Ontario, Canada N1H 6Z9
TWIN TUB WASHING MACHINE
The model number can be found on the serial plate located on the back panel of the unit.
All repair parts available for purchase or special order when you visit your nearest service depot. To request service and/or the location of the service depot nearest you, call the TOLLFREE NUMBER.
When requesting service or ordering parts, always provide the following information:
Product Type
- Model Number
Part Description