DWM17WDB - Washing machine DANBY - Free user manual and instructions
Find the device manual for free DWM17WDB DANBY in PDF.

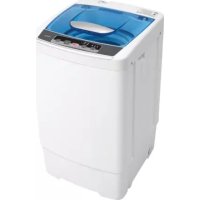
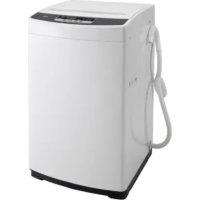
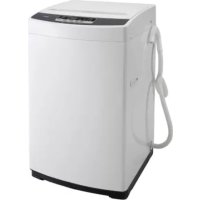
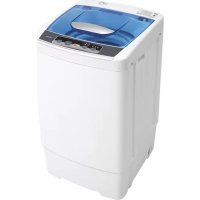
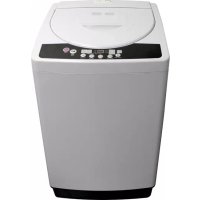
| Product type | Portable top-load washing machine |
| Brand | Danby |
| Model | DWM17WDB |
| Wash capacity | Approximately 1.7 kg |
| Power supply | 120 V, 60 Hz, three-prong grounded plug |
| Loading type | Top-load |
| Wash cycles | Normal, Rinse and drain, Spin |
| Water levels | Multiple selectable levels |
| Temperatures | Cold water, hot water (automatic cold rinse) |
| Compartments | Detergent dispenser, fabric softener dispenser |
| Lint filter | Yes, removable and cleanable |
| Casters | 4 swivel casters for mobility |
| Adjustable foot | Yes, for leveling |
| Sound-dampening pad | Included to reduce vibration |
| Supply hoses | 2 hoses (hot and cold) with quick-connect fittings |
| Drain hose | 1 hose, max height 70 cm |
| Maintenance | Regularly clean the drum, intake filter, and lint filter |
| Safety | Automatic stop when lid is open, mandatory grounding, do not use flammable solvents |
| Warranty | 12 months functional parts, 30 days plastic parts |
| Customer service | 1-800-263-2629 (toll-free) |
Frequently Asked Questions - DWM17WDB DANBY
User questions about DWM17WDB DANBY
0 question about this device. Answer the ones you know or ask your own.
Ask a new question about this device
Download the instructions for your Washing machine in PDF format for free! Find your manual DWM17WDB - DANBY and take your electronic device back in hand. On this page are published all the documents necessary for the use of your device. DWM17WDB by DANBY.
USER MANUAL DWM17WDB DANBY
PORTABLE WASHING MACHINE
Owner's Use and Care Guide 2-14
- Welcome
- Important Safety Information
- Features
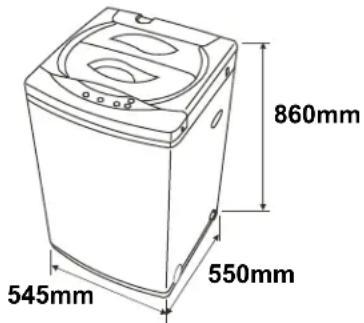
- Installation
Operation Instructions
Care and Maintenance - Troubleshooting
Warranty
LAVEUSE A CHARGEMENT SUPERIEUR
Read and follow all safety rules and operating instructions before first use of this product.

PRECAUTION:
Thank you for choosing a Danby appliance. This Owner's Use and Care Guide will provide you with valuable information necessary for the proper care and maintenance of your new appliance. If properly maintained, your Danby appliance will give you many years of trouble free operation. Please take a few moments to read the instructions thoroughly and familiarize yourself with all of the operational aspects of this appliance.
For easy reference, may we suggest you attach a copy of your sales slip/receipt to this page, along with the following information, located on the manufacturers nameplate on the side of the unit.
Model Number:
Serial Number:
Date of Purchase:
WARNING
Improper connection of the grounding plug can result in risk of Fire, Electric Shock and/or injury to Persons associated with the appliance. Check with a qualified service representative if in doubt that the appliance is propylene grounded.
This information will be necessary if your unit requires servicing and/or for general inquiries. To contact a Customer Service Representative, call Danby TOLL FREE: 1-800-263-2629
FOR YOUR SAFETY: Read these instructions carefully before operating the unit.
SAFETY PRECAUTIONS
- Read all instructions before using the portable washer.
- Do not wash articles that have been previously cleaned in, washed in, soaked in, or spotted with gasoline, dry-cleaning solvents, or other flammable or explosive substances, as they give off vapours that could ignite or explode.
- Do not add gasoline, dry-cleaning solvents, or other flammable or explosive substances to the wash water. These substances give off vapours that could ignite or explode.
- Under certain conditions, hydrogen gas may be produced in a hot-water system that has not been used for 2 weeks or more. HYDROGEN GAS IS EXPLOSIVE. If the hot-water system has not been used for such a period, before using a washing machine, turn on all hot-water faucets and let water flow from each for several minutes. This will release any accumulated hydrogen gas. As the gas is flammable, do not smoke or use an open flame during this time.
DANGER
Risk of child entrapment. Child entrapment and suffocation are not problems of the past. Junked or abandoned appliances are still dangerous . . . even if they will "just sit in the garage a few days."
- Before you throw away your old portable washer: Take off the lid.
- Never allow children to operate, play with, or crawl inside the portable washer. Close supervision of children is necessary when the washer is used near children.
- Do not reach into the washer if the agitator or inner tub is moving.
- Do not tamper with controls.
- Do not repair or replace any part of the washer or attempt any servicing unless specifically recommended in the user-maintenance instructions or in published user-repair instructions.
- Never clean portable washer parts with flammable fluids. The fumes can create a fire hazard or explosion.
- Do not place the washer in steamy rooms or where the washer is directly exposed to rain. Moisture may destroy the electrical insulation causing an electrical shock hazard.
- Do not store, use gasoline, or any other flammable vapors and liquids in the vicinity of this or any other portable washer. The fumes can create a fire hazard or explosion.
- If the power cord is damaged, it must be replaced by the manufacturer or it's service agent or a similar qualified person in order to avoid a hazard.
Save these instructions
- DETERGENT CASE
- SOFTENER DISPENSER
- INNER TUB
- CONTROL PANEL
- BASE
6.NOISE PROOF PLATE - ADJUSTABLE FOOT
- LEVEL ADJUSTABLE KNOB
- DRAIN HOSE (1PC)
- POWER SUPPLY CORD
- AGITATOR
- LINT FILTER
- INLET HOSES (2PCS)

ACCESSORIES
| INLET HOSE | NOISE PROOF PLATE 1 PIECE | CONNECTOR 1 PIECE |

Installation Instructions
BEFORE USING YOUR PORTABLE WASHER

Remove the exterior and interior packing.
You will need the following tools:
Wrench
- Pliers
Screwdriver
Check to be sure you have all of the following parts:
2 Inlet Hoses
- F截图 Adapter
1 Noise Proof Plate With Screws
4 Casters
- Remove shipping brace. Note - It should be saved and used (to prevent damage to washer components) whenever washer is moved or transported to a new location.
- Clean the interior surface with lukewarm water using a soft cloth.
- Allow 2 inches of space between the back and sides of the appliance.
BEFORE USING YOUR PORTABLE WASHER (con't)
- Put your laundry into the washer evenly. Uneven laundry may cause noise or vibration.
- Don't use excessively hot water (50°C or more). Plastic parts may be deformed or damaged. Also, clothing may be deformed or bleached.
- Before washing, check all pockets. If nails or pins remain in pockets, they may damage the washer or clothes.
- Never splash water on the control panel.
- Plug the washer into an exclusive, properly installed-grounded wall outlet.
- Do not under any circumstances cut or remove the third (ground) prong from the power cord. Any questions concerning power and/or grounding should be directed toward a certified electrician.
SELECTING A LOCATION
Before you install the portable washer, select a location with the following characteristics:
- A hard level surface (if the surface is uneven, see Adjusting The Adjustable Foot).
- Away from direct sunlight. Direct sunlight may affect the acrylic coating, plastic and electrical components.
- Adequate ventilation.
- Away from sources of heat such as coal or gas. Make sure that the washing machine does not stand on its power cord. Ventilation openings must not be obstructed by carpeting when the portable washer is installed on a carpeted floor.
LEVELING LEGS

Correct

Incorrect

Incorrect
Loosen
Tighten
Level Adjustable
Knob
“
Adjustable Foot
If the floor is uneven adjust the adjustable foot (do not insert pieces of wood, or any other objects under the feet).
- Loosen the adjustable foot by turning the level adjustable knob with your hand until it is at the desired height.
- Tighten the adjustable foot by turning the level adjustable knob in the reverse direction.
- Place the washer on a sturdy flat surface.
- If the washer is placed on an uneven or weak surface, noise or vibration occurs (Allowable is 1^ ).
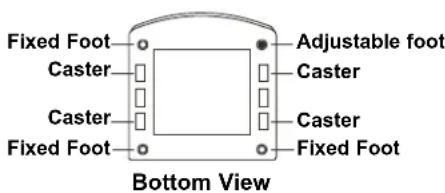
- For portable applications, the washing machine comes equipped with four north/south casters that can easily be installed to assist in the movement of the machine to and from the sink. Lay the unit on its back. Install the casters into the bottom of the base as depicted.
- Return the machine to the upright position. When the machine is positioned for operation set the height of the adjustment foot slightly higher than the front caster to prevent movement of the machine during wash and spin operation.
NOTE: Not all movement will be totally eliminated, this is normal.
INSTALLING A NOISE PROOF PLATE
Take the noise proof plate out of the package.

The opening of the noise proof plate is at the bottom of the machine.

Insert the noise proof plate into the washing machine base.
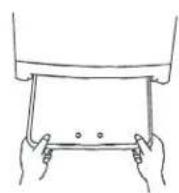
Lay down the machine and secure the noise proof plate by fastening the two set screws.

CONNECTING THE WATER SUPPLY HOSE
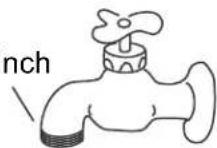
WATER FAUCET
Water supply faucets must fit standard 3/4 inch (19.05mm) female garden hose couplings. Do not use slip-on or clamp-on connections.
Standard 3/4 Inch
Note: Refer to section on water supply requirements before connecting water inlet hoses.

If you just have one water supply line (cold or warm water), connect the inlet hose to the cold water connector on the water mixing valve.
IMPORTANT
In this situation you can not set the wash temperature to hot.
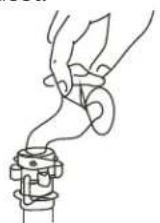
Hold down the plate of the inlet hose connector and disconnect the tap connector from the inlet hose connector.
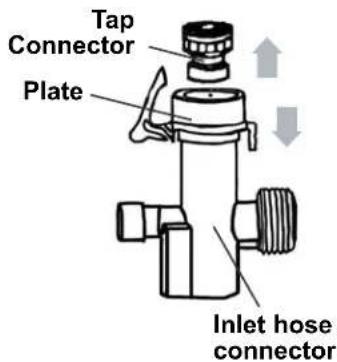
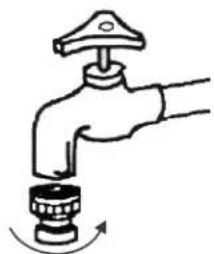
Screw on the tap connector counter clockwise.
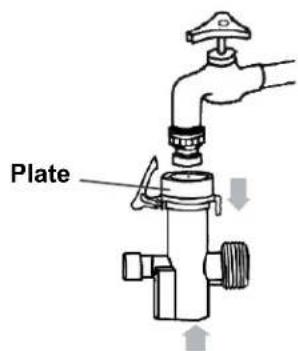
Hold down the plate and connect the inlet hose connector to the tap connector.
CONNECTING THE WATER SUPPLY HOSE
Connect the water inlet hose to the connector by turning the connecting nut.
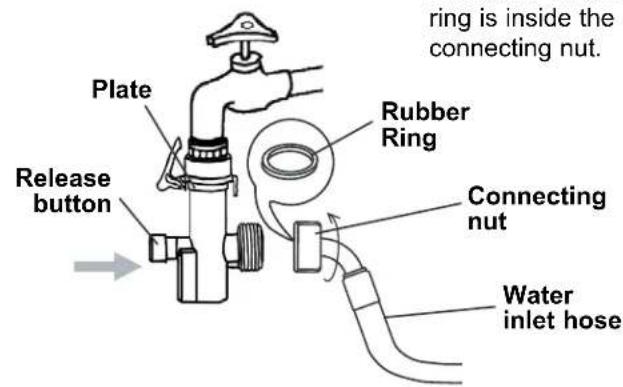
To release, turn off the water faucet and press the release button to release the pressure of water then press down the plate.
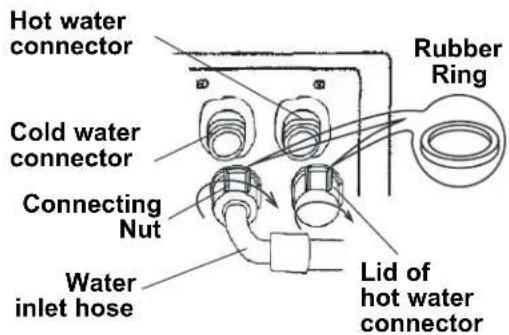
Do not unscrew the lid of the hot water connector on the water mixing valve, and then connect the other end of water inlet hoses to the cold connector in water mixing valve by turning the connecting nut.
2
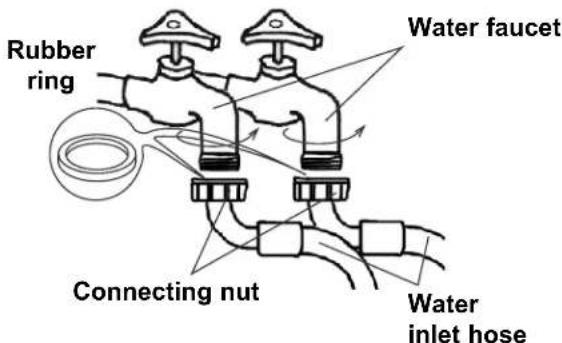
If you have both cold and hot water supplied, connect the inlet hose cold to cold and hot to hot.
Connect the water inlet hose to the tap connector by turning the connecting nut.
To release, turn off the water faucet and turn on the washer to run about 5 minutes and then disconnect the inlet hoses.
Unscrew the lid of the hot water connector in water mixing valve, and then connect the other end of water inlet hoses to the connectors in water mixing valve by turning the connecting nut.
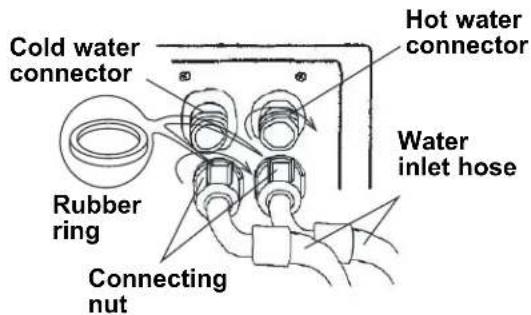
Note:
- Do not over tighten or cross thread the nut in order to prevent the elbow of the water inlet from breaking.
- If water seeps, you should check the nut to see if there is a rubber sealed ring.
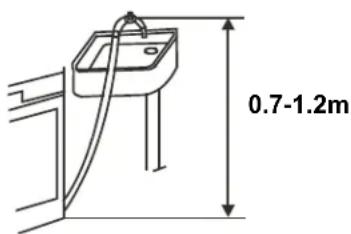
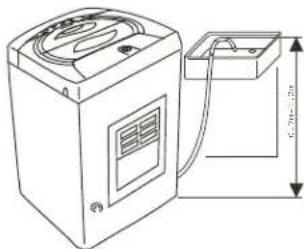
POSITIONING THE DRAIN HOSE
Connect the drain hose to the water outlet of the washing machine then fasten it with a pinchcork. Since both horizontal or vertical drainage is available, the drain hose can be laid down on the ground, or in the basin or bathtub, as long as the drainage range is not higher than 70~cm (27").
Improper use of the grounded plug can result in the risk of electrical shock. If the power cord is damaged, have it replaced by an authorized service technician.
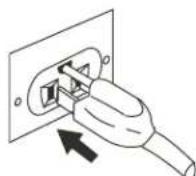
This portable washer should be properly grounded for your safety. The power cord of this portable washer is equipped with a three-prong plug which mates with standard three prong wall outlets to minimize the possibility of electrical shock.
Do not under any circumstances cut or remove the third ground prong from the power cord supplied.
This portable washer requires a standard 120 Volts~/.60Hz electrical outlet with three-prong ground.
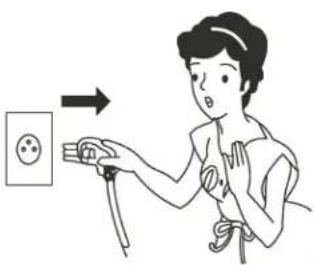
To prevent injury the cord should be secured behind the portable washer and not left exposed or dangling.
Never unplug the portable washer by pulling the power cord. Always grip the plug firmly and pull straight out from the receptacle.
Do not use an extension cord with this appliance. If the power cord is too short, have a qualified electrician or service technician install an outlet near the appliance.

Operating Instructions
CONTROL PANEL
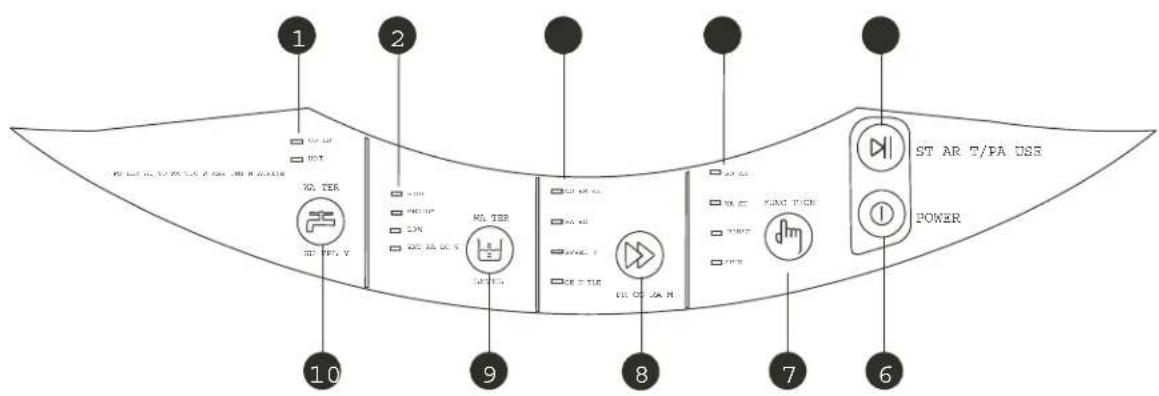
- Water Temperature Indicator
- Water Level Indicator
- Wash Mode Selection Indicator
- Process Selection Indicator
-
Start/Pause Button
-
Power Button
- Function Selection Button
- Wash Selection Button
- Water Level Selection Button
- Water Temperature Selection Button
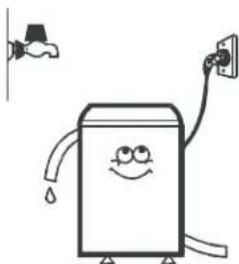
PREPARATION
1) Connect the inlet hose and turn on the faucet, Don't switch on the power if water pressure is lower than 0.05 Mpa and higher than 0.5 Mpa.
2) Open the faucet.
3) Put the plug into the socket. For safety the plug should have ground connection.
4) Insert the end of the drain hose into the hook shelf, and hang the drain hose over a drain outlet.
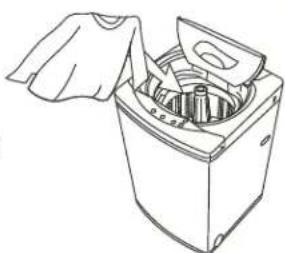
5) Put the wash load into the tub and close the lid.
If the lid is not closed the washing machine will not operate.
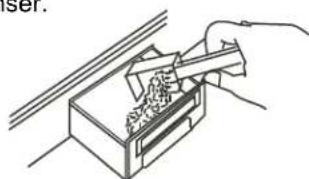
6) Add the suitable quantity of detergent into the detergent dispenser.
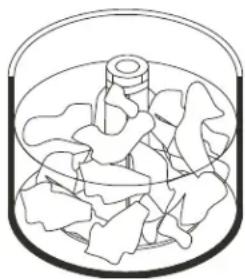
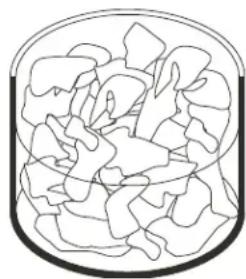
BEFORE WASHING
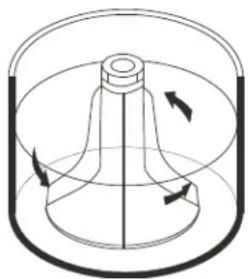
Prepare the wash load. Mix large and small articles in a load to get the best washing results. Drop articles loosely into the inner tub. Do not pack articles in or wrap them. Articles should move freely through the wash water for best cleaning results. Articles should rollover, sink and then reappear.
When washing very large articles, do not fill inner tub as full as with other loads. The water level in your washer should fit the size of your wash load. Small load will use lower water levels. There must be enough water in the inner tub to allow articles to move and turn over freely. Overloading the inner tub can result in poor washing and rinsing. Overloading may also cause wrinkling and tearing of articles.
WATER LEVEL
RIGHT WRONG
OPERATING
Press down the power button.
Press down the water level button.
Choose appropriate water level according to wash load quantity and then the corresponding indicator will blink.
Water temperature choice
Push down the water temperature choice button, you can choose the inlet (cold water or hot water). When the cold-water indicator and the hot-water indicator turn on simultaneously, means you chose the warm water.
NOTE: The washer will provide a cold rinse in all TEMPERATURE settings.
IMPORTANT: A single cold hose system does not allow the washing machine to automatically (select) regulate incoming water temperatures to match those listed on the control panel such as WARM or HOT.
Press down the program select button.
Choose the appropriate program mode according to wash load quantity and then the corresponding indicator blink.
Press down the function select button.
Choose the desired function group and then the corresponding indicator will blink.
Press down the Start/Pause button once and the machine will begin operation.
Please press this button to stop the normal operation, if it continues to work, press it again. Water level can be reset during the normal operation. If higher water level is selected, the machine will operate after refilling the water.
FUNCTIONS
Each wash is preprogrammed; see the details in the wash program chart.
| SOAK | WASH | RINSE | SPIN | |
| Normal | 20 min | 12 min | 2 cycles | 5 min |
| Hard | 30 min | 12 min | 2 cycles | 5 min |
| Speedy | 10 min | 5 min | 1 cycle | 2.5 min |
| Gentle | 10 min | 4 min | 2 cycle | 5 min |
Note:
Clothes easily discolored should be washed separately to prevent inter-dyeing.
- If you want to change a selected program, press the Start/Pause button first, then press the Program button before pushing Start/Pause button again to restart.
- When Rinse & Drain program is on, do not use detergent.
- If you want to drain water during washing, press the Start/Pause button, then select Rinse and Drain program. Press Start/Pause button again to restart.
- If you open the lid, all the operations would be interrupted within 7 seconds, closing the lid the operation would continue.
CLEANING
- Clean the surface of your portable washer regularly with soft fabric.
- Clean the inner tub regularly, especially immediately after starch or bleach operation.
-
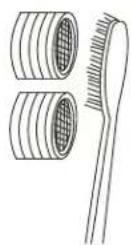
Clean the filter in the inlet valve or inlet hose regularly in order to prevent it from clogging.
-
Unplug the power cord.
- Remove the inlet hose and clean the filter with a brush.
-
Clean the surface of the washing machine with a soft cloth regularly.
Clean the inner tub regularly, especially after washing starched or bleached laundry. -
Clean the lint filter.
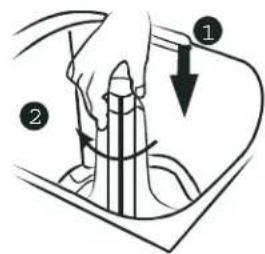
Insert the filter frame into the agitator as it was.
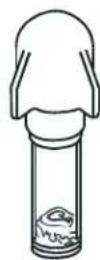
Turn the filter inside out and wash the lint off with water.
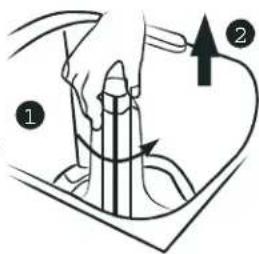
Remove the filter frame by pulling it upward.
Vacation Time
- Turn off the tap, remove water inlet hose and let water drain out from the hose.
- Set spin cycle for 1 minute.
- Unlug the power cord.


Occasionally a problem may arise that is minor in nature, and a service call may not be necessary. Use this troubleshooting guide for a possible solution. If the unit continues to operate improperly, call an authorized service depot or Danby's Toll Free Number 1-800-263-2629 for assistance.
| PROBLEM | POSSIBLE CAUSE |
| Washer does not operate. | Not plugged in. The circuit breaker tripped or a blown fuse. The lid is not closed. Make sure the water source is turned on. |
| No water or insufficient water supply. | The water source faucet is not turned on. The water source hose is frozen. The water intake hose is bent. The filter on the water intake hose is clogged. |
| The washing machine does not drain. | The drain hose is squashed or bent. The water hose mesh filter is clogged. |
| Washing machine vibrates or is too noisy. | Check to assure that the washer is level. The washing machine is touching another object. The laundry load is not balanced. |
| Washing machine does not spin. | The lid is not closed. The washer is not on a level surface. |
Danby
LIMITED IN-HOME APPLIANCE WARRANTY
This quality product is warranted to be free from manufacturer's defects in material and workmanship, provided that the unit is used under the normal operating conditions intended by the manufacturer.
This warranty is available only to the person to whom the unit was originally sold by Danby Products Limited (Canada) or Danby Products Inc. (U.S.A.) (hereafter "Danby") or by an authorized distributor of Danby, and is non-transferable.
TERMS OF WARRANTY
Plastic parts, are warranted for thirty (30) days only from purchase date, with no extensions provided.
| First Year | During the first twelve (12) months, any functional parts of this product found to be defective, will be repaired or replaced, at warrantor's option, at no charge to the ORIGINAL purchaser. |
| To obtain Service | Danby reserves the right to limit the boundaries of "In Home Service" to the proximity of an Authorized Service Depot. Any appliance requiring service outside the limited boundaries of "In Home Service", it will be the consumer's responsibility to transport the appliance (at their own expense) to the original retailer (point of purchase) or a service depot for repair. See "Boundaries of In Home Service" below. Contact your dealer from whom your unit was purchased, or contact your nearest authorized Danby service depot, where service must be performed by a qualified service technician.If service is performed on the units by anyone other than an authorized service depot, or the unit is used for commercial application, all obligations of Danby under this warranty shall be void. |
| Boundaries of In Home Service | If the appliance is installed in a location that is 100 kilometers (62 miles) or more from the nearest service center your unit must be delivered to the nearest authorized Danby Service Depot, as service must only be performed by a technician qualified and certified for warranty service by Danby. Transportation charges to and from the service location are not protected by this warranty and are the responsibility of the purchaser. |
Nothing within this warranty shall imply that Danby will be responsible or liable for any spoilage or damage to food or other contents of this appliance, whether due to any defect of the appliance, or its use, whether proper or improper.
EXCLUSIONS
Save as herein provided, Danby, there are no other warranties, conditions, representations or guarantees, express or implied, made or intended by Danby or its authorized distributors and all other warranties, conditions, representations or guarantees, including any warranties, conditions, representations or guarantees under any Sale of Goods Act or like legislation or statue is hereby expressly excluded. Save as herein provided, Danby shall not be responsible for any damages to persons or property, including the unit itself, howsoever caused or any consequential damages arising from the malfunction of the unit and by the purchase of the unit, the purchaser does hereby agree to indemnify and hold harmless Danby from any claim for damages to persons or property caused by the unit.
GENERAL PROVISIONS
No warranty or insurance herein contained or set out shall apply when damage or repair is caused by any of the following:
1) Power failure.
2) Damage in transit or when moving the appliance.
3) Improper power supply such as low voltage, defective house wiring or inadequate fuses.
4) Accident, alteration, abuse or misuse of the appliance such as inadequate air circulation in the room or abnormal operating conditions (extremely high or low room temperature).
5) Use for commercial or industrial purposes (ie. If the appliance is not installed in a domestic residence).
6) Fire, water damage, theft, war, riot, hostility, acts of God such as hurricanes, floods etc.
7) Service calls resulting in customer education.
8) Improper Installation (ie. Building-in of a free standing appliance or using an appliance outdoors that is not approved for outdoor application).
Proof of purchase date will be required for warranty claims; so, please retain bills of sale. In the event warranty service is required, present this document to our AUTHORIZED SERVICE DEPOT.
Warranty Service
In-home
Danby Products Limited
PO Box 1778, Guelph, Ontario, Canada N1H 6Z9
Telephone: (519) 837-0920 FAX: (519) 837-0449
1-800-263-2629
Danby Products Inc.
PO Box 669, Findlay, Ohio, U.S.A. 45840
Telephone: (419) 425-8627 FAX: (419) 425-8629
04/09
Bienvenue
Danby Products Limited
PO Box 1778,Guelph, Ontario, Canada N1H 6Z9
Telephone: (519) 837-0920 FAX: (519) 837-0449
1-800-263-2629
Danby Products Inc.
PO Box 669, Findlay, Ohio, U.S.A. 45840
Telephone: (419) 425-8627 FAX: (419) 425-8629
04/09
Bienvenida
PORTABLE WASHING MACHINE
The model number can be found on the serial plate located on the back panel of the unit.
All repair parts are available for purchase or special order when you visit your nearest service depot. To request service and/or the location of the service depot nearest you, call the TOLL FREE NUMBER.
When requesting service or ordering parts, always provide the following information:
Product Type
- Model Number
Part Number
Part Description