LTL 1406 CK - TV TOKAI - Free user manual and instructions
Find the device manual for free LTL 1406 CK TOKAI in PDF.

User questions about LTL 1406 CK TOKAI
0 question about this device. Answer the ones you know or ask your own.
Ask a new question about this device
Download the instructions for your TV in PDF format for free! Find your manual LTL 1406 CK - TOKAI and take your electronic device back in hand. On this page are published all the documents necessary for the use of your device. LTL 1406 CK by TOKAI.
USER MANUAL LTL 1406 CK TOKAI
2 MANUEL D'UTILISATION
48 USER MANUAL
94 MANUAL DEL USUARIO
Lire attentivement la notice avant d'utiliser I' apparéil Before operating this product, please read user manual completely Lea attentamente el manual del usuario antes de utiliser el aparato
Sommaire
2.2. Apparel principal
4.2 OPTIONS DU MENU VIDÉO (Image)
- SafetyWarnings and Cautions 48
2.Description of main unit and remote-control unit 53
2.1. Connection and preparation for use 53
2.2. Main Unit 54
2.3. Front Panel Control 54
2.4. Remote-Control Unit 55
- Illustration of the interface and connection signal 58
3.1. Illustration of the interface 58
3.2.Batteries Installation of Remote-Control Unit 59
3.3.Connection signal 59
- Basic Operation 64
4.1. First Time Installation 64
4.2.VIDEO MENU OPTIONS (Picture) 65
4.3.AUDIO MENU OPTIONS (SOUND) 66
4.4. FUNCTION 66
4.5.ATV 69
4.6.DTV 72
4.7. TELETEXT (in ATV & DTV mode) 79
4.8.PC 80
4.9.HDMI/YPBPR 80
4.10.MEDIA 82
4.11.RECORDER 87
4.12.TV Program Guide 89
- PC Mode 90
6.Trouble Shooting 91 - TV Specification 92
English
1. SafetyWarnings and Cautions
Safety guidelines

This symbol indicates that the presence of conductive electric currents inside the appliance may cause an electric shock.

The exclamation point within an equilateral triangle is intended to alert the user to the presence of important operating and maintenance (servicing) instructions in the literature accompanying the appliance.
END OF LIFE DISPOSAL

Warning! This logo set on the product means that the recycling of this apparatus comes within the framework of the Directive 2002/96/CE of January 27, 2003 concerning the Waste of Electrical and Electronic Equipment (WEEE).
This symbol means that used electrical and electronic products should not be mixed with general household waste. There is a separate collection system for these products.
If you want to dispose of this equipment, please do not use the ordinary dust bin!
---The presence of dangerous substances in the electrical and electronic equipments can have potential consequences on the environment and human health in the cycle of reprocessing this product.
---Therefore, at the end of its lifetime, this product shall not be disposed with other non-recycle waste. Used electrical and electronic equipment must be treated separately and in accordance with legislation that requires proper treatment, recovery and recycling of used electrical and electronic equipment.
---Local authorities and resellers have set special procedures for the purpose of collecting and recycling this product (please contact your local authority for further details). You have the obligation to use the selective waste collection systems put in place by your local authority.
---If your used electrical or electronic equipment has batteries or accumulators, please dispose of these separately beforehand according to local requirements.
---By disposing of this product correctly you will help ensure that the waste undergoes the necessary treatment, recovery and recycling and thus prevent potential negative effects on the environment and human health which could otherwise arise due to inappropriate waste handling.
| CE | This unit complies with European Council Directive 2006/95 CE (Electromagnetic Compatibility & Low Voltage Directives) |

Warning
High voltages are used in the operation of this product. Do not remove the cabinet back from your set. Refer servicing to qualified service personnel.

Warning
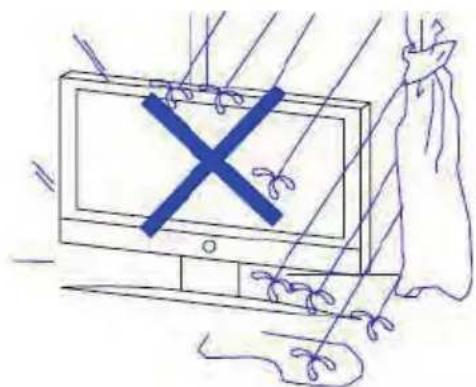
To prevent fire or electrical shock hazard, do not expose the main unit to rain or moisture.

Warning
Do not drop or push objects into the television cabinet slots or openings. Never spill any kind of liquid on the television receiver.
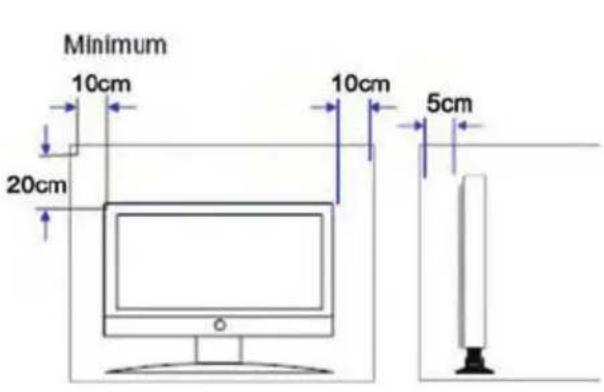

If the television is to be built into a compartment or similarly enclosed, the minimum distances must be maintained. Heat build-up can reduce the service life of your television, and can also be dangerous.
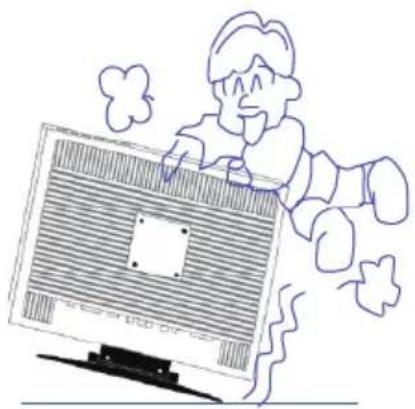

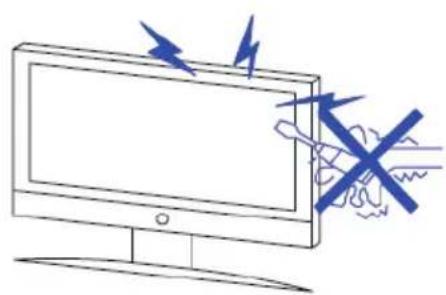
Never stand on, lean on, or push the product or its stand suddenly. You should pay special attention to children.
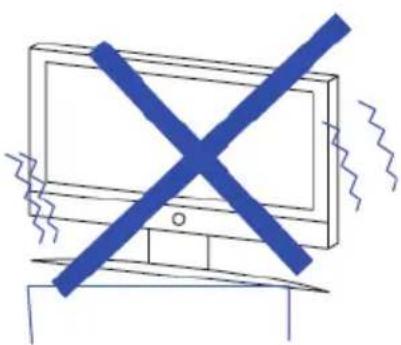

Do not place the main unit on an unstable cart stand, shelf or table. Serious injury to an individual, and damage to the television may result if it should fall.
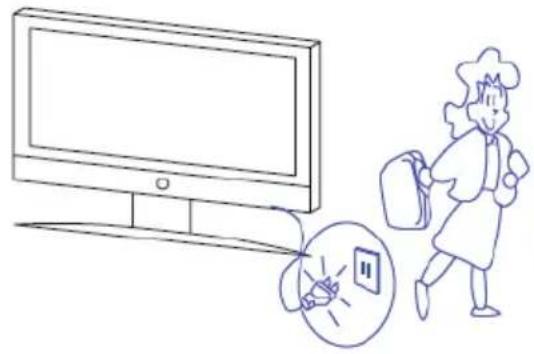

When the product is not used for an extended period of time, it is advisable to disconnect the AC power cord from the AC outlet.
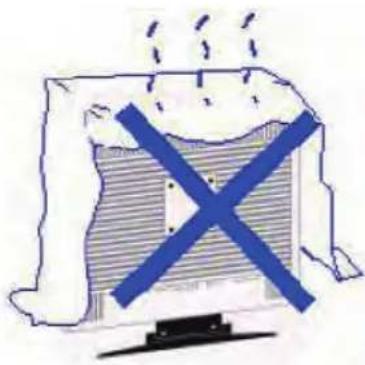

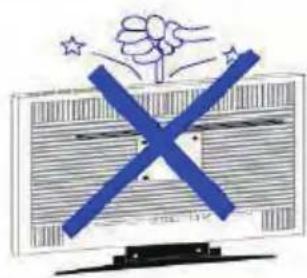
Avoid exposing the main unit to direct sunlight and other sources of heat. Do not stand the television receiver directly on other products which give off heat. E.g. video cassette players, audio amplifiers. Do not block the ventilation holes in the back cover. Ventilation is essential to prevent failure of electrical component. Do not squash power supply cord under the main unit.

The LCD panel used in this product is made of glass. Therefore, it can break when it is dropped or excess force is applied. Be careful not to be injured by broken glass pieces in case the LCD panel breaks. Also, care should be taken so as not to be injured when mounting the unit on the wall or any other location.

When unit is mounted to a caravan or other moving vehicle, please ensure that the unit is firmly secured to wall and supported underneath whilst traveling.
English
Condensation: Humidity might form on the reading lens when the unit is taken from a cold place to a warm place. If condensate has formed inside the appliance, this latter might not work correctly. In such case, do not use the appliance a few hours before you use it again.
Power source: Only use this unit with one of the power sources specified in the user's guide and on the identification label.
Power Cord: To unplug the mains power cord, pull it by the plug. Never pull on the cord itself. Never touch the mains power plug if your hands are wet as this may cause an electric shock or a fire. Power cords must be correctly fixed in order to prevent them from being damaged. Pay peculiar attention to the cord connecting the unit to the mains power plug. Avoid overloading mains wall outlets and extension cords beyond their capacity as this could cause a fire or an electric shock.
2. Description of main unit and remote-control unit
2.1. Connection and preparation for use
Supplied Accessories
Remote Control
User Manual
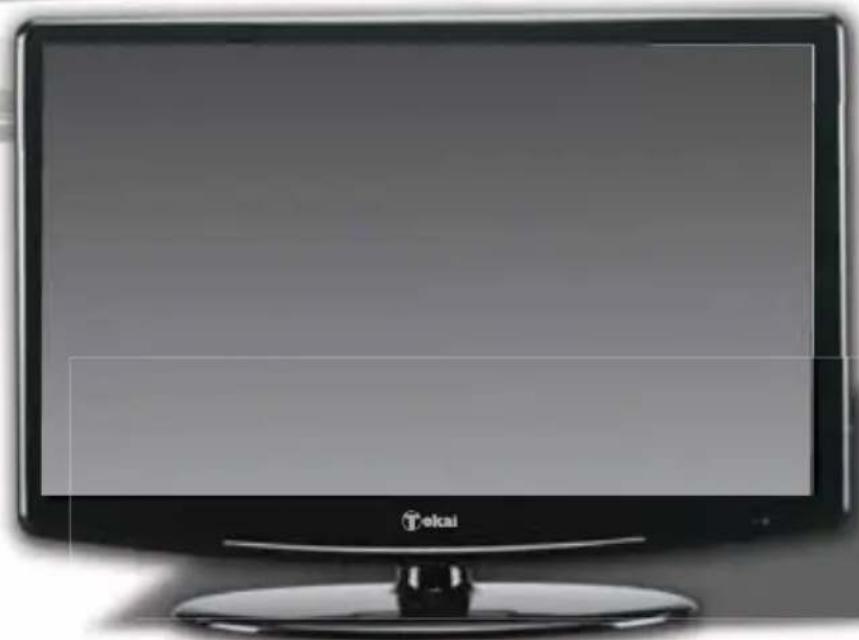
2.2. Main Unit
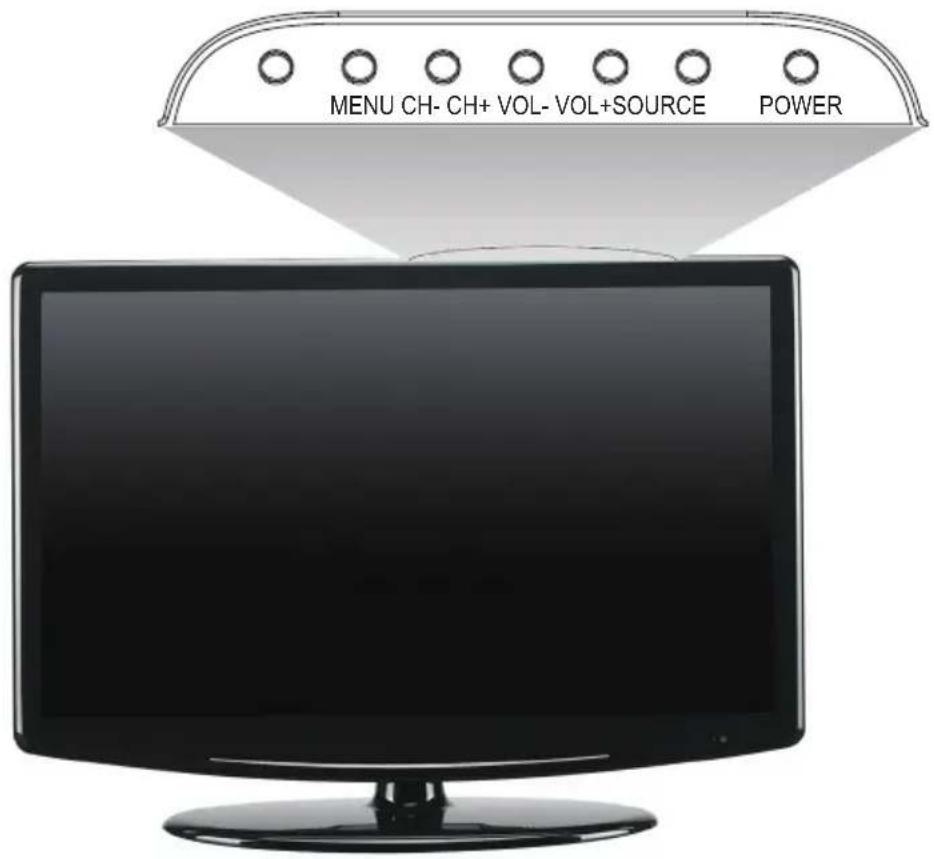
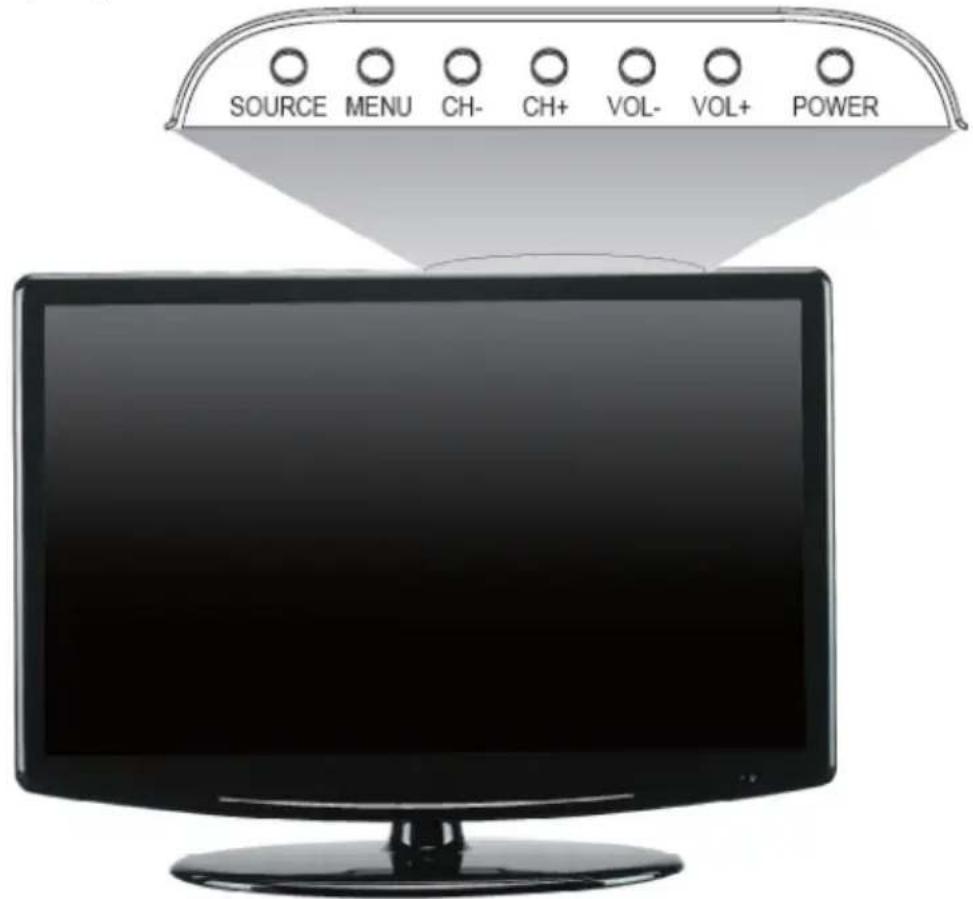
2.3. Front Panel Control
2.2.1. POWER - Turn on the TV by pressing the button once. Press the button again to turn off the TV.
2.2.2. VOL(-) - This button decreases the TV's volume. If the OSD menu is active, pressing this button will move the selection to the left.
2.2.3. VOL(+) - This button the TV's volume. If the OSD menu is active, pressing this button will move the selection to the right.
2.2.4. CH(-) - This button changes the TV channel downward. If the OSD menu is active, this button functions as down control for the menu.
2.2.5. CH+ - This button changes the TV channel upward. If the OSD menu is active, this button functions as up control for the menu.
2.2.6. MENU - This button activates the On Screen Display (OSD) menu. If a sub-menu is active, pressing this button will return selection to the previous menu level.
2.2.7. SOURCE - This button switches between all the different sources of the TV. When the OSD is active, this button acts as the enter button and confirms the menu selection.

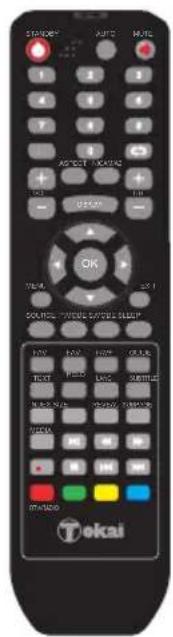
2.4. Remote-Control Unit
English
| NO | Button | Description |
| 1 | STANDBY | Press the button to turn on TV, press again to enter to standby state. |
| 2 | AUTO | Press to auto adjust the screen position. (PC mode) |
| 3 | Press the button to mute the sound output. Press it again to restore it. | |
| 4 | Numbers | Press to select the TV channel you want to enter, or input password numbers. |
| 5 | -/- | If you want to choose over 9 channel, you can use the button. |
| 6 | Press the button to switch between the current and the previous channel. | |
| 7 | ASPECT | Press the button you can adjust screen play mode. |
| 8 | NICAM/A2 | Press the button, you can choose different audio system. |
| 9 | VOL+/- | Adjust the TV volume. |
| 10 | CH+/- | Adjust the TV channel. |
| 11 | DISPLAY | Press this button to display the current mode / current information. |
| 12 | ▼/▲/←▼ | Allows you to navigate the OSD menus and adjust the system settings to your preference. |
| OK | Press this button to confirm and enter you desired items. | |
| 13 | Menu | Press the button to display the OSD (on-screen display) menu for adjusting the image, sound and functions. Pressing this button again removes the OSD display. |
| 14 | EXIT | Clear all on screen display and return to TV viewing from any menu. It is not available in USB mode. |
| 15 | SOURCE | Press this button to open the input source OSD menu. |
| 16 | P.MODE | Press the button you can switch image input mode. |
| 17 | S.MODE | Press the button you can switch sound input mode. |
| 18 | Sleep | Press this button to set up the TV auto turn off time. |
| 19 | FAV | Display the favourite channel list. |
| 20 | FAV- | Press these buttons to increase favorite channel. |
| 21 | FAV+ | Press these buttons to decrease favorite channel. |
| 22 | GUIDE | Display the TV Programme Guide. |
| 23 | TEXT | Press this button to turn on the Teletext function press again to turn it off. |
| 24 | HOLD | Press this button to freeze the analogue text image on the screen (the signal will continue to be broadcast). Press the button again to unfreeze. |
English
| NO | Button | Description |
| 25 | LANG | Press this button you can select available Languages in DTV mode. |
| 26 | SUBTITLE | Display the subtitle which is broadcast with the programme. (DTV mode) |
| 27 | INDEX | Press this button to go to the analogue Teletext index page. |
| 28 | SIZE | Press this button to select the analogue Teletext Size. |
| 29 | REVEAL | Press this button to display hidden analogue Teletext information. |
| 30 | SUBPAGE | Press this button to turn on Subpage and press again to turn it off. |
| 31 | MEDIA | Press the button to directly enter the USB source. |
| 32 | II | In Media mode play/pause the USB content. In DVB-T mode start to time shift. In DTV pause picture on the screen. |
| 33 | ←→ | Press to play a USB program in fast rewind or forward mode. |
| 34 | ● | Press the button to directly record the DTV into USB disk. |
| 35 | ■ | Press this button and the USB stop, and press again the USB playing. |
| 36 | |←→| | Press to go to the previous or next chapter in USB mode. |
| 37 | DTV/RADIO | Press this button can switch DTV or Digital Radio. Press red button to enter corresponding item in the OSD menu or Page in TXT function. |
| 38 | Coloured buttons | Press the Coloured buttons to enter corresponding item (in OSD Menu) or page (in TXT function). |

- To operate the LCD TV, you must point the remote control at the remote sensor of the TV (Objects placed between them may affect the operation).
- Never let the remote sensor on the TV become exposed to the direct sunlight or strong light
3. Illustration of the interface and connection signal
3.1. Illustration of the interface
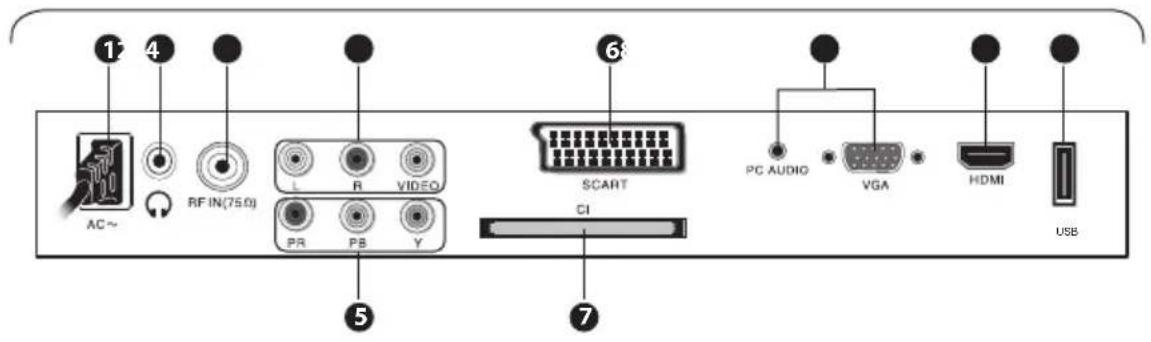
Item Description
| 1 AC ~ AC 100-240V Power input for the LCD TV. | |
| 2 Q | Connect earphones for private listening. |
| 3 RF IN (75 Ω) | Connect to the aerial socket on the wall with the RF coaxial cable. |
| 4 VIDEO / AUDIO (L/R) | Connect to the Composite Video and AUDIO (L/R) output sockets on external video devices. |
| 5 Y, PB, PR | Connect a component video device to these jacks. |
| 6 SCART Connect SCART out from a SCART device to the SCART input. | |
| 7 CI Slot Allows the insertion of a Common Access Module. | |
| 8 VGA / PC AUDIO Connect to a computer or other devices with a VGA interface. | |
| 9 HDMI | Connect a signal to HDMI (High-Definition Multimedia Interface). |
| 10 USB port | Allows the insertion of a USB storage device. |
3.2. Batteries Installation of Remote-Control Unit
- Turn the remote-control unit upside down. Scratch the grip of the battery compartment.
- Install two new 1.5V AAA batteries, make sure the anode and cathode of the batteries matches the "+" marks inside the battery compartment. Or not it would damage the unit.
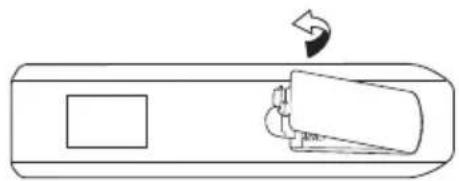
- Close the battery compartment cover.
3.3. Connection signal
3.3.1.HDMI connection
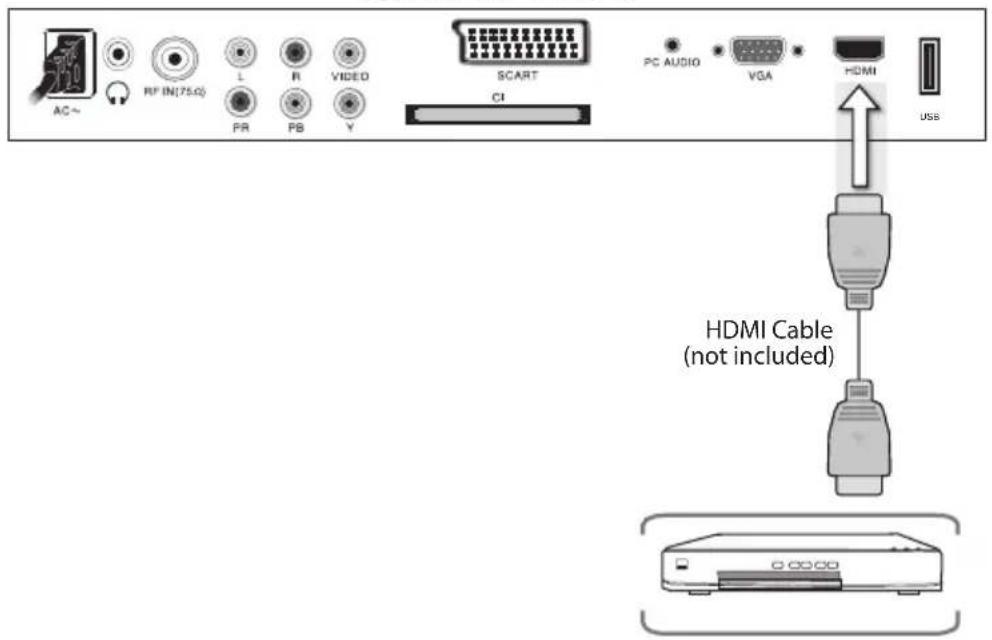
Right Rear Side View of TV
- Turn off the power to the LCD TV and DVD player.
- Connect a HDMI cable to the HDMI output of your DVD player and the other end to the HDMI input in the rear of your LCD TV.
- Turn on the power to the LCD TV and your DVD player.
- Select Digital HD by pressing the SOURCE button on the front of the LCD TV or on the Remote Control
3.3.2. PC and Audio connection
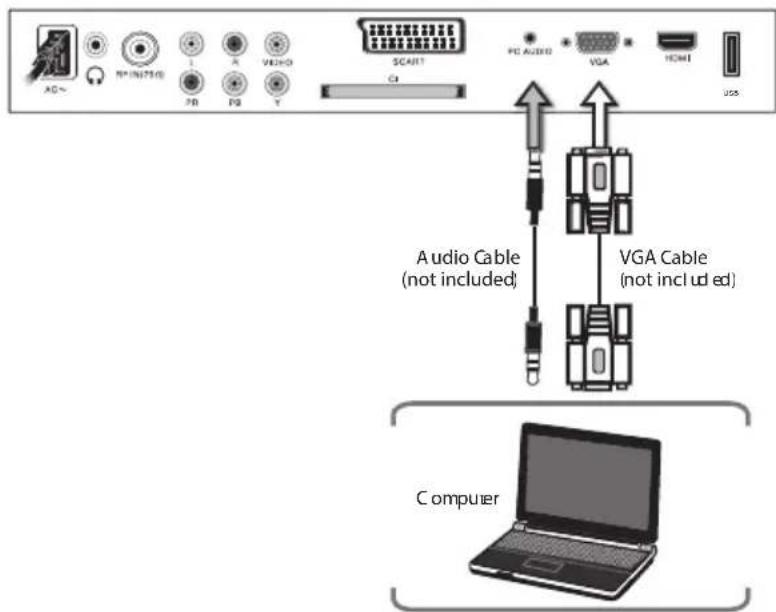
- Turn off the power to your LCD TV and Computer.
- Connect a 15-pin D-sub RGB (VGA) cable to the RGB output of your computer and the other end to the VGA input (purple area) in the rear of your LCD TV.
- Connect the Audio Out on your computer to the RGB Audio (purple band) at the rear of your LCD TV.
- Turn on the power to your LCD TV and computer.
- Select PC by pressing the SOURCE button on the front of your LCD TV or on the Remote Control.
3.3.3.CVBS and Audio connection
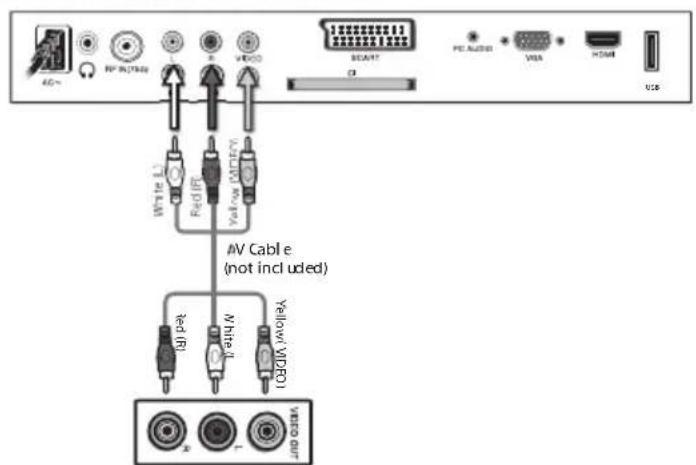
- Turn off the power to the LCD TV and DVD player.
- Connect the CVBS jack on the rear of your DVD player to the CVBS out on the rear side of your LCD TV. (Video Cable not supplied)
- Connect the R (red color) and L (white color) audio connectors on the rear of your DVD player to the R (red color) and L (white color) audio input connectors in the side of your LCD TV. (Audio L/R cable not supplied)
- Turn on the power to the LCD TV and DVD player.
- Select AV by pressing the SOURCE button on the front of your LCD TV or on the Remote Control.
3.3.4. YPBYR and Audio connection
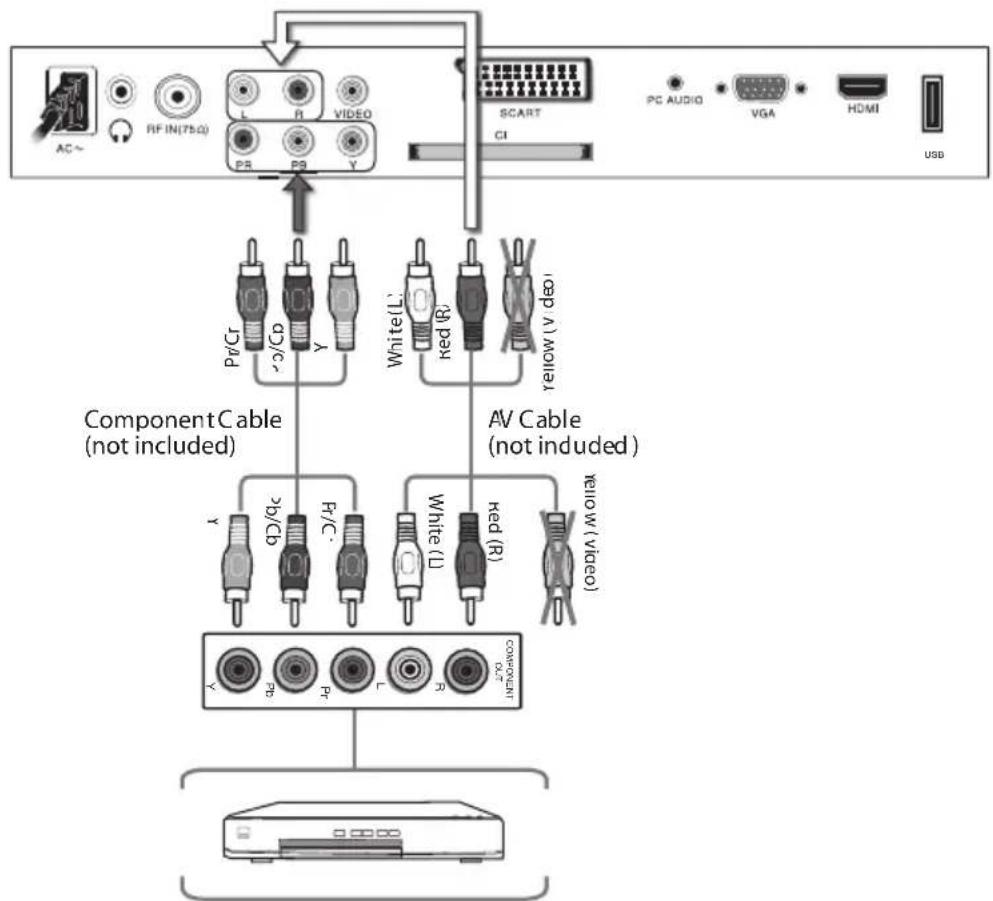
- Turn off the power to the LCD TV and DVD player.
- Using the connectors in the green color area, connect the y (green color) connector on the rear of your DVD player to the corresponding y (green color) connector in the Component Analog HD group (green color band) in the rear of your LCD TV.
- Connect the Pb (blue color) connector on the rear of your DVD player to the corresponding Pb (blue color) connector in Component Analog HD group (green color band) in the rear of your LCD TV.
- Connect the Pr (red color) connector on the rear of your DVD player to the corresponding Pr (red color) connector in the Component Analog HD group (green color band) in the rear of your LCD TV.
- Connect the R (red color) and L (white color) audio connectors on the rear of your DVD player to the R (red color) and L (white color) audio input connectors in the Component Analog HD group (green color band) in the rear of your LCD TV.
- Turn on the power to the LCD TV and DVD player.
- Select Component Analog HD by pressing the SOURCE button on the front of the LCD TV or on the Remote Control.
Note:
Refer to your DVD player user manual for more information about the video output requirements of the product.
3.3.5. SCART connection
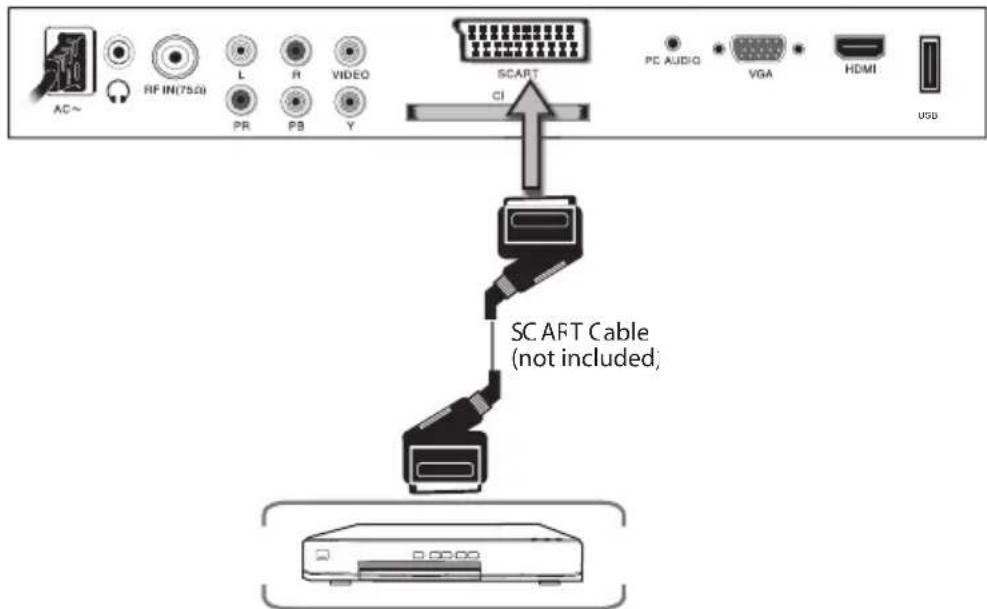
- Turn off the power to the LCD TV and DVD player.
- Connect the SCART jack on the rear of your DVD player to the SCART jack.
- Turn on the power to the LCD TV and DVD player.
- Select SCART by pressing the SOURCE button on the remote or front of the LCD TV or on the Remote Control
3.3.6.ANTENNA connection

- Turn off the power to your LCD TV.
- Connect the coaxial (RF) connector from your antenna, cable or cable box to the TV connector on the rear of your LCD TV.
- Turn on the power to your LCD TV.
- Select TV by pressing the SOURCE button on the front of your LCD TV or on the Remote Control.
3.3.7. USB connection
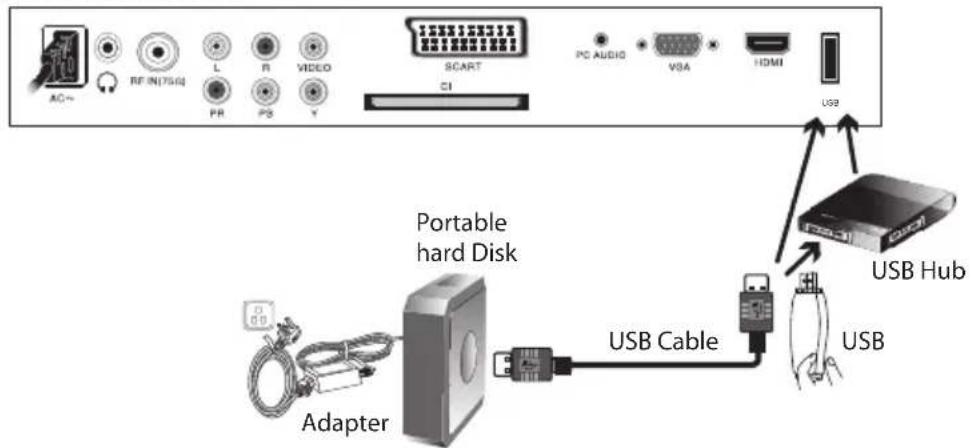

- If a hard disk is used, make sure its mains adapter is connected to the mains supply.
- If a USB hub is used, make sure its mains adapter is connected to the mains supply as the total current consumption may exceed 500mA .
3.3.8. HEADPHONE Connection
Note: All cables shown are not included with the TV.
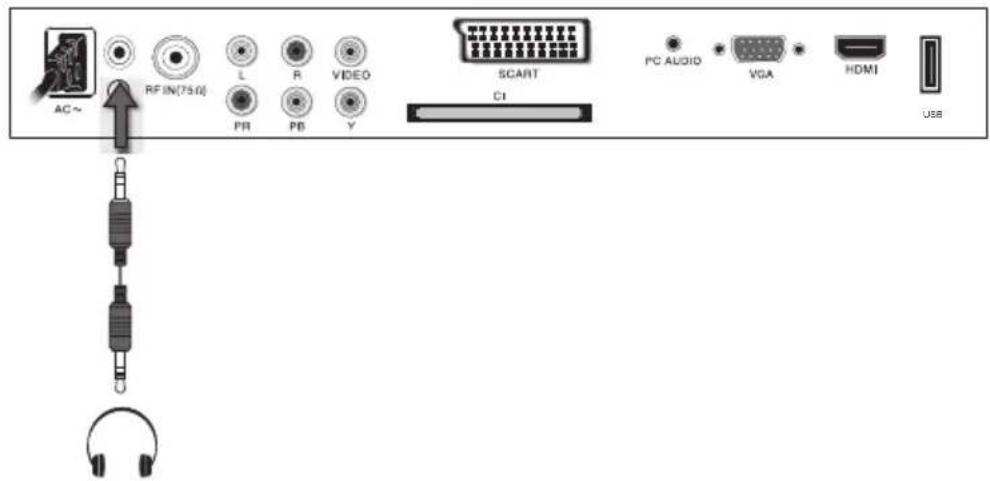
- You can connect a headache to your TV if you wish to watch program without disturbing people around you.
- Insert some standard headphone with a 3.5mm jack plug into the 3.5mm jack on the back of the TV(see diagram).
Note: 1. HEADPHONE VOLUME WARNING.
Connect headphones with the volume set low and increase it if required.
Prolonged listening through some headphones at high volume settings can result in hearing damage.
- You will not receive the sound from the TV when you connect headphones to the system.
4. Basic Operation
*Press SOURCE button to display the input source list;
press▼/▲ button to select the input source you want to watch;
Press ENTER button to enter the input source.
4.1. First Time Installation
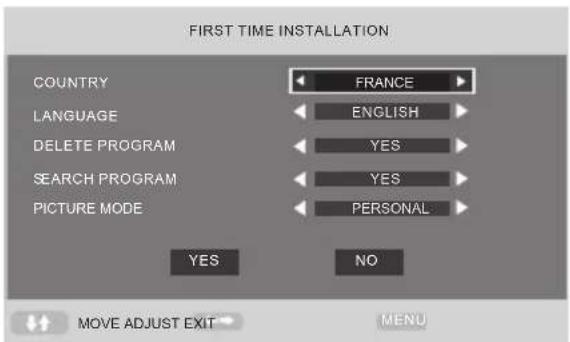
Country
Press / button and then use / to select the country which you live in.
Language
Press / button and then use / to select the OSD language. The language you choose will be used in the following settles.
Delete Program
Press / button and then use / to select whether to delete all the programs.
Search Program
Press / button and then use / to select whether to start searching programs. The channel search setting can be found in the AUTO TUNING part.
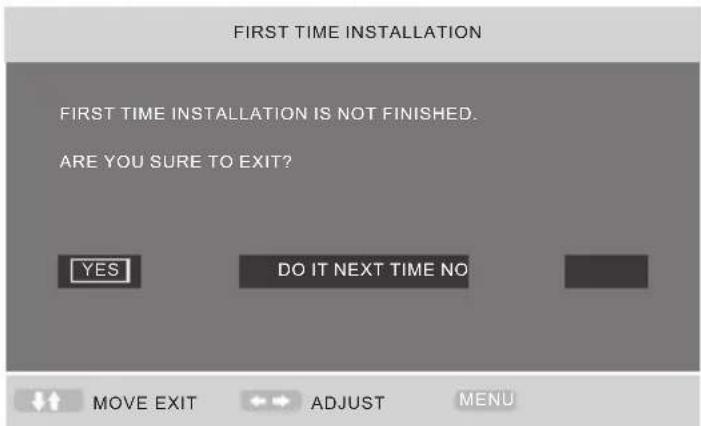
After setting the items, select OK to finish the first time installation, or select Cancel to exit this menu. If you cancelled the first time installation, it will remind you whether to set the first time installation next time.
Picture Mode
Press / button and then use to select the picture mode.
4.2.VIDEO MENU OPTIONS (Picture)
Press MENU button on the front panel or MENU on the remote control to display the main menu.
- Press / button to select PICTURE in the main menu.
- Press / button to select the option that you want to adjust in the PICTURE menu.
- Press / button to adjust.
- When you are satisfied with your adjustment, press the MENU button to return to the previous menu.
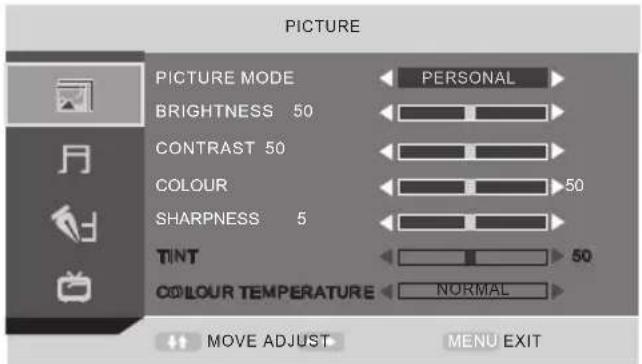
4.2.1.Picture Mode
Select Picture Mode in PICTURE menu.
Available picture mode:
Personal: You can adjust the Brightness, Contrast, Colour, Sharpness to your own taste.
Standard: Anormal use mode which usually used in a unchangeable light environment.
Movie: This mode is better used in a dark environment. The brightness is higher than other modes.
Mild: This mode is better used in a place which is bright, the brightness, colour and sharpness are lower than those of other modes.
Game: Usually used when you play games, the brightness is just lower than that of MOVIE mode. If you change the value of Contrast, Brightness, Colour, Tint, Sharpness or Colour temperature on the picture menu, the picture mode will be changed to "Personal" automatically.
4.2.2.Brightness
Press / button and then use to adjust the brightness of the picture.
After adjust the value you want, press LCD-MENU button to return to the preview MENU.
4.2.3. Contrast

Press / button and then use to adjust the contrast of the picture.
4.2.4. Colour
Press / button and then use / to adjust the colour saturation.
NOTE: This option is invalid in PC mode, and it will be shown in gray.
4.2.5. Sharpness
Press / button and then use to adjust the sharpness of your TV. The suitable sharpness can make the picture look more clearer.
4.2.6.Tint
Press / button and then use / to adjust the tone of colour when your system is in NTSC.
4.2.6. Colour temperature
Press / button and then use / to adjust the optimum colour temperature mode to suit your eyes for viewing. The picture looks more brighter when the COLOUR TEMPERATURE is higher.
4.3.AUDIO MENU OPTIONS (SOUND)
Press MENU button on the front panel or MENU on the remote control to display the main menu.
- Press the / button to select SOUND in the main menu.
- Press the / button to select the option that you want to adjust in the SOUND menu.
- Press the / button to adjust.
- When you are satisfied with your adjustment, press the MENU button to return to the previous menu.
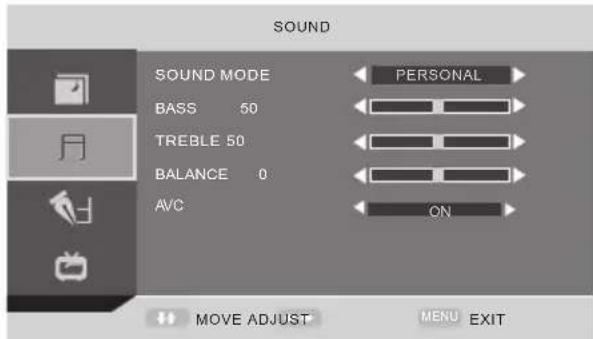
4.3.1. Sound mode
Select Sound Mode in SOUND menu. (Available sound mode: Personal, Voice, Music, standard, Theatre.)
If you change the value of Bass and Treble on the Sound menu, the sound mode will be changed to "Personal" automatically.
4.3.2.BASS
Press / button and then use to increase or decrease the level of the lower-pitched sounds.
4.3.3.TREBLE
Press / button and then use / to increase or decrease the level of the higher-pitched sounds.
4.3.4.BALANCE
Press / button and then use to adjust the audio output between left and right speakers.
4.3.5.AVC
Press / button and then use to select on/off to adjust volume autocontrol.
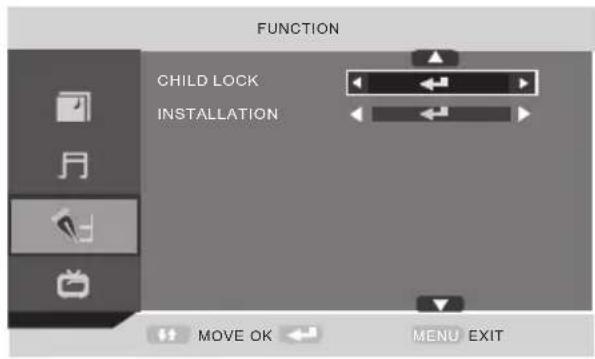
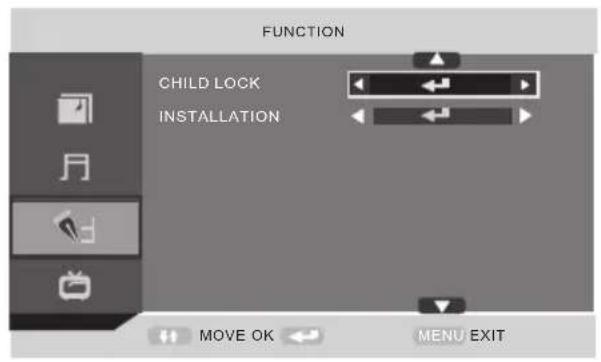
4.4. FUNCTION
Press MENU button on the front panel or MENU on the remote control to display the main menu.
- Press the / button to select FUNCTION in the main menu.
- Press the / button to select your option what you want to adjust in the FUNCTION menu.
-
Press the / button to adjust.
-
When you are satisfied with your adjustment, press the LCD-MENU button to return to the previous menu or press the EXIT button to exit the main menu.
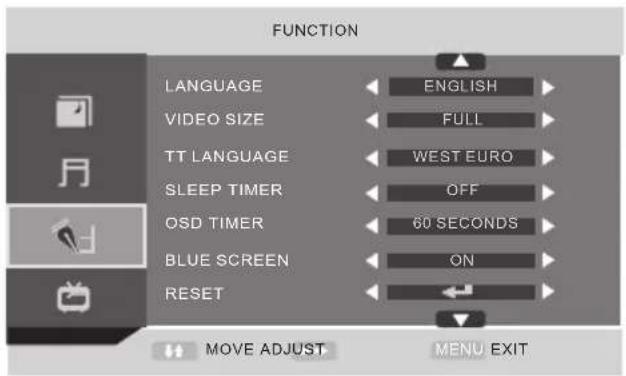
4.4.1. LANGUAGE
Use to select the language in the language menu (available language: English, Italian, Espanol, Portuguese, French, German). It also can be selected in the First Time Installation.
4.4.2.VIDEO SIZE
This option allows you to select the screen display mode which best corresponds to your viewing requirements.
Note: The available aspect mode may be different in different input signal.
4.4.3. TT LANGUAGE
Use to select TT (Teletext) Language (Available TT Language: West Euro, East Euro, Russian, Arabic, Farsi, Greek, Cyrillic, Hebrew)
4.4.4.SLEEP TIMER
Select the sleep time to put automatically the TV in standby mode, for example, the TV will be in standby mode 30min after you set the SLEEP TIMER 30 min. Timer can be selected as 0min (off) to120min.
4.4.5.OSD TIMER
You can select the time when the OSD display on the screen from 5Sec to 60 sec.
4.4.6. BLUE SCREEN
This option allows you to select the blue background on or off. If on, the screen background will turn blue at very weak or no signal condition
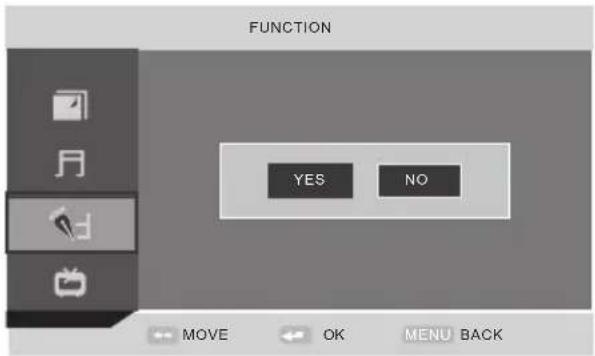
4.4.7. RESET
Press OK or button to reset the TV to the factory default.
4.4.8.CHILD LOCK
Press OK or button to set the child lock. You need to enter the PIN code. If the Child lock is set "on", and the default PIN code is empty, you can press OK button directly to enter.
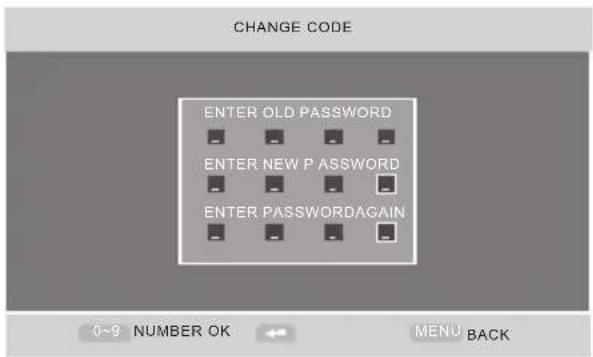
TIPS: Super user's (administrator's) password is 0000.
Child Lock
Press OK or button to set the child lock.
Key Lock
Press OK or button to set the key lock.
Change Code
Press button to enter Change Code menu.
4.4.9. Installation
Press button to open the first time installation menu, and the operation of this menu is in page 18. Note: If you set the CHILD LOCK "ON", you can't enter the INSTALLATION (It's in gray).
4.5.ATV
Press MENU button on the front panel or MENU on the remote control to display the main menu.
- Press the / button to select in the TV main menu.
- Press the / button to select your option what you want to adjust in the TV menu.
- Press the / button to adjust.
- When you are satisfied with your adjustment, press the MENU button to return to the previous menu or press the EXIT button to exit the main menu.
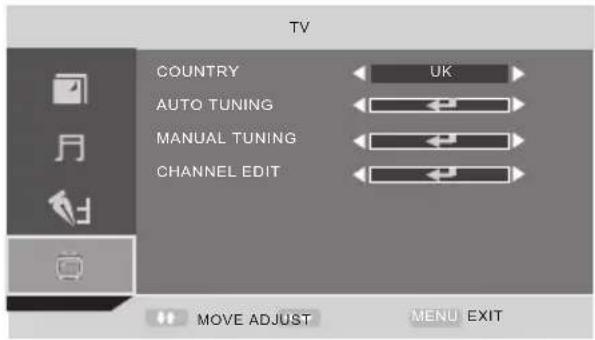
4.5.1. COUNTRY
This option allows you to select the country. (Spain, France, Italy, Germany, UK, Other)
4.5.2.AUTO TUNING
This option allows you to tune the channels that can be received automatically.
Note: Before you perform Auto Tuning, you must choose the country where you are by selecting COUNTRY option.
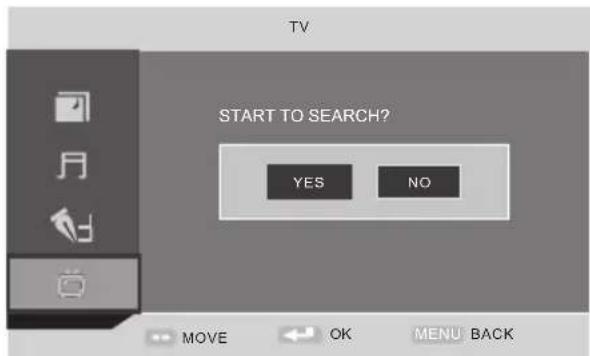
Press OK key to start. You can see the child lock if you set the child lock "ON" before, press enter password 0000 and choose "Yes", Press MENU to cancel and NO to back.
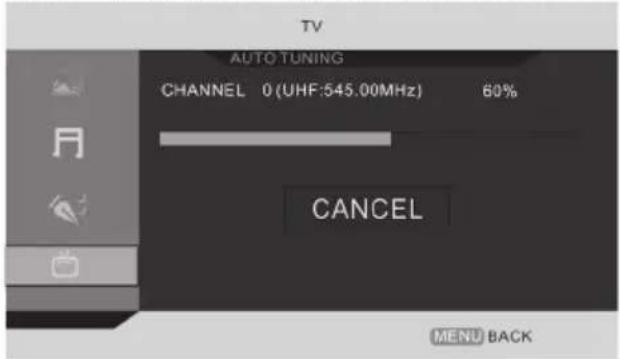
You can press MENU button to stop auto tuning and close the OSD menu.
4.5.3. MANUAL TUNING
This option allows you to perform Manual Tuning. Press to select the suitable option. This option has two functions:
- Set the frequency of channel for AFT option.
- Press button for 3+ seconds and it will start auto tuning from this frequency.
Note: Before you perform Manual Tuning, you must choose the country where you are by selecting Country option in the FUNCTION menu.
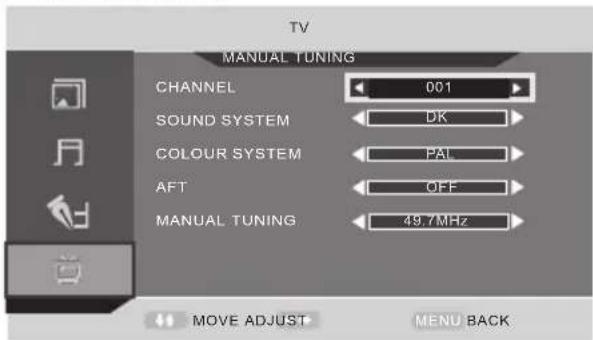
Press / to perform your selection, Press the password 0000 to enter the CHANNEL menu. the menu of Manual tuning will display on the screen.
Channel
Press / to select Manual tuning in TV menu.
Sound System
Press / to select a corresponding sound system, such as DK, I, L, BG.
Colour System
Press / to select a corresponding colour system, such as Auto, PAL.
AFT (auto fine tune)
Due to weak signals or a wrong antenna configuration, some of the channels may not be tuned to the best reception condition. AFT function allows you to fine tune channel selected (the frequency of channel is around the value in Manual Search option).
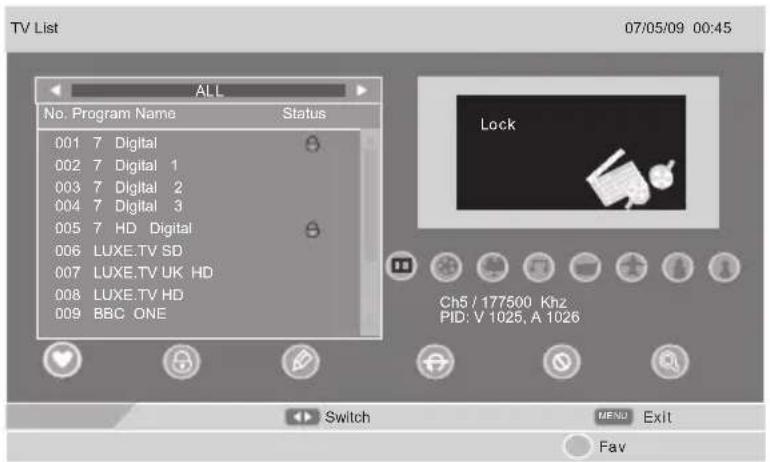
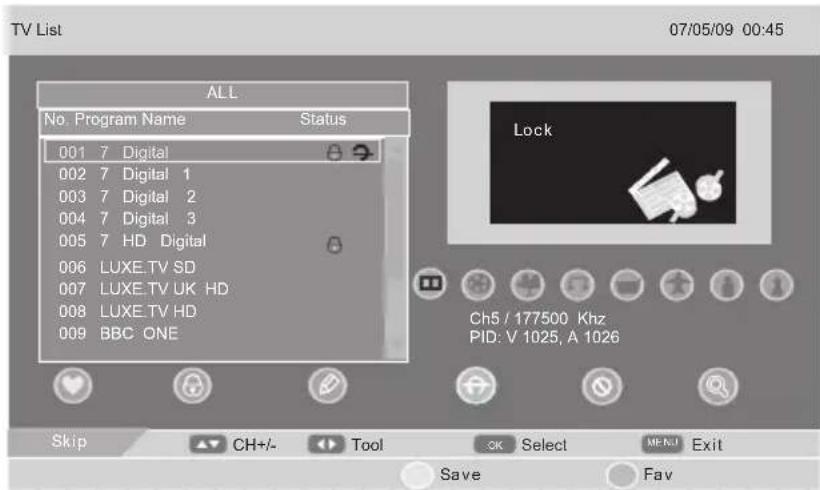
CHANNEL EDIT
This function allows you to sort the TV programs according to your preferences, as following:
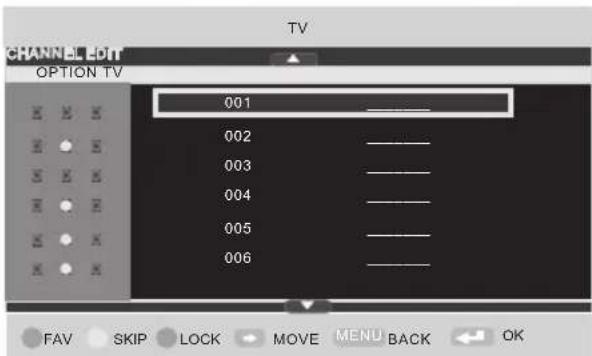
This option has four functions:
- Press Green button to set the current channel to your favorite channel. If the current channel already be one of your favorite channel, press Green button again will set it to a normal channel.
- Press blue button to set the current channel to lock. If the current channel already lock, press blue button again will unlock.
3、Press yellow button to skip the current channel.
4、Press / button to select the channel in the list. Press OK button to display as follows:
Press / button to select the location you would like to place the channel.
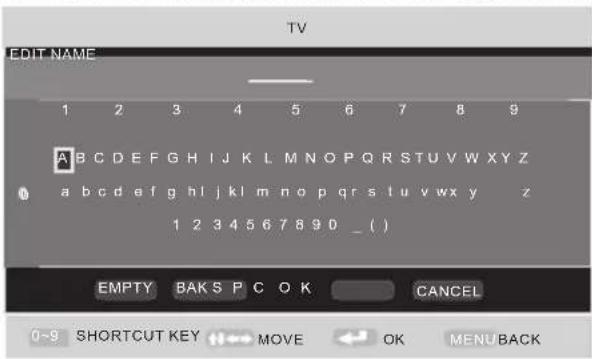
Input channel name", Press / button to select OK save and return back to the previous menu.
Press OK button to perform your selection.
4.6.DTV
Press MENU button on the front panel or MENU on the remote control to display the main menu.
- Press / button to select DTV in the main menu.
English
- Press / button to select the option that you want to adjust in the DTV menu.
- Press button to adjust.
- When you are satisfied with your adjustment, press the MENU button to return to the previous menu.
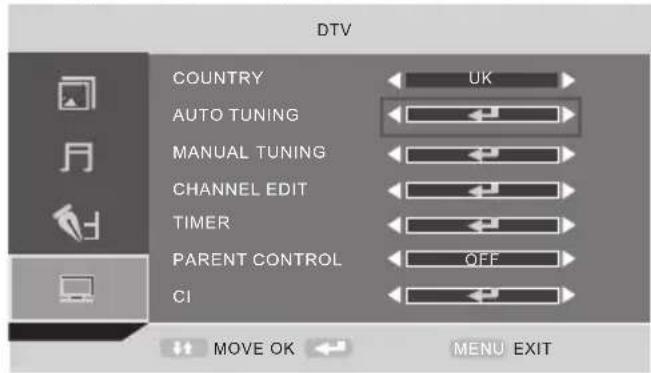
4.6.1.COUNTRY
Press / button to select Country, then press / button to select different country.
4.6.2.AUTO Tuning
Press / button to select Auto Tuning, then press OK button to enter.
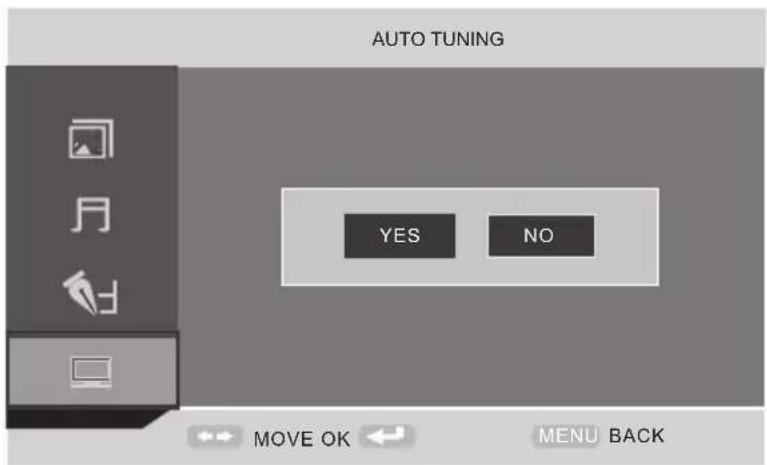
Press / button to select YES or NO, press OK button to auto tuning when select YES, press OK button to return back to the previous menu when select NO.
4.6.3.Manual Tuning
Press / button to select Manual Tuning, then press OK button to enter.
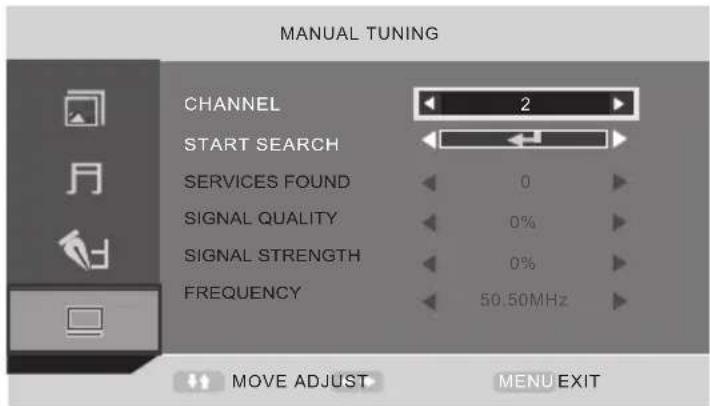
Channel
Press / button to select Channel, then press / button to select different channel.
Start Search
Press / button to select Start Search, then press OK button to start search.
4.6.4.Channel Edit
Press / button to select Channel Edit, then press OK button to enter.

Fav: Press the number buttons 1-8 to set the current channel to your favorite group 1-8. if the current channel already be one of your favorite group 1-8, press the number buttons 1-8 again will set it to a normal channel.
Press Yellow button on the remote, the menu will appear as follows:

Press OK button to save the change or press Menu button to return back the previous menu.
Press Blue button on the remote, the menu will appear as follows:
Press / button to switch between all channel and fav 1-8 channel.
Press Blue button to return back to the previous menu.
Lock: Press OK button to set the current channel to lock.
If the current channel already lock, press OK button again will unlock.
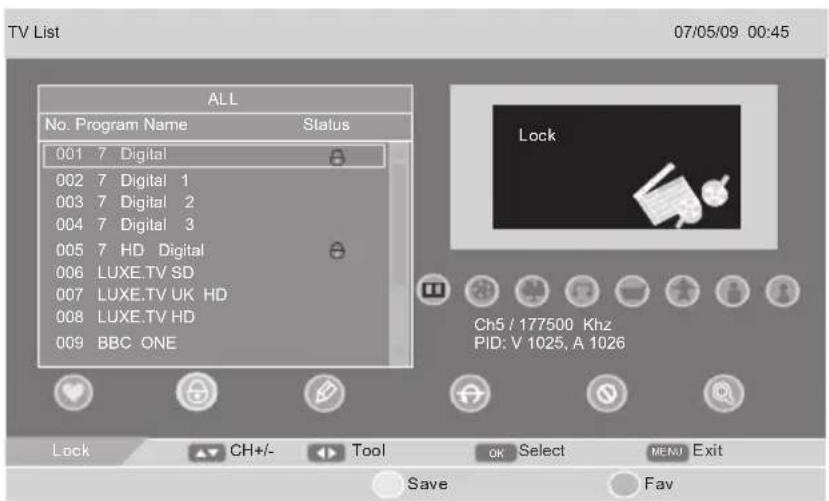
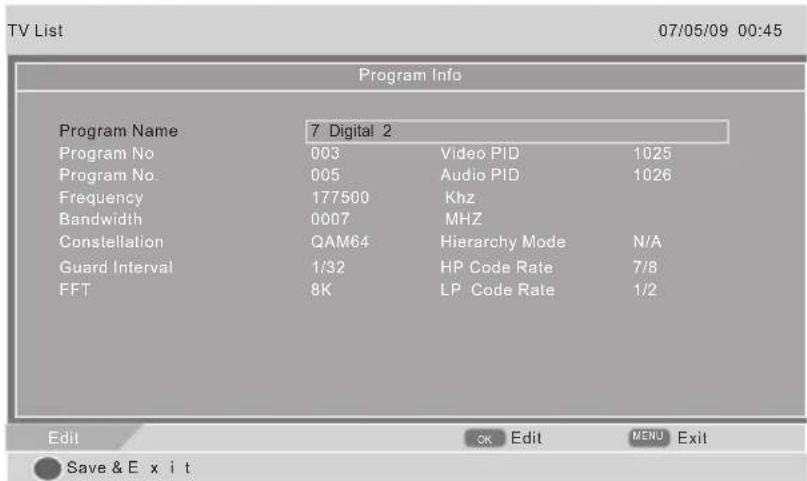
Edit:

Press / button to select Channel, then press OK button to enter the program info menu.
Press OK button to enter the program name menu.
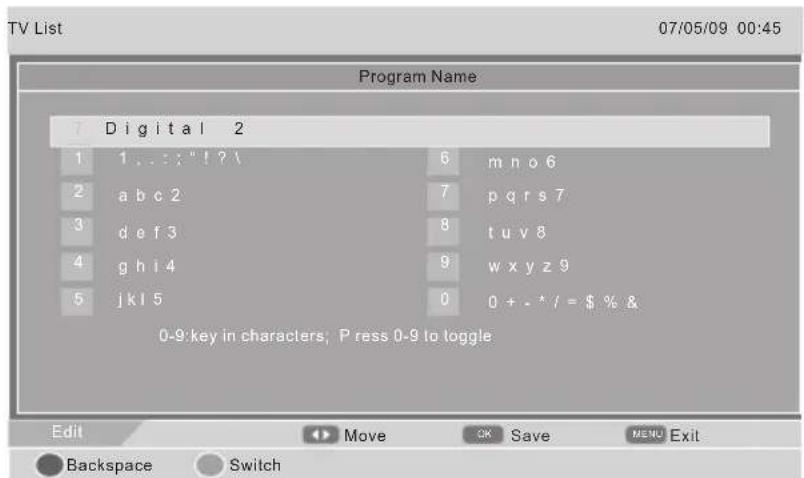
Press the number buttons 0-9 to select different character.
Press Green button to Switch between upper and lower case letters. Circularly press the number buttons 2 to select between a, b, c and 2 Press OK button to save.
Skip: Use the cursor buttons to select the channel you wish to Skip.
Press OK button and will be shown at the channel selected.
To remove the skip function, press the OK button again.
When a channel has been selected to Skip, you still may select that channel with the numeric buttons.
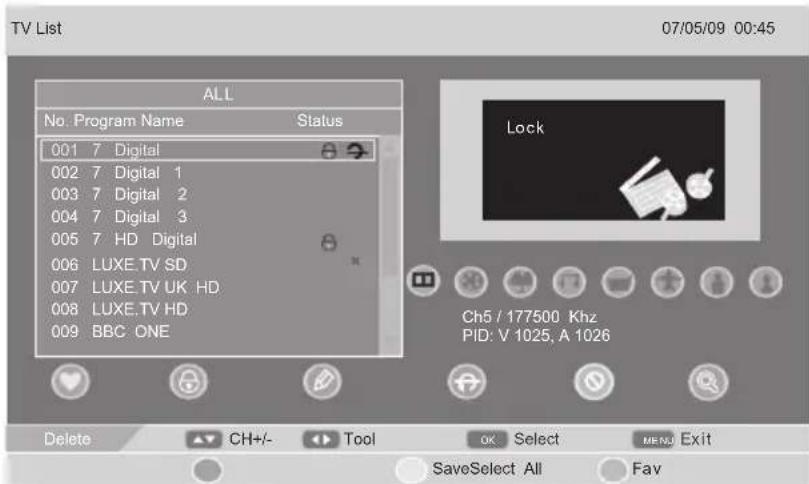
Delete: Use the cursor buttons to select the channel you wish to delete. Press OK button and will be shown at the channel selected.
To remove the delete function, press the OK button again.
Note : Any deleted station is removed from the memory and must be retuned if required.
Search:
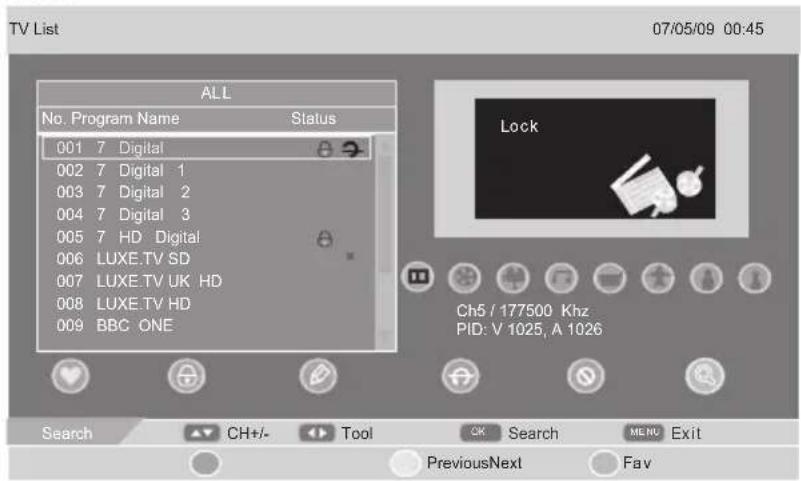
Press OK button to enter the search menu.
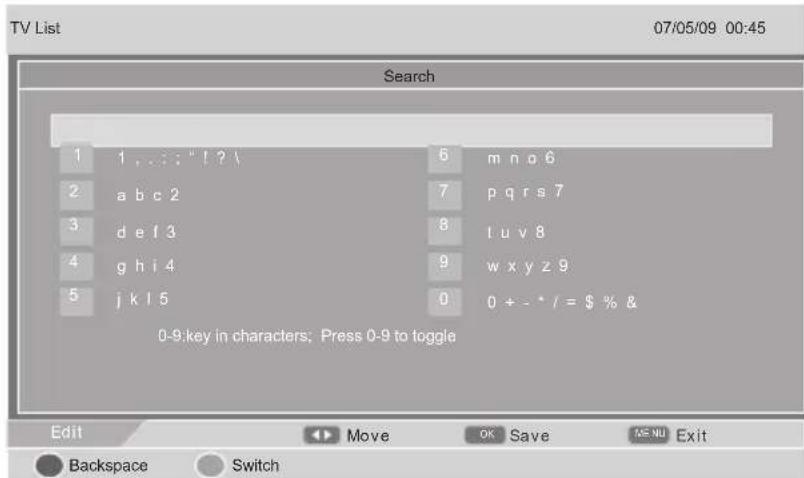
Press the number buttons to select the corresponding characters, then press OK button, Cursor in the program of the first letter that is selected character.
4.6.5.Timer
Press / button to select Timer, then press OK button to enter.
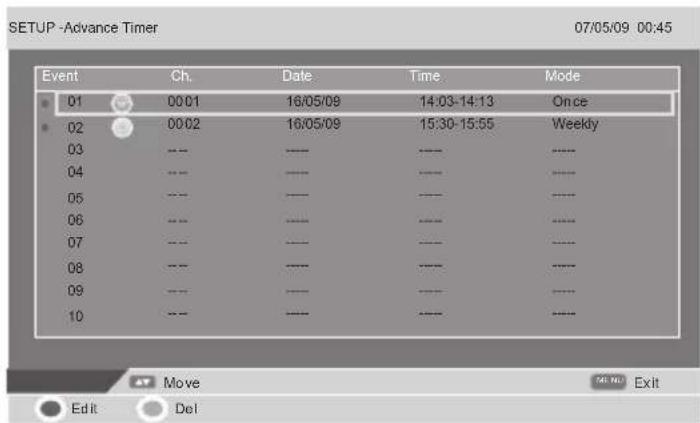
Press / button to select, then press RED button on the remote control to edit event edit.
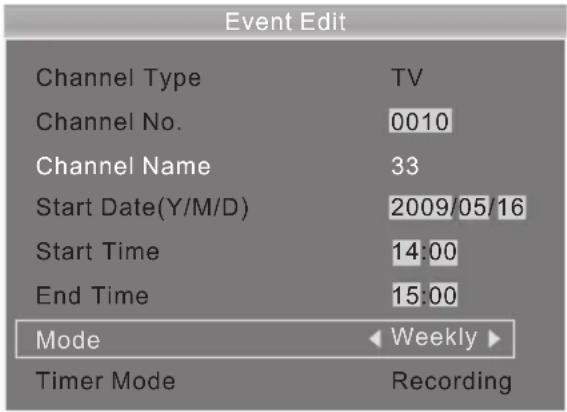
Channel No.: I input channel No. or select the channel No.
Start Date(Y/M/D): S et start date of recorded.
Start Time: S et start time of recorded. End Time: S et end time of recorded.
Mode: S et the mode of recorded. Optional mode: once, daily, weekly, monthly, stop.
Timer Mode: Press / to select between timer and recording.
4.6.6.Parent Control
Press / button to select Parent Control, then press / button to select 6, 10, 14, 18 or off.
4.6.7.CI
Press / button to select C1, then press OK button to enter.
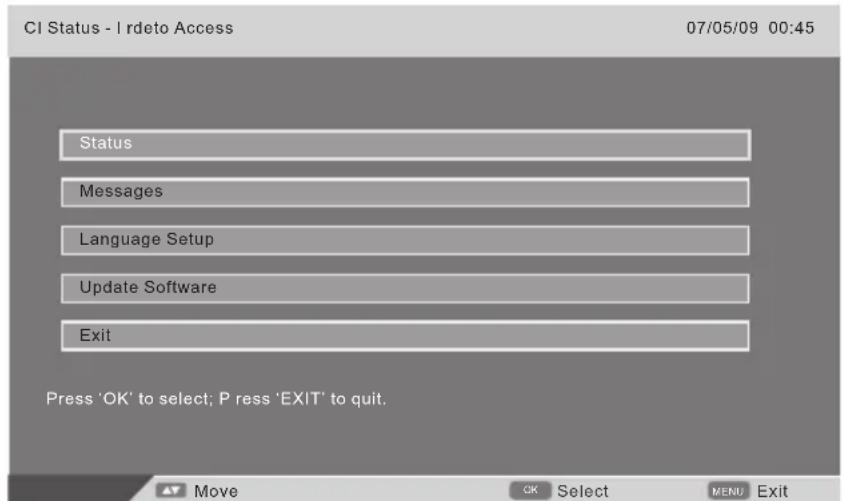
This is just an example for reference, different CI module will have different CI menu.
4.7. TELETEXT (in ATV & DTV mode)
- TXT buttons such as: INDEX, HOLD, SUBPAGE, REVEAL, and SIZE are available for the TXT function ONLY in ATV mode (these keys do not operate in DTV mode for TXT).
- TXT key button in DTV mode, is only used to TURN ON & OFF the TXT function. Then use colour keys of the remote to operate the TXT function in DTV mode.
Teletext function (in ATV mode only)
Press the (TEXT) button on the remote control to enable the Teletext function. To disable the function, press the button again.
- Press (TEXT) button to turn on the Teletext function press again to turn it off.
- Press (HOLD) button to freeze the image on the screen (the signal will continue to be broadcast). Press the button again to unfreeze.
- Press (SUBPAGE) button to display teletext Subpage.
- Press (INDEX) button to go to Teletext index page.
- Press (SIZE) button to select the Teletext Size.
- Press (REVEAL) button to display hidden Teletext information.
- Press the numeric buttons to jump to different pages.
-
Press the / buttons to go to the previous or next page. Note:
-
When in Teletext state, mute button has no effect.
- When in Teletext, OSD menu no effect.
Teletext function (in DTV mode only)
- Press (TEXT) button to turn ON the Teletext function press again to turn it OFF.
- HOLD, SUBPAGE, INDEX, SIZE, REVEAL keys are INACTIVE for the teletext function in DTV mode.
- In DTV mode, use the 4 colour keys of the remote control to operate the Teletext function in DTV.
- To cancel TXT operation in DTV mode, press TEXT key again.
4.8.PC
Press MENU button on the front of panel or MENU on the remote control to display the main menu in PC mode.
- Press / button to select the PC in the main menu, then press button to enter.
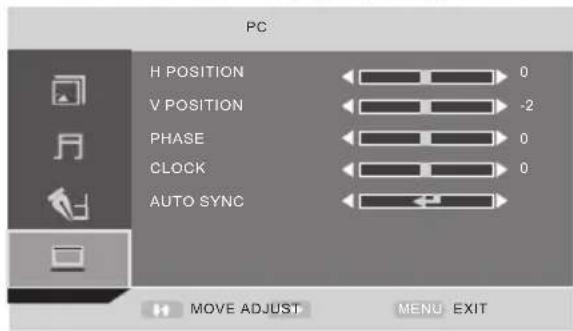
- Press / button to select the option that you want to adjust in the PC menu.
- Press button to adjust.
- When you are satisfied with your adjustment, press the MENU button.
H Position
Press / button to select the H Position, you can adjust the horizon position of the picture by pressing button.
V Position
Press / button to select the V Position, you can adjust the vertical position of the picture by pressing button.
PHASE
Press / button to select the PHASE, Press / button to adjust the picture apply to the LCD (The picture will shake if the PHASE sets unsuitable)
CLOCK
Press / button to select the CLOCK, Press / button to adjust the signal's transfer speed to make the picture looks well.
AUTO SYNC
Press / button to select the AUTO SYNC, Press OK button to adjust. This option can set the above setting well automatically.
4.9.HDMI/YPBPR
Press MENU button on the front of panel or MENU on the remote control to display the main menu in HDMI /YPBPR mode.
- Press / button to select the HDMI/YPBPR in the main menu, then press button to enter.
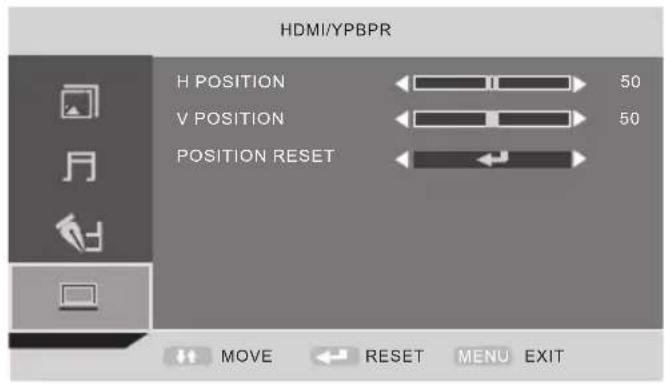
- Press / button to select the option that you want to adjust in the HDMI/YPBPR menu.
- Press button to adjust.
- When you are satisfied with your adjustment, press the MENU button.
H Position
Press / button to select the H Position, you can adjust the horizon position of the picture by pressing button.
V Position
Press / button to select the V Position, you can adjust the vertical position of the picture by pressing button.
Position Reset
Press / button to select the Position Reset, Press / button to reset the settings above.
4.10. MEDIA
IMPORTANT: All multimedia operations are available only when an USB storage device is connected.
Press MEDIA button on the remote control to show the MULTIMEDIA menu, press MEDIA button again or EXIT button to exit this menu.
Press button to select the sub-menu (My Album/My Music/My Movie/My Recorder), press OK button to enter.
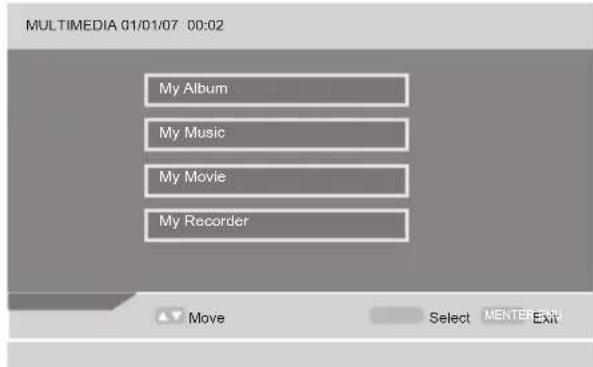
4.10.1. My Album
Press / button to select My Album, press OK button to enter. Press MENU button to return back to the previous menu.
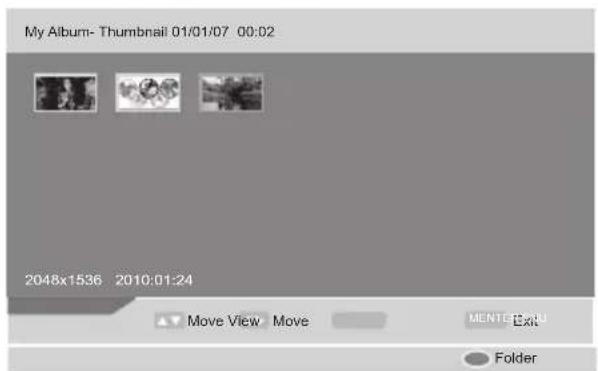
Press buttons to select the photo you want to view, press OK button to view the picture, press Exit button to exit.
Press RED button on the remote control to zoom picture.
Press GREEN button on the remote control to display music Folder, and you can play the music at the same time.
Press YELLOW button on the remote control to flip the photo horizontally.
Press BLUE button on the remote control to flip the photo vertically. Press OK button to slide the photos.
4.10.2. My Music
Press MEDIA button on the remote control to enter, then press buttons to select My Music, press OK button to enter. Press MENU button to return back to the previous menu.
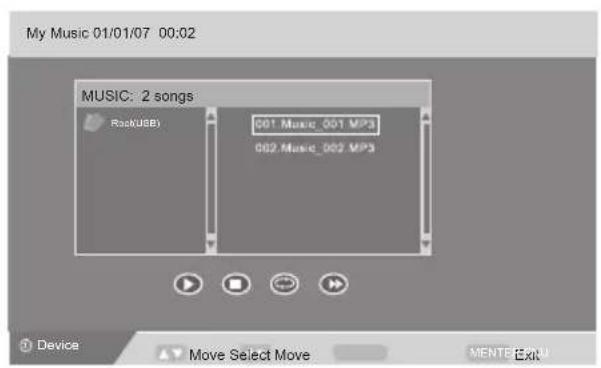
Press buttons to select the music that you want to listen, press OK button to confirm selection.
Press RED button on the remote control to play the music, press RED button again to make a pause.
Press GREEN button on the remote control to stop, press RED button to continue playing the music.
Press YELLOW button on the remote control to set the repeating mode.
Press BLUE button on the remote control to select the fast-forward speed.
Press DISPLAY(DISP) button on the remote control to switch to the device type menu.
Press EXIT button to exit.
4.10.3. My Movie
Press MEDIA button on the remote control to enter, then press buttons to select My Movie; press OK button to enter, Press MENU button to return back to the previous menu.
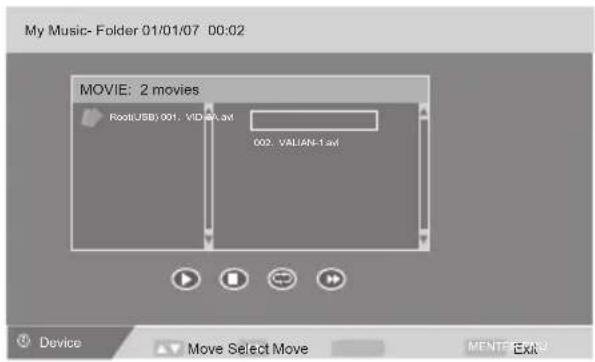
Press buttons to select the movie that you want to view, press OK button to play. Press DISPLAY button on the remote control to switch to the device type menu.
Press RED button on the remote control to make a pause, press RED button again to continue playing the movie.
Press GREEN button on the remote control to one-step-play, press GREEN button again, you can set slow-forward speed to see the movie.
Press YELLOW button on the remote control to set the fast-backward speed.
Press BLUE button on the remote control to set the fast-forward speed.
4.10.4. My Recorder
Press MEDIA button on the remote control to enter, press buttons to select My Recorder.
press OK button to enter, press MENU button to return back to the previous menu.

Recorded List
Press buttons to select the recorded list, then press OK button to enter.
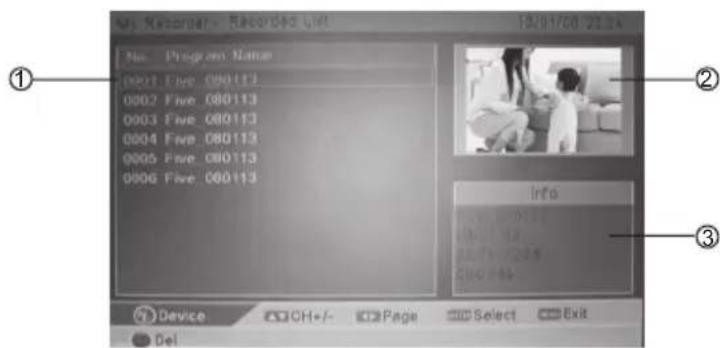
Information of the recorded video selected.
Preview window for the recorded video selected.
- Recorded video list.
Press buttons to select the recorded program you want to view.
Press GREEN button to preview.
Press 卡 button on the remote control to play the previous movie.
Press button on the remote control to play the next movie.
Press EXIT button on the remote control to return back to the recorded list menu.
| or | When playing, Press button repeatedly to reverse speed in the sequence of: ←x2/←x4/←x8/←x16/←x32/.. Press button repeatedly to fast forward in the sequence of: →x2/→x4/→x8/→x16/→x32/.. |
| or | Press the button to skip about 3 minutes forward. Press the button to skip about 3 minutes back. |
| During playing, press the button to pause, press again to resume playback. | |
| During playing, press the button to stop, and exit Time Shift mode. |
Press Red button to appear the delete menu, as follows:

Delete the file of selected when press OK button,
don't delete the file when press EXIT button.
Recorded Device
Press buttons to select the recording device, then press OK button to enter.
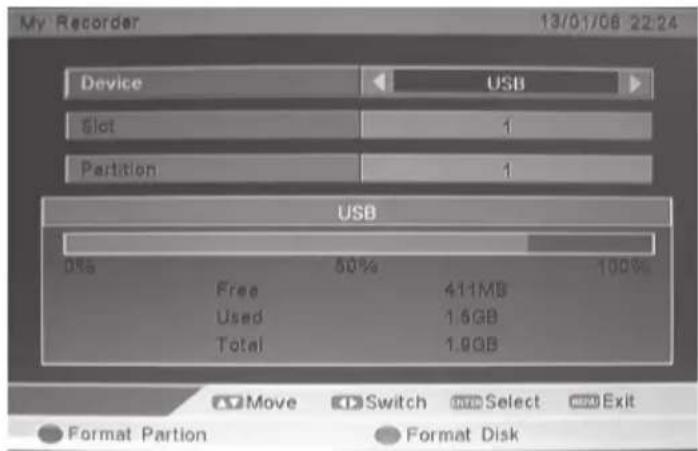
Press Red button to format the partition, the menu will appear as follows:

Format the partition of selected when press OK button, cancel formatted the partition when press EXIT button.
Press Green button to format the disk, the menu will appear as follows:

Format the disk of selected when press OK button, cancel formatted the disk when press EXIT button.
Recording Preference
Press buttons to select the recording preference, then press OK button to enter.
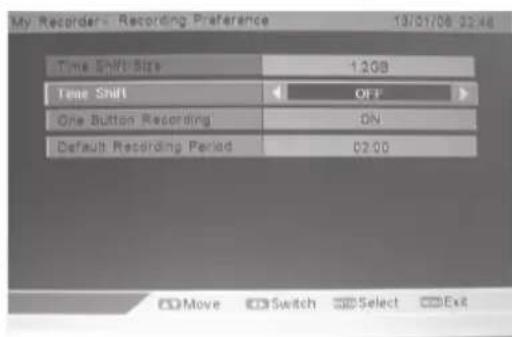
Time Shift Size
The minimum USB's time shift size recommend to be 768MB.
The time shift size will vary depending on the size of USB storage device.
Time Shift
Press buttons to select the option, then press to select between off, pause and auto.
One Button Recording
Press buttons to select the option, then press to select between off and on.
Default Record Period
Press buttons to select the option, then press to set. The longest record period, is 8 hours, the shortest record duration is 15 minutes (default setting is 2 hours).
4.11. REORDER
DTV (Digital TV Record Function)
It is recommended to format first your USB or HDD into the TV set before starting recording operation.
First of all before recording DTV on your USB device or HDD once inserting your external device in the USB slot, the TV set will suggest to format the internal memory of your USB equipment into FAT32. Please proceed first before recording.
CAUTION! When formatting your equipment, all files inside, if any, will be deleted.
Special instructions about Recording and Playing your equipment via USB 2.0 slot.
- Recording: is only used for your personal studying, research or enjoy BUT NOT allowed for the use of commercial transmission or other related purpose.
- Supported equipment: your TV set can match USB 2.0 U-Disc. It also match memory stick via USB memory card reader.
- About Program: DTV program which the bit rate is lower than 6 Mbps.
After recording, should be saved to MPEG-2 files, and the file extension is ".Mpeg".
- About capacity: The system support up to 4 partition, and the total capacity is not bigger than 300GB. It is recommended that the size of each partition is up to 120 GB.
Every recorded file has the biggest size of 3.8 Gbyte (about 4 hours). If keeping on recording the file which is exceeded 3.8 Gbyte, the system will generate a new file automatically.
Before recording, users can choose different partition for recording and the default setting is the first partition. - Before setting the Timer-record, you should insert the U-disc or USB HDD into the USB slot of the TV set. Then your recorded program will be saved in U-disc or USB HDD. Also while recording and playing your USB equipment. DO NOT remove the USB key from the USB slot, otherwise your device will be damaged.
IMPORTANT NOTICE:
YOU CAN ONLY RECORD THE DTV PROGRAM OF YOUR TV SET.
THE SET CANNOT RECORD THE ATV PROGRAM, NOR FROM ANY EXTERNAL DEVICE CONNECTED TO THE EXTERNAL SOURCE OF THE TV (i.e. External Decoder, CANAL + decoder, etc...)
4.11.1.Time Shift Function
This function allows the TV to automatically record live TV and make it available for viewing at any time. With the Time Shift Mode set to Auto or Pause, you may pause or rewind normal TV viewing (DVT-T mode only), at any time without missing any of the live broadcast.
Auto Time Shift Mode
When you set time shift to auto, system always record the program in background, you possible direct into time shift mode to look the just program.
In other circumstances, you may just leave the TV for a while without pressing any buttons. Then when you have returned, press the button or the button to virtually rewind or fast forward the live viewing broadcast programme. Press the button to play the missed broadcast programme. The DVR Time Shift progress bar will be displayed on the screen.
Pause Time Shift Mode
If you set time shift to pause, system would record the program in background only when you press pause button.
During the normal TV viewing, you may press the button to virtually pause the live viewing broadcast programme if you want to go out for a while (e.g. going to the bathroom / kitchen). When you have returned, press the button to play the missed broadcast programme. The DVR Time Shift progress bar will be displayed on the screen.

The progress bar will hide automatically after 3 seconds. Press DISPLAY button to display the DVR Time Shift progress bar again.
4.11.2. One Button Recording
Use this function to record the DTV programme you are watching on the main screen and save them for future viewing.
1) Enter into RECORDING PREFERENCE mode, use buttons to select One Button Recording, and use buttons to switch to ON.
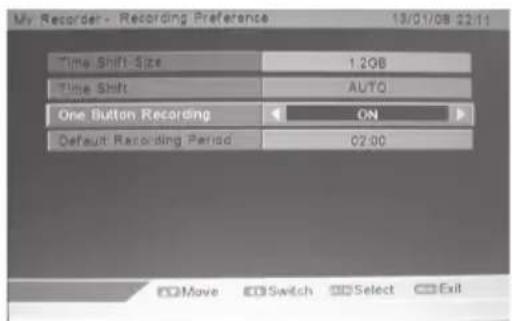
Press the button to set the Default Record Duration (preset configuration). press the buttons to set the recording duration. The longest recording duration is 8 hours, the shortest recording duration is 15minutes.
Press the EXIT button to exit the menu and return back to the main screen you were watching.
Press the REC button on the remote control to start recording. The current recording status will be displayed in the top left hand corner of the screen.
To stop recording press the button and press the OK button to confirm.
2) Enter into RECORDING PREFERENCE mode, use buttons to select One Button Recording, and use buttons to switch to OFF.
Press button on the remote control to record, the record duration menu will appear as follows:
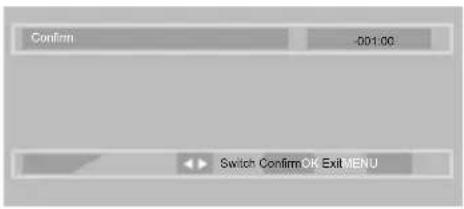
Press buttons to set record duration. The longest record duration is 8 hours, the shortest record duration is 15 minutes.
Press the EXIT button to exit the menu and return back to the main screen you were watching.
Press theREC button on the remote control to start recording. The current recording status will be displayed in the top left hand corner of the screen.
To stop recording, press the button and press the OK button to confirm.
4.12. TV Program Guide
If you want to understand what programs will playing and get TV information in the current or in the future, you can press GUIDE on the remote controller to enter TV Program GUIDE menu.

The GUIDE menu display screen are neutral. According to the different signals, this menu will change.
5. PC Mode
Setting up your PC software (based on Windows XP)
The Windows display-settings for a typical computer are shown below. But the actual screen on your PC will probably be different, depending upon your particular version of Windows and your particular video card. But even if your actual screen look different, the same, basic set-up information will apply in almost all cases.
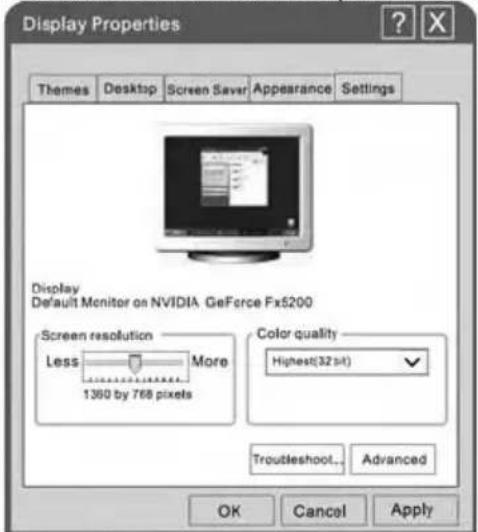
- First, click on "Control Panel" on the Windows start menu.
- When the control panel window appears, click on "Appearance and Themes" and a display dialog-box will appear.
- When the control panel window appears, click on "Display" and a display dialog-box will appear.
- Navigate to the "Setting" tab on the display dialog-box. The correct size setting (resolution) Optimum: 1280 × 800 .
If a vertical-frequency option exists on your display settings dialog box, the correct value is "60Hz". Otherwise, just click "Enter" and exit the dialog box.
| Resolution | Horizontal Frequency (KHz) | Vertical Frequency (Hz) | Pixel Clock (MHz) | Standard Mode |
| 720x400 | 31.47 | 70 | 28.32 | DOS |
| 640x480 | 31.46 | 60 | 25.17 | VGA |
| 800x600 | 37.88 | 60 | 40.00 | SVGA |
| 1024x768 | 48.36 | 60 | 65.00 | XGA |
| 1280x800 | 49.38 | 60 | 71.1 | SXGA |
6. Trouble Shooting
Before arranging for service, firstly know the status and then check simply as follows:
| Problems | Check |
| No picture or sound. | Check if the power supply is plugged in. Check if the power switch is in "on" position. |
| Picture is OK, but no sound | Check if the volume control is set to the minimum or mute position. |
| Remote control doesn't work | Check if the power switch is in "on" position. Check if the batteries are out of use or not connected well. Make sure that there is no strong light striking the sensor window of remote control unit. Check there are no obstacles between the sensor window and remote control unit. |
| No TV signal | Check if the SOURCE button is set to TV status. Check if the antenna is well connected. Check if you installed the TV correctly. |
| No external video signal | Check if you installed the TV correctly. Check if the SOURCE button is set to AV position. |
| Picture lacks color or picture too dark | Check color, brightness and contrast controls are correctly adjusted. |
| All channels lose color intermittently | Check if the antenna is broken. Check if the antenna is disconnected. Check if the antenna is damaged. |
| Poor reception, loss of color with certain channels | Check if channels are correctly tuned. |
| Diagonal stripes appear on picture | The receiver may be affected by interference (e.g. from nearby radio broadcasting transmitter or from another TV receiver). |
| Picture has 'snow' | Check if the antenna is broken. Check if the antenna is disconnected. Check if the antenna is damaged. |
| Ghost images appear | Check if the antenna direction has been changed by a storm or strong wind, etc. (because ghost images are caused by the arrival at the antenna of both the signal which has traveled directly from the transmitter and the signal which has been reflected from a hill or a large building. The direction of the antenna should be chosen for minimized ghosting.) |
English
7. TV Specification
| Items | Relevant illustrations | |
| The whole machine parameters | Screen size, visible | 13.3" Wide Screen TFT LCD |
| Screen format | 169 | |
| Resolution | 1366x768 Pixel | |
| Contrast Ratio | 400:1 | |
| Active Display Area | 293.42(H)x164.97(V)mm | |
| Maximum brightness | 200 cd/m2 | |
| Response time | 8ms | |
| Display colors | 262K | |
| Maximum viewing angle | 90° (Horizontal) / 50° (Vertical) | |
| Maximum lifetime of background light | 10,000 hours | |
| Dimension (packed) | 412x145x375mm | |
| Accessories | Remote-Control, User Manual | |
| Power requirement | AC 100-240V, 50/60Hz | |
| Normal Power Dissipation | <20W | |
| Standby Power Dissipation | <1W | |
| TV | ATV System | PAL, SECAM |
| Audio Output | 2x1.5W | |
| OSD language | English, French, German, Italian, Spanish, Portuguese | |
| Local control keys | POWER, VOL-, VOL+, CH-, CH+, MENU, SOURCE | |
| AV | One-road HDMI, VGA input and PC Audio IN and CVBS input, YPbPr, SCART, USB, Audio output, CI CARD | |
Note: All specifications are subject to change without notice. Since the unit is marketed in various countries, a few features may be different than described in this user manual.