TTE32A6604K - TV TOKAI - Free user manual and instructions
Find the device manual for free TTE32A6604K TOKAI in PDF.
User questions about TTE32A6604K TOKAI
0 question about this device. Answer the ones you know or ask your own.
Ask a new question about this device
Download the instructions for your TV in PDF format for free! Find your manual TTE32A6604K - TOKAI and take your electronic device back in hand. On this page are published all the documents necessary for the use of your device. TTE32A6604K by TOKAI.
USER MANUAL TTE32A6604K TOKAI
1 MANUEL D'UTILISATION
34 USER MANUAL
natural_image
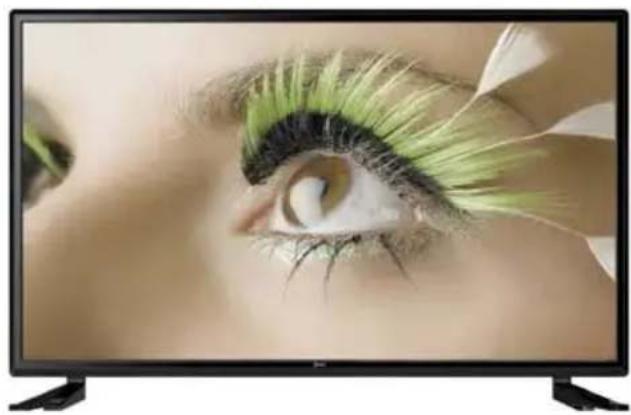
Black television displaying a person's eye with green eyeliner and black hair accessory (no text or symbols visible)Lire attentivement la notice avant d' utiliser l' appareil Before operating this product, please read user manual completely


INDEX
text_image
Tokai TTE-32AB034K ● MANUEL UTILISATION ● USER MANUAL The advertisement is also known as "other" agents Subscending the product dealer that was used to install products1 x Télécommande
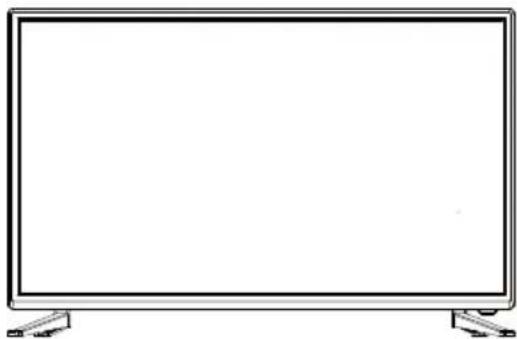
1 x TV
natural_image
Line drawing of a flat-screen monitor with no text or symbols on the screen or side
natural_image
Diagram of two symmetrical mechanical components labeled 'support' (no other text or symbols)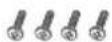
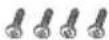
ST4x14MM vis de fixation
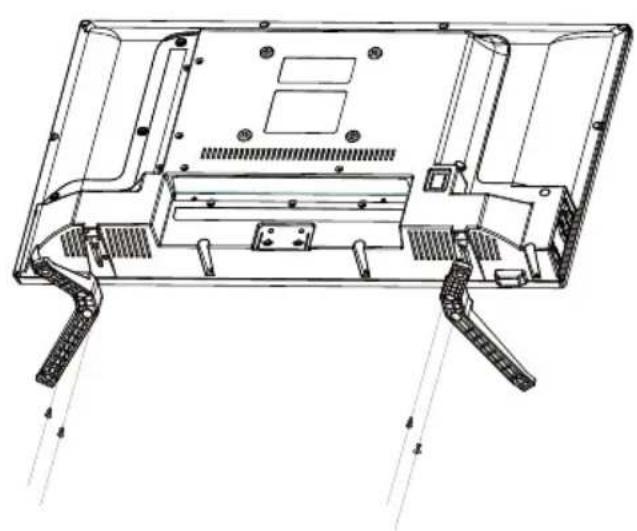
Installer le support
natural_image
Technical line drawing of a laptop chassis showing front panel, rear panels, and internal components (no text or labels)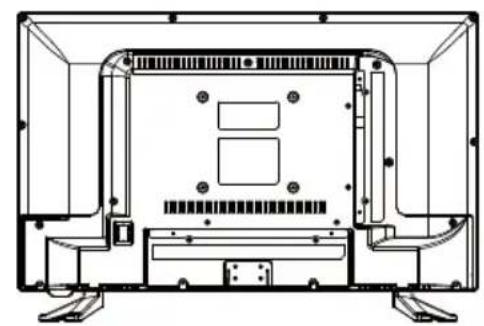
natural_image
Technical line drawing of a mechanical or electronic component with no visible text, numbers, or symbols.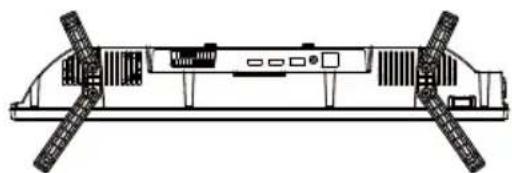
natural_image
Technical line drawing of a mechanical assembly with mounting brackets and control panel (no text or symbols)Détacher le support
natural_image
Technical line drawing of a device interior with four circular features highlighted (no text or symbols)text_image
Fig B Fig Anatural_image
Line drawing of a flat-screen monitor with a hand pressing a button on the right side (no text or symbols)text_image
Auto Installation - Setup 1 - Home Mode: Home Dynamic Standard Mild Next Page Move Enter Exit Exit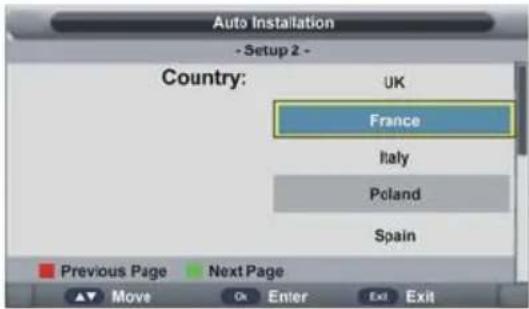
text_image
Auto Installation - Setup 2 - Country: UK France Italy Poland Spain Previous Page Next Page Move Or Enter Exit ExitInstallation 1
text_image
Auto Installation - Setup 3 - Language: German English French Italian Spanish Previous Page Next Page Move Enter Exit
text_image
Auto Installation - Setup 4 - Auto Power Off: Hours can be chosen for a continuous viewing, and after that the TV will be powered off. "off" means the viewing is timeless. Off 1 Hour 2 Hour 4 Hour Previous Page Next Page Move Enter Exit ExitInstallation 3
text_image
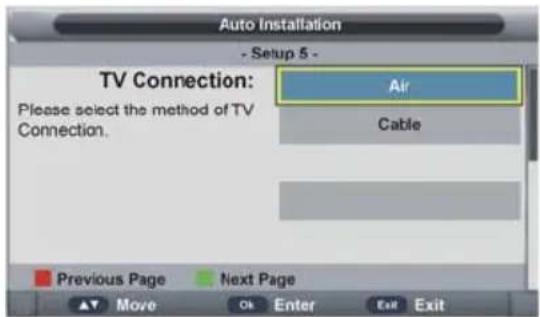
Auto Installation - Setup 5 - TV Connection: Please select the method of TV Connection. Air Cable Previous Page Next Page ▲▼ Move OK Enter Exit Exit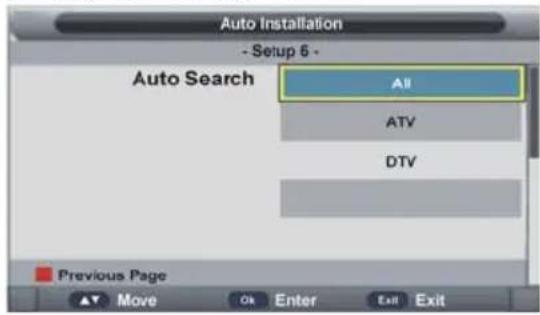
text_image
Auto Installation - Setup 6 - Auto Search All ATV DTV Previous Page ▲ Move Ok Enter Exit ExitInstallation 5
text_image
Auto Installation ATV c Message 0 DTV c Are you sure to skip ATV Radio channel scan? OK Cancel Process : 67% Menu Skip Exit Exit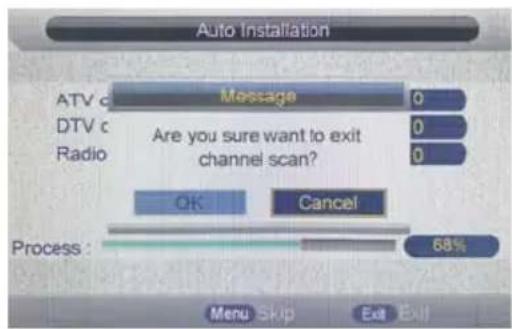
text_image
Auto Installation ATV c Message 0 DTV c Are you sure want to exit Radio channel scan? OK Cancel Process : 68% Menu Skip Exit Exitnatural_image
Front view of a blank rectangular TV or screen with two labeled connectors at the bottom (no text or symbols on the screen itself)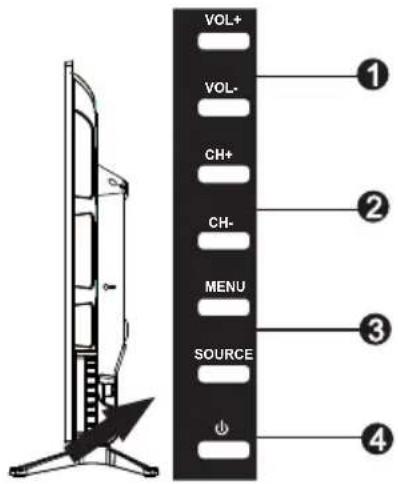
text_image
VOL+ VOL- CH+ CH- MENU SOURCE ① ② ③ ④natural_image
Technical line drawing of a device interior with mounting brackets and internal components (no text or symbols)Remarque :
natural_image
Technical line drawing of a mechanical or electronic component with no visible text, numbers, or symbols.- Option 2
text_image
Ordinateur DVD or VCR RF In Earphone PC VGA IN SCART OUT COAX OUT RF INAudio SCART VGA IN PC Audio Sort COAX OUT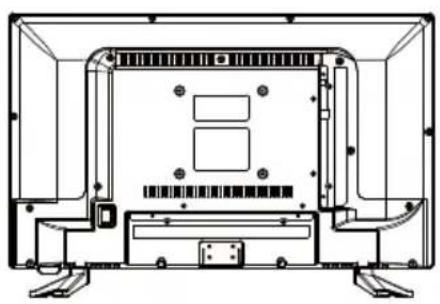
natural_image
Technical line drawing of a device rear panel with mounting feet and internal components (no text or symbols)natural_image
Technical line drawing of a mechanical or electronic component with no visible text, numbers, or symbols.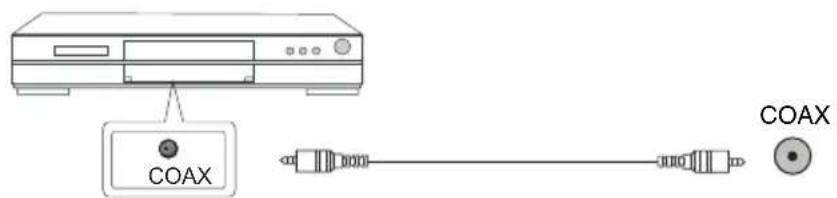
text_image
COAX COAX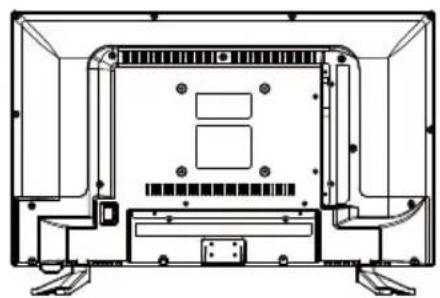
natural_image
Technical line drawing of a mechanical or electronic component with no visible text, numbers, or symbols.text_image
Picture Picture Mode Standard Brightness 50 Contrast 50 Sound Sharpness 5 Colour 50 Tint 50 Colour Temperature Warm Aspect Ratio 16:9 Setup Move On Enter Exit Exit Menu Return2.8 Description audio
text_image
Channel - Channel Manager No. Program Name Type 0001 Sky News dtv 0002 Sky Sports dtv 0003 Sky History dtv 0004 Sky Travel dtv 0005 Sky Health dtv 0006 Sky Entertainment dtv 0007 Sky Education dtv 0008 RTL dtv 0009 VOX dtv Del Lock Skip Swap Move CHI- Page+ Exit Exit Menu Returntext_image
Channel - Favorite Manager No. Program Name Fav1 Fav2 Fav3 Fav4 Type 0001 Sky News ✓ dtv 0002 Sky Sports ✓ dtv 0003 Sky History ✓ dtv 0004 Sky Travel ✓ dtv 0005 Sky Health ✓ ✓ dtv Favorite 1 Favorite 2 Favorite 3 Favorite 4 Move CI+-- conservative Exit Exit Menu Returntext_image
Channel Tuning ATV channels found: 0 DTV channels found: 21 Radio channels found: 2 CH: 48 690 MHz Feature Air 57% Process 57% Setup Exit Exittext_image
Channel - DTV Manual Tuning Channel 21 Frequency(KHz): 474000 Bandwidth(MHz): 8 Sound Start Channel Feature Strength 82% Quality 98% Setup Move On Enter Exit Exit New Return3.61 Chaînes
text_image
Channel - DTV Manual Tuning Frequency(kHz) 107500 SymbolRate(KS/s) 6875 Modulation(QAM) 64QAM Start Picture Sound Channel Strength 82% Feature Quality 98% Setup Move Ok Enter Exit Exit Menu Return3.8 Activer/désactiver LCN
text_image
Feature - Lock Lock Channel On Picture Parental Guidance Off Change Pin Code ENTER Sound Hotel Mode ENTER Channel Feature Setup Move Ok Enter Exit Exit Menu Return
text_image
Feature - Change Pin Code Picture Old Password Sound New Password Channel Confirm New Password Feature Setup Exit Exit Memory Returntext_image
Feature - Clock Date 24/08/2012 Time 12:35 Time Zone +12:00 Sound DST On Channel Feature Setup Move Ok Enter Exit Exit Menu Return4.31 Date
text_image
Partition List Total Size: 0003.7 G Free Size: 0002.2 G 01 Judaka1 Format Set Default Partition Move Ok Entertext_image
Record List 09/01 OR1 2013/08/10 18:26 16:19:03:25 Delete Return Move Entertext_image
Feature - HDMI Link Enable HDMI Link On Auto Power On On Auto Standby On Speaker Preference TV Speakers Amplifier Support ARC On Move Enter Exit Exit Menu Return Picture Sound Channel Feature Setuptext_image
Setup / PC Setup Auto Adjust ENTER H Position 0 V Position 0 Phase 0 Clock 0 Picture Sound Channel Feature Setup Move Ok Enter Exit Exit Menu Returntext_image
Rec Duration Time 00:42text_image
Screenshot of a software toolbar with icons for media, audio, video, play, search, info, gear, and list functions.text_image
/Udska1/Music Return Courage.mp3 With me.mp3 Yesterday once more.mp3 Love him.aac Always together.mp3 Friends.mp3 I believe.wma Delete Add/Del all to playlist 16KB Unknown Unknowntext_image
/Udska1/Movie Return Titanic.avi Woman's Dream.avi CONT-4F.ts Lost in journey.avi The pursuit of happyness.avi 2012.avi Transformers.avi Delete Add/Del all to playlist 768MBtext_image
00:11:32/01:39:35text_image
/Udskaf/Text Return After London.txt A Letter to Jack.txt Once you and me.txt Beautiful Rose.txt Think it over.txt A Red Red Rose.txt Leaf in a boat.txt Delete Add/Del all to playlist Move CH+ Page +/- Ok Enter Exit Exittext_image
e-Book So far as this, all that I have stated has been clear, and there can be no doubt that what has been thus handed down from mouth to mouth is for the most part correct. When I pass from trees and animals to men, however, the thing is different, for nothing is certain and everything confused. None of the accounts agree, nor can they be altogether reconciled with present facts or with reasonable supposition; yet it is not so long since but a few memories, added one to the other, can bridge the time, and, though not many, there are 2/3/18 Add/Del bookmark Go to page Bookmark list Playlists Quick Menu Page - Page + Exit ExitImportant Safety Instructions....35-36
What is included in the box ....37
Attaching/Detaching the stand and wall mounting....38
Getting Started - First Time Installation .....39-40
TV Buttons and Input Source Menu 41
Remote Control 42
Remote Control Preparation 43
Connections 44-45
TV Menu Operation 46-55
..... Picture Menu.... 46
Sound Menu 47
Channel Menu 48-50
Feature Menu 51-54
Setup Menu 55
PC Menu....56
Programme Guide ....57
USB Mode / Media Player....58-60
General Information....61-63
Frequently Asked Questions....61
Technical Specifications....62
End of Life Disposal 63
EXCLUSIVE IMPORTER 63
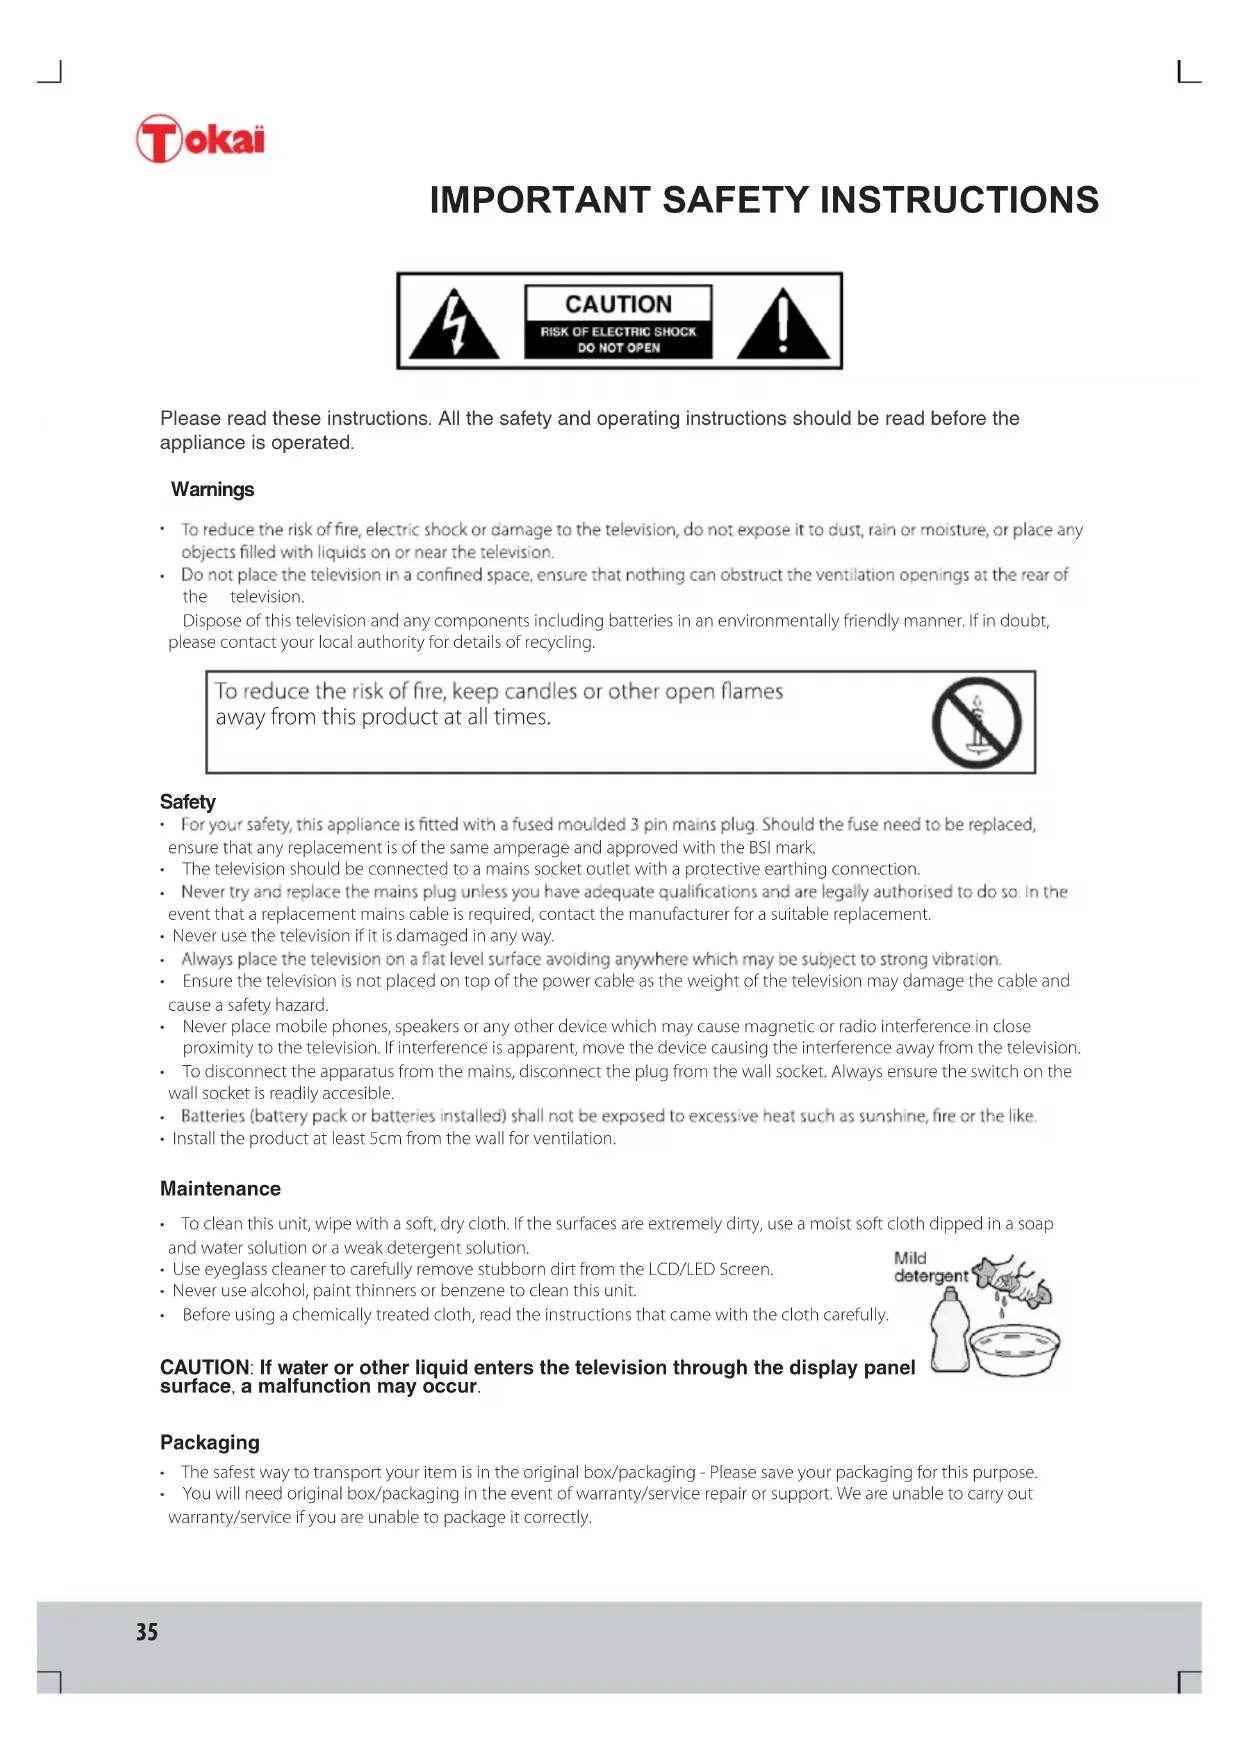
IMPORTANT SAFETY INSTRUCTIONS

text_image
CAUTION RISK OF ELECTRIC SHOCK DO NOT OPENPlease read these instructions. All the safety and operating instructions should be read before the appliance is operated.
Warnings
• To reduce the risk of fire, electric shock or damage to the television, do not expose it to dust, rain or moisture, or place any objects filled with liquids on or near the television.
- Do not place the television in a confined space, ensure that nothing can obstruct the ventilation openings at the rear of the television.
Dispose of this television and any components including batteries in an environmentally friendly manner. If in doubt, please contact your local authority for details of recycling.
To reduce the risk of fire, keep candles or other open flames away from this product at all times.

Safety
- For your safety, this appliance is fitted with a fused moulded 3 pin mains plug. Should the fuse need to be replaced, ensure that any replacement is of the same amperage and approved with the BSI mark.
• The television should be connected to a mains socket outlet with a protective earthing connection. - Never try and replace the mains plug unless you have adequate qualifications and are legally authorised to do so. In the event that a replacement mains cable is required, contact the manufacturer for a suitable replacement.
- Never use the television if it is damaged in any way.
• Always place the television on a flat level surface avoiding anywhere which may be subject to strong vibration. - Ensure the television is not placed on top of the power cable as the weight of the television may damage the cable and cause a safety hazard.
- Never place mobile phones, speakers or any other device which may cause magnetic or radio interference in close proximity to the television. If interference is apparent, move the device causing the interference away from the television.
- To disconnect the apparatus from the mains, disconnect the plug from the wall socket. Always ensure the switch on the wall socket is readily accessible.
- Batteries (battery pack or batteries installed) shall not be exposed to excessive heat such as sunshine, fire or the like.
• Install the product at least 5cm from the wall for ventilation.
Maintenance
- To clean this unit, wipe with a soft, dry cloth. If the surfaces are extremely dirty, use a moist soft cloth dipped in a soap and water solution or a weak detergent solution.
- Use eyeglass cleaner to carefully remove stubborn dirt from the LCD/LED Screen.
- Never use alcohol, paint thinners or benzene to clean this unit.
• Before using a chemically treated cloth, read the instructions that came with the cloth carefully.
CAUTION: If water or other liquid enters the television through the display panel surface, a malfunction may occur.

• The safest way to transport your item is in the original box/packaging - Please save your packaging for this purpose.
- You will need original box/packaging in the event of warranty/service repair or support. We are unable to carry out warranty/service if you are unable to package it correctly.
IMPORTANT SAFETY INSTRUCTIONS

text_image
CAUTION RISK OF ELECTRIC SHOCK DO NOT OPENPlease read these instructions. All the safety and operating instructions should be read before the appliance is operated.
Important Information Regarding Use of Video Games, Computers, Captions or Other Fixed Image Displays
The extended use of fixed image program material can cause a permanent "shadow image" on the LCD panel.
This background image is viewable on normal programmes in the form of a stationary fixed image. This type of irreversible LCD/LED panel deterioration can be limited by observing the following steps:
- Reduce the brightness/contrast setting to a minimum acceptable viewing level.
- Do not display a fixed image for extended periods of time.
- Turn the power off when not in actual use.
Examples of images that you need to watch out for are as follows (this is not an exhaustive list):
• TV Channel Logos: e.g. Shopping channel logos and pricing displays—especially if they are bright and stationary. Moving or low-contrast graphics are less likely to cause ageing of the screen.
- Time Displays.
- Teletext: Do not view a stationary page for a long period of time.
• TV/DVD Menus: e.g. Listings of DVD disk content.
- Pause Mode: Do not leave the TV in pause mode for long periods of time, e.g. When watching DVDs or videos.
Important: Once a 'shadow image/screen burn' occurs, it will never disappear and is not repairable under warranty.

This equipment is a Class II or double insulated electrical appliance. It has been designed in such a way that it does not require a safety connection to electrical earth.
How do I dispose of this product?
ROI: Waste electrical products should not be disposed of with household waste. Separate disposal facilities exist. Check with your Local Authority or retailer for recycling advice.

natural_image
Two identical black-and-white line diagrams of a trash bin with diagonal lines, no text or symbols present.Batteries
- Observe the correct polarity when inserting batteries.
- Do not use different types of batteries together or mix old and new batteries.
- Dispose of batteries in an environmentally friendly way.
• Certain regions may regulate the disposal of batteries. - If you are not using your TV for an extended period of time then remove the batteries to prevent possible damage due to leakage.
- Please consult your local authority regarding disposal
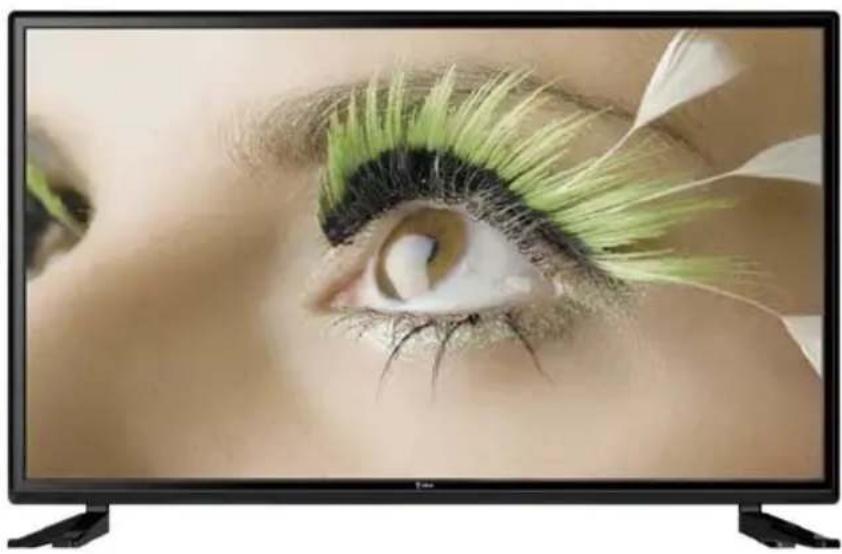
WHAT IS INCLUDED IN THE BOX
Accessories
Included with this TV are the following accessories:
1 x Instruction Manual

text_image
Tokai TTC-32AB8044 • MANUEL FUTUSISATION • USER MANUAL I'm absolutely in the world's world? I want Before contacting the product, please call your 'tamed' package.1 x Remote Control
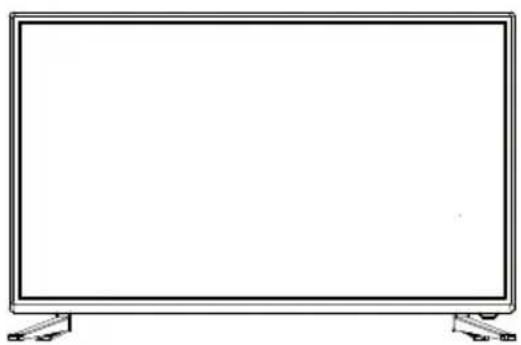
1 x TV
natural_image
Line drawing of a flat-screen monitor with stand legs (no text or symbols)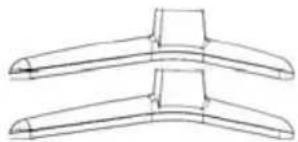
natural_image
Line drawing of two symmetrical mechanical components with no text or symbolsStand
ST4x14MM
Stand fixing screws
Please save your packaging as you will need this in the event of warranty/service repair or support. We are unable to carry out warranty/service if you are unable to package it correctly. The safest way to package your item in the event of warranty/service repair is in its original box/packaging.
ATTACHING/DETACHING THE STAND
Attaching the Stand
Insert the stand into the bottom of the LED TV body fit and tighten the screws.
natural_image
Technical line drawing of a laptop chassis showing internal components and structural ribs (no text or labels)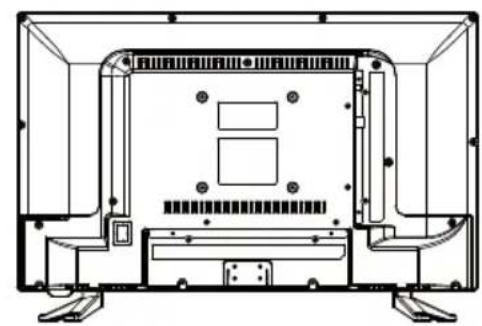
natural_image
Technical line drawing of a mechanical or electronic component with no visible text, numbers, or symbols.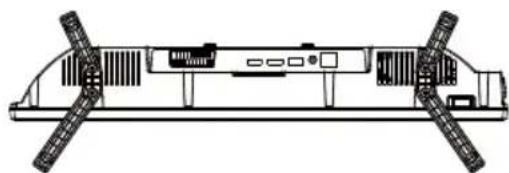
natural_image
Technical line drawing of a mechanical or electronic component with no visible text or symbolsDetaching the Stand
To remove the screws in the circled area then the stand will come off.
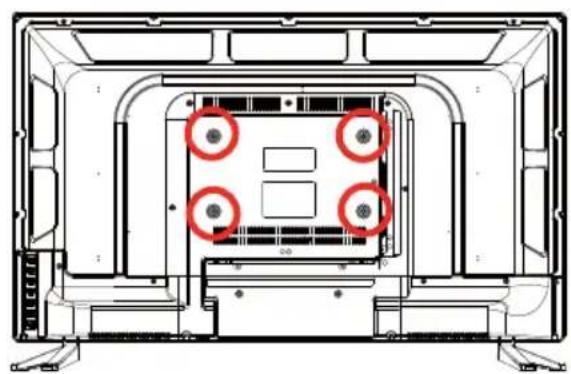
Wall mounting the TV
WARNING: Only attempt to wall mount your TV if you are competent to do so. If you are in any doubt seek professional assistance.
This television requires a VESA 200x200mm.
1) Fix the wall-mounting bracket to the wall
2) Tighten the screws (M6X10) onto the TV.
3) Put the TV on the bracket.
IMPORTANT - Before drilling any holes in the wall ensure you are not drilling where there could be any electric wires, water or gas pipes.
natural_image
Technical line drawing of a computer monitor interior with four circular annotations highlighting areas of interest (no text or symbols present)Important — If wall mounting this TV, only use the spacers already provided in the wall mounting holes. Using other screws which are longer could cause irreparable damage to internal parts.
GETTING STARTED - First Time Installation
1) Connect the TV to the TV Aerial wall socket. (Fig A)
2) Connect the power cable to the wall socket (Fig B)

text_image
Fig B Fig A3) Insert 2 x AAA batteries (not supplied) into the Remote control. Take care to observe correct polarity.
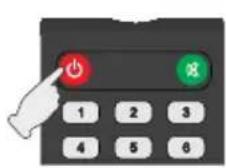
4) Switch on the television using the red (power) button on the remote control, or on the side of your TV.

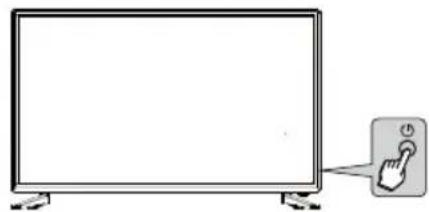
natural_image
Illustration of a flat-screen monitor connected to a button with a finger (no text or symbols)5) The first time below installation menu page will display on the screen:
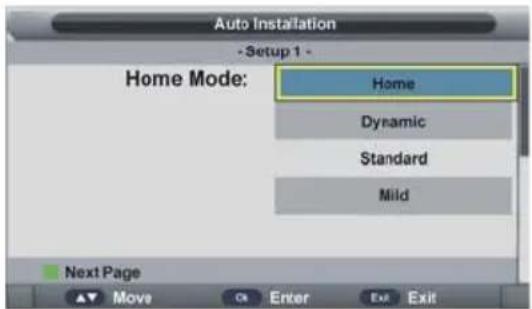
text_image
Auto Installation - Setup 1 - Home Mode: Home Dynamic Standard Mild Next Page Move Cr Enter Exit Exit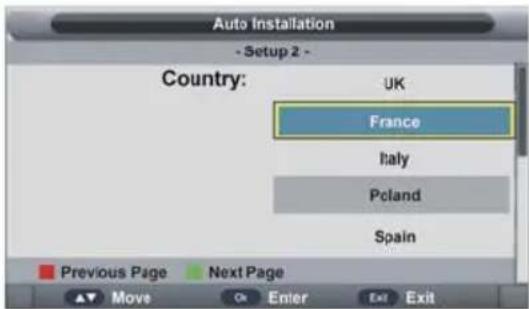
text_image
Auto Installation - Setup 2 - Country: UK France Italy Poland Spain Previous Page Next Page Move Enter Exit ExitSetup 1
- Press ▼/▲ navigation button to select desired picture Mode.
- Press OK button to call out a dialog box. Select OK to confirm selection and turn to next page; select Cancel to dismiss the dialog box.
- Press ▼/▲ navigation button to select the country that you are living in.
- Press OK button to confirm selection and turn to next page.
Setup 2
text_image
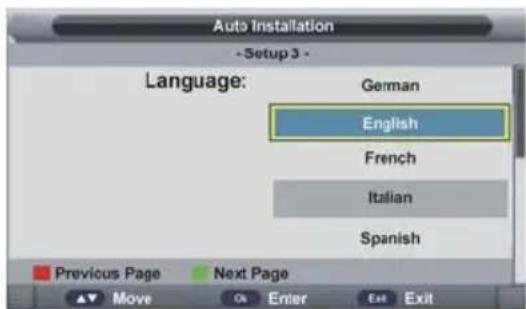
Auto Installation - Setup 3 - Language: German English French Italian Spanish Previous Page Next Page Move Or Enter Exit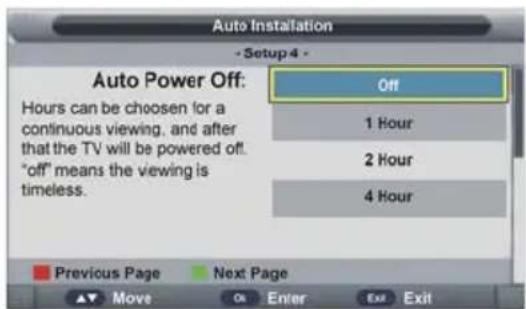
text_image
Auto Installation - Setup 4 - Auto Power Off: Hours can be chosen for a continuous viewing, and after that the TV will be powered off. "off" means the viewing is timeless. Off 1 Hour 2 Hour 4 Hour Previous Page Next Page Move Or Enter Exit ExitGETTING STARTED - First Time Installation
Setup 3
- Press ▼/▲ navigation button to select desired menu language.
- Press OK button to confirm selection and turn to next page.
- Press ▼/▲ navigation button to select desired auto power off time.
- Press OK button to confirm selection and turn to next page.
Setup 4
text_image
Auto Installation - Setup 5 - TV Connection: Please select the method of TV Connection. Air Cable Previous Page Next Page ▲▼ Move Ok Enter Exit Exit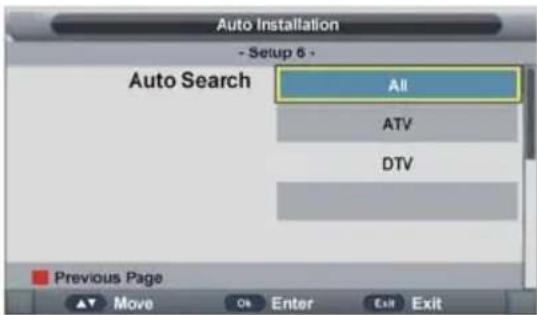
text_image
Auto Installation - Setup 5 - Auto Search All ATV DTV Previous Page ▲▼ Move On Enter Exit ExitSetup 5
- Press ▼/▲ navigation button to select desired connection type.
- Press OK button to confirm selection and turn to next page.
- Press ▼/▲ navigation button to select desired searching type.
- Press OK button to confirm selection and then this unit will search programs automatically.
Setup 6
6) If you would like to skip current tuning and start another (if you choose ATV&DTV tuning in the previous screen), press MENU. To cancel completely, press EXIT.

text_image
Auto Installation ATV c Message 0 DTV c Are you sure to skip ATV Radio channel scan? OK Cancel Process : 67% Menu Skip Exit Exit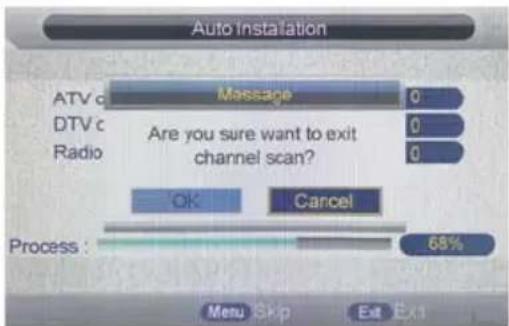
text_image
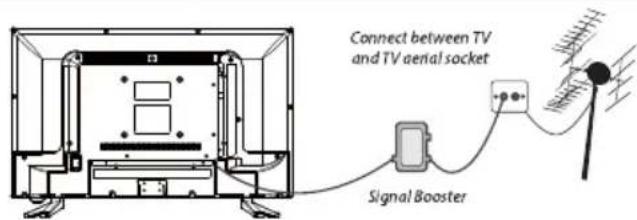
Auto Installation ATV c Massage 0 DTV c Are you sure want to exit Radio channel scan? OK Cancel Process : 68% Menu Skip Exit ExitTip: If the TV finds some, but not all, of the Digital channels, the TV is functioning correctly but the signal being received is not strong enough. (The signal strength needs to be above 85% - you can see the signal strength the TV is receiving when you change channels/ programmes) You will need to increase the signal reception in order to receive all of the channels available. The most economical way to do this is by purchasing and connecting a 'signal booster' in between the TV and the TV aerial socket. If this does not solve the problem, you will need to upgrade the TV aerial to a digital hi-gain compatible aerial.
text_image
Connect between TV and TV aerial socket Signal BoosterTV BUTTONS & SOURCE MENU
① Volume up/down and menu left/right.
② Channel up/down and menu up/down.
Displays Menu/OSD
3
Displays the input source menu.
4 Standby Power On/Off.
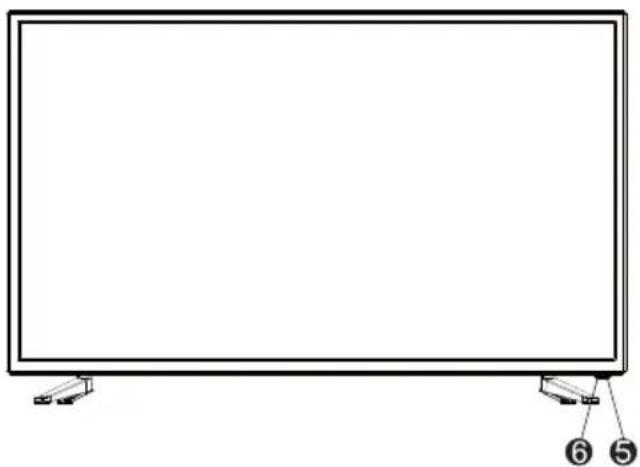
5 Red illuminates in standby mode, green when your TV is switched on.
6 Infrared sensor for the remote control.
natural_image
Front view of a flat-screen monitor with labeled buttons (no text or symbols on the screen)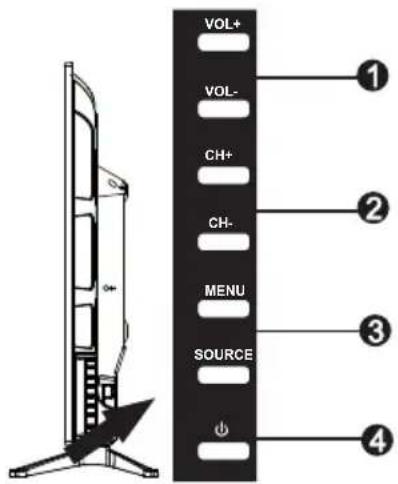
text_image
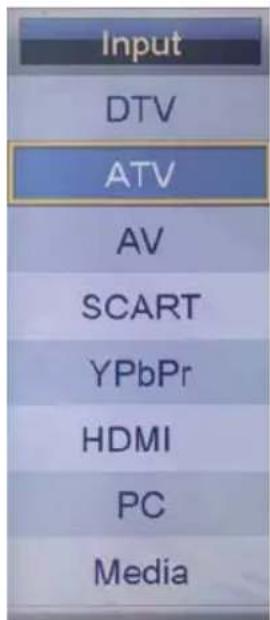
VOL+ VOL- CH+ CH- MENU SOURCE ① ② ③ ④Choosing Mode Input/Source
To switch between the different input/connections.
A) Using the buttons on the remote control:
1) Press [SOURCE] - The source menu will appear.
2) Press [V] or [A] to select the input you require.
3) Press [OK].
B) Using the buttons on the Television:
1) Press [SOURCE].
2) Scroll up / down using CH+/CH- buttons to the input/source you require.
3) Press Vol+ to change input/source to the one selected.
text_image
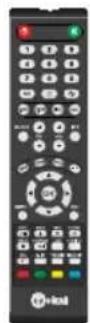
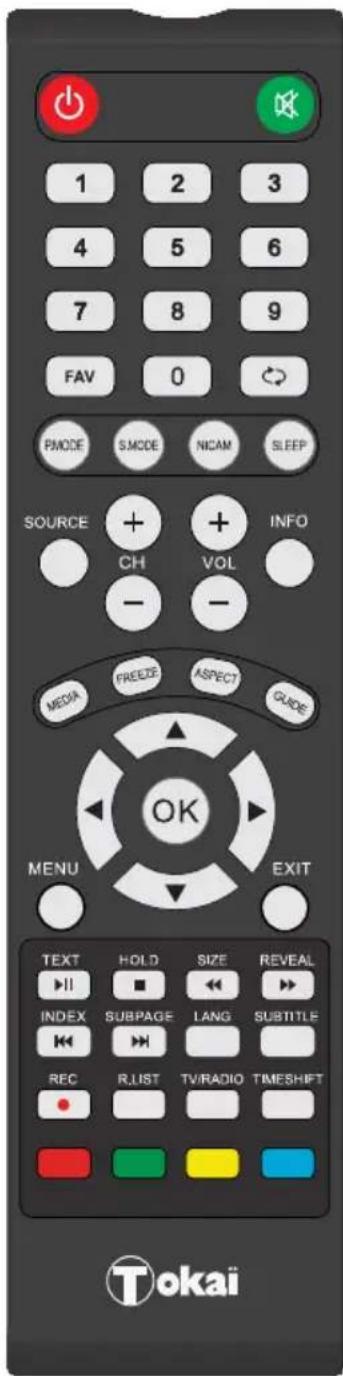
Input DTV ATV AV SCART YPbPr HDMI PC MediaREMOTE CONTROL
1 POWER Switch on TV when in standby or vice versa. MUTE Mute the sound or vice versa.
2 NUMBER BUTTONS
0 -9 to select a TV channel directly.
FAV Display Favourites List.
To return to the previous channel viewed.
P.MODE Scrolls through picture mode options
S.MODE Scrolls through sound mode options
NICAM TV nicam select.
SLEEP Press repeatedly to cycle through the sleep options
3 SOURCE To display the input/source menu
CH + - To increase or decrease the number of the channel being watched
VOL + - To increase / decrease the sound level
INFO To switch off the screen when listening to radio / displays media information during USB playback
MEDIA Switches to USB media screen
FREEZE To freeze the picture.
ASPECT Scrolls through aspect mode options
GUIDE Opens the 7 Day TV Guide(Digital TV mode)
4 Allows you to navigate the on-screen menus and adjust the system settings to your preference
MENU To display OSD menu
EXIT To exit all menus
5 TEXT To enter Teletext mode
HOLD Teletext mode - Hold current page which is displayed
REVEAL Teletext mode - To reveal or hide the hidden words
INDEX To display the index page
SIZE Change the size of display in Teletext mode.
S.PAGE Sub coded page access.
LANG Language options.
SUBTITLE To switch the dialogue at the bottom of the screen (on/o)
To Record the current television programme
REC LIST To display the Recorded List and Schedule List.
TV/RADIO Switches between DVB-T TV and Radio channels
T.SHIFT In DTV mode, press to execute the time shift function.
To play/pause
To stop the playback
To play in fast rewind mode
To play in fast forward mode
To restart the current chapter
To advance forward to the next chapter
COLOURED BUTTONS
For navigating as prompted on screen
1
2
3
4
5
text_image
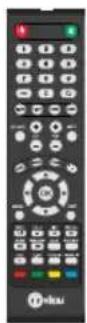
1 2 3 4 5 6 7 8 9 FAV 0 PMODE SMODE NICAM SLEEP SOURCE + CH + + VOL INFO - MEDIA FREEZE ASPECT GUIDE OK MENU EXIT TEXT HOLD SIZE REVEAL II ■ ↔ INDEX SUBPAGE LANG SUBTITLE REC R_LIST TV/RADIO TIMESHIFT TokaiREMOTE CONTROL PREPARATION
BATTERY INSTALLATION
install the batteries as the following pictures. Be sure + and – terminals are positioned as indicated in the battery compartment.
SERVICE LIFE OF BATTERIES
- The batteries normally last for one year although this depends on how often the remote control is used.
- If the remote control fails to work even when it is operated near the player, replace the batteries.
- Use two size AAA dry batteries.
NOTE:
Do not drop, step on or otherwise impact the remote control. This may damage the parts or lead to malfunction.
If the remote control is not going to be used for a long time, remove the batteries.
Point the remote control from no more than about 6m from the remote control sensor and within about 60° from the front of the player.
NOTES:
- The operating distance may vary according to the brightness of the room.
- Do not point bright light at remote control sensor.
- Do not place objects between the remote control and the remote control sensor.
- Do not use this remote control while simultaneously operating the remote control of any other equipments.
Precaution on battery use
Improper use of batteries can result in leakage of chemicals and/or explosion. Be sure to follow the instructions below:
Place batteries with their terminals corresponding to the (+) and (-) indications.
Different types of batteries have different characteristics. Do not mix batteries of different types.
Do not mix old and new batteries. Mixing old and new batteries can shorten the life of new batteries and/or cause old batteries to leak chemicals.
Remove batteries as soon as they are non-operable. Chemicals that leak from batteries can cause a rash. If chemical leakage is found, wipe with a cloth.
The batteries (battery pack of batteries installed) shall not be exposed to excessive heat such as sunshine, fire or the like.
IMPORTANT NOTES ON BATTERIES :
Please help to protect the environment. It is recommended to dispose of old batteries in collection centers specially designed for that.
CONNECTIONS
| A | Earphone Out | Earphone Out |
| B | VGA |PC audio | PC VGA input | PC Audio Input |
| C | SCART SCART Input | |
| D | RF | RF Input (tv antenna) |
| E | COAX Out | Coax Audio Output |
| F | HDMI | HDMI Input(HDMI3 ARC) |
| J | USB | USB Input |
| H | YPbPr(MINI) | Connect to the device's composite terminal |
| I | AV(MINI) | External AV signal input |
| G CI(CI SLOT) | CI Card is not included The card reader input CI (commoninterface)this requires CAM (conditional access module)used for payTV. | |
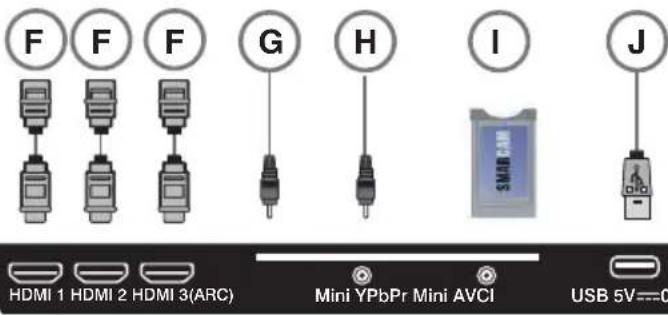
text_image
F F F G H I J HDMI 1 HDMI 2 HDMI 3(ARC) Mini YPbPr Mini AVCI USB 5V=0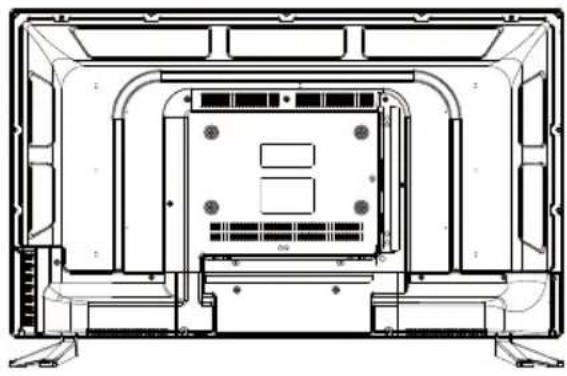
natural_image
Technical line drawing of a device interior with mounting brackets and internal components (no text or symbols)Note:
Pay per view services a smartcard to be inserted into the TV.
If you subscribe to a pay per view service the provider will issue with a CAM card "Smartcard". The CAM can then be inserted into the
COMMON INTERFACE port.
Side Connections
text_image
EARPHONE SCART PC AUDIO PC VGA COAXIAL OUT RF A B C D EBottom Connections
Connecting a High Definition (HD) Device
- Option 1 Via HDMI to HDMI cable.
A HDMI cable can output both video and audio and enables you to enjoy digital-quality video and audio with minimal loss of quality.
Tv's Input/Source should be set to HDMI. The HDMI ports support HDMI 1.4 input
One HDMI port (HDMI 3) supports ARC.
NOTE: For optimum performance always use this option if the device you are connecting is equipped with an HDMI output.

text_image
HDMI OUT HDMI
natural_image
Technical line drawing of a mechanical or electronic component with no visible text, numbers, or symbols.-Option 2
Connecting a DVD Player/Recorder, Video Recorder or Cable, or PC
Tv's Input/Source should be set to SCART or VGA and PCaudio.
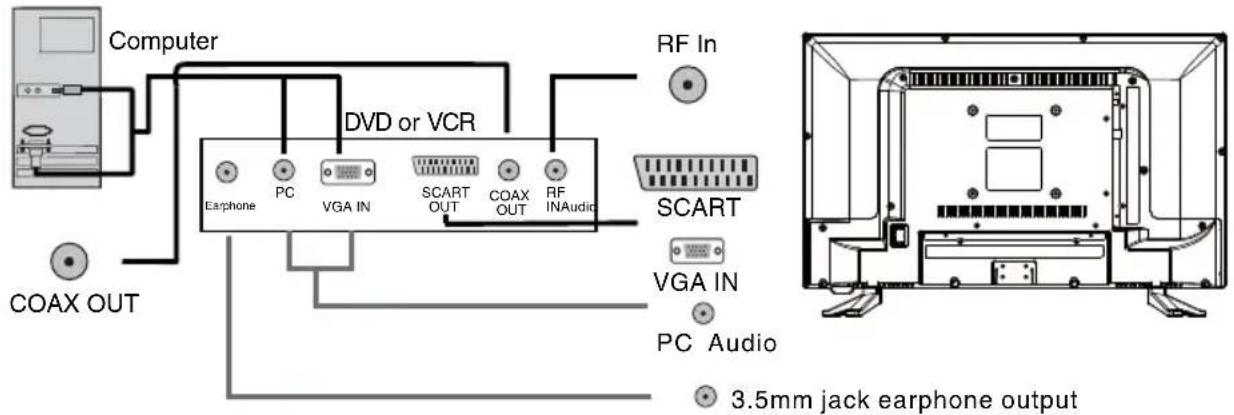
text_image
Computer DVD or VCR RF In SCART VGA IN PC VGA IN PC Audio 3.5mm jack earphone output COAX OUTEarphone connection :
3.5mm jack is not included in the box enables you to enjoy better audio with minimal loss of quality.
Use the HEADPHONES output of your TV set to listen the audio of the unit through your own stereo headphones (not included). When you connect headphones to the unit, the main speakers will be muted.
Notes : Hearing experts advise against exposure to continuous extended play at loud volume levels while using headphone (or earphones), possible hearing loss may result.
IMPORTANT: To prevent hearing damage always set the volume control to a low level before you connect the headphones. Then connect the headphones, put them on, and very gradually increase the volume to a comfortable listening level.
Connecting a hi-fi system / sound amplifier
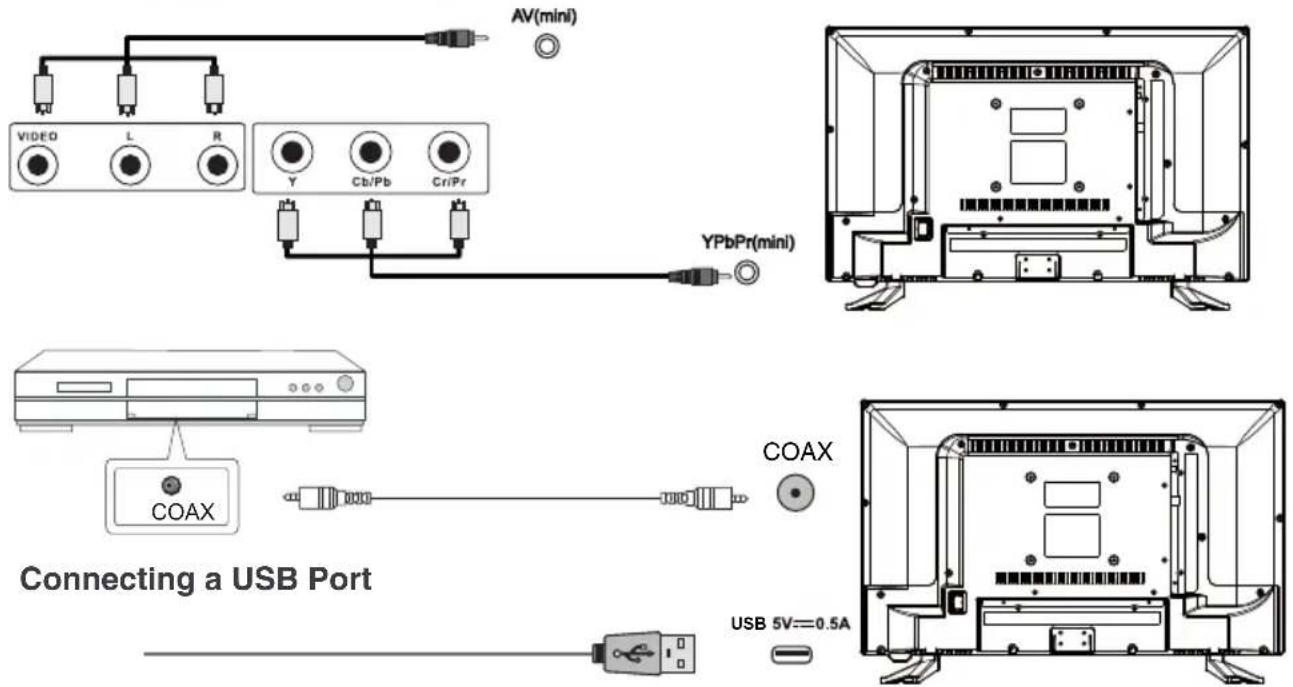
text_image
AV(mini) VIDEO L R Y Cb/Pb CriPr YPbPr(mini) COAX COAX USB 5V==0.5A Connecting a USB PortNotes: you can use recharge function of USB port for your phone when your TV is turned on, But it will take a long time because the USB voltage is only 5V=500mA. However, due to the different phone models, TV models are different, USB interface output voltage, current and mobile phones may need to enter the voltage, current does not match, there will be some security risks.
1.Picture Menu
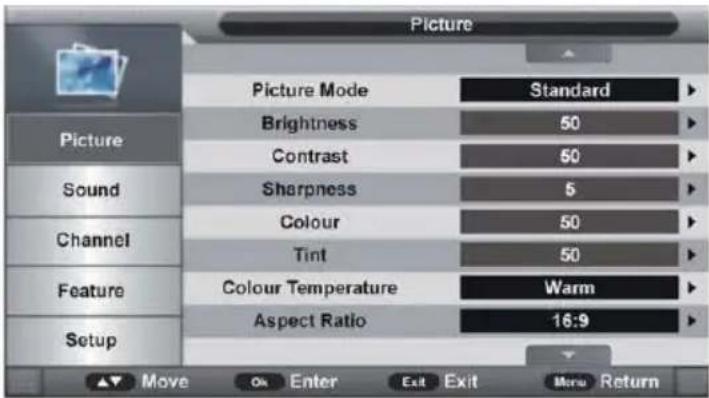
text_image
Picture Picture Mode Standard Brightness 50 Contrast 50 Sound Sharpness 5 Colour 50 Channel Tint 50 Feature Colour Temperature Warm Setup Aspect Ratio 16:9 Move OK Enter Exit Exit More ReturnPress MENU button to display the main menu.
Press ▼/▲ button to select PICTURE, then press ENTER/▶ to enter.
Press ▼/▲ button to select option, then press ◀/▶ button to adjust.
1.1 Picture Mode
Press ▼/▲ button to select the Picture mode, then press ◀/▶ button to select the option that you want to adjust in the Picture menu. Available options: Standard, Mild, User, Dynamic.
Tips : you can press PMODE button on the remote control to change the Picture Mode directly.
1.2 Brightness
The brightness value of picture can be adjusted from 0-100.
1.3 Contrast
The contrast value of picture can be adjusted from 0-100.
1.4 Sharpness
The sharpness value of picture can be adjusted from 0-100.
1.5 Colour
The colour saturation value of picture can be adjusted from 0-100.
NOTE: The value of Brightness, Contrast, Sharpness, and Colour is adjustable only in User picture mode.
1.6 Tint
This item is used to adjust the tone of color in NTSC system from 0-100.
1.7 Colour Temperature
This item is used to adjust the optimum colour temperature for suitable viewing.
Available options: Standard, Cool, Warm.
1.8 Aspect Ratio
Press OK or ▶ navigation button to enter submenu and press ▼/▲ navigation button to select preferred option.
Available options: Auto, 4:3, 16:9, Zoom1, Zoom2.
NOTE: If there's no signal, pressing ASPECT button on remote control will not work. And the available video size may be different in different input source.
1.9 Noise Reduction
This item is used to eliminate the image noise to gain better image effect.
Available options: Off, Low, Middle, High.
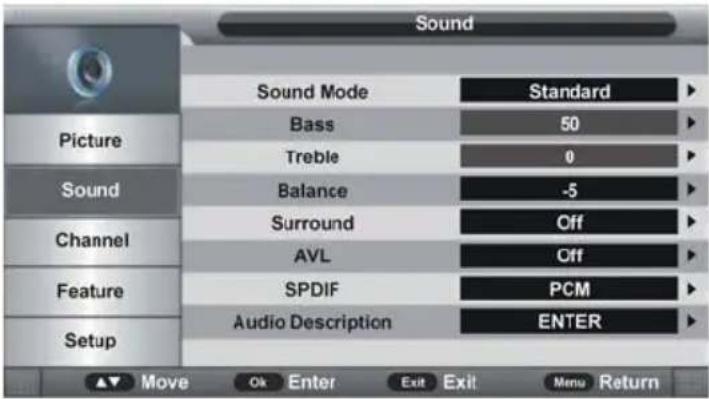
2. Sound Menu
text_image
Sound Sound Mode Standard Picture Bass 50 Treble 0 Sound Balance -5 Surround Off Channel AVL Off Feature SPDIF PCM Audio Description ENTER Setup Move Ok Enter Exit Exit Menu ReturnPress MENU button to display the main menu.
Press ▼/▲ button to select SOUND, then press ENTER/▶ to enter.
Press ▼/▲ button to select option, then press ◀/▶ button to adjust.
2.1 Sound Mode
Available options: Standard, Movie, Music, Speech, User.
Tips: You can press SMODE button on the remote control to change the Sound mode directly.
2.2 Bass
This item is used to adjust the level of lower-pitched sounds from 0-100.
2.3 Treble
This item is used to adjust the level of higher-pitched sounds from 0-100.
NOTE: The value of Bass and Treble is adjustable only in User sound mode.
2.4 Balance
This item is used to adjust the audio output between left and right speaker from -50 to 50.
2.5 Surround
This item is used to turn on/off Surround function.
2.6 AVL (Auto Volume Level)
This item is used to turn on/off AVL function.
2.7 SPDIF
This item is used to select desired SPDIF audio output type.
Available options: Off, PCM, Auto.
2.8 Audio Description
This item is used to turn on/off Audio Description function. For Visual Impaired users, this function can assist them to know a certain scene or action through the narration.
NOTE: Audio Description function works only when you are viewing programs that contain related narration information.
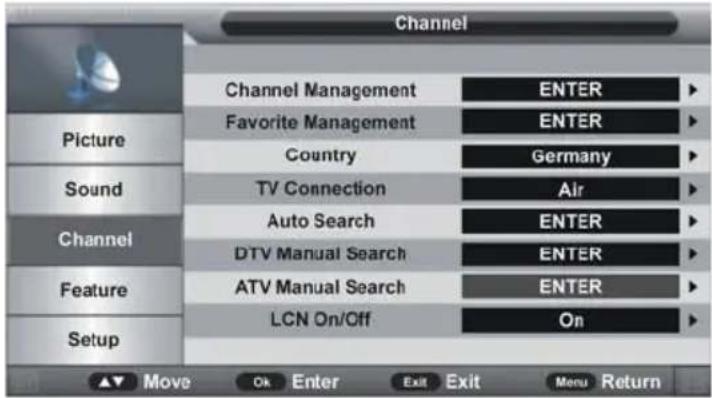
3. Channel Menu
text_image
Channel Picture Sound Channel Feature Setup Channel Management Favorite Management Country TV Connection Auto Search DTV Manual Search ATV Manual Search LCN On/Off ENTER ENTER Germany Air ENTER ENTER ENTER On Move Ok Enter Exit Exit Menu ReturnPress MENU button to display the main menu.
Press ▼/▲ button to select CHANNEL, then press ENTER/▶ to enter.
Press ▼/▲ button to select option, then press OK or ▶ button to enter submenu.
3.1 Channel Management
Press ▼/▲ navigation button to select this item and press OK or ▶ navigation button to enter submenu.
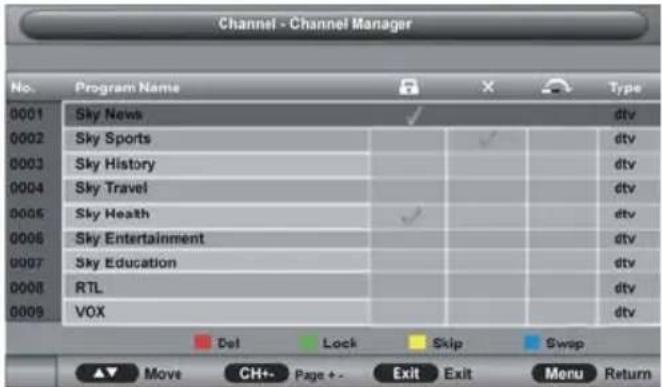
text_image
Channel - Channel Manager No. Program Name Type 0001 Sky News dtv 0002 Sky Sports dtv 0003 Sky History dtv 0004 Sky Travel dtv 0005 Sky Health dtv 0006 Sky Entertainment dtv 0007 Sky Education dtv 0008 RTL dtv 0009 VOX dtv Del Lock Skip Sweep Move CH+... Page+... Exit Exit Menu Return- Press ▼/▲ navigation to select preferred program.
a) Press RED button on remote control and use number buttons to input the password. Then press RED button to add/remove a delete mark on highlighted program. After that, press OK button to enter a dialogue box. Select OK to delete it; select Cancel to cancel this operation.
b) Press GREEN button on remote control and use number buttons to input the password. Then press GREEN button to lock/unlock a program.
c) Press YELLOW button on remote control to add/remove skip mark.
d) Press BLUE button on remote control to enter MOVE mode. Then use ▼/▲ navigation button to select preferred position and press OK button to move it.
3.2 Favorite Management
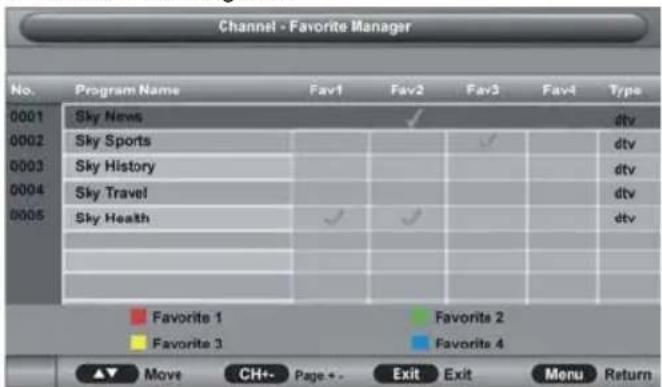
text_image
Channel - Favorite Manager No. Program Name Fav1 Fav2 Fav3 Fav4 Type 0001 Sky News ✓ dtv 0002 Sky Sports ✓ dtv 0003 Sky History ✓ dtv 0004 Sky Travel ✓ dtv 0005 Sky Heath ✓ dtv ✓ ✓ ✓ ✓ ✓ ✓ ✓ ✓ ✓ ✓ ✓ ✓ ✓ ✓ ✓ ✓ ✓ ✓ ✓ ✓ ✓ ✓ ✓ ✓ ✓ ✓ ✓ ✓ ✓ ✓ ✓ ✓ - ✓ ✓ ✓ ✓ ✓ ✓ ✓ ✓ ✓ ✓ ✓ ✓ ✓ ✓ ✓ ✓ ✓ ✓ ✓ ✓ ✓ ✓ ✓ ✓ ✓ ✓ ✓ ✓ ✓ ✓ \\ Favorite 1 Favorite 2 Favorite 3 Favorite 4 Move CH+... Page +....Exit Exit Menu Return- Press ▼/▲ navigation to select preferred program.
a) Press RED button on remote control to add highlighted channel to Favorite 1 list.
b) Press GREEN button on remote control to add highlighted channel to Favorite 2 list.
c) Press YELLOW button on remote control to add highlighted channel to Favorite 3 list.
d) Press BLUE button on remote control to add highlighted channel to Favorite 4 list.
3.3 Country
This item is used to select the country that you are living in.
3.4 TV Connection
This item is used to select the connection type of your TV.
Available options: Air, Cable.
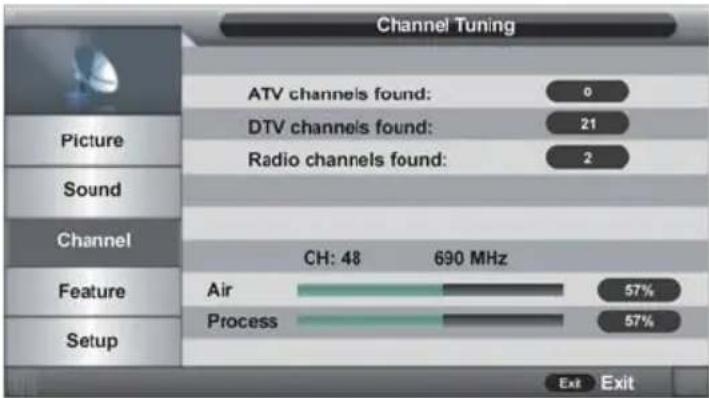
3.5 Auto Search
Press ▼/▲ navigation button to select this item and press OK or ▶ navigation button to enter submenu. Then press ▼/▲ navigation button to select All, DTV or ATV and press OK or ▶ navigation button to enter a dialog box. Select OK to start auto searching; select Cancel to cancel this operation.
text_image
Channel Tuning ATV channels found: 0 DTV channels found: 21 Radio channels found: 2 CH: 48 690 MHz Air 57% Process 57% Exit ExitTo exit auto tuning, press MENU or EXIT button and select OK.
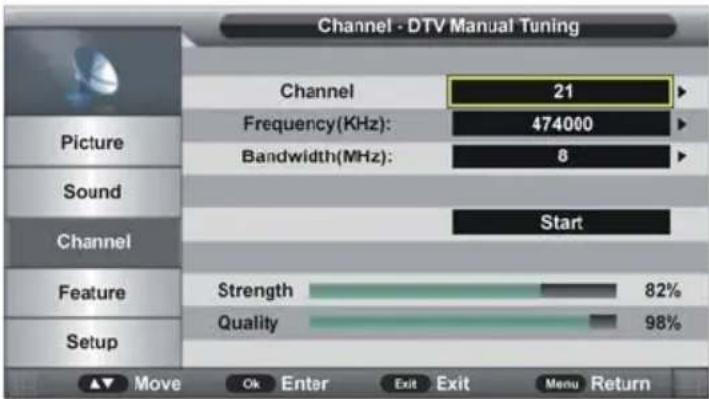
3.6 Digital Manual Search
When TV Connection is Air:
text_image
Channel - DTV Manual Tuning Channel 21 Frequency(KHz): 474000 Bandwidth(MHz): 8 Sound Start Channel Feature Strength 82% Quality 98% Setup Move Ok Enter Exit Exit Menu Return3.61 Channel
Press OK or ▶ navigation button to enter submenu and press ▼/▲ navigation button to select preferred program
3.62 Frequency (KHz)
Press OK or ▶ navigation button to enter submenu. Press ◀/▶ navigation button to move the cursor; press number buttons on remote control to input desired value.
3.63 Bandwidth (MHz)
Press OK or ▶ navigation button to enter submenu and press ▼/▲ navigation button to select preferred bandwidth.
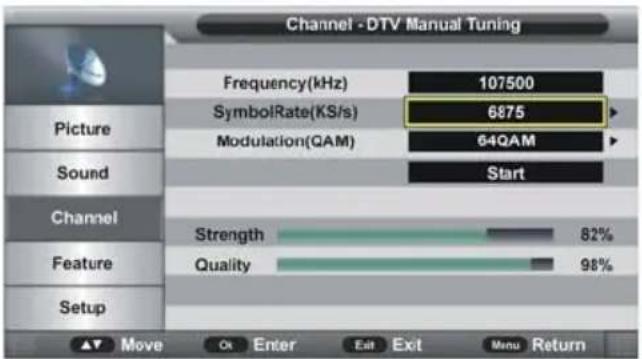
When TV Connection is Cable:
text_image
Channel - DTV Manual Tuning Frequency(kHz) 107500 SymbolRate(KS/s) 6875 Modulation(QAM) 64QAM Start Strength 82% Quality 98% Channel Feature Setup Move Ok Enter Exit Exit Menu Return3.64 Frequency (kHz)
This item is not user adjustable.
3.65 SymbolRate (KS/s)
Press OK or ▶ navigation button to enter submenu.
Press ◀/▶ navigation button to move the cursor; press number buttons on remote control to input desired value.
3.66 Modulation (QAM)
Press OK or ▶ navigation button to enter submenu and press ▼/▲ navigation button to select preferred modulation.
Once the settings of part 3.61 to part 3.63 are finished, select Start in the menu and press OK button to start searching.
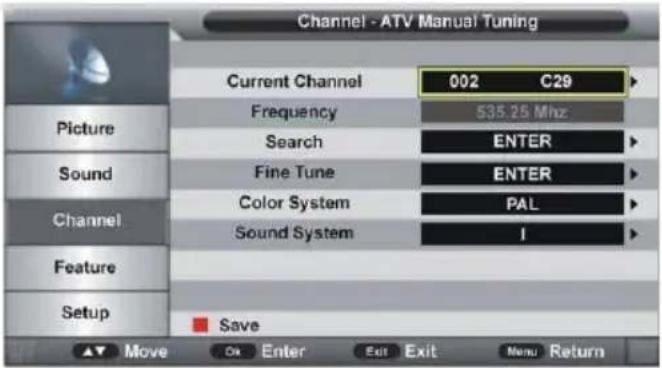
3.7 ATV Manual Search (for ATV input source only)
text_image
Channel - ATV Manual Tuning Current Channel 002 C29 Frequency 535.25 Mhz Search ENTER Fine Tune ENTER Color System PAL Sound System I Feature Setup Save Move On Enter Exit Exit Menu Return3.71 Current Channel
Press OK or ▶ navigation button to enter submenu and press ▼/▲ navigation button to select preferred program.
3.72 Frequency
This item is not user adjustable.
3.73 Search
This item is used to start searching.
3.74 Fine Tune
Press OK or ▶ navigation button to enter submenu and press ◀/▶ navigation button to fine tune it.
4. Feature Menu
3.75 Color System
Press OK or ▶ navigation button to enter submenu and press ▼/▲ navigation button to select preferred color system.
Available options: Auto, PAL, SECAM.
3.76 Sound System
Press OK or ▶ navigation button to enter submenu and press ▼/▲ navigation button to select preferred sound system.
Available options: BG, DK, I, L, L'.
NOTE: The Sound System options may vary due to different Color System settings.
3.8 LCN On/Off
This item is used to turn on/off LCN (Logic Channel Number).
4. Feature Mode
text_image
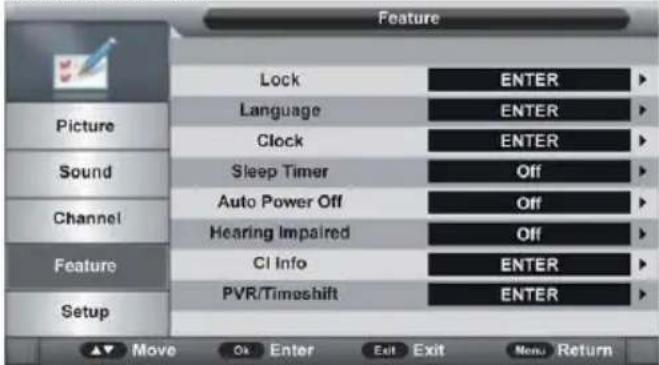
Feature Lock ENTER Language ENTER Clock ENTER Sleep Timer Off Auto Power Off Off Hearing Impaired Off CI Info ENTER PVR/Timeshift ENTER Picture Sound Channel Feature Setup Move OK Enter Exit Exit Menu ReturnPress MENU button to display the main menu.
Press ▼/▲ button to select FEATURE.
4.1 Lock
Press OK or ▶ navigation button to enter submenu.
Input the factory default password "0000" using number buttons on remote control. NOTE: You can use the universal password "8899" if forget the factory password.
Press ▼/▲ navigation button to select preferred item.
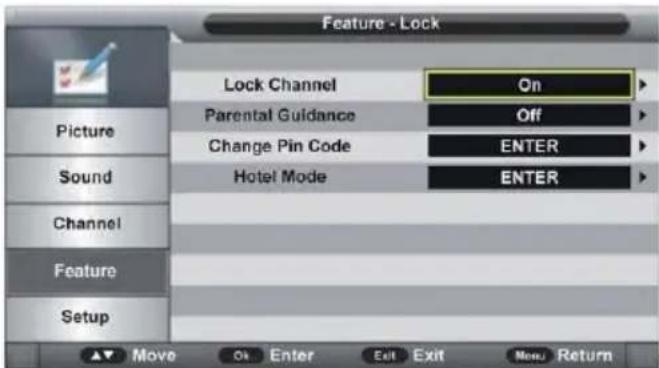
text_image
Feature - Lock Lock Channel On Parental Guidance Off Change Pin Code ENTER Hotel Mode ENTER Picture Sound Channel Feature Setup Move On Enter Exit Exit New Return4.11 Lock Channel
This item is used to turn on/off Lock Channel function.
4.12 Parental Guidance
Press OK or ▶ navigation button to enter submenu and press ▼/▲ navigation button to select preferred option.
Available options: Off, 3 to 18.
4.13 Change Pin Code
Press OK or ▶ navigation button to enter submenu.
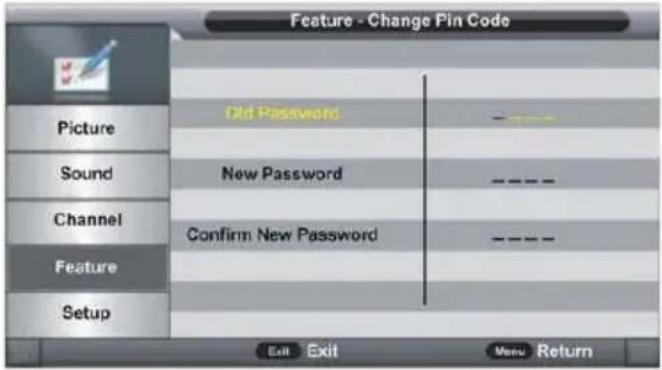
text_image
Feature - Change Pin Code Picture Old Password Sound New Password Channel Confirm New Password Feature Setup Exit Exit Menu ReturnInput the Old Password, New Password, and Confirm New Password in turn. After that, this unit will save the new password automatically.
4.2 Language
Press OK or ▶ navigation button to enter submenu. Then select preferred OSD menu language, subtitle language, audio language, and DTV/ATV TELETEXT language using navigation buttons.
4.3 Clock
Press OK or ▶ navigation button to enter submenu.
Press ▼/▲ navigation button to select preferred item.
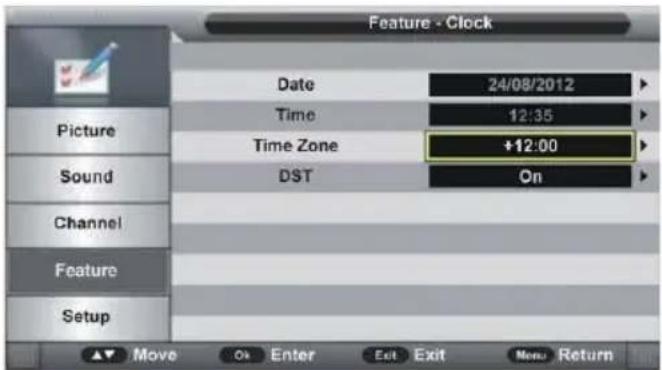
text_image
Feature - Clock Date 24/09/2012 Time 12:35 Time Zone +12:00 Sound DST On Channel Feature Setup Move On Enter Exit Exit Menu Return4.31 Date
When auto searching is done, this unit will get the date from the signal and save it automatically.
4.32 Time
When auto searching is done, this unit will get the time from the signal and save it automatically.
4.33 Time Zone
Press OK or ▶ navigation button to enter submenu and press ▼/▲ navigation button to select preferred option.
4.34 DST (Daylight Saving Time)
This item is used to turn on/off DST function.
4.4 Sleep Timer
This item is used to set the automatic sleep time in standby mode.
Available options: Off, 10 Mins, 20 Mins, 30 Mins, 60 Mins, 90 Mins, 120 Mins, 180 Mins, 240 Mins.
4.5 Auto Power Off
This item is used to set the Auto Power Off time.
Available options: Off, 1 Hour, 2 Hours, 4 Hours.
4.6 Hearing Impaired
This item is used to turn on/off Hearing Impaired function. For Hearing Impaired users, this function can assist them to know a certain scene or action through the caption, instead of hearing it.
NOTE: Hearing Impaired function works only when you are viewing programs that contain related caption information.
4.7 CI Info
This item is used to display the CI information.
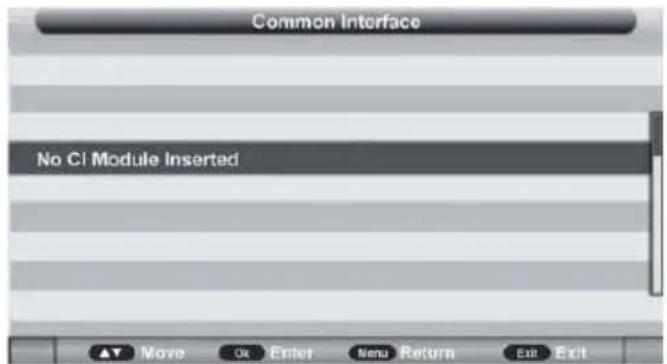
text_image
Common Interface No CI Module Inserted ▲▼ Move Or Enter New Return Exit Exit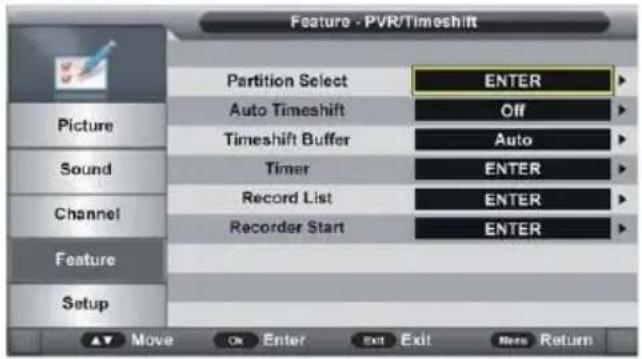
text_image
Feature - PVR/Timeshift Partition Select Auto Timeshift Timeshift Buffer Timer Record List Recorder Start ENTER Off Auto ENTER ENTER ENTER ENTER ENTER Move Enter Exit Exit Menu Return4.8 PVR/Timeshift
Press OK or ▶ navigation button to enter submenu. Press ▼/▲ navigation button to select preferred item.
4.81 Partition Select
Press OK or ▶ navigation button to enter submenu. Press RED button to enter a dialog box and then select OK to format your USB memory device. Press GREEN button to set default partition.
4.82 Auto Timeshift
This item is used to turn on/off Auto Timeshift function.
4.83 Timeshift Buffer
This item is used to select desired time shift buffer duration. Available options: Auto, 30Mins, 1hr, 2hr.
4.84 Timer
Press OK or ▶ navigation button to enter submenu.
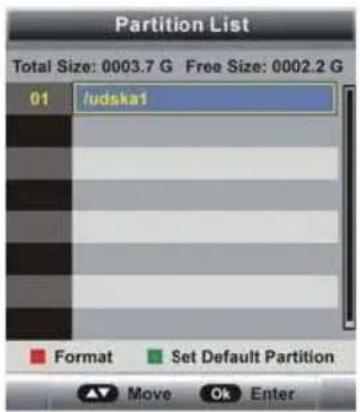
text_image
Partition List Total Size: 0003.7 G Free Size: 0002.2 G 01 /udska1 Format Set Default Partition Move Ok Enter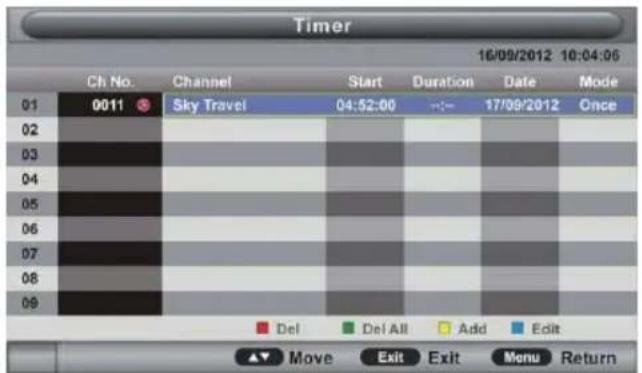
text_image
Timer 16/09/2012 10:04:06 Ch No. Channel Start Duration Date Mode 01 0011 Sky Travel 04:52:00 17/09/2012 Once 02 03 04 05 06 07 08 09 Del Del All Add Edit Move Exit Exit Menu Return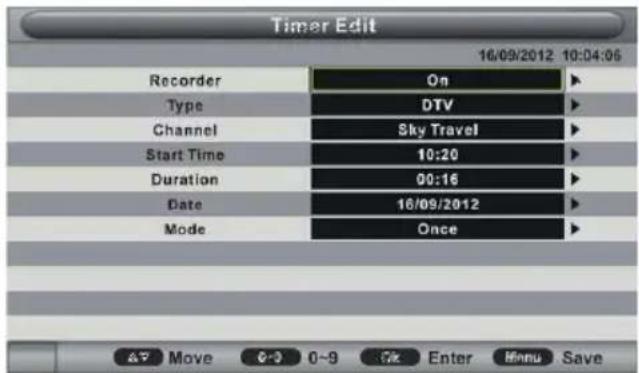
text_image
Timer Edit 16/09/2012 10:04:06 Recorder On ▶ Type DTV ▶ Channel Sky Travel ▶ Start Time 10:20 ▶ Duration 00:16 ▶ Date 16/09/2012 ▶ Mode Once ▶ △7 Move 0-3 0-9 5x Enter Menu SavePress RED button on remote control to delete highlighted option.
Press GREEN button on remote control to delete all.
Press BLUE button on remote control to enter Edit page.
Press YELLOW button on remote control to enter Add page.
Recorder: Turn on/off Recorder.
Type: Select your recording type: DTV, Radio. Channel: Select a channel you want to record.
Start Time: Set the recording start time.
Duration: Set the recording duration.
Date: Set the date of recording.
Mode: Set the recording mode.
NOTE: To change the numerical display of above items, press OK button to enter it and then use ◀/▶ navigation button to move the cursor; use number buttons to input your desired value and press OK button to confirm your setting.
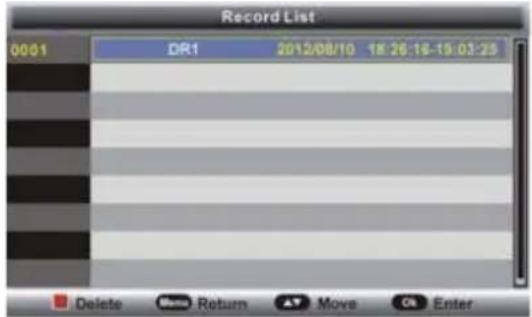
4.85 Record List
Press OK or ▶ navigation button to enter submenu.
Press ▼/▲ navigation button to select recorded files and press OK button to start playback.
text_image
Record List 0001 DR1 2012/08/10 18:26:18-19:03:25 Delete Move Return ▲ Move OK Enter4.86 Recorder Start
This item is used to start recording when watching an available digital program.
NOTE: Before recording, insert your USB memory device into USB slot first.
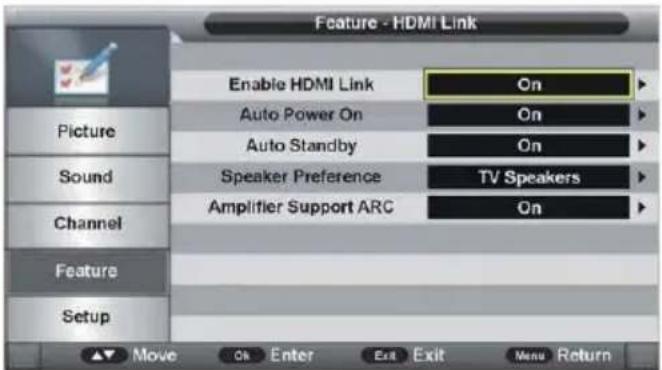
4.9 HDMI Link
Press OK or ▶ navigation button to enter submenu.
Press ▼/▲ navigation button to select preferred item.
text_image
Feature - HDMI Link Enable HDMI Link On Auto Power On On Auto Standby On Speaker Preference TV Speakers Amplifier Support ARC On Picture Sound Channel Feature Setup Move On Enter Exit Exit Menu ReturnTo use "HDMI Link" function:
Make sure the HDMI device (Amplifier, etc.) is connected correctly and HDMI device must support HDMI CEC (Consumer Electronics Control).
Press SOURCE button on the remote control to select HDMI input source.
Enable HDMI Link: turn on/off HDMI Link.
Auto Power on: turn on/off Auto Power On function.
Auto Standby: turn on/off Auto Standby function.
Speaker Preference: select TV Speakers or Amplifier as a preference.
Amplifier Support ARC: turn on/off ARC function.
text_image
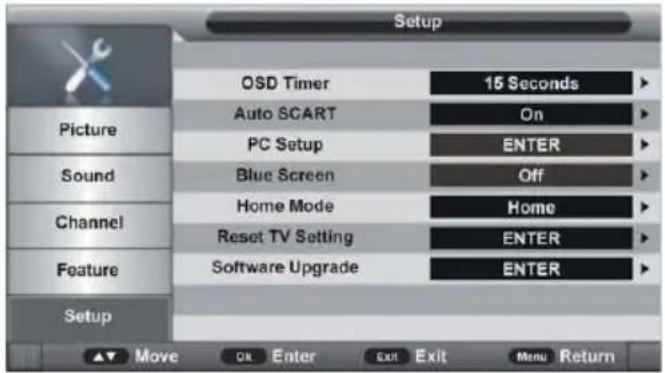
Setup OSD Timer 15 Seconds Auto SCART On PC Setup ENTER Sound Blue Screen Off Channel Home Mode Home Reset TV Setting ENTER Feature Software Upgrade ENTER Setup Move On Enter Exit Exit Menu ReturnPress MENU button to display the main menu.
Press ▼/▲ button to select SETUP.
5.1 OSD Timer
Press OK or ▶ navigation button to enter submenu and press ▼/▲ navigation button to select preferred option.
Available options: 5/10/15/20/25/30 Seconds and Never.
5.2 Auto SCART
This item is used to turn on/off Auto SCART function. If Auto SCART is on, you can view the programs by SCART automatically when SCART cable is connected.
5.3 PC Setup (for PC input source only)
This item is adjustable only with PC input signal.
5.4 Blue Screen
This item is used to turn on/off blue background function. The screen background will turn blue at very weak or no signal condition, if Blue Screen is ON. NOTE: This item is not adjustable in DTV mode.
5.5 Home Mode
This item is used to select desired picture mode.
Available options: Home, Dynamic, Standard, Mild.
5.6 Reset TV Setting
This item is used to reset to factory default settings.
5.7 Software Upgrade
This item is used to upgrade the TV software through USB memory device.
ATV AND OTHER MODES
Press SOURCE button on the unit or remote control to select desired input source.
For these modes, please refer to the menu operations of DTV mode.
PC MODE
Connect a personal computer to this unit.
Power on your computer and this unit.
Press SOURCE button on the unit or remote control to select PC input source.
Press MENU button to display the main menu. Select Setup using ▼/▲ navigation button. Then press OK or ▶ navigation button to enter submenu.
Select PC Setup and enter it.
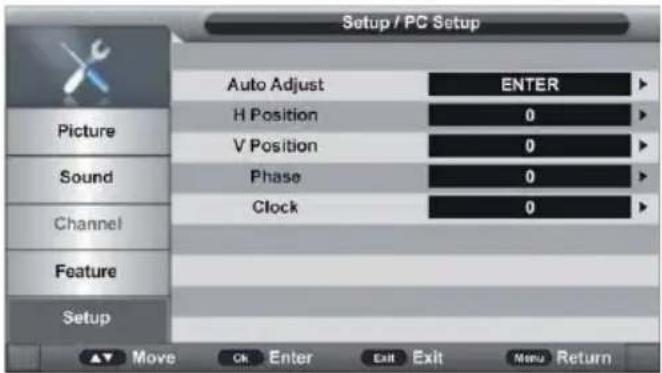
text_image
Setup / PC Setup Auto Adjust ENTER H Position 0 V Position 0 Phase 0 Clock 0 Picture Sound Channel Feature Setup Move Ck Enter Exit Exit Menu ReturnPress ▼/▲ navigation button to select preferred item.
Press OK or ▶ navigation button to enter submenu. Press ◀/▶ navigation button to adjust the value.
1. Auto Adjust
This item is used to adjust the PC screen automatically.
2. H Position
This item is used to adjust the value of horizontal position.
3. V Position
This item is used to adjust the value of vertical position.
4. Phase
This item is used to adjust the picture apply to the TV.
5. Clock
This item is used to adjust the signals transfer speed.
NOTE: For other menus, please refer to the menu operations of DTV mode.
TV GUIDE/RECORDER (FOR DTV MODE ONLY)
TV GUIDE (FOR DTV MODE ONLY)
Press GUIDE button on remote control to enter below menu page.
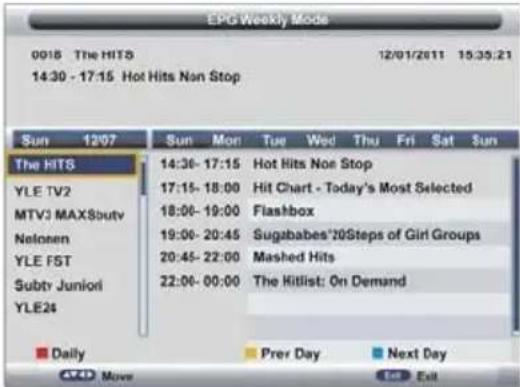
text_image
EPG Weekly Mode 0018 The HITS 12/01/2011 15:35:21 14:30 - 17:15 Hot Hits Non Stop Sun 12/07 Sun Mon Tue Wed Thu Fri Sat Sun The HITS 14:36- 17:15 Hot Hits Noe Stop YLE TV2 17:15- 18:00 Hit Chart - Today's Most Selected MTVJ MAXSbutv 18:00- 19:00 Flashbox Nelsonen 19:00- 20:45 Sugababes'20Steps of Girl Groups YLE FST 20:45- 22:00 Mashed Hits Subty Juniori 22:00- 00:00 The Hitlist: On Demand YLE24 Daily Prer Day Next Day CDO Move EnterPress ▼/▲ navigation button to select preferred channel.
Press ◀/▶ navigation button to switch between left column and right column.
Press RED button to switch between weekly mode and daily mode.
Press YELLOW button to display the TV guide of previous day.
Press BLUE button to display the TV guide of next day.
RECORDER (FOR DTV MODE ONLY)
Insert your USB memory device into USB slot first.
When watching a digital program:
Press ● button on remote control to start recording directly and press it again to call out below menu.

text_image
Rec Duration Time 00:42Use ◀/▶ navigation button to move the cursor; use number buttons to input your desired value and press OK button to confirm your setting.
Press ■ button on remote control to call out a dialog box, and select OK to stop recording; select Cancel to dismiss the dialog box.
To watch recorded programs:
Press R.LIST button on remote control to call out the Record List menu.
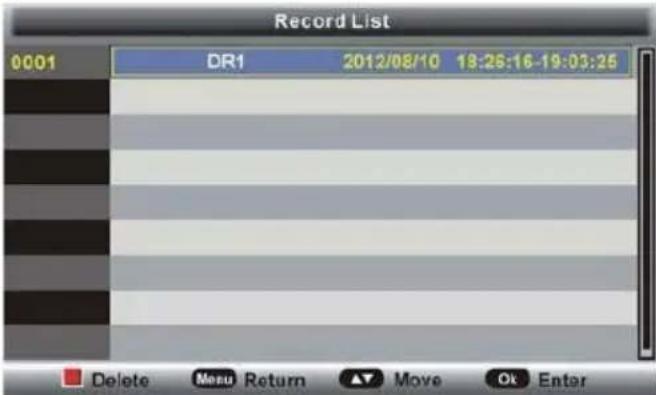
text_image
Record List 0001 DR1 2012/08/10 13:26:16-19:03:25 Delete Menu Return ▲ Move Ok EnterPress ▼/▲ navigation button to select recorded files and press OK button to start playback.
USB MODE/MEDIA PLAYER
Press SOURCE button on the unit or remote control to set the unit in MEDIA mode.
Insert a USB memory device into USB slot before following operations.
Press ▼/▲/◄/► navigation button to move the cursor.
Press EXIT button to return to previous menu page.
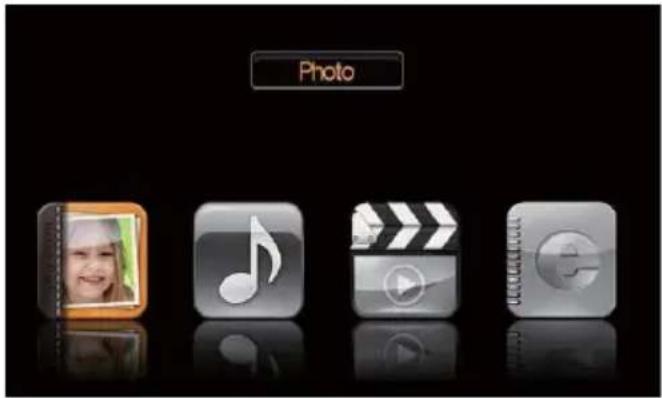
text_image
Photo1. Photo
Press ◀/▶ navigation button to select Photo in the main menu and press OK button to enter it.
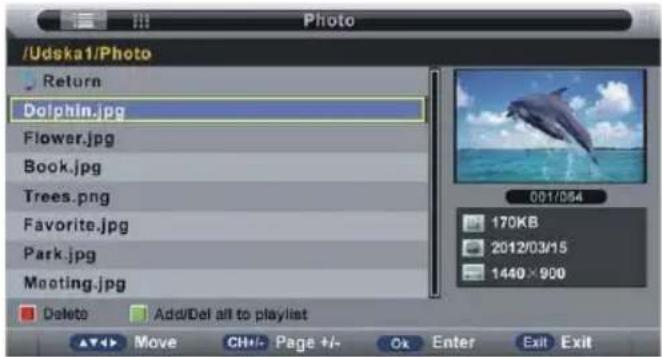
text_image
/Udska1/Photo Return Dolphin.jpg Flower.jpg Book.jpg Trees.png Favorite.jpg Park.jpg Mooting.jpg Delete Add/Def all to playlist 09/1/54 170KB 2012/03/15 1440×900 Move CH+ Page +/- Ok Enter Exit ExitNOTE: When selecting Photo files, press EXIT button to move the cursor to TITLE and then press ▶ navigation button to view files in thumbnail mode.
Use navigation buttons to select preferred file.
Press RED button to enter a dialog box, and select Yes to delete highlighted file; select No to cancel this operation.
Press GREEN button to add/remove all the files from play list.
Press OK button to add/remove highlighted file from play list.
Press ▶ button to start playing.
During photo normal playing:
Press OK button on remote control to display the tool bar; press EXIT button to hide it.

natural_image
Row of black square icons representing media control and information (no text or symbols)Press ◀/▶ navigation button to select preferred option in the tool bar and press OK button to confirm selection/enter submenu.
Press▶ button on remote control to play or pause playing.
Press ■ button on remote control to stop playing.
Press◀ button on remote control to play previous file.
Press▶ button on remote control to play next file.
2. Music
Press ◀/▶ navigation button to select Music in the main menu and press OK button to enter it.

text_image
/Udska1/Music Return Courage.mp3 With me.mp3 Yesterday once more.mp3 Love him.aac Always together.mp3 Friends.mp3 I believe.wma Delete Add/Def all to playlist Move Ch+ Page +/- Ok Enter Exit ExitUse navigation buttons to select preferred file.
Press RED button to enter a dialog box, and select Yes to delete highlighted file; select No to cancel this operation.
Press GREEN button to add/remove all the files from play list.
Press OK button to add/remove highlighted file from play list.
Press▶ button to start playing.
During music normal playing:
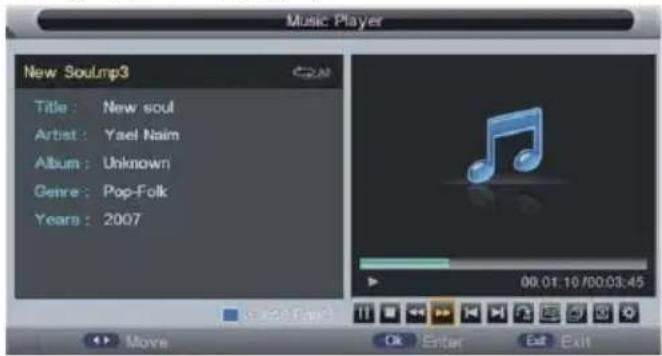
text_image
Music Player New Soulmp3 Title : New soul Artist : Yael Naim Album : Unknown Genre : Pop-Folk Years : 2007 00:01:10/00:03:45 Move Ok Enter Exit ExitPress ◀/▶ navigation button to select preferred option in the tool bar and press OK button to confirm selection/enter submenu.
Press BLUE button on remote control to close the on-screen display; press any button on remote control to display it again.
Press ▶ button on remote control to play or pause playing.
Press ■ button on remote control to stop playing.
Press ← button on remote control to move fast backward.
Press ▶ button on remote control to move fast forward.
Press ← button on remote control to play previous file.
Press ➤ button on remote control to play next file.
3. Movie
Press ◀/▶ navigation button to select Movie in the main menu and press OK button to enter it.
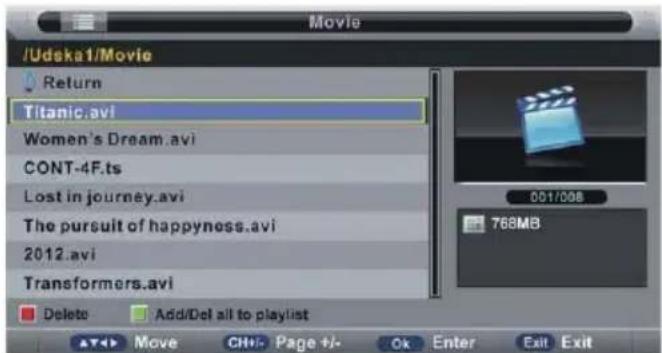
text_image
/Udaka1/Movie Return Titanic.avi Women's Dream.avi CONT-4F.ts Lost in journey.avi The pursuit of happyness.avi 2012.avi Transformers.avi Delete Add/Del all to playlist Move CH+ Page +/- Ok Enter Exit ExitUse navigation buttons to select preferred file.
Press RED button to enter a dialog box, and select Yes to delete highlighted file; select No to cancel this operation.
Press GREEN button to add/remove all the files from play list.
Press OK button to add/remove highlighted file from play list.
Press ▶ button to start playing.
During movie normal playing:
Press OK button on remote control to display the tool bar; press EXIT button to hide it.

text_image
00:11:32/01:39:36Press ◀/▶ navigation button to select preferred option in the tool bar and press OK button to confirm selection/enter submenu.
Press▶ button on remote control to play or pause playing.
Press ■ button on remote control to stop playing.
Press◀ button on remote control to move fast backward.
Press▶ button on remote control to move fast forward.
Press← button on remote control to play previous file.
Press ➕ button on remote control to play next file.
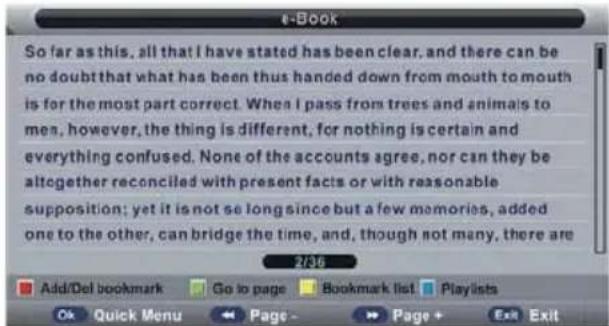
4. e-Book
Press ◀/▶ navigation button to select e-Book in the main menu and press OK button to enter it.
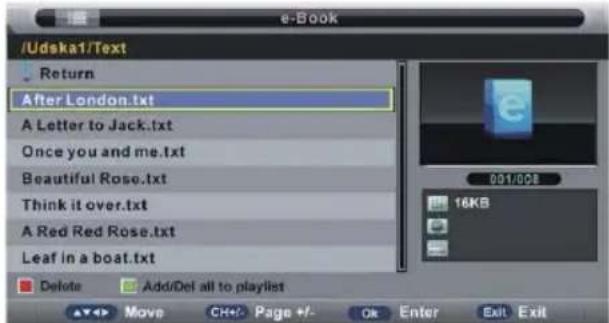
text_image
/Udskai/Text Return After London.txt A Letter to Jack.txt Once you and me.txt Beautiful Rose.txt Think it over.txt A Red Red Rose.txt Leaf in a boat.txt Delete Add/Del all to playlist Move Ck+/- Page +/- Ok Enter Exit ExitUse navigation buttons to select preferred file.
Press RED button to enter a dialog box, and select Yes to delete highlighted file; select No to cancel this operation.
Press GREEN button to add/remove all the files from play list.
Press OK button to add/remove highlighted file from play list.
Press ▶ button to start playing.
During e-book normal playing:
text_image
e-Book So far as this, all that I have stated has been clear, and there can be no doubt that what has been thus handed down from mouth to mouth is for the most part correct. When I pass from trees and animals to men, however, the thing is different, for nothing is certain and everything confused. None of the accounts agree, nor can they be altogether reconciled with present facts or with reasonable supposition; yet it is not so long since but a few memories, added one to the other, can bridge the time, and, though not many, there are 2/36 Add/Del bookmark Go to page Bookmark list Playlists Quick Menu Page - Page + Exit ExitPress RED button on remote control to add/remove current page from Bookmark List.
Press GREEN button on remote control to enter GOTO mode. Input valid number and press OK button to enter desired page directly.
Press YELLOW button on remote control to display the Bookmark list.
Press BLUE button on remote control to display the play list.
Press◀button on remote control to play previous page.
Press▶ button on remote control to play next page.
NOTE: To play your multimedia files, make sure you have selected correct icon in the main menu of MEDIA
PLAYBACK. That is to say, you can only play Photo files in PHOTO item, Music files in MUSIC item and so on.
FREQUENTLY ASKED QUESTIONS
| General | I would like to have louder sound by connecting additional speakers. | Subject to the TV model and connections, it is possible to connect the TV to an external amplifier or surround sound (subject to connections/inputs on the device) as follows:-1) Connect a COAX cable* from the TV's COAX output to your amplifier/ surround systems COAX input.2) Connect a 3.5mm jack to L/R phono cable* from the TV's headphone socket (where fitted) to your amplifier/surround sound L/R input. Please note sound to the TV's speakers will be disabled.3) On selected models, it maybe possible to connect a SCART input/ output* switch with an additional L/R Phono cable* to the TV's SCART socket and to the L/R Phono Input of your amplifier/surround sound. Please note due to copyright laws it is not possible to output video/sound from the TV on certain sources, i.e. HDMI, DVD etc.*cables and switches mentioned are available to purchase separately from your retailer. |
| General | Why are some options in the menu unavailable and greyed out? | Some options are only available in certain sources, i.e. HDMI, SCART. They are unavailable in the other sources where they have no effect. |
| TV | I have tuned in Digital TV but I am not receiving any or all of the channels and/ or the channels I receive are breaking up | 1) Check you are in an area that can receive Digital TV.2) Check you are using an aerial that is able to receive a good digital signal. In most cases, you will need an outdoor digital hi-gain/wideband aerial. In areas that have excellent Digital TV coverage, you may be able to use a loft type aerial but it is highly likely that you will also need to connect a booster between the back of the TV and the TV aerial wall socket. Unfortunately, to receive a good enough digital signal, it is not possible to use a portable/indoor type aerial. |
| TV | I have re-tuned my television but when I switch it off it is not storing the channels. | Complete a first time installation, please refer to the set-up menu section of the manual for how to do this. |
| VCR/DVD Recorder | I have connected the TV to my VCR or DVD Recorder via SCART but it is not recording. | In addition to connecting via SCART, you should connect the aerial cable from the wall socket to your VCR/DVD Recorder and another aerial cable from the VCR/DVD Recorder to the TV. |
| Game Consoles | I have connected my PS3 to the TV via HDMI, but I am not receiving any pictures or sound on my Television. | 1) Ensure the TVs source is set to the HDMI source you are using (i.e., HDMI 1/2/3/).2) Check your settings on your PS3 are as per the PS3 instruction manual. |
| USB Mode | I have inserted a USB Memory Key, but the TV does not recognise it. | Ensure the USB Memory Key is formatted to type FAT32. |
| USB Mode | Can I use a USB portable hard drive with my TV? | If you wish to use a portable hard drive larger than 32GB, please note that it must be formatted to the FAT32 file system in order to operate on this TV. Windows XP/Vista computers are only capable of formatting up to 32GB, therefore, you will need a software programme/utility to format larger hard drives. Please refer to the web site for more information. Please note this EU Receiver may not be compatible with all USB HDD devices available in the market place. |
| System Lock | I have changed the password on the television and now forgotten it. | There is a master password of 4711, to gain access to the TV menu and reset the normal password. |
TECHNICAL SPECIFICATION
| Customer Type | TTE-32A6604K | |
| Screen | Resolution | HD 1366x768 |
| Screen Size | " (~82cm)32 | |
| Luminance | 200cd/m2 | |
| Contrast Ratio | 1:3000 | |
| Aspect Ratio | 16:9 | |
| Response time | 8.5ms | |
| View Angle | 871/781 | |
| Visible range | 697.6845(H) x 392.256(V) | |
| USB Multimedia Playback Format | Movie: AVI,MPEG,MKV,RMVB Music: MP3,WAVPhoto: JPG,JPEG Text: TXT | |
| Inputs/Out-puts | Video Inputs | 3 x HDMI(HDMI 1=ARC), 1 x SCART, 1xPC(VGA) |
| RF Input | 1 x RF | |
| Audio Outputs | 1 x 3.5mm jack for earphone, 1 x Coax Audio output ,AV(mini) ,YPbPr(mini) | |
| Sound | Power Watts RMS) | W8 x 2 |
| Other | 1 CI port - 1 USB port for Recording and Playback | |
| Voltage and power consumption | AC 100V ~ 240V ~ 50Hz/60Hz, 65W(<0,5W StandBy) | |
| Dimensions including stand | 732mm (W) x 476.8 mm (H)x 211.5 mm (D) | |
| Weight | Net | 5.54 kg |
Note: All pictures in this manual are examples and are for reference only, actual product may differ from the pictures.
End of Life Disposal

Warning! This logo set on the product means that the recycling of this apparatus comes within the framework of the Directive 2012/19/EU of July 4th, 2012 (recast) concerning the Waste of Electrical and Electronic Equipment (WEEE).
This symbol means that used electrical and electronic products should not be mixed with general household waste. There is a separate collection system for these products.
If you want to dispose of this equipment, please do not use the ordinary dust bin!
- The presence of dangerous substances in the electrical and electronic equipments can have potential consequences on the environment and human health in the cycle of reprocessing this product.
Therefore, at the end of its lifetime, this product shall not be disposed with other non-recycled waste. Used electrical and electronic equipment must be treated separately and in accordance with legislation that requires proper treatment, recovery and recycling of used electrical and electronic equipment. - Local authorities and resellers have set special procedures for the purpose of collecting and recycling this product (please contact your local authority for further details). You have the obligation to use the selective waste collection systems put in place by your local authority.
- If your used electrical or electronic equipment has batteries or accumulators, please dispose of these separately beforehand according to local requirements.
- By disposing of this product correctly you will help ensure that the waste undergoes the necessary treatment, recovery and recycling and thus prevent potential negative effects on the environment and human health which could otherwise arise due to inappropriate waste handling.

This unit complies with European Council Directive 2014/30/UE (EMC) & 2014/35/UE (LVD) for Electromagnetic Compatibility & Low Voltage Directives
We company LEMA SAS hereby states that the unit under reference TTE-32A6604K complies with the essential requirements and other relevant provisions of the Council Directive RED 2014/53/EU.
The Declaration of Conformity is available on request at the websitewww.tokai.fr (heading: Contact).
EXCLUSIVE IMPORTER
This product was imported by the Company : LEMA S.A.S.
For any questions concerning the conformity of the product, thank you to send your request to :
LEMA S.A.S.
8, Rue Traversière
92230 GENNEVILLIERS
FRANCE