
Cubo TS525 - Radio Brionvega - Free user manual and instructions
Find the device manual for free Cubo TS525 Brionvega in PDF.

| Product type | Collectible radio with alarm |
| Brand | Brionvega |
| Model | Cubo TS525 |
| Dimensions (approx.) | 30 x 20 x 15 cm |
| Weight (approx.) | 3 kg |
| Power supply | 100-240 VAC, 50/60 Hz; 12 VDC, 2.5 A adapter |
| Power consumption | 30 W (max) |
| Backup batteries | Not included; battery compartment (type not specified) |
| Main functions | FM, DAB/DAB+, Internet Radio, Music Player (USB, UPnP), iPod/iPhone Dock, Aux In, Dual Alarm, Sleep, Preset (8 stations per source) |
| Network connectivity | Ethernet RJ45, WiFi 802.11 b/g/n |
| Audio inputs | Aux In (3.5 mm jack), USB Type A, iPod/iPhone Dock |
| Audio outputs | Line Out, Sub Out (for external subwoofer) |
| Antenna | Telescopic for FM/DAB |
| Remote control | Included, CR2032 battery |
| Display | LCD screen |
| Supported audio formats | MP3, AAC, WMA, FLAC (via USB and UPnP) |
| Care and cleaning | Slightly damp soft cloth; do not use abrasive products |
| Safety | Do not open, do not expose to moisture, unplug during prolonged absence |
| Spare parts and repairability | Contact an authorized Brionvega service center |
| Box contents | Radio, power adapter, remote control, iPod/iPhone dock, manual |
Frequently Asked Questions - Cubo TS525 Brionvega
User questions about Cubo TS525 Brionvega
0 question about this device. Answer the ones you know or ask your own.
Ask a new question about this device
Download the instructions for your Radio in PDF format for free! Find your manual Cubo TS525 - Brionvega and take your electronic device back in hand. On this page are published all the documents necessary for the use of your device. Cubo TS525 by Brionvega.
USER MANUAL Cubo TS525 Brionvega
Legenda
natural_image
Blank rounded rectangle with a small rectangular base at the bottom (no text or symbols)6.4.1 Dynamic Range Compression (DRC)
- On and volume adjustment knob
- Liquid crystal display
- Alarm button - Managing the alarm clock function
- Back button - Back function
- Mode function - Activating the desired audio function
- IR sensor for using the remote control
- Down/Up knob - Menu navigation function Menu/Select button - confirmation and selection function
- Auxiliary Aux In audio input
- Preset button - Memory function
- Telescopic radio antenna
- Ethernet network port RJ45
- Line Out connection for an auxiliary loudspeaker
- SUB OUT connection for the external subwoofer (optional)
- iPod/iPhone connection for connecting the provided Docking Station
- USB port
- External power supply connection socket
- Power supply transformer
- Radio support feet
- Battery compartment
- Battery compartment cover
- Extractable handle for radio transport
- Capacitative button for the Mute/Sleep function
- Recessed button for turning on the radio
- iPod/iPhone Docking Station
- iPod/iPhone connection connector
- Docking Station power supply LED
- Remote control
- Remote control battery compartment

1 Introduction
1.1 Important safety regulations
- Read the instructions carefully and carefully follow the provided indications.
- Clean only with a dry cloth.
- Transport it using its protective packaging.
- Conserve the product's original packaging in the case of repair
- Do not connect the device to the electrical mains if the plug, cable or transformer is damaged, but contact the authorised Technical Support Centre in your area.
- Do not keep the device connected to the electrical mains if you will be away for long periods.
- The device must be positioned near the electric socket and the power supply cable must be easily accessed so it can be disconnected if necessary. Arrange the power supply cable so that it does not hinder the passage of people.
- Do not insert any objects inside the device.
- Do not remove the device cover; inside there is "high voltage" current that could cause electric shocks.
- Do not place the device in a humid environment with vapours or possible water sprays.
- Do not place the device near sources of heat such as heaters, stoves or heat producing devices.
- Do not place the device in a narrow space, but make sure that there is space for ventilation all around it. The ventilation slots must be kept free to cool the internal electronics.
- Do not have any checks or repairs performed by unspecialised personnel, but always contact authorised Brionvega Service Centres.
- Do no place any open flame, such as burning candles, near the device.
- Do not place any container filled with liquid, such as vases, on the device.
- Excessive acoustic pressure from earphones could cause hearing loss.
• The device must be connected to a three pronged socket (for the earth connection).
- Carefully read all chapters in this manual before using the product. The manual provides the basic instructions for operating the ts525 system.
- The installation, preliminary settings and procedures that require opening the unit and coming into contact with the electric components must be performed by qualified personnel.
- To ensure safe and reliable operation over time, only use power supply cables provided by the manufacturer. Observe all precautions and warnings.
- Read the information provided at the end of the instruction manual regarding the environmental standards for product disposal and environmental protection.
- Danger of explosion if battery is incorrectly replaced.
- Replace only with the same or equivalent type.
- The battery (battery or batteries or battery pack) shall not be exposed to excessive heat such as sunshine, fire or the like.
• To reduce the risk of fire or electric shock, do not expose this unit to rain or moisture.
- To accord APPLE's MFI certificate, when user use the "R-SPR OUT" jack, must be connect to special auxiliary speaker box by the manufacture.
1.2 Package contents
The Brionvega Collection TS525 radio box contains:
• Brionvega Collection radio, model TS525;
• Power supply I/P: 100-240 VAC 50/60 Hz; OP: 12VDC 2,5A;
- Remote control;
- iPod/iPhone docking station;
- User and installation manual;
Check that the box contains all of the listed items. If anything is missing, contact Brionvega customer service.
The telephone number can be found on the back cover of this instruction manual.
1.3 External sources
To be able to use all Brionvega Collection TS525 radio functions, the following are necessary:
• 100-240V electric socket
- Ethernet or WiFi network with internet access, with the relative access password if required by the provider (internet network necessary for the Internet Radio, Network Music Player, Software Update functions)
- USB mass memory with stored music (for playing music using the Music Player function)
- iPod/ iPhone for the use of the docking station
• External audio source for the use of the optional Aux In audio connection.
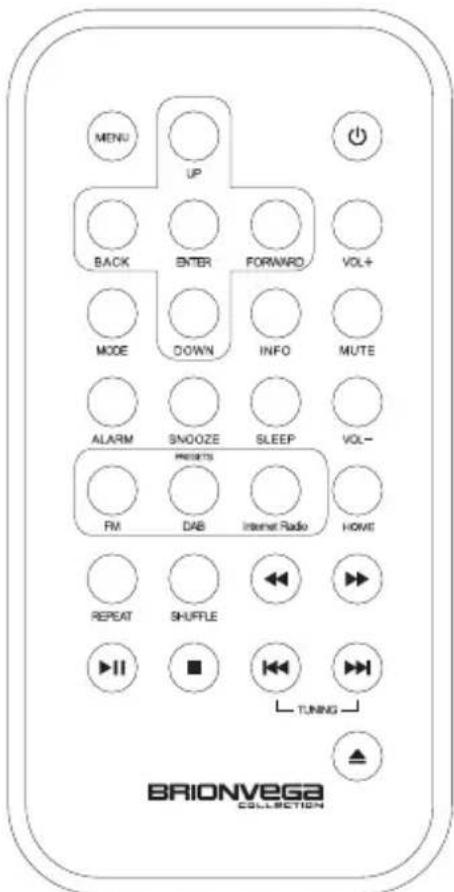
2 Remote control

natural_image
Blank white rounded rectangle with a small rectangular base at the bottom (no text or symbols)| Home | Return to the initial screen |
| Up | Scroll menu up |
| System off | |
| Back | Back menu navigation |
| Enter | Function access and confirmation |
| Forward | Forward menu navigation |
| Vol + | Increase volume |
| Mode | Select audio function |
| Down | Scroll menu down |
| Info | Source information |
| Mute | Deactivates the audio |
| Alarm | Access the alarm clock section |
| Snooze | Snooze function |
| Sleep | Sleep function |
| Vol - | Decrease volume |
| FM | FM radio function |
| DAB | DAB, DAB+ radio function |
| Internet Radio | Internet radio function |
| Menu | Accesses the main manu |
| Repeat | Repeat track function |
| Shuffle | Plays tracks randomly |
| Scan track back | |
| Scan track forward | |
| Audio playback pause - play | |
| Stop audio playback | |
| Radio tuning back - Radio track back | |
| Radio tuning forward - Radio track forward | |
| Cd-Rom ejection |
Replacing the remote control battery:
The remote control battery can be replaced by removing the battery port slot on the rear of the remote control.
Battery model: CR2032
3 Starting up the Brionvega Collection TS525 radio
Although the Brionvega Collection TS525 radio has many technically advanced functions, its start-up and initial settings are very simple.
To use the DAB, DAB + or FM radio function, connection to an 100-240 v electric socket is required.
For the Music Player function, a mass storage memory containing the music tracks must be connected to the USB port located on the rear radio panel, or an Ethernet of WiFi connection to a network with an active UPnP compatible music server, such as the Windows Media PlayerTM or many smartphones. For modes that use information originating from the internet, an Ethernet or WiFi network connection is required.
- Connect the power supply cable;
Pull out the antenna (if you want to receive a DAB, DAB+ or FM radio signal); - Press the on button on the radio or remote control;
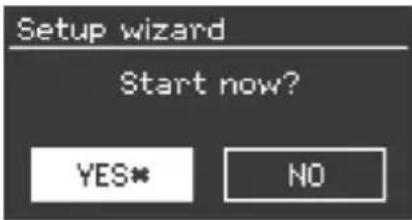
3.1 Automatic installation
When the Brionvega Collection TS525 radio is turned on for the first time, a simple automatic procedure is started for setting the current date and time and for the initial network connection settings.
Once the automatic installation procedure is complete, the Brionvega Collection TS525 radio is ready to be used.
Note:
To repeat the automatic installation select:
Menu > System configuration > Automatic installation
Press Yes to start the automatic installation procedure.
Note:
If an Ethernet connection is used, skip the automatic Setup. If the power supply is disconnected during the automatic installation, the procedure will be automatically activated the next time the radio is turned on.
3.1.1 Time format
Select the desired time format (12h / 24h) and confirm your preference.
3.1.2 Date and time
The date and time can be set manually or automatically.
Automatic updates synchronise the date and time with the information received from an external source. The automatic update is usually very precise.
Automatic update
The automatic update functions using information received from the FM radio signal, the DAB, DAB radio signal or via the internet.
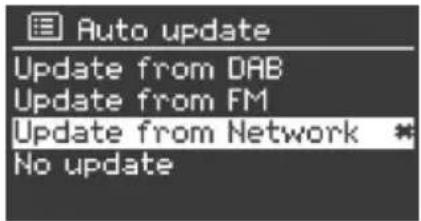
- Select the desired update source;
(DAB, DAB + signal, FM signal, network update, no update)
No update will leave the time set manually unchanged.
- Setting your geographical time zone:
- If daylight saving time is used, the system will automatically update the time.
Note:
The system will be automatically updated when it receives new time information.
Manual settings
If automatic updates are not selected, the date and time must be set manually..
Date and time are displayed in the following order: dd-mm-yyyy for the date and hh:mm for the time.
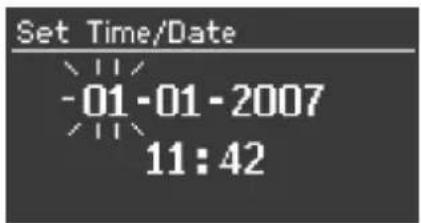
Enter the information using the selection knob and then press it to confirm the changes that were made.
3.1.3 Network
The Brionvega Collection TS525 radio is compatible with the standard network communication protocols.
The following is required to connect the system to the network:
- an internet connection using a network cable, or
- a WiFi internet connection with the relative access key (if set).
Select your geographical region and the WiFi network you want to access.
If the selected network does not require an access key, the system will automatically connect without requiring additional settings.
![SSID Buffalo-1 [WPS]Linksys-1 Company WAP-1 [Rescan] [Wired]](/content/2026/02/366999/images/842eaa966ca505ff3dafec821e75de14ba733102f4a82cdf13fbe3e0beed24db.jpg)

If the selected network is protected and requests an access key, the password win-
dow will appear. If the network to which you want to connect is unencoded, it will appear in the selection list. If it is set to be invisible (hidden SSID), enter the name manually. If the network to which you want to connect does not appear on the list, contact the person who set it up or your service provider.

Entering a standard password
To enter the standard network key, use the selection knob to pass from one value to another and confirm your selection by pressing the knob.
Three lateral functions can also be accessed by turning the knob:
BackSpace: cancels the last character)
OK: confirms the selection
Cancel: deletes the entered password
If the connection is successful, the Brionvega Collection TS525 radio will display “connection in progress” and then “connection successful”.
Otherwise, the previous window will reappear for entering the correct network key.
3.1.4 Equaliser
The Brionvega Collection TS525 radio is equipped with an internal digital equaliser. To change the standard parameters, access the following menu items:
Menu > System config. > Equaliser
It is possible to select from a variety of existing settings or create your own customised bass and treble settings.
You can also activate the loudness function, which increases the intensity of the low frequencies, optimising the sound especially at a low volume.
3.1.5 Network
The Brionvega Collection TS525 radio is able to store the last 4 wireless networks (WiFi) to which the radio was connected.
You can view your own profile at the following menu item:
Menu > System config. > Network > Network profile
In this window, you can cancel any unwanted connections.
3.1.6 Language
The Brionvega Collection TS525 radio starts automatically in English. From the menu Menu > System config. > Language you can select your preferred language.
3.2 Internet portal for registering the radio
The advanced electronics in the Brionvega Collection TS525 radio makes it possible to register your radio inside a dedicated Internet radio portal. From here, you can
search for new stations, organise a list of your favourite radio broadcasters, which will be automatically tuned in your Brionvega Collection TS525 radio.
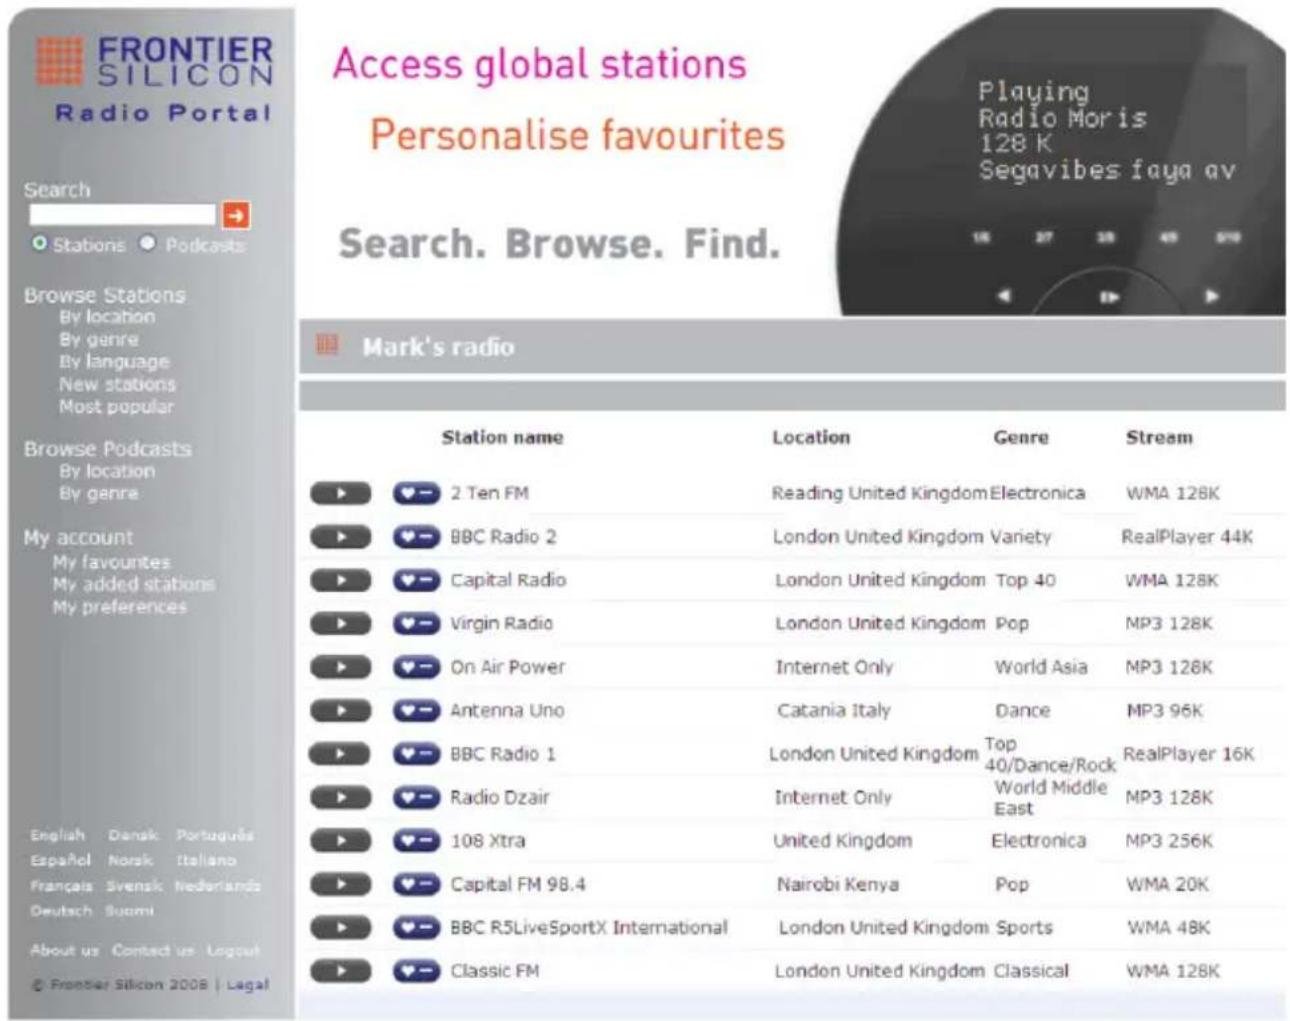
To register your Brionvega Collection TS525 radio in the dedicated portal, you will need your access code that can be found in the following menu window, which is accessed from the Internet Radio audio function:
Menu > Station list > Help > Get access code
Write down the access code
Go to the portal www.wifiradio-frontier.com
Register with the portal (if you are accessing it for the first time)
The following information is required:
• Radio access code
- Your email address
• A password of your choice
- Your radio model (ts525)
Once you have accessed the portal, you can immediately search for new radio stations, organise your favourites and use the advanced functions offered by www.wifiradio-frontier.com.
3.3 UPnP server setup
The Brionvega Collection TS525 radio is able to playback shared music content with an UPnP server. This function is currently supported by Windows Media Player 10 or subsequent versions. in addition to many other programmes, numerous network memory devices (NAS) and smartphones.
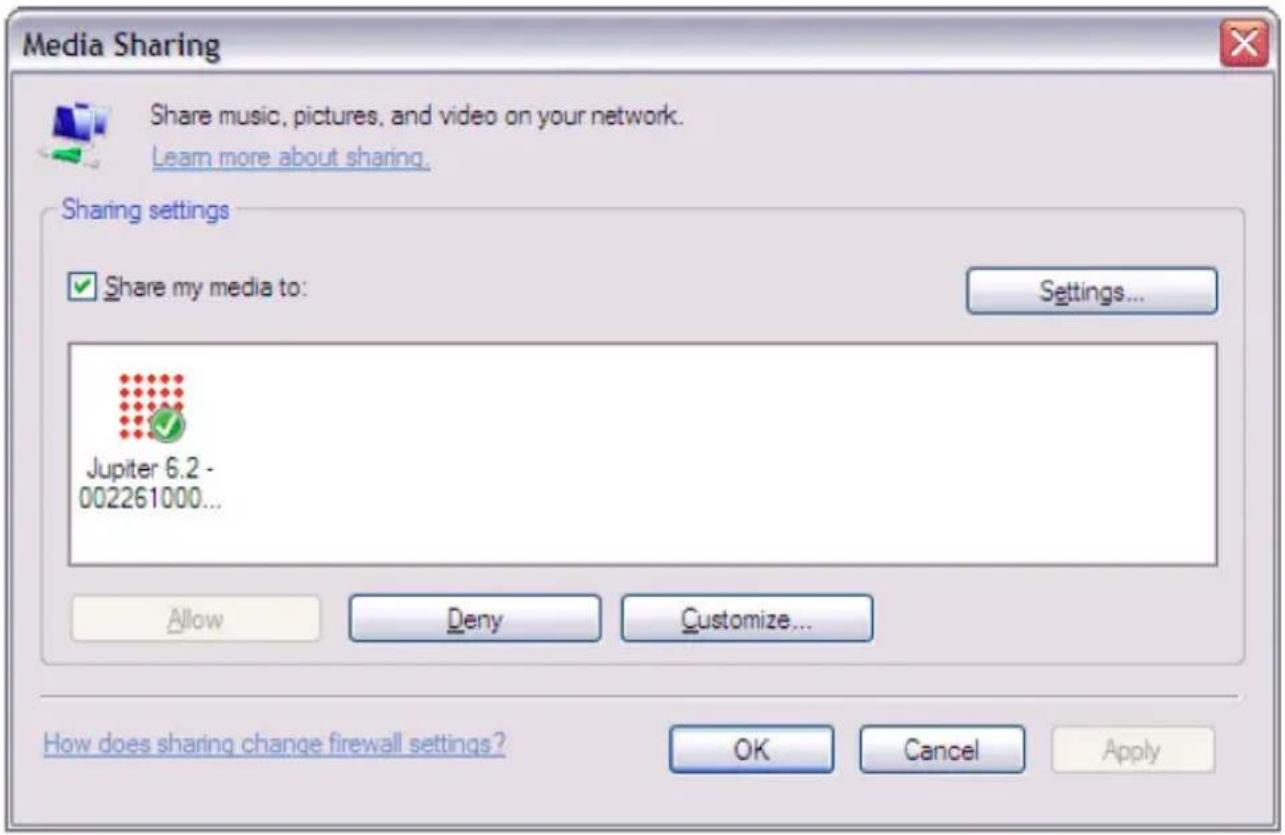
3.4 File sharing with the Windows Media Player
The most common UPnP server is the Windows Media Player.
To set up the Windows Media Player as the UPnP server, proceed as follows:
• Make sure your PC is connected to the data network
• Make sure the radio is on and connected to the same data network
• In WMP, add the files and folders that you want to share to the library
• In WMP, enable file sharing (Library > File sharing)
Check that the radio accesses the shared audio resources and press OK to confirm the selection. Your PC is now ready to share music with your Brionvega Collection TS525 radio. The UPnP server functions in the background and does not need to be activated each time.
4 Internet Radio function
Your Brionvega Collection TS525 radio is able to play radio stations and podcasts with signals originating from all over the world.
When the Internet Radio function is selected, the radio automatically obtains a list of available stations and displays them on your radio.
The various radios are organised into categories, for example by Genre or Geographic Location.
To access the Internet Radio function, press the MODE button until Internet Radio appears on the display, or select Menu > Main Menu > Internet Radio.
Available functions
4.1 Recently played stations
The next time you turn on your Brionvega Collection TS525 radio, the last station you listened to will be played. To select another radio station that is listed among the recently played stations, go to: Menu > Most recent stations
4.2 Station list
The following sub-functions can be accessed form the stations list menu.
4.2.1 Bookmarks
From the Bookmarks menu, you can access the group of preferred radio stations that were added at the internet portal www.wifiradio - frontier.com.
4.2.2 Local Italia
The Local Italia function makes it possible to access a selection of Italian internet radio stations.
4.2.3 Stations
From the Stations function, you can search for radio stations or podcasts according to precise category divisions: Country, Genres, Station Search , where you can perform a customised search by name, recently played stations, new stations.
4.2.4 My added stations
From this menu, you can view the internet radio stations that were added from the internet portal www.wifiradio-frontier.com.
4.3 Information about the current playback
By pressing the Info key on the remote control, you can view a series of information about the current playback.
The following information is available: radio station name and description, genre and geographic location, signal quality, signal buffer quantity and day and date.
5 Music player function
Your Brionvega Collection TS525 radio is able to play music tracks that are in Mp3, AAC, WMA, FLA formats from a local computer that has activated UPnP sharing (see chapters 3.3 and 3.4) or a mass storage memory connected to the radio's USB port. To access the Music Player function, press the MODE button until Music Player appears on the display, or select Menu > Main Menu > Music Player
Once you have accessed the Music Reader, use the Menu key to select from among the tracks on the network's UPnP server (shared Media) or playback from the USB memory (USB playback).
Once the USB playback function is selected, the menu will display a list of the files and folders in the mass storage memory.
You can use the Back and Forward keys on the remote control to navigate the music folders in the mass storage memory, and using the knob.
Using the Menu/Select knob or the << and >> keys on the remote control, you can scroll the audio track list.
Press the Menu/Select knob or the Enter key on the remote control to select the desired track and play it.
5.1 Repeat and shuffle function
You can select to repeat an audio track or randomly play the music content. To set up these options, use the menu items Repeat Playback and Shuffle. Use the Menu/Select knob to set the desired function or the keys on the remote control.
5.2 Information about the current playback
By pressing the Info key on the remote control, you can view a series of information about the current playback. The available information is different for the USB source and for UPnP shared sources:
- UPNP: Track name, artist name, bar indicating track progress, track duration, track codec and bitrate, current date and time
• USB: File name, folder, directory, track codec and bitrate, current date and time.
6 DAB, DAB+ radio function
Your Brionvega Collection TS525 radio is able to receive the DAB, DAB+ radio signals, displaying the information related to the radio station and the current track. To access the DAB, DAB+ Radio function, press the MODE button until DAB, DAB+ Radio appears on the display, or select Menu > Main Menu > DAB, DAB+ Radio
6.1 Station search
First, your Brionvega Collection TS525 radio will automatically scan for the available DAB, DAB+ radio frequencies.
A manual scan for available radio stations is also possible.
To start a manual search, select the option Complete Search.
To start a search only for stations with a good radio signal, select the option Local Search.
At the end of the search, the available DAB, DAB+ stations will be displayed.
To delete radio stations that are on the list but do not function due to a poor signal, you can use the function Delete, not valid.
6.2 Selecting stations
Using the Menu/Select knob or the UP and DOWN keys on the remote control, you can scroll the available radio station list. Press the Menu/Select knob or the Enter key on the remote control to select the desired station and play it.
6.3 Information about the current playback
When receiving DAB or DAB + radio stations, the name of the current station is displayed together with the DLS information (Dynamic Label Segment), information that is transferred to the radio in real time.
A specific icon at the top of the screen will indicate if the radio transmission is in stereo mode.
By pressing the Info key on the remote control, you can view additional information about the current playback.
6.4 Settings
6.4.1 Dynamic Range Compression (DRC)
This function compresses the dynamic range of what you are listening to, making the sound more “delicate”, therefore less bothersome for other people who may be in the same area. Two levels are available in addition to deactivation. For better sound balance, it is recommended to activate this function only when actually necessary. To change RDC, select Menu > RDC > High, low or deactivated.
6.4.2 Ordering the stations
You can order the DAB, DAB+ radio stations using three options: alphanumerical order, only valid stations, all stations together.
7 FM radio function
Your Brionvega Collection TS525 radio is able to receive FM radio signals and display the RDS information for the tuned station.
To access the FM Radio function, press the MODE button until FM Radio appears on the display, or select Menu > Main Menu > FM Radio.
7.1 Station search
Using the Menu/Select knob or the |<< and>>| keys on the remote control, you can change radio frequencies.
Using the remote control, by pressing down on the |<< and >>| keys for 2 seconds, the search will automatically stop on radio frequencies with the best signal.
7.2 Information about the current playback
The name of the radio station and the RDS information transferred to the radio in real time are displayed. If no information is available, only the frequency is displayed. A specific icon at the top of the screen will indicate if the radio transmission is in stereo mode.
Using the Info key on the remote control, you can obtain additional information about the current playback, which differs depending on the RDS information transmitted by the radio.
7.3 Settings
7.3.1 Search settings
The scanning of FM frequencies will stop automatically at each radio signal, even those with a poor quality.
If you only want to tune strong frequencies, activate the relative function in the Search settings menu.
7.3.2 Audio settings
You can select to play stereo stations with low signals in mono audio mode. If necessary, you can activate the relative function from the Audio Settings menu.
8 iPod-iPhone function
Your Brionvega Collection TS525 radio is equipped with an iPod/iPhone compatible docking station. When on the docking station, the iPod/iPhone will be automatically
recharged (red LED on).
To access the iPod/iPhone function, press the MODE button until iPod/iPhone appears on the display, or select Menu > Main Menu > iPod/iPhone. When connecting the iPod/iPhone, you will be automatically asked if you want to switch to the iPod audio mode.
You can use the Back, Forward keys and the Menu/Select selection and confirmation knob to navigate the iPod/iPhone music folders.
The same operation can be carried out from the remote control, using the same keys. The remote control can also be used to activate 2 additional functions: the Repeat track, Random repeat function and the Shuffle function.
8.1 Information about the current playback
The names of songs are automatically displayed when they are played.
Using the Info key on the remote control, you can view additional information about the current track, such as the source folder, the time progression bar, the current date and time.
9 Aux mode
Your Brionvega Collection TS525 radio is able to playback signals from an external source that is connected to the AUX IN input.
To access the Aux function, press the MODE button until Aux appears on the display, or select Menu > Main Menu > Aux.
- Connect the audio sources to the Aux In input.
- Activate the playback of the external audio source.
- Adjust the volume of your Brionvega Collection TS525.
Adjust the two volumes (source and TS525 system) if necessary.
10 Alarm clock and Sleep function
Your Brionvega Collection TS525 radio has a time and date function, which makes it possible to autonomously manage two separate alarm clocks.
To use the alarm functions, the correct date and time must be set.
To perform this operation, refer to paragraphs 3.1.1 and 3.1.2.
10.1 Alarm clock function
To access the alarm clock page, press the Alarm button from the front radio panel, or press the Alarm key on the remote control or access the menu using the Menu/Select selection and confirmation knob, access the main menu and then the Alarm clock menu.
Select the alarm you want to change using the Menu/Select selection and confirmation knob and then set the alarm clock.
The available parameters are:
Enable: ON-OFF and relative alarm frequency settings.
Time: 10.00
Mode: audio source that must be played as the alarm signal.
Volume: 12
Save: to save the settings
The active alarms are indicated by a specific icon to the bottom left of the radio display.
When the alarm goes off, it can be turned off temporarily using the Snooze function, which is activated by touching the upper part of the radio, near the handle. Always by touching the upper part of the radio, near the handle, it will be possible to increase or decrease the Snooze time.
10.1 Sleep function
The sleep function is used to set the automatic shut-off of the Brionvega ts525 after an adjustable interval of time.
To set the time for the Sleep function, go to the main menu and select the Sleep function using the selection and confirm knob Menu/Select.
The following time intervals are available:
Sleep OFF, 15 minutes, 30 minutes, 45 minutes, 60 minutes.
Once the desired time is selected, the system returns automatically to the main menu. Pressing the Snooze button during audio playback activates the MUTE function. Simple press the Snooze key again to reactivate the audio volume.
11 Preset Function
The TS525 Radio Brionvega Collection is equipped with a Preset function which enables the storage and rapid recall of up to 8 radio frequencies for each of the three FM, DAB/DAB+ and Internet Radio reception modes.
Storing a station:
After having tuned to the desired station press and hold down the PRESET button until the list of stored stations appears.
Using the Menu/Select knob choose the desired storage position.
Confirm your choice by pressing on the Menu/Select knob.
The station will then be stored.
Recalling a stored station:
After having turned the system on and having chosen the desired radio mode (FM, DAB/DAB+ or Internet Radio) briefly press the Preset button.
Using the Menu/Select knob choose the stored station that you wish to recall.
Confirm your choice by pressing on the Menu/Select knob.
12 Software update
Periodically, a software update may be released for your Brionvega Collection TS525.
You can manually search for updates or enable the automatic check function.
If updates are available, the user will be asked if the new software should be installed.
After installation, the previously set user preferences are automatically restored.
Attention:
before starting the update procedure, make sure that the radio is connected to the electrical mains and is not battery powered. a loss of power during the software update could damage the radio permanently.
To enable the automatic update function, select:
Menu > System config. > Software update >
Automatic update control
13 Restoring factory settings
You can reset the radio's factory settings and delete all the user set preferences. The software version, if previously updated, will remain the same.
To restore the factory settings, select:
Menu > System config. > Restore factory settings > Yes.
Inhalt
natural_image
Blank rounded rectangle with a small rectangular base at the bottom (no text or symbols)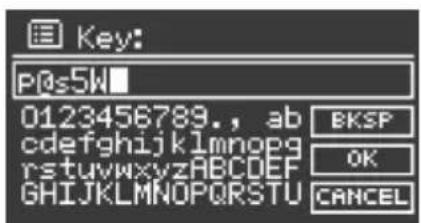
weitere Eingaben.
6.4.1 Dynamic Range Compression (DRC)
natural_image
Blank white rounded rectangle with a small rectangular base at the bottom (no text or symbols)6.4.1 Dynamic Range Compression (DRC)
natural_image
Blank rounded rectangle with a small rectangular base at the bottom (no text or symbols)6.4.1 Dynamic Range Compression (DRC)
Sleep OFF, 15 minutes, 30 minutes, 45 minutes, 60 minutes.
Product Specification
1 Functionality Description
AUX/ iPod/iPhone /INTERNET/DAB/FM function
Alarm / Sleep / Snooze
FM RDS function
Time format setting 12 Hours / 24 Hours
Auto Turning Function
8 Preset Stations Memory
Support MP3 and ID3 Tags
DAB+
Support USB hard drive
2 iPod/iPhone series MP3 jukebox player docking
Play audio from iPod/iPhone MP3 jukebox player.
Including iPod/iPhone, iPod/iPhone mini, iPod/iPhone Photo, iPod/iPhone U2, IPHONE
Different audio source switching. iPod/iPhone or AUX input.
3 Radio frequencies supported
Internet Radio(Wifi): 2412\~2462MHz (For UL)
2412\~2472MHz (For CE)
FM: 87.5\~108 MHz
Black background light display with white characters
Viewing area: 55mm x 27.5mm
6 Acoustic
4 inches x 1( dynamic full range) speaker driver
Amplifier Power 3W RMS@THD:10%
Frequency Response 70 Hz \~ 15 KHz
7 Power Supply
External Adapter: Input:100-240VAC/50-60Hz
Output:12VDC/2.5A L=2000mm
Battery: 6 x IEC R14 battery
8 Input
3.5 phone jack AUX IN for external audio input source
iPod/iPhone docking seat
RJ45
USB hard drive
9 Output:
3.5 Stereo Line out phone Jack
3.5 R-SPR Output jack
10 Accessories:
User manual
Gift Box
External adapter
Remote Control
11 Unit Safety Certification:
CE certification
FCC
UL
12 Dimension: WxHXD
264mm × 130 mm × 112 mm
Weight: 2,2 kg.
Declaration of conformity
CE
This product conforms with the basic requirements of the
EMC Directive 2004/108/EC, the Low Voltage.
Directive 2006/95/EC and the R&TTE Directive 1999/5/EC
including all of the modifications valid at the time of this declaration.

WEEE symbol
The crossed-out wheeled bin is the European Union symbol for indicating separate collection for electrical and electronic equipment. This product contains electrical and electronic equipment which should be reused, recycled or recovered and should not be disposed of with unsorted regular waste. Please return the unit or contact the authorised dealer from whom you purchased this product for more information.
FCC Declaration of Conformity
This device complies with part 15 of the FCC regulations. The operation of this device is subject to the following two conditions:
(1) This device may not cause harmful interference; and
(2) This device must accept any interference received, including interference that may cause undesired operation.
Radio and television interference
This equipment has been tested and found to comply within the limits for a class B digital device, pursuant to Part 15 of the FCC Rules. These limits are designed to provide reasonable protection against harmful interference in a residential installation. This equipment generates, uses, and can radiate radio frequency energy and, if not installed and used in accordance with the instructions, may cause harmful interference to radio communications. However, there is no guarantee that interference will not occur in a particular installation. If this equipment does cause harmful interference to radio or television reception, which can be determined by turning the equipment off and on, the user is encouraged to try to correct the interference by one or more of the following measures:
Reorient or relocate the receiving antenna.
Increase the separation between the equipment and receiver
Connect the equipment into an outlet on a circuit different from that to which the receiver is connected.
Consult the dealer or an experienced technician for help.
FCC warning
Changes or modifications not expressly approved by the party responsible for compliance with the FCC Rules could void the user's authority to operate this equipment.

FCC RF Exposure Warning
This equipment complies with FCC RF radiation exposure limits set forth an uncontrolled environment.
This equipment should be installed and operated with a minimum distance of 20 centimeters between the radiator and your body.
This transmitter must not be co-located or operationg in conjunction with any other antenna or transmitter
- Legenda
- Dynamic Range Compression (DRC)
- Introduction
- Important safety regulations
- Package contents
- External sources
- Remote control
- Replacing the remote control battery:
- Starting up the Brionvega Collection TS525 radio
- Automatic installation
- Note:
- Time format
- Date and time
- Automatic update
- Manual settings
- Network
- Entering a standard password
- Equaliser
- Network
- Language
- Internet portal for registering the radio
- Menu > Station list > Help > Get access code
- UPnP server setup
- File sharing with the Windows Media Player
- Internet Radio function
- Recently played stations
- Station list
- Bookmarks
- Local Italia
- Stations
- My added stations
- Information about the current playback
- Music player function
- Repeat and shuffle function
- Information about the current playback
- DAB, DAB+ radio function
- Station search
- Selecting stations
- Information about the current playback
- Settings
- Ordering the stations
- FM radio function
- Station search
- Information about the current playback
- Settings
- Search settings
- Audio settings
- iPod-iPhone function
- Information about the current playback
- Aux mode
- Alarm clock and Sleep function
- Alarm clock function
- Sleep function
- The following time intervals are available:
- Preset Function
- Storing a station:
- Recalling a stored station:
- Software update
- Attention:
- Restoring factory settings
- Inhalt
- Product Specification
- Functionality Description
- iPod/iPhone series MP3 jukebox player docking
- Radio frequencies supported
- Acoustic
- Power Supply
- Input
- Output:
- Accessories:
- Unit Safety Certification:
- Dimension: WxHXD
- Declaration of conformity
- WEEE symbol
- FCC Declaration of Conformity
- FCC warning
- FCC RF Exposure Warning
Brand : Brionvega
Model : Cubo TS525
Category : Radio