HM4200 - Blender AEG - Free user manual and instructions
Find the device manual for free HM4200 AEG in PDF.

User questions about HM4200 AEG
0 question about this device. Answer the ones you know or ask your own.
Ask a new question about this device
Download the instructions for your Blender in PDF format for free! Find your manual HM4200 - AEG and take your electronic device back in hand. On this page are published all the documents necessary for the use of your device. HM4200 by AEG.
USER MANUAL HM4200 AEG
natural_image
White portable electric kettle with coiled wire and a black handle, no visible text or symbols on the device itself.HANDMIXER EASYCOMPACT MODEL HM4xx
GB Instruction book....11–14
Before using the appliance for the first time, please read the safety advice on page 12.
natural_image
Illustration of a kitchen utensil with a crossed tool and a prohibition symbol (no text or labels)D
natural_image
Close-up of mechanical components with a magnified inset showing a disassembled part (no text or symbols visible)natural_image
Exterior view of a modern electric fan with attached cable and accessories (no text or symbols visible)natural_image
White hand mixer with a bowl of liquid, no visible text or symbolsD
natural_image
Close-up of a white electric shaver with control buttons and a directional arrow (no readable text or symbols)text_image
SINCH PESC OKT HAWA NO-
Solange die Pulstaste im Betrieb gedrückt gehalten wird, arbeitet der Mixer mit seiner maximalen Geschwindigkeit. Die Schlagbesen sind nicht für die Verarbeitung von festen Gemengen geeignet. Verwenden Sie für schwere Teige, solche wie Kuchen- und Brotteig, die Knethaken.
-
Εάν κατά τη λειτουργία της συσκευής κρατάτε πατημένο το κουμπί ανάδευσης, ο αναδευτήρας λειτουργεί στη μέγιστη ταχύτητα. Σημείωση: Τα χτυπητήρια δεν είναι κατάλληλα για τα δύσκαμπτα μίγματα. Για τη βαριά ζύμη, όπως η ζύμη πιτών και ψωμιού, χρησιμοποιείστε το γάντζο ζύμης ζύμη.
-
Zolang u de pulsknop ingedrukt houdt tijdens het mixen, draait de mixer op de hoogste snelheid. Belangrijk: Gardes zijn niet geschikt om stijve mengels mee te bewerken. Voor zwaar deeg, zoals taart- of brooddeeg, dient u de deeghaken te gebruiken.
-
Lorsque le bouton Pulse est maintenu enfoncé, le batteur fonctionne à sa vitesse maximale. Les fouets ne sont pas compatibles pour émulsionner des aliments compacts. Pour les pâtes lourdes, types pâtes à tarte ou pain, utilisez les crochets à pétrir.
Einstellungen und Fehlersuche / Puθμίσεις και επίλυση προβλημάτων Instellingen en problemen oplossen / Réglages et gestion des pannes
D
natural_image
White portable electrical lamp with grid-patterned cover and power cord (no visible text or symbols)D
natural_image
Close-up of medical or laboratory instruments including a syringe, tubing, and cleaning tools (no visible text or symbols)natural_image
Electric kettle with plug and power plug, showing internal components and a close-up of the plug's base (no text or symbols visible)A. Hand mixer
B. Speed selector
C. Pulse button
D. Eject button
E. Whisks
F. Dough hooks
G. Compact storage stand*
H. Release button
*depending on model
GB
Read the following instruction carefully before using the appliance for the first time.
- This appliance is not intended for use by persons (including children) with reduced physical, sensory or mental capabilities, or lack of experience and knowledge, unless they have been given supervision or instruction concerning use of the appliance by a person responsible for their safety.
• Children should be supervised to ensure that they do not play with the appliance. - The appliance may only be connected to a power supply whose voltage and frequency comply with the specifications on the rating plate!
- Never use or pick up the appliance if – the supply cord is damaged, – the housing is damaged.
- If the appliance or the supply cord is damaged, it must be replaced by the manufacturer, its service agent or similarly qualified person, in order to avoid hazard.
• Always disconnect the appliance from the supply if it is left unattended and before assembling, disassembling or cleaning.
• Never release the accessories while the appliance is running.
- Avoid contact with moving parts. Contact could result in injury!
- Do not immerse the appliance in water or any other liquid.
- When processing heavy load, do not use the appliance continuously for more than 30 seconds. Allow to cool down before restarting.
- Do not use this appliance to stir paint. Danger, could result in an explosion!
- This appliance is intended for domestic use only. The manufacturer cannot accept any liability for possible damage caused by improper or incorrect use.
- Switch off the appliance and disconnect from supply before changing the accessories or approaching parts that move in use.
Getting started
natural_image
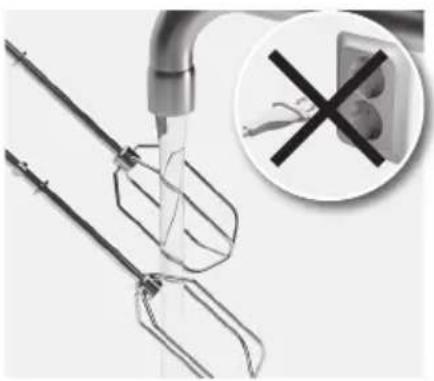
Illustration of a fork and stirrer with a magnified inset showing a crossed-out biological structure (no text or symbols)- Before first use, be sure to clean whisks and dough hooks. Before inserting or removing them from hand mixer unit, always remove plug from power outlet.
natural_image
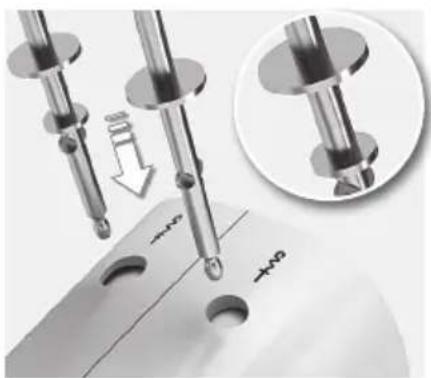
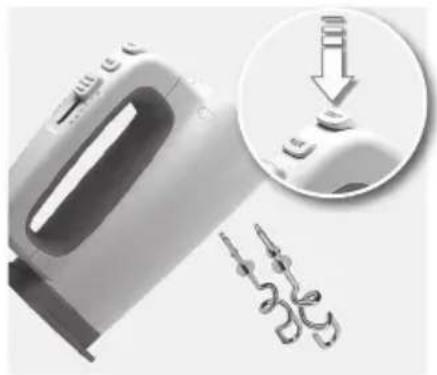
Mechanical assembly diagram showing pin connections and a magnified inset of a mechanical component (no text or symbols)- Push whisks or dough hooks into accessory slots underneath the mixer, until they click into place. Note that one of the dough hooks has an extra ring and fits only into the wider slot. See symbol cm-4.
natural_image
Exterior view of a modern electric fan with attached cable and accessories (no text or symbols visible)- Before removing whisks or hooks, unplug the handmixer. Then hold the device firmly with one hand, while pressing the eject button.
Operating instructions
natural_image
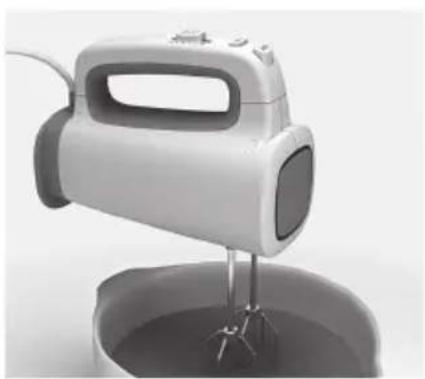
Close-up of a white hand mixer with a bowl of liquid, no visible text or symbols- The mixer can be used continuously for up to 2 minutes. Then allow to cool for at least 20 minutes. Use a standard plastic mixing bowl and amounts not exceeding 1.5 kg solid foods or 1.75 l liquids. Do not use the hand mixer with the stand attached on the heel 📄.
natural_image
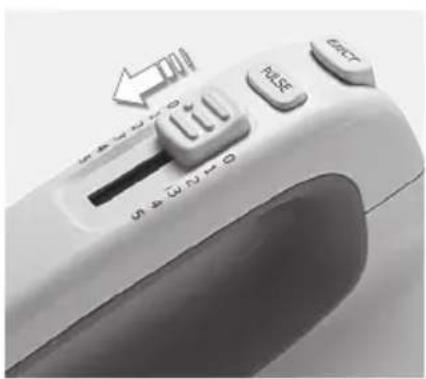
Close-up of a white electronic device's handle with buttons and a vertical indicator (no readable text or symbols)- Operating the mixer. Select speed by setting the speed selector from 1 to 3 or 5 (depending on model). Always start mixing at a low speed, then increase. Due to risk of injury, never touch running whisks or hooks with either tools or fingers.
text_image
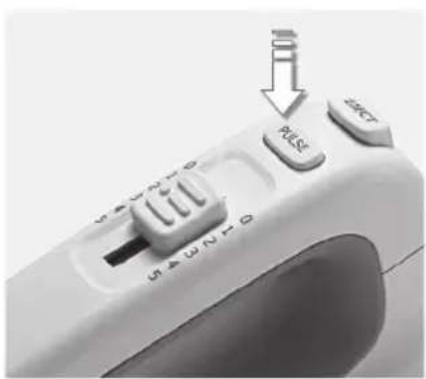
PES SAMS SAMS- When the Pulse button is pressed and held during operation, the mixer operates at its maximum speed. Note: Whisks are not suitable for processing stiff mixtures. For heavy dough, such as pie and bread dough, use the dough hooks.
| Setting Speed range 1–3 or 5, depending on model | |
| Kneading, Mixing Start with 1 or 2, then up to 5 | |
| Folding in 3, 4 | |
| Stirring Start with 2 or 3, then speed up | |
| Whisking, Frothing 3, 4 or 5 | |
| Start processing at low speed to avoid powdery foods and liquids spraying out. | |
| Troubleshooting | |
| The handmixer is not working Make sure the appliance is plugged in and that all accessories are correctly assembled.If the handmixer is still not working, contact the customer service. | |
Cleaning and storage /
natural_image
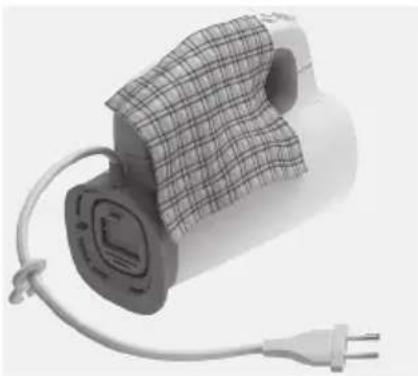
Close-up of a cylindrical battery with a grid-patterned cover and connected to a power plug (no visible text or symbols)- Before cleaning, always unplug the appliance. Never rinse or immerse appliance in water, just wipe with a damp cloth.
natural_image
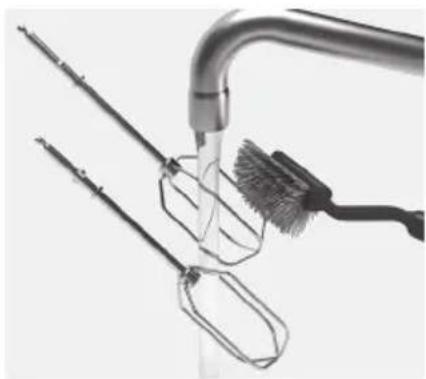
Close-up of laboratory glassware including a pipette and a brush, with no visible text or symbols- Whisks and dough hooks can be cleaned with a brush under running water or in the dishwasher.
natural_image
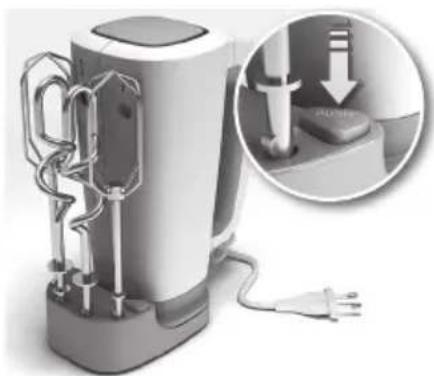
Electric kettle with attached plug and power plug, showing internal components and a magnified inset of the plug (no text or symbols visible)- Storage. Fasten the handmixer on the stand and wrap the cord on the heel. Push whisks and dough hooks into the accessory slots on the stand. To release the handmixer, press the button on the stand.
Disposal
Disposal
Packaging materials
The packaging materials are environmentally friendly and can be recycled. The plastic components are identified by markings, e.g. >PE<, >PS<, etc. Please dispose the packaging materials in the appropriate container at the community waste disposal facilities.
Old appliance

The symbol — on the product or on its packaging indicates that this product may not be treated as household waste. Instead it shall be handed over to the applicable collection point for the recycling of electrical and electronic equipment. By ensuring this product is disposed of correctly, you will help prevent potential negative consequences
for the environment and human health, which could otherwise be caused by inappropriate waste handling of this product. For more detailed information about recycling of this product, please contact your local city office, your household waste disposal service or the shop where you purchased the product.