HM6200 - Mixeur plongeant AEG - Free user manual and instructions
Find the device manual for free HM6200 AEG in PDF.
Download the instructions for your Mixeur plongeant in PDF format for free! Find your manual HM6200 - AEG and take your electronic device back in hand. On this page are published all the documents necessary for the use of your device. HM6200 by AEG.
USER MANUAL HM6200 AEG
consignes de sécurité en page5.
GB Instruction book 12–16
Before using the appliance for the
first time, please read the safety
C. LED light speed indicator
A B C D E F G HSafety advice
Read the following instruction
carefully before using the appliance for
• Thisapplianceisnotintendedforuse
bypersons(includingchildren)with
reduced physical, sensory or mental
capabilities, or lack of experience
and knowledge, unless they have
been given supervision or instruction
concerning use of the appliance by a
person responsible for their safety.
Do not allow children to use the
appliance without supervision.
• Childrenshouldbesupervisedto
ensure that they do not play with the
• Theappliancemayonlybeconnected
to a power supply whose voltage
and frequency comply with the
specications on the rating plate!
• Neveruseorpickuptheapplianceif
– the supply cord is damaged,
– the housing is damaged.
• Iftheapplianceorthesupplycord
is damaged, it must be replaced by
the manufacturer, its service agent or
similarly qualied person, in order to
• Alwaysdisconnecttheappliancefrom
the supply if it is left unattended and
before assembling, disassembling or
• Neverreleasetheaccessorieswhile
the appliance is running.
• Avoidcontactwithmovingparts.
Contact could result in injury!
• Donotimmersetheappliancein
water or any other liquid.
• Themixercanbeusedcontinuously
for up to 3 minutes. Then allow to
coolforatleast20minutes.When
processing heavy load, do not use
the appliance continuously for more
than 30 seconds. Allow to cool down
• Thismixerisequippedwithathermal
fuse which operates if the motor
is overheating. If the mixer has
overheated and stopped working
please diconnect and allow to cool
down for at least 1 hour before using
• Donotusethisappliancetostirpaint.
Danger, could result in an explosion!
• Thisapplianceisintendedfor
domestic use only. The manufacturer
cannot accept any liability for possible
damage caused by improper or
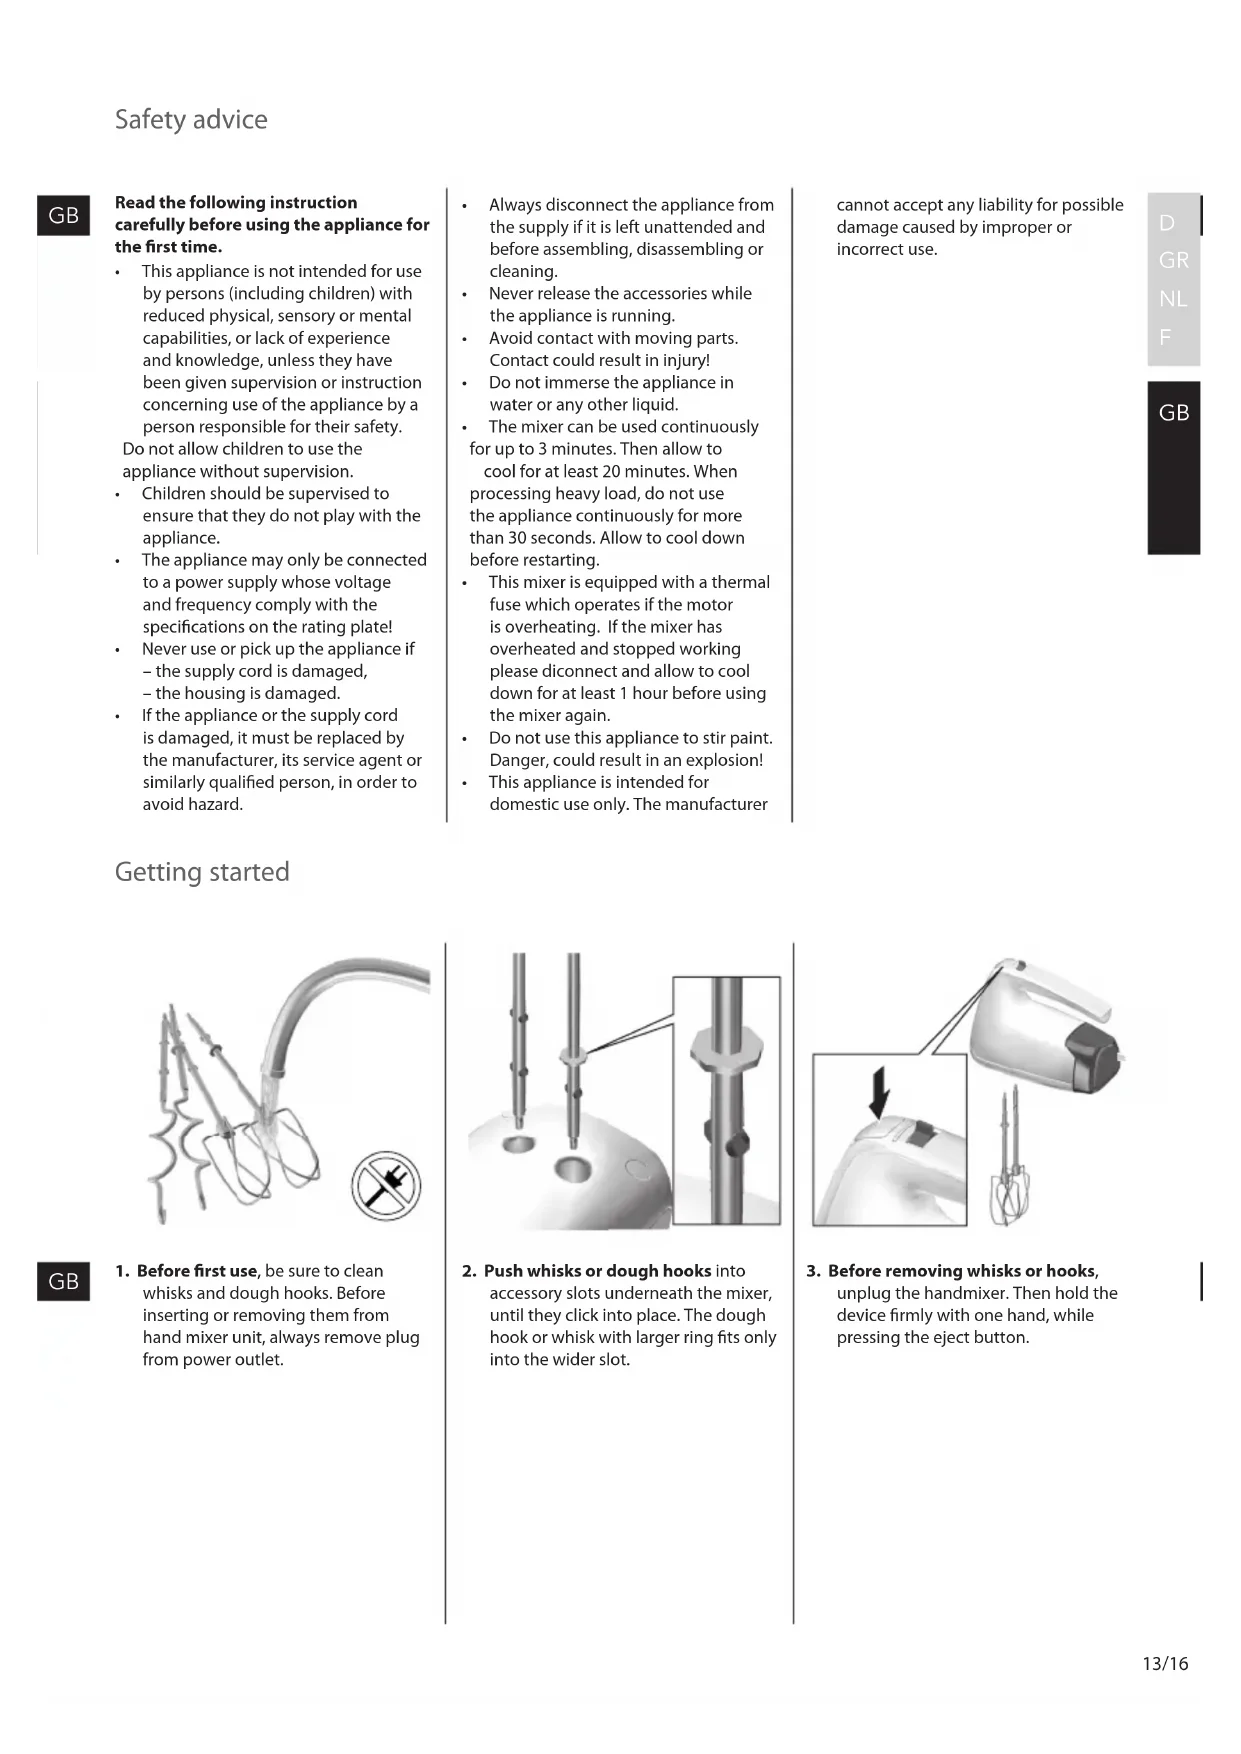
3. Before removing whisks or hooks,
unplug the handmixer. Then hold the
device rmly with one hand, while
pressing the eject button.
1. Before rst use, be sure to clean
whisks and dough hooks. Before
inserting or removing them from
hand mixer unit, always remove plug
2. Push whisks or dough hooks into
accessory slots underneath the mixer,
until they click into place. The dough
hook or whisk with larger ring ts only
into the wider slot.
D GR NL F GBOperating instructions
3. During use, you can put the mixer
vertically, but make sure the speed
selector is at the “0” position.
Whenmixingiscompletesetthe
speedselectortothe“0”positionand
1. The mixer can be used continuously
for up to 3 minutes. Then allow to
cool for at least 20 minutes. Use a
standard plastic mixing bowl and
amounts not exceeding 1.5 kg solid
foods or 1.75 l liquids. Warning!
due to risk of injury never touch
running whisker or hooks with
either tools or ngers.
2. Select the speed by moving speed
selector. Selectandholdatthe“+”
speedselectorwillreturntothe“0”
position. LED light will indicate the
mixing speed. Always start at low
speed then increase.
Settings and troubleshooting
Setting Stepless Speed Selector Kneading Use the highest speedMixing start with the lowest speed and increase to MAX 50% of total speedFolding in Start with the lowest speed and increase to MAX 50% of total speedStirring Use the highest speedWhisking,Frothing Use the highest speedStart processing at low speed to avoid powdery foods and liquids spraying out. Troubleshooting The handmixer is not working Make sure the appliance is plugged in and that all accessories are correctly assembled.If the handmixer is still not working, contact the customer service. 14/16
1. Before cleaning, always unplug the
appliance. Never rinse or immerse
appliance in water, just wipe with a
2. Whisks and dough hooks can be
cleaned with a brush under running
water or in the dishwasher.
The packaging materials are environ-
mentally friendly and can be recycled.
The plastic components are identied by
markings,e.g.>PE<,>PS<,etc.
Pleasedisposeofthepackagingmaterials
in the appropriate container at the
community waste disposal facilities.
Rosemary Olive Bread
25g green or black drained olives without
The symbol on the product or
on its packaging indicates that this
product may not be treated as household
waste. Instead it shall be handed over
to the applicable collection point for
the recycling of electrical and electronic
equipment. By ensuring this product
is disposed of correctly, you will help
prevent potential negative consequences
for the environment and human health,
which could otherwise be caused by
1.Puttheour,water,salt,sugar,oiland
2. Knead the dough with the kneading
3.Putthebowlwiththedoughinthe
refrigerator for 60 minutes.
4. Add the rosemary and the olives to the
dough and put it into a one-litre beaker.
5. Insert the kneading hooks and use
the turbo setting to mix the ingredients
inappropriate waste handling of this
product. For more detailed information
about recycling of this product, please
contact your local city oce, your
household waste disposal service or the
shop where you purchased the product.
6. Bake the bread in a baking tin at 180°
for approximately 30 minutes.
Note: This recipe is extremely heavy for
your mixer. Let your mixer cool down for
60 minutes after preparing this recipe.