KM4000 - Mixeur plongeant AEG - Free user manual and instructions
Find the device manual for free KM4000 AEG in PDF.
Download the instructions for your Mixeur plongeant in PDF format for free! Find your manual KM4000 - AEG and take your electronic device back in hand. On this page are published all the documents necessary for the use of your device. KM4000 by AEG.
USER MANUAL KM4000 AEG
consignes de sécurité en page 7.
GB Instruction book 21–27
Before using the appliance for the
rst time, please read the safety
advice on page 22 carefully.3
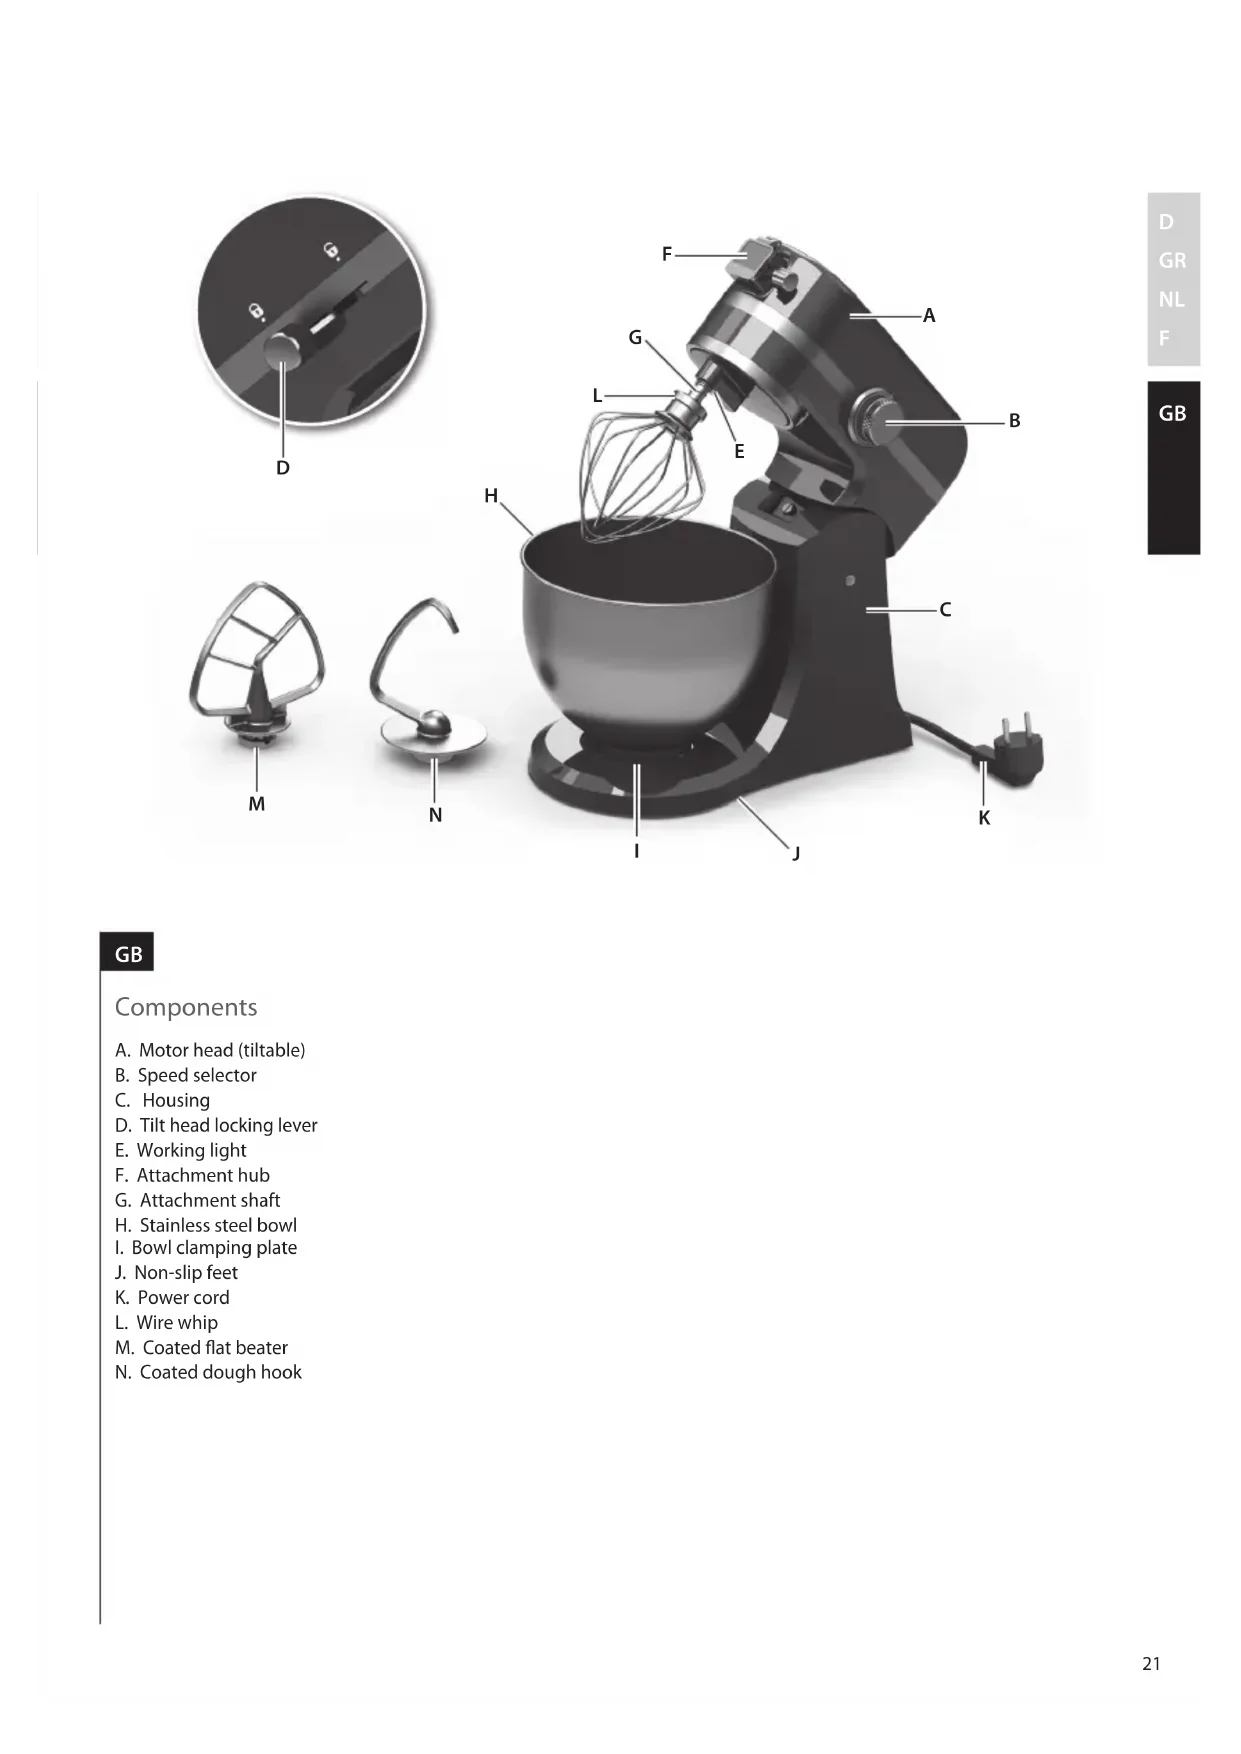
D GR NL F GB A B C K M N I J F H G L E D D GR NL F Teile
J. Anti-slip pootjes
Room 2.1~6.1 dl 60~80 sec. 8~10
D. Tilt head locking lever
H. Stainless steel bowl
M. Coated at beater
N. Coated dough hook
GB A B C K M N I J F H G L E DRead the following instruction carefully before using the appliance for
• This appliance shall not be used by children. Keep the appliance and its
cord out of reach of children.
• Care shall be taken when handling the sharp cutting blades, emptying the
bowl and during cleaning.
• Appliances can be used by persons with reduced physical, sensory or
mental capabilities or lack of experience and knowledge if they have been
given supervision or instruction concerning use of the appliance in a safe
way and if they understand the hazards involved.
• Children shall not play with the appliance.
• The appliance may only be connected to a power supply whose voltage
and frequency comply with the specications on the rating plate!
• Never use or pick up the appliance if
– the supply cord is damaged,
– the housing is damaged.
• If the appliance or the supply cord is damaged, it must be replaced by the
manufacturer, its service agent or similarly qualied person, in order to
• Always place the appliance on a at, level surface.
• Always disconnect the appliance from the supply if it is left unattended
and before assembling, disassembling or cleaning.
• Appliance is for indoor use only.
• Do not immerse the appliance, cord or plug in water or any other liquid.
• Do not let cord hang over edge of table or counter, do not let cord contact
hot surface, including the stove.
• Never use accessories or parts made by other manufactures not
recommended or sold; may cause a risk of injury to persons.
• Make sure the motor has completely stopped before disassembling and
• Avoid contact with moving parts. Contact could result in injury! Do not use
other tools or utensils during the appliance usage.
• Do not leave this product out of your sight when it is running.
• Ensure all loose matters and your clothes/accessories are kept away while
• Never process boiling liquids (max 90°C).
• Do not use this appliance to stir paint. Danger, could result in an explosion!
• Never operate appliance with the attachments wire whip, at beater or
dough hook unless the bowl is in place.
• This appliance is intended for domestic use only. The manufacturer cannot
accept any liability for possible damage caused by improper or incorrect
D GR NL F GB Getting started
1. Before using the appliance
for the rst time: Unplug the
appliance. Wash all the accessories
by hand in warm soapy water or in
(The accessories are dishwasher-
proof, except for the Wire whip.)
Clean the motor unit with a damp
Caution: Never immerse the
motor unit in water!
Let all parts dry thoroughly.
3. Move Speed selector to “OFF”.
Place the Stainless steel bowl on
the bowl clamping plate. Move
the bowl clockwise to lock into
Warning: Never operate the
appliance with the attachments
wire whip, at beater or dough
hook unless the bowl is in place.
5. Tilting the Motor head down:
Move the Tilt head locking lever to
“Unlocked” with one hand, tilt the
Motor head down with the other
hand. Insert the plug in the main
4. Place an attachment on the
Attachment shaft: Align the slot at
the top of the attachment with the
pin on the Attachment shaft. Push
attachment up and turn it counter-
clockwise until the pin is locked into
position. To remove attachment,
move it clockwise and pull o.
2. Place the appliance on a at surface.
Tilting the Motor head up: Move the
Tilt head locking lever to “Unlocked”
with one hand, tilt the Motor head
up with the other hand. Once in up
position it locks. Warning: Keep
ngers and hands away from areas
6. Move the Speed selector from
“OFF” to desired speed (1-10).
Once mixing is complete, turn the
Speed selector to “OFF” and unplug
8. Note: If the Speed selector is
already turned on before the
appliance is plugged in, both the
blue Speed selector LED light and
the Work light will ash OFF and ON
to let you know the Speed selector
has been left on. Turn the Speed
selector to OFF and the lights
will stop ashing. Then resume
7. Work light and Power indicator
light: If the appliance is plugged
in and a speed is selected, a blue
LED lights up around the Speed
selector. A work light will also light
up over the working area. If the
Speed selector is moved to “OFF”,
the working light will automatically
shut o after 3 min.
1. Attachment hub: The appliance
comes with a built in multipurpose
Attachment hub. Read and
carefully follow the instructions
that comes with each attachment
for correct and safe use.
2. Adjusting the Attachment shaft:
The appliance is adjusted at the
factory so that the Flat Beater
clears the bottom of the Bowl. If
the Flat Beater hits the bottom
of the Bowl or is too far away
from the sides, you can adjust
it correctly. See 3 for further
3. Turn the Speed selector to “OFF”
and unplug the appliance. Tilt
the Motor head back. Use a slotted
point Head screwdriver to adjust
the screw. Turn counter clockwise
to raise the Attachment shaft, turn
clockwise to lower it.
1. Unplug the appliance. Wash all
the accessories by hand in warm
soapy water or in the dishwasher.
(The accessories are dishwasher-
proof, except for the Wire whip.)
Clean the motor unit with a damp
Caution: Never immerse the
motor unit in water!
Let all parts dry thoroughly.
2. Do not use abrasive cleaners or
scouring pads when cleaning the
GB Cleaning and careDisposal
Recycle the materials with the symbol
. Put the packaging in applicable
containers to recycle it.
Help protect the environment and
human health and to recycle waste of
electrical and electronic appliances.
Do not dispose appliances marked
waste. Return the product to your local
recycling facility or contact your mu-
Amount of dough may exceed maximum
Remove half and process in two batches.
Dough may be too wet, it sticks onto the side
Add more our, 1 tablespoon at a time until
the motor speeds up. Process until dough
cleans the side of the bowl.
The motor does not work. The appliance is not connected to the mains. Make sure to plug in the appliance before
The appliance vibrates/
moves during operation.
The rubber feet are wet. Make sure the rubber feet at the bottom of
the unit are clean and dry.
It is normal for heavy loads (e.g heavy dough,
Remove half and process in two batches.
The attachment scrapes
the Stainless steel bowl
The height of the attachment shaft is incor-
Adjust the height of the attachment shaft.
The Work light and Power
indicator light ashes on
The Speed selector has been left turned on. Turn the Speed selector to “OFF”.
D GR NL F GB Beating function quantities and Processing Times (mixing light dough (e.g: cake dough))
Recipe Ingredients Quantity Unit Time Speed
The butter should be soft not hard. Stir the soft butter with sugar until creamy. Add the eggs one after another.
While stirring, add the sour cream and vanilla sugar. Finally stir in the our together with baking soda.
Place all ingredients in the bowl, and mix them, till it is ready.
Hooks function quantities and Processing Times
Recipe Ingredients Quantity Unit Time Speed
Place all the ingredients into the bowl and knead until satisfactory.
Wheat our 16,0 dL At least 480s
Water 4,0 dL Oil 1,0 dL Fresh egg 2,0 pcs
1. In a container mix the half of yeast with the salt and the sugar and set aside;
2. In the bowl of stand mixer put the remaining yeast, the water and the oil;
3.This dough should be mixed with common beaters, at minimum speed until obtain a smooth mixture;
4. After, add the egg and the yeast mixed with salt and sugar;
5. The speed should be increased to medium and the our should be added gradually;
6. After realizing that the mass tends to rise by the beaters, they must be changed by the beaters for heavy mass;
7. Put all the our and mix until obtain a homogenous mixture;
8. At this point you will need to monitor the input power of stand mixer, so that it not exceed the maximum value
determined by the manufacturer;
9. The mass reaches the point when no more paste in the hand.
*Do not exceed Speed 2 when preparing yeast dough. This may damage the mixer.
GB Whisking function quanitities and Processing Times
Printed on recycled paper